
Chapter Seven
Working Practices and General Guidelines
We have come a long way with our understanding of the grammar of the shot. We should all be more familiar with the types of shot and the guidelines covering framing and composition. We have seen how lens choices, focus, lighting and camera movement help to show your stories with richer visual meaning. And we know that all of our hard work during production pays off when we pre-think the editor’s needs and deliver the appropriate goods.
The grammar you are learning and putting into practice is a well-established and proven set of principles that will help your audience understand your visual intentions. In filmmaking, as with any discipline or craft, there are many different ways of approaching the material. Finding solutions to the challenges that confront you is part of the learning process and part of the fun. Although not an exhaustive list by any means, the content of this chapter is designed to help bolster your understanding of cinematic language. It offers tips, tricks, and suggestions (both general and specific) that may enhance your work habits and lead to a stronger and more effective visual presentation – and they may also prevent some headaches down the road.
Organization is a key factor in successful filmmaking. Even a small project can produce a large amount of video and audio files and keeping track of them through post-production is a big deal. It is very beneficial to identify the beginning of each take, and a slate can help with this process (see Figure 7.1). These devices used to be made of actual slate way back when and a camera assistant would write important information on them with chalk. Today they are more like a “white board” and you can use dry-erase markers to pen down the pertinent information. When you record the slate at the beginning of the shot it identifies what the title of the project is, the scene/shot/take being recorded, the director, the DP and the date of production. Being able to see this information on the screen at the head of each shot helps the editor organize the material during post.

Figure 7.1 A slate is used primarily on film sets when two separate devices record picture and sound information. A – a traditional headslate; B – Tail slate; C – an MOS headslate (where audio is not recorded); D – audio waveform of slate sticks clapping.
Beyond the written information, the slate board also helps with the syncing process. Syncing or synchronization is required on emulsion film or video productions that employ dual-system recording. The film or video captures the picture information and a digital audio recorder captures the sound. Although the video camera could also capture sound data, the quality of the audio is often superior this way. The picture and sound files are synchronized (or married together) during post with the aid of the slate board’s clap sticks. When a clapper/loader voice slates the start of a take, s/he also physically closes the striped sticks on the slate board, which makes a loud “clack.” S/he has marked the take. The picture file for that take has only one frame where the sticks are shown at the moment of closing. The audio file for that take has only one “frame” where the sound of those sticks closing is heard. These two matching frames are paired together and the picture and sound files will then play in sync during the editing process. On high-end film productions, timecode syncing makes this process a bit easier.
When shooting video projects without a separate digital audio recorder, your camera captures both picture and sound information. The captured files on your editing system are already married together on the basis of their timecode; there is no need to “sync” them. It is still a useful practice to “head slate” the shot on video because the visual and auditory shot identification will make shot organization that much easier for the post-production team. If you do not have the physical slate to write on and record, then you should at least voice slate the head of the shot so that everyone will still know what the shot is (stating project, scene, shot, take, and date).
There are occasions, especially found in documentary shooting, where you do not have time to head slate a shot because the real-world event begins so abruptly. You can perform what is called a tail slate, where you identify the shot after the event has transpired but before you cut the camera’s recording. The physical slate is held upside-down for the tail slate (Figure 7.1).
Sometimes you will be shooting material that has no usable audio associated with it. When you are recording with emulsion film and you do not “roll” audio for a take it is called filming “MOS.” This anagram has several possible origins, but the meaning is the same – do not look for an audio file during post-production because one was never recorded. The slate is still used to add the visual information to the picture track, but the clapper/loader holds his/her fingers inside the clap sticks so they cannot possibly close – confirmation to the editor that no corresponding audio file should be looked for with this particular picture track.
However you handle the slate, your main goal is to help identify the shots for easier post-production workflows.
Communication is the name of the game. Your motion picture project may be trying to convey a message or information, or evoke a thought or feeling in the audience – communication is happening. Crewmembers must share their production plans and make the project happen efficiently – communication is happening. The on-camera talent needs to be guided toward delivering the best performance – communication is happening. All too often with novice motion media producers, this last need for communication is overlooked.
Trained actors as well as amateurs need help in understanding the limitations of your framing of the shot – how much room do they have to look, move, gesticulate, and so on before they encounter the edges of the frame? Interview subjects need to be advised where to look near camera. Band members need to know what action to perform during a shot from a music video, and so forth. So many technical and logistical things are happening on a set that it becomes all too easy for newbie filmmakers to forget about the talent, or assume that they “get it.” Getting lights, camera, and sound ready for a take only counts if the talent is on the same page. When everyone understands what the shot is about, it has that much more of a chance at being done successfully.
When you do communicate with the talent, try to keep the interaction brief, clear, and professional – after all, they are trying to do their job, too. Above all, you should be using language that makes sense to them. Remember that as you sit behind the camera facing the talent, they are facing you and your worlds’ directions are mirrored. What is to their right will be to your left and vice versa. In order to keep things simple, provide stage directions that fit with the talent’s alignment to the set or location. Some people actually use theatre stage directions on a set. If the talent is not familiar with that terminology and you need them to slide over to your frame left a bit more, say something like “Please slide to your right by an inch or two.” This method makes it immediately clear in their mind in what direction they are to move and by how much (Figure 7.2).

Figure 7.2 The camera’s frame left and frame right are rarely stage left and stage right for the talent. Speak in their terms and directions will be easy to follow.
Technologies are changing rapidly. The traditional 4:3 “tube”-based television set of the 20 th Century has all but gone away, HD is on our smart phones, and 4K displays are just around the corner. The older 4:3 TV, as a receiver and display monitor for picture information, did a valiant job, but it suffered from a peculiarity known as domestic cutoff. The TV set actually “cut off” or did not display the outer edges of the original video or filmed image at the top, bottom, left, and right sides of the screen. This area of lost picture information was roughly 10% in from the edge of the source material. Content creators knew that this cutoff would eventually happen, so they framed their shots within what is called the safe action zone (Figure 7.3). Most HD display technologies, and certainly streaming videos on computer and handheld media monitors, do not suffer from this same limitation.

Figure 7.3 The safe action line helps keep important visual information away from the edges of the frame in both 16:9 and 4:3 images.
To help with this, many cameras will have a line, corner marks or an overlay grid on the viewfinder or monitoring screen that shows where this safe action area exists around the edge of the full image frame. When composing your shots, you should keep in mind that important information or action should not take place in this outer edge of the frame. While taking account of this extra screen area, be aware of appropriately compensated headroom and look room as well. If you record images of signs or other written materials, make sure to place them fully visible within the frame away from the edges. There are often markings on the viewfinder known as the safe title area for just such a purpose. In general, regardless of your camera format, it is a good practice to keep all important action and composed visual elements well within the safe action zone (Figure 7.4). Most video editing software will also have the option to display similar action and title safe grids in the playback monitors, so any questionable framing may be double-checked by the editor.

Figure 7.4 This lower third title is placed just inside the picture safe line.
How to Manually Focus a Zoom Lens
Any auto-focus camera lens should do all of the focusing “on-the-fly” as you set your shot’s framing. If your camera is equipped with a manual focus zoom lens there is an easy way to achieve best focus on your subject.
The main things to remember are:
- Check the focus of the camera’s eyepiece/viewfinder and verify it is set to your vision
- Select the framing for your shot with subjects in place, etc.
- Set your aperture wide to allow more light into the viewfinder system
- Zoom in on your subject (set lens to maximum focal length and magnify the object you wish to be in sharp focus)
- Set focus (on the eyes if a human face is your subject)
- Reset focal length to select shooting frame
- Set aperture for desired exposure
Always Have Something in Focus
You will find it beneficial to have something within your frame in focus. The human visual system, when working correctly, always allows you to see some plane of space around you in proper focus. You have the luxury of automatic focus shifting – meaning that you can be focusing on something two inches away from your eye one moment and then focusing on an object very far away the next moment. Cameras have either manually focused lenses or auto focus controls that guess at what object you would like to have in focus. The center-weighted or “face recognition” auto focus settings can be helpful when you are first starting out, but controlling your focus manually is usually preferred. You get greater creative control that way.
The main lesson about focus is to have something important to the shot in focus at all times. Humans do not see “out of focus” by design (unless you require prescription corrective lenses and do not wear them). We do not like to watch blurry images because it goes against our nature. Our eyes and brains try to make it sharp when it cannot be made sharp, and we reject it. That is why a viewer might overlook bad framing or flat lighting, but any out-of-focus (blurry or soft focus) shot stands out like a sore thumb. Of course, there are special cases and allowances for creative uses of blur. Perhaps the shot is a subjective POV and the camera represents the altered perceptions of an inebriated or semiconscious character. Music videos, commercials, and experimental films often play with radical focus shifting and blurred imagery as well.
As an example, let us say that your frame has one female character in a close-up shot. If the depth of field of the shot is shallow enough, only the woman is in focus and the background is blurry. Creatively, this helps keep the attention of the audience on the woman and not on other objects behind her in the frame. However, if the woman fully exits frame and the focal plane does not alter, then the background will remain blurry and the audience is left watching an empty blurry frame until the next shot cuts on to the screen. It is a good practice to rack focus to the background as soon as the character fully exits the frame. This way the audience is watching the woman (in focus) leave the frame and then their eyes can immediately rest on the background, which has come into sharp focus. There is no awkward feeling or moment of confusion on the part of the viewer. This is critical, especially just before a cut to a new shot or new scene. The quick, smooth shift in the plane of critical focus to the background gives the viewer’s eye something to focus on as the shot ends (Figure 7.5).
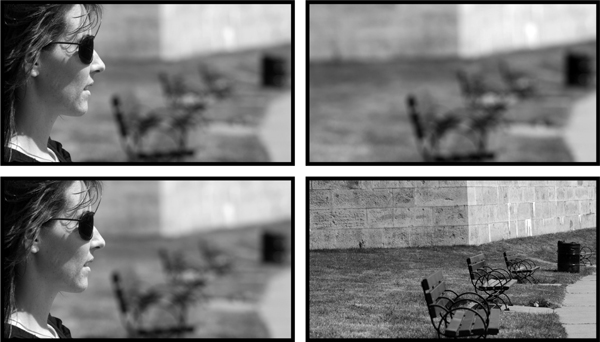
Figure 7.5 A series of shots illustrating a focus shift racking from the foreground to the background.
You should always be aware of your depth of field (DOF) – the range of objects seen to be in acceptable focus within the depth of your shot. The DOF can be controlled (made greater or smaller) and shifted within the film space (closer or further from camera). Remember that the nature of optics will provide you with only one critical plane of focus in front of the camera’s lens. Whatever lives exactly at that distance from the camera will be in sharpest focus. The DOF operates around this one critical focus plane and its depth (in distance from camera) is segmented into two unequal parts. The first segment (roughly one-third the overall area of good focus) falls before the critical plane, and the second segment (roughly the remaining two-thirds of the good focus depth) falls just behind the critical focus plane.
If you know the several variables that can affect the DOF then you will always know how to control it.
LIGHT—When you use lots of light, either from the sun or from large film lighting fixtures, you will need to close down the iris of the lens in order to achieve proper exposure. The smaller iris opening (or higher f-stop number) optically causes a larger depth of field. This is why many daylight exterior shots provide you with sharp focus on almost all objects – from very near to the camera out to infinity. Deep focus techniques can be used on interior film sets, but you have to bathe the space with very large quantities of light to achieve this.
When you shoot in very dark spaces the lens iris must be opened up very wide, letting in as much light as possible in order to capture a properly exposed image. This wider opening of the lens aperture causes a shallow DOF. You must be cautious when shooting in low light conditions because it is more difficult to keep the important objects within your frame in proper focus, particularly when there is movement towards or away from the lens. If your shooting environment is bright (sunny) and you wish for a more shallow DOF, then you could employ neutral density filtration (either to the lens or electronically in your camera) to set that wider lens aperture.
FOCAL LENGTH—The optics of the camera lens also play a role in how much DOF you get to use. Wide angle lenses, or lenses set to a short focal length such as 10 mm, will offer a greater DOF. Long focal length lenses, set to 75 or 100 mm or more, will generate a much more shallow DOF.
CAMERA-TO-SUBJECT DISTANCE—The DOF increases when your subject (and critical plane of focus) is far away from camera. The DOF decreases when your subject (and the critical plane of focus) is very close to the camera. Macro-photography (capturing images of small objects very close to the lens) exhibits this same phenomenon. Your lens may have a macro setting, or you could employ close-up filters (+diopters). Product shots and TV commercial work can use these to great effect.
SIZE AND SENSITIVITY OF THE RECORDING MEDIUM—The sensitivity of your video camera’s digital imager and its size play a factor in the depth of field calculation.
It will now be rather simple to imagine a scenario for either a very large DOF or a very narrow one. Placing the camera far away from a subject, with a wide angle lens setting and lots of light, will generate a very large DOF. Placing camera rather close to your subject, with a long focal length lens in very dim lighting, will generate a rather shallow DOF. Use these guidelines when you wish to keep your subject in focus but blur out your foreground or background objects (Figure 7.6).
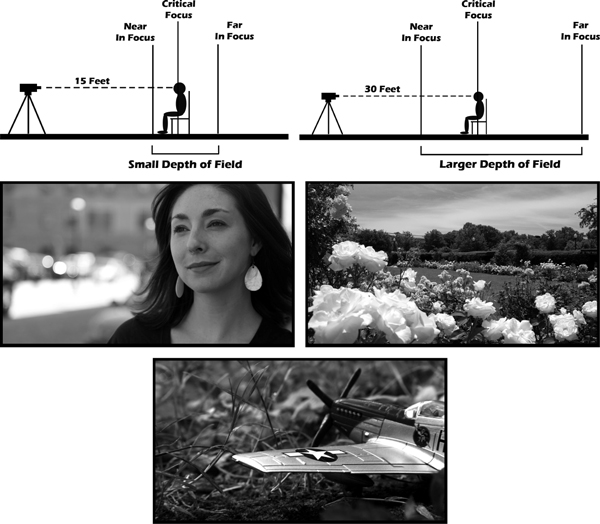
Figure 7.6 A shallow depth of field directs an audience to look where the focus is. A larger DOF creates a deeper area within the film space that also appears in sharp focus allowing an audience to see both near and far. Macro or close-up cinematography can yield a very shallow DOF of just a few mm or inches.
An important part of your compositional considerations should always be headroom – how much or how little space you allow at the top of the frame for a person’s hair or hat, etc. Too much headroom will force the eyes and face of a subject too low in the frame. Too little headroom will raise them too high in the frame or simply look wrong due to the chopping off of the forehead and so forth. If you have to err in one direction, however, you should have slightly less headroom.
Why? Well, when you give too much and force the face lower in the frame, you also force the mouth and chin lower. As the person speaks it is very likely that the bottom of the chin and jaw will break below the bottom edge of the frame in a CU shot. The top of the human head does not traditionally move, so it is safer to lose that above the top edge of frame. This keeps the chin and jaw fully visible in the frame as the person speaks (Figure 7.7). Consistent headroom across shots in mirrored coverage shots of a fictional narrative dialogue scene is also important. As the editor cuts back and forth between characters, the headroom of each shot stays relatively consistent, keeping the viewer’s eyes engaged roughly at the same height in the frame.

Figure 7.7 Always aim for proper headroom in your shots.
The “talking head” subject being interviewed for a documentary also requires a consistent treatment of headroom. While shooting a long question-and-answer period for a documentary, it is important that the camera operator maintain correct headroom throughout the shoot. The editing may call for shots to be placed in any order, and if there is largely differing headroom among the shots it may look awkward when cut near one another in the final piece. As a final important tidbit about shooting “talent” for a documentary, try not to reframe drastically while the subject is speaking. Very slight pans and tilts may be necessary to keep proper framing as the subject moves around in his/her seat, but you should not drastically alter your focal length or focus while the subject is giving the answer to a question. If you do, it will most likely make that portion of the visuals unusable for the editor. You should wait until the subject stops speaking and then reframe and adjust focal length and focus.
If you need to shoot a tight close-up or an extreme close-up of a human face, mouth, or hands, be very clear with your talent exactly how constrained the framing really is. This enables them to better judge the limitations of their possible on-camera movements for such a tight shot. A close-up is going to be achieved with either very close camera proximity to talent or via a rather long focal length lens on a camera slightly farther away. In either case, the resulting frame represents a magnification of the person’s face or hands and therefore the entire screen will be filled with that information.
With such extreme magnification, the slightest movements of the talent can “break frame” (move beyond the edges of the established frame border), alter good composition to bad, change critical focus within the depth of field, and so forth. Typically, your goal would be to have talent move as little as possible on these very close shots. If action is needed, be very precise with how little movement is really required and communicate that clearly to the talent. You may even choose to show them physically what you need by demonstrating it yourself.
There is an old expression concerning an actor’s performance that says, “Less is more.” This holds very true when photographing the close-up shots. With the entire face filling the frame, slow, subtle movements and minor changes in facial expressions yield a very effective performance. The human audience, attuned to watching faces for emotional cues, can make a very powerful connection with the actor in close-up.
Projects destined for television, computer, or mobile device screens can benefit from having more MS to MCU shots than media distributed for the large cinema screens. The closer shots display more important narrative information and the magnified visual details “read” better on the smaller display screens.
When you are planning your shots for coverage, incorporate the “Choker” and XCU shots of “details” with discretion. If they fit your overall visual style for the project, have a place in the narrative, and provide important details to the audience, then they will fit in with your other shot types. If not, they have the potential to be too “big” and run the risk of standing out as visual anomalies within your project.
Documentaries and other non-fictional filmmaking involve many “talking head” interview close-up shots. You will find that the MS and the MCU might be the tightest shots you wish to get. A CU or especially a “Choker” might be too intimate when listening to a scientist or historian discussing factual information (remember the meaning of implied proximity between the image size and the audience). However, an audience might not mind a very tight close-up in an emotional documentary about a cancer survivor. Here, the personal connection feels more appropriate.
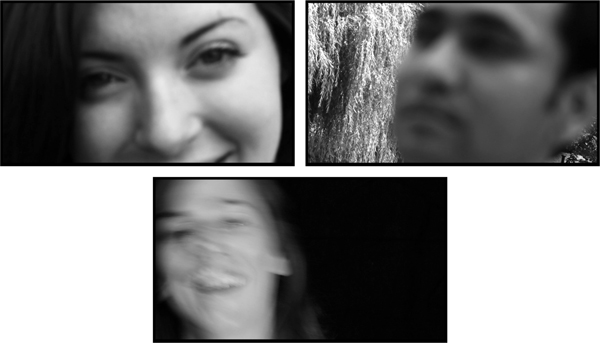
Figure 7.8 It is easy to “break frame” or lose focus when dealing with human subjects in BCU and XCU shots.
It has been a long-standing practice in portraiture (painting, still photography, motion pictures) to include what some people call the eye light, catch light, life light or eye twinkle in your subject’s eyes. This point of light, visible in the talent’s eyes, causes a twinkle and helps draw your audience into looking more closely at the face and eyes of the subject. Having light reflected off the eyes implies the spark of life. Having no eye light can imply that the character is dark, evil, duplicitous, is no longer living, or, as in a horror film, might be a vampire, zombie, or robot.
Due to the moist surface and curvature of the human eye, any light source in front of the subject will reflect off the eye and be recorded in the image. A medium shot may be the most distant shot where the small point of light in the eye can be “read” or be visible to the audience. While recording any of the close-up shots it would be beneficial to have some light source set up near the axis of the lens for giving your talent the eye light – it may be your key source, if appropriate, or a special light, like a large softbox put there just for the catch light glint.
Whether you are using a point source, a soft source, a bounce, or the sun, the important thing is to make sure that the reflection in the eye shows the light source coming from the correct direction of other known light sources in the film world. Because most lighting fixtures in reality and in film worlds are above the head of the people, the reflection would be in the middle to the top hemisphere of the human eye as seen through the camera’s lens. In certain instances, as with a desk lamp, phone or computer screen, or water reflection, the eye’s twinkle light may come from below and be visible in the bottom half of the eye. In the end, because the eyes are so important, it is almost always a good idea to give them as much attention as you can in all your shots, even just for reasons of good exposure (Figure 7.9).
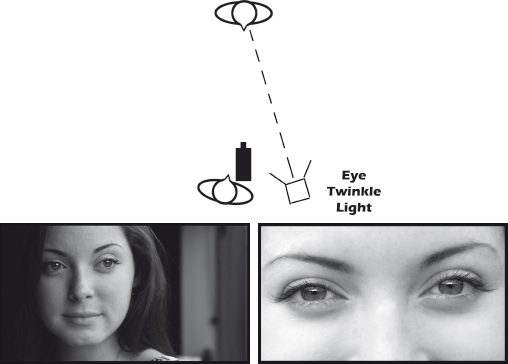
Figure 7.9 A light source placed along the axis of the lens will help generate an eye light or twinkle on the recorded image.
Try to Show Both Eyes of Your Subject
The eyes of your subject act as a magnet for the eyes of the viewer and much of the emotional or mental state of the character is conveyed via the eyes in a close-up shot. So, if it fits your story, you would be well served to make sure the eyes are easily visible. We have already discussed the use of the eye light or catch light to bring attention to the eyes, but we should mention that a 3/4 profile shot is also a highly desirable blocking/camera angle to cover the individual in the closer shots.
The 3/4 profile allows the camera lens to see and record both eyes of the subject. This same angle on the subject would work for an over-the-shoulder shot as well, but you may have to play with the physical distance between the actors in order to get the framing correct. If you wanted to quickly change an over-the-shoulder shot into a clean single close-up in 3/4 profile, you would have to ask the actor whose back is to camera to step back a few paces in order to clear the frame. Keeping that now out-of-frame actor nearby will maintain the eye-line of the actor being recorded in the CU (see diagrams in Figure 7.10).

Figure 7.10 The diagrams illustrate how to turn an OTS into a clean single shot by having the “shoulder” talent step back and out of frame. These examples show a full face, 3/4 profile and full profile shot of the subject. Use the most appropriate angle for the shot in your story, but remember to favor your subject’s eyes as much as possible.
Remember that a straight-to-camera shot will reveal both eyes, and if the eyes remain off the axis of the lens, then you have a clear view of how the person looks. If the talent looks directly into lens then the shot becomes entirely a subjective shot, which is less appropriate for drama and more appropriate for news reporting. A full profile shot is also a specialty shot. Only one side of the subject’s face is visible and the one eye that is visible cannot really be “looked into.” The audience stays separated from the subject’s thoughts or feelings, but if this framing begins a pan over to what the character is looking at then the initial profile is a motivator for conveying new visual information to the audience. Of course, you should use any talent position or camera angle that you feel is appropriate to your story, provided it conveys your meaning or makes visible your intended information. The 3/4 profile is just a very solid approach to shooting closer shots and it will not disappoint the audience.
Be Aware of Eye-Line Directions in Closer Shots
An eye-line traces across film space to unite the subject’s gaze to some object of interest. Whether the object of interest is another person, a picture frame, a car outside of a window, or a menacing cloud in the sky does not matter. What does matter is the direction in which the actor’s eyes look when you cover them in a medium shot or closer. Head placement and the resulting direction of the subject’s gaze are easy to “fudge” in a wide shot because we have greater context in the film space. Close shots reveal more detail of the subject’s head and eye alignment but remove the greater context of the film space, and a keener emphasis on eye-line direction is needed.
Generally, when filmmakers look at the talent through the camera’s lens they will have to gauge how accurate the eye-line of the actor is. Does it match the direction of the eye already established in the wider shots? Will it match up with the corresponding shot of the object being “seen?” Because close-up shots magnify the features, it may be necessary to modify the actual direction an actor is looking. The important thing is to ensure that the eye-lines for all concerned characters match in their individual shots. The angle or direction of the gaze will often just not look correct and you will have to talk the talent into the right eye-line. Experienced actors can pick a spot and “hit” their eye-line marks off camera easily. In certain situations it can be helpful if someone behind or around the camera holds a tracking object, such as their closed fist, in order to get the talent to establish the new and correct eye-line for your closer shots (Figure 7.11).

Figure 7.11 Talent’s eye-line must match from wide shots into closer shots. You may have to talk the talent into establishing a new object of interest on set for a better eye-line. This eye-line is first off its “mark” and then corrected.
Follow Action with Loose Pan and Tilt Tripod Head
Much of what you record with your shots will involve objects or talent in motion. Whether you are framing a medium shot or a medium close-up, you could run the risk of having the action on screen bump the edges of frame or even break out beyond the boundaries of your frame – usually left, right, or top. It is best to keep all major action away from the edges of your frame, but there will be times where action covers more ground on set or location and you will need to follow the movements of your subject. This certainly happens with sports coverage, but it may be as subtle as tilting up slightly when your actor sits up tall in his seat when his character gets a brilliant idea.
Most tripod heads (where you mount the camera) are equipped with pan and tilt capabilities and therefore pan and tilt locks to help keep them stable. When the camera operator is asked to follow action and reframe “on the fly,” it is best to have a better quality tripod head and camera support. The more professional equipment allows for smoother and more stable panning and tilting actions. The goal of the camera operator is to maintain good framing; if the talent is moving, such as someone pacing the floor, playing tennis, or dancing, it is wise to keep the pan and tilt locks loose. This allows for smooth, minor adjustments of the camera angle as the action unfolds during the take. This reframing happens all the time, but it is done so smoothly and unobtrusively that it is most often not noticed by the audience. You should aim to do the same (Figure 7.12).
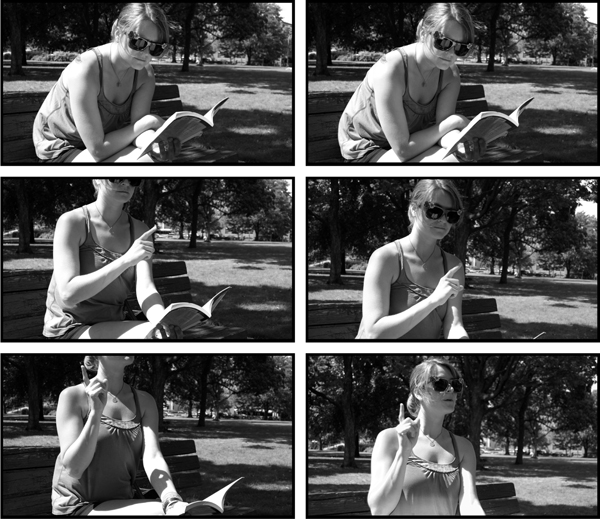
Figure 7.12 A camera operator must be ready to reframe during the recording of action to maintain proper composition.
Shooting Overlapping Action for the Edit
Remember, it is your job during production to provide the appropriate shots to the editor so that the visual elements will make sense and cut smoothly in the final product. When you have to shoot an action from two or more angles and you do not have the luxury of operating more than one camera, you will have to make the talent repeat the same action over and over again for each take at each camera position. Overlapping action is the action performed by the talent that is visible from each different camera angle covering the shots for a scene. You need to record this overlapping action in each shot so that the editor will have good and varied choices for creating an “action edit” or a “continuity edit.” (Learn more about editing practices in our companion text, Grammar of the Edit.)
Wide shots and medium shots may call for more overlapping action coverage due to their inclusion of more visual elements. Closer shots will not normally require as much overlapping coverage because they tend to highlight details that are magnified on the screen and not as much movement can be recorded for matching from one shot to the next – although matching the movement and speed of head turns in CU shots is rather important for smooth continuity action edits.
Continuity of Action
Most filmmakers value performance over continuity and many will encourage their talent to perform similar but not identical movements, alter the scripted lines, or emote in various ways from shot to shot and take to take. This approach can work well if the performance is there in all coverage shots, but, if not, the continuity mismatches will be a nightmare during the editing process.
Matching Speed of Action
Your scene calls for a subject to walk up to a closed door, turn the knob, open the door, and walk through into the next room. You decide to cover the action from an MLS and an MCU on one side of the door and an MS on the other. The actions performed by the talent in the MLS and MS should be of similar speeds (walking up to the door and opening the door and walking through). However, there may be need for a modification to the speed of execution on the part of the actor while performing the close-up shot of the hand turning the doorknob. Closer shots of overlapping action should have the movements performed at a slightly slower speed.
A hand traveling into a close-up shot of a doorknob will appear to move much faster across the screen because the screen is only showing the magnified detail of the doorknob and the moving hand. As experienced by the audience, the larger object covers more screen space in a faster time. In wider shots, when more of the comparative film space is visible, the movements of an object or action can appear slower even though the rate of progress is the same. So, for proper continuity, you may wish to shoot the close-up insert shot with a slightly slower movement of talent. At your discretion, perhaps shoot another take at “normal” speed so that the editor will have both choices (Figure 7.13).
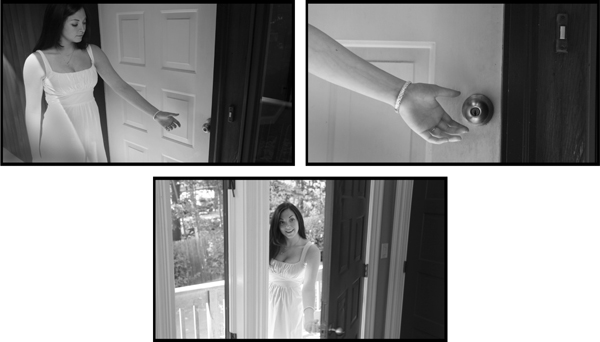
Figure 7.13 Talent movements in CU shots or tighter should be performed slightly slower so, when magnified across the entire screen, they appear normal when compared to the rate of movement in the wider shots of continuous action.
Overlapping Too Much Action
There is a danger in shooting too much overlapping action on each camera setup. For economy of time, money, and energy in both production and post-production, it is wise to be judicious with your choices of how much or how little overlapping action will need to be captured from each unique camera angle. Too little will provide the editor with inadequate options for cutting the continuity edit. Too much may allow a greater choice but can come at the added expense of more time and money being spent on getting the extraneous coverage that may never be used during the edit.
Whether you are producing a short film, a music video, a 30-second commercial, or even an animation, you would benefit from creating storyboards, overheads, and shot lists before the first day of production begins. Storyboards are small drawings that map out what the framing and composition will be for each shot that you want to record. The pictures act as templates for the eventual real set-ups you make, like a comic book version of the motion picture. Storyboards also allow you to see how the various shots necessary to cover the action will edit together once you enter the post-production phase. The drawings help get everybody involved in the creation of the actual images on the same “visual page.” Animatics (animated storyboards) have become popular as a modern pre-production tool but require additional software technologies beyond a pencil and paper.
Overheads can be simple “bird’s-eye view” diagrams that map out where on the set you will place camera, talent, lighting fixtures, etc. They help get the crew ready to place the right things in the right places when you get to location or arrive on set. Finally, shot lists are a way to account for all of the various shots that you will need to accomplish to get the coverage for a scene. The list is often labeled per scene number with separate letters representing each unique camera angle on action (i.e., Scene 1-B, Take 1). Creating storyboards and shot lists will be accomplished before the physical shooting actually begins, during the period referred to as pre-production (Figure 7.14).
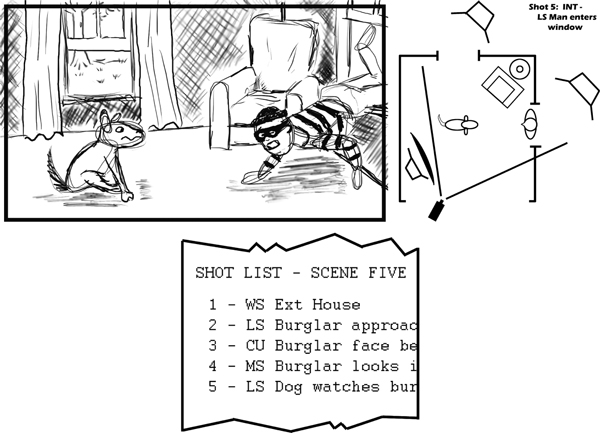
Figure 7.14 An example of a storyboard, an overhead schematic, and a shot list.
It should be clear that not every frame shot during production makes it into the final edit of the project. Bad takes, beginnings and endings of shots, coverage not required, and overlapping actions not used by the editor will end up on the “cutting room floor” (an expression from film editing days when the unwanted outtakes of the physical plastic strips of emulsion film were thrown on the floor of the edit room).
The shooting ratio is the relationship between the amount of visual material recorded during production and the amount of material that makes it into the final edited version. The overall shooting ratio is represented by two numbers separated by a colon (:). As an example, if you used one good take in the final edit, but shot seven different versions of that take, then your shooting ratio for that one shot would be 7:1. People have based this ratio on different criteria (film footage, takes, tape stock, etc.) but TIME is probably the most predominant factor. If you shot 30 hours of material for a one-hour program, then you have a 30:1 shooting ratio.
Scripted fictional narratives will often have a lower shooting ratio because each shot should be well planned ahead of time. Documentaries may have a larger shooting ratio due to the lack of scripting to action and interviews. Wildlife, travel, and especially multi-camera “reality” television shows can have huge shooting ratios. It is not always easy to predict what the shooting ratio of a project will become, but it is a good idea to at least generate a best guess ratio when planning your shoot. Budgets are not always about money. Time is a very important factor during production and post-production, so the fewer takes you have to roll on the more time is saved all around. A low shooting ratio with a good variety of shot coverage can be a winning combination for everyone (Figure 7.15).
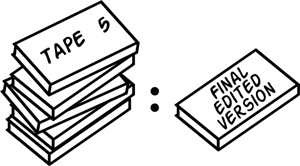
Figure 7.15 Five “tapes” of material edited down to one “tape” of that material is an example of a 5:1 shooting ratio.
Frame for Correct “Look Room” on Shots that Will Edit Together
You need to record a simple scene of two people facing each other having a conversation. In addition to a wide two-shot, your coverage calls for clean singles with medium close-ups. When you compose for the MCU of Character A on the left, you might place their head along the 1/3 “line” on frame left, allowing them to look across the empty space over to frame right. The “answering” shot of Character B is mirrored in its composition, with B’s head on frame right looking across the void to frame left. This composition mimics what the wider two-shot had already established regarding the empty space in between the two characters. The eye-lines of the subjects trace back and forth across the empty space in between and, as a result, the audience will do the same when the two MCU shots are edited together. The direction of the “gaze” is maintained and followed across the cut.
This same technique can be used between a person and any object at which they may look. In one shot, a person frame left may be looking off frame right at some object. When you record the answering shot of that object, it should be placed over on frame right in order to allow the appropriate space for look room. When these two shots are cut together, the eye-line traces across to screen right on shot one and continues that direction in shot two until the viewer’s eye rests upon the object of interest. It would be rather awkward to frame people or objects such that when they are cut together they appear to butt up against one another, as in Figure 7.16.
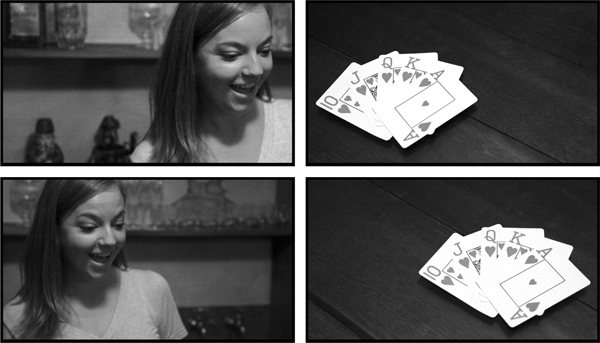
Figure 7.16 It is important to follow lines of attention and allow for proper look room space when composing closer shots of people and objects that will be cut together.
Shoot Matching Camera Angles when Covering a Dialogue Scene
With a traditional approach to shooting a simple dialogue scene you would most likely begin by covering the wide or establishing shot, moving the camera for a tighter two-shot, then getting one character for his over-the-shoulder and clean single, and finally “turning around” and getting the same tighter shots for the remaining character. Working this way, you set the scene for the audience and also allow for the talent to settle in and match their lines and actions better. Your goal should be to use the same camera distance, camera height, lens focal length, depth of field, and the same or very similar lighting for each character. The framing and composition of the single close-up shots and any OTS should mirror one another.
The important lesson for the new filmmaker to remember is that although the close-up shots may be shot last, they should be thought about ahead of time to check for how they will be physically set up in that environment. Will there be room for the camera to move to get the shots? Will there be any problems with background objects? Will lighting or depth of field pose any issues? Before you set everything and shoot the wide, it can be a good idea to quickly walk through the other camera set-up positions and check for possible “gotchas.”
As usual, how things eventually edit together helps dictate how they should be originally recorded. When you cover the two individuals talking in this simple scene, their close-up shots and over-the-shoulder shots should match or mirror one another. This way, when the editor gets to cut the scene together, the viewer sees the wide shot and understands the overall scene’s lighting and character placement in the film space. Then, when closer shots are cut back to back, the audience is given matching “mirrored” shots and knows how to place these individuals within the larger film space outside the CU frame. If you have covered the two characters with different camera heights, lenses, depths of field, or drastically different lighting, then there will be noticeable visual incongruity in the edited scene. Mismatched shots cut in a back-and-forth fashion could confuse and possibly annoy the viewer because the information being presented is not harmonious.
This sequence of mirrored coverage is often called shot-reverse-shot. The coverage shots for one character are shot all the way through into the closest framing and then camera and lighting can switch over to cover the shots for the remaining character.
In our example, the first MCU is shot from +45 degrees around the 180 degree arc and, eventually, the other character is covered in an MCU from −45 degrees (see Figure 7.17). You get matching imagery, and the shot-reverse-shot cycle is available for the edit.
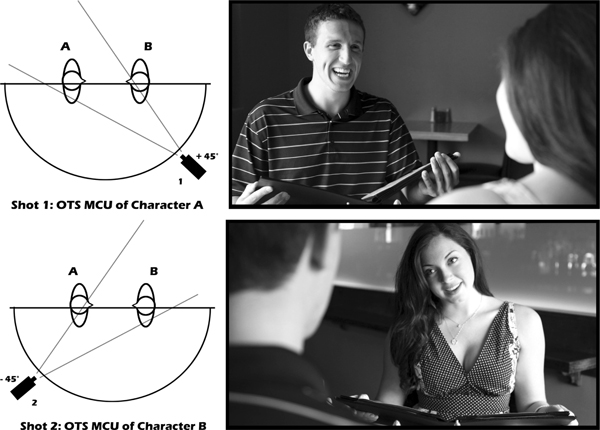
Figure 7.17 Shoot matching shot-reverse-shot coverage for traditional editing choices.
Ways to Cross the 180 Degree Line Safely
We know that when shooting coverage for a scene, the camera should normally stay on one side of the set or location within the established 180 degree arc. We do this so that when the various shots of that scene’s coverage are edited together, the screen direction of movements and the eye-lines of characters match the established spatial relations found in the wider master shot. There may be times when you wish to move the camera around the set and get new angles on action from the opposite or “incorrect” side of the axis of action. This can be done, but there are some special ways to do it without it being jarring to the viewing audience.
Talent movement (blocking changes) within the shot will establish a new axis of action for each new direction the subject faces. Once a new line exists, the camera is free to reposition.
If the movement of talent provides the motivation, then a mobile camera (handheld, Steadicam, dolly, etc.) can cross over the action line during the continuous shot. The original 180 degree line is established with the first wide shot, but the line is then changed and updated as the camera moves to follow the movement of the subject around the set.
If you establish the line in the wide shot and then move the camera to the farthest extreme along the arc without going over the line, you will have created a neutral shot for use during the edit process. Because this extreme location along the arc “sits on the fence,” you would then be free to fall to the other side of the line and shoot from the new side. The new line is established after the neutral shot and allows the audience to reset their spatial understanding of the film space.
You may also try to use a cutaway shot to a related object or person within the same film space. If you provide shots from both sides of the action line, but you have also recorded cutaways or insert shots for the editor, then the cutaway can break the spatial attention of the viewer and the next shot may be shown from the far side of the original axis of action. The majority of the film space and the blocking of the subjects will be established in the wider shot, so the visual break of the cutaway creates an easier transition to the new action line for the audience. You could even shoot another reestablishing shot of the wide scene from a different angle (Figure 7.18).
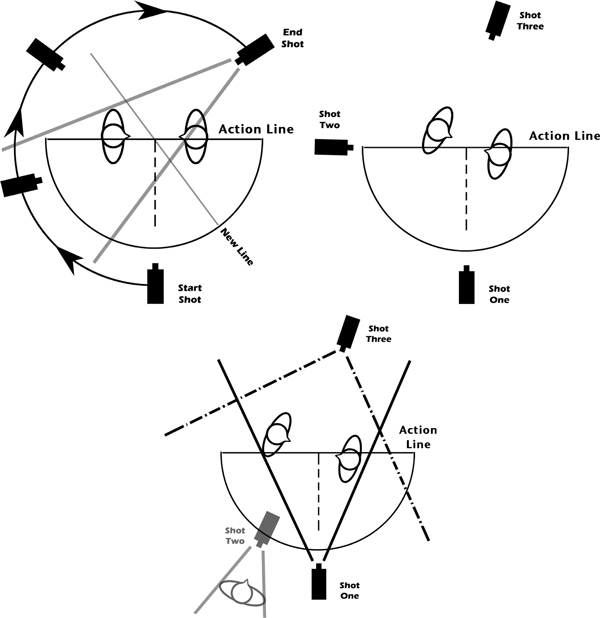
Figure 7.18 Ways to move the camera across the 180-degree line safely while shooting coverage for a scene.
Place Important Objects in the Top Half of Your Frame
We normally view things from the top down (pages of a book, a web site, a person walking towards us, etc.) and, in many cultures, from the left to the right. This is no different when viewing a motion picture. Filmmakers have taken advantage of this phenomenon and created meaning around an object’s placement within the frame. Objects (including people’s heads) that are placed in the top half of the frame receive more attention from the viewer. The objects are said to have more “weight” or visual presence and are assigned a greater importance within the scene or story. Objects placed lower in the frame tend to have less “weight,” have less visual presence, and are seen as less important in the story.
An example is a wide two-shot where a more powerful character stands frame left over the seated figure of the less powerful character on frame right. An up/down power dynamic is created (Figure 7.19).

Figure 7.19 Objects placed higher in the frame hold more visual “weight” or importance. A viewer’s eye is trained to look there first.
This does not mean that you should never put important objects in the lower half of your frame, but the top half/bottom half guideline does come into play quite often. Some key factors in choosing your composition should be the object’s importance in the narrative, the size (proximity) of the object, its focus and its illumination, and, of course, its position within the frame. Think about how the viewing audience will look at your frame on screen. How will they digest the visual information that you present to them? Many significant objects will be placed at the top, but interesting compositions that use the entire frame can also challenge the viewer. You can compel the viewer’s eyes to roam the image looking for that item of interest. You may wish to experiment and put all the main subjects of a story at the bottom of the frame and see what kind of reaction you get from an audience.
Be Aware of the Color Choices Made Throughout Your Project
Color choices can be very important to a motion picture. A particular color can take on meaning in your story – red could be a warning or indicate passion, whereas blue could symbolize a cold or uncaring individual, a sterile environment, or could even represent freedom found in the air or water. Even if you do not take your color scheme that far into thematic meaning, the color choices that are made for set dressing, costumes, and make-up will have an effect on how the shots get recorded and how visible certain objects might be. For instance, you may not wish to put a subject clothed in all dark clothing in front of a shadowy or dark-colored wall for the fear that she will get “lost” in the sea of darkness. Or maybe that is precisely what you wish to do.
There is a science to color and light and you should certainly explore more of that on your own [see suggested internet and book references in Appendix A]. Just be aware that bright colors and warmer tones will tend to appear closer to a viewer (as though they were popping off the screen), whereas darker colors and cooler tones appear to be farther away as if they were receding into the background. This phenomenon could help you create particular areas of visual attention in your compositions by juxtaposing bright and dark color areas within your sets and wardrobe (Figure 7.20). An Art Director or Production Designer often works on such details and collaborates with the film’s director and DP to help establish an overall “look.”
Figure 7.20 The colors or tones of wardrobe and set dressing can play a major role in your image creation. Beware of combining dark clothes with dark backgrounds.
Beyond the colors of paint and fabrics, you can also apply colored gels to light fixtures in order to create color washes across people and environments – most commonly seen as blue for cool moonlight at night and orange for warm interior night lights. These work especially well together within the same lighting scheme. There are also color-altering processes that you can use during the post-production phase of a digital video project. These color treatment effects may even include desaturation where you remove much (or maybe all) of the color information from your source material.
Keep Distracting Objects out of the Shot
Many of you have seen a live news report on location when a passer-by waves vigorously at the camera from behind the standing reporter. The out-of-place movements distract our attention away from the main point of the report and the connection to the story is lost. A small crew on a live news report cannot do much to prevent these distractions, but any not-live-to-air shoot should allow for some control over the set. Take the time to verify that the frame is clean and that no objects, either moving or stationary, might prove to be a visual distraction for the viewing audience.
The main goal is to keep the composition strong. Any object that has noticeable movements or bright colors or an odd shape can compromise the good composition by acting as an eye magnet to the viewer. If you shoot a CU of a person’s head, make sure that no strange lines, shapes, or objects come “out” from behind their head. This can have a comical effect when done intentionally, but, for the most part, frame these shots so that no distracting objects either obscure the face in the foreground or “grow” out of the head or body from the background. The same can be said for any “talking head” interview CU shot for a documentary. Active TV sets, computer monitors, and even windows to the outside world can draw the viewer’s eye away from the main subject. Either do not incorporate these items in the shot or blur them out through creating a very shallow depth of field (Figure 7.21).
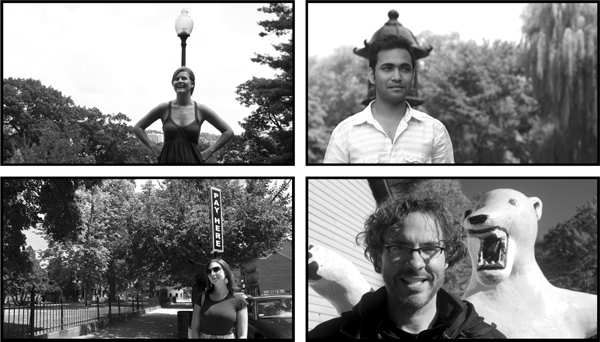
Figure 7.21 Try to keep your frame clean and free of distracting objects, especially near the heads of talent.
Beware of Continuity Traps While Shooting a Scene
A filmmaker needs to be aware of many continuity concerns while shooting coverage for a scene – matching dialogue delivery, action or motion, framing, camera angles, eye-line, and so forth. There may be many things, however, beyond the basics that can cause a continuity headache. The important thing is to be observant and thorough. Continuity issues can make the post-production process difficult, so try to avoid them during production (Figure 7.22).
Figure 7.22 Be aware of continuity traps (both visible and auditory). The clock and the street musicians may not help your edited shots.
Continuity traps tend to be objects on set or around the shooting location that will change over time. Shooting all of the coverage for a particular scene or event can take a long time, so these continuity traps will appear to change (sometimes drastically) from one shot to the next and back again when the coverage is edited together. These secondary continuity errors may not be as noticeable as actor movement or eye-line matching but they are still potential sources of audience annoyance. Any time the audience is reminded that they are watching an artificially crafted motion picture experience you run the risk of losing them and their positive attention.
Continuity traps to watch for:
- Be aware of functional clocks or large watches that will reveal the passage of time when shooting chronologically but will cause a continuity issue when the scene is edited.
- The same goes for the movement of the sun. Either bright sunshine or the resulting shadow movement will jump around from shot to shot during the edited piece. You may not have any control over the sunlight, but you could structure your shooting schedule around it or change the framing so that it does not become an issue. Dawn and dusk may bring about issues of streetlights and car headlamps in use when none should be on.
- Any background activity, such as an active TV set, people, and cars, should be either removed or made to do the same thing in each medium or close-up shot you need to take that may involve their participation.
- Finally, audio concerns should be addressed, such as airplanes, automotive vehicle sounds, telephones ringing, refrigeration and HVAC units, and especially noncontrollable music from any source around your location. All of these could potentially pose a threat to smooth editing.
Use the Depth of Your Film Space to Stage Shots with Several People
Simple shots of one or two persons allow ample screen space to compose their blocking and placement within the frame. When your shot must contain a larger number of people you will have to find creative ways to layer the multiple subjects into the depth of the film space. The foreground, middle ground, and near background become a combined zone where persons can be blocked or staged to fit within the frame. As seen through the camera’s lens, the bodies of the people will have a slight overlap, but the faces will mostly be clearly visible and discernible.
The actual blocking will depend on the physical space of the set or location, the set dressing or furnishings within the space, and the size of the individuals. For groups of six to ten people you may need to have some sitting and some standing and all at different distances from the camera’s lens. If the group is larger or needs to be a crowd, there will eventually be a point where an overlap of faces will occur and most will not be discernible. In that event, place the most knowable or important people nearer to camera so the audience can still see their faces and recognize them for who they are. It is not often desirable to have one or more characters whose head is turned away from camera, but you might find that to have all heads facing the same direction looks awkward, unnatural, or too subjective. When you finally know the variables on the day of shooting, you should quickly experiment with the best blocking options that take advantage of the depth of the film space. Raising the camera height “above the crowd” (a slightly higher angle shot) will also show the staging of bodies deep into the set, and more faces may be seen this way (Figure 7.23).

Figure 7.23 Use the depth of the film space to help stage the bodies when more people must occupy the frame.
In a Three-Person Dialogue Scene, Matching Two-Shots can be Problematic for the Editor
By staging three people standing across the width of the frame in a wide shot, you establish the position and spatial relations among the people. For this example, let us label the person on screen left as character A, the person in the middle as B, and the person frame right as C. You would normally continue to get coverage of the scene by moving in for the two-shot. In this case, you could get a two-shot of A and B and you could get a two-shot of B and C. The issue arises during the edit session.
In two-shot #1, character A will be frame left and B will be on frame right, but in two-shot #2, character B will be frame left and C will be frame right. If you cut #1 next to #2, you will clearly see character B jump from frame right to frame left. This may prove rather distracting to a viewing audience. Although you should shoot both two-shots mentioned earlier, you also need to shoot single close-up shots of all three characters so that the editor will have the best possible shot options when the cutting process begins (Figure 7.24).
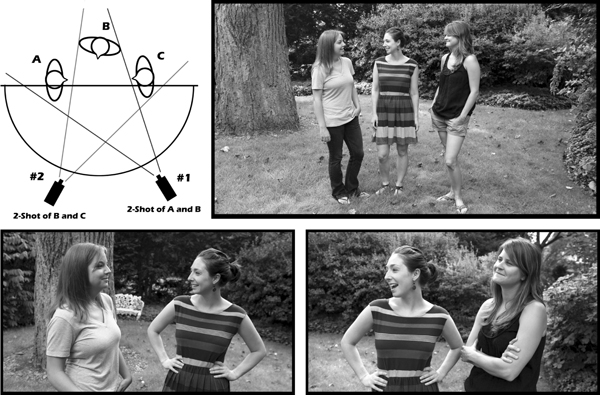
Figure 7.24 Two-shots in a three person dialogue scene will not cut together well as the central figure jumps from one side of frame to the other. Give the editor better options by also shooting clean singles of all three characters.
The optical shifting through multiple focal lengths that a zoom lens allows is not possible with our human eyes. The scaling of magnification is alien to our visual processing and stands out from ‘normal’ cinematography. As the angle of view runs from wide to narrow, a “zoom in” simply magnifies the center of the wider frame when the camera is locked down on the tripod head. That new, center framing at the end of your zoom in may not be what you want your final frame to be, so you should keep loose pan and tilt locks on the tripod to allow for easier reframing during the shot. Be aware that these changes in the focal length will alter the perceived perspective observed by the audience (wide = exaggerated distance/narrow = compressed space). The depth of field will also be affected by the FL changes, so be conscious of your focus marks.
There was a time when zooms in fictional narrative films were considered “amateurish” or “hokey” (like “snap zooms” from the 1970s kung-fu movies). Today, they are used to great effect in a highly stylized fashion in science fiction and action/adventure movies and even video game “cinematics” animation design. Because of their frequent use by amateurs using camcorders (think of that easy access to the W/T toggle switch) zooms are often incorporated into POV video shot by a character in a feature film, TV show, or music video. The viewing public has also grown quite accustomed to zooming shots when presented in news stories or photojournalist documentaries where the camera must remain further away from the action for safety reasons.
You may find that a focal length change during a shot with a moving subject is required to maintain your desired composition. Combining the focal length change with a panning or tilting action that follows the moving subject may hide the zoom in or zoom out. The camera’s reframing helps cover the more visually distinct optical shift of the zoom factor. You can also “hide” a zoom with its speed of execution. Very, very slow zooms can be incorporated into a very long take, such as an engaging dialogue scene, where the focal length change is so subtle over time that it is not really noticed by the engrossed audience member (Figure 7.25).
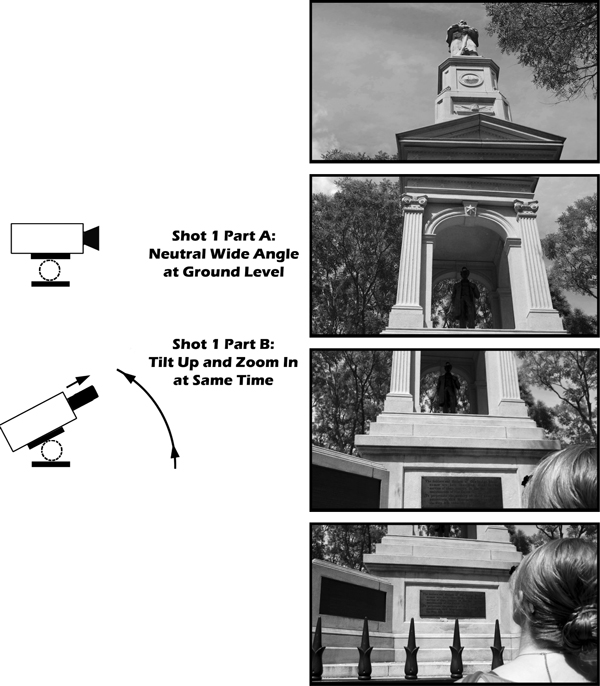
Figure 7.25 “Hiding” a zooming lens movement within a pan or tilt is often very effective. Framing and focal length changes are made at the same time to alter composition and perspective.
Motivate Your Truck-In and Truck-Out Dolly Moves
It is commonly accepted that camera movement during a shot is motivated by the staged action being covered – meaning, as things move in the shot, the camera can move along with them. This holds true for dolly shots that either push into a set or pull out of it. This practice is often called trucking or tracking.
Usually the motion of any object (a rolling ball) or any subject (a delivery boy) is ample motivation to truck in. The object moves into the depth of the shot so the camera follows, seeking out more detail and more information. This pushing in and exploring is natural to the audience because it replicates what a human might do in order to follow action and see more detail – get closer to the item or area of concern. It is an investigative expression of coverage.
Trucking out, however, is a less “natural” movement. The reverse motion of the truck out implies a person leaving a scene walking backward – not something that humans are likely to do on a regular basis. If a subject or object is moving toward the camera and the filmmaker wishes to truck out in order to keep the subject or object in frame, then that provides the motivation for the camera move. This is often called leading the subject. Because a truck out usually reveals larger or longer areas of the film space yet to be seen by the audience, it can be a useful tool in creating suspense (where is the character taking us? – what is he seeing behind us?), in relating new story information, and revealing the consequences of another’s actions. Therefore, you are likely to find a truck out at the end of a scene or sequence or at the end of an entire motion picture. The truck out provides a visual overview of where a subject has been and sets up a possible reveal for new plot points and visual data (Figure 7.26).
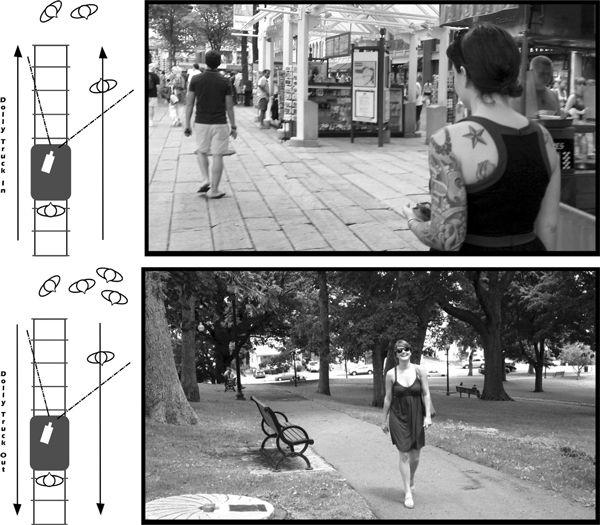
Figure 7.26 Talent movement can motivate truck-in and truck-out dolly moves.
Allow the Camera More Time to Record Each Shot
We all know that time and money are very important to all motion picture projects no matter what the medium, format, story, or type of event being shot. Most often the ultimate goal is to pass on all production video to the edit team and have them piece together the final presentation. It is very important that you provide the post-production crew with as much usable visual material as possible, which means making sure that each take of each shot has plenty of start-up time and plenty of completion time.
It is wise to get the camera “rolling” before any critical action happens. This allows all equipment the time required to get up to operating “speed” and it gives the talent and crew time to settle. Rolling camera (starting the record process) before “Action!” is called also provides the editor with critical extra frames at the head (or beginning) of the shot. She or he can then potentially use these extra video frames to pad out the timing of the shots during the edit or even create a longer video transition effect in the editing software. It is a common pitfall of new filmmakers to start recording as they call out “Action!” and as a result they often miss some very critical frames at the start of the shot. This holds especially true for tape-based capture but still applies to digital media file video as well.
A similar process should be followed at the end of the shot. As the filmmaker calls “Cut!” the camera should be allowed a few more seconds of recording time. This ensures that all necessary action is captured by the camera and also provides that critical extra footage at the tail (or end) of the shot for the editor to play with. Getting into the practice of rolling early and cutting a bit late will help you win friends for life on the editing team (Figure 7.27).
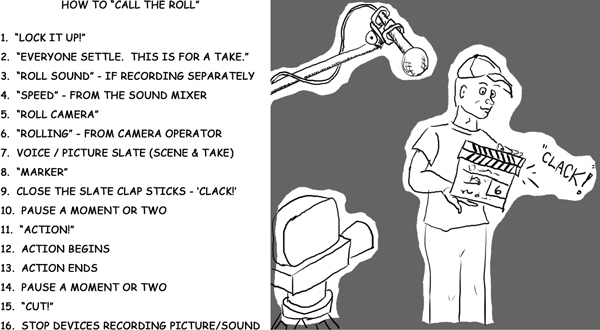
Figure 7.27 Rolling the camera early and stopping it late will ensure the extra “padding” footage often needed during the edit. Slating shots will help identify them during postproduction. If you wish, use this method to be thorough.
Allow Actions to Complete Before Cutting Camera
There may be many occasions where this practice is neither possible nor prudent, but, for the most part, it should be followed because it makes a great deal of sense. It is the job of the editor to decide when to cut into a shot and when to cut out of a shot. The production crew should cover all of the action in each shot so that the editor has that footage from which to make his or her best choice while cutting the scene.
If an actor is to walk out of frame, let him/her walk fully out of frame and allow the empty space to be recorded for a short while. The same goes for a car, plane, dog, and so forth. Allow the exit action to complete and let the camera run for a bit longer – a second or two. These extra frames can be of particular importance if the editor decides to create a dissolve or fade or some other transition that will imply the passage of time before the next shot. If the action calls for something to fall, a door to close, or a person to round the corner of a building and disappear from view, then let all those actions complete in the shot before you cut camera. As discussed earlier, the static end frame of a pan or tilt will also provide the opportunity for the recorded action to be completed at the end of the camera move (Figure 7.28).
Figure 7.28 Allow actions to complete before stopping the camera.
You may also occasionally see the camera trail off from an action and move its attention/framing onto a neutral background. After covering an action fully or partially, perhaps it tilts up to the sky, or down to the ground, or simply comes to a rest on some other nearby but unrelated object or background element in the scene. This treatment implies that the action is ongoing but gives the editor a clean neutral frame to cut away from and into the next shot or scene.
Use Short Focal Length Lenses to Reduce Handheld Camera Shake
The field of view or angle of view that a lens provides depends on its focal length. A wide lens – a lens that is set to a short focal length such as 10 mm – captures a larger field of view and therefore creates an image that shows more of the environment in front of the camera. When you see more of the environment, objects in that space tend to appear smaller. If the camera were to move or shake slightly while recording a wide shot, as with a handheld camera, the smaller objects in the frame do not travel very far because of the relative distances they have to traverse in the wider image. The larger distances between objects and their relationship to the horizon line and the edges of frame will help them appear more stable if the camera experiences a minor shake or wobble.
Conversely, a lens set to telephoto – a long focal length such as 100 mm or more – captures a much narrower field of view. This lens setting magnifies details of a narrow slice of the environment, and the objects within the frame are enlarged. These magnified objects will have less distance to travel around the frame before they hit an edge or leave the frame altogether. Also, a shallow depth of field usually accompanies the long FL, so focus issues become heightened. This is why a handheld camera with a long focal length lens is likely to create an extremely shaky and motion-blurred image. Magnified objects in a narrow field of view make even small movements appear like large shifts in spatial stability. As a result, try to use short focal lengths when you need help stabilizing handheld camera coverage (Figure 7.29).
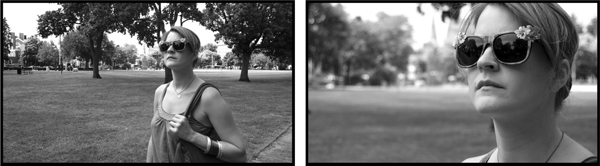
Figure 7.29 A wider lens angle provides more stability if the camera shakes during handheld recording.
Beware of Wide Lenses when Shooting Close-Up Shots
You may use any lens you like if it suits the shot and the story. You should be aware, however, of what a lens will do for your image in both a positive way and, potentially, a negative way. We all understand that wide lenses capture a large field of view and that they tend to have a larger depth of field. The curvature of the optics involved can also exaggerate the perspective when the subject is close to the camera. The shorter the focal length, the more exaggerated the warped perspective. Extreme versions of this optical phenomenon are called “fish-eye” lenses.
If you set your lens to the shortest focal length and reduce the camera-to-subject distance in order to get a close-up shot, you will most likely encounter this warped perspective exaggeration. The individual’s nose will appear larger and perhaps bulbous, almost poking out at the camera, whereas the ears and the remainder of the head will appear to recede from the camera. Background objects, if visible, will also appear much smaller than they would with longer FLs.
This treatment is often used for a comic effect or when one wishes to show a “nightmare” state of consciousness. For normal CU work, however, you may be better served to use a longer focal length setting on your lens and move the camera further away from talent. Much like still photographers who use longer lenses to take portraits, you can reduce the exaggerated perspective of the subject by “flattening” the recorded space. The reduced depth of field of the long FL may also help isolate the facial features and bring more attention to the CU, while the background blurs (Figure 7.30).

Figure 7.30 Wide lenses in close can distort facial features in a CU. A longer focal length from slightly farther away can help keep the “portrait” perspective normal.
When you watch a meteorologist deliver the weather report in front of a large radar image showing swirling patterns of cloud movement, you are seeing the result of a chromakey. You may be more familiar with the terms green screen or blue screen. These names refer to the same process whereby a certain color (chroma) is “keyed out” or removed from a video image. Post-production software is used to select that particular color (most often green or blue) and turn it invisible while the remaining pixel data in the image is untouched. This layer of “keyed” video becomes the foreground element (the weather person) or top layer in a composite. Then, some other video image (clouds on radar) is placed on the layer below to become the visible background of the new composited video image.
Although you could “key” any color in your video clips, the colors green and blue are most often used because they are two colors whose ranges of hues are not normally present in the skin or hair of human beings. Be advised that green- and blued-eyed people will have their eyes disappear if you use the same color for your chroma-screen color.
Lighting your foreground object should be done with the same care as you would use when lighting any subject for a motion picture project. Matching the lighting of the composite environment is sometimes desired if you are truly going for that special effect to trick your audience. If at all possible, you should have certain light fixtures just to use on your talent and another set of dedicated lighting fixtures to illuminate the chroma-screen in the background.
The main things to remember are:
- Keep the screen as smooth and flat as possible
- Illuminate the chroma-screen with uniform lighting (same light levels) across all the screen visible in your shot; the screen does not need to be very bright, just uniformly lit
- Keep your foreground subject far enough in front of the green screen so that there are no shadows of any kind cast on the chroma-screen
- If using a 16:9 widescreen camera, then you may mount the camera frame vertically to maximize the vertical resolution of the HD imager (shoot with portrait aspect ratio)
Figure 7.31 A simple green sheet (smooth, flat, and evenly lit) can serve as a chromakey screen. The result of pulling the key in post-production.
Shooting B-Roll, 2nd Unit, and Stock Footage
Depending on the genre and budget of your motion picture project, you may have a need for additional visual material beyond the principal photography.
If you are creating a work of non-fiction (especially a documentary, corporate promotional video, or even a how-to or process video) it is important to schedule time and resources to acquire B-Roll. B-Roll can be any visual material that “shows” something related to the topic of the program you are constructing. It is often used by the editor of the video to “cut away” from the main interviews or to pad out the timings between voiceover segments. Examples could be video of a corporation’s headquarters, a busy factory’s assembly floor, signage, trains pulling into a station, or shoppers in line at a store – whatever may be related to the topic of the main video.
On fictional narrative and long-form non-fiction, there often arises the need for visual materials that will be used in the final edit but are not part of the main scenes, interviews, or events recorded by the primary production crew. On films with larger budgets, the 2nd Unit is another team that goes to precise locations to record exterior views, aerial views (helicopter or airplane), or driving shots and so forth. This imagery can be used as establishing shots, cutaways, or background plates for process shots or special visual effects shots. It will be very important to acquire this footage using the same format camera, or possibly even a higher resolution imaging device, to maintain or match the look and quality of the original production video.
Another option available to filmmakers is the acquisition of stock footage, archive film, or still photography for use in a new project. As the original material may not be of the same format, it will be important to create a workflow plan so the copies you access can be used in your final edit. Often payment for usage is required, or certainly a full credit needs to be given to the organization that contributes the archive materials.
Shooting a Talking Head Interview
Depending on the genre of and your chosen visual plan for your motion media project, there could be innumerable methods to frame, light, and record an interview subject. If you capture the person saying the things they have to say, then the job would appear to be accomplished successfully. Certain basic approaches to covering the “talking head” interview for documentaries have worked well for decades, so perhaps you would like to start here and diverge when it suits your “story.”
A traditional approach is:
- Seat your subject in a quiet room, with few distractions. The chair should not swivel, rotate, or recline.
- If you, the filmmaker, are asking questions, then sit with your head very close to camera lens. Subject’s eye-line will go to you consistently, near lens but not into lens.
- If you can record two channels of audio, use a body mic (lavalier) for clear, clean subject voice and a boom mic for voice plus ambience.
- Expand camera-to-subject distance if possible so you can frame a medium shot to medium close-up with a longer focal length. This helps with flattened portrait perspective and a shallower depth of field.
- Subject should be seen in 3/4 front profile composition either frame left or frame right, with appropriate head room and look/nose room.
- Allow space at bottom of frame for “lower-thirds” identification graphic added in post.
- A three-point lighting set-up is a good place to start. Try a soft key and fill with a hard kicker back light on opposite side from key. Key side of face away from lens. If you do not like it, use whatever lighting you have as is appropriate for your documentary’s visual design.
- Exposure should be lower, so a shallow depth of field can help blur out the background of your “set.” Audience then watches “in-focus” interviewee’s face.
- Always ask the interviewee to say and spell his or her full name at the beginning of the recorded interview.
- Ask open-ended questions that require explanations and not simply “yes” or “no” answers.

Figure 7.32 An example of shooting an interview.
During Documentary Filming, Be as Discreet as Possible
When you are on location shooting documentary footage it can become very challenging to acquire the shots that you need without raising a lot of attention toward yourself and your crew. You will most likely attain the best results by remaining discrete, being respectful, and working quickly. As a crewmember working on any project it would be wise to remain discrete and efficient, but these working practices might get you more mileage when working in foreign or potentially hostile environments.
You should, first of all, obtain all required permissions, certificates, releases and waivers so that you can shoot at these locations legally. Your goal is to observe and record, not intrude or stage the events. The more people who are aware of who you are and what your purpose is, the more likely you are to get negative attention or simply have people behave differently than they normally might. The advancements in equipment – small digital video and audio recorders – will help you keep your “footprint” smaller, allowing for more discrete operations. Film emulsion cameras still tend to be a bit bulkier, and their rarity causes more curiosity in onlookers. Remember to obey all local laws and respect the privacy of individuals who do not wish to be a part of your project.
- Slate the head of your shots.
- Communicate clearly with talent before and during production.
- Frame action within camera viewfinder’s Safe Action lines and frame signage or titling within Safe Title zone.
- Manually focus a zoom lens at longest FL on subject you wish to see clearly.
- Always have something in your frame in focus.
- Control your depth of field through choices of FL, aperture, and camera to subject distance.
- Be aware of headroom in your frame.
- Use close-up shots when you want your audience to pay more attention and make either an intellectual or an emotional connection with the subject on screen.
- It is most often appropriate to place an eye light or catch light so that your talent’s eyes glint.
- Try to show both eyes of your subject: 3/4 front profile is a good place to start.
- Be aware of eye-line directions in closer shots.
- Follow action with loose pan and tilt tripod head.
- Record some overlapping actions during each coverage shot so the editor may cut on action movements within the frame during a scene.
- Storyboards and shot lists help with organization and efficiency during production.
- Be aware of your shooting ratio to save time and money.
- Frame for correct “look room” across the cut on shots that will edit together.
- Shoot matching camera angles of subjects when covering dialogue for a scene.
- Plan accordingly to cross the 180 degree line safely when shooting coverage for a scene.
- Place important objects in the top half of your frame.
- Be aware of the color choices made throughout your project.
- Keep distracting objects out of the shot and away from talent’s head.
- Be aware of continuity traps while recording coverage for a scene.
- Use the depth of your film space to stage shots with several people.
- In a three-person dialogue scene, matching two shots can be problematic for the editor.
- Understand when and how to perform a zoom during a shot.
- Motivate your truck-in and truck-out dolly moves.
- Allow the camera more time to record each shot at head and tail.
- Allow all actions to complete before cutting camera.
- Use short focal length lenses to smooth handheld camera movement.
- Be aware of very wide lens distortion when shooting close-up shots near to talent.
- Light chromakeys with even illumination, no shadows, and no matching hue in the FG.
- Remember to shoot B-Roll and other supporting visual materials for your project.
- Three-point lighting, MS to MCU and 3/4 profile offer a good start to creating a traditional Talking Head interview.
- During documentary shooting, be as discreet as possible
Chapter Seven – Exercises & Projects
- Practice recording close-up shots of non-human subjects – signs, cars, plants, books, chairs, whatever. Make sure that you account for head room and look room and maintain all items of interest within the safe picture/safe title zones.
- If your video camera has a zoom lens, practice zoom/pans and zoom/tilts and zoom/pan/tilts. Does it make a difference if the focal length change is motivated or unmotivated? Could you achieve a similar effect by moving the camera instead?
- Go to a friend’s house or take them to some public space in your community. Ask him or her questions about himself or herself and how they relate to the space where they are. Take note of the responses and then, after the interview, go and record B-Roll and inserts that will be useful for the editing process.
- Using a handheld camera (with a wider focal length), practice following a moving subject from the back, leading from the front, and “crabbing” along from the side in profile. Which is easiest/most difficult to accomplish and why? Think of scenarios when you might wish to use each type of handheld “dolly.” (Safety note: always have a spotter moving with you when operating camera by hand so no one falls or gets hurt – especially if you are walking backwards or sideways.)
- What documents can you prepare during pre-production that will help you set up the necessary shots quickly on the given shoot day?
- Describe two ways in which you can “cross the line” safely when recording coverage for a dialogue scene.
- What are the key visual cues that let you know a shot is achieved with a zoom and not a dolly move?
- Why is it suggested to run the camera before calling “action” and for a few seconds after calling “cut?” Who will thank you the most for doing this on all takes?
- What is the process of “Calling the Roll?”
- How can you effectively control the depth of field for your camera/lens while recording on your own film set?
- What is the danger in recording a tight close-up with your widest lens angle very near to the subject’s face?