
Chapter Six
Dynamic Shots – Subjects and Camera in Motion
- Subjects in Motion – Talent Blocking
- Slow Motion/Fast Motion
- Handheld Camera
- Pans and Tilts
- Dolly Moves and More
We have been talking about basic guidelines for shooting motion pictures, but we have not really discussed the motion part yet. Presenting the illusion of moving objects on a screen has been the main attraction of movies and television since they were first introduced. Beyond still photography and live theatre, motion imagery (film, video, 3D computer animations) has been able to successfully engage audiences and show them virtually any information or entertainment that can be imagined.
In this chapter we will explore the basic approaches to handling subject and camera movement during motion picture production.
Subjects in Motion – Blocking Talent
The human visual system responds well to brightness, color, and movement. The movement of subjects within a static frame is a great way to give your shots visual energy. The term staging is often used to describe the physical placement of subjects on the film set and within the borders of the recorded frame. The term blocking is often used to describe the physical movement of subjects on the film set and within the same frame. Creating interesting blocking can engage the viewer’s eye and keep them involved with the imagery and in the story. We like to watch things move around on screen. So, talent blocking across the screen (left to right or vice versa) helps reinforce direction. Talent blocking deep into the set or location adds to the illusion of a three-dimensional film space and draws the viewer’s attention into the depth of the frame (Figure 6.1).

Figure 6.1 Talent blocking may be across the frame, deep into the frame, or both.
Static shots and stationary subjects, when arranged in compelling compositions, can have a visual energy and power all of their own, and can serve as contrast to moving shots when edited in sequence. It depends on the type of motion picture project that you are creating. Talent movement, when blocked creatively, will also add dynamic physical energy to your shots. In some schools of film theory, even the direction of movement can have meaning within the narrative. As an example, in an American frontier story, characters on a long journey to the territories may always have a screen right to screen left movement, perhaps implying that the right is East and the left is West – “civilization” is ever marching westward. Maybe a character is always moving from the foreground of a shot into the background – perhaps this means that he is running away or is too mysterious to be captured up close within the frame for very long.
Presentation Speed – Slow Motion and Fast Motion
When it comes to the presentation speeds of “normal” motion, the two key numbers to remember are 24 frames per second (fps) for emulsion film and high-end video productions and 30 frames per second for most other video. Technologies surrounding image capture are changing all the time, but a basic rule still applies – changing the standard capture frame rate of your medium while preserving the presentation frame rate of that medium will create a change in the perceived speed of objects in motion.
Slow Motion – or Overcranking
Capturing images at a higher frame rate than “normal” (24/30) will yield the appearance of objects moving slower than normal when displayed at the normal frame rate speed. Basically, the movement of an object (athlete, racehorse, bursting water balloon, etc.) is broken down into many more representative “slices” or frozen frames by increasing the frame rate/shutter speed of the camera. The more frames you can capture in one second, the slower the objects will appear to move. When you have many more frames of motion to display but you show them at the normal rate of delivery, each shot (not frame) plays on screen for more time than the original action took to complete. The audience will therefore see movements in slow motion.
Scientific films and sports playback have used slow-motion imagery for motion analysis for many decades. Fictional narrative and animation films have also used slow motion cinematography to great effect. Watching events play out in slow motion can be very dramatic, moving, powerful, and sometimes comedic experiences for a viewing audience.
Fast Motion – Undercranking
Capturing images at a slower than “normal” (24/30) frame rate will yield the appearance of objects moving faster than normal when displayed at the normal frame rate speed. This method is used to create time-lapse motion images, such as speeding traffic flow or sunrise or sunset and cloud movements across the sky. It condenses events that take a longer time to unfold and displays them at a much faster rate for the audience to watch.
Fast motion is often associated with the silent comedy movies of the early 1900s. It is used in educational films, scientific visual studies, industry promotional videos, and fictional narrative and music videos – just about any motion image project that seeks to condense actions across time.
If having your subject move within a static frame puts energy into your shot, then imagine what will happen once you start moving the camera while recording your images. Because the camera is the proxy for your audience, a moving camera will really take them on a ride. Gauging just the right kind and amount of movement is one of your creative and technical decisions. Does a slowly moving camera match the energy of the scene? Does a quickly moving and shaky handheld camera match the tone of a scene depicting a chess match? Does it have to? In order to figure this out, it would be helpful if we explore the various ways in which the camera can move.
Handheld
Perhaps the best place to begin a discussion of camera movement is with the most basic yet most challenging approach – going handheld. You may find it convenient to hold a smaller camera in your hand, but just because it is a readily available mode of shooting does not mean that it is appropriate and it certainly does not mean it is easy to do well. The first factor involved is a technical one: the camera you are using to shoot your project. Modern digital video technologies have allowed cameras to be quite small and quite capable; they can weigh a few ounces to just a few pounds. If you are working on an emulsion film motion picture, the nature of the medium requires much heavier and much more substantial camera equipment, often weighing in at 20 to 40 pounds or more. This is not necessarily conducive to handheld shooting, although they do have specially designed cameras and support (like a Steadicam™ or a Glidecam™) for just such a purpose.
The smaller, more lightweight handheld camera is simultaneously a blessing and a curse. It allows for easy movement, but that often leads to too much movement. Having and using a tripod is always encouraged, especially if you are new to shooting motion pictures. Remember, everything you do with your shots should have a purpose. Shooting handheld should not happen because you lack the appropriate camera support, but rather because you know that your story will benefit from the kinetic energy that a well-controlled handheld camera can bring to motion imagery.
Due to the spontaneous and uncontrolled nature of the shooting environments, documentary and news recording will often use a handheld shooting style. When replicating similar real-life events – a riot, armed conflict, natural disaster, etc. – fictional narrative filmmakers will also employ a handheld camera to lend that feeling of reality to the experience on screen. Amateur videos are mostly shot handheld and, for similar reasons, filmmakers will use this style to mimic “amateur” content in their professional films. Handheld camera is also used when shooting action sequences, or any scene with quickly rising drama, to lend them a visually frenetic style. This can enhance feelings of tension and suspense in the audience. Reality TV programming (and spoofs of reality shows) also employ handheld; again relying on an audience to assume that handheld camera coverage means real and immediate events unfolding (unscripted) right before their eyes. Music videos use a fair amount of handheld camera coverage as well.
Perhaps it would be best to compile a brief list of advantages and disadvantages for the handheld camera option.
Advantages
- Easy to readjust framing on the fly
- Creates sense of personal immediacy within the scene (subjective POV)
- Allows operator to move freely around the set or location
- Infuses shots with a lot of energy from motion
- When it’s wanted, can easily make an audience think of documentary/news/amateur video
Disadvantages
- Easily becomes too wildly shaky or causes swaying on the horizon line
- Difficult to manage focus with narrow DOF
- Difficult to cut with static camera shots
- Too subjective, may be inappropriate for neutral voice of the motion picture
- Generally limits focal length usage to wider angles of view because the more environment visible within the frame, the more “stable” the image will appear
Pan and Tilt
Pan and tilt refer to the horizontal and vertical repositioning of the camera lens. A pan (or panoramic shot) keeps the camera anchored to the center of an imaginary circle but rotates or swivels the camera lens horizontally left or right (see Figure 6.2). A tilt rotates or swivels the camera’s lens up or down during the recording of a shot. If a balloon floats out of a child’s hand and drifts up to the clouds, the shot can start with the lens pointing down toward the ground and end tilting up toward the sky in order to follow the path of the balloon (see Figure 6.3).

Figure 6.2 Overhead of camera panning horizontally during a shot. The camera pans right to follow the subject’s actions.

Figure 6.3 Profile view of camera tilting from neutral position to up or down positions. Example of a tilt up shot.
There is also a combination shot that combines a pan with a tilt where the camera lens is simultaneously panned across the film space and tilted up or, conversely, the camera is tilted down while panning across. Either way this results in a diagonal motion through the film space in front of the camera. An example could be two people walking through a sculpture park: as they pause (frame right) to look up at a tall sculpture (currently out of the frame), the camera sweeps up and across the location to the left in order to end the shot on the sculpture itself. An upward diagonal tilt-pan has been executed to cover both the people and the taller work of art (Figure 6.4).

Figure 6.4 These are frame grabs from one continuous tilt-pan up and across this location. One shot provides the audience with multiple pieces of visual information through this tilt-pan movement.
The action of a pan or a tilt is actually an unnatural experience for the human visual system. Our eyes and brains do not make smooth pans or tilts while viewing our surroundings. Instead, the eye travels along the horizontal or vertical path locking onto points of interest, registering with the brain, and then darting along quickly to the next point of interest. It becomes a very rapid series of starts, stops, starts, stops, with the resulting illusion that we have panned along the city street or tilted our eyes up the building or mountainside. Because a motion picture camera lens is not as selective, everything that it “sees” throughout the duration of the pan or tilt gets equal treatment. The smooth execution of a pan or tilt and the speed of that execution directly affect how the human audience receives the information within the movement of the shot.
To help the audience accept the camera’s panning or tilting movement, it is often good to motivate the move. In our examples so far we have provided these motivations. The upward movement of the lost balloon motivates the camera to follow the action and it tilts up toward the sky. The audience would like to see what happens to the balloon so they would naturally wish to follow its motion upward. Then we have the two characters who stop and stare up at the interesting sculpture. Their eye-line from frame right across to upper frame left motivates the diagonal camera tilt-pan up to reveal the taller work of art. All of the important narrative information is delivered in one continuous moving shot. The camera fulfills the expectations of the audience by showing the object of the characters’ interest without having to cut to a new shot.
Recall that an audience member often places him- or herself in the position of your camera, which is showing the audience the story. When the camera moves, it then takes on a sort of intelligence, following action or seeking information. Motivating your camera moves (pans and tilts especially) helps keep the flow going and feeds the inquisitive nature of the viewing audience. The movement of a subject or object provides a reason for the camera to pan or tilt along with it.
There are times, however, when you have no visible motivating action for the camera to follow on a pan or a tilt. Perhaps you wish to shoot a long, slow pan of displayed photographs depicting several generations of a family, or maybe there are many different pairs of shoes in the front hallway of a home you would like to record. There is no motivating movement of these subjects, but the camera takes on a “mind of its own.” It becomes a narrator or an “unrepresented” observer showing the audience things that are important to the story. The camera can pan or tilt slowly or quickly. The pacing is set by the tone of the scene – slow for languid, emotional moments or quickly for fast, energetic scenes.
Traditionally there has been a preferred method of accomplishing a good pan or a good tilt shot. When you first start out operating a camera on pans and tilts they should have three components: the start frame, the camera movement, and the end frame. A pan or tilt composed of all three elements will be able to be edited into your scene more easily than if you had just movement alone.
1. The Start Frame
Almost every pan or tilt shot should begin with a static camera position. Your starting frame of the shot should be well composed – it could stand alone as a good still image. It is from this start frame that the subject that motivates the pan or tilt begins its action. Keep the camera still, let the action begin, and then begin the camera’s panning or tilting. We do not discuss editing much in this book, but a quick word to the wise: cutting on movement, either into a shot already in motion or out of a shot once in motion, is a visually complicated thing to do and often poses an editorial challenge. Your editor will thank you when you begin your pan or tilt shot with several seconds of a static start frame.
2. The Camera Movement
Once the subject’s motion has begun, your camera movement also begins. The camera’s motion should ideally be smooth and steady and actually “lead” the movement of the subject. By this we mean that proper headroom, look room, and pictorial composition should be maintained throughout the life of the pan or tilt action (see Figure 6.2 or Figure 6.3). Any individual frame extracted from the shot during the camera movement phase would be able to stand on its own as a well-composed still image. Because the camera is leading the subject’s progress, the camera would naturally reach the end of its horizontal or vertical arc prior to the subject completing its movement.
3. The End Frame
As the camera has already come to a rest before the subject completes the movement, the end frame has been reached successfully. This end frame should, once again, be a well-composed static shot that can complete the pan or tilt action in a visually compelling fashion. You should linger on this end frame, recording several seconds of it while there is no camera movement. The editor now has a steady, locked-off frame to cut out from at the end of your pan or tilt if the edited story calls for it.
As you become a more experienced filmmaker, you will be in a better place to experiment with a moving camera on pan/tilt shots without static frames at the head and the tail, especially if they cover a series of very fast action shots. The easiest visual test to see if static head and tail frames are required for a panning or tilting camera move is to record it twice – once with and once without. In your editing software, create two versions of your sequence of shots. One version will use the video clip with static start and end frames while the other version will just have motion. Most often the static start and end frames will help during the edit process.
Equipment Used to Move the Camera
Pan and tilt shots require no equipment to be accomplished successfully. They can be done with a handheld camera. One of the problems inherent to using a handheld camera is the lack of consistently steady control over the movements. No matter how steady you try to keep your hands and arms, the camera, especially the smaller, lightweight video cameras, pick up on each step, bump, and even breath. And no matter what you think may be a cool or popular style of crazy camera movement, nothing can take the place of smooth, steady shots that engage the audience rather than alienating them. It is almost always advisable to use some sort of camera support that will not only steady the camera, but also allow it to do more well-controlled, precise movements and help maintain proper focus. The following section discusses some of these devices.
Tripod
The camera should always have a companion piece of support equipment to keep it stable and level when you need it. The tripod is the ideal tool for this job. Tripods come in different sizes and weights, depending on the camera that needs to be supported, but they all have three legs. The three-leg design allows for solid balance and leveling on most surfaces. You attach the camera to what is called the tripod head. On most models, the tripod head is designed to provide pan and tilt movements, so it is often called a pan and tilt head.
Attached to the head is a stick that allows you, through the use of torque, to execute rather smooth pan and tilt movements by grabbing this arm and swiveling the tripod head on either the horizontal or the vertical axis. This stick is called the pan handle and is most often positioned between the camera operator’s body and the back of the tripod head itself. Many tripod heads control their axis movements through either plate friction or fluid pressure. The tighter the settings, the more rigid/slower the movement – the looser the settings, the freer/faster the movement. Advanced tripod heads for professional motion picture work are called geared heads and use two wheels to pivot the camera through pans and tilts and there is no pan handle per se.
A level, locked-off tripod allows you to record extremely stable static shots. Many models of tripod have a built-in “bubble” level on the head, but you can also align any vertical objects (trees, walls) or the horizon line to the edges of your frame to achieve a useable “level.” A tripod with the pan lock loosened allows for very smooth and level horizontal pans. The pan lock engaged and the tilt lock loosened allow for very accurate tilting movements up and down without any drifting to the left or right. One would have to have both pan and tilt locks disengaged in order to maneuver the tripod head to execute a smooth and stable diagonal pan-tilt. Tripods will generally sit directly upon the floor or the ground, and will have either spiked or rubber cup feet. A device called a spreader (that attaches to all three legs from the center) keeps them from spreading too far apart and dropping the camera too low to the ground. Many place a sandbag on the spreader for extra weight and stability. Tripods are also commonly referred to as support, legs, or sticks.
Dolly
The original motion picture cameras had a hand-cranked film transport mechanism, which meant that one hand (often the right) of the camera operator was constantly engaged in turning the crank motor during the actual recording of the shot. The camera was mounted on a tripod and the entire apparatus did not move during the shooting. The desire for camera movement quickly led to experiments where the camera and tripod were attached to a four-wheeled cart. The operator would stand on a platform, cranking the camera, and other crew members (now called grips) would push or pull the entire apparatus around the film set or location. This, in essence, evolved into the modern-day film dolly.
At their roots, all dollies are wheeled platforms. Some have three wheels, some have four wheels, and some have many small ball-bearing wheels like those on a skateboard. Many dollies have thick rubber or air-filled wheels that allow it to be pushed or pulled around relatively flat surfaces like a gymnasium floor or along the tiled hallway of a school building. Other dollies have grooved, hard rubber wheels that fit on tracks on the ground. These tracks (or rail) are like small railroad tracks and come in straight or curved sections and you can assemble different lengths to create a path for the dolly to follow (Figure 6.5).
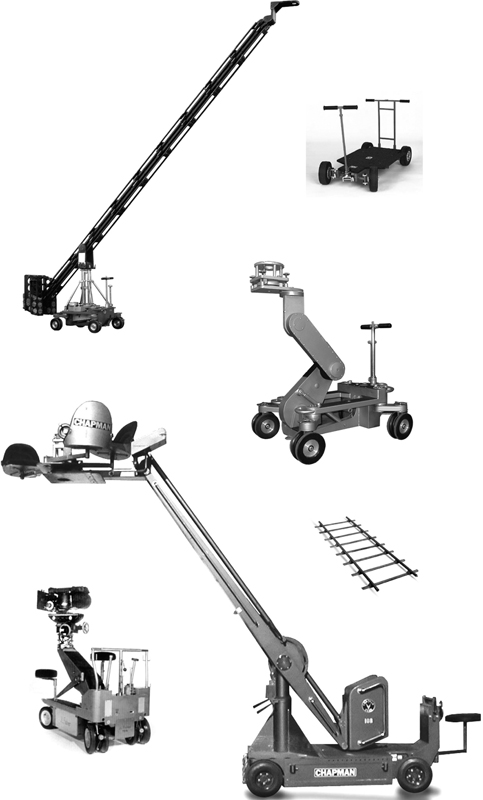
Figure 6.5 Various styles of camera dollies and booms. (Photos courtesy of Chapman-Leonard, Inc., J.L. Fischer, Inc., Matthews Studio Equipment.)
Each of these different dolly types has different ways of mounting the camera. Some simple ones are just flat beds that let the tripod and the operator sit on top. Others have a built-in pedestal that can be raised (ped up) or lowered (ped down) via hydraulics. Still others have a boom arm that sits atop the pedestal and the camera and head are mounted to the end of the boom, allowing for wheeled movement and camera height and angle changes all at the same time. In a pinch, a hospital wheelchair, a skateboard, a wheeled office chair or a blanket being pulled over the polished floor can act as an impromptu dolly as well. Currently, sliders (or mini-dollies) are very popular with moving small form-factor DSLR HD video cameras.
The basic job of the dolly is to smoothly transport the camera across short distances. You can follow or lead or move alongside a subject and record its movements across the film space. Slow movements can be less noticeable to an audience, but they can be more difficult to accomplish on set. The faster dolly movements help instill a dynamic energy or sense of urgency in the shot. Just as the pan and tilt had three components, so too does a dolly move have the static start frame, the camera dolly movement, and finally the static end frame.
Always use extra caution when performing dolly moves or whenever camera and camera operator may be in motion. Personal safety is always more important than getting a good shot.
Let us take a look at the two major movements of direction that can be accomplished with a dolly.
Crab
Much the same as a crab on the seashore walks sideways, a dolly can be pushed left or right parallel to the action being recorded. In this case, however, even though the dolly is physically moving parallel to the subjects, the camera is perpendicular to the action. Traditionally, during the crab dolly, the camera moves at the same pace as the walking talent.
Picture a man walking down the sidewalk of his urban neighborhood greeting the many people he encounters along the way. The camera and dolly would be set in the street and pushed along the street at the same pace as the actor as he progresses down the sidewalk. Parked cars may make up the foreground, the man and the neighbors would make up the middle ground, and the storefronts and stoops of the apartment buildings would make up the background. The man and the dolly both move in the same direction and have similar pacing (see Figure 6.6).

Figure 6.6 Although the crab dolly rides parallel to the action’s direction, the camera lens is most often aligned perpendicular to the movement.
Truck
If you need to push the camera into the set or in toward a subject being recorded, then you are “trucking in.” If you need to pull the camera out away from the set or the subject being recorded, then you are “trucking out.” These movements may also be referred to as tracking in and tracking out. This type of dolly move usually entails that the dolly and the camera are pointing in the same direction. The one axis glides deep into the set or out of the set in a straight line (Figure 6.7).
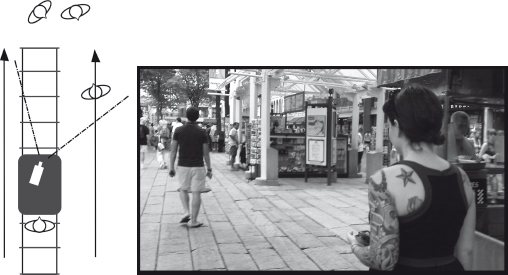
Figure 6.7 Overhead showing the dolly trucking in to the set along the tracks. The movement of the subject motivates the move in.
When done slowly, this achieves a barely noticeable change in shot type: a long shot becomes a medium shot and a medium shot ends as a close-up. This is a way to alter framing or shot type without having to perform a change in focal length or have the editor add a cut to the scene. You basically alter the framing and composition of the shot over space and time during the recording of the shot. Unlike a zoom, which alters magnification and perspective on objects, this movement appears much more natural to an audience member as the moving camera lens acts like our own visual system and maintains perspective on the changing field of view. When done slowly enough, the dolly movement is barely apparent to the consciousness of the viewer – things have just changed somehow but no one “saw” how. Some refer to this extremely slow dolly movement as a “creep.”
One can certainly combine several of these movements discussed so far in order to create a more complex shot that is sometimes called a developing shot. You could have talent move through a set as the camera dollies along the ground to follow the action and have the camera boom up the pedestal to alter the lens height during the shot. A focal length change could also be introduced during a developing shot. The movement of the dolly and the possible pan or tilt can help disguise the zoom factor as the focal length change occurs. These types of developing shot can be very difficult to execute, but they can show a lot of story action in one shot and be very visually interesting to the audience.
We have not really mentioned it during any of this discussion on movements, but it should be made apparent once more that focus is going to be a major concern of any filmmaker engaged in these sorts of movement shots. Camera-to-subject distances will change where focus falls on the set and it is the job of the camera assistant and camera operator to keep these consistent throughout the duration of the shot. This can become quite difficult and requires a great deal of preparation and organization on the part of both talent and crew. It is often best to run through the action for several rehearsals so that talent, camera operator, camera assistant, and dolly grip all understand what the timing of the shot is going to be like. The crew will use a measuring tape for camera-to-talent distances and set marks on the lens or follow focus wheel. These complex developing shots that involve talent movement, camera movement, focus changes, and possible focal length changes can eat up a lot of time on set, so be careful with your scheduling on that shoot day.
Steadicam
For the most part, dollies are limited in the direction of their movements (left, right, in, out, and sometimes around). Handheld camera work can be liberating but you constantly run the risks of bad framing, bad focus, and too much shaky movement (unless your story calls for such a visual treatment). Luckily, a device called the Steadicam was invented in the 1970s that allows a camera to be mounted to a spring arm that mounts onto a body harness that is worn by a walking camera operator. This clever device makes it possible for a camera to achieve dolly-like smoothness as it is maneuvered on foot – in essence “hand held.” Focal length and focus are controlled remotely by an assistant, but composition and movement are controlled by the operator wearing the vest harness. Because the camera is freed from having to follow dolly tracks, the Steadicam allows for rather long and intricate tracking shots where talent moves into and out of sets or locations, up or down stairways, and over rough terrain.
In the film industry marketplace, there are many similar devices available. They vary in complexity, size and expense, but they all balance a “handheld” camera for smooth moving shots.
Cranes and Such
Sometimes your motion picture project calls for a grand, sweeping shot of an exterior location. A camera at ground level, regardless of how wide your lens is, just cannot encompass as broad a section of your film space as you would like to see. This is where the use of cranes comes in. Just as large cranes allow construction equipment to work up high, cranes employed for film use allow the camera to work up high. There are many different types and sizes of cranes, but the general idea is to lift the camera (and sometimes the camera operator as well) up in the air over the set or location to achieve a very high angle view down on the action. Many crane-like devices called jibs also have the ability to “boom” the camera from ground level up to a higher elevation during the actual recording of the shot. This movement, although not a natural move, is fluid and graceful and can add visual power to a scene. Crane shots will help you show a lot of information from a high angle or even a direct overhead bird’s-eye view. You will often see crane or jib shots used as establishing shots to open a scene, or summation shots that close a scene.
- Blocking is the plan of movement for your talent around the set.
- Slow motion results from the use of higher frames per second than in normal recording of action. Fast motion results from fewer than normal fps.
- A handheld camera should serve a narrative purpose. Beware of shaky cam syndrome and questionable focus. Handheld is often used in news gathering and documentary.
- Horizontal pans and vertical tilts should ideally begin with a static start frame, move smoothly through the camera motion, and finish on a well-composed static end frame.
- The tripod is the best way to secure smooth, level, stable shots that will cut together.
- A wheeled dolly or a smaller slider, whether on tracks or just the floor, helps achieve smooth gliding camera shots in either crab mode or trucking mode.
- The Steadicam device combines the best qualities of smooth dolly work with the ease of movement of handheld photography.
- Cranes, booms, and jib arms help you get sweeping upward or downward moves that add large areas of information and a sense of grandeur to your shots.
Chapter Six – Exercises & Projects
- Practice panning/tilting with a handheld camera. Did you create a motivation for the camera movement?
- Shoot pan and/or tilt shots as part of a scene but do not have static frames at the beginning or end of the move. Edit the scene. Do the pans/tilts work without the static frames? Why or why not?
- If you do not have a dolly, improvise one out of a rolling chair or skateboard and record a short tracking shot that ends on a close-up of a subject. Recreate the same shot but do not move camera – zoom in to get the CU. Review the two shots and note any differences and similarities in the imagery.
- Practice recording a “crab” profile shot (either dolly or handheld) of a person walking slowly, and then once again walking quickly. Was it easy to keep pace with the moving talent? Were you able to maintain lead room, headroom, and focus?
- True or False?: “Blocking” refers to the focal length settings involved in a long zoom shot.
- What type of image creation is the term “overcranking” associated with? What is the basic concept behind it?
- List three advantages and three disadvantages to handheld camera operation.
- What are the three main components of performing a pan or tilt shot?
- How is tracking in on a dolly different from zooming in during a shot?
- Why does a tripod not have two legs or four legs?
- What does a Steadicam (or similar rig) offer that a traditional handheld camera cannot?