
What goes on inside a Macintosh
What you need for Final Cut Pro: the basic Firewire setup
What is necessary for a complete turnkey Final Cut Pro nonlinear editing station? That is a loaded question, and the answer depends primarily on what you want to do with it. But if what is wanted is a base-level editing station that captures, edits, and outputs lossless video through Firewire, then here is the bottom-line configuration that Final Cut Pro version 2.0 requires.
An Apple Macintosh Computer with a G3 or later processor and built-in Firewire ports, G4 recommended (Beige G3 models not supported) |
|
Macintosh Operating Software 9.1 or later (OSX not yet supported) |
|
Apple QuickTime Version 5 or later |
|
192 megabytes of RAM or more (256 megabytes is highly recommended) |
|
Two or more physical hard disk drives |
|
A Firewire DV device, such as a DV deck or camera or DV converter |
|
The Apple Final Cut Pro software. |
The reader will notice that the words, “or later” recur constantly in the list. This is because, like many applications, Final Cut Pro can function under different versions of the OS or QuickTime and with a huge variety of hardware. The Apple Macintosh is a very adaptable machine that you can customize to suit your needs. When the time comes to upgrade or change your system configuration, you will find that it is much easier and less expensive to do so than to purchase a whole new configuration. Macs last forever. The preceding list gives the minimum requirements.
Welcome to the Macintosh
The Final Cut Pro nonlinear editing station is composed of four principal areas:
1 |
The Macintosh computer and hardware |
2 |
The Macintosh Operating Software (OS) |
3 |
|
4 |
The external DV device. |
Each of these parts has to work together correctly for editing to take place. Although advances in software and hardware development have made much of this configuration transparent, there are still tweaks that you can make for best results.
Final Cut Pro likes its tummy scratched in certain ways that will seem strange or onerous to users with prior experience in other nonlinear editing applications, such as Avid and Media 100. Those systems operate from a hardware and software configuration that is totally closed and proprietary. If you purchase a Media 100, the hardware card that is included with the system is linked directly with its software component and as such is enabled behind the scenes for the tasks it must complete. The result is that you simply start the application and begin editing.
If that sounds great and convenient, it is. But the trade-off is that such a closed system is more expensive in the short term and arguably more limited in the long run. The system you get from Media 100 will work only with its own software and hardware components. This limits users to continually opting for the solutions that Media 100 produces for upgrade or expansion. The Apple Final Cut Pro solution, however, is unlimited in this respect, allowing users to configure their own systems in whichever direction is suitable for their purposes. As new hardware and software options are developed by the teeming third-party industry, the users’ options increase many-fold, and Final Cut Pro begins to reveal itself as a wise investment.
This concept is referred to as “hardware-independent.” In other words, the Final Cut Pro software and interface can be applied to many different hardware configurations without limitation as to either the hardware or the actual video format itself. Although the hardware requirements must be met, Final Cut Pro will work with similar ease and efficiency whether editing simple Firewire-generated DV media or the super-professional HDTV sources that are just now appearing. After investing in the necessary hardware, users will be able to employ the same low-priced application they are using currently to edit the most up-to-date media that exists now or will come in the future.
A discussion of all the hardware configurations that are possible with the Final Cut Pro editing station would extend far beyond the scope of this book. New solutions are being developed and released on a daily basis, and by the time you read this, new ones that the author could not possibly predict are likely to have hit the market. Such is the nature of the world of technology.
Still, Firewire DV editing with Final Cut Pro is here to stay. The format of DV and Firewire is one that will remain constant for quite some time, so we can focus on its major features to determine the best way to arrange and configure the hardware and software. Let’s take the system apart and look at what is involved in the Macintosh’s hardware.
The first item, the Macintosh computer, is obviously necessary. A G3 processor or better and Firewire ports are necessary for Final Cut Pro to function correctly. Apple’s current Macintosh models sport Altivec-enhanced G4 processors, which are more than fast enough for Final Cut Pro. But a G3 Blue and White Macintosh from yesteryear will function satisfactorily, if somewhat more slowly in more processor-intensive functions like rendering.
Earlier machines with G3-upgrades and the short production run of the Beige G3 Macintosh are not supported by Apple for Final Cut Pro 2.0. Although enterprising hackers will no doubt come up with a way to get them to work, this is not the path for the inexperienced. The recommendation is to invest in a system that is already completely functional.
The four primary areas of the Apple Macintosh
The neatly arranged insides of your Apple Macintosh computer are composed of four major areas: (1) the processor/motherboard, (2) the Macintosh Operating Software (Mac OS), (3) the storage (RAM and hard drives) and (4) the input/output buses (AGP, PCI, Firewire, etc.). Although this description is vastly oversimplified, it is the most general blueprint of the computer. The interaction of these parts results in a working computer capable of running Final Cut Pro.
Although most of the items to be discussed are built into the motherboard and the computer cannot be purchased without them, it really helps to understand how the whole package works together so that you can make more intelligent decisions about your system when the time comes to add new components or troubleshoot existing ones. Although you can sometimes dodge a requirement and still run Final Cut Pro, the requirements are there for a reason, and eventually you may run into behavior that could have been avoided if you started with a machine that fully matches the recommended specifications.
If all of this tech talk seems a little overbearing, relax and just absorb as much as you can. You do not have to be a computer technician to edit with Final Cut Pro, nor should you trade your precious editing time and skills for a fixation on hardware and software issues. But it will make your life easier in the event that problems do crop up to know exactly what everything does, where it goes, and so forth. If you can’t get through this discussion, just make sure that your system has the necessary hardware and software requirements and skip on up to the project setup chapter.
The processor and the motherboard of the Macintosh Minitower
The processor located on the Macintosh’s motherboard (all of that circuit board material inside the Macintosh) can be defined as the brain of the computer. It receives instructions from the Macintosh Operating Software and acquires data resources from input/output buses. As one would expect, the processor must be very fast and efficient to perform all of this at once. Indeed, your Macintosh needs to have a G3 Power PC processor or faster in order to be certified to run Final Cut Pro.
The discussion in this section will assume that the user is working with a Macintosh Desktop Minitower model. Although Final Cut Pro can easily work with properly configured PowerBook laptop and iMac mini-desktop units, the vast majority of editors are likely to be using the Minitower. If you intend to work with a model other than the Minitower, the system requirements are still in effect, and there may be other issues to address, such as hard drive options and RAM. Make sure that you take such issues into account before purchasing a machine that may end up costing you more in the long run.
The Macintosh Minitower is the flagship of Apple’s Macintosh line and always sports the latest in Apple’s processor development. If you’re shopping for a Macintosh from a vendor other than Apple, make sure you know which processor you are purchasing. It is not unusual for one year’s model of Power Macintosh to go through three or more major hardware revisions. A machine may have the same processor and the same shell cover, but a different motherboard and faster bus system. As with everything else, a great deal is usually too good to be true. Make sure you get the complete information about the machine that you intend to buy. Do not accept general descriptions. Although an older machine may be fine, you don’t want to pay new prices for a machine that is a year old.
The Minitower is also the most easily and thoroughly upgradeable in all respects. Adding new drives, more RAM, and new devices is almost too easy, and there is far more interior space to do so than with any other Macintosh. Any new improvements to the Power PC processor will be included immediately in the Minitower, while for various reasons it may not show up in iMacs, PowerBooks, or iBooks for generations.
Of course, the Minitower is more than a name, it is a descriptive term. This is not a portable computer. It is built to be a stationary workstation that is permanently part of an integrated solution accommodating the hundreds of accessory devices developed for use with it. It weighs in at a good thirty pounds and has a side latch for uncommon ease of access to its interior.
The Macintosh Minitower is currently configured with several different motherboards sporting dual processors and varying speeds of single-processor units. All the different configurations are suitable for use with Final Cut Pro, and your choice of configuration should mirror what you intend to use it for. Dual-processor models may offer vast speed increases in the future depending on software developments, but the present cost of this feature may not be worth it if you do not intend to do effects work that requires rendering. Dual processors can really make a difference in rendering speeds, but they can also make a real difference in the wallet, especially when rendering isn’t a burning issue.
Inside the Minitower, you will find room for four extra hard drives in addition to the stock hard drive that the Macintosh ships with. Adding new drives is a snap with the Minitower and takes less than a minute. The standard Macintosh includes two ATA drive buses that can contain a total of two devices each. The upper ATA bus contains the DVD player and an optional Iomega Zip drive. The lower ATA bus contains at least one stock ATA hard drive—the startup drive that ships with your Mac—and can easily take another. The other empty drive bays can be utilized if you invest in an inexpensive expansion card that allows for the inclusion of more hard drive and other devices.
If you order a Power Macintosh with the SCSI option instead of the ATA drives, the system will come with a SCSI card installed in one of the PCI expansion slots described later in this chapter. This is a slightly more expensive option but is completely acceptable and may be a better way to construct your system with a view toward future expansion.
There are either three or four RAM slots, depending on the model, allowing easy installation of additional RAM chips. Your system will come with a certain amount of RAM preinstalled, but you can easily upgrade the RAM to a gigabyte and a half (1,500 megabytes of RAM). How much RAM you should have installed and why will be addressed shortly in the discussion of storage.
Also located on the motherboard are the various input/output buses. They are the pathways from the processor to the rest of the computer’s parts through which data is brought in or sent out. The largest of these are the PCI expansion slots and accelerated graphics port. Your Macintosh will arrive with one stock video card in an AGP slot, which is dedicated to your computer monitor. The PCI expansion slots are for adding additional components such as extra video cards for multiple monitor support, SCSI cards for inclusion of SCSI devices, and beyond this just about anything else you can imagine.
In addition to these PCI and AGP buses and located on the outside and to the rear of the Minitower are the remaining input/output buses. Standard buses on the Macintosh are the Firewire ports, universal serial bus (USB) ports, an Ethernet connection, a modem connection, and a speaker jack. In addition to the Firewire connectors on the exterior of the Minitower, another Firewire connector is included directly on the interior of the motherboard for Firewire devices you may want to install inside the Macintosh.
The Macintosh Operating Software (Mac OS)
If the processor can be referred to as the brains of the Macintosh, then the operating software could be called the mind. The Mac OS (logo shown in Figure 2-1) is the complicated set of files and folders that directs all the powerful hardware and makes it available for use to applications like Final Cut Pro. Visitors from the world of Windows may be confused by the seemingly eccentric order of the Macintosh system, but often this is because it is so incredibly straightforward.
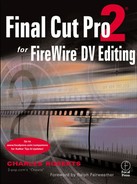
The desktop metaphor and the System Folder
The Macintosh OS is organized using the visual metaphor of the physical desktop (Figure 2-2). It keeps its components stored as files that live in folders stored on drives or partitions, which are simply sections of a physical drive that act like a separate physical drive. You can easily divide a single physical hard drive up into many logical partitions, which the Mac OS will regard as different drives, but which in reality occupy only a specific locked-off area of the same drive. Although this can be useful for setting up different work scenarios as will be discussed later, this does not release the user from the requirement of having two separate physical hard drives for use with Final Cut Pro.
![]()
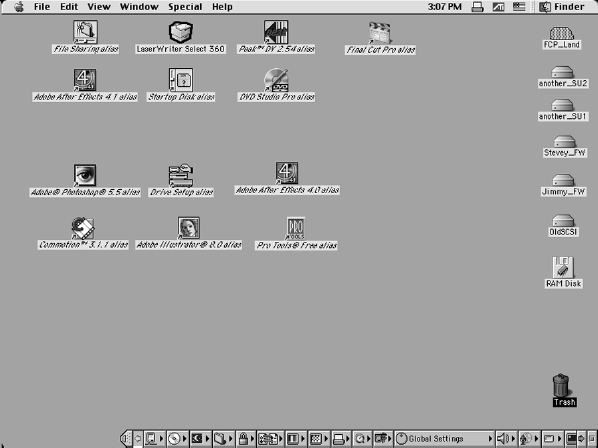
In the Desktop metaphor, every drive or partition acts like a separate desktop/file cabinet with its files and folders stored inside (Figure 2-3). It’s like having a lot of filing cabinets in your office. You can have items pulled out of the filing cabinets onto your desktop, but they are still organized and are really regarded as belonging in a proper location in one of the filing cabinets.
At least one of these drives or partitions must contain a System Folder. The System Folder is the folder that contains all the software that runs the Macintosh and is necessary to start up the Macintosh itself. We call a drive or partition that has a complete System Folder “bootable” or a boot partition, because you can actually “boot” the Macintosh using that drive or partition. You can have more than one bootable drive or partition on your Macintosh at a time. Simply installing a functional System Folder on a drive or partition makes it possible to boot up from that drive or partition.
This is one flexibility of the Mac OS that is dearly loved by Mac aficionados. It is incredibly easy to set up different boot drives or partitions based on what you want to do. As we will see, sometimes system components that are required for Final Cut Pro or other nonlinear editors do not interact well with other applications such as word processors or Internet applications. So instead of buying a second computer for that, the user can simply set up a different boot partition for each task: one for the editor and one for the word processor. All you have to do to switch between one and the other is to select the partition you want to work from as the boot partition and restart the Macintosh. It is very easy to configure your system to do this and you will find it a very efficient way of working.
One thing that often confuses new users about the Mac OS is the Desktop system and the Finder. The Desktop is essentially what you see on the screen while the Mac is running. The Finder is an application that is always running in the background and allows you to navigate through the Desktop to find and work with the files and folders you want. The Finder never shuts down, and when you are running an application and not using the Desktop, the Finder simply hides in the background until you use it again.
The Finder is a part of the active System Folder though, and this is where people get easily confused. Each drive or partition actually has its own Desktop folder (this is what allows us to install a System Folder on any drive and make it bootable; without a Desktop, how could you see what you are doing?). Whichever drive or partition is the present boot partition and thus has the active System Folder is also the current Desktop and Finder you are working with.
The Desktop itself is actually a hidden folder (not really hidden because you are staring at it the whole time you are working) and you can save things there. When you save to the Desktop, you are actually saving a file into the hidden folder that always displays its contents on the Desktop. New Mac users are often confused by seemingly odd behavior when saving to the Desktop. Every drive or partition has its own Desktop folder, and these Desktop folders are always all visible at once. However, when you save a file to the “Desktop” in an application’s dialog box, it is saved only in the Desktop folder of the drive that has the active System Folder, the current boot drive or partition.
You could save something to this one Desktop folder, and then reboot to another partition. The file will still show up on the Desktop, because you are always looking at all the Desktops for all the drives and partitions at once. But you will have saved the file to a different drive than it appears. Just because you can see a file on the Desktop of your Macintosh doesn’t mean that it lives in the Desktop of the current boot drive. You can check the actual drive location of a file or folder at any time by selecting the file or folder, then going to the File drop down menu and selecting Get Info. The window that pops up will give the exact directory location of the file and many other details about it.
Although this may seem slightly confusing, it is because the system is so transparent. If you are completely unfamiliar with the Mac OS, you are encouraged to find a book specifically on the subject. We will only go through the most important components here, and you should really become as knowledgeable about your system as possible. The Macintosh OS is filled with little-known tricks and treats that can speed up your workflow immensely, but you’ll never see most of them without someone pointing them out.
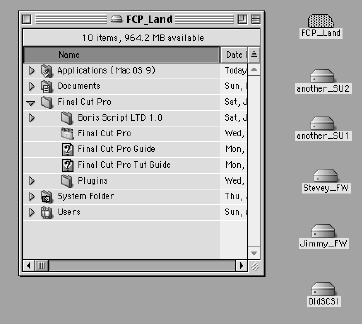
The System Folder of your Mac OS is composed of files and folders, most of which are constantly working in the background to keep the system running smoothly. Very little needs to be done to keep it running, but there are a few folders that you will probably be accessing periodically to provide regular maintenance or to tweak and upgrade. These components will become familiar as you access them more. One of the fantastic things about the Mac OS and the Apple Macintosh system in general is that it is really infinitely customizable. Rather than call Technical Support when something goes wrong, you simply look under the hood for the probable culprit based on troubleshooting rules-of-thumb and the body of knowledge of the large community using the Mac OS and Final Cut Pro in particular.
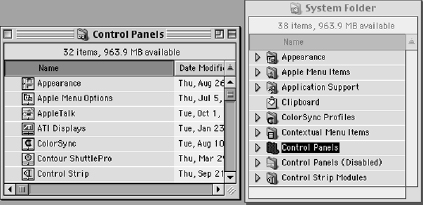
If you open the System Folder, you will see many files and folders (Figure 2-4). Let’s go through the ones most important to your Final Cut Pro system. The really critical components are the Control Panels, the Extensions, and the Preferences. These are the components that really drive your system and make Final Cut Pro and the hardware do its job. These are also the ones that are most likely to get out of hand and are on the first line of a troubleshooter’s defense when the Macintosh’s behavior goes south.
The Control Panels
Control Panels are a group of applications that allow you to configure your hardware and software directly (Figure 2-5). Unlike other computer operating systems, the Macintosh OS actually allows you to directly access the hardware of the Mac. When you want to bring audio in from the built-in audio card, you simply turn it on. You don’t have to tell each part of the computer where the other part is. This is why you will find that the Macintosh is unusually “plug-n-play” friendly. If you want to install a piece of hardware, you simply connect it and possibly install a software driver. You don’t have to tell the system where it is; at most you simply have to tell the system how you want to use it.
The Control Panels are the tools that allow you to do this. Some are parts of the Mac OS itself, such as the Startup Disk Control Panel mentioned earlier that allows you to choose which drive or partition to boot from at the next restart of the Macintosh. Others are third-party programs that allow you to customize whichever items they are related to, such as a setup panel for a graphics tablet or the like.
The important thing to remember here is that Control Panels are small applications you run periodically if you need to change something in your system. They are usually linked to another application or piece of hardware, and that item may not work correctly if the proper Control Panel is not installed in the Control Panel folder of the active System Folder. Sometimes your Macintosh may need to be rebooted for a change in a Control Panel to take effect, especially if the change affects hardware components like RAM or your hard drives.
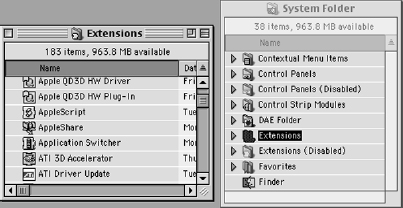
The Extensions
The Extensions folder contains files that act as drivers for hardware and software on your Macintosh (Figure 2-6). The Extensions folder is probably the single most important folder in your System Folder, because it contains the small driver files that actually enable everything else to work. Some of these have names that are fairly obvious, like “QuickTime Firewire DV Enabler.” Others have completely unintelligible names that are strings of letters and numbers like “IrDALib.” It is not necessary for you to understand the function of each extension in your folder, but it is imperative that you keep track of them and be aware of what extensions get installed and into which System Folder they get installed.
Unlike Control Panels, extensions are not applications per se. They are simply library files that hardware or software items may need to access periodically to function correctly. If your extensions are functioning properly and getting along with each other, you may never have to bother with them at all. In fact, if you try and engage an extension by double-clicking on it as you would a Control Panel, you will be greeted by a polite message stating that the file is an extension and that to be used, it must live in the Extensions folder. Then it asks, “Would you like me to put it there?”
The Control Panels and extensions are part of a group of files called inits. When your Mac is booting up, it loads these files into RAM before anything else. This is important, because most of these inits are actually drivers for hardware and software items you may have installed on your Mac. When your Mac loads these inits into RAM at startup, they stay accessible to the hardware and software all the time, regardless of what you are currently doing. Unlike applications such as Final Cut Pro, which you must open to run, inits are always running invisibly so that if the system needs to use them they will be ready. Most inits must be loaded into RAM at start up to be accessible in this way, thus the origin of the word init, or initial.
A problem that can crop up with inits is “extension conflict.” Sometimes when you install software, inits may also be installed into either the Extension folder or the Control Panels folder. Unfortunately, sometimes these inits were designed to load into the same address in the RAM that other inits are told to load into. This can result in lockups and crashing and it may even prevent your system from completely booting to begin with. This becomes more likely with third-party products, which don’t necessarily know that they may conflict with other third-party inits. The more third-party items you have on your system, the greater the likelihood that this could occur.
There is no absolute way of eliminating the possibility and there is no way of ever creating the perfect extension set that doesn’t have conflicts. That’s why there are no “magic bullet” lists of the way your extension set should work, short of the original base set that the Mac OS installs. There are ways of troubleshooting and eliminating such problems as they occur. You can be sure that if you experience odd problems soon after installing software or hardware, there may be a conflict somewhere. When you install any software, you should always take a moment to glance through and see if any new extensions were installed so that you can isolate any problems that occur. There is a large community of Macintosh users out there using very similar tools, and any problems such as this are discovered and rooted out quickly. The best strategy is to keep track of your inits and keep your eyes open to Web sites devoted to uncovering such lore.
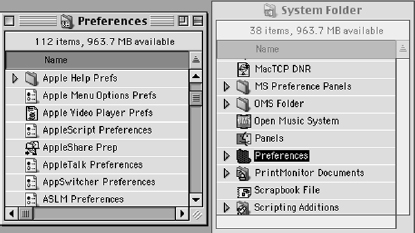
The Preferences
The third category of system files that you should know about is the Preferences folder (Figure 2-7). Every application on your Macintosh has special settings that allow you to customize things like the workspace, functionality, etc. Whenever you start an application, it looks in the Preferences folder in the System Folder for a Preferences file for that application. When it finds the file, it opens the application based on the preferences laid out in that file. If there is no Preferences file for the application, it creates a new one from scratch based on the original default preferences from the initial software installation.
The reason you should know about preferences is that such files are often very old files. Since they are constantly being updated and saved, they are the files most likely to become corrupt. They are accessed and altered not only every time you start an application but frequently during your work. Corrupt preferences are also the most difficult element to find if they cause a problem because they rarely break completely. Instead, a corrupt Preference file can merely exhibit strange behavior that resembles any number of other problems.
Even so, rooting out corrupt preferences is one of the first lines of defense in troubleshooting because it is one of the easiest things to eliminate as a problem. If you remove an application’s preferences file from the Preferences folder and restart the application, the application will simply create a new preference file from scratch. If that was the problem, presto—the problem is fixed. If not, you have only wasted five seconds of troubleshooting. Be prepared to reset your preferences with the application though, which can even include needing to reserialize (i.e., to enter the serial number again), since those are sometimes among the contents of the file you are throwing out.
These three file types are the most frequently accessed features in the Mac OS. As you set up and use your editor, it will behoove you to get familiar with and keep tabs on each folder. For simpler purposes using only Final Cut Pro and a few third-party hardware and software items, the preinstalled Mac OS set of inits and preferences will be perfect. On the other hand, beware of becoming too careful and weeding away too much in the search for the perfect extension set. Sometimes, one extension that is obviously necessary may need data from an extension that is less obviously necessary. You don’t want to go eliminating problems that don’t exist yet.
Data storage: RAM and hard drives
There are two different categories of storage on your Macintosh: volatile and nonvolatile. Volatile refers to memory that is lost when your Macintosh is powered down. When you shut down your Macintosh, whatever was stored in volatile storage is lost, but whatever was stored in nonvolatile storage is saved until you reboot the computer. RAM, or random access memory is volatile storage. Physical hard drives of whatever flavor are nonvolatile storage. Each has its place and function.
RAM
RAM chips are integrated circuit chips that hold electrical charges while the machine is powered up. RAM is incredibly fast, which is why the active parts of the System Folder (e.g., the inits and the system itself) load up into and run from RAM at start up. RAM is also the storage space where applications live and perform their functions while you are running them. When you quit an application, it gives up the space it was using in RAM, making that space available for other uses. You can have only as many applications running as you have RAM to support.
Typically, Macs ship stocked with either 128 megabytes or 256 megabytes of RAM installed, but you can easily install up to 1,500 megabytes, depending on which model of Mac you own. RAM chips are sold in sticks of 64, 128, 256, and 512 megabytes. Since you have only three or four RAM slots, it behooves you to purchase larger sticks so that in future years you may add more as you need them. If you have four 64-megabytes sticks, you will have to throw away 64 megabytes in order to add more RAM.
Obviously, more RAM is better than less; you can’t have too much RAM. The average System Folder running Mac OS 9.1 uses anywhere from 60 to 75 megabytes of RAM just for itself. If you had only 128 megabytes installed on your system and you were running Mac OS 9.1, there would not be enough left to run Final Cut Pro 2.0, which requires a minimum of 100 megabytes of RAM and really should have more.
Your applications load up into and run from RAM. How much RAM they use depends on two things: (1) the minimum allowable RAM, which is how much RAM the programmer determined that the application requires for normal operation, often just enough to actually open it but not enough to work effectively; and (2) your user settings for the application, which you set by determining how much RAM you can allocate based on how much physical RAM you have installed and how much is left after the system makes its demands.
There is a feature included with the Mac OS Memory Control Panel called virtual memory which you can, and generally should, keep turned off. This feature also exists on the PC platform, although it cannot be disabled there. In the Mac OS, what virtual memory does is simulate the existence of more RAM in your system by using a hard drive as if it were RAM. Using virtual memory from a ten-gigabyte hard drive provides a nearly unlimited amount of RAM. Instead of writing information into the super-fast RAM chip, it writes to a locked-off section of a hard drive.
Why is this a bad idea? As we mentioned earlier, RAM is very fast storage. The processor on the motherboard can access it at nearly instantaneous speeds. But your processor can work only as quickly as it is provided data, so the Macintosh is as slow as the slowest link in the chain. If the processor is receiving data from bona fide RAM chips, your Mac will work at its fastest. If, on the other hand, you are using virtual memory, your processor will receive information only at the dramatically lower speed of the hard drive. The average data rate of a RAM chip is in the neighborhood of 90 megabytes per second. In contrast, the stock hard drive on your Macintosh might keep a sustained data rate of 6–10 megabytes per second at best.
The importance of using real RAM in processor-intensive applications like nonlinear editors should be obvious. Use of virtual memory is highly discouraged in most situations, and it should never be enabled when running Final Cut Pro or any other video or audio application. You will also find that other applications work unbearably slow when it is engaged. Take advantage of the rock-bottom prices on RAM and settle the situation correctly.
Hard drives
In the category of nonvolatile storage, we have the large and sometimes confusing range of hard disk–based drive solutions. As nonvolatile storage, disk-based storage is capable of retaining data saved to it when powered down. Unlike RAM, which is functional only when receiving power in the computer’s motherboard, the disk drive is its own physical magnetic medium. When you write information to it, that information is stored as magnetic data and will remain intact when the unit is shut down.
How the computer accesses that data on the drive is what spawns the bewildering diversity of disk-based storage solutions. There are solutions that are appropriate for only one specific purpose, and there are good all-around solutions that function well under many circumstances. Since prices of hard drives can run the gamut from very inexpensive to ruinously expensive, it is important to understand what standards are necessary for Firewire DV editing with Final Cut Pro so that one get the best deal available.
The two most important criteria with which to judge a disk drive are its storage size and its sustained data rate. Your own particular needs with regard to the first issue, the storage capacity, can be determined by reconsidering the data rates we looked at in the preceding section of the book. We know that the data rate of the Apple DV codec we will be using is around 3.6 megabytes per second, which gives us a storage need of roughly five minutes per gigabyte, or 1,000 megabytes, of drive storage (3.6mbs/seconds × 60 seconds × 5 minutes = 1,080 megabytes). Thus a 20-gigabyte drive will hold just under one hundred minutes of DV codec video. If one were using a digitizing card that offered lower compression and higher data rates, that number could shrink to two minutes to the gigabyte, or only forty minutes to a 20-gigabyte drive. The need for large drives should be abundantly obvious.
The second criterion to be evaluated is that of sustained data rates. As we will see, there are a number of different ways for a drive to transfer data back and forth between itself and the motherboard. These differing methods produce limitations on how fast a drive can deliver or accept data. No matter how fast the drive itself is, it can function only as quickly as the interface with the motherboard of the computer. The sustained data rate of a drive depends not only on the drive’s internal capabilities, but on the standard bus it uses to communicate with the processor/motherboard. First, we’ll look at the types of drive solutions by location, (removable, internal, and external) and then by standard. The major standards appropriate for Final Cut Pro Firewire DV editing are ATA and SCSI, as well as the popular variation of the Firewire drive.
Types of drive by location: removable disk
The first category of hard drives is that of removable disks. The lower-end scale of removable disk drives involves smaller and slower disk types such as the 3.5" floppy and the Iomega Zip disk. These disk types are valuable primarily for their ability to move small amounts of data quickly. With a limit of 250 megabytes of storage and a very slow data transfer rate of around 1.5 megabytes/second, the Iomega Zip disk is clearly not acceptable for use in the capture, playback, and storage of DV footage. Its use is generally limited to saving documents and other smaller relevant files.
Types of drive by location: the internal drive
The next category of hard drive solutions is that of internal drives. The stock hard drive that came as the startup drive for your Macintosh is just such an internal drive. Internal drives may be of either ATA or SCSI, the two major standards we will describe, and their only real limitation is the amount of space inside your Macintosh. There is room on the inside of your Macintosh to add four additional hard drives. Internal drives, sometimes also referred to as “bare,” are the least expensive drive solution, as they require only a connection cable, a few screws, and a power supply cable. They do require a little work on the user’s part, though, as they must be manually installed. This installation is really quite simple, however, particularly with the new Macintosh body design.
The two major drawbacks to filling your Macintosh with internal hard drives are portability and heat. Because you are actually seating the hard drive in the Macintosh’s belly, you are can’t easily move it to another Macintosh should you need to do so. Installation and removal are easy, but not that easy. An internal drive is to be considered a fairly permanent item in the Macintosh.
The second drawback is heat. The inside of the Macintosh gets very hot, much hotter than you think. The more items you have installed in it, the hotter it runs, taxing the single cooling fan built in to the system. Overheating systems can exhibit strange behavior or simply melt down completely. Although the built-in fan should keep your internals cool enough, be aware that filling the Macintosh up to the brim and then running it in a 90º Fahrenheit room may cause problems.
Types of drive by location: the external drive
An external drive is simply an internal drive that has been prepackaged in a resilient casing with an input/output interface based on whichever standard it uses. One simply pulls it out of the box and connects it to the Macintosh with no muss or fuss. Of course, the user pays for this ease in price. Expect to see the price for the same amount of storage to double for an external drive solution. The 20-gigabyte internal drive that costs $100 can easily fetch $200 or more once a manufacturer has installed it in an external case for you.
Why choose an external drive rather than an internal? There actually are some benefits to using an external drive that may be less than obvious. As stated before, there is a limit to the number of internals one can fit in the Macintosh. For externals, there is only the limit of your storage standard, and if that is nearly unlimited, so to will be the number of possible drives. Although the ATA drive standard does not exist as an external option, both SCSI and Firewire external drives are in heavy use as external solutions. A Macintosh can technically accept up to 63 Firewire drives at the same time. The larder knows no limit.
External drives are obviously spared the heat issue that can affect congregating a large number of internals inside the Macintosh. Although an external drive also needs cooling resources, generally the casings are designed so that a fan is not necessary, or one is included.
External hard drives also may be considerably more convenient in terms of mobility. Although no hard drive is designed to withstand the heavy shocks of being moved around constantly, it can be done much more easily than doing so with an internal. Moving an external hard drive to another system is as simple as disconnecting then reconnecting a cable. Moving an internal drive will require some surgery, regardless of how simple that surgery can be.
Types of drive by standard: ATA, IDE, or EIDE
There are four primary standards of connectivity with your Macintosh, each of which can be used for communication with drives. These are the input/output buses that will be described in the next section. But since each of these buses determines the standard for the drive we connect through it, it is necessary to look briefly at them. The four, in order of popular usage, are ATA, SCSI, Firewire, and USB.
Each of these standards simply does one thing; it transfers data at a maximum speed or data rate. The drive at the end of this connectivity is limited in its data rate by the actual limitations of the standard. Each standard therefore determines the limitations of our drive choice in terms of maximum data rates. No drive or set of drives ever reaches the limits of its specifications, but some come very close. Our job is to look at what we need for Firewire DV editing with Final Cut Pro and see how far we can make our money stretch.
The first and most popular standard is ATA, also known as IDE or EIDE. This is the most inexpensive drive solution on the market, offering enormous amounts of drive space for the lowest prices. As standards go, ATA is the best deal on the market, and, with some reservations, it is a very suitable drive standard for Firewire DV editing.
The ATA drive interface does, of course, have some limitations that are a reflection of the bargain prices per gigabyte of storage. The first and most serious limitation is that the cables that connect ATA devices must be shorter than 14 inches. This means that there are no external ATA drive solutions. If all ATA drives must be internal, then there is a practical limit to the number of ATA drives one can have in one’s system.
ATA drives are further limited by the fact that the standard ATA bus can hold only two devices. As we will see in the chapter on buses, this implies further expense inasmuch as expansion cards are required to expand the number of ATA buses and drives.
Although the specifications for ATA data rates changes with the technology on an almost daily basis, generally speaking, the sustained data rate for an ATA individual drive (given the many different possible variations among drives, Macintosh units, and fragmentation) tops out at around 16 megabytes per second. Since the data rates required for Firewire DV editing are around 3.6 megabytes per second, the ATA standard is well within the range of suitability for use with Final Cut Pro. The low cost and acceptable data rates make the ATA drive a logical choice for most Firewire DV editors.
Types of drive by standard: SCSI
The next popular standard of connectivity for storage is SCSI, which stands for Small Computer Systems Interface. SCSI is a very old standard that has gone through many phases and contains several different levels of data rate and access. A few generations back in the history of the Macintosh, the SCSI interface was the standard for connection with drives of all kinds and came built into the Macintosh’s motherboard.
These days, the cost-effectiveness of the ATA standard has eliminated most of the lower-end usage of the SCSI standard. But SCSI has remained in higher-end applications, where its flexibility stands superior to ATA in every way. The SCSI chain is a very wise investment consideration where future expansion will make necessary the ability to adapt to new and more demanding technology.
The acceptable SCSI cable lengths, while still limited to a certain length, are far longer than those of ATA. This means that external drive solutions are possible. In addition, the main SCSI standard allows up to 14 possible devices on a single SCSI bus, as compared with two devices for the ATA bus. And most SCSI cards allow for internal as well as external drives to be used simultaneously, provided that the data rates for each will be limited to the slowest data rate on either side. Add this to the incredible speeds that SCSI card and drive manufacturers currently boast and you have a very impressive standard for connectivity. Depending on the card, SCSI card type, drives, and formatting software system, data rates of 160 megabytes per second are possible.
The catch of course is the price. Even bare internal SCSI drives can cost up to three times as much as a comparable ATA drive. And since the Macintosh does not carry a built-in SCSI bus on its motherboard as it does an ATA bus, a SCSI card must be figured into the price of the system, further driving up the cost of the storage solution. The cost of a 60-gigabyte solution using the SCSI interface could easily amount to $1,500, whereas a sixty-gigabyte ATA drive could be had for around $300. Of course, the savings would appear later, because the SCSI interface easily accepts more and faster-configured drives, internal and external, whereas the ATA bus is completely filled.
SCSI prices tend to fluctuate less and remain at a premium, partially because of their popularity in higher-end solutions and partially because of their special flexibility in terms of expansion and configuration. ATA drives continue to plunge as each new development in drive technology nudges up the data rates and storage capacity of the individual ATA drive. Whether or not SCSI or ATA is a better solution depends on your long-range plans, but ATA is generally the drive of choice for Firewire DV editors, while SCSI is the system of choice for higher-end production stations for which flexibility and the ability to handle extreme data rates are basic requirements.
Types of drive by standard: Firewire
Special mention must be made of an external solution that exists in the Macintosh market today, that of Firewire drives. Although we have discussed Firewire as a system of transferring digital video and audio, the Firewire connectivity is really simply a data transfer system that is fundamentally similar in function to ATA and SCSI. Although radically different in design, the standard is simply a specification of a rate for transferring data between one end of a cable and the other.
Firewire has a specified data rate ceiling of 400 megabits per second. Since there are 8 bits per byte, this delivers a maximum possible data rate of 50 megabytes per second. Of course in practice, this is far higher than the actual possible rates achievable with the present hardware available to use with the Firewire interface. It is only a specification that is used to determine the limits of that particular standard.
High data rates are not the only bonus conferred by the Firewire interface standard. Firewire shares and expands the connectivity gains inherent in the SCSI standard and allows for long cable lengths, enabling it as an external solution. Devices can be daisy-chained, allowing up to 63 possible devices on the Firewire bus. As a bonus, Firewire connectivity confers the ability to hot-plug Firewire devices. Hot-plugging means the user can disconnect a device while the computer is still running, something disastrous for either ATA or SCSI devices. Further still, Firewire is capable of carrying “bus-power,” which means that it can deliver the electrical current to run a device that would ordinarily have required a wall socket.
In reality, there is no such thing as a “Firewire drive.” Firewire drives are basically external drive boxes containing an ATA drive and a bridge that converts the ATA data to and from Firewire data. Thus, the cost of the Firewire drive is determined by the low price of the ATA drive, the increasingly low price of the ATA-Firewire conversion bridge, and the box that holds it all together. There are several do-it-yourself kits on the market that allow you to purchase and install your own internal drive for use in a Firewire case. Just remember that the drive you install in the case is the weakest link in the chain, and that you shouldn’t depend on a drive that you wouldn’t want as an internal unit. A slow drive in a fast Firewire chain equals a slow Firewire drive.Given the benefits of using the Firewire interface for storage, one might wonder why anyone would use anything else for DV editing. The convenience, portability, and rich feature set of Firewire drives make them very attractive, and their reliance on very inexpensive drives makes them a cost-effective solution.
Types of drive by standard: USB
The final standard for connectivity in data transfer is that of the universal serial bus (USB). USB delivers a very low standard data rate that does not exceed 1.5 megabytes per second. While this data rate is acceptable for less-intensive applications such as floppy disks and the Iomega Zip drive, it is far below what is needed for editing with the DV codec and Final Cut Pro. The USB standard is not recommended for editing purposes, although it has its uses elsewhere in the Macintosh system as we will see in the discussion of input and output buses.
The Input and Output Buses
The input and output buses of the Macintosh constitute the way in which it receives and delivers data to and from the outside world and other parts of the Macintosh. There are several such buses, and each one is dedicated to a specific task depending on its specification. The primary input/output buses are: the AGP, the PCI, the ATA, the SCSI, the Firewire, and the USB buses. In addition to these, there are other specialized input and output ports (e.g., the Ethernet, the Internet modem, and the external speaker).
The accelerated graphics port
The accelerated graphics port (AGP) is a dedicated expansion slot on the motherboard of the Macintosh. It is a very high-speed interface that is designed to communicate with the primary graphics card controlling the computer monitor you use with your Macintosh. The Macintosh comes standard with one such video card in the AGP slot. The AGP card is also the engine that drives the high-intensity graphics requisite for the proper functioning of Final Cut Pro and other applications.
The AGP port is a relatively new feature of the Macintosh, and it is possible that users with an older Macintosh G3 and some G4s will not have an AGP port or card. This is no cause for alarm; the AGP is not required for Final Cut Pro to function correctly, although it may deliver improved performance. Some expansion cards that add real-time or multiple monitor support through one expansion card may require an AGP slot, giving an added benefit to its presence on the motherboard. It should be noted that many video cards are not AGP cards and that such cards will not fit in the AGP slot. Attempts to do so will damage the card, the motherboard, or both. Make sure you are buying the appropriate card for your needs when shopping for a new video card.
The peripheral component interconnect
The second bus is the peripheral component interconnect (PCI ) bus. These are the expansion slots lined up next to the AGP slot on the motherboard. Different models of the Macintosh include different numbers of PCI slots, from an all-time high of six slots in the old Power Mac 9500/9600 to four slots in the present-day model. PCI slots are one of the most useful items on the Macintosh motherboard, because they allow the user to easily install a completely customizable set of input and output devices such as analog video and audio capture cards, SCSI and ATA expansion cards, extra video cards for multiple monitor support, and a host of other third-party items, the list of which grows by the hour.
One of the most appealing things about the AGP and PCI buses is that, in contrast to their counterparts on the PC side, they are completely plug-and-play compatible. This means that although you may have to install a software driver of some kind in the Extensions folder, you do not have to worry about hardware conflicts and addresses as you would with a PC. The Macintosh hardware and software are able to locate and work with AGP and PCI expansion cards with almost no fuss, provided the proper software drivers are present in the System Folder. PC users who discover this are usually amazed at the ease of installation they encounter in the Macintosh, compared with the nightmare of IRQ settings of other operating softwares.
If the Macintosh was purchased from Apple with a SCSI drive system installed, one of the PCI slots will be occupied by the SCSI card. Since the Macintosh does not come with a SCSI interface built in to the motherboard anymore, a PCI slot and SCSI card are necessary to use SCSI devices. Once again, installing and utilizing a SCSI card is painlessly simple. Most SCSI cards can service SCSI drives inside the Macintosh as well as external SCSI devices simultaneously, making for a uniquely flexible solution. And the SCSI standard is not limited to drives, with every manner of peripheral device offering a SCSI version. Items like scanners, archival data tape backup units, and CD or DVD burners are all available with SCSI connectivity.
ATA expansion cards are also available that allow users to add more than the previously stated limit of two ATA drives to their Macintoshes. An ATA expansion card adds two more ATA buses to the Macintosh, allowing you to install up to four more ATA drives internally. ATA expansion cards are very inexpensive compared with SCSI cards and may prove the best expansion alternative for low-end users looking for more internal drive capacity.
Beyond the SCSI and ATA expansion possibilities lies a range of third-party cards, each of which performs a specific task. Extra video cards for multiple monitor support are inexpensive and painless, most of them not even requiring software drivers beyond the ones automatically installed with the Macintosh OS. No special hardware or software is generally necessary to add a second or even third computer monitor to your editing station. Both the AGP and PCI slots are situated so that the connector side of the card installed in the slot will peek out of the rear of the machine, making connections to computer monitors, external hard drives, and the like a snap.
The ATA bus is a dedicated bus that sits directly on the motherboard of the Macintosh. Unlike a SCSI bus, which is a card that requires a PCI slot, the ATA bus is already connected directly to the processor and is hardwired to the motherboard. It allows the connection of two ATA devices, which can be hard drives, CD burners, or anything else that uses an ATA interface. On Macintoshes that were not purchased from Apple with the SCSI option, one of the two devices will already be in place, that being the stock startup ATA drive. SCSI systems are likely to have no ATA drives preinstalled on this bus.
In actuality, there are two ATA buses included with every Macintosh motherboard. One is dedicated to the CD/DVD Player and Iomega Zip drives located in the front panel of the Macintosh. Although it is technically possible to remove these and replace them with hard drives, this is not generally recommended. It would be rather counterproductive to run a Macintosh in the twenty-first century without a CD or DVD drive, since this is how the bulk of software is installed. As for the Iomega Zip drive bay, it is narrow in the extreme, and getting a drive to fit comfortably in that space is difficult even for a professional. For more internal drives, consider an expansion card, or look into the external options.
The ATA bus requires that the two devices on each bus have distinct addresses. One address is called the Master and one the Slave. There is actually no difference in the interaction between the Master and Slave addresses, and it really makes no difference which device is which. This is simply a way for the Macintosh to differentiate between the two devices on the bus. If there is only one drive on the ATA bus, it can be either Master or Slave, but if there are two they cannot both be Master or Slave. The determination of this address is set with small plastic jumpers, based on the drive manufacturer’s conventions. These are usually printed on the side of the hard drive itself for convenience.
The Firewire Bus
The third type of bus included in the Macintosh is the Firewire bus, a high-speed input/output port that is the basis for our whole system of Firewire DV editing. It connects the Macintosh with DV cameras and decks, Firewire drives, and CD burners, and potentially any other device that also has a Firewire connection. The Firewire bus has two separate ports to communicate with any external devices you connect to it. A wide range of devices can be connected at once, regardless of their function. You can have a DV deck, a Firewire hard drive, a scanner, and a removable drive all connected at once without fear of failure for any of them. Hubs are also available that allow the user to connect devices to a uniform location rather than stringing them together in a daisy chain.
Firewire devices can be connected in a daisy chain of up to 63 devices, any of which can be connected or disconnected without powering down the computer or device (hot-swappable). They do not require special addresses or IDs and can usually be used by the system without the installation of software drivers. Even so, care must be taken that the Macintosh is aware that the drive is going to be disconnected to prevent corruption. Simply dismounting the drive by dragging it to the Trash on the Desktop will make it available and safe for hot plugging.
Because there are two different types of Firewire connectors, great care must be taken in selecting the proper cable for use. There is a 6-pin connector, known as a bus-powered connector, and a 4-pin connector. This makes three possible cables: a 6-pin–6-pin cable, a 4-pin–6-pin cable, and a 4-pin–4-pin cable. The connectors on the Macintosh are of the 6-pin variety. Most deck and camera jacks are of the 4-pin variety, so unless your Macintosh comes packaged with the proper 4-pin–6-pin cable you may need to obtain one. Many CD burners and other devices utilize the 6-pin–6-pin connector, so check to make sure you have the correct one before attaching equipment.
The bus-powered 6-pin connector enables you to pass electrical power to Firewire devices that can accept it, meaning that in some cases you may not need to plug a device to a wall AC circuit. This feature is relatively rare and is almost exclusively the domain of pocket-sized portable Firewire drives. Make certain that any device you own can function with bus power before relying on it.
The Universal Serial Bus
The Universal Serial Bus (USB), is a slower data rate connection used for input and output of devices that do not require massive streams of data. Your keyboard, mouse, printers, and graphics tablets are very undemanding devices, and the USB has more than enough bandwidth to handle them. The present standard for the USB maintains a data rate of roughly one and a half megabytes per second.
There are a large number of devices on the market that can utilize the USB connection. Floppy disk drives, lower-end SCSI adapters, and even CD burners and audio and video capture cards have been designed for the USB interface. Like the Firewire bus, USB can carry power to a device. Hubs are also available in both powered and unpowered varieties. Some devices that do not actually power from the USB connection still require a powered connection, so be careful to select a powered hub should you be in the market for one. Like Firewire, USB connections are hot-pluggable as well, giving the standard some excellent flexibility compared with the older serial standard that it replaced on the Macintosh.
Care should be taken in considering the inclusion of far-out third-party USB devices in a system. USB third-party software drivers are notorious for causing extension conflicts with the system software. In general, if you can get a Firewire device for roughly the same price as a similar USB device, you are better off with the Firewire device every time. If you do install a third-party USB device, such as a custom mouse or keyboard, keep an eye on the extensions that get installed as drivers so that in the sudden event of bad behavior, you know where to start investigating for conflicting extensions.
Various other inputs and outputs
Ethernet and internal modem
The Ethernet and modem connections that come stock on the Macintosh allow it to communicate with the outside world of other computers and/or the Internet. The software that operates your Ethernet and modem are built in to the Mac OS, so networking with a Macintosh is a shockingly simple. To network multiple Macintoshes, simply connect them together either directly or through an Ethernet hub. The built-in modem is also a snap to use, and the initial startup of your Macintosh will walk you through the process of either accessing your present Internet account or starting a new one.
Speaker out
Unlike most PCs, a high-quality 16-bit sound card is built into the motherboard of every Macintosh, allowing you to run excellent stereo quality audio out to speakers from your system. As with the Ethernet and modem connections, the sound is controlled entirely by the Mac OS software and requires no extra configuration for audio output.
Checking the pieces: the Apple System Profiler
Although there are an infinite number of other items that you may have installed with your system, the list at the beginning of this section states the bare minimum for satisfactory performance. Although you may have purchased your system preconfigured as an out-of-the-box editing solution, you should still take a moment to check through the process of installation, as detailed hereafter, to make sure that your system is optimized and prepared for editing.
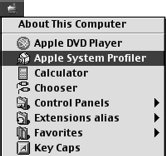
To check on almost everything relating to your Macintosh’s hardware and software, access the Apple System Profiler from the Apple dropdown menu on the extreme upper left corner of the Macintosh Desktop (Figure 2-8). The Apple System Profiler is a little application that gives the hardware and software status of your entire system at the moment. It is an excellent tool for quickly checking what version of an extension you are using or whether or not a device is present and doing what it should be doing.
The first tab of the Apple System Profiler shows the General System Profile. It describes the version of the currently loaded system software, the startup drive and its bus and address, the amount of installed RAM and its distribution amongst the RAM slots, etc. It describes the major areas of your system all on one tab.
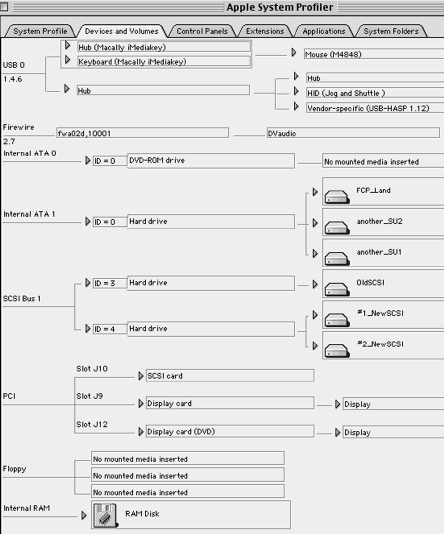
The second tab, Devices and Volumes, is a detailed map of all hardware components currently connected to your system. Each bus is represented, along with a hierarchical chart of what is connected to each bus and the settings, if any, of the device or volume at the location.
The next two tabs give a detailed listing of all the control panel and extension inits existing in your system. These tabs will display active inits as well as inactive ones you may have disabled. It will also indicate whether or not the init in question is an Apple or third-party init and specify its version and its size. The Applications tab displays every application program on your system. This can include many smaller applications that are included in the installed package of larger application sets. And finally, the System Folder tab displays all the bootable System Folders present on your system.
In addition to being informative to the user, the Apple System Profiler is an invaluable tool for Technical Support or long-distance troubleshooting. You can save a copy of your Apple System Profiler as a report to print out or e-mail to a troubleshooter, eliminating the need for the troubleshooter to be present to look at your system. Simply glancing through the Apple System Profiler and looking for known issues can solve many problems.
The first tab of your System Profiler should show that Mac OS 9.1 or later and Quick-Time 5 are installed (Figure 2-9). Further down the tab, Virtual Memory should be off,and the built-in memory should show at least 256 megabytes or more. If you have less, you should look into purchasing and installing more RAM. The system software can grab as much as 75 megabytes and Final Cut Pro requires more than 100 megabytes for itself. Even so, Final Cut Pro will give unpredictable behavior if it is allocated only the bare minimum to run. Performance will be vastly improved if Final Cut Pro is allocated more than the minimum.
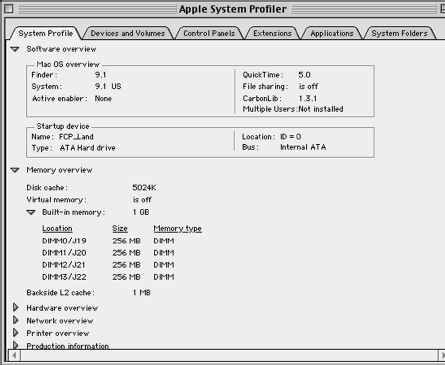
Version 2.0 of Final Cut Pro can actually utilize as much RAM as the user allocates, and performance only improves on doing so. Even if you are running an earlier version, you should make sure that you have enough physical RAM installed to provide over 75 megabytes for the system’s use and then at least 120–180 megabytes for Final Cut Pro. Take advantage of cheap RAM prices, and give your system some breathing space.
If you know for a fact that you have more RAM than is actually displayed in the Apple System Profiler, there are several reasons why this could happen. You could have damaged or defective RAM chips. The chips may be installed incorrectly. Some firmware updates to the motherboard have even been known to reject certain makes of RAM chips, even though there is nothing technically wrong with them. In such a case, you will need to look further into the matter and determine the actual cause.
In the Devices and Volumes tab (Figure 2-10), you should see a number of relevant items. If your DV camera or deck is connected to the Firewire port on the Macintosh, you should see it listed as a “DV Audio” device on the Firewire bus. If you have drives located on the native ATA bus, these should be present. If you have a SCSI card and drives installed, the SCSI card should be listed as occupying a slot in the PCI bus, and you should also see a SCSI bus listed that contains your individual SCSI drives.
It is imperative that there be two separate physical disk drives for use with Final Cut Pro. One of these will be the startup drive that currently holds your System Folder and into which you will be installing Final Cut Pro. The other separate physical drive is only for your captured DV footage. It is not recommended that you use the same physical drive for the System Folder/Final Cut Pro and the captured media for reasons that will be detailed in the setup process of your Final Cut Pro project.
Installing Final Cut Pro software
If you have ascertained that all the necessary hardware and software elements are present, it is time to install the Final Cut Pro software. Simply insert the CD, click on the install icon, and let the installer go to work. If you have not upgraded your QuickTime to version 5 or if you are missing any necessary system software, the installation process will stop and allow you to correct the situation. Although Final Cut Pro does not require you to register the full version of QuickTime Pro that accompanies the Final Cut Pro license, it is suggested that you do so to avoid annoying messages about updating as well as to take advantage of some of the more useful features.
At the end of the installation process, Final Cut Pro will ask you to give it some initial preset information about your equipment setup. After entering your serial number, you will be faced with a dialog box entitled “Choose Setup.” This is simply Final Cut Pro asking you to establish the initial parameters for a project. You will later be able to change anything you enter at this time. If you are unsure, simply hit OK and pass on to the next window.
On hitting OK, you will have completed the necessary installation steps and will be inside the application itself.