

Why we do it right every time
Final Cut Pro is a software application. Applications run from inside of RAM, which is volatile memory. Thus when you shut down the application, everything you have done up to that point disappears. Of course if that were the limits of technology, computers would not be worth much to us. In order to work over the course of many different editing sessions, we must save our projects to a hard drive. This allows us to return to the project at a later time without having lost our previous work.
The act of saving files in anything from word processors to video games really isn’t difficult. But it is imperative to understand the necessity of consistency and organization in the saving process. One of the most common mistakes new users make with nonlinear video editors is being inconsistent in project backup strategies. Either they do not back up their projects at all, or they do so in a way that becomes counterproductive in the event that they actually need to recover their work.
Don’t let this happen to you. Properly saving your project and then backing it up on a regular basis takes no more effort than not doing so. However, the benefits are that you can always return to exactly where you want to work in the history of your project, no matter whether it’s the last time you were editing or 12 o’clock noon, two weeks and four days ago before your client informed you of the correct spelling of that corporate vice-president’s name. Not archiving your projects is a mistake you tend to make only once.
The proper method for creating and saving your new project is a step-by-step process, similar to the process of completing the Scratch Disk Preferences, and similarly, the process is very fast once you get the hang of it. You should build your editing session startup procedures based on the following step-by-step process. Doing so will consume no more than a minute of your time and will give you the security of a bullet-proof hardware, software, and backup strategy. You’ll be able to forget about the annoying configuration pitfalls and spend your time doing the fun part: editing.
Starting from the application alias
STEP 1
Start up Final Cut Pro from the application alias. If you already have a project you are returning to, you can start Final Cut Pro by double-clicking on the project file itself, which will cause Final Cut Pro to open only your project, not all others that were open when it was shut down last.
The first step in creating a new Final Cut Pro project is to start the application by doubling-clicking the application icon. Of course, if you have already worked through the preceding section of this book, then you have already opened the application at least once.
Closing all open projects
There is a reason for attention to this step in the project startup procedure. Unlike other applications, Final Cut Pro, when started from the application alias, always automatically opens all projects that were open when it was last shut down. This means that if you are working on more than one project at a time or if you share a workstation with other users, when you start up Final Cut Pro from the application alias, some project other than the one you want to work with could open up.
This is further complicated by the fact that Final Cut Pro allows for more than one open project at a time. It is easy to accidentally begin working with someone else’s project open in the background. From there it is only a matter of time before you make accidental changes to a project you weren’t even aware was open. The easiest way to avoid this is to develop the habit of closing all open projects when starting from the application alias.
STEP 2
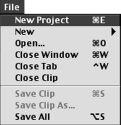
Immediately go to the File drop-down menu and select Close Project. Then take a look at the Browser window and make sure that the only tab in this window is named Effects. If there are other Project tabs remaining, continue to select Close Project until you have closed all open projects.
It is important to remember that if there was no open project the last time that Final Cut Pro was shut down, it will still create a new open project named Untitled Project 1. Although this untitled project is very likely a blank slate, Final Cut Pro will allow the user to save using this name. For this reason, you cannot assume that anything named Untitled Project 1 is not someone else’s hard work. Be safe; always immediately close any project opened at the startup of the application.
Complete the necessary Preferences and Audio/Video Settings
STEP 3
Go through the Preferences and Audio/Video Settings. While there is no project currently open, go through and set up the Preferences and Audio/Video Settings for your project, using the procedures laid out in the previous section of this book.
Remember that these settings were not saved with your project file and will simply be set to whatever they were the last time that the application was open. If someone else was working with a different configuration, it will still be there, regardless of the open project.
Creating a new project and saving it correctly
After completely checking your Preferences and Audio/Video Settings, you are ready to create, name, and save your project.
STEP 4
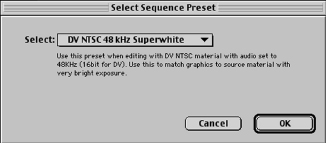
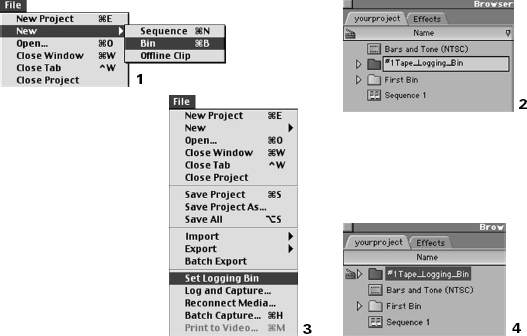
Go to the File drop-down menu and select New Project (Figure 4-1). On doing so, a couple of things will happen. First, if you set Prompt for Settings on New Sequence in the General Preferences, a Select Sequence Preset box will appear (Figure 4-2). Since all new projects are created with one new sequence, Final Cut Pro is asking you to specify its preset. Choose the appropriate preset based on your media.
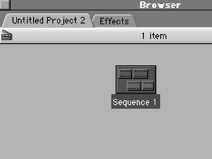
After selecting a sequence preset, a few windows will pop up on the screen. We will explore all of these windows momentarily. Second, a new tab will appear in the Browser window named Untitled Project, followed by a number (Figure 4-3). The number is derived from Final Cut Pro’s automatic naming convention. If you create multiple projects with the same name during the same editing session, Final Cut Pro will automatically add a sequential number to the end of the name in an effort to differentiate between them.
STEP 5
Now that there is a new open project, go back to the File drop-down menu and select Save Project As (Figure 4-4). In the dialog box that follows, click on the Desktop button to move the file location bar to the Desktop.
Unlike captured media files, the project file you save as you work should live on the startup drive. Hitting the Desktop button moves the dialog box save location to the Desktop of the startup drive. Your project file, which is not a media file, should be located on the startup drive in its own folder. For the same reasons that we don’t want to capture our media files to the system and application drive, we don’t want to save a project file to the media drive. There’s nothing wrong with backing up extra archive copies of your project file to the media drive, but don’t run your project from there.
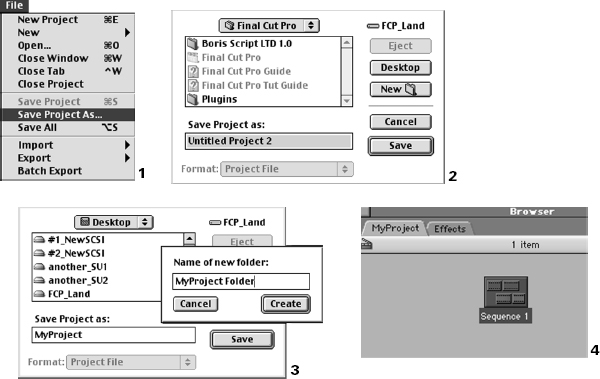
When at the Desktop level, click on the New Folder button. This will bring up another dialog box asking you to name and create a folder. Name the folder MyProject Folder and click Create. This will move the file location bar of the first dialog box into the MyProject Folder you just created on the Desktop. This will be the folder containing your actual project file. Although it is not required that you create such a container folder, you will find that it offers archiving benefits a little later in the process.
STEP 7
Now enter the name MyProject in the field and click Save. Your project file is now saved in its own folder on the Desktop of the startup drive.
Hiding Final Cut Pro/Showing the Desktop
Because there are so many windows in Final Cut Pro, sometimes it can be difficult to see items on the Desktop, especially if you are working with only one computer monitor. The Mac OS has a feature called Hide that allows you to make all the parts of an application invisible temporarily so that you can see the Desktop.
STEP 8
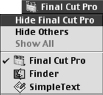
To Hide an application, make sure that it is active, meaning that its name is displayed in the Finder bar in the top right-hand corner of the screen (Figure 4-5). The Finder bar always displays which application is active. When Final Cut Pro is the active application, click this bar and select Hide Final Cut Pro.
STEP 9
You can also use the keyboard shortcut for hiding an application. Make sure the application is active, and then Option-click anywhere on the Desktop’s background. All of Final Cut Pro’s windows will disappear when you hide it. The application is still running; it is just out of sight to allow you an unobstructed view of the Desktop. To return to the application that has been hidden, go back to the Application bar and find Final Cut Pro on the list (Figure 4-6). It will be slightly grayed out because it is hidden. Selecting it in the Finder bar will bring it back to the front again.

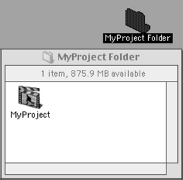
If you hide Final Cut Pro at this point, you will see that a new folder named MyProject Folder has appeared on the Desktop (Figure 4-7). Opening that folder will reveal the project file that you have just named and saved. Each time that you select Save from the File drop-down menu, this is the only file that will be updated. This method of saving your project will prevent you from committing the rookie mistake of accidentally saving your projects all over your multiple hard drives. It’s easy to end up with different versions of the same project littering your system. Using this system will eliminate this possibility, as well as simplify the process of backing up.
Backing up; Archiving your project
How to do it
Finally, you will want to back up this folder containing your project to another disk. You can back this up to any disk other than your startup drive, although it is recommended that you back up to a removable format such as an Iomega Zip Disk. The purpose is to spread a couple of copies around so that when a system goes down, it doesn’t take all of your project files with it.
STEP 10
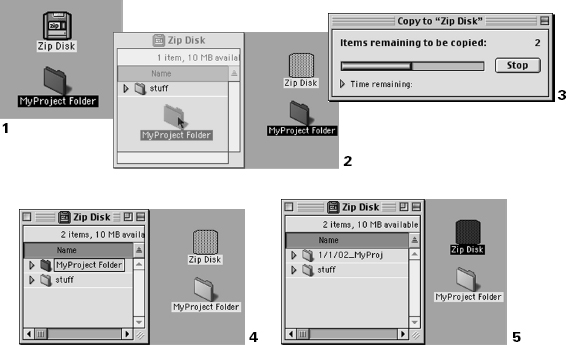
Pop in an Iomega Zip disk. When the disk appears on the Desktop, double-click the Zip disk to open it up on the Desktop. Pick up the MyProject Folder and drag it over into the disk window and it will be copied onto the Zip disk (Figure 4-8).
STEP 11
After the short copying process, locate the MyProject Folder you have just copied over to it. Once you locate the folder, single-click the name of the folder.
STEP 12
A moment after being single-clicked, the folder’s name will become highlighted, meaning that it can be renamed. Rename it with the date, time, and any other relevant information you want to include, using up to 31 characters. Remember that you are changing the name of the project folder and not the name of the archived project file itself.
Now, each time you finish with an edit session, pop in the archive Zip disk and repeat the process, each time changing the name of the newly copied project folder to reflect the time and date that it was archived. Eventually, you will have a Zip disk full of versions of your project at each stage of its development. If you want to go back to the way your project was on such and such a date, just go into your project archive Zip disk and copy the folder from that date to your Desktop. You may have to re-render a few things, or even recapture if you’ve thrown away media, but at least you won’t have to rebuild your project from scratch.
Its a good idea to do this at least every few hours, since the process only takes a moment, and three or four hours is enough time to radically change the entire nature of your project. Remember to remove your Zip disk after using it for this purpose; a mounted Zip disk can deliver a performance hit on your system even if you are not accessing it. Mount a Zip disk only for the purposes of backing up files, and then get it out of there.
Why we do it
There are two benefits to backing up this way. First and most obvious, such a backup will ensure that no matter what happens to your project files, you have a backed-up copy of your project. This is, after all, a computer, and files tend to corrupt at the most inopportune times. The more frequently you back up your project, the less you lose when your system crashes and takes your project file with it. Such things happen rarely, but they do happen.
A second benefit is less obvious. Backing up your project to another disk on a regular basis also allows you to step back into your editing process in a manner limited only by the frequency with which you back up to disk. As with most applications, you can perform Undos of actions while the application is running. But once you quit, you lose the ability to go back and change things to the way you had them previously. Unless you have saved prior versions of the project elsewhere, you can never return to an earlier state.
Imagine that you have edited an entire program. After finishing and copying it out to tape, you watch it and realize that there are serious problems with it that cannot be fixed easily by adjusting the sequence recorded to tape. It would be easier if there were a copy of the project that dated back to when you first made your mistake.
Archival backup procedures provide this option. The process is also referred to as Sequential Backup, because as you periodically archive copies of your project, they will be identified and organized by their date and other information you include in your naming system. If you ever need to step back into your editing progression, simply go back into your archived project files and locate the folder that is nearest to the date you need to return to.
The reason for Sequential Folder Saving instead of Sequential File Saving
You may be wondering why we created a folder for the project file and renamed it rather than simply renaming the project file itself. There is another method of Sequential Backup in which users save a new copy of their project with a different name each time they back up their project. Instead of copying the project file and folder to the Zip, this process saves a new copy of the project file. This means that every time you archive your project file, you would change the name of it, usually including the same information that we put in the archived project folder: name, date, time, etc.
There is nothing intrinsically wrong with this other method of archiving project files for most editing applications. In fact, in some ways the process is a little more robust than archiving the folder. The problem is that it’s ultimately a bad idea for Final Cut Pro 2.0, because of the new way that Final Cut Pro manages its Scratch Disk resources.
The reason has to do with the way Final Cut Pro organizes its media after you capture it. When you set your Scratch Disk Preferences, you gave Final Cut Pro a location to save media files to: a Scratch Disk folder. When you did this, Final Cut Pro created three folders inside of the Scratch Disk folder: Capture Scratch, Render Files, and Audio Render Files. (See Figure 4-9.)
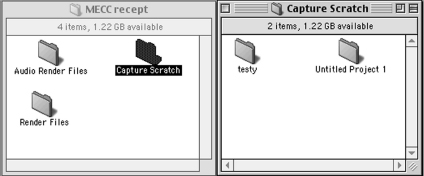
The wrinkle is that Final Cut Pro does not simply stream files into these folders. Inside these folders, Final Cut Pro creates yet another new folder for each differently named project that is opened while that location is set in the Scratch Disk Preferences. This means that if you open five different projects while the Scratch Disk is set for one folder, you will end up with five differently named folders inside that Scratch Disk’s Capture Scratch folder.
Thus if we sequentially back up our project by renaming it each time, we would create a new project capture folder in our Scratch Disk folder each time we Saved As with a new name. If you are archiving regularly, as you should, this could lead to four or five new capture folders per editing session. If your project runs for a couple of weeks, you could end up with a real mess in your Scratch Disk folder.
Don’t blame Final Cut Pro for this. It arranges things this way so that you will have more control over your media from inside of the application, which is a feature you will discover is well worth the project setup confusion. But it is important that you organize your Scratch Disk folders and utilize an archival backup strategy so that you can make sense of your media folders outside the application as well as from inside. Nothing is more painful than looking at a mess of files and folders and wondering what goes where and what can be safely thrown away. Use this archival system, and you will be spared such trauma.
The Windows of Final Cut Pro
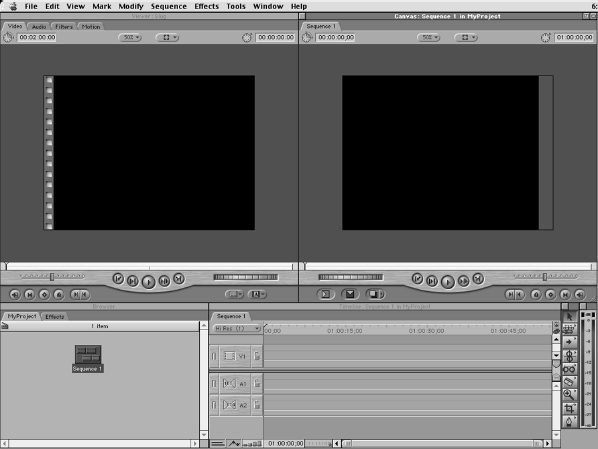
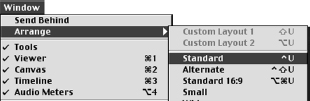
After starting the new project and saving it correctly as described above, several windows will have opened up. These windows, in clockwise order from the top left, are the Viewer, the Canvas, the Audio Meters, the Toolbar, the Timeline, and the Browser windows (Figure 4-10). The arrangement you see when you start the project is the default arrangement, which you can customize any way you like. If you ever get mixed up and are missing windows that have somehow gone off screen, look under the Windows drop-down menu, select the Arrange sub-menu, and then choose Standard, which will return you to this exact state (Figure 4-11). If any of your windows are closed and you need to access them, they are available from the Windows drop-down menu as well.
Before beginning the discussion of Final Cut Pro windows, it is important to note that most of the windows utilize what is referred to as tab architecture. This means that one window may hold more than one item, just as one filing cabinet can hold more than one folder. At the top of each window, you will see the tabs. To switch back and forth between the different tabs in a window, simply click on the tab you want to bring up front.
Tabs can also be “broken away” from a window to create a new window occupied only by the “torn-away” tab. If you need to look at two tabs from the same window, simply grab the tab and drag it away from the window to create a new one. Most tabs can be restored to the windows from which they originated by being dragged back into place.
The Project tab
The Browser window is the top-level window of the application (Figure 4-12). It contains the Project tab that represents your entire Final Cut Pro project and all its contents. The three objects associated within the Project tab are the Clip, the Sequence, and the Bin. As you capture or import video, audio, and graphics clips, they will appear in this Project tab. When you create a new sequence to edit in the Timeline window, it will also appear in the Project tab. There should initially be one sequence in the Project Tab, because all new projects are created with one sequence. Finally, anything that goes into the Project tab can be further organized into bins, which are simply organizational folders that can be created in the Project tab.
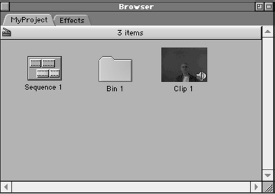
The two primary resources of a Final Cut Pro project are the Clip, which is the individual icon for the media we edit into the sequence Timeline, and the Sequence, which is the linear timeline into which we are editing the Clips. They are available here in the Project tab. They are readily organized through the Bin, the third object of the Project tab, a sort of folder that can store and organize Clips and Sequences according to whichever categorization you find convenient.
The Effects tab
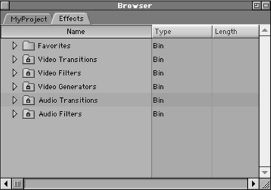
There is another tab in the Project window that is always open, even when there are no open projects. This is the Effects tab (Figure 4-13). The Effects tab contains many different built-in effects such as transitions, color bars, special effects, audio filters, and titles. When you have clips available, you will be able to apply Effects to them from this tab simply by dragging and dropping the Effect you want to use on the Clip. We will return to the Effects tab later on in the book.
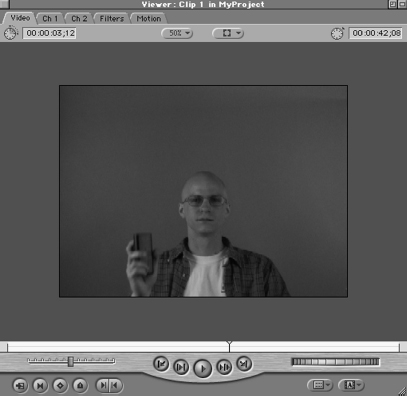
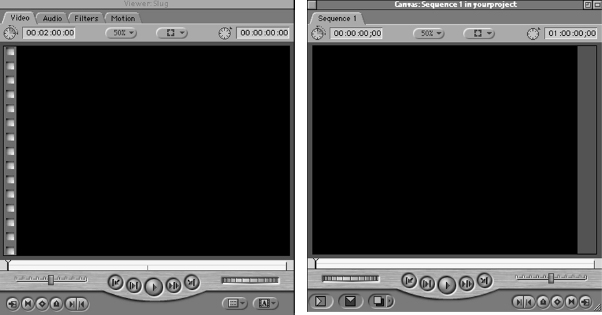
The Viewer window
The Viewer window is associated with clips (Figure 4-14). When you load a clip into the Viewer window, you can manipulate it in many ways. You can play it back and review the footage. You can assign new In and Out, or Edit, Points, defining how much of the clip is used when you edit it into a sequence, no matter how long the clip originally was. The tabs at the top allow you not only to adjust features of the video and audio, but also to apply special effects. These effects range from the motion-based suite, which alter size, position, scale, and many other attributes, to the effects filters, an enormous choice of special effects plug-ins that you can apply to your work.
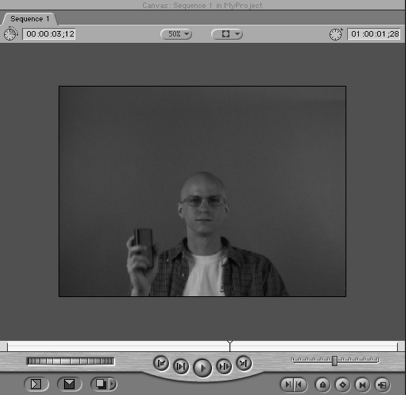
The Canvas window
The next window is the Canvas window, which corresponds to the Sequence (Figure 4-15). Whereas the Viewer window allows you to load, prepare, and preview clips for editing into a sequence, the Canvas window allows you to preview sequence Timelines. Once again, there is a tab architecture to the Canvas, allowing you to switch back and forth between the different sequence Timelines in your project as you work.
Both the Viewer and the Canvas have video windows through which you view your progress as you edit. You can—and should—adjust these windows for optimum performance. Although some machines may have no trouble with other display settings, you should generally set the frame size to 50 percent when playing back video. Having the video windows play at odd percentages can yield quirky performance, and 100 percent is usually too much to ask of the processor and absorbs too much screen real estate. The ideal video window size is 50 percent.
You should take care to make sure that no objects or other windows ever overlap a video window when attempting to play back video. Also make sure that the entire video window is visible and that there are no scroll bars along either the side or bottom of the window. If there is any cramping of the Viewer or Canvas window’s style, you will get compromised performance or no performance at all from them. If you get Dropped Frames messages during playback, overlapping windows is one of the first things you should check for.
Because you can have more than one project open at a time, it is easy to edit using resources from many different projects. Clips or sequences from one project can easily be edited into another one by simply dragging them into place from one open project to another. Although this ability may seem minor, Final Cut Pro is the only video editing application that offers this very handy timesaving feature. Rather than spending time shutting down and starting up new projects or exporting or importing huge files, you simply open whichever projects you want to access, move materials to or from, and get right to work.
Going clockwise, the next window is the Audio Meters (Figure 4-16). These meters show rising or falling bars in the left and right channels based on the level of audio. This allows you to keep an eye on the decibel level of your audio, as well as troubleshoot your system’s audio. If you don’t hear audio, but you see levels, or if you hear nasty distortion but your Audio Meter levels are acceptable, it may be time to go in for a little system maintenance.
Those with a background in analog audio should take special notice of these Audio Meters, which are based on digital audio. With digital audio, 0dB is the highest possible audio level before clipping occurs. Unity, or the optimum reference level generally used by professionals, does not occur at zero as with common VU meters, but registers at around –12dB. Thus, we will use a –12 dB reference tone when mastering to tape later in the book.
At the time of this writing, Apple acknowledged that the Audio Meters may be creating performance problems with other areas of the application. If you experience mysterious problems in capture and playback that cannot be attributed to any other issues, try closing the Audio Meters and shutting down and restarting Final Cut Pro. It is possible that the Audio Meters are a source of trouble. Many users have reported that closing the Audio Meters completely eliminated their problematic performance. This obviously is not necessary if you are not yet experiencing problems. Don’t go looking for trouble you don’t yet have.
The Toolbar
The next window is the Toolbar (Figure 4-17). This strip contains all the useful little tools that come into play when editing. Selecting an icon on the Toolbar changes the mouse pointer and makes the tool available. Some of the tools have several different possible variations, or Toolsets, which you can enable by clicking on a tool and holding it down for an extra moment. These tools will be covered in the sections on editing and compositing later on in the book.
![]()
![]()
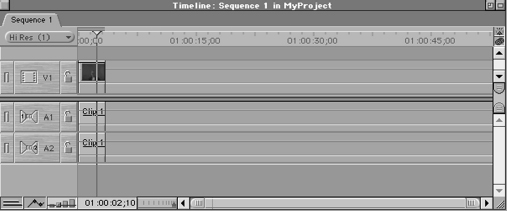
Finally, the last window is the Timeline (Figure 4-18). The Timeline is not a sequence in and of itself; it is merely a window in which you work with sequences. As with the Project, Viewer, and Canvas windows, the Timeline is based on a tab architecture so that you can have more than one sequence available in the Timeline window. To switch from one sequence to the next, simply click on the tab.
You will notice rather quickly that each of these windows is linked directly to the others. Adjustments made in one window will change the project globally, meaning that whenever you make a change in one window of the project that affects other windows, the change will be automatically reflected elsewhere. For instance, when you switch sequences in the Timeline window, the Canvas window tabs switch around to show the same sequence.
Moving a clip around the windows
The Color Bars and Tone Generator clip from the Effects tab
As an example of this, and to exhibit the way the windows work, let’s utilize a little generator from the Effects tab that behaves like a clip and pass it back and forth between the windows. As we don’t yet have any captured clips to work with, we’ll use the Bars and Tone Clip that comes preinstalled with Final Cut Pro. Color Bars and Audio Test Tones are used professionally with any video production to allow technicians to calibrate their equipment for the best possible playback. Final Cut Pro includes a clip of them for use in your finished projects. They will come into play in the final chapter of the book concerning output to tape. Since the preinstalled Bars and Tone clip acts just like a regular captured clip, we’ll use it for example footage.
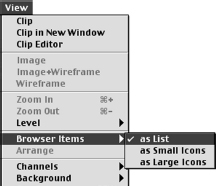
First, make sure that the Project window is set to be viewed as a list, rather than as icons. With the Project Tab in the Browser window active, go to the View drop-down menu (Figure 4-19). Select the Browser Items submenu and then choose As List.
If any of your Project or Effects tab items appear as icons or spread-out objects rather than a vertical list with information columns to the right, perform this action for each separate tab or bin of the Browser. For this exercise it is important to see the items as a list. Later on in the book, we will explore the functionality of the Large and Small Icons viewing modes.
Moving the clip from the Effects tab to the Project tab
STEP 14
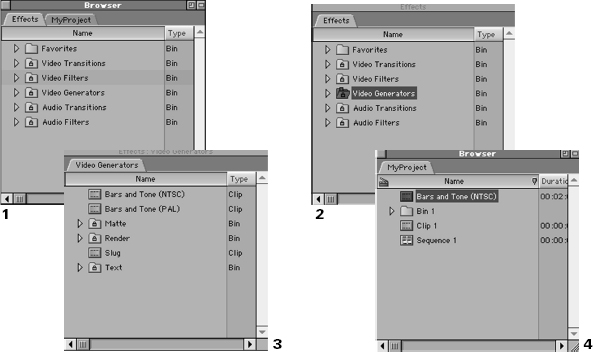
Go to the Project window and click on the Effects tab (Figure 4-20). Grab the tab, drag it away from the Project window, and drop it so that it becomes its own window. A little way down the Effects tab, locate the Video Generators bin and double-click it. The Video Generators bin will open up in a new window.
STEP 15
In the Video Generators bin, locate the Bars and Tone clip. There will be two Bars and Tone Clips available—one for NTSC and one for PAL. Select the one that is correct for your video standard and drag it into your Project tab in the Project window.
Creating a bin and using it as an organizing tool
STEP 16
With the Project Tab active, go to the File drop-down menu and select New, followed by Bin in the submenu that appears (Figure 4-21). A new bin will appear in the Project tab.
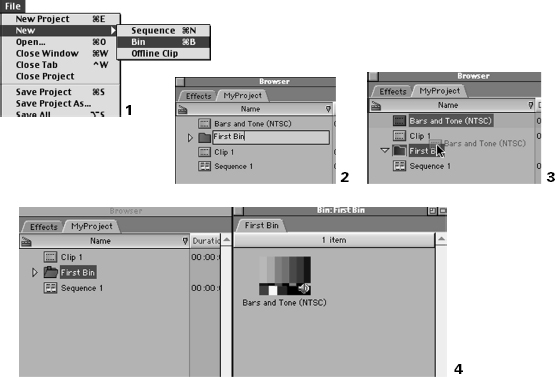
When a new bin is created, the name of the bin will be highlighted. Immediately type in the name First Bin. If the bin’s name is not highlighted, single-click the default name Bin 1 and the name will become highlighted.
STEP 18
After renaming the bin, grab the Bars and Tone clip you just dragged from the Video Generators bin and drop it onto the First Bin. It will disappear inside. If you double-click the First Bin, it will open into its own window, showing you the Bars and Tone clip inside. You’ve just completed your first act of project organization!
Moving the clip from the Bin to the Viewer
Now let’s open the Bars and Tone clip in the Viewer. This can be done in either of two ways.
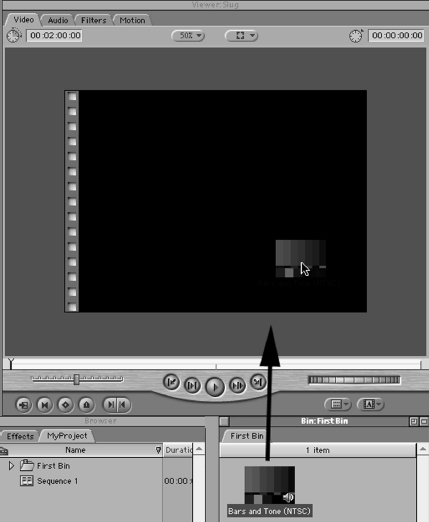
You can drag the clip physically from the First Bin into the Viewer window (Figure 4-22), or simply double-click the clip in the bin. When you do either, the title of the Viewer window will change, revealing that the clip loaded in the Viewer is the Bars and Tone clip from your project.
STEP 20
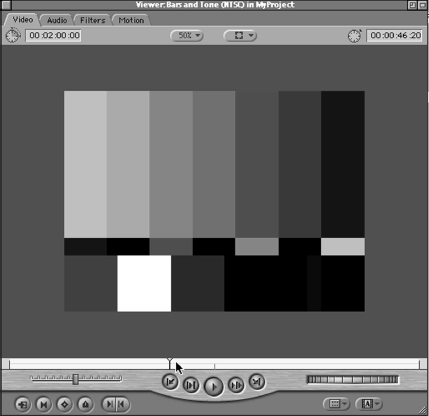
Hitting the play button in the Viewer window will begin playback of the clip. You will hear the 1 KHz audio test tone that accompanies the video color bars in the Bars and Tone Clip. A quick glance at the Audio Meter window will show that the 1 KHz audio test tone registers at –12 dB, exactly as it should.
Although the color bars should not and do not move, the little yellow indicator near the play button at the bottom of the Viewer window moves along as the clip plays. You can click anywhere in the current time indicator bar, or Playhead, and drag to move back and forth in the clip (Figure 4-23).
Clicking on the tabs at the top of the window reveals other aspects of the clip (Figure 4-24). The Audio tab shows a solid gray mass for levels, because the clip is a test tone with no variations in audio level. In other video clips you will work with, you will see a waveform, or a graphic representation of how loud or soft a clip’s audio is. You will also be able to adjust those levels on this tab.
Clicking on the tabs at the top of the window reveals other aspects of the clip (Figure 4-24). The Audio tab shows a solid gray mass for levels, because the clip is a test tone with no variations in audio level. In other video clips you will work with, you will see a waveform, or a graphic representation of how loud or soft a clip’s audio is. You will also be able to adjust those levels on this tab.

The Filters tab will currently have no Effects Filters listed, because we have not yet applied any. These will be covered later on in the chapter on Compositing and Special Effects.
The Motion tab will present many options, including the ability to change the size, position, rotation, and scale of the clip. It will also allow us to change these over time so that we can create professional-looking effects easily and naturally. We will also cover these in the Compositing and Special Effects chapter of this book; for now, leave this and the Filter tab alone.
Moving the clip from the Viewer Window to the Sequence
To move the Clip to the next window, we can once again choose from a few different techniques, each of which will produce the same result. The Canvas window always shows what is happening in the Timeline window, and vice versa. You can therefore move a clip into a sequence by one of the two following methods.
STEP 21
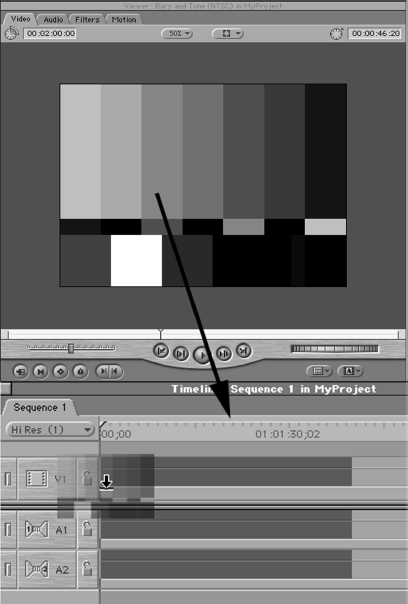
Click anywhere in the video window of the Viewer that has the Bars and Tone clip loaded and drag down into the beginning of the sequence on the Timeline window (Figure 4-25). It will appear as a long linear clip there and stay positioned wherever you drop it. You could also:
STEP 22
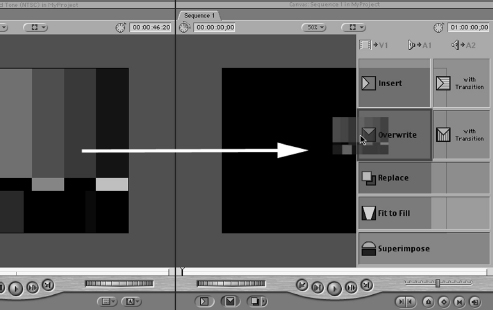
Grab the Bars and Tone clip in the Viewer as in the previous example, but drag it instead into the Canvas window, holding the mouse button down momentarily (Figure 4-26). Doing so will reveal a graphic overlay of boxes proposing several different types of Edits. Final Cut Pro is asking in what way you wish to put the clip into the sequence. We will cover these in detail in the next chapter on Editing techniques, but for now, drop the clip onto the Overwrite box. The clip will appear in the sequence, once again, as a long linear strip in the Sequence. It will appear starting from wherever the sequence playhead was positioned right before the edit took place.
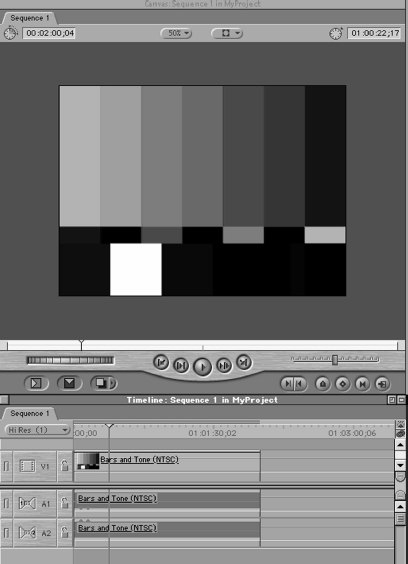
Having completed either of these actions, you will find that there is now a Bars and Tone clip in the sequence in the Timeline window and that the Canvas window displays the Bars and Tone Clip (Figure 4-27). Hitting play with either the Canvas Window or the Timeline active will show the current time indicator moving forward and, once again, we will hear the 1 KHz audio test tone.
These are not the limits of our ability to move clips around Final Cut Pro, merely the basic methods meant to show how the windows work together in a project. For instance, we could have simply dragged a clip directly from the bin to the sequence or the Canvas if we had no need to work with it in the Viewer. Similarly, we could actually open a sequence in the Viewer in order to apply effects to the whole thing rather than to the individual clips inside it. There’s really very little limit on how you can work with clips inside your project.
But we get ahead of ourselves. The main thing to remember as you work through Final Cut Pro is that there is always more than one way to get something done. The options are there to help you increase productivity and speed, based on the individual nature of your project and media. The more you work, the clearer this will become and the better judge you will be of which method is best for your needs.
What is Media and how do I get it into Final Cut Pro?
What is Media?
In order to edit, you need media to work with. Media is much more than just video or audio that you capture from Firewire. The term media refers to any content that you use in a project. This can range from video and audio captured from DV tape to audio imported from an audio CD. You can also use image files created in such applications as Adobe Photoshop or image sequences from compositing applications such as Adobe After Effects or Pinnacle Systems Commotion. You can even import special vector-based files such as the Flash file format. In short, you can use nearly anything you can create elsewhere.
Anything that you bring into a Final Cut Pro project to work with is media. This seemingly simple concept is an important one. There is a tendency among new users of nonlinear editing applications to think of the objects in use in the Timeline as the actual media files. This is an intuitive conclusion that unfortunately oversimplifies what is actually going on when you capture or import.
When you bring media into Final Cut Pro, you are merely allowing Final Cut Pro to access a file that exists somewhere on your hard drives. The clips that you see in the Project, Viewer and on the sequence Timeline are really indexes or references; they are simply icons that point to a media file on the hard drive. When you edit, you are telling Final Cut Pro how much of the original media file to display and where.
This icon is just textual data and is a part of your project file. It is used to determine how much of the indexed media file is accessed and the way it is to be displayed. When you use an effect or you trim a clip for use in a sequence, you are not really affecting the media file on your hard drive. You are simply telling Final Cut Pro how to display the media file in your project. Because the icon’s text bits can direct the media to appear shortened or lengthened and arranged in any order or repeated endlessly, they are said to be nonlinear, hence the name nonlinear editor for the systems. This concept is also referred to as Non-Destructive Editing, because you are not making changes to the actual media. You are only changing the way that Final Cut Pro displays the media when it plays back.
This is to be contrasted with the venerable system of linear tape editing, in which one edits with the original tape media and must put each piece in the order it is to occur in playback. The convenience of nonlinear editing should be obvious compared to this. In linear editing, if you aren’t happy with an edit you have made, you must go back and rerecord a new edit the way you want it using the original tapes. In addition, all the edits you have made following the edit you are changing usually must be re-edited as well.
With a nonlinear editor, on the other hand, we can simply arrange our clips on the sequence in any order that we like. Not happy with an edit? Just rearrange the clips. Since the clip is just referring back to a media file somewhere on your Scratch Disk, it makes no difference where it is displayed on the sequence; it will play back every time in just the way you desire it.
The reason for belaboring this point is that the safe and secure capturing process depends on our understanding of what media is, the distinction between our project clips and our actual media files and where those media files go when we capture or save them. We have already set our Scratch Disk Preference, which tells Final Cut Pro where to save the media files we capture. We know that we can take advantage of timecode and Device Control, which accompany the Firewire DV data stream. We will now explore how to take advantage of both of these to gather media to work with in a project.
How do we get it inside Final Cut Pro?
We have not actually brought any media into Final Cut Pro yet, so let’s get right to it. There are three basic ways to bring media in: Log and Capture, Capture Now, and Import. These three methods have different requirements and come into play based on differing situations. Log and Capture requires not only that you use a deck or camera that Final Cut Pro can control, but also that you use timecode. Capture Now, on the other hand, simply captures whatever is currently streaming through the Firewire connection regardless of the presence or lack of timecode data or Device Control. Finally, Import allows you to bring media into your project that already exists on your system in some format that Final Cut Pro can understand.
Log and Capture
What is Log and Capture?
Logging and Capturing is, without exception, the safest and most reliable system of capture available to you, regardless of hardware or software configuration. When you Log clips using timecode, you create a placeholder for a yet-to-be-captured media file you will want to use. You are simply telling Final Cut Pro that a clip exists out there on timecode tape that corresponds to the timecode numbers you enter as you log.
Since the Final Cut Pro clip is a reference to timecode numbers as well as the actual captured media file, clips can exist as what we call Offline Clips. In other words, the offline clip is just a placeholder for media that you may not have captured yet, or that has disappeared and you want to capture again. A clip is just a malleable little icon that refers to a media file that existed before, exists now, or will exist once you have captured it.
Remembering our discussion of timecode will make it clear how powerful this concept is. If a clip contains all the data about the tape the timecode numbers originated from, referred to as its Reel Name, and the actual timecode numbers of a portion of that tape, there is no limit to how secure and easily contoured our project can be. If we want to give our project to another editor so that that editor can work with it, we don’t need to save all those huge media files on a big hard drive to give to the editor. We can simply give the editor the project file and the original tapes and the editor can quickly and easily recapture the same media on his or her system. If we have lost our media for some reason, or if we want to revisit a project we worked on in the past but we have eliminated the media for, we can simply recapture it and get back to work. Nothing could be easier.
There are even more benefits to using this system, which you will discover as you get more involved in the editing process. The main thing to remember is that with Logging and Capturing, you are at the mercy of two things—your Project file and your original source tapes. Always maintain a strong consistent system of Project file backups, and be careful that you do not end up with timecode breaks on your source tapes.
Pre–Log and Capture techniques: The paper log and the Timecode Window burn
Before starting the Log and Capture process, it is important to mention that there are actually a couple of different ways to Log and Capture. The first is referred to as a Paper Log. This old but reliable system involves simply watching your tapes and writing down the timecode numbers of the clips you are going to want to use when editing.
Most shooters produce source tapes that include far more material than will be used by the editor. The amount of material shot on tape compared to the amount of material actually used in the final edited project is referred to as a shooting ratio. Because tape is so incredibly cheap, many shooters are inclined to let the tape run rather than stop and start for the important parts. Common shooting ratios for video production are often higher than 6 to 1, and produce tons of material that will only waste space on your drives if captured en masse.
As we saw when discussing digital video data rates, video files are huge, even when compressed down to the respectable 3.6 megabytes per second of DV. Five minutes of footage takes up over a gigabyte of hard drive storage space. If you were shooting at a roughly 5 to 1 ratio and you just captured an entire tape, this would mean that you stored 25 minutes, or 5 gigabytes of video on your drive when you only needed, at most, to store 1 gigabyte.
Clearly, this is not the way to work, even with today’s enormous and inexpensive hard drive solutions. You will find that you still run out of drive space far too quickly. As with RAM, there is no such thing as too much hard drive space. Previewing your tapes and taking loose notes can easily eliminate the problem. Simply jot down the beginning and ending timecode numbers for each section of footage you know you need to capture and edit. Never fear that you might need something you forgot; if you ever need more footage, simply go back in and get that as well. In the final chapter of this book, you will be shown several methods of speeding up this process enormously using Batch Lists for generating paper logs and automating the Logging process.
What if you are collaborating with someone in a project and you both need access to the tapes to create paper logs? You have only one set of source tapes, and moving them around makes you a little nervous, not to mention the fact that constantly playing back and shuttling around on the source tapes increases the likelihood of damage to the tapes themselves.
The solution is another time-tested one. Create what is referred to as a Timecode Window Burn Dub. Most DV cameras will allow you to output the video and audio to analog VCRs. Indeed, your Final Cut Pro editing station will be based on this ability so that you can preview the editing on an NTSC or PAL video monitor. Most DV decks and cameras will also let you display the timecode numbers of the footage on screen in the bottom corner as the video plays.
To create a Timecode Window Burn Dub, simply record a copy of your source tapes to VHS tape with the timecode display turned on in the deck/camera. Then you can use this VHS dub to get the numbers you want by pulling them right off the television screen without having to jeopardize your precious source DV tapes. Since the displayed timecode numbers will exactly match the frame address numbers on the source tape, you will have an accurate paper log of the footage with no excess playing of the original DV source tapes.
Do you have to use paper logs to Log and Capture, though? Not at all. You can easily manually log your clips from right inside Final Cut Pro. Either system is good, although you will find that once again, your particular source material decides which method is most appropriate. Paper logs are most useful when the shooting ratio is very high and when your necessary footage is spread over many source tapes. Manual Logging from inside of Final Cut Pro is more useful when very precise logging is necessary over a limited amount of source material, and, of course, when paper logs do not exist for whatever reason.
Manual Logging is a very simple act. Simply shuttle back and forth around your footage in the Log and Capture window, setting In and Out points for each of the clips you intend to create. After setting an In and Out Point for a clip, you create the offline clip, and it appears inside your project. It will remain offline, signified by a red slash line through its icon, until you capture it, but it is safe as long as your project itself is saved and backed up. If your system should crash, the Logged Clip will still be waiting when you return, provided you saved the project prior to crashing.
Let’s go through and log a clip. As you might expect, there is a recommended process for this. Although Final Cut Pro will allow you to log clips in a sloppy, haphazard manner, doing so really negates the safety, security, and reliability you are gaining through the process of logging and capturing. Setting up and organizing your project will save headaches later on.
Create a Logging Bin
First we will create a Logging Bin. A Logging Bin is the specific bin that all clips appear in as they are logged. When you log a clip and create it, it appears offline in the Logging Bin. However, if you have not established a Logging Bin yet, Final Cut Pro assumes that the Project tab itself is the Logging Bin. This might be OK for the first few clips you create, but very quickly, you will have masses and masses of clips cluttering your Project tab, making it difficult to find anything at all.
Don’t make that mistake. Start out with good organizational habits. Final Cut Pro offers really strong tools for organizing your Project, so take advantage of them. Start by creating a separate Logging Bin for each source tape you Log and Capture from. As you get the hang of Logging, you will find that you learn to organize for the project itself and not just for the source tapes.
STEP 23
To create a new Logging Bin, activate the Project tab in the Browser window, then go to the File drop-down menu, and select New and then Bin in the submenu (Figure 4-28). When the bin appears in your Project tab, change the name of the bin to #1 Tape_Logging_Bin and hit Enter.
STEP 24
After changing the name of the Bin, make sure it is still highlighted, or selected; then go back to the File drop-down menu, this time selecting Set Logging Bin. When you do this, a little film slate clapper should appear next to the bin’s icon in the Project tab. This clapper identifies the bin as the current Logging Bin. Until you change that status, any clips you log will be automatically sent to that bin for storage.
Opening the Log and Capture window
STEP 25
Make sure that your deck or camera is connected through Firewire to the Macintosh and is powered on. Make sure that there is no DV tape inserted in the deck or camera. Although it is not technically necessary to remove the tape before going through the next few steps, in a moment you will see the rationale for doing so.
STEP 26
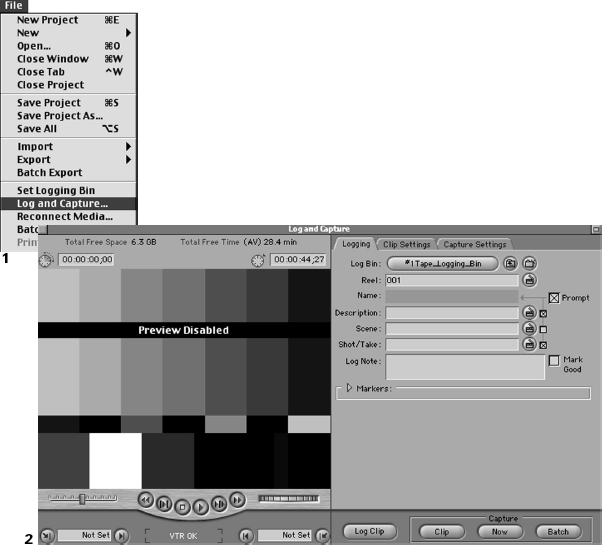
Go back to the File drop-down menu and select Log and Capture (Figure 4-29). On doing so, a window will appear that bears the name Log and Capture. From this window, you will not only log your clips manually or from paper logs, but you will also capture those clips, either as a batch group or individually.
You may notice that when the Log and Capture window appears, the video signal from your deck or camera jumps a little and switches from whatever was showing before to a blank screen. This is because, despite Firewire’s amazing flexibility, it can still send data in only one direction at a time. When you initialize Log and Capture, Final Cut Pro reverses the direction of this data from going out of the Macintosh and into the DV device, to going out of the DV device and into the Macintosh. For this reason, you have to remember to close the Log and Capture window when you are finished working in it. Otherwise, you will not be able to switch back to viewing your editing progress.
The Log and Capture tabs
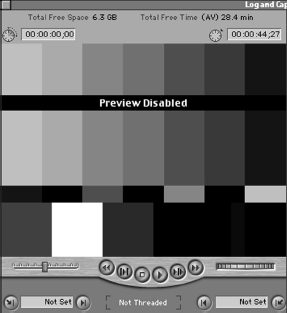
The Log and Capture window is divided into two halves. On the left is the Video Preview window, which initially displays color bars when not being fed a video source (Figure 4-30). Ignore the Preview Disabled message. It will be enabled as soon as you feed it some video. More important, below the preview window and underneath the Play transport button, you should see the message “Not Threaded,” which means that the DV device is present, but no tape is inserted, or “VTR OK,” meaning that a deck or camera is connected, it currently has a tape loaded, and Final Cut Pro sees it. Either of these messages indicates that Final Cut Pro is in fact communicating with the deck or camera.
Any other messages in this location when opening the Log and Capture window could be an indication of misconfigured settings or even hardware problems. Setting your Device Control preset to Non-Controllable Device, for example, will yield a “No Communication” message, as if you had a Firewire device connected but turned off. Of course, if you are using a converter box without timecode or Device Control, you will have to get used to the “No Communication” message.
In addition, do not be concerned that the video quality in this window is rather low. DV Firewire capture is simply a data transfer, and your footage will look exactly the same in Final Cut Pro as it does on the tape. The low quality in this window is simply a result of Final Cut Pro’s saving a little processing power for the capture process. If you need to see higher quality as you Log your Clips, you can watch the footage on a video monitor coming from the video outputs on your DV device. The frames you choose will be the same ones whether you select them by viewing the monitor outputs from the DV device or from the Log and Capture window.
The right half of the Log and Capture window is divided into three separate tabs: the Clip Settings tab, the Capture Settings tab, and the Logging tab.
STEP 27
The Clips Settings tab
Click on the Clip Settings tab on the right side of the Log and Capture window (Figure 4-31). The Clips Settings tab is mostly available for editors using analog capture cards and has tools for calibrating Final Cut Pro to deliver the proper luma and chroma values to work correctly with them. There are, however, two settings that apply to Firewire DV users. There are two little drop-down bars that allow you to refine what you capture in regards to audio and video.
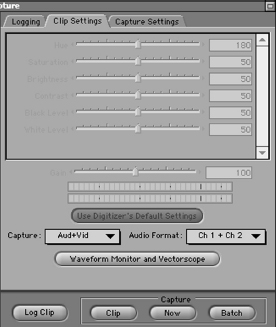
The drop-down bar on the left allows you to select Video Only, Audio Only or Video + Audio from the DV data coming through the Firewire tube. The drop-down bar on the right allows you to specify how Final Cut Pro will regard the audio channels on your tape when you capture them. This can be set for: Channel 1 and Channel 2 separate; Channel 1 only; Channel 2 only; Channel 1 and Channel 2 as a stereo, or panned, mix; or Channel 1 and Channel 2 as a mono mix. If you are not sure, leave this set at the default of Channel 1 and Channel 2 Stereo.
STEP 28
The Capture Settings tab
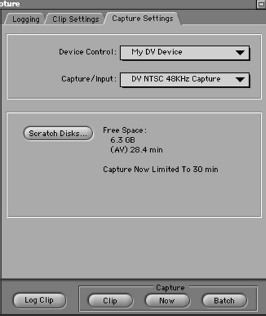
Click on the Capture Settings tab on the right side of the Log and Capture window (Figure 4-32). The Capture Settings tab is actually a quick shortcut to your Scratch Disk Preferences and Audio/Video Settings. If you realize that you need to capture your clips to another hard drive right before you capture, there’s no need to leave the Log and Capture window to do so. Simply click the Scratch Disk button, and the Scratch Disk Preference window will appear. Make your changes, close the window, and carry on with your capture.
Similarly, the Device Control and Capture Settings Presets drop-down bars from the Audio/Video Settings can be accessed here as well, although you can only choose between the presets you established in the Audio/Video Settings tab. If you need to access some other hardware or software configuration that is not yet available as a preset in the Audio/ Video Settings, you will not be able to select it here and will need to quit Log and Capture and return to the true Audio/Video Settings window.
If you initially set your Preferences and Audio/Video Settings when you started up your project as recommended, you would need to visit this tab only when your situation changed. If you are running Final Cut Pro as a dedicated DV Firewire editing station, your hardware and software configuration will likely never change. Once again, a quick check at the beginning of your edit session will keep you from having to remember to check these windows as you work.
STEP 29
The Logging tab
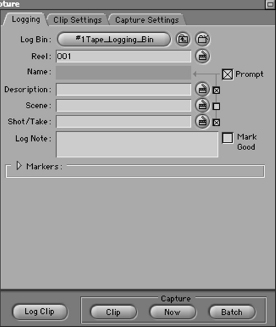
Click on the Logging tab on the right side of the Log and Capture window (Figure 4-33). The final tab, which incidentally is the front tab in this window, is the most important. The Logging tab contains information fields that we need to fill out for each clip as we log it. The information you include in this tab when you log a clip will accompany it in your project, even after you have captured media and converted the clip to Online status. While most of the information you enter here is basically gratuitous and is necessary only for your own organizational purposes, some is critical to your ability to later recapture the media you associate with the clip.
You can never have too much information about a clip. Be as thorough as possible when filling out the fields. You might not think some items are important, but keep in mind that you will be able to organize or perform searches for clips based on the information you put in these fields. For instance, you could stratify a bin based on which clips are marked Good, or alphabetically by name, description, date, or Reel Name. The more information, the better. Because most of this sort of logging work is often repetitive, Final Cut Pro will automatically repeat information in some fields, such as the Reel Name and the Clip Name, from one clip into the next as you Log.
The Reel Name
The most critical field for you to address here is the Reel Name. The Reel Name refers to the particular tape that relates to the timecode numbers you assign with the clip you are logging. The Reel Name is the special link between the real-world tape and the offline clip you are logging. Many different source tapes could and do have the exact same timecode numbers you are associating with this clip. The only way to differentiate one clip’s timecode numbers from another clip’s identical timecode numbers is giving them different Reel Names based on the different tapes they were logged from. If you wanted to capture a clip based on its timecode numbers and then were unable to remember which particular tape the clip was originally logged from, you’d be in a lot of trouble very quickly.
It is imperative, therefore, that you develop a system of individually naming your tapes and labeling them in a durable and easily recognizable fashion, then consistently changing the Reel Names as you log clips from the differently named tapes. You will find that when the time comes to capture all the clips you have logged, Final Cut Pro will go through and ask you for each individual tape by Reel Name as it needs them. If you make all the Reel Names the same, it will be difficult for you to complete the Log and Capture process using more than one tape.
We initialized the Log and Capture window without a tape inserted in the DV device for a reason. This is because we want to get into the habit of giving each separate DV tape a distinct Reel Name, as described above. Although Final Cut Pro will happily allow you to go to the Log and Capture window with a tape already queued up in the deck or camera, doing so causes a default Reel Name of 001 to be inserted in the Reel Name field of the Logging tab. Unless you make a point of changing the Reel Name before you begin Logging Clips, each one will be assigned the Reel Name 001.
This obviously will not work. However, if you get into the habit of inserting tapes only after initializing the Log and Capture window, you will find that each time, Final Cut Pro will greet you with a message, “A new tape has been inserted in the VTR. You may wish to change the Reel.” Although Final Cut Pro will not change the Reel Name for you, you will find that you never forget to stop and change it as necessary if you are alerted by this message. The message will reappear anytime you insert a new tape in the deck or camera with the Log and Capture window open.
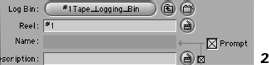
Look above the Reel box and you will see a broad button labeled Log Bin. Inside the button should be the name “#1 Tape_Logging_Bin,” which you assigned as the Logging Bin in Step 24 earlier in the chapter. Although you cannot directly change this Logging Bin assignment to another specific bin, you can open the assigned Log Bin by clicking on the button. You can also create a fresh Logging Bin by clicking on the New Bin button to the right. You can have only one Logging Bin set at a time, no matter how many projects you have open concurrently, so you have to be a little careful about where you are sending your logged clips. Keeping your eye on the ball will keep your clips in order and your project free of clutter and lost work.
The Name and Description fields
Below the Reel field is the Name field. You have two choices here, since for some reason you cannot type directly into the Name field. You can type the name into the Description field, and, when you hit Enter, you will see the information appear as well in the Name field. The other method is to wait until you have selected your Timecode In and Out Points and are ready to actually log the clip to name it.
Next to the Name field is a small checkbox labeled Prompt. If you check this box, on logging a clip you will be greeted by a dialog box that asks you to name the clip. The box will provide fields to describe it with logging notes and mark it as Good or Not Good. Although this method does not give you the option of giving the clip Scene or Shot/Take designations or Markers, you may find it more useful because it forces you to make choices about the naming of your clip, rather than letting Final Cut Pro simply add a number onto the end of the name of the last clip name you logged. Always take responsibility and make choices that are right for your project.
The Markers
Click the sideways triangle to reveal the area labeled Markers (Figure 4-34). As you log each clip, you can also leave special Markers at various points in the clip to help you remember where specific sections of the clip are. The Markers are associated only with the timecode of the clip and do not affect your footage at all. But they can make it very easy to divide larger clips into smaller ones, as well as reminding you where important parts of the clip are once you bring the media into Final Cut Pro, as we will see later in the book.
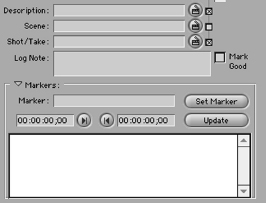
As you log the clip, just hit the Add Marker button when the playhead is parked on a frame you want to mark, making sure that you enter both the first frame and the last frame of the marked sections. If you want to mark only a single frame, make that frame’s timecode value both the beginning and end timecode value for the Marker. If you want to mark a range of frames, add a Mark In point, then move to the end of the range of frames you want to mark and add a Mark Out point. Add as many Markers or ranges of marked frames as you want. Name each Marker; you’ll be able to go in and change any information in the Marker after the clip is logged and/or captured.
The Capture Buttons
Finally, at the very bottom of the tab you will find four buttons of great importance (Figure 4-35). The three buttons to the right are enclosed in a box labeled Capture. They refer to the different possible methods by which Final Cut Pro can capture media. The three buttons are named Clip, Now, and Batch, and when pushed, they initiate the kind of capture that they refer to. Each one has a different value in the production process. There are instances where Capture Now will be the smartest option, whereas in other situations, Batch Capture will be the most effective. As always, strategy determines which method is best for your project.
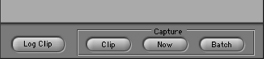
The first method, Capture Clip, is probably the least efficient way to gather media. It functions by capturing one clip at a time, based on the present values in the Log and Capture window. Instead of logging many clips and then capturing them en masse, or simply Capturing Now and quickly grabbing a whole section of footage, Capture Clip takes the Timecode In and Out Points that are currently in the window and captures using them. You do not hit the Log Clip button and create an offline clip. You can get only one clip at a time this way, although you must still log your footage to get the timecode values you need to capture with. This option will be most useful if you have paper logs with the timecode right in front of you, but you need only one or two clips at a time.
Capture Now
The second method, Capture Now, is probably the most frequently used method of capturing clips into Final Cut Pro, because to the new user it often appears more intuitive. Push the button and the capture starts. Capture Now begins capturing whatever happens to be streaming down the Firewire tube when you press the button. It will continue capturing from the Firewire tube until you hit the Escape key on your keyboard, or until it reaches the time limit you specified in the Scratch Disk Preferences.
The most important feature of Capture Now is that, unlike Capture Clip and Batch Capture, it does not require timecode data for Capturing Clips. Although you must specify that no timecode is present by disabling Device Control by selecting Non-Controllable Device in the Device Control Presets of the Audio/Video Settings, Capture Now will capture anything coming down the Firewire tube, including a blank blue video screen from a deck with no tape inserted.
Of course, if you are capturing from a DV device that has timecode, Capture Now will capture and use the timecode that is there. But if you are using any of a number of solutions that do not pass timecode data through the Firewire tube, such as DV converter boxes, Digital 8 camcorders that are playing back video recorded on a Hi8 camera, or DV tapes that have extremely spotty timecode data, Capture Now will be the only way that you can capture into Final Cut Pro.
Use of Capture Now prompts two warnings, however. First, capturing clips without timecode data, which is the principal value of Capture Now, is a risky way to work. Once you capture the clip, it will function just like any other clip. But if its media files are somehow lost or deleted, you will never be able to recapture the exact same clip using Capture Now. You can recapture the same area of video footage and painfully reconstruct your edits with the new clip, but you will not be able to use the simple timecode recapture strategies that make Final Cut Pro so resilient and safe to use.
Using timecode on the other hand, would allow you to easily recapture the exact same clip from your timecode DV tape. Capture Now, when used without timecode, starts and stops with about the same degree of accuracy as a consumer VCR, which we described as unsuitable for accurate editing earlier in the book. If you use non-timecode source material such as the examples above, if possible, consider dubbing your source material to a true DV timecode device such as a DV deck or camera. That will provide you with the same material at the same loss of one generation from analog to digital video, but with clean timecode at the cost of an eight-dollar reusable DV tape. You weigh the risks.
The second warning is that, because Capture Now does not require timecode data to Capture clips, it treats those clips somewhat differently when capturing them. You must manually save any Capture Now clips’ media files before accessing the clip in a project. As such, there is a specific procedure necessary to get your clips into your project after using Capture Now. If you do not take care to follow the procedure described in the section on capturing, you may lose access to the clip.
Batch Capture
The last button is for Batch Capture. This is the most efficient method of Capture, and takes full advantage of timecode. Using Batch Capture techniques, you will use the Capture window to log as many clips into your Logging Bin as you wish. When you have completed logging them and have saved the project to keep from accidentally losing them, you hit this button and go to a special window where you can capture all of them, or any smaller group of them, en masse. This is a much better way of capturing the clips you need without having to manually go in and get each individual clip. It automates the process so that you can go off and have a sandwich while Final Cut Pro searches the tape and retrieves the exact media that you have specified for your project.
This whole method of logging and Batch Capture is referred to as online/offline capturing. When you enter the timecode data and log the clip, it appears in your Logging Bin as an offline clip, meaning that although a clip exists for the timecode data you’ve entered, there is not yet any media associated with it. Until you perform a Capture of the offline clip, it will not have any captured media to reference or index to.
However, after you have logged the clips you want and Batch Captured them, they will become online clips, meaning that the clip now refers not only to timecode data, but also to the media you captured using that timecode data. The Batch Capture button initializes this process of capturing offline clips after you’ve completed the logging process.
Log Clip
The fourth button, named Log Clip, actually creates these offline clips, based on the timecode data you enter in the Log and Capture Window. Once you have given the window a Timecode In and Out Point, instead of simply hitting Capture Clip to capture the clip immediately, you can use Log Clip to create an offline clip in your Logging Bin. Once you have repeated this process enough times to log all the clips you need from your tape, you will proceed to the Batch Capture button described above and capture as many of the Offline clips as you wish. The Log Clip button is the magic switch that converts valid timecode data in the Logging window into Final Cut Pro clips that you can capture and edit with. We’ll return to this when we perform the action of Logging and Capturing.
Logging and Capturing
Let’s log and capture a single clip, using the Log and Capture window to the left of the tabs. We will go through each of the methods for Capturing, first using Capture Clip, next using Batch Capture, and, finally, using Capture Now. All three of these use the same Log and Capture window, although the process differs slightly for each.
Incidentally, if the Log and Capture window is too large and takes up too much of the window, close it and reduce the size of your Canvas and Viewer windows (not the percentage size in the percent drop-down bar but the actual dimensions of the Viewer and Canvas windows). The size of the Log and Capture window is based on the size of those two windows. Keep the Viewer and the Canvas set at 50 percent, and then tighten up their dimensions using the pull tab on the bottom right-hand corner of each window. You want the video window to fit the Viewer and Canvas windows without resulting in scroll bars on either one, so that there is almost no gray area surrounding the video window itself (Figure 4-36). Then reopen the Log and Capture window, and you will see that its size is reduced as well.
The Log and Capture Video Window
The Log and Capture window is dominated by the Log and Capture screen on the left. Unless Final Cut Pro is currently receiving video data through the Firewire tube, the Log and Capture Preview window will simply show color bars.
Insert a DV Tape. As soon as you do so, you will receive a message recommending that you assign a Reel Name to the new tape that has been inserted (Figure 4-37). Do so, using the Reel Name “#1,” which corresponds to your Logging Bin name.

Scratch Disk info
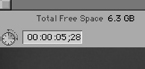
After you name the reel and click through that message, take a look back at the Log and Capture box. At the very top of the window you will see two phrases—Total Free Space and Total Free Time (Figure 4-38). The values for these designations are the amount of free disk space on the current Scratch Disk–assigned drive and the amount of time that free drive space can accommodate at the data rate of the codec you are capturing with. This is merely another warning sign for you regarding your Scratch Disk Preferences. If you see anything unusual here, such as a drive space figure that is too high or low, or a capture limit that is too short, you may have committed an error in assigning the Scratch Disk location or Capture Setting. Final Cut Pro can’t fix this for you, but it can help you catch your own errors.
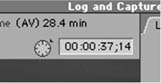
Current frame timecode field
Moving to the top right-hand corner of the window, you will see a small watch dial followed by a field containing a timecode value (Figure 4-39). This field is the timecode for the video frame that the DV Tape is currently parked (i.e., paused) on. If you have a tape in your deck that contains timecode and Final Cut Pro is configured correctly, this window will always report the exact timecode number of the frame the tape head is currently parked on.
You can also use this field to shuttle around the tape.Because the Log and Capture window actually controls the deck as well receving video from it, this field works both ways; it tells you which frame is queued up on the tape head, and you can tell it to go to a certain frame by entering the timecode number. This is but one of many to ways navigate to locations on your tape.


The Tape transport controls and J-K-L support
Moving below the video window, you will see the playback buttons, otherwise referred to as transport controls (Figure 4-40). Using these controls you can shuttle back and forth, remotely controlling the deck from inside Final Cut Pro. There are five buttons for controlling playback as well as two knob-wheel–type controllers that mimic physical deck controls.
The most important buttons on the transport controls on any deck are obviously the rewind, pause, play, and fast-forward controls. Final Cut Pro makes using this window— and other windows—easier, by using a keyboard shortcut convention called J-K-L support. What J-K-L means is that the J key initiates rewind, the L key initiates play/fast forward, and the K key simply pauses the playhead where it is. Beyond this, J-K-L has the flexibility of variable-speed playback. If you hit either the J key or the L key repeatedly, you will find that the playback speed increases, while K always stops the playback entirely.
Using J-K-L means that you can leave the mouse alone and forget about looking at the keyboard to find the right combination. Resting your hand on the keyboard with your middle three fingers spread over the J-K-L keys is very natural, which is why it has become very popular. Practice using it to move back and forth to find frames you want, and you’ll quickly get addicted to using it.
The other two buttons on the transport are Play Around Current and Play In to Out. Play Around Current simply plays a certain number of frames before and after the frame that is currently on the tape head. Where does this certain number of frames originate? It is determined by the settings in the General tab of the Preferences, where it is referred to as Preview Pre-roll and Preview Post-roll. Whatever values you entered in that Preference correspond to the number of frames that will be played before and after the current frame in the window. Play In to Out is simply a preview of the In point to the Out point based on what is currently entered in the In and Out point fields, which we have not entered just yet.
The Jog and Shuttle wheels
The other two controllers hearken back to the world of physical decks. They are referred to as Jog and Shuttle controls. The control on the left-hand side is the Shuttle controller. If you click on the knob and drag it in either direction, you will find that the deck responds by moving in that direction. The speed of playback corresponds directly to how far in either direction you tug the knob. Shuttling is a great variable-speed method of moving around. The J-K-L controls we just described are referred to as Shuttle controls, because we can determine how fast or slow the playback is by the number of times we strike the same key repeatedly.
The controller on the right-hand side is called a Jog controller. The difference between Jog and Shuttle is that with Jog, one turn of the knob means one frame passes on the tape, no matter how far or with how much force you tug the controller. Unlike the Shuttle controller, which can be pulled only so far in either direction, the Jog controller turns a complete 360 degrees, after which a frame has been advanced. There is also a keyboard frame advance and retreat that corresponds to the Jog controller’s frame accuracy. These are the Left and Right Arrow keys, which will advance or retreat one frame at a time.
You will find that Jog and Shuttle have their places and are meant to be used together. Shuttling is useful for moving quickly over large sections of tape, while Jog finds the exact frame you need to edit with. Use Shuttling to get into the neighborhood and then Jog to get the perfect edit frame. But master the J-K-L and Left Arrow–Right Arrow shortcuts rather than dragging the mouse around. Apple will not compensate you for damages caused by carpal tunnel syndrome, so you’d better start protecting your wrist from harm with the keyboard shortcut conventions.
Set the In and Out points for the logged clip
Once you have decided on the In and Out points (i.e., the frames you want to use for the beginning and end of your clip), look below the transport controls to find two timecode data fields, each of which is accompanied by two buttons (Figure 4-41). These are the In and Out Points you will establish for your clip. Prior to setting any In or Out points, these fields will read, “Not Set.”
Remember that you have to leave enough room for the deck to Pre-roll into—a number of frames that we specified while setting up the Audio/Video Settings in the Device Control Preset. The recommended Pre-roll setting is five seconds, so you need to make sure that there are five full seconds for the deck to roll back into prior to beginning the capture. Otherwise, you will receive an “unable to lock deck servo” error message when you initiate the actual capture.
STEP 31
When you have selected a suitable frame for an In point, locate the timecode field on the bottom left-hand side of the window. Click on the button to the right of this timecode field and you will see the timecode number appear there (Figure 4-42). This button is the Mark In point.

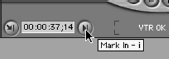
The button to the left of the In point field is the Go To In Point button, which will simply return the tape to the currently established In point should you need to get there quickly.
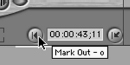
STEP 32
Now shuttle a little further into your tape, making sure that you do not cross any timecode breaks. When you have found a good location for the end of the clip, look over to the timecode data field on the bottom right-hand side of the window. You will find an Out point button on the left side of this field which corresponds to the In point button on the In point field. Clicking the Out point button inserts a value into the Out point field (Figure 4-43).
As with the In point field, the button on the right of the Out point field is Go To Out point and will quickly roll the tape to that frame if engaged. With the establishment of an In and Out point, you now have a valid, if not yet logged, clip, in the Log and Capture window.
As always, there is a much faster way to insert In and Out points using convenient keyboard shortcuts. The I key and the O key will insert In and Out points into these fields. The convenience is reinforced by the fact that these keys are directly above the J-K-L keys that you use for shuttling. You rarely need look at the computer monitor or keyboard again. Simply keep you hand poised on the J-K-L keys and when you find either an In or Out point, move your fingers a half inch up and strike the key. There’s no faster way to log clips, nor one that is less stressful on the wrist. A little practice is all it takes and you’ll be able to log clips without thinking about the process at all. Being able to focus on your editing without thinking about which onscreen button you need to access is the key to becoming a good editor.
The Clip Duration Timecode Field
Now that you have entered a valid In and Out point for the clip, look in the top left-hand corner of the window where you will find another timecode data field (Figure 4-44). This is the Clip Duration Field, which calculates the duration of the current clip, based on the In and Out points. You should see a value here now that you have entered an Out point that follows an In point.
Of course, as with the Current Frame field on the upper right-hand corner of the window, this field can actually affect the other fields. If, for example, you already know the In point and you know that you need to log 10 seconds following that In point, there is no need to shuttle forward and find the frame number or even to calculate the Out point in your head. Simply type 1000, which is a shorthand for the timecode value of 00:00:10:00 or 10 seconds, into the Clip Duration field and it will automatically update the Out point based on the In point and the Duration timecode value.
Capture using Capture Clip
Now that you have entered the required information for the clip, you are ready to capture using either of the two logging methods described earlier.
STEP 33
Click the Clip button in the Capture box on the Logging tab side of the window (Figure 4-45), Final Cut Pro will begin the capture process. If you selected the Prompt checkbox on the Logging tab, you will be shown a box asking you to name the clip. Do so, click OK,and Final Cut Pro will wake up the deck and begin searching for the In Point. You will see a black screen with a message at the bottom telling you what Final Cut Pro is doing at the moment. When it finds the In point on the tape, it will begin capturing and continue to do so until your clip is completely captured. It is now available for editing.
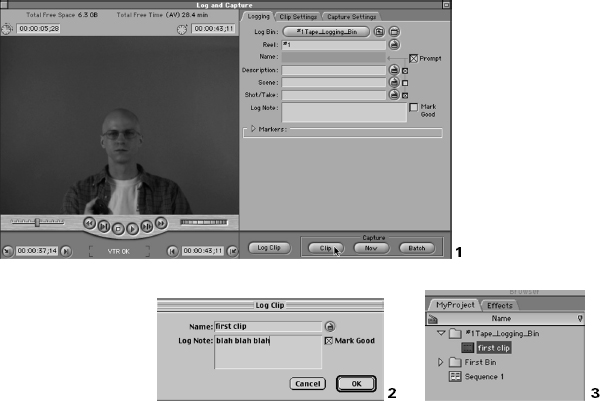

If you take a moment and look back into the Log and Capture window, you will see that it has set a new In point that is one frame later than the Out point of the clip you have just finished capturing (Figure 4-46). The new Out point is one frame later than the new In point, because you will need to log a new Out point, no matter what the new In point is. This means that Final Cut Pro is now ready for you to log the next clip you want to capture.
Logging and Capturing as a Batch Capture
Logging offline clips for Batch Capture
Although you have just successfully captured a single clip, it should be pretty obvious that this would be a very slow method if you needed to capture 100 clips, all with widely varying durations. It would be much more efficient if you could log all of your clips one after another, and upon finishing that operation, simply walk away from your station while Final Cut Pro grabbed them all in order.
What you need is the Batch Capture operation. As described earlier in the discussion of Offline/Online capturing, you will log each clip one by one, creating offline clips in your Logging Bin. After you have completed logging all the clips you want from a single tape/ reel, you will select Batch from the Capture button selections and let Final Cut Pro do all the work.
Using the Log Clip button
To do a Batch Capture, simply repeat Steps 31 and 32, entering new In and Out point information just as you did with the Capture Clip process. However, instead of clicking Clip in the Capture buttons, select the Log Clip button to the left (Figure 4-47).
STEP 34
After selecting new In and Out points, select the Log Clip button. On clicking Log Clip, you will once again receive a dialog box asking you to name the clip. Do so, and click OK.
After clicking OK, however, Final Cut Pro does not immediately begin the Capture
process. If you look into the Logging Bin you established in the Project tab of the Browser window, you will see a new offline clip. Offline clips are identified by a red line slashing through the clip icon. If you double-click the Offline clip so that it loads in the Viewer window, you will see a standard Offline Clip image, indicating that there is no media file yet associated with the clip.
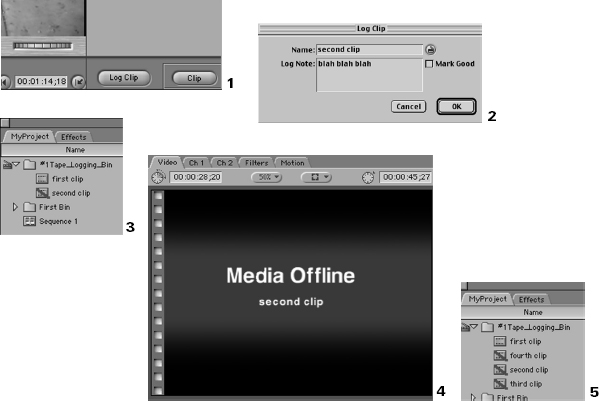
Instead of immediately rushing to capture this offline clip, leverage Batch Capture techniques by logging another few clips using the same logging method. As you proceed, you will see the new offline clips appear in the Logging Bin one after another. After you have logged a few more clips, return to the Log and Capture window and select Batch from the Capture button selections.
The Batch Capture button and dialog box
STEP 35
After logging a number of Offline clips, select the Batch button (Figure 4-48). When you hit Batch, you will be taken to a dialog box that acts as a sort of idiot check for the capture you have initiated. Since the Batch Capture is an automated process that is likely to involve a great deal of unattended action on the part of Final Cut Pro, you are given this opportunity to check all your settings, as well as the number of clips you are about to capture and their expected length.
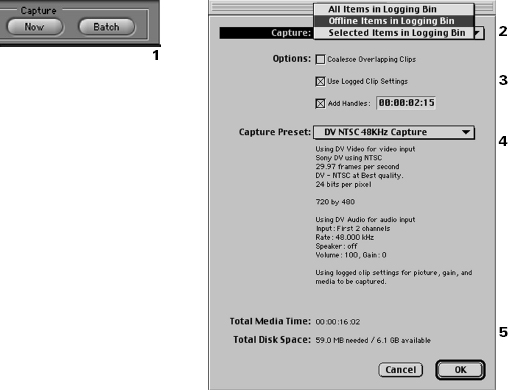
Capture Selected or All Clips menu bar
At the top of this box, you will see a small drop-down bar (Figure 4-49). Depending on how you left your Logging Bin, this will allow you to choose to capture either all the offline clips in your Logging bin or just the selected ones. Chances are that if you hit Batch immediately after logging your last clip and without revisiting your Logging Bin, the last clip you logged is the only one actually selected. That is because after you log a clip, Final Cut Pro selects that clip until you log the next one, or otherwise perform another selection.
The Batch Capture dialog box drop-down bar gives you the option of capturing all of the offline clips in the Logging Bin or only the selected ones. Why, you may ask, would you want to capture only selected offline clips in the Logging Bin? Sometimes, it would be counterproductive to try and capture them all. We can log all the offline clips we want, including clips from different tapes. As we saw before, we need to insert a new Reel Name for each different tape we use so that Final Cut Pro can tell that the similar timecode numbers for two clips actually refer to different tapes. If you don’t give a clip a reel name, Final Cut Pro will assume the clip should be captured from whatever Reel Name was there from the last time.
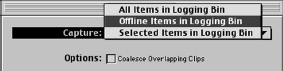
If you have logged the clips correctly, including giving the correct Reel Name to each clip that corresponds to the tape it relates to, Final Cut Pro will actually ask you for the correct tape before it begins the act of capturing. Every time it goes to capture a clip, it will check the reel name and make sure that the reel the clip is looking for is the same one as the tape you put in when it asked you for that reel. If a new clip from a different reel is to be captured, Final Cut Pro will temporarily stop the capture process and ask for the new reel the clip is associated with.
If you do all of your logging across many different tapes and Reel Names and you chose All Clips in Logging bin, Final Cut Pro would stop capturing when it reached a clip that was associated with a Reel Name and tape not currently in the deck. As such, you want to select only clips associated with a specific Reel Name and then choose Selected Items in Logging Bin. If you have any clips selected in the Logging Bin, Final Cut Pro will give the option of capturing All Clips in Logging Bin, or Selected. This gives you the ability to let Final Cut Pro do the capturing without interruption for tape changes and, most important, without your attendance. When you come back after the first capture, switch the tape to the next reel name, select the clips associated with that Reel Name, and proceed with the next round of captures.
The next items are the Options checkboxes.
Options checkboxes: Coalesce Overlapping Clips
The first is called Coalesce Overlapping Clips. This refers to how Final Cut Pro will capture the media for any two or more clips that have overlapping timecode values. It’s quite easy to accidentally log two clips, each of which use some of the same timecode numbers from the same tape. If you enter an Out point for a clip on one day and then the next day log another clip from the same tape with a beginning timecode value that is before the Out point of the earlier clip, you’ve got overlapping clips. This isn’t the end of the world. You simply need to inform Final Cut Pro of how to deal with it. Since this could easily happen without your knowledge, simply plan ahead and have it set the way that you would want it dealt with if you knew.
To Coalesce the clips means that Final Cut Pro would capture one media file that contained all the data for both clips. The clips in your project would behave the same either way, but coalescing just means that the two clips refer back to a giant media file containing all the video frames for both clips. Disabling Coalesce would create two completely separate clips which each have a copy of the frames of video they share. Disabling is a slight waste of drive space, but there is something to be said for having distinct media files for each clip. Leave Coalesce disabled unless this is a mistake you make consistently, in which case you might want to take a look at your logging methods rather than utilize the Coalesce function.
Options checkboxes: Use Logged Clips Settings
The next Option is Use Logged Clip Settings. For most Firewire DV editors, this checkbox will not make much of a difference. Use Logged Clip Settings simply tells Final Cut Pro to override the Capture preset settings currently in play and to use the ones that were enabled when the clip was logged originally. Since the settings will rarely change for Firewire DV editors, leaving this unchecked will ensure that you capture the clips according to the way you have the system set up as you begin your capture, not the way it was on the airplane as you logged clips on your way back from that business meeting in Zurich.
Options checkboxes: Handles
The next Option is a checkbox that contains a timecode field for entering handles. If you remember, “handles” simply means having the system grab a specified number of video frames during the capture in addition to the number you asked for when you logged In and Out timecode numbers for the clip. If you set a value for handles of 15 frames, Final Cut Pro will always capture an extra 15 frames at the beginning and end of every clip you capture. This will not affect the In and Out points of your captured clip. The frame handles will stay safely out of view until you need to bring them into play. Your In and Out points will always reflect the way that you logged them for the clip until you change them.
You can of course override the option to get handles on your captured clips by disabling the checkbox, but doing so is a pretty bad idea. Once you’ve captured the clip and you begin editing, you will usually find at least one clip that you need extra frames for, especially in the case of sequences that require transitions like fades and dissolves. It’s usually hard to predict exactly how much video you’ll need for these purposes, and a good solid 15-frame handle is usually about right for the purpose. In addition, this will protect you from a rare occurrence in which the capture process accidentally duplicates the first frame it captures. Inserting handles will completely eliminate this as a potential threat.
Capture Preset choice bar
The next item is a drop-down bar that allows you at the last minute to switch the Capture Preset you want to use for the Batch Capture. Although it is not likely that you will have to change this, you at least have the option. This would be the right time to make sure that you have selected the proper audio sample rate and to switch it if you have chosen an incorrect one. Below the Capture Preset drop-down bar, you will find a summary of the settings for the current Capture Preset.
Batch Capture idiot check summary
Underneath the Capture Preset bar, you will see your last idiot check summary information. The first item, labeled Total Media Time, refers to the total amount of time to be captured in the entire Batch Capture. It is the sum total of all the clips’ durations combined. If you see a particularly odd number here, like 12 hours, you should probably abort the capture and check your clips.
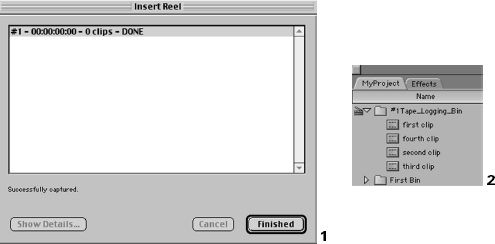
The second item is labeled Total Disk Space and will contain two numbers. The first number is a calculation of the total amount of drive space necessary to capture the amount of Total Media Time based on the data rate of the codec in use. Since Firewire DV editors will be using the DV codec, which we know has a data rate of roughly 3.6 megabytes per second, this number should be easy to mentally calculate. The second number is the amount of drive space currently available on the assigned Scratch Disk Drive. This does not include a Minimum Allowable Free Space on Scratch Disk limit that you may have set in your Scratch Disk Preferences, so don’t let a large number here go to your head.
If you see a problem, hit the Cancel button and rectify the issue. If everything is set and checks out, click OK and begin the Batch Capture process. You will be greeted with a box asking you to insert the proper tape. When you do so and hit OK, Final Cut Pro will proceed to capture all the clips. When it has finished capturing, the offline clips in the Logging Bin will have lost their red lines and, having associated media files, will now appear as online clips (Figure 4-50).
Capture Now
Important information about Capture Now
Logging your clips with timecode for immediate capture or Batch Capture strategies is definitely the safest and most efficient method of capturing media. But some Firewire configurations do not have access to timecode. And in some situations, capturing a quick clip will be more productive than logging a clip manually as described in the previous section.
In these instances, Capture Now will be more effective. Final Cut Pro allows for this, although the process is slightly different. Care must be taken, because clips captured using Capture Now are handled differently and it is easy to miss a step in the process, confusing your project and possibly losing the link between the media you capture and the clip you want to work with in your project.
Capture Now and the relationship with DV timecode
First, you need to determine whether you are sending timecode data from the DV device through the Firewire tube to Final Cut Pro. Remember that just because video and audio are getting captured doesn’t mean that timecode data is being captured as well.
If you are using a Digital 8 camera, only footage that was shot using the Digital 8 camera has valid DV timecode written into the data of the footage. If you are using a tape that was recorded in a standard Hi8 or 8mm video camera, the footage will not have DV timecode. Although you can still easily capture this footage using Capture Now, you cannot do so using Device Control, and you will not be able to get timecode data for the clip when you capture it. If you are using a DV converter box, there will also be no DV timecode accompanying the DV data stream through Firewire, unless your system has a serial converter of some kind.
Also remember that this refers to any device that offers pass-through operation. Many DV decks and cameras will allow you to connect an analog device to the inputs of the DV device, which will convert the analog signal to DV stream on the fly and pass it directly to Final Cut Pro through the Firewire connection. Such pass-through connections also do not carry DV timecode and act precisely like a DV converter box.
If you are using Capture Now with one of the aforementioned solutions and do not have DV timecode, you may use Capture Now to gather your clips, but you must switch your Device Control Preset to Non-Controllable Device in the Capture Settings tab of the Log and Capture window. This preset will keep Final Cut Pro from looking for the DV timecode that does not exist. If you do not switch this preset, the attempt to Capture Now will result in a long system hang followed by an error message.
On disabling Device Control, you will see that the Clip and Batch Capture buttons have gone gray and become unavailable. This is because they require Device Control and timecode to operate.
Because you have no access to timecode, Final Cut Pro will not be able to control the device. This means that you will have to queue up the footage that you want to capture on the deck by hand. This is a slightly awkward way of working in which you hit play on the device, hit Now in Final Cut Pro, and hope that it begins capturing before the first frame you wanted to work with passes by. Although it may work in a pinch, it becomes frustrating rather quickly in larger jobs.
On the other hand, if your device has DV timecode, you can Capture Now with complete Device Control and with the security that recapturing lost clips using timecode can deliver. In this case, make sure that the Device Control preset is still set correctly for the configuration you want to use and not to Non-Controllable Device.
Special saving conventions
The other major difference between logged clips and Capture Now has nothing to do with the method by which you capture, although that is different as well. The main difference is in how the media is dealt with after the capture is complete. Clips captured through Capture Now are not automatically saved to the Scratch Disk and added to a Logging Bin as are logged clips. Capture Now clips are not associated with a project until you save them and move them to a Project tab in the Browser window. You can even capture clips using Capture Now without a project being open!
This can be very confusing to new users of Final Cut Pro who have not yet mastered the flexibility with which Final Cut Pro can juggle media between and even outside of open projects. To avoid this problem be careful to follow the following steps in using Capture Now.
The Capture Now process
STEP 36
If you have Device Control and DV timecode, make sure that you fill out the Logging tab information to the right, as if you were performing a logged capture. In particular, make sure to enter a Reel Name, since your clip will carry valid timecode data and should be associated with a specific tape in case you need to recapture the exact same clip with timecode later on. Of course if you have no DV timecode, such Logging data will not be stored with the clip anyway.
STEP 37
If you have Device Control, start the tape rolling, using the J-K-L keys as described in the section on Log and Capture. They will perform the same way. If you have no Device Control, simply hit play on the DV Device. You will need to cue up your tape a few seconds ahead of the place you want to start capturing, because it takes a moment for Final Cut Pro to prepare the Scratch Disk for your media. Think of this as a Pre-roll and add at least five seconds so that you are sure you get the In point you wanted, plus a little extra.
STEP 38
As the tape is rolling, hit the Now button in the Capture options. When you do so, the Currently Capturing window will pop up and you will watch what is being captured stream in. When you are ready to stop the capture, simply hit the Escape key. The Escape key is the only way to stop Capture Now, with the exception of reaching the Capture Now limit you set in the Scratch Disk Preference tab in the Preferences.
When the Currently Capturing window disappears, you will see that a new Viewer window has opened containing the clip you just captured (Figure 4-51). The title at the top of this Viewer window will read Untitled 0000, unless you entered a clip name in the Logging tab prior to capture. This is because the clip has not yet been officially saved to your Scratch Disk. Even though the clip is sitting in a Viewer window, it is not yet recognized by a Final Cut Pro project. To be recognized, it must be saved into a project by placing it in one and then saving it to a Scratch Disk folder.
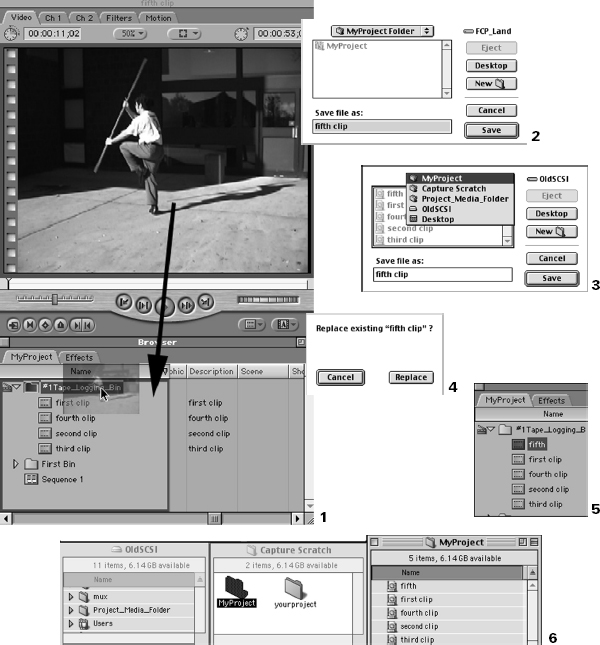
Immediately drag the Capture Now clip from the Viewer window down into your Project tab or Logging Bin. When you do so, you will be presented with a dialog box asking you to save the clip. Saving the clip does more than simply keep it from being lost. It establishes a link between the clip in the project and the media file in your Scratch Disk folder, essentially creating a reference for the project to work with.
STEP 40
Navigate the Save dialog box to the folder that you have set as the project’s Scratch Disk location. Inside the Scratch Disk Folder, double-click on the Capture Scratch folder. Then double-click on the folder that bears the name of your project. Inside that folder, you will see the name Untitled 0000 (or your clip name if you gave it one in the Logging Tab) grayed out. This file is the temporary capture location that Final Cut Pro will use until you either save the clip, which you are doing now, or decide you don’t want to keep it.
At this point, you can name the clip something else. If you were working with DV timecode during this Capture Now session, you could have assigned the clip a specific name in the Logging tab and that name would have stuck through the capture and saving process. But if you were not capturing with DV timecode, you would have been unable to name the clip until this point.
STEP 41
Before saving the clip in this dialog box, change the name to something relevant. If you do not change the name in the Save dialog box, Final Cut Pro will ask if you want to replace the temporary file created during the Capture Now. If you change the name, it will not. Either way is fine; just don’t use Untitled anything, and don’t skip this process. When you hit OK, the clip will be renamed in the Project tab of the Browser window, and if you navigate back through the Desktop to your Scratch Disk folder, you will see that the Untitled 0000 clip has now been renamed with the name you saved it under.
If you do not save following this method, you will end up with clips saved all over your system. This makes it very difficult, if not impossible, to guarantee that your media will be easy to find in the event you want to get rid of it or that your system works at optimum efficiency with regard to the performance of your media and startup drives. If you hit Cancel during the process and do not actually save the clip, the capture will be lost and the Untitled 0000 clip will vanish from your Capture Folder.
Once the clip has been saved correctly, it is available to your project in the same fashion that the logged and captured clips were.
When was the last time you saved and backed up your project? After you have completed your logging or capturing is the right time to save the project you have created the clips in, because, although the actual media files have been properly saved to the media drive, the clip, which is now associated with the project, has not yet been saved as part of the file. If your system had crashed for any reason, the clip would not be there when you reopened and you would need to find the media files in your capture scratch folder and manually import them.
It should be obvious that Capture Now is not an efficient system for capturing large numbers of precise clips. Wherever possible, it is far wiser to capture clips by logging their timecode. It is safer, faster, and less likely to give you headaches.
Importing media
Capturing footage from DV tape is not the only way of getting media to work with in Final Cut Pro. Final Cut Pro is quite flexible and can import and export a wide range of media file formats. Final Cut Pro can easily import the following file formats, arranged by file type:
Graphics: |
|
BMP |
|
Flashpix |
|
GIF |
|
JPEG/JFIF |
|
MacPaint (PNTG) |
|
Photoshop (PSD) |
|
PICS |
|
PICT |
|
PING |
|
QuickTime Image File (QTIF) |
|
SGI |
|
Targa (TGA) |
|
TIFF |
|
Video: |
|
AVI |
|
QuickTime Movie (MOV) |
|
Image Sequences |
|
Flash (video only) |
|
Audio: |
|
AIFF |
|
Audio CD Data (Macintosh) |
|
System 7 Sound |
|
Wave (WAV) |
Some of these formats may seem obscure, but they all have one thing in common: Final Cut Pro can import them into your project and use them as clips for editing purposes.
Such importing is very common. By using audio tracks from an audio CD or using Photoshop files to create graphics you can easily add professionalism and class to your finished production. Although Final Cut Pro is a really advanced editing solution, there are things that other applications can do much better.
Graphics applications such as Photoshop have tools that are much more suited to developing beautiful text and other visual elements. Audio applications such as Digidesign Protools and Bias Peak are often used to texture, mix and clean up audio tracks that don’t sound their best initially. Further, if you deal with clients who provide you with standard graphics or sound elements, you’ll have to deal with importing their materials.
You’ll be happy to find out that Final Cut Pro could care less what most file types are. It deals with every file as a piece of media just like any clip you capture. The only restrictions on the clip will of course depend on what the file was (audio-only files such as AIFFs, for example, will have no accompanying video); Final Cut Pro will leave this up to your discretion. “Parts is parts,” as they say.
The main point is that Final Cut Pro regards each imported file as a clip and a media file linked together after the manner of our captured clips. Because of this, these imported media files need to be saved correctly as were the Capture Now clips. There is no Scratch Disk Preference for importing media files. We must complete that action ourselves. Let’s step through the process of correctly importing a couple of common file formats and look at the proper method for doing so.
Importing audio CD tracks
Importing audio tracks from audio CDs is an easy and quick way to add life to your production, but there are a couple of nonintuitive pitfalls that await the editor who engages in such an import. The main two issues are saving the file correctly and making sure the sample rate matches that of your other clips and sequences.
The audio CD format
Audio CDs are not formatted like other media disks.
STEP 42
Pop an audio CD into the Macintosh and it mounts on the Desktop just like any disk. Double-click it and open it up as a window (Figure 4-52). Inside you will find a number of files with track numbers for names. If you double-click on any of them, the Apple Audio CD Player will automatically begin playing the audio track that corresponds to that track number on the CD. It would seem that the file with the track number is the actual audio file on the CD. Unfortunately, this is not true.
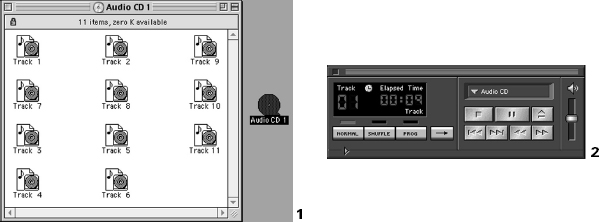
If you grab one of these files from the audio CD and drag it to the Desktop, it will copy almost instantly (Figure 4-53). Remove the CD from the Macintosh CD-ROM drive. Then double-click the just-copied file and you will find that the Apple Audio CD Player can no longer find the file the audio track refers to.
The Apple Audio CD Player can no longer find the file the copied audio track refers to because, with the audio CD format, the media file is actually hidden. The audio track file you copied to the Desktop is really just a reference to the media file that is hidden on the CD, rather like our clips and captured media file in Final Cut Pro. The media file is accessed through this file so that you can play the track, but only if the audio CD is present. So much for drag-and-drop music piracy.
Does this mean that you can’t use audio CD tracks in your production? Not at all, although you need to be careful of breaking the law by illegally copying and using trademarked material. In order to use audio CD tracks, you need to physically import the track. This involves converting the audio CD file format that is not native to the Final Cut Pro application into an audio file that Final Cut Pro can use. Final Cut Pro does this for you when importing.
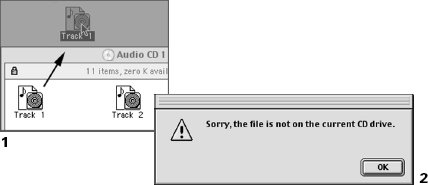
STEP 44
Return the audio CD to the Macintosh’s CD- or DVD-ROM tray. When the CD has mounted on the Desktop, go to the Final Cut Pro File drop-down menu and select Import, and then File from the submenu (Figure 4-54).

You will be presented with a dialog box that asks you to locate the file you wish to import. Navigate the box to the Desktop, locate the audio CD, double-click it, and then select the audio track you want to import.
These track numbers don’t tell you much about the audio track you are importing. If you aren’t sure you’ve got the right track, you will be able to preview it right before committing to saving it to your Capture Folder. For now, select the one you think is correct.
STEP 46
Click the Convert button, and you will move to the next dialog box, which contains two important tools. Before saving this track as a file, click the Options button.
STEP 47
You will move to a new box that offers some customizations in connection with the way you import the track. At the top of this box, you will be asked to select a sample rate to convert the Audio CD track to. Audio CD sample rates are always 44.100 KHz. You need to maintain the highest possible sample rate here, so select 44.100 KHz. On importing an audio CD track, you cannot up-sample (i.e., convert the sample rate up from 44.1 KHz to 48 KHz), so maintain the same quality that exists in the original format.
In the bottom area of this box, you can preview the track you are importing by hitting the Play button. Also, you can actually create a range of the track to import by moving the Start and End points, making it easy to trim down the audio track to just the section you want to use. If you realize that this isn’t the audio track you wanted, hit Cancel, return to the previous box, and select another track.
STEP 48
Once you have set these Options, click OK to return to the Save dialog box. Now, navigate the dialog box to your project’s Capture Folder. Initially, the Save button will be grayed out, because the current Save location is on the audio CD, which is a locked disk. Since this audio file is a relatively large file with a higher data rate, it should be saved with your other video and audio media in the same Capture folder you have designated in your Scratch Disk Preferences.
STEP 49
Once you reach your project’s Capture folder on your Scratch Disk, type in a name that corresponds to the file, followed by the suffix .441.aif—for example, “purplehaze.441.aif.” When Final Cut Pro converts the Audio CD Track to a format it can use, it will convert to an AIFF file, which is the native audio file format for sound files in QuickTime, the multimedia architecture that Final Cut Pro is based on.
Click OK and the File Format Conversion begins. When it is complete, you will see that a new audio clip, designated by the icon of a speaker, has appeared in your project tab. The speaker icon tells you that the clip is an audio-only clip. If you double-click the clip to load it into the Viewer, you will see that it contains only an audio tab and a filters tab. Now that the clip is imported, you can use it as you would use any clip.
CD import part 2: converting the sample rate
But there is still one complication. Our audio recorded in camera—and therefore the appropriate audio sample rate for our sequence—is either 48 KHz or 32 KHz, not 44.1 KHz. We know that we cannot mix sample rates in our sequences. So how is it possible to get the sample rate of the new 44.1 KHz audio clip up to the 48 KHz or down to the 32 KHz required by our sequence?
The answer is simple; we must export the clip, converting the sample rate as we do so, and then re-import the clip at the new, proper sample rate. It takes only a moment to do so, but not converting the sample rate delivers the risk of audio distortion and possible sync issues. Always work with clips that share the same sample rate with other clips and with the sequence they appear in.
STEP 51
Select the 44.1 KHz clip in the project tab (Figure 4-55). Then go to the File drop-down menu, select Export and then QuickTime from the submenu. A dialog box will appear that requires a couple of changes.
STEP 52
Look to the bottom of the box and locate a drop-down bar entitled Format. Clicking on this menu will offer several different options for Export file formats. Remember that QuickTime is really just an architecture, not a specific file type, so there are separate Quick-Time formats for Audio, Video and Audio, MPEG, and the PC variations of AVI and WAV. Since this is an audio file, select AIFF. When you select AIFF from the menu, you will see that Final Cut Pro automatically adds an ‘.aif suffix to the file name in the box. You will want to change the name in a moment anyway, so move to the next Option before naming and saving.
STEP 53
Click the Options button and you will enter a new dialog box that asks you for specifics about how to process the file as it exports. This is where you specify the sample rate conversion. Change 44.100 to 48.000, making sure that Compressor stays set to None. Click the OK button to return to the Save dialog box.
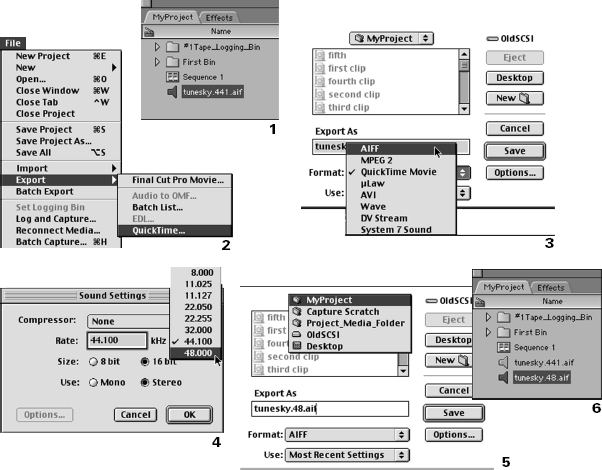
Navigate the box once again to the same proper Capture folder in your Scratch Disk folder. Now type in a name that retains the subject of the clip but specifies that the clip is now 48 KHz and an AIFF file to boot—for example, “purplehaze.48.aif.” Click OK, and the conversion will take place.
Once that is complete, you can import the new 48 KHz AIFF file into your project and begin working with it. Be careful that you pay attention to the naming. Unless you throw away one of the two clips you will have a 44.1 KHz and a 48 KHz clip of the same audio CD track in your project. Some editors simply throw the one with the wrong sample rate out immediately to avoid confusion. I generally back up everything from my CD track down to my toenails. Do what is best for your own organization purposes, but remember to be careful about naming clips and files.
Importing Photoshop image files
Graphics files created in Photoshop are easy to integrate into your Final Cut Pro project. Why settle for the limitations of Final Cut Pro’s built-in Title Generator (which we will in fact examine later in the book), when you can come up with well-designed graphics files that incorporate image content as well as stylistic text. Best of all, it’s easy to get these into your project.
As with audio files, there are a couple of complications in the import process that must be taken into account. With image files from Photoshop, the two issues are square vs. non-square pixels and accessing Photoshop Layer effects in Final Cut Pro. Failure to take these into account will result in distorted images and/or unexpected features on completion of the import process.
Square vs. non-square pixels
The first issue, that of square vs. non–square pixels, calls for a little explanation about the way different systems display images. A digital image is broken down into individual dots of image detail called pixels, short for picture elements. It is an atomic model in which the pixel is the smallest indivisible section of an image. We measure all digital images using pixels (with the exception of vector-based images, which are addressed in the section that follows), whether that image is a still digital video frame or a scanned image.
Now if all pixels were exactly square, this would make things very simple. And in fact, all computer-driven display systems use square pixels to interpret digital imagery. Most computer applications, like Photoshop, use square pixels. Some video capture cards use square pixels, and video that is to be viewed only on computer screens, such as Web and CD-ROM multimedia codecs, use square pixels as well.
But the problem is that most professional DV editing systems, including Final Cut Pro, use video codecs that require images to be processed using rectangular pixels, which are commonly referred to as non-square pixels. Not all video codecs use non-square pixels, and, as we know, Final Cut Pro can use many different codecs in addition to the DV codec we are using with Firewire editing. The need for square or non-square pixels is determined by the video codec you use. The main thing to consider here is whether or not the image you are creating in Photoshop, or wherever, will be mixed with video compressed by a codec that uses a non-square pixel size. Like audio sample rates, you cannot mix square pixel images with non-square pixel video.
The DV codec that you use with Final Cut Pro uses non-square pixels. If you work with it in a sequence, and your images are not prepared in advance to deal with the difference in the shape of the pixels, the images be stretched vertically and will appear tall and thin. The square pixels of the image that were created in a square pixel graphics application such as Photoshop are interpreted into the non-square pixel shape of the DV codec Final Cut Pro is using.
There is an easy way around this problem. Create your images in your square pixel graphics application using a stretched frame size that Final Cut Pro can scrunch back to the proper pixel shape for mixing with non-square pixel video. The process involves prefiguring the dimensions of the DV frame in the graphics application as if it actually were using square pixels. Then you squeeze the image down in the equal and opposite direction that you know it will be stretched when the square pixels get interpreted as non-square.
Don’t let the math or the process bother you. It’s a simple series of steps that has been ingrained in every Final Cut Pro editor’s head since day one. DV NTSC, which has an actual non-square pixel size of 720x480, would be 720x534 if its pixels were perfectly square. DV PAL, which has an actual non-square pixel frame size of 720x546, would be 768x576 if its pixels were perfectly square.
In Photoshop, you will create graphics images using the pre-figured 720x534 or 768x576 square pixel size of your DV video frame. Then the last step you will take before saving your graphics file will be to use the Image Size command in Photoshop (or the equivalent in whichever application you use) to squeeze the pixel dimensions of the graphics file down (to 720x480 for NTSC or 720x546 for PAL) for import into Final Cut Pro. When you import to Final Cut Pro, the squeezed image will be stretched back out as the square pixels are stretched into non-square pixel shapes. No detail or data is lost or gained. The pixels are just shaped a little differently.
Getting Photoshop layer effects into Final Cut Pro intact
The other thing to understand about importing images is the way that Final Cut Pro deals with Photoshop layers. Photoshop files can be flattened single-layer files or stacked multilayer files. When you create a Photoshop image, you can add imagery to it either on the initial image layer, rather like painting on a flat canvas, or by adding imagery to new layers that exist as discrete images stacked one top of another. This adds a lot of functionality to the Photoshop image, allowing you to edit parts of an image without altering other parts of it and to create one file that contains many different image components, all separated and discrete.
The way this is organized in the Photoshop file is that each layer of a multilayer file is actually a distinct flattened image. Each layer of the Photoshop multilayer file could be viewed as an individual still image, but they are knitted together, one on top of the next so that you see them from the top down as a composite image. This just means that you see the multiple layers of the file from the top down as if it were one image. Anything on the upper layers covers whatever is beneath on the lower layers.
Final Cut Pro is integrated with Photoshop in a special way. It accepts single-layer flattened Photoshop files as you would expect, simply translating the still image into video frames. But it can also import multilayer Photoshop images with the individual layers intact, each layer being regarded as a flattened still image. This is a real bonus, because it allows you to apply Final Cut Pro effects or movement to the individual layers of the graphics you’ve created rather than having to apply all your effects to an entire image. This can speed up your workflow enormously, especially if you work with a lot of Photoshop-generated text and graphics that must be manipulated and adjusted on a case-by-case basis.
The problem with this is that many of the really excellent effects that can be applied to image layers in Photoshop cannot be directly accessed when a multilayer file is imported to Final Cut Pro. Because many of these effects are Photoshop’s proprietary vector-based effects, they are lost when the image is directly imported into Final Cut Pro, which cannot understand them. On the other hand, if you rasterize, or convert the multiple layers to bitmap while still in Photoshop, the layer effects cease to be vector-based and become a part of a flattened bitmap, or raw pixel data. This means that they will still be present when you import the image into Final Cut Pro.
Vector and bitmap graphics
To understand why this is, we need to understand a little about the difference between vector-based and bitmap-based graphics. Vector-based is from Mars, bitmap-based is from Venus, and you are sitting here on Earth. With a few rare interesting examples, applications cannot deal directly with both types of graphics, because they measure and plot space in a distinctly different way. The vector-based method describes the world in a series of geometric shapes, since all complex shapes, like the human body, can be broken down into many smaller less complex shapes. The bitmap method on the other hand is an atomic model, based on the earlier described pixels, in which image matter is composed of an exact number of indivisible individually colored dots.
These two methods of generating an image are at loggerheads. There is no such thing as a single reducible geometric shape. As your high school geometry teacher might have drilled into you, “A point is not a shape.” Shapes are possible between points. With a vector-based graphic, you have a point A and a point B. To describe a simple shape like a line, all you have to know is that it is the shortest distance between A and B. To make things more complex, just add another point, or vector, C, and now you’ve got a triangle. The more vectors you add, the more complex the shapes get until at some point you aren’t looking at geometry, you’re looking at images.
If you look around at naturally occurring shapes, it’s difficult to escape the notion that vector geometry is a natural science, as well as a thoroughly artificial one. Infinitely thin lines and small points aren’t physically possible, but nature does generate uncannily geometric patterns. Philosophical pondering aside, it is important to note that vector geometry is an exceptional way of creating computer graphics, one that allows a lot of flexibility and efficiency in adapting shapes in such applications as Photoshop.
Shapes do not exist in the bitmap universe. Neither does empty space. This is the primary difference between the bitmap and the vector. With a bitmap image, each space of the image is occupied by a pixel. The color of that pixel determines what you see in that section of the image. The larger the number of pixels squeezed into an image, the higher the detail (resolution) of the image, since there will be more opportunities for pixels to change color over a distance.
But that is the key; no matter what color the pixels are, they are there, completely filling the image. Vector images, on the other hand, are shapes created from points in an empty space. You see a geometric shape because it has an inside and an outside. A bitmap has no outside, unless you go outside the image file entirely.
Which system is more real or accurate? That is impossible to say, because it depends on the situation. In real life, we tend to see things from a vector-based perspective, because we see through the air around us. When no objects are in a space, we say it is empty, even though we know all about the air molecules in the way. Vector-based images tend to get ridiculously complicated once you get to the level of detail we think looks acceptable for broadcast video. The value of geometric shapes isn’t really worth much when you have to express a geometric shape with 6,000,000,000,000,000,000,000 different vectors. That could take years just to express one frame of video.
But in the bitmapped view, there is no such thing as empty space, and any number of physicists will come running to join in on the argument. For the bitmap view, outer space, which is almost empty of molecules, would only be a slightly lower resolution of the air-filled empty space on Earth in which we see no objects. The problem with bitmap as a system is that if you don’t have enough pixels squeezed into the image—in other words the resolution—you get lesser and lesser detail. It takes a lot of resolution, or pixels per inch, to generate a respectable bitmap image.
The process
The issue for our two applications here is that Photoshop, which lives on Mars, performs some of its image editing effects using vector-based calculation and display methods. At present, video applications, with only a couple of fairly limited exceptions, are all very much living on Venus with a bitmap format. A video frame, as we have said elsewhere, is simply a still image composed of a certain number of pixels of height and width. The series of these still images creates video, And those still images are all bitmaps.
Photoshop has many applications and tools that were not created strictly to address creating images for video applications. For this reason, some of the more interesting visual effects you can create with text and image are vector-based and unavailable for direct use in Final Cut Pro. This does not mean that we have no way of taking advantage of such vector-based effects. It just means that we have to at some point convert the vector-based effects into a bitmapped image data. This is a process called “bitmapping” or “rasterizing.” When you bitmap a layer that has vector effects, you take all the geometric shape information and turn it into raw pixel bitmaps that describe the shape that the original vector-based effects looked like.
We will create a Photoshop text graphics file, add some vector-based shading effects, then bitmap it and import it into Final Cut Pro. Let’s step through the process of importing a text image from Photoshop.
In Photoshop, create a new image that is 72 pixels per inch (the native resolution for DV video) and 720x534 for DV NTSC projects or 768x576 for DV PAL (Figure 4-56). Since we will want to be able to use this text image over a video clip as a superimposed element, select transparent for background.
STEP 56
Create some text using the Photoshop text tool. Be careful not get your text too close to the edge of the image or it will go out of what is called the Title-Safe Zone.
The Title-Safe Zone and Overscan
The title-safe zone is a rectangle slightly smaller than the actual frame size of the video standard you are using. All video monitors and television have a frame running around the front edge of the screen, cropping what the cathode ray tube displays into a nice tidy 4:3 rectangle. Unfortunately, this crop is not only slightly different on all video monitors, it is also a good deal smaller than what the television tube is actually capable of displaying. The area that is cropped from display is called the overscan.
When you are working in Photoshop, you have to imagine where this title-safe area square should be and get your text inside of it. There is no law about the size of title-safe any more than there is a law about the individual cropping of the television screens by television manufacturers. A safe bet is to use 10 percent of the screen height and width to determine the distance in pixels from each side. For DV NTSC, this would be a centered rectangle in the Photoshop image of 576 pixels wide and 384 pixels high. You can easily set up guides in the Photoshop image window to keep you in the safe area.

You will notice that anytime you create text in Photoshop, the text is created on a new layer, automatically making the Photoshop image a multilayer file. The original layer that was created when you began the Photoshop image is called the background layer (or layer 1). This layer will remain intact as our transparency layer. We will describe the technical part of transparency in the compositing and effects chapter later in the book. For now, just know that it has to be there and that it needs to remain intact and discrete from your text layers.
STEP 57
In Photoshop, select the text layer in the Layer palette, go to the Layer drop-down menu, select the Effects and then in the submenu that follows, select Bevel and Emboss (Figure 4-57). Tweak the settings to your amusement and hit the OK button.
Bevel and Emboss shading effects, being vector-based layer effects, will disappear if we import this Photoshop file as is into Final Cut Pro. Since we want to retain the special layer effects we just added, this will have to be a flattened image file. Since the vector-based effects we want to keep are also layer effects, we need to find a way to convert the layers that have vector-based effects into bitmaps.
The easiest way to change vector-based effects into bitmapped information is to merge two layers into one. When two Photoshop layers are merged, all the separate layer information (e.g., vector-based effects) is bitmapped into the one layer. It becomes a flat group of pixels, rather than a range of vector data.
We could do this by Merging Down or Flattening from the Layer drop-down menu right now. But there’s a complication. If we merge or flatten this text layer with the Background layer, we will lose the transparency that the Background layer was going to deliver when we get to Final Cut Pro. The easiest way to get around this problem is to create another empty layer just beneath the text layer and merge down. That way, the text layer gets bitmapped with an empty layer and the Background transparency layer stays intact.
STEP 58
Go to the Layer drop-down menu and select New, and then Layer from the submenu. Click OK in the Layer dialog box that follows. There should be a third and empty layer in your Layer palette above the text layer and the background layer after doing so.
STEP 59
Go to the Layer palette, grab the text layer and drag it up above the new empty layer in the palette. Make sure the text layer is selected.
STEP 60
Go back to the Layer drop-down menu and choose Merge Down. When you choose Merge Down, the text layer will merge with the empty layer directly underneath it, converting the nice shading effects of the text to bitmapped image data. The Background bottom layer will still be intact. Now that we have completed preparing the text for shading and transparency, we need to perform the final square pixel squeeze so that it is displayed correctly in Final Cut Pro when imported there.
Go to the Image drop-down menu and select Image Size (Figure 4-58). Immediately uncheck Constrain Proportions, since we need to squeeze the image vertically more than horizontally.
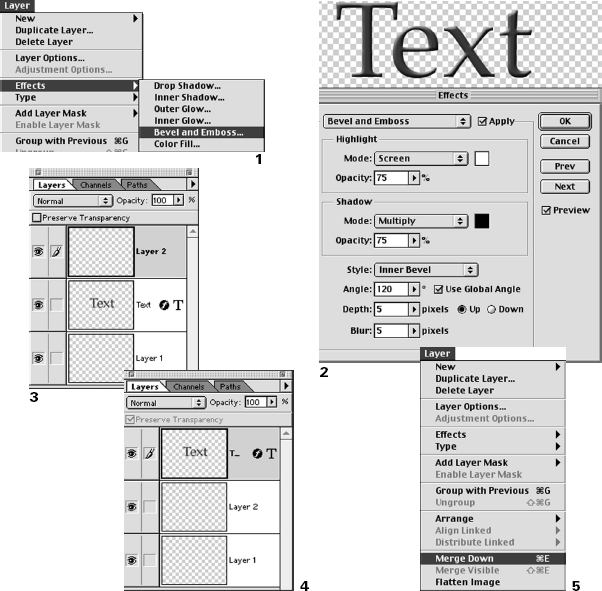
STEP 62
For DV NTSC projects, leave 720 for the width and type in 480 for the height. For DV PAL projects, enter 720 for the width and 546 for the height. Hit OK. The Image should re-size itself, gently squishing the text slightly out of shape. It is ready to be interpreted by Final Cut Pro as a correctly ratioed non-square pixel image.
Go to the File drop-down menu and select Save As. In the Save As dialog box, navigate to the Desktop and select New Folder. Name the folder “Production Graphics folder,” and click Create.

Name the file “thisone.psd,” making sure that it is followed by the .psd suffix. Click Save. Quit Photoshop and start up Final Cut Pro.
Importing Photoshop files into Final Cut Pro is simple. You can go through the File menu drop-down process of importing the individual files as with the audio CD, but it is much easier to simply pick up the folder your Photoshop files are in and drag it directly into the Project tab or individual bin of the Browser window (Figure 4-59). The folder you drop becomes a bin, and Final Cut Pro automatically imports all the files it contains.
With no fuss, Final Cut Pro instantly recognizes the files and creates icons for them. The actual Photoshop files do not move from the Production Graphics folder; Final Cut Pro merely creates a link to them from the icons representing them in the Project tab.
Unlike the Audio file we imported and the files we captured, still images need not be saved to a special media drive. This is because the image file will not actually come into play when the clip indexing it is played. Instead, imported still image files must be rendered to play back correctly. The render files that will be created during the render process will go to and be played back from the Scratch Disk location. Thus the original graphics file will not be directly accessed during playback. Just remember not to move the image file’s location after importing it to the project or you will break the link between the graphics file and the clip in the project.
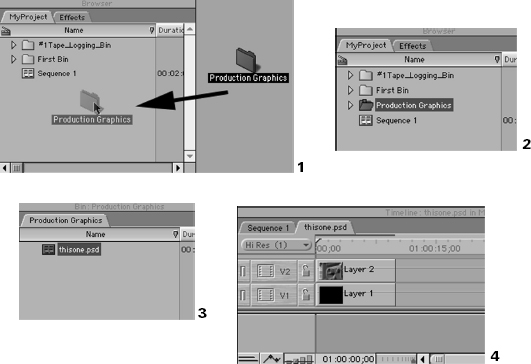
Open the new “Production Graphics” bin. Take a look at the icon used for the “this-one.psd” Photoshop image file. Immediately you will notice something interesting. Instead of your Photoshop image file being imported as a normal clip, it is imported as a sequence. The Photoshop file contained two layers when we saved it: the text layer and the transparency layer. When Final Cut Pro encounters a Photoshop image with more than one layer, it interprets it as a nested sequence, a concept we will discuss later in the book. For now, take a look at what is in this sequence.
STEP 66
Double-click the “thisone.psd” sequence so that it opens in the Timeline window. You will see that there are two video layers; one contains the text image, and the other is black (the background transparency layer). This is the best part about importing Photoshop multilayer images. Because the Photoshop layers are still discrete, you can manipulate them as individual clips. As we will see later in the book, this sequence can be used just like a clip. If you want to see its transparency, you’ll need to superimpose it on a video layer above another clip, which is one of the subjects of the upcoming chapters.
As a final note to the introduction of graphic elements to Final Cut Pro projects, imported still graphics must be rendered in order to play back. This is because Final Cut Pro must convert the still image into a video file. An imported graphics file is a single still. For the still to be played back, it must be rendered into a still image for each individual frame in which it appears on a sequence.
Organize your project for media
Much was said in the preceding chapter about ways of organizing the various media in your projects and for good reason. The Project tab is an open slate at the beginning of a project, but it quickly gets confusing as the many different forms of media crowd in.
Simply employing unique naming conventions is not enough. It is important to use the many tools Final Cut Pro offers for keeping your project clean. Make sure to establish bins early, separating not only different types of media, such as imported audio and graphics files, but also the different Reel Names and tapes utilized in your projects.
Also remember that any media you import rather than capture will most likely not have timecode data the way that a captured DV clip does. Although there are exceptions to this rule, any file that does not carry timecode should be backed up to an archive format, such as CD-R or removable disk. Most audio files and production graphics files are relatively small in comparison to video files, and since they cannot be recaptured the way that video can, backing up copies is good insurance against accidental loss. This is especially easy in view of the fact that all new Macintosh models ship with CD burners as the stock CD-ROM drive.