Intermediate Programming
Once an automated lighting programmer understands the basic concepts of programming consoles and fixtures, the skills beyond console syntax and DMX protocols must be learned. There are specific routines that programmers use daily, yet these skills are rarely detailed in manufacturers’ manuals. This chapter discusses these talents and describes why they are important.
Mark Cues
One of the most important elements of good programming is an excellent transition from cue to cue. If a show is programmed with no consideration to how the fixtures change from cue to cue, then the programming can look sloppy. When you notice fixtures moving into place as they fade up or abrupt gobo changes, chances are these are unintended mistakes. The programmer probably did not take the time to preassign the fixtures in their new settings. An essential tool to prevent these mistakes is the mark cue or setup cue. Some consoles either automate this process entirely or have tools to make it easier, while other consoles leave it to the programmers to build their own mark cues. Regardless of your console, it is important to understand how to build mark cues and what they are used for.
The most common example for a mark cue begins with a simple transition of scenes in a theatrical show. If cue five has two fixtures fade out on stage right, then cue six has the same two fixtures fade up on stage left, you will see the need for mark cues. As the fixtures are fading up on stage left, they will also be moving from stage right to left. This is not the desired effect, as you only wanted to see them fade up in their new position. What you need is for the fixtures to move in black (MIB) to their new position. This will require a cue between cues 5 and 6 (5.5) that presets or marks the fixtures. Usually you will assign a time to cue 5.5 so that it will occur automatically once cue 5 is complete. This way when you trigger cue 6, the fixtures will simply fade up already in their new position. Cue 5.5 would now be a mark or setup cue.
Visually the mark cue does nothing, but in reality it is preparing the fixtures for their next cue. As soon as the blackout of the two fixtures finishes (cue 5), the mark cue is played (cue 5.5). It moves the fixtures into their new position while still in black. Then when the fade up cue is played (cue 6), the fixtures are already in position and simply fade up without moving. My example is with positions, but can be applied to any attribute of the fixture. For example, let’s say you have a gobo wash on a cyclorama in cue 10, fade out in cue 11, then fade up again with a new gobo wash in cue 12. You will need to place a mark cue at 11.5 to change the gobo while the fixtures are in black. If you do not have a mark cue, then you will see the gobos change while the gobo wash is fading up in cue 12.
Oftentimes the need for a mark cue is not known until the cues are played back. Only then do you notice that fixtures are not preset for their next cue. When you replay your cues in rehearsal and notice fixtures moving into positions while fading up, you should note the cue numbers and create mark cues (unless the move is part of the desired effect). Then the next time your cuelist is played, the mistakes will no longer be a part of the show.
Tricks of the Trade
When building cues you need to think both forward and backward to determine where a fixture is coming from and where it is going. If you are aware of this while building cues your programming will go quickly and cleanly. There will be no need to add mark cues after the first time playing back the cues. In the previous example, when building cue 12 with the new gobo wash, you can simply save a copy of this cue with intensity at zero for cue 11.5. This way you will have created the mark cue at the same time you created the original cue.
Another good trick when building mark cues is to create an intensity palette with all fixtures at an intensity of zero. Next, label this palette “MARK.” Now every time you build a mark cue instead of setting the intensity to zero, select this palette for the fixtures you wish to mark. The fixtures will be assigned an intensity of zero, but instead of indicating 0%, the console will display the palette name “MARK” (assuming your desk has these functions). The data in your cue will indicate to you that those fixtures are being marked because the intensity channel will be labeled as such. If your desk allows for tracking, you can then look at the contents of a cue anytime and see that the fixtures are marked. This will save confusion later on when adding cues as you will be able to tell the difference between fixtures that simply have an intensity of zero and those that are marking (although both will actually have an intensity of zero).
Many automated lighting programmers use unique numbering to help identify their mark cues. For instance, cue 20 might be followed by a mark cue at 20.05 and cue 22.2 by 22.25. This method places a 5 at the 100ths place digit of the cue number and allows for quick and easy identification of mark cues. In addition, if the console allows for naming of cues, the cue could be named “mark.” The most important factor to remember is to be consistent with your numbering and labeling so that all mark cues (and only mark cues) use the unique scheme.
Once your mark cues are built, you must also consider the timing of the mark. If you are presetting fixtures in a new position with a mark cue, you need to ensure the fixtures are in the new position before it is time for the fade up cue. If the mark cue does not have time to complete, then the fixtures will not be fully marked. On the other hand, some situations require slow marks. For example, if you have moving-head fixtures on the stage, you might not want them moving quickly into their new position as it could be distracting. In this case you might assign a few seconds crossfade to your mark cue so the fixtures move slowly into position (assuming you have enough time between cues). Also, when marking color scrollers, it is important to consider the speed at which the mark happens. If the mark occurs instantly and the scroll runs the entire length possible, it might be noisy. There is nothing worse than hearing a group of scrollers slam to a new color in the middle of a quiet scene.
Some consoles have powerful features that allow for automated creation of mark cues or move in black settings. These tools are very useful as they will analyze your programming and determine when a fixture changes from an intensity of zero to an intensity above zero. If the console concludes that the fixture is changing attributes (position, color, gobo, etc.) between the two cues, then it will automatically set up or mark the fixture. This allows for very quick, almost lazy, programming as the desk will correct potential problems for you. However, most consoles with automated marks or move in black features do not give you total flexibility or labeling abilities. For example, a mark cue might be inserted between cues 4 and 5, but there might not be data associated with this in the contents view of the console. If you had built your own mark cue (and not used the automated one from the desk) you would have gained this powerful tool. In addition, many of the automated marking functions do not give you complete control of the mark. If you have conventional fixtures with a gel scroller, you might want to mark the scroller change so the color change happens in black. Some desks do not associate the scroller with the dimmer channel and would miss this in their automated marking function.
Mark cues assist in producing clean lighting transitions, while minimizing distractions to the audience. Shows programmed without regard to what occurs between cues appear sloppy and unprofessional. By taking the time to preset your fixtures, or use console functions to assist in the process, you can drastically improve the quality of your lighting programming. However, keep in mind that not all transitions have to be clean. When planned within the cueing, it is often remarkable to see lights change parameters while fading up. This change adds another element of interest to the lighting cue. Ultimately it is up to the designer to decide what type of effect is desired. Until technology allows the fixtures to read our minds and know what we are going to do next, mark cues will be a vital part of automated lighting programming.
Block Cues
Tracking records only the changes you make to each cue and allows previous values to remain unchanged or track into the current cue. There are, of course, times when you want to prevent values from tracking into your new cue, and this is where block cues come in.
A block cue is defined as a cue that contains all parameters for a fixture or fixtures. The block cue will not allow any values to track into it from previous cues or cuelists (see Figure 5.1). This is especially important when you step back and break your show into sections. For example, when programming a dance recital, cues 1–27 are for the first dance number, 28–42 for the second, and 43–82 for the last dance number of Act I. It would be best to make cues 1, 28, and 43 block cues, so that no values could track into each individual dance number. If you do not build a block cue at the start of each section, then you run the risk of data flow problems. For instance, cue 26 changes the wash lights to indigo. The wash lights do not change values again until cue 40 when they change to red (the color values were not recorded into cues 27–39, allowing the color to track). Then during the dress rehearsal, the LD decides to change the color of cue 26 to green. This change is perfect for the end of the first dance routine (cues 26 and 27), but now the green will also track into cues 28–39, drastically changing the look of the second dance routine. Had cue 28 been a block cue with the color value recorded as indigo, then the changes could have been made to the first routine without affecting the following routines.
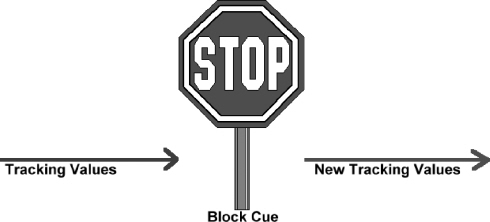
Figure 5.1 A Block Cue Stops the Flow of Tracking Data
By strategically placing block cues into your show, subsections of programming can be created. A block cue can provide a “fresh” start where you know no changes earlier on will affect future cues. Even in unstructured shows carefully placed block cues prove helpful.For example, if you are simply flying through looks on bump buttons for a one-off concert, most of your cues will probably allow certain attributes to track. You might have a button for a color chase, another for strobe, another for ballyhoos, etc. It is good practice to have a look to go to that is fully blocked (maybe at the end of each song). This way when you play the blocked cue, you can be assured that all other chases, effects, etc. will not track into the look. Then from this blocked state, you can continue adding tracking cues to create new looks on stage.
Marking and Blocking
I once programmed an ice skating tour that was running via SMPTE timecode. I had to build the show to prepare for any skater not being able to skate on any given night due to injury, etc. The sound operator would simply skip that portion of the audio track and the associated timecode, causing the lighting console to skip ahead in the cuelist to the beginning of the next number in the show. To prepare the show for these occasions, I had to be sure that my mark cues were also block cues as well as the start of timecode for each skating number. If I had simply allowed the console to jump from one skate number to another without blocking my mark cues, then who knows what kind of wacky looks would have been “created” by skipping portions of the show. Without the block cues in place, the data from the previously played skate routine could have tracked into the next routine. Blocking all values for your marked fixtures ensures that any unwanted tracking information doesn’t corrupt your final state on stage.
Organization
When building cues that are also blocked, make a point to note this in the cuelist. If the console has a comments field, I will usually indicate a blocking cue with “BLOCK.” This way I can tell at a glance of the cuelist where I have broken the chain of tracking and how I have divided my show. As indicated earlier, usually the mark cue for the beginning of a number of a section of the production will also be the block cue.
Over Blocking
There are, of course, times when blocking can be a hindrance. You would not want to block every single cue in the show, as this would totally eliminate the tracking. If you have a blocking cue in the middle of a dance number and you expected a certain fixture to track its gobo through all the cues, you must make sure the block cue does not destroy the tracking for this fixture. As every show is different, blocking needs will change from production to production. Just as with any tool we have in our programming bag, it is up to you to determine when to block and when to allow values to track. Understanding the value of each option can aid in making any show a success.
Effects Generators
Mathematics is a subject that we all study in school, but generally we allow modern technology to assist us in the more complex algebraic and trigonometric functions of everyday life. Our lighting consoles perform a great deal of math with every function programmed into them and usually we do not even think about how the consoles operate. However, by understanding the basic principles involved, we can better use the applications to achieve our end goal on stage. Most automated lighting consoles now come with some sort of effects generator. Each of these systems might appear different, but underneath they all operate on the same principle: math! That’s right. The console’s automatic effects are comprised of simple trigonometry formulas such as: y = a sin[b (x − c)] + d and sin(x) * cos(3 * x) * pi/2.
While Hipparchus (190 B.C.–120 B.C.), known as the father of trigonometry, might have no problem with these formulas, they are not an efficient method of programming automated lighting. Luckily the gurus who write console operating systems do remember their trigonometry and they have created wonderful interfaces for us to use. Everything from premade circles to rainbow chases, to hand-drawn shapes are now as easy as one press of a button. I even know of one console that will allow you to enter your own trigonometric formulas to apply effects (why you would torture yourself in this manner I do not know). In order to create original effects and not just utilize the premade shapes of a console, it is extremely important to understand the underlying principles at work within an effects generator.
The DMX Protocol
The DMX protocol of a fixture is based on a number of control channels, each with 256 values. The value of each channel relates to a specific function of the fixture. Since most fixtures have a dimmer channel where a value of 0 is no output and a value of 255 is full output, I will use this in my examples of effects. If you want to create an effect that dims the fixture up and down, then you will need something that changes the value of the dimmer channel from 0 to 255 and back down to 0. This effect will have to send all values between 0 and 255 so that the dimming is linear and does not appear erratic.
Trigonometry to the Rescue
In order to task the console with automatically fading your fixture, you can assign a sine wave effect to the dimmer channel. I will not bore you with the definition of a sine wave, but I will explain what it means to the average lighting programmer. Most automated lighting consoles have some sort of effects generator and the terminology will be different with each; however, the basic concepts remain the same. A sine wave is a curve that starts from a base value and increases and decreases the same amount from that starting point at a specified rate. If you start with a dimmer value of DMX-128 (50%), and have a full sized sine wave, then your fixture will dim up and down at a rate defined by your console (see Figure 5.2).
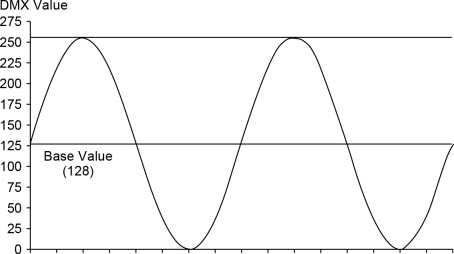
Figure 5.2 An Example of a Sine Wave Effect with a Base Value of 128
Because the sine wave is increasing and decreasing the same amount from the starting point, a full sized effect will cause the fixture to dim up and down. If you start with a value of 255 and apply a full sized sine wave, then the values will increase above 255 for half of the sine wave. Because DMX protocol does not allow for anything higher than 255, the dimmer will remain open for half of the effect and only dip to 128 (50%) for the other half (see Figure 5.3).
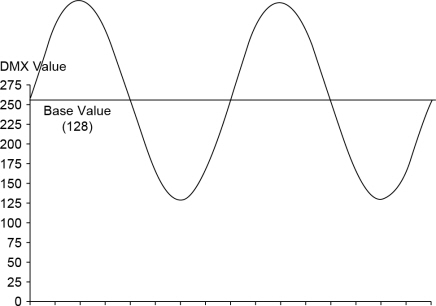
Figure 5.3 An Example of a Sine Wave Effect with a Base Value of 255
Modifying the Size and Rate
If you alter the size of the sine wave, you can produce an effect that travels through different portions of the DMX protocol. For example, a sine wave with a starting point of 128 (50%) at full size will travel from 0 to 255. However, the same effect with a size of 50% will yield a fade from 64 to 192 (25–75%). In a similar fashion, the rate of the effect will adjust the speed at which the fade occurs. By adjusting the effect’s rate, you can slow down or speed up the fade. However, it is important to remember that although your console might send the DMX values at an extremely fast rate, your mechanical fixture probably will not be able to keep up. For instance, if you have a sine wave on a dimmer fading from 0 to 255 and you set the rate to 2000 cycles a second, you will probably only see the fixture increase and decrease slightly from the base value. This is because most mechanical dimmers cannot move this fast. However, many times this will create a totally unexpected result that can be utilized in your programming.
Offsetting Each Fixture
Now you should be able to create an effect where all your fixtures are dimming from 0 to 255. Because all your fixtures have the same effect, size and rate, they will be dimming together. Most consoles allow you to alter the starting point of the effect. For example, by default all your fixtures might be starting at a point in the sine wave equal to DMX-128. However, if you offset the point in the curve where each fixture starts, then your effect will be much more dynamic. If you have six fixtures in a row on a truss and you adjust the offset of each slightly more than the previous (the second fixture starts its fade after the first, etc.), then you will have created a linear dimming chase (see Figure 5.4). If you randomly adjust the offset, then the fixtures will be randomly dimming up and down.
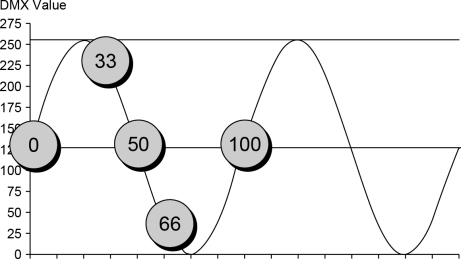
Figure 5.4 An Example of Offset Starting Points within a Sine Wave Effect
Different Wave Forms
Usually your console will offer different types of effects waves or tables to choose from. Some of these include sine, cosine, sawtooth, step, and ramp. Each of the different effects will alter the way the DMX values are changed. For example, a step effect will jump from one value to another without crossfading. A ramp effect will crossfade in one direction and snap in the other. It is a good idea to familiarize yourself with the definition of each effect provided in your console (Figure 5.5).
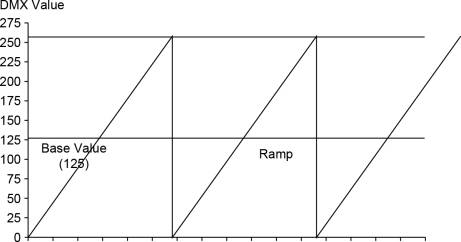

Figure 5.5 Examples of Ramp and Step Wave Effects
Other Parameters
Now that you have a basic understanding of how effects operate on the dimmer channel, let’s look at a couple more complex situations. Many hard edge fixtures include an iris, and often the protocol for this channel will include built-in effects (see Table 5.1).
Table 5.1 Sample Iris DMX Protocol
|
DMX Channel |
DMX Value |
Effect |
|
9 Iris |
0–10 |
Closed |
|
11–119 |
Varied Sizes (small to large) |
|
|
120–130 |
Full Open |
|
|
131–200 |
Varied Speed Ramp Snap (includes shutter) |
|
|
201–240 |
Varied Speed Iris Pulse |
|
|
241–255 |
Full Open |
If you wanted to create an effect that opens and closes the iris, then you would need a starting value of 64 and a size of 50 (resulting in a DMX output of 0–128). Otherwise your effect would travel into the portions of the protocol used for iris strobes and ramp snaps. In the same manner, if you want to build an effect that bounces between two gobos, you will need to find an appropriate starting point and size. For instance, the base value of the effect should be equal to a value between the two gobos and not a value equal to either gobo. When building effects, it is a good idea to have the fixture’s DMX protocol nearby so you can verify which DMX values to assign to the effect.
Use Them Wisely
Effects generators are wonderful tools for lighting programmers; however, they can also be very annoying when overused or used without understanding. All too often I see people who use these generators for the majority of their programming and usually they have no idea what is going on. For example, if you need to create a ballyhoo on stage and select a premade effect from your console, then you should take the time to adjust the starting value and size so the fixtures only move in the desired locations. By looking at effects as another item in your bag of tricks, then you can effectively utilize them in your show.
FYI: Effects Engine™
A little known lighting industry fact is that Flying Pig Systems registered a trademark on the term “Effects Engine” when they first introduced it into their lighting console. While this has no bearing on other consoles creating similar functions, it does legally give Flying Pig Systems the exclusive use of this term as it relates to lighting consoles.
Kickin’ It Old School
I have been programming automated lights for so many years that often I forget the education that occurred in my early years. Just as we learned as programmers what to do with the fixtures and consoles, so did the manufacturers. Many tasks that had to be created by hand are now automatic functions of the fixtures or desks. However, I still apply the concepts I learned in the beginning with every programming session I am involved with. Many of these “classic” programming techniques are lost in a wash of autogenerated effects in modern shows.
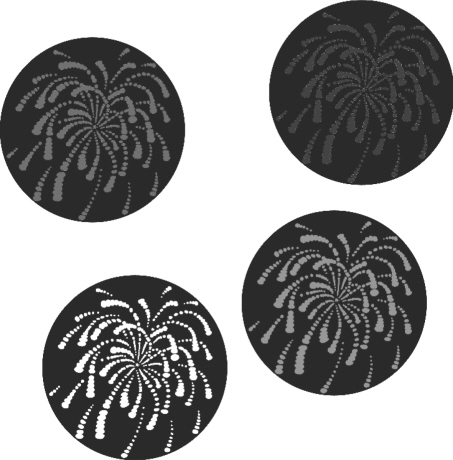
Fireworks
Here is the situation: You have 12 hard edge fixtures and a nice backdrop. You want to give the feeling of individual firework shells going off in the distance (see Figure 5.6). One way to achieve this effect would be to have one fixture come on, expand like a firework, and disappear. Then repeat similar looks with the other fixtures one at a time.
A common method of creating this chase would be as follows. You first need to build a look with all twelve fixtures on the backdrop. Place each fixture in a different location and in different colors and/or gobos. As you build this look, remember the image with all fixtures on at the same time will not be seen, only one fixture at a time. So do not worry if some fixtures overlap or contrast with each other. Now that the look is built, you need to preset the fixtures for the chase. Select all twelve fixtures, set the iris to the smallest setting, and close the shutter. Record this as cue one of the chase. Now again select all twelve fixtures, set the iris to the smallest, and close the shutter. Record this as cues 2–12 with a crossfade time of zero. I am assuming your console uses tracking; if not, then record cues 2–12 the same as cue 1 (with all values for all fixtures). Now you should have twelve cues with all fixtures set to small iris and a closed shutter. Of course, on stage this will appear as no output, so obviously there is more work to be done!
Making the Magic
To make the real magic of this cue, you must now edit each of the twelve cues. In the first cue, select fixture one and open the shutter and assign the iris to full. Rerecord these changes to cue one, then begin editing cue two. In cue two select fixture two and open the shutter and set the iris to full. Continue similar edits through all twelve cues. Now when you play the cuelist, or chase, you will see each fixture open its shutter and iris out. Then when the next step of the chase occurs, that fixture will close its shutter and another will open its shutter and iris. You will need to adjust the rate of the chase to match the speed of the iris in your fixtures (usually around 1 second a step).
The great thing about building a chase in this manner is that it has the mark cues built in. As each fixture closes its shutter, it will also reset its iris to the minimum setting. This allows it to be ready to repeat the look the next time the cue comes around. In addition, to make the chase more interesting, you can randomize the order. If your console will play chases in random order, there is no worry about which fixture is setup for the next cue, as they all are always preset. When using a console without a randomize feature, you can create the original cues in a random order. Instead of selecting the fixtures in numeric order while editing cues 1–12, you could select them randomly. I usually write out the numbers 1 through 12 on a piece of paper. Then as I randomly edit each fixture, I put a check mark next to each one that I have used. This way I do not repeat any fixtures and I know when I have used all of them.
Timing
It is important to understand why this chase works with a zero crossfade time. The shutter will open and close instantly, yet the iris will take about 1 second to open. This is due to mechanics of the iris. To change the look on stage to appear as raindrops, you can simply select different gobos and colors and put a crossfade time on the iris. If you slow down the iris (to around 2 seconds) and increase the amount of time on each step, then the cue will appear different. If your chase is running faster than the iris moves, then you will not see the iris fully open. In this case, add more time to remain on each step of the chase longer.
Modern Miracles
This section is entitled “Kickin’ It Old School” because in the early days of automated lighting programming, this is how we had to build our chases. Now many consoles and fixtures have built-in effects. Take a look at the DMX protocol for most hard edge fixtures manufactured today and you will find a “ramp snap” or “pulse” setting for the iris. These will close the shutter and iris on the fixtures and then randomly open them one at a time. By using this setting, you no longer have to program a chase to create a fireworks effect. In addition, most automated lighting consoles contain effects generators that can be used to ease in the programming of these looks.
Applying Concepts
Hopefully you can begin to form other ideas from this basic programming concept (e.g., if you need to create a color that sweeps through a series of fixtures). By applying the lessons learned with this simple fireworks chase, you should be able to create a chase that adds in a color mixing parameter one fixture at a time while resetting from the previous step. In addition, this exercise reinforces the practice of building mark cues and repetitive tasks. The next time you find yourself in a situation where you need to make a large chase that resets after each step, think about building all the marks first, then going back and editing in the actual changes. Lighting programmers have many “tricks” at our disposal, but we must look at each situation and decide how to apply them for any given situation. I do not build as many fireworks chases today as I did ten years ago, but I certainly use the methods I learned from it on every show.
Common Chases
The following list describes some common chases that make for great programming exercises. Each one makes use of various programming principles and concepts. A good lighting programmer should be able to build any of the following fairly easily. In addition, the programmer should recognize multiple methods for creating each look, such as using built-in fixture effects or console effects generators.
Kicks—All fixtures are blacked out and pointing down on the stage. One at a time, a fixture will turn on its intensity and move to a position pointing upward. As it finishes its move, it will blackout and return to its starting position while at the same time another fixture will begin a similar move.
Ballyhoo—All fixtures move about in an area (stage or audience) in a random type fashion.
Stabs—All fixtures are irised down to their smallest size and placed in a static position with no intensity. Then one fixture at a time snaps to full intensity. As each fixture snaps on, the previous fixture snaps off. Oftentimes, stabs are built using multiple positions with the fixtures changing positions when blacked out.
Fading Pulse—All fixtures randomly fade intensity from 0–100%.
Indigo/Red—A rapid snap change from an indigo or congo color to a red or orange color. Usually all fixtures change at the same time.
Random Strobe—All fixtures strobe at various rates to create a random strobing effect.
Fireworks/Droplets—Fireworks as described earlier snaps the intensity to full and irises out fixtures one at a time in a random order. Droplets is very similar; however, it snaps the intensity to full andirises in fixtures one at a time in a random order.
Line Chase—All fixtures are blacked out, then turn on one at a time in a linear order. Usually this chase is used with fixtures placed all in a row.
Smooth Color Mix (Rainbow)—Color mixing fixtures crossfade through all possible colors except white. They are often created with six steps or cues as shown in Table 5.2.
Gobo Rockers—Rotating gobos are set to an indexed position and then crossfaded or snapped between two indexed positions. This causes the gobo to rock back and forth.

There are many variations on these chases as well as multiple names and descriptions. Over time you should learn to recognize common programming principles and develop many that are unique to your style of programming.