Automated Lighting Concepts
Before studying the practice of programming automated lights, you should be familiar with specific concepts associated with automated lighting. Having a good understanding of the principles involved will open the doors to better programming. The following topics provide a basic understanding of the most important concepts related to automated lighting programming.
DMX-512
Most automated lighting fixtures use a common language known as DMX-512. This standard signal specification allows for 512 discreet channels of control per data line or universe. Each of these control channels has the potential to be any value from 0 to 255. Originally designed for controlling dimmers, zero was mapped to 0% intensity and 255 was mapped to 100% intensity with a linear dispersion of all values in between. Generally this is still the case with dimmers, but DMX is also used by automated lighting fixtures. Each parameter of a fixture (pan, tilt, gobos, color mixing, etc.) is assigned a particular DMX channel. As the value for this channel changes, it will affect the specific function of the fixture. For instance, a gobo channel might assign no gobo at a value of zero, while a value of 25 will output the first gobo. A value of 50 will output the second gobo and a value of 75 the third. This mapping will continue through all 256 values of the DMX channel. The mappings of DMX channels to their functions for a specific fixture is known as the DMX protocol of the fixture.
DMX Protocols
The DMX protocol of a fixture is the mappings of parameters to specific DMX channels (see Table 2.1). For example, if a fixture uses 8 channels of DMX, channels 1 through 4 might be used for pan and tilt (some parameters such as pan and tilt use 2 DMX channels each for a finer resolution of control which is also known as 16-bit), 5 for dimmer, 6 for gobos, 7 for color, and 8 for shutter. Each individual fixture of this type needs to use 8 unique DMX channels within the universe total of 512 channels. The first channel each fixture uses (of its 8) is known as the fixture’s DMX start channel, or DMX address of the fixture. When using three of these fixtures, you will need to address them at 1, 9, and 17, and will be using DMX channels 1 through 24 to control them.
|
DMX Channel |
Purpose |
Ranges |
|
1 |
Pan Coarse |
0–255 |
|
2 |
Pan Fine |
0–255 |
|
3 |
Tilt Coarse |
0–255 |
|
4 |
Tilt Fine |
0–255 |
|
5 |
Intensity |
0–255 (0 is no output and 255 is full output) |
|
6 |
Gobo Wheel |
0–10 no gobo |
|
11–30 gobo 1 |
||
|
31–50 gobo 2 |
||
|
51–70 gobo 3 |
||
|
71–90 gobo 4 |
||
|
91–110 gobo 5 |
||
|
111–130 gobo 1 shake |
||
|
131–150 gobo 2 shake |
||
|
151–170 gobo 3 shake |
||
|
171–190 gobo 4 shake |
||
|
191–210 gobo 5 shake |
||
|
211–230 gobo wheel spin clockwise (linear) |
||
|
231–255 gobo wheel spin counterclockwise (linear) |
||
|
7 |
Color Wheel |
0 no color |
|
1–20 no color + 1 (linear) |
||
|
20 color 1 |
||
|
21–39 color 1 + 2 (linear) |
||
|
40 color 2 |
||
|
41–59 color 2 + 3 (linear) |
||
|
60 color 3 |
||
|
61–79 color 3 + 4 (linear) |
||
|
80 color 4 |
||
|
81–99 color 4 + 5 (linear) |
||
|
100 color 5 |
||
|
101–110 color 5 + no color (linear) |
||
|
111–130 color 1 shake |
||
|
131–150 color 2 shake |
||
|
151–170 color 3 shake |
||
|
171–190 color 4 shake |
||
|
191–210 color 5 shake |
||
|
211–230 color wheel spin clockwise (linear) |
||
|
231–255 color wheel spin counterclockwise (linear) |
||
|
8 |
Shutter |
0–10 closed |
|
11–90 periodic strobes (varied speeds) |
||
|
91–150 random strobes (varied speeds) |
||
|
151–200 random synchronized strobes (varied speeds) |
||
|
200–220 fixture reset (hold for 10 seconds) |
||
|
221–230 lamp on (hold for 10 seconds) |
||
|
231–240 lamp off (hold for 10 seconds) |
||
|
241–255 open |
Fixture Modes
Not all fixture protocols are created equal. A fixture might have different modes that allow various functions of the fixture. For example, a 16-channel wash light might have a 14-channel mode, a 16-channel mode with normal functions, a 16-channel mode with special functions, and an 18-channel advanced mode. It is very important to choose the mode that will provide the functionality you need for your show. Then each fixture must be set to this mode via its menu system or dipswitches. Most automated lighting consoles make use of fixture libraries that assign the programming features of the desk to the proper DMX channels for the fixture. When patching you must make sure the fixture library you use in the desk matches the mode assigned to the fixture. If you use the 14-channel mode library in the desk, but assign the fixture to the 16-channel mode, you will have problems controlling your lights. It is essential that you study the protocols of the fixture as well as the fixture libraries of your desk to ensure that not only do they match up, but that they also provide the functionality you desire.
When programming a lighting console, values are sent to specific DMX channels for controlling the fixtures. For example, if you program a fixture so it is color mixed to a green color, the console will assign values to Cyan at 255 and Yellow at 255. Now if you want to dissolve to yellow, you will need to change the cyan value to 0. By assigning a crossfade time to the change of cyan from 255 to 0, you will cause the console to send all values between 255 and 0 over the period of time specified. This linear change of values is known as a crossfade.
Bump
A value change with a time of zero is known as a bump or snap change. If in the above example the crossfade time was set to 0, then the console would instantly change the DMX value of the cyan channel from 255 to 0 without sending any other values. This would result in an instantaneous change from green to yellow.
Parameter Abilities
Some fixture parameters are fully crossfadable, while others allow for only snap changes. By reading the DMX protocol provided by the manufacturer, you can determine if a function is crossfadable. Generally a continually variable parameter (linear) can be crossfaded, while a parameter with indexed values will not be crossfadable. Looking at the sample DMX protocol (see Table 2.1), one can see that the gobo values are indexed and not crossfadable. Because each gobo has a range of values assigned to the full gobo, crossfading from 51 to 75 will cause the fixture to snap from gobo 3 to gobo 4. Crossfading is possible with the color wheel because the DMX ranges allow for linear positioning of the color wheel. Crossfading from 40 to 60 will scroll from color 2 to color 3 on the color wheel.
Precedence (HTP and LTP)
When an automated lighting console changes the values of a parameter for a fixture, usually the most recent change has the highest priority. For example, if the first cue points a fixture to stage right, then the second cue moves the fixture to stage left, this new value for pan and tilt takes precedence over the previous value. This type of priority is known as latest takes precedence (LTP) because the latest change will affect the fixtures regardless of the value sent to it. LTP is generally used by automated lighting consoles for all parameters of fixtures.
Some lighting consoles have an option of using highest takes precedence (HTP) for intensity parameters. In this case, the value closer to 255 will have priority over a lower value. For instance, cue one has an intensity of 80% (DMX value 205) and cue two has an intensity of 50% (DMX value 128). When using HTP, cue one will have priority over cue two and the fixture will remain at 80% because cue one has a higher value than cue two. Highest takes precedence is extremely useful to ensure that conventional channels are not accidentally blacked out or dimmed down by other cues. HTP is generally used only for intensity channels as most other parameters are not as clearly defined at specific values (i.e., greater value = more output).
Tracking
Most automated lighting consoles use a process called tracking. To a seasoned programmer, tracking is an essential tool. However, for those without a complete understanding of tracking, it often works against them.
Nontracking Consoles
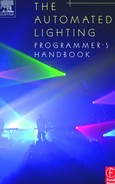
To better explain tracking, I will first describe how a nontracking console works. As an example, I have a show with six fixtures and am building cue one. After assigning the intensity to full, each fixture is moved to its desired position and the color is adjusted. Then this information is stored as cue one. My console will save not only the changes I made to the fixtures (intensity, position, and color) but also all the other attribute settings for the fixtures. The cue contains data that tells my fixtures not only where to point and in which color, but also which color to project, which iris setting, etc. (see Figure 2.1).
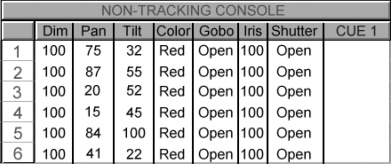
When building cue two simply move the fixtures to a new position; again my console will record data for all parameters of the fixtures (see Figure 2.2). While building cue two I have to assign the fixtures to the same settings as cue one or I will see unexpected changes when going to cue two (the color assigned in cue one will revert back to the console defaults in cue two).
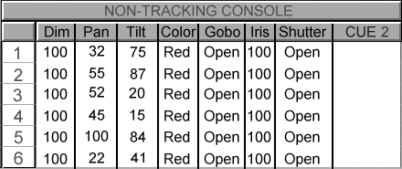
Figure 2.2 Nontracking Console Cue Two Example
Usually to avoid this problem, the programmer will copy cue one to cue two, then make the needed changes to cue two. This creates a problem when you want to change the color used in cues 1–6. You will have to edit all six cues because each cue has the same color information. This is where tracking saves the day.
Tracking Consoles
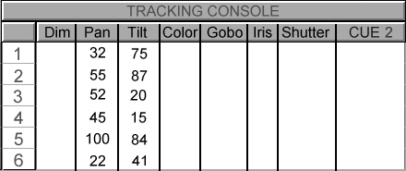
As stated above, nontracking consoles store values for all parameters of all fixtures in each and every cue. A tracking console will only store the values of the parameters you have adjusted. In simple terms, tracking avoids redundant data in the cuelist. Using the same example, build cue one by assigning intensity, position, and color. When this information is stored as cue one, my console will only save the changes made to the fixtures (see Figure 2.3). My cue contains only the intensity, position, and color settings and no other information.
Now as cue two is being built, I again simply move the fixtures to a new position and save the changes (see Figure 2.4). All other settings for the fixture (color, color, iris, etc.) will track into cue two from the previous cue(s).
If I want to change the color being used in cues 1–6, then I will only need to edit cue one as the color setting will track into the following cues.
Advantages of Tracking
When working with one large cuelist or cue stack, tracking has many advantages. First, cue creation is very easy. If cue two only needs to move the fixtures to stage right, then this is the only information needed in cue two. There is no need to copy the other parameter settings from cue one. Secondly, because the console is only storing the changes made to each cue, editing becomes much simpler. For example, if you have thirty cues in a row with the intensity of your fixtures at 100%, this intensity setting only needs to be stored in the first cue. All the subsequent cues can be written with no value for intensity. The 100% setting will track through all 30 cues until you change the intensity on cue 31 to 0%. Later if you decide to change the intensity level for cues 1–30 you will only need to edit cue one as the setting tracks through all the other cues.
Another powerful advantage to tracking is the ability to build cues or chases that only affect certain parameters or fixtures. This is the magic that allows programmers to assign to a bump button a cue that will strobe the fixtures without changing any other parameters. At any point in a show the bump button can be pressed to add strobing to the fixtures without changing any other parameter settings. On a nontracking console this would not be possible as the cue assigned to the bump button would have to contain position, color, etc. as well as strobe.
Disadvantages of Tracking
As you have read, tracking is very beneficial; however, it can also be confusing and frustrating. Back to my first example above, when building cue one only the changes (intensity, position, and color) were recorded, not any color, iris, etc. values. When creating the cue the fixture had no color, but this information was not recorded because no changes were made to the color parameter. Later when running the show this cue is played back and mysteriously a color is projecting on stage. This can happen when another cuelist is played prior to my example cuelist. Because cue one had no data for the color parameter, the console tracked the previous color setting into cue one. The solution to this problem is to edit cue one so it contains color data, telling the fixture to project no color in cue one. The same problem can occur in reverse when another cue is playing as a new cue is built. If an active cuelist assigns the fixtures to red and a new cue is written with no color information stored, then the fixtures may or may not be red when the new cue is played back. If a different cue is played first assigning your fixtures to green, then the green will track into this new cue. This is because your new cue will allow any previous color to track into it.
In my example regarding 30 cues with the intensity at 100%, a different tracking problem could develop. If cues 1–15 are for one dance number and cues 16–30 are for another then you change the intensity in cue one to 85%, you have just changed the intensity level for two different portions of your show. A good programmer will ensure that when edits are made, they do not track into subsequent cues where the changes are not desired. In Chapter 5, I will describe a very useful tool to solve this type of error, the block cue.
Practice Makes Perfect
Tracking is often considered one of the hardest concepts for automated lighting programmers to grasp. The results of tracking are often bewildering to the novice, as the console appears to not playback what was recorded. With an understanding of tracking, a programmer can manipulate the features of most automated lighting consoles with ease. The best method to ensure your understanding is with practice, so fire up your console and practice programming with tracking.
There are many fundamental concepts related to automated lighting programming. Each fixture and console may refer to these items using different terminology, but a good programmer will identify the similarities and easily adapt to the specific vocabulary. With a basic understanding of these ideas you are ready to learn the particulars of automated lighting programming.