Part 2
The Software
_______________________

Canon includes, with all EOS cameras, a copy of the EOS Digital Solution disk. On it you’ll find programs for both Macintosh and PC computers designed to make your digital lives significantly easier. These are rather deep programs, however, and have been engineered with subtleties that are simply impossible to completely investigate in this guide because of page restrictions. I would suggest you use the following as a knowledge base, quick-start information to customize your workflow as your understanding increases.
EOS UTILITY
Canon’s EOS Utility (EU) is what you’ll use to talk between your camera and computer, to download images from the card, and to tether the camera to the computer to see each image much larger than you ever could on the camera’s LCD. There are also some camera settings that you can control with your computer. Be sure to check your computer against the list of system requirements noted in the manual before downloading the software.
DOWNLOADING IMAGES
Your Rebel was supplied with a transfer cable for the camera/computer hookup. With the camera turned off, connect the small end into the camera’s Transfer socket.
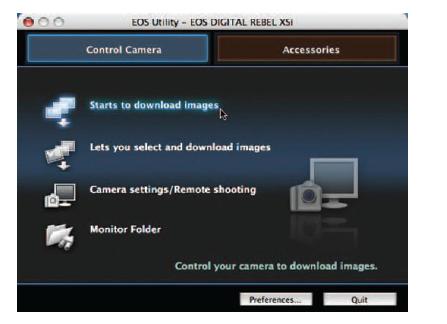
Plug the other end into the computer’s USB port and turn the camera on. The EU Main window appears.

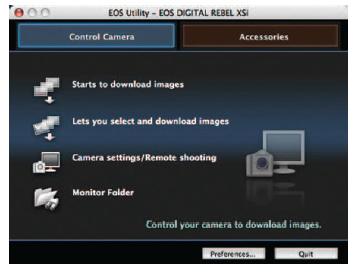
The first selection, “Starts to download images, ” will download all images on the card. EU will also sort the batch by date into folders, and it will launch Digital Photo Professional (DPP) so you can edit immediately, if you wish (see Digital Photo Professional for instructions). The default location for downloaded images is Users > Pictures, but you can change that if you wish by selecting File > Open Destination.

Of course, you can build a file of individually downloaded images. From the Main window, click on “Lets you select and download images. ” Select the image you want and click the Download button on the bottom of the screen. You may determine a destination location other than Users > Pictures before downloading if that’s more convenient for you.

Note that EU does not recognize third-party card readers, only cards in the camera. If you prefer not to use EU, you can download directly into DPP or ImageBrowser. You could also open the card in a third-party reader and drag and drop the images (without any previews) into a selected or new folder. Use EOS Digital > DCIM > 100Canon to find the file list. Select All and drag your images wherever they need to be.
Quit EU when you’re done.
USING YOUR COMPUTER TO SET THE CAMERA
Start the camera as before, then select Camera settings/Remote shooting to access functions.
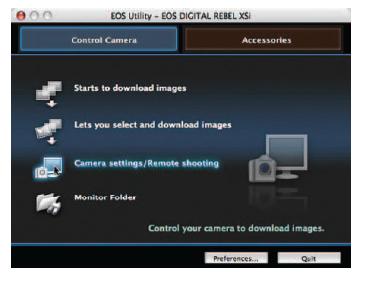
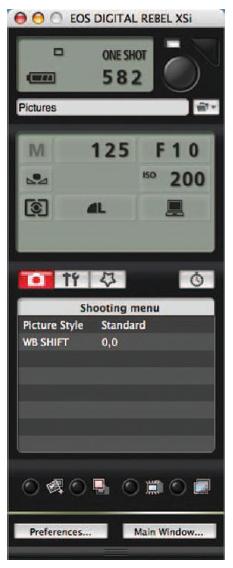
A new window, called the Capture Window, appears. You’ll notice the same menu symbols that you see in the main menu, one each for Setup, Tools and My Menu. You’ll also see that the camera’s current Zone, Creative Controls, Meter mode and other controls are represented by their respective icons. All of these functions may be accessed and changed through your computer, just by clicking on them. Any change you make in the camera will be mirrored on the computer screen.
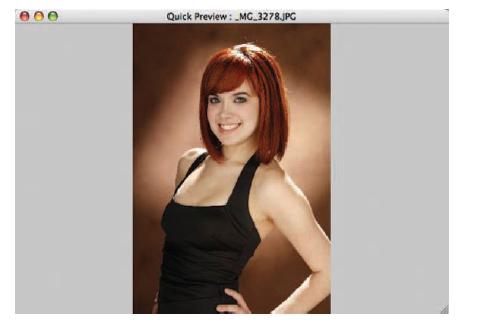
Additionally, the bottom row of buttons allows you to jump to the Download Images ’ DPP window, see a Quick Preview of an image, or activate Live View shooting for tethered shots (and make additional adjustments to the camera, even fine-tune the focus).
The last of the four buttons will shoot a test image, which will not be written to the card or the computer.
The Tools menu, in addition to setting Date and Time and the Live View settings, lets you add your name as the camera owner. Also, if you’re hooked up to the Internet you can upgrade the camera’s firmware just by clicking.
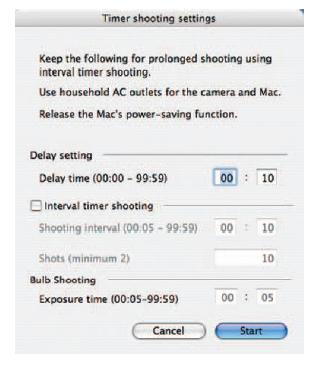
As you might expect, some items are accessible through this item that you won’t be able to find any other way. For example, Canon has included an intervalometer, a device that will automatically fire the camera at predetermined intervals. Want to watch paint dry? Grass grow? Select the Clock icon (found just above the Shooting Menu), set the timer accordingly and walk away. The camera will shoot as many frames as you wish, at intervals that you specify. You can even set it to shoot a series of time exposures. This is a very cool toy.

To exit at any time, just click the Main Window button.
REMOTE SHOOTING
Tether the camera to the computer as before, and turn the camera on.
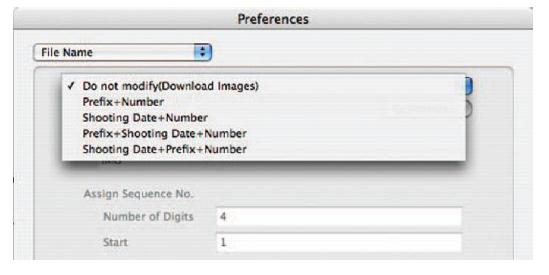
Check Preferences and tell the camera if you want to make any changes to any of the options. For example, you can determine which folder you want the pictures to be placed in or create a new folder, whether you want the image written to both the card and the computer, whether you want to change the file name, and so on.
From the Tools menu, select Live View function settings > Enable > Return.

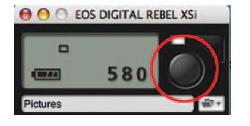
When you’ve made necessary changes to the camera’s operation and are satisfied with any test shots, push the shutter button in the top right corner of the Capture window. Your shot will appear on your computer screen. Note that if you need to shoot with the camera it’s not necessary to disconnect it from the computer. This is valuable if you’ve run out of card space because you can write directly to your computer’s hard drive.
The final selection, “Monitor Folder, ” is not used by the Rebel.
DIGITAL PHOTO PROFESSIONAL
A RAW file is considered the digital equivalent to a film negative (thankfully without the requisite liquid chemistry) and can be affected by a variety of software controls to create a .tif or .jpg file delivering exactly what you want to present. It does take additional time to work a RAW file, which is something you need to consider if you’re working with a large number of images, but the extra effort can be worth it if you need a superlative final product for an advertisement, commercial, or fine art piece.
Canon’s RAW conversion software was built for Canon files only. Because Canon does not share its architecture with other manufacturers, those companies can only create programs that generically do the job. Consequently, those other manufacturers, whose goal is to create generic translators work with any RAW code not incorporate the subtleties and nuances available to the engineers at Canon. Of course, color and exposure can also be adjusted in other programs, but why would you want to take that extra time?
Another, significant, benefit from working with Canon’s DPP software is the reduction of noise is a processed image. Noise is a natural by-product of signal amplification, how the camera defines ISO, a term that originally defined how sensitive film was to light. Camera manufacturers have programmed their sensors to mimic that same scale, so that at ISO 100 an exposure of 1/100th of a second under bright sun at f16 on film (the Sweet Sixteen rule) will yield the same results with digital media. To get higher ISO, film photographers had to switch film stock or “push process” the film at the lab. Digital cameras create higher ISO by amplifying the signal that reaches the sensor chip, but the higher the camera’s
TIP
A RAW file itself is never changed, no matter how you change the screen image. When you see a RAW image on your screen, you’re looking at an image influenced only by the conditions under which it was shot and the manipulations that you make in the conversion software. When you like it, tell the machine to Convert and Save and a new file will be created as a TIFF or JPEG (your choice). The original RAW file information can be revisited any time, and it remains intact until removed or deleted.
ISO, the more noise it produces. Because Canon’s DPP software was built for its own chips, it has built-in noise reduction, engineered only for Canon, that generic RAW converters simply cannot target. Noise is typically most prominent in darker tones or shadows and with higher ISO speeds.
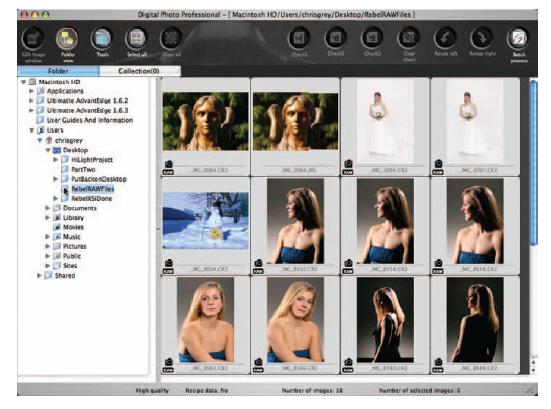
DPP uses two windows for its operation. The Main window acts like a browser; you point it to the folder you wish to view, select it, and all of that folder’s contents show up in rows of thumbnails.
Select one, some, or all of the images, then select Edit Image window from the button menu at the top. Doing so will call up a second window, the Edit window, and your selected images will appear in a vertical row on the left. The first image from the selected group will appear large in the main portion of the Edit window. You’ll note this image will look fuzzy for a few seconds, as DPP renders the file.

Now that you’re initially familiar with the two windows, let’s back up for a moment. DPP magic can happen in either window, and I want to focus on the Main window before we proceed.
With the Main window open, click the Folder View button to hide the Drive menu on the left and maximize the rows of thumbnails. Dragging on the expansion tab at the lower right corner will expand the screen even further, as long as you have room on your monitor.

Select All highlights every image in the folder; Clear All de-selects them.

You can select each image individually and rank them in order of importance (first, second, third) by clicking the Check1, Check2, or Check3 buttons.
Obviously, the Clear Check button will clear any previously checked files.
Rotate Left and Rotate Right will turn the selection in 90° increments.

Any of these controls can be applied to both RAW and JPEG images. Previous editions of DPP had additional, redundant controls built in to the Main window. Canon has streamlined DPP with v3.4.0, which was shipped with the camera.
If you’re happy with what you’ve done to your images in the Main window, select Batch Process to convert them into real TIFFS or
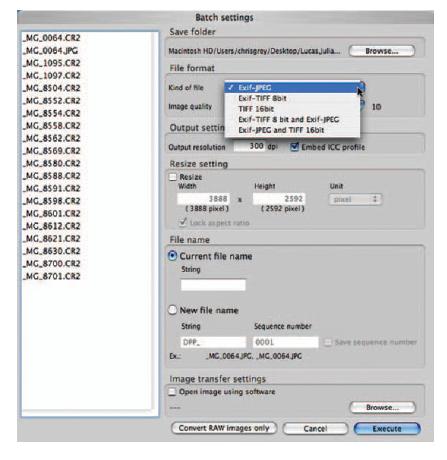
JPEGs. You’ll see a new window appear, the Batch Settings window, where you’ll make decisions as to where the processed images will go, what kind of file (16 bit TIFF, 8 bit TIFF, or JPEG) they’ll become. Additionally, DPP can resize images up or down from their original file sizes. This is especially valuable if your client needs a high-quality file for a larger-than-normal use, a two-page magazine spread for example.
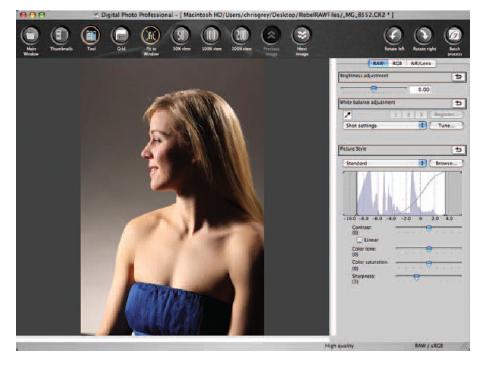
THE EDIT WINDOW
By default, the Edit window opens with Thumbnails and Tools selected, so that you’ll see the first several of your selected images along the left and the Image Adjustment toolbox at the right. Should you choose to edit individual images, the tools in this window alone will probably accomplish 90% of your goals with DPP.
Select the images you wish to work on and click Edit Image window. Now that you’ve seen the Main window, the first thing you’ll notice is that there are new buttons to work with, as well as additional Rotate and Batch Process buttons. You’ll also notice three buttons at the top of the Toolbox window: RAW, RGB, and NR/LENS. If you shoot in RAW you’ll be able to work in all three windows, and each does different things.
The Main Window button will return to the file selection, of course. Selecting Thumbnails will isolate the image currently selected so that you may study it without the distraction of other images or colors. It is presented on a neutral background and permits you to use any of the controls on the right.

Selecting Tool hides the toolbox on the right so that you may study the effect of what you’ve done against a neutral field.
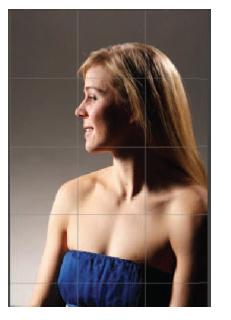
Use Grid to place gridlines over the image. Grid pitch may be changed in Preferences.
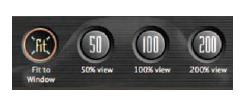
Magnify the image by 50% to 200% by clicking on the appropriate button. Click Fit to Window to return.
RAW IMAGE ADJUSTMENT
Note that you can revert to the original shot settings at any time by selecting the Return button, located on the right of each adjustment bar.
For image correction, use the Brightness slider to affect exposure up to two stops either brighter or darker.

TIP
DPP offers adjustments over a four f-stop range, which means you should be able to salvage an image that was overexposed by up to two full f-stops, a feat taht’s not possible with any software if your original shots were JPEGs only, because digital exposure is the most fussy on the high end. With JPEGs, an overexposure of only + 1/3 stop will damage detail to be brought back. It can’t be “burned in” like overexposed detail in traditional negatives because it simply doesn’t exist. Shooting RAW is a partial solution to over-and underexposure issues but will take more of your postprodiction time. Use it wisely.
This image was deliberately shot using the Tungsten color setting. Because tungsten light is very warm, the camera added a lot of blue and cyan to counteract the low color temperature. Fortunately, the image, which was shot in daylight, may be easily rescued in DPP.
White Balance adjustment can be made a number of different ways. Clicking on Shot Settings calls up an extended color temperature preset scale. Select any of the presets and the color will instantly change to reflect that color temperature.
Select Color Temperature from the extended scale, and a slider will materialize. Move the slider left or right to get a color temperature you like.
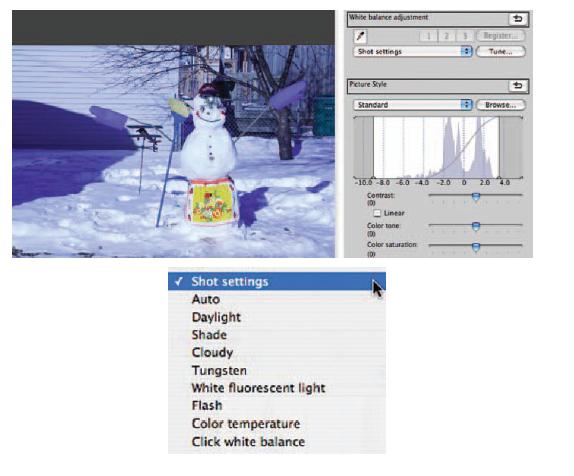

Selecting Tune will call up a color wheel. Put the cursor on the center dot and drag it around until you’re happy. You can get any color shift you could possibly ever want by using this tool.

It’s also possible (and very easy) to register up to three Custom White Balance settings. Simply select the White Balance setting you’d like to use by choosing from the dropdown list, using the slider under Custom White Balance or the Color Wheel.
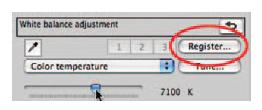
In the Register window, select Custom 1, 2, or 3, then click OK. Your color temperature selection is available anytime until it’s changed.
Although custom color temperatures can’t be set at the White Balance window in the Main window, those set in the Edit window will be available in the Main window after they have been registered.
I’m sure you can see the importance of a control like this. Many wedding photographers shoot everything in RAW format, preferring to take the time to fine-tune each image before processing and printing. Many of those images are made with on-camera flash and sometimes look a little flat. Adding a little extra warmth by changing the color temperature from 5600K to 7500K might be beneficial to the final product and can be accomplished easily. Beauty and glamour photographers frequently want an even greater level of warmth in their images, perhaps all the way up to 10000K. Like all controls in any Canon camera, I merely ask you to play with them and make your own decisions as to how your vision is to be represented.
If you like the concept of changing an image’s color temperature and want to apply it to existing, NON-RAW, images, I’ve outlined a simple yet versatile Photoshop formula in my book Photoshop Effects for Portrait Photographers , also from Focal Press.
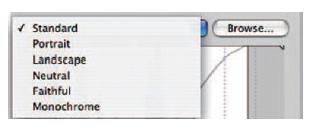
PICTURE STYLES
You can, of course, set any Picture Style you wish in the camera. If you shoot JPEGS, and you want a look that’s different from what is considered “normal”, that’s
what you’ll have to do, of course. The beauty of RAW and the Edit window is that you have access to all of the Picture Styles, so you can toggle between them to see what looks best, without locking yourself in to a camera-processed style.
Picture Styles are like processing films from different manufacturers in the same chemistry; they all slightly vary in color and look. Whether you use Photoshop for final tweaks or not, the ability to rapidly but consistently alter the Picture Style gives you unprecedented creative freedom over the look of your image. See Picture Styles for more information and comparison images.
ADJUSTING DYNAMIC RANGE
What appears to be a traditional histogram is actually a Dynamic Range adjuster. The image in the Edit window originally showed a dynamic range of - 9.0 to + 3.6. You can change these numbers by moving the shadow slider (on the left) and the highlight slider (on the right) toward the middle. Moving either slider eliminates some of the shades of light or dark that comprise the image, making transitions from white (no detail) to highlight detail, or black to shadow detail, shorter than what was shot. Although you might wonder why you would ever want to shorten the dynamic range, this tool is quite practical; if you’re shooting for a critical application and you know the maximum dynamic range of that application is, say, - 8.4 to + 2.0, you can make those changes as well as necessary Brightness adjustments to get the best possible representation of your image in a shorter dynamic range. If you do not do this, it’s possible that the image will be tonally clipped when it’s reproduced.
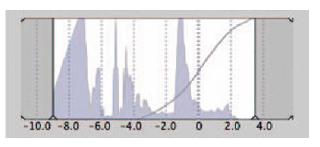
Just below the Dynamic Range window is a graduated slider that you can use to raise or lower the contrast of the image as it appears after you move the other sliders or by itself, without any DR adjustment. It’s extremely useful for fine-tuning an image with a shortened dynamic range.
Checking the Linear box below the contrast slider will flatten the curve and seems to show an average of represented pixels within the image, actually adjusting the Linear Tone Curve. This is a tool generally used by advanced users to create their own custom profiles. You’ve been warned.
Below the Dynamic Range graph are three more sliders that are important to any of the Picture Styles: Color Tone, Color Saturation, and Sharpness.
Color Tone skews the overall color of your image in either of two directions. Slide to the left, and the tone takes on more red. Move it to the right, and the image gains yellow. This is a useful tool if you need to add to or mellow out colors in a general way.
Color Saturation, like its Photoshop counterpart, either saturates or desaturates the color strength of your image.

Sharpness decreases or increases the Sharpness level, as you wish.
Black and white is back! Canon’s Monochrome Picture Style is absolutely outstanding, producing neutral tones of great depth and full of visual
TIP
For truly neutral results on self-printed prints, there are a few things you should know. Many inkjet printers will not print a neutral black-and-white print, even if you send it a neutral file. The standard inks are not designed to do that, and results typically show a slight magenta or green cast. If your printer allows true black and white, you may first have to flush the ink delivery system and change cartridges, a somewhat expensive routine because of wasted ink. Some new printers, like Canon’s imagePROGRAF line, can produce beautiful, almost perfectly neutral images without skipping a beat (or changing a cartridge). Check and test your equipment before starting a money job.
There is a new online service, MyBWLab.net, that uses new color management technology to produce beautiful, color-neutral black-and-white images from wallet size to 30 × 40, something that few labs can guarantee. Prints smaller than 11 × 14 have traditionally been made on machines that cannot be color-managed tightly enough for truly neutral images, but these folks have ironed out the wrinkles.
information, with natural highlights and terrific shadow detail. DPP uses an almost identical algorithm to the Picture Styles algorithm in the newer cameras, with a few additional features.
When you select the Monochrome Picture Style, you’ll notice changes to the secondary control sliders. The Color Tone and Color Saturation sliders, respectively, change to Filter Effect and Toning Effect.

FILTER EFFECT
Those of us who shot lots of black-and-white film will no doubt remember the colored glass filters we used to alter the wavelength of the light that struck the film. In portraiture, women were often photographed with yellow or orange filters because they would lighten skin tones. Men were sometimes photographed with a green filter, which would darken the skin slightly, presumably to give them more character (a look referred to in more than one book as “swarthy ”). Nature and architectural photographers would routinely use a red filter to darken blue skies or a green filter to lighten foliage because the filters would lighten colors similar to themselves while darkening their opposites.
Canon’s software engineers designed the four most popular black-and white filters—yellow, orange, red, and green—into this nifty little slider, and, like all the effects in DPP, the application of each can be viewed in real time. Take a look at each and make your own decisions.

No Filter effect.

Red Filter applied.

Green Filter applied.
TONING EFFECT
Just below the Filter slider is Toning Effect. Should you be looking for the classic sepia-tone look of older, silver-based, photographs or just would like to put some extra zip into a black-and-white image, you might find what you need here. Chemical toners were designed to replace the silver in photographic print paper with other metals or with dye, either of which would change the overall color of a print. Toners were originally available in a wide variety of colors and tones but have virtually disappeared from the market since the advent of digital darkroom techniques. Canon’s Toning Effect slider reproduces four colors of toner: sepia, blue, purple, and green. The program also allows you to mix a Filter Effect and a Toning Effect, which can result in some interesting combinations.
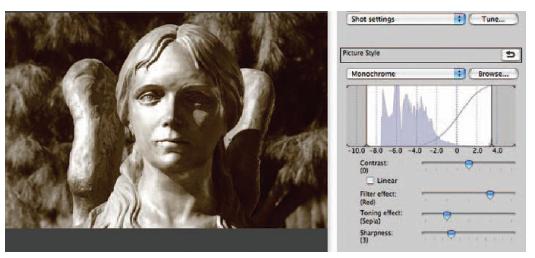
Sepia Tone with Red Filter.
SHARPNESS
With the exception of Monochrome, all Picture Styles in DPP default to level 3 Sharpness when selected. Sharpness, or the degree of it, is purely a matter of the photographer’s taste balanced against the subject matter. Most family portraiture should not be critically sharp, if for no other reason than to spare your subjects the reality of time, whereas a great deal of advertising’s portraiture (and most product photography) needs to be sharp as a tack.
These two comparison images show the range of sharpness available with DPP. In Standard Picture Style, the first shot is set at zero, the second at 10.

Zero sharpness.

Sharpness level 10.
RGB IMAGE ADJUSTMENT
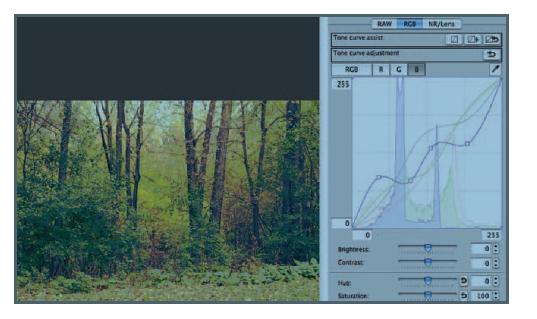
You can continue to fine-tune your image by selecting the RGB Image Adjustment button, found at the top of the Tool window. Here you’ll find what looks like a traditional histogram. Although it shares some of the functions of a histogram, it’s actually a Tone Curve Adjustment and, as such, combines the best of Photoshop’s Levels and Curves and Canon’s DPP.
As with Photoshop’s Curves, you create a break point by clicking and dragging certain portions of the graph line, changing the tones, contrast, and brilliance of the image. For general corrections, Canon has installed two basic curves, found as buttons next to the Revert button.

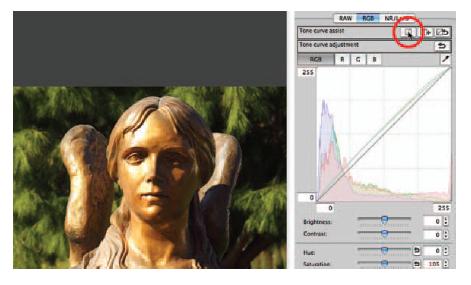

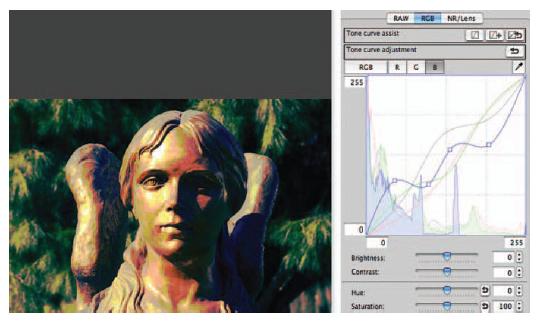
At the top of the chart, you’ll see four boxes: RGB (changeable to Luminance in Preferences), R, G, and B. Selecting any of the individual channels allows you to make a Tone Curve correction to just that channel. So, whereas Luminance mode allows us to make general corrections over the full RGB spectrum, Luminance, along with changes made to the individual Red, Green, or Blue channels, provides more than selective retouching, individual RGB tweaks provide even more creative opportunities. You can place up to eight break points on each of the four lines.
Finally, just in case you missed this before, Canon’s placed another white balance eyedropper right where you need it, on the end of the row. Click on a white or gray portion of any image (if either exist in the image) to neutralize the entire image.
Because most of the items in the drop-down menus are duplicated as buttons or selections in the Tool palette, I was able to do everything I’ve shown you so far without using any of those menus. There are a few exciting and innovative items hiding in Menuland, however, and we need to take a look at them.
RECIPES
You may have noticed some commands in the File and Edit menus that sound a little strange. There are, in fact, seven commands that cryptically reference “recipe. ” Well, DPP keeps a running tab on all the changes that are made to an image until it’s finished and converted to a TIFF or JPEG. The final version of all changes made to an image can be saved and, like a recipe, applied to another image to make a new one that’s just as tasty as the first.
It took several minutes to get this particular effect, and I often reset a control because I didn’t like what I saw. I radically changed the dynamic range, exposure, contrast, and individual RGB channels, as well as the entire Luminance tone curve. Before converting it to a TIFF, I selected Edit > Save Recipe in File, named it, selected a location for it (I created a Recipe folder), and clicked Save. That’s it. Now I can apply this recipe to any photo I wish, now or in the future.
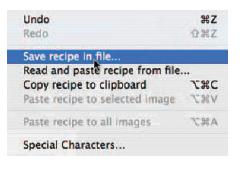
To use the recipe (or any other that’s been saved in the created Recipe folder), first select a new photo in
the Edit window or in another RAW file folder. Go to Edit Read and Paste Recipe from File…, and select the proper file and recipe. Go back to Edit > Paste Recipe to Selected Image. The new image will be processed according to the recipe in just a few seconds.
DPP can also trim your images on the fly, to any aspect ratio you wish, by using the Trimming tool found under the Tools menu. Calling up that tool will send your selected image to a new window, where you’ll see the Aspect Ratio palette. You can choose from a number of presets, or select Custom and simply type in the dimensions you need. If you want to crop without a ratio, just select Free and crop as you wish.
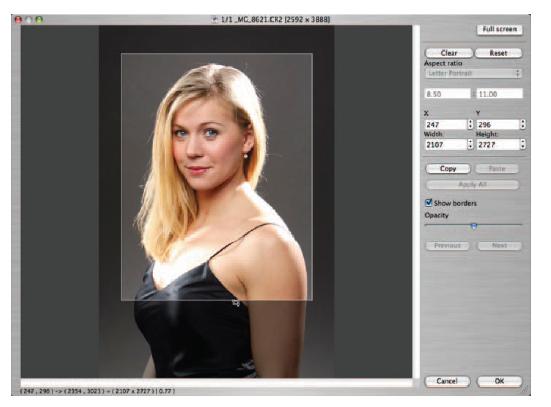
Unless you return to the last saved settings or revert to the image’s shot settings, DPP will produce a trimmed file each time you process that file from now on. You can easily tell if the image has been trimmed because the crop will show on the image’s thumbnail.

If you’d like to check for areas that may be too bright or too dark for reproduction (this series was deliberately overexposed on the sides) go to View or View > Shadow highlight warning is 192, o cautious perhaps change that level in Preferences.

TIP
Although DPP was developed as a high-end tool for RAW file conversion, it functions quite well, albeit with limitations, as an editing and image enhancing program for .jpg and .tif files as well. You can only use the RGB Image Adjustment window and palette, but you can make changes to one image and apply them to others via a recipe. Like working with RAW file data, changes made to TIFFs or JPEGs are only made when selected images are processed. The original image data remains intact.
You may make adjustments to the following tems:
Brightness
Click White Balance
Contrast
Color Saturation
Hue
Sharpness
Dynamic Range
Tone Curve Adjustment
Tone Curve Assist
The final selection, NR (Noise Reduction)/Lens, reduces noise in RAW images beyond what the camera is capable of. Even if you used either High Speed Noise Reduction or Long Exposure Noise Reduction in the camera, residual noise may remain. This function further tempers the noise levels.
The Lens function is for correcting peripheral light dropoff (vignetting) seen with some camera/lens combinations as well as chromatic aberration also possible with some lenses. Canon has included a list of cameras and lenses that this function may be used with in the instruction manual found on the second CD included with the camera.
For all its depth, DPP is remarkably easy to use. I’m certain if you just jump in and play with it you’ll find it will do everything you’ve always wanted in RAW conversion software, and more.
PICTURE STYLE EDITOR
For those of you who think five color Picture Styles just aren’t enough, Canon’s Picture Style Editor (PSE) will let your creative side

Original Image
shine. Use this software, a reference Picture Style, and a RAW image to create your own Picture Styles for use in DPP or registered to your camera to be used whenever you wish (via EU).
You will have to play with this program to understand its subtleties, but it is a lot of fun. Personally, I like to create narrow, color-limited .pf2 files and apply them to dissimilar images, just to see what happens. I’ll be honest—this experiment mostly fails because my settings are so narrow. When it succeeds, however, the resulting images can be wonderful, impossible to create any other way.
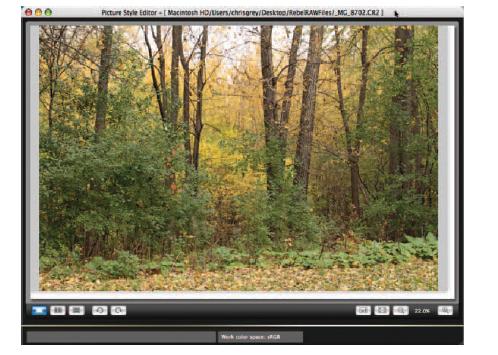
To use PSE, open the program and drag a RAW file into it.

Should your image require exposure or white balance adjustment, select Tools > Preliminary Adjustment and make appropriate changes.
You have the option of working on a full window image, an image at 100%, or a split screen to compare your before and after changes. The horizontal split screen used here displays the adjusted image on the bottom. A vertical split screen is also available.
Use the View menu to select Navigator. You’ll use the Navigator to change the display position for the screen, display the image’s

histogram in RGB values, and set warnings to prevent excessive levels of brightness/darkness. If you check “Show warning on images,” any excessive luminance or color value change will cause portions of the image to blink.
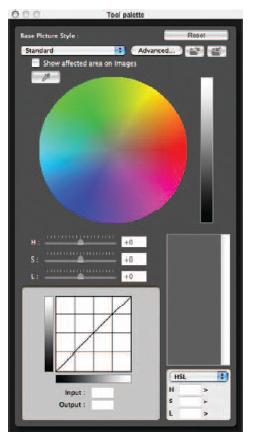
Your other tool is the Tool Palette. Use the Tool Palette to make adjustments to the image, which you’ll be able to see on the screen almost immediately. Additionally, you’ll use this function to select a base Picture Style and to adjust color saturation, contrast and sharpness, color tone and gamma, and brightness and contrast.
TIP
There are also additional Picture Styles available through Canon’s website, www.cusa.canon.com, although they’re a bit hard to find. First, select Cameras. In the upper right of the next screen you’ll see a link to Resources and Learning. Select it and go to the Learning Station. Find Picture Style in the Digital Camera section. Click on it, and you’ll be directed to a special website where you can download additional Picture Styles. Once you download any or all of them, you can use the Open Picture Style file window in the Tool Palette to retrieve and use any one of them as a base style.
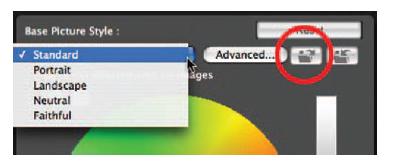
Click Advanced on the Tool Palette and the Advanced Picture Style Settings window appears. Drag each slider where you want it and click OK. The results will show immediately in the split screen so, if you don’t like the result, open the Advanced Window again and click Reset.

Use the Eyedropper to select a color in the image that you wish to enhance or change (I chose the lighter green of the leaves). The Eyedropper selection will be indicated on the Color Wheel along with a triangle selection, called the Range of Effect, which represents the limits of color that are affected by the selection. This range of effect may be shortened or lengthened by grabbing one of the markers with the cursor.
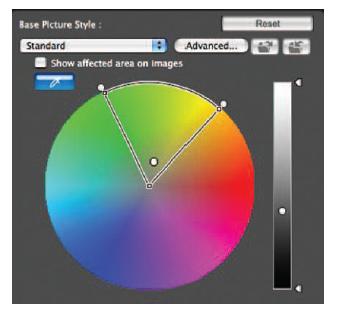
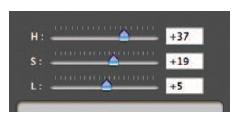
Use the Hue, Saturation, and Luminance sliders to fine-tune the Range of Effect. These sliders have no influence on any color outside the range.
Repeat the Eyedropper selection if you wish to adjust any other colors.
There are variations on this technique, all spelled out in the manual, that you should play with when you have the opportunity. To this effort, however, all that’s necessary is to select the Save Picture Style window (File > Save Picture Style file). Follow my instructions, and you may use this new Picture Style, Autumnal Passion, on any image you wish, whether it looks good or not.


To access the new Style, open DPP and select the image(s) for the Edit Window. For Picture Style, find Autumnal Passion by clicking Browse. You’ll find it by title wherever you left it, but it will be noted by however you captioned it. Select it and process the image. It baffles science!
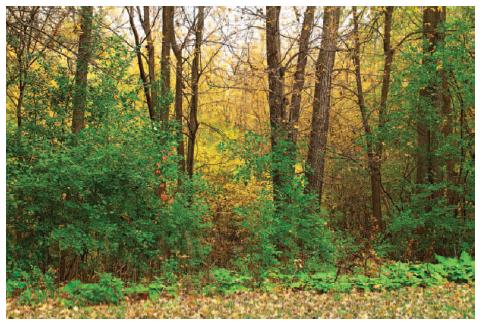
After applying Autumnal Passion.

Another image, before AP treatment.

After treatment with Autumnal Passion.
IMAGEBROWSER
This is the software you’ll use to download, edit, organize, and print your images. Basic steps may be all you need, but there are many advanced features as well.
DOWNLOADING IMAGES
Connect the camera to the computer as instructed in EU and launch ImageBrowser (IB). Turn the camera on. EU will launch automatically. Select “Starts to download images ” to begin the download.
As images begin to download, a Quick Preview window appears and presents, well, a quick preview of each image as it’s transferred. You can cancel this, if you wish, but I’ll bet you won’t. This is better than the LCD and faster, too.
You can also download from a card reader. After you start IB you’ll be prompted to select a destination folder, after which the Download Images window appears.

After the images have been downloaded, find the correct folder and click it. Your images will appear in the Browser window. Selecting individual frames will enlarge those images in the center window. You may select multiple images by holding down the Command key (Mac) or the Shift key (PC).

Selecting SlideShow from the bottom row will launch a new window that will cycle through however many images you highlighted.
The next command over, Print & Email presents a number of options for sending the images directly to a printer or creating email shots for family, friends, or clients. This example would send the highlighted images to a printer for an index print. If you wished to email one or many of these, you’d be guided through the process until the images were the correct size for email. When finished, the email application is launched and you can attach the new file or simply drag it to the copy block of the email.

IB defaults to Preview mode, but if you’d rather see your images as thumbnails, change the selection to List mode.
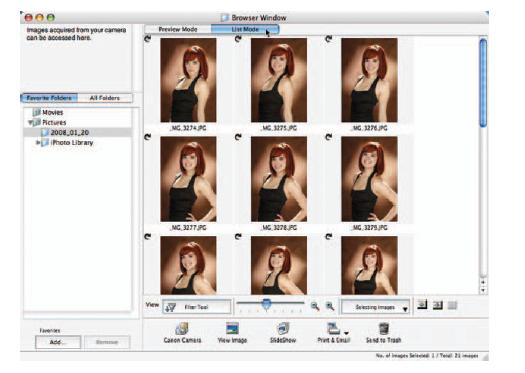
Change the display magnification level by dragging the slider in the middle of the window.

If you wish to see a larger version of any image, just double-click it or select View Image from the bottom of the window. A new viewer window, larger than the IB’s, will appear.
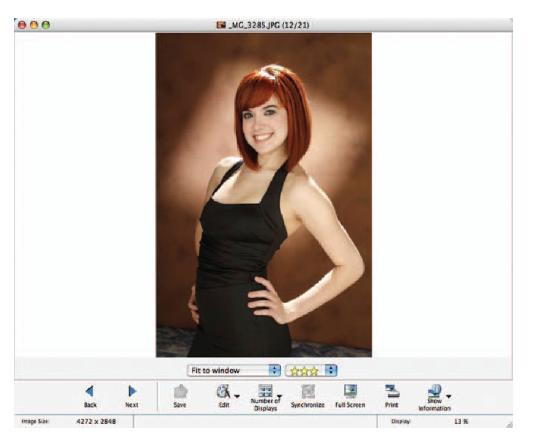
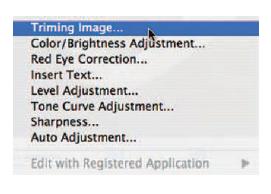
The new window features a number of additional commands not found on the main screen. Edit, for example, allows you to do many things traditionally done in other software like Photoshop, such as Sharpness and Tone Curve adjustments or cropping (yes, they really did misspell “trimming”), although IB’s crop tool has built-in aspect ratios for panoramics and other styles. There is also an option to add text (and import date and time data, if you wish). Each Edit function opens in a new window.
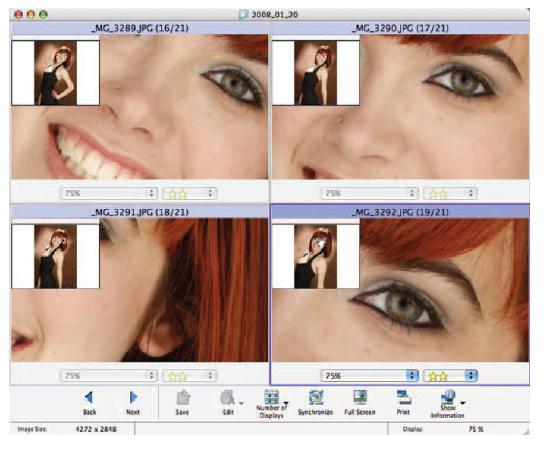
Synchronize is interesting, because you can compare up to four images at a time, previously selected in the Main window, moving an “enlargement position ” indicator anywhere in any of the four navigation windows. Each display synchronizes with the others so that the exact position of each image can be compared. You will need to select 4-Page View from Number of Displays before selecting Synchronize.
Full Screen darkens the entire monitor screen to black and places the image onto the black field for the largest possible view. Click anywhere on the picture to return to the window.
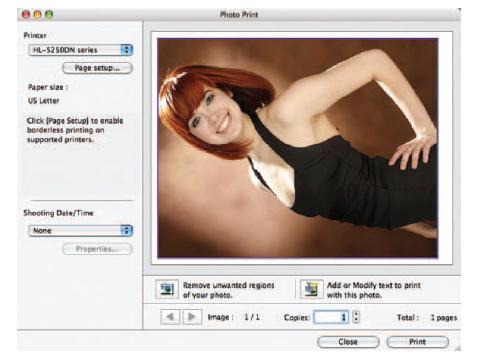
Print is a little different than the function in the Main window in that only the Photo Print window will be shown. You can still add text or crop the image before sending data to the printer.
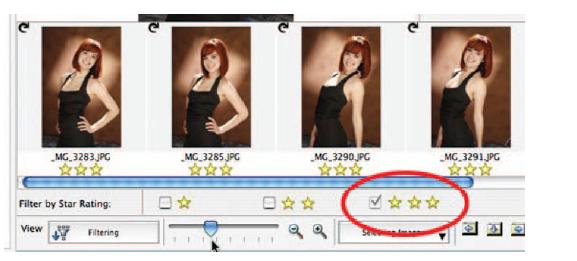
Sort images by selecting some or all of the thumbnails in the Browser window. Click on any one of them to call up the View window. Use the Back and Next arrows to move through the selection. Assign values one, two, or three stars to each one (each image is assigned two stars by default—Canon knows you can shoot better than they can spell).

Based on the number of stars assigned to the images, you can extract your favorites from the file and place them in a new folder. After you’ve assigned stars, go back to the Browser window. Select Filter Tool and uncheck each level of stars you wish to hide. What remains will be your favorites.
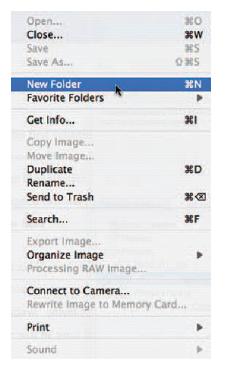
Go to the Folder list to the left of the Browser window and select the main Pictures folder or another of your choice. Go to File > New Folder, give it a name, and click OK. With only your favorites selected, use Select All and drag the favorites into the new folder.
You can transfer shots from IB to other software for editing or enhancement by “registering ” it with Image Browser. Go to IB’s Preferences. Select Register Application > Add. Your computer’s Applications window will open. Find the program you wish to authorize, such as Photoshop, and Open it. Click OK.
Back in the Browser window, find the image(s) you wish to transfer. Use Edit > Edit with Registered Software > (your Application of choice). The image will be transferred to the authorized program for editing. Once those changes are made and saved, the saved image is returned to the ImageBrowser file.
PHOTOSTITCH
Photostitch is a fun little addition to ImageBrowser and is now a lot faster than it used to be. With it you can stitch together up to four individual images and create a panoramic image that’s impressively long and cool to look at.
In ImageBrowser, select the images you wish to overlap.
Use Edit > Menu > PhotoStitch to start the program.

Check the arrangement of the images in PhotoStitch‘s window. If they‘re not in the correct sequence, now’s the time to fix them. If you’re happ 2. Merge. You’ll be prompted to click Start.
When you click the Save tab PhotoStitch automatically draws crop for any uncommon areas such as you’d get by handholding the camera (as I did) and raising or lowering the horizon slightly from shot to shot.
SHOOTING TIP
Multiple images for panoramics are best shot in Manual and with Auto Focus turned off. Subtle light changes between frames will mean slightly different exposures from frame to frame, destroying the visual integrity of the final image. It’s also a good idea to use a tripod, perfectly leveled, of course, but that’s not always practical. Use one of the Focus Points as reference and keep it on the horizon for each shot. Overlap the end of each image by 30% so PhotoStitch can find enough common lines to make a flawless final image.

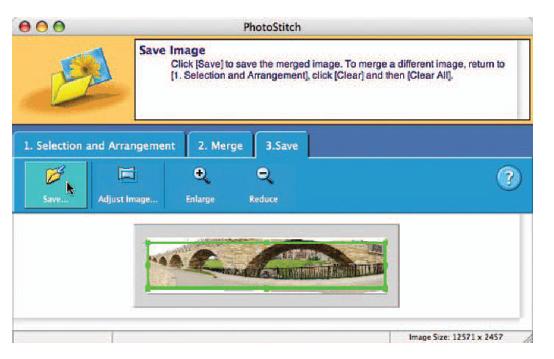
Click the Save button and you’ll be prompted to name the final image and to find a place to put it. Photostitch will now merge the frames and make the final.
