
Part 1
The Camera
_______________________
Making Pictures; Viewing
the Images; Menus; Cards,
Readers, and Batteries

Making Pictures
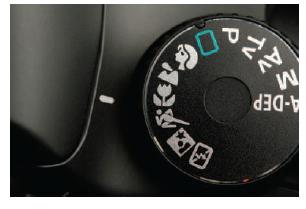
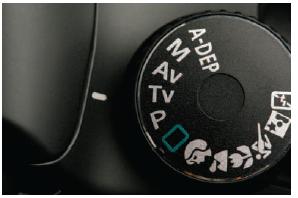
THE BASIC ZONE
Your Digital Rebel offers two options for creative photography, easily accessed via the Mode Dial. The first, the Basic Zone, distinguishes the various functions by icons and can be used “as is” to create great images the very first time you use the camera. Using any of the Basic Zones means the camera will make decisions for you. For first-time users, the Basic Zone is a great place to start.
None of the Basic Zone modes allow changes in white bal-ance, exposure compensation, or exposure beyond what the camera’s processor says is correct. Instead, each mode is pre-set to what a photographer would typically choose for a spe-cific type of image, like a portrait or a landscape. However, if the camera is not able to achieve this effect and get a good exposure, it will still attempt to give you a well-exposed image.
All Basic Zone modes allow you creative freedom. The Portrait mode, for example, can also be used for landscapes or inte-riors, although the camera will evaluate the scene with the presets it uses for a portrait. I know this may sound confus-ing. After all, why go to the trouble of creating six different modes if you can use any of them for any shot? The answer lies in how the camera balances aperture and shutter speed. Understanding how that’s done for each mode (and how those balances affect the look of your final image) will help you make great pictures.
FULL AUTOMATIC
The first zone, strangely enough, is Full Automatic, designated on the Mode Dial as a green rectangle. In Full Auto, you allow the camera to make every decision, and you are not allowed to use any function, Custom or otherwise, to change the image. Turning off the “beep” is the only other feature you can use. If snapshot photography is all you’re interested in, the Rebel will handle that task beautifully in Full Auto. Unfortunately, you’ll also be missing over 90% of the camera’s capabilities.

If there’s a downside to Full Auto it’s that the flash may pop up and fire if the camera thinks there isn’t enough light for a good picture (the flash will not pop up if you’re using Program). An upside is that the camera will switch back and forth between its One Shot focusing mode (for stationary subjects) and AI Servo (to track moving subjects). The camera will determine if it thinks the subject is moving or standing still.
SHOOTING TIP
Someone once told me that it is a good idea to always put the camera away in Full Auto or Program. If you happen to stumble across a “fleeting moment,” the camera will be ready to go as fast as it can get ready (.02 seconds), and you’ll get an image. This is useful advice for many family situations, as well as for more unexpected situations. In other words, you’ll be ready to make tabloid history the next time Elvis appears.

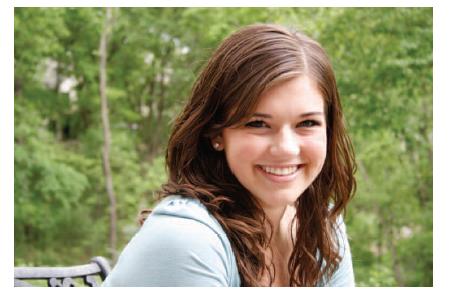
PORTRAIT MODE
Although you’re not limited to using this mode only for shooting people, Portrait mode automatically gives you a fast shutter speed and wide aperture. The fast shutter speed means motion blur (from a moving subject or camera) is minimized or nonexistent. The large aperture provides for minimal depth of field and soft backgrounds.


In Portrait mode, the camera defaults to its Multiple Exposure drive. Like motor drives on film cameras, the Rebel will fire continuously, stopping only when the card or the buffer are full. This feature is extremely useful for portraiture in available, or ambient, light, as people’s expressions change over the course of just a second. Shooting multiple frames can capture subtle nuance.
You can increase the subject to background effect by using the longest focal length possible with your zoom lens or by changing to a longer telephoto lens. Moving in closer to the subject will create even softer backgrounds.


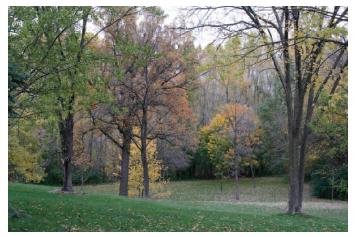
LANDSCAPE
Landscape mode is meant for normal or wide perspective shots of distant hori-zons. Cameras set in this mode will default to an aper-ture somewhere in the middle of the lens’ range, giving you reasonable depth of field (it’s not usually necessary to shoot landscapes for maximum depth of field).
The light meter will default to its Evaluative setting, and the camera will meter the entir scene but give emphasis to the area where the camer sen to focus. Should y you want to lock y recompose, hold the shutter but-ton halfway down, then r and shoot. Landscape may be used for interiors, too.

EQUIPMENT TIP
Exposure information will not lock or store in the camera’s memory unless the shutter but-ton remains half pressed. Also, critical focus is almost never possible in any of the Basic Zone modes because the camera is always set to Automatic Focus Point Selection. The camera chooses what it wants to focus on; you don’t get to select a focus point to use. Yes, you can focus/meter lock and recom-pose when in Landscape mode, but which focus point or points the camera decides to use is out of your control.

CLOSEUP
When using the Closeup mode, the camera will tend to choose an aperture that’s not quite wide open, like it does in Portrait. The closer you are to your subject, the less depth of field you have, even in Manual mode with small apertures. This mode will give you just a little depth of field to help show-case your subject with more than just pinpoint focus. At the same time, maintaining a faster shutter speed will help eliminate camera shake, which is more obvious when shooting fine detail. Of course, the ability of the camera to focus closely cannot be greater than the closest working distance of the lens.
Should you find you enjoy closeup (aka macro) photography—and many people do—take a look at Canon’s line of macro lenses. The EF50 mm f2.5 Compact Macro is an inexpensive yet impressive lens to begin with, and it will open up a whole new world for you.

SPORTS
The Digital Rebel’s Sports mode attempts to stop whatever action is in front of your lens. In this mode, the camera tries to give you a combination of fast shutter speed to stop action and, whenever possible, an aperture capable of more depth of field than available in Portrait or Closeup modes. Every lens works best at its middle apertures, and the camera will give you those f-stops unless the light level is too low. If that’s the case, the camera will set progressively wider apertures to compensate for the low light and to maintain faster shutter speeds. It’s only after the camera has reached maximum aperture that it will allow shutter speeds to slow down. Slower shutter speeds, of course, may result in a more blurry image.

The best thing about using this mode is that the camera switches to AI Servo, which can intelligently track moving objects and keep them in focus from frame to frame, even if they’re moving toward the camera. High-speed multiple frame shooting is also activated.
To use Sports mode, first place the focusing points on the subject, although you don’t need to use the center focus point as the camera will choose any focus point where there is the best detail and contrast. Next, hold the shutter button halfway down to activate the focus tracking. The camera will beep
SHOOTING TIP
When working in the Sports setting in Basic mode, the camera will toggle between ISO 100 and 400 in its attempt to deliver the fastest shutter speed. Indoor light conditions are trequently too dark even for ISO 400 to deliver a "frozen" moment. You would get better results by switching to Av (in the Creative Zone), dialing in a large f-stop, and upping the ISO to 1600. Be sure to check the White Balance setting or use Auto White Balance (AWB).
softly when it has achieved focus. Fully depress the shutter button to begin shooting, which you can continue to do until either the flashcard or the buffer is full or the action has passed.
NIGHT PORTRAIT
This mode works best if you station your camera on a tripod, as the camera will auto matically hold the shutter open long enough to register background light behind your subject. It works in tandem with flash, either the built-in camera flash or an accessory unit, and the amount of time the shutter stays open depends not on the flash but on the brightness of the background light.

Flash shots typically show a properly exposed subject but a very dark background, because the flash loses intensity as it travels away from the subject. For this reason, Night Portrait mode works equally well for inside portraits or in any location where you’d like some detail behind your subject.
Even with a tripod, it’s a good idea to ask your subject(s) to hold still after the flash fires and until you hear the shutter close.
FLASH OFF
This mode disables the camera’s command to fire the built-in flash or any accessory flash plugged into the flash shoe. The camera attempts to give you a combination of shutter speed and aperture that will properly expose the frame but still provide some depth of field. Under lower light, the shutter must stay open longer, leading to the possibility of camera shake. Based on the focal length of your lens, the shutter speed indicator light, visible inside the viewfinder along the bottom of the viewfinder window or on the exterior LCD panel, will blink to indicate potential camera shake, and you may wish to stabilize the camera with a tripod or other support.

This mode is particularly useful if you need to photograph a building interior and do not want the distraction or influence of a flash. Also, the Auto Focus function will default to AI Focus to enable the camera to switch back and forth between One Shot and AI Servo automatically. This mode is identical to Full Auto (the Green mode), with the exception that the flash will never pop up unless you want to.

THE CREATIVE ZONE
A separate set of functions found on the other half of the Mode Dial, the Creative Zone offers a huge opportunity for aperture and shutter speed options as well as the use of many of the personal or fine-tuning options like custom functions or exposure compensation.
PROGRAM AE
Like its Basic Zone brother, Full Automatic, Program AE (Auto Exposure) is a general-purpose shooting mode and will set shutter speed and aperture in exactly the same way. Still, it offers a number of options that Full Auto does not, and here are a few of the most important:

- You can change the white balance from Auto White Balance to any of the presets or to a Custom white balance (always a good idea).
- If your subjects are too light or dark, you may dial in some exposure compensation. This is often necessary when photographing a dark subject against a light background or vice versa.
- The RAW file format is available when using Program AE.
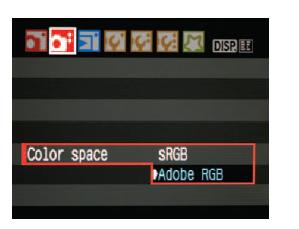
- You can change the Color Space from default SRGB to ADOBERGB (1998).
- All picture styles are available.
TV SHUTTER SPEED PRIORITY AE
Tv (Time value) allows you to choose the shutter speed best suited to your creative needs while the camera chooses the correct reciprocal f-stop. This mode is valuable when you are photographing moving objects because you can easily change the amount of motion blur in your final image, from none at all to as much as you want (if the lighting conditions will support it) and maintain that level even if the scene gets a little lighter or darker.
Note that if you see the aperture light blinking in the viewfinder or on the LCD display, you will not get a correct exposure.

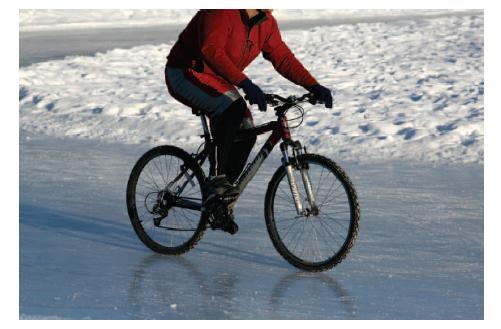
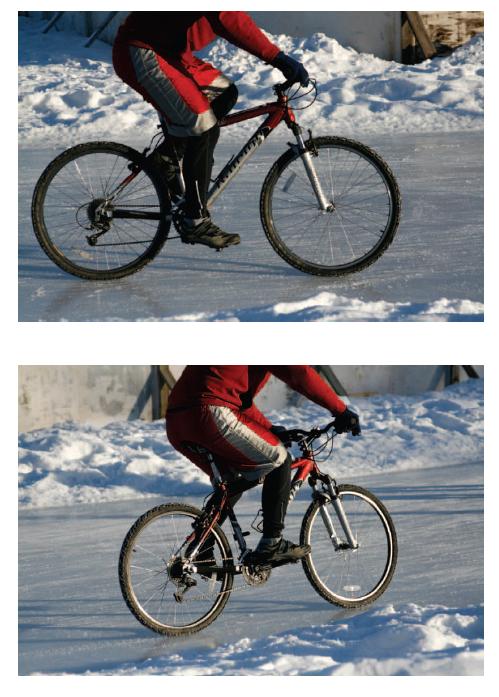
Resetting the shutter speed to 1/25 of a second allows the blown snow to softly blur.
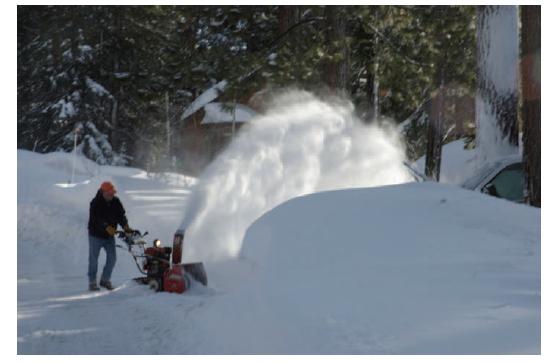
A Tv shutter speed of 1/500 of a second effectively freezes the blown snow.
AV APERTURE PRIORITY AE
If depth of field, or the lack of it, is more important than stopping motion, you may wish to use the Av mode. Bearing in mind that a larger number (smaller aperture) will result in more depth of field than a smaller number (larger aperture), use the Main Dial to set the camera’s aperture to the desired size and fire away. The camera automatically sets the reciprocal shutter speed. Unless you see the shutter speed number blinking in either the viewfinder or on the LCD, you will get a good exposure.
Personally, Aperture Priority is my favorite mode if I’m just walking around, looking for things to photograph, and just want to snap away. I don’t usually like great depth of field, so the faster shutter speeds I get with a large aperture, and Canon’s rapid ultrasonic motors and

image stabilizers, mean I can shoot quickly and with confidence under a wide variety of lighting conditions.
MANUAL PHOTO
Manual is my favorite mode in the Creative Zone, for a number of reasons. First of all, using it forces me to think about what I’m doing and what I want to see when I’m done. If I’m on location for a commercial client, I know I can bend the camera to my will and deliver exactly what the art director wants. And, of course, working in Manual mode is indispensable in the studio, where everything must be tightly controlled to be successful (and where semi-automatic modes are almost impossible to work with).
Working in Manual means you will have to set aperture and shutter speed to a combination that will deliver a perfect exposure. In Manual, you’ll use the Main Dial to control both functions, although the default is shutter speed. To change the aperture, hold down the Aperture/Exposure Compensation button on the camera’s back while rotating the Main Dial.

You may need to use an accessory light meter when working in Manual under available light. Although you can see light levels measured in the viewfinder, setting the camera this way is somewhat tedious. If your studio is equipped with electronic flash, you will need a separate light meter to measure strobe as well as ambient light.
The Rebel will strobe-sync to shutter speeds as fast as 1/200th of a second. This is often useful if you’re balancing strobe light to bright ambient light, either to fill the shadows or to overpower the ambient altogether. You can also attach an accessory Canon Speedlite to the hot shoe on top of the camera or a device such as a Pocket Wizard to wirelessly fire studio strobes.
A-DEP
There is more depth of field behind an object in focus than there is in front of that object. A-DEP (Automatic Depth of Field) AE uses the Rebel’s seven focus points to determine where to place the primary point of focus to achieve maximum depth of field over the area covered by those focus points. A-DEP is especially useful for groups of people or objects set in staggered distances from the camera.

To use it, simply turn the dial to the A-DEP icon and compose your picture. A- DEP will analyze the data from the focus points and set an aperture that will adequately obtain depth of field over the group, along with its corresponding shutter speed. You can see the camera’s selection in the information bar along the bottom of the viewfinder or at the top of the LCD display on the back of the camera body.
If you see a blinking shutter speed, either 30 ” or 4000, it means the subject is either too dark or too light. If the aperture number blinks, it means that proper depth of field could not be attained. Either move farther away from the subjects or change to a wider-angle (shorter focal length) lens. Also, A-DEP will not work if the lens is set to Manual Focus.
It’s possible that with low-light subjects the camera will set a shutter speed that requires a tripod to avoid camera shake.

CHANGING ISO
An ISO number indicates the relationship between the sensitivity of the sensor and the amount of light necessary to render a scene properly. In the days of film, a lower ISO (50, 64, or 100) meant less grain and more contrast but required more light for a correct exposure. Films with a higher ISO number (400, 800, or higher) would produce correct results with more noticeable grain and less contrast, but under darker conditions. Once you put a roll of, say, ISO 400 film in your camera, you were pretty much stuck with it until you finished. With digital, the ISO is tied to the amplification of the sensor, and you can freely change ISO ratings as you shoot.
In the Basic Zone, the Rebel toggles between ISO 100 and ISO 400 as it sees fit (you have no control over its selection). In the Creative Zone, the range is from ISO 100 to 1600, and you can change the range at will.
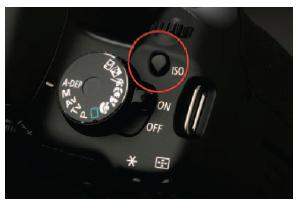
To change the ISO in any mode in the Creative Zone, press the ISO button (next to the Mode Dial). The LCD will change to the ISO screen. Use the Cross Keys to toggle to the speed of your choice and press the Set key. Your new selection will appear in the upper right corner of the LCD.
Images made with higher ISOS in earlier cameras were not especially attractive. Signal amplification to the sensor resulted in noticeable “noise, ” the digital counterpart to film’s grain. The Rebel uses new technology that minimizes that noise, resulting in images that are cleaner and more crisp than ever before. This image, for example, was made at ISO 1600 and, although it’s difficult to see in this small reproduction, the noise (little that there is) is totally acceptable.

EXPOSURE COMPENSATION
There are times when any internal light meter can be fooled, and there will be virtually no way to get an automatic perfect setting from the camera. For example, when photographing a lit subject against an unlit, dark background, the result will often be an overexposed subject. Unless the subject fills the majority of the frame, the camera will see the large, dark
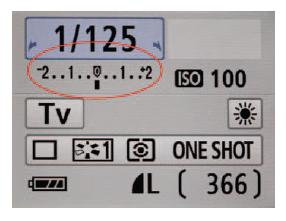
shape and attempt to do its job by providing an aperture/shutter speed combination that adequately represents the large, dark shape as a properly exposed large, dark shape. In reverse, when photographing a dark subject against a bright background, the camera will underexpose the subject in an attempt to correctly expose the majority of the frame.
You have two options when faced with this challenge:
- You can take a meter reading with a hand-held meter and set the camera accordingly in Manual mode.
- You can adjust your P, Tv, Av, or A-DEP exposure through Exposure Compensation.
Exposure compensation forces the camera to give the exposure more or less light than the camera’s meter says it needs and is often the only practical solution for exposure problems when shooting JPEGS on the fly. It is also a useful tool if you wish to deliberately over or underexpose for effect, as you will get a consistent adjustment.
To access your exposure compensation feature, press the Av button in any Creative Zone mode and turn the Main Dial to the desired amount.
Practice will teach you the correct levels of exposure compensation for a variety of situations. When dealing with constants, such as shooting a snow scene, you may find that compensation of +1 stop over what the camera says will give you perfect results every time.

A large bright background may cause the camera to underexpose the subject.

An exposure compensation of +1 stop forces the camera to add more exposure to the scene.
Exposure compensation may be acquired in 1/3-stop increments (½ stops when CFN 1:1 is used), up to two full stops plus or minus. To activate the function in P, Tv, Av or A-DEP, simply depress the Aperture/Exposure Compensation button while turning the Main Dial. You’ll see the compensation amount change on the LCD screen.
Exposure compensation changes stay in place even if the camera is turned off. You’ll need to manually reset to zero when you’re finished.
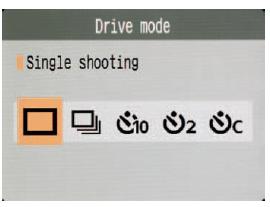
DRIVE MODES
The Rebel provides three different ways to work the shutter, all of which are accessed through the Drive Mode Selection button found on the camera’s back, next to the LCD screen. Push that button and the Drive Mode screen will come up on the LCD. Use the Cross Keys to make your selection and press the Set key. Note that Drive Mode selection is not an option in the Basic Zone.
SINGLE SHOT
Just as it says, this function allows only one frame per shutter depression. This is the default setting, and it is perfect for most everything that doesn’t move.
CONTINUOUS SHOOTING
You can shoot approximately 3 frames per second, continuously, until either the buffer or the card is full. Many people never consider this mode as a “normal” mode, and I don’t know why. Perhaps they feel editing the extra images will be too much work, perhaps it’s because they don’t attach enough importance to the subject. Whatever the reason, the continuous shooting option should not be overlooked. The additional frames will show subtleties that increase your odds of getting a great image instead of just a good one.
SELF-TIMER
Want to be your own star? Using the first self-timer option gives you 10 seconds to get in front of your own lens and create a masterpiece. With the self-timer selected, push the shutter button. The SELF-TIMER Lamp will flash and the camera will beep in half-second intervals for the first 8 seconds, steadily for the last 2 seconds.

When 10 seconds is just too long to wait, you may select a two second delay instead. This is especially useful if you’re using C. Fn-8, Mirror lockup (see Custom Functions) to take a picture that might be affected by camera shake, such as a time exposure. When your image is composed, depress the shutter once to lock up the mirror and once more to take the picture. You have 2 seconds to get your finger off the camera before it fires.
New to the XS/1000D is the option to self-time a continuous burst of up to 10 frames. To use this feature, select the “C” option and use the vertical Cross Keys to set the desired number of exposures. Press Set. When you depress the shutter, you’ll hear the 10-second countdown beeps after which the camera will capture the continuous sequence.
Please note that the camera will auto focus as you depress the shutter. If you’ll be standing beside a person or an object, you shouldn’t have a focus problem. If not, you’ll need to disable auto focus and manually prefocus on the spot where you’ll be. Those of you using C. Fn-9:1, back-button focus, will also need to prefocus.

EXPOSURE AND METERING
AVAILABLE METERING MODES
The Rebel’s internal light meter is the instrument that measures the brightness of the subject and, in all but Manual mode, sets the camera’s shutter or aperture to what it sees. The Rebel XS/1000D is capable of metering exposure, via TTL (Through The Lens) full aperture metering, three different ways, each of which is accessed though the Meter Mode button located on the top of the Cross Keys. Whether you select Evaluative, Partial, or CENTER-WEIGHTED Averaging, you’ll get an accurate exposure for any “average ” scene.

Understanding, in visual terms, what each mode might do for you is crucial to your development as a digital photographer. After all, what’s the use of buying this beautiful technology if you never use anything but Program or Full Auto?
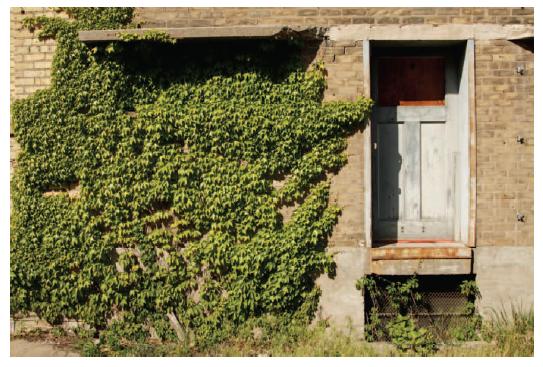
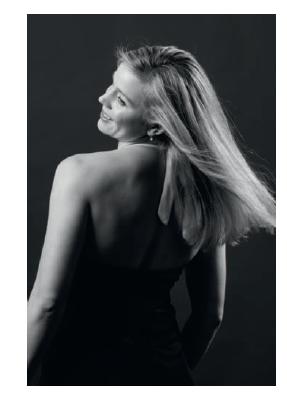
Evaluative Metering is the most general purpose metering system and is the default mode for all of the Basic Zone settings. It is a sophisticated system based on zones of varying selectivity, with the most important zone located around the center focus point. It is considered to be the best mode for most scenes.
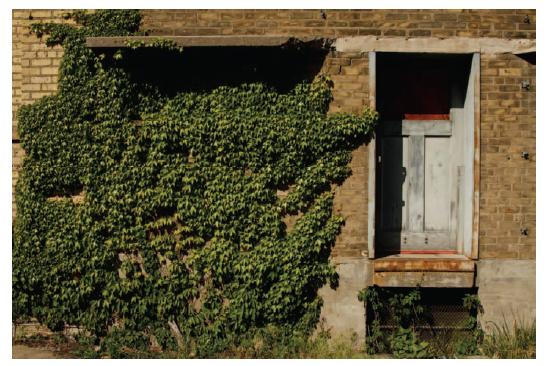
If your scene features a subject that is darker or lighter than the background, you may get more successful results by selecting Partial Metering. The area measured by the meter is about 9% of the total frame, in the center. Essentially an oversized spot meter, Partial Metering can be utilized when a dark subject needs to be balanced against a brighter one or vice versa.
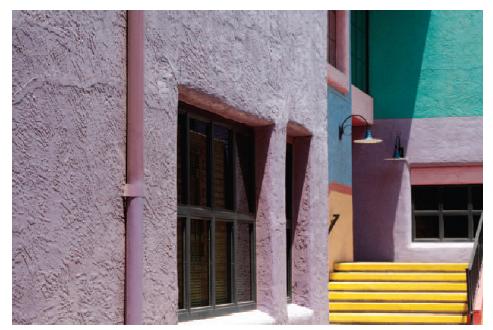
Because there were more bright areas than dark, the Evaluative mode slightly underexposed this image.

The Partial mode effectively balanced the bright wall and dark window.
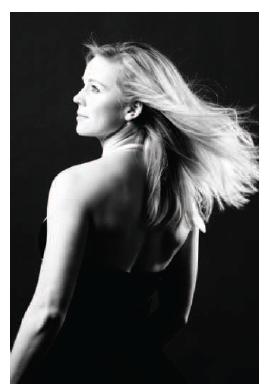
The third method is the Center-Weighted Averaging Meter, which takes the majority of its reading from approximately 25% of the frame, from the center, then averages that portion against what it reads from the rest of the frame. This function is valuable when you are photographing an object or group that is more important than the surroundings but not significantly brighter or darker than those surroundings.
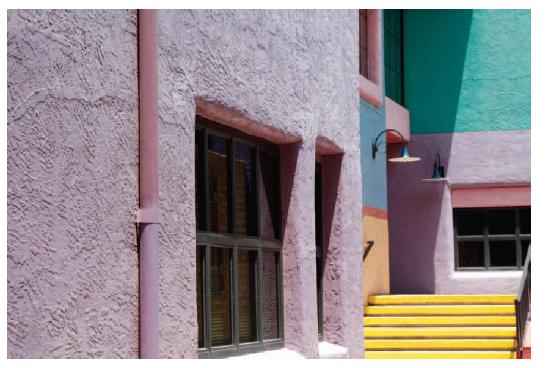
The Center-Weighted Average Meter balanced both the brights and the darks for this ima
AUTO FOCUS

When you look at a potential photo op, the first thing you see is usually the most important element. You’ve trained your eye to see the important details and to tell you how to compose the image. Let’ w Canon can help you capture that vision, beginning with some of the options you have for focusing (and I want to emphasize “some of the options ”) because you can create personalized control combinations tailored to your special shooting needs using specific controls and Custom Functions. Canon’s wonderful auto focus system is, in my opinion, the top of the line. Designed entirely in-house and refined during the 35 mm EOS era, new algorithms and new chip technologies have increased per-formance to an auto focus mechanism of unparalleled performance.
TECH TIP
If you wish to change the composition of the image after metering for the important infor-mation, you will have to engage the AE (Auto Exposure) Lock before moving the camera, because the Partial Metering function does not correlate with focus points for exposure evaluation. Be aware that focus points are not actually used for metering (in any metering mode) although their selection will indicate to the metering system where to place its importance.
Working in conjunction with the super fast Digic III processor, Image Stabilization (in some lenses), Ultrasonic Motors, and the latest in CMOS imaging sensor upgrades, Canon’s auto focus mechanics are something for the company to be proud of and for you to exploit as just one more tool to make your photographic life easier.
To be effective, any auto focus system must know where to look. The Rebel’s system uses a combination of one high-precision cross-type sensor along with a network of six single-line sensors within the frame for an accurate focusing mechanism. Using Canon’s auto focus (AF) technology and certain Custom Functions allows you to tailor your focusing habits to your camera, to your application, and, ultimately, to the success of your images. Canon’s AF technology permits you to achieve fine focus by allowing the camera to select the area it believes is dominant (it’s usually correct) or critical focus by manually selecting the AF point you wish to use.
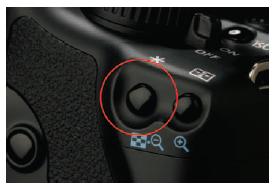
You can see the Rebel’s AF points when you look into the viewfinder. To access them for selection, press the AF Point Selector button located in the upper right corner of the camera’s back (the same button that is also used to enlarge images in Playback mode). Use the Main Dial to rotate through the selections (also visible on the LCD) until you select the individual AF point you wish or, when all the lights are lit, use Automatic Focus Point Selection (AFPS). You will have approximately 5 seconds to rotate the Main Dial, after which AF point selection will turn itself off. After you’ve made your selection, aim the camera at your subject and hold the shutter button halfway down. In the viewfinder, you’ll be able to see how your camera has evaluated the scene and where it has decided to focus.
Should you decide you don’t like the AF points the camera chose or if the area you wish to be sharp is outside the AF points, you may move the camera to a better position, push the shutter button halfway to achieve focus, then recompose the image without releasing the shutter button.

Some situations may require shot-to-shot focus in a particular area, perhaps a series of portraits in which the subject’s face is too far off center to effectively utilize the entire focusing matrix. In this circumstance, you can simply use the AF button to select a single focus point that’s appropriate to your composition.
AE LOCK
AE Lock works only in the Creative Zone, but not in the Manual mode.
When you need to have a certain portion of your image metered properly yet wish to compose the image for a different area, you can use AE (Auto Exposure) Lock to lock the exposure for the important area in place while you shoot around it.

The AE Lock button is located on the back of the camera, on the upper right side. This is the same button you will use for FEL (Flash Exposure Lock) focus. I think it’s best to assign a focus point before using this AE Lock, as the reading will be more precise than if you used Automatic Focus Point Selection (AFPS), and I’d suggest the center just because it is a high pr oss-type this feature before using AE Lock as focus must be achie ough the shutter release.
To use this function, place the focus point (the center, in this case) on the part of the image you wish to be correctly exposed. Press the shutter halfw achieve focus. Immediately pr the AE Lock button and k depressed. Recompose the image and shoot. You may recompose and shoot as many pictures as you like with that exposure long as you hold down the AE Lock button.
SHOOTING TIP
The effect of AE Lock will differ depending on the metering mode. Personally, I prefer the Partial mode, as it’s strongly center weighted to begin with. I’d suggest you shoot a num-ber of tests, using each metering mode in sequence, and compare them to see which you prefer. AE Lock is not something you’re likely to use every day, so it makes sense to find a matrix you’re comfortable with.

The exposure value of this dandelion was measured with the center AF point.

Once the value was determined, the shutter was held halfway and the AE Lock button engaged while the image was recomposed. If the photographer had not used the AE Lock button, the meter would have read the darker center and overexposed the dandelion.
AUTO FOCUS MODES
To use any auto focus mode, you must set the Focus Mode switch of the lens to AF (you can always focus manually when this switch is set to M). You cannot switch between modes if the camera is set to Full Auto, although you can switch between One Shot, AI Servo, and AI Focus when in Program mode. You can also change your focus points, something you cannot do when you’re in Full Auto or any other Basic Zone.
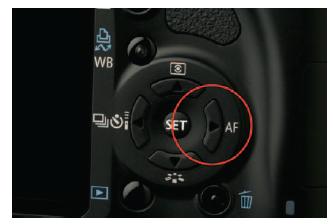
Three auto focus modes are available on the Rebel, accessed by pushing the AF button on the right side of the Cross Keys. Make your selection based on what you are shooting, and press the Set key to enable it.
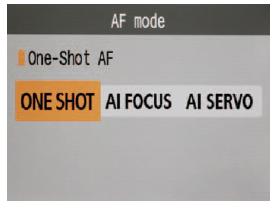
ONE-SHOT AF
Of the auto focus modes available on Canon gear, ONE-SHOT AF is most suitable for any subject standing still. With Automatic Focus Point Selection, the AF point(s) that the camera uses to determine focus will flash briefly in the viewfinder, giving you an opportunity to judge whether or not the critical focus area was selected. A Focus Confirmation light will be displayed in the viewfinder at the right end of the info bar.
If focus cannot be achieved, the Focus Confirmation light will blink rapidly and you will not hear the confirming beep. This can sometimes happen even if you’re working within the focusing limits of the lens. Areas of flat or minimal detail, like a blank wall, or reflective surfaces like mirrors or windows may send the auto focus mechanism into a sort of sub-electronic dilemma, racking the lens through a complete focusing cycle that finds nothing to lock on to. It can be frustrating when it happens, but it won’t hurt anything. Practice with the camera will minimize these episodes.
With One-Shot AF and Evaluative metering, and with Aperture Priority or Shutter Priority selected, the aperture or shutter speed are
set at the same time that focus is achieved and will be locked as long as the shutter button is depressed halfway. This allows you to recompose the shot, if necessary, without changing the light meter reading, a useful tool if you’d like to zoom in on an important detail, meter it, then zoom out for the actual exposure.

AI SERVO AF
There’s no question that Canon’s auto focus is blazing fast and deadly accurate. It’s always been one of Canon’s better features, and as such it is always under improvement. It seems that each new model works faster (and under progressively lower light levels, too).
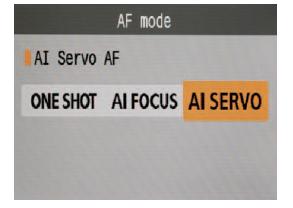
After selecting AI Servo from the Auto Focus options button, start by holding the shutter button halfway down to get the first focus point on your subject, then simply continue to hold the shutter button in the same position, halfway down, for all the exposures in your series. If you let up on the shutter button, you will have to reacquire a starting auto focus point before the AI Servo will kick in again. Note that neither focus confirmation lights nor beepers will be visible or audible in this mode.
Canon has also built in what the company calls Predictive AF, a function within the AI Servo that allows the camera to analyze the movement of objects if they approach or retreat the camera at a constant rate. If you manually select an AF point, the camera will track the subject and will predict and confirm that focus point immediately before making the exposure. If your AF point selection is automatic,


the camera will use the center AF point to begin but continue to track the subject as long as it is covered by at least one other AF point within the focusing ellipse. In this case, any active AF point will not light up. Trust it. It works.
AI FOCUS
AI Focus is a nifty little feature that combines the best of One-Shot Focus and AI Servo.
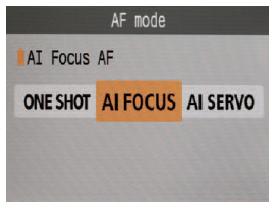
When AI Focus is selected, you can shoot as you would with subjects that are not moving, or moving minimally, essentially One-Shot focusing. Should the subject begin to move with more energy, the camera will automatically shift into AI Servo mode, tracking and predicting the next point of focus. This feature works just as well if the photographer moves toward the subject.
Using AI Focus does not require you to hold the shutter button halfway down during the sequence, it will reacquire focus frame to frame, much more rapidly than if you were using One-Shot Focus.
At first glance, it would appear that AI Focus is the way to go. After all, an auto focus program that will track both moving and nonmoving subjects should be pretty cool, right? If there is a problem with AI Focus it would be that the camera has to make some complicated decisions in an extremely short period of time. I’m here to tell you, at least for this technological moment, that doing so is a tough job. Personally, I’ve seen this function succeed and fail, for a number of reasons, not the least of which was that both the subject and I were moving. AI Focus can sometimes mistake a slow-moving subject for stationery or, because it has many decisions to make, can miss a fast-moving object.
Test this for yourself. I’m sure that with just a little practice you’ll know a whole lot more about how Canon’s AF system works.
I’ve noticed in lower light situations, such as when a subject is lit by a relatively dim softbox in a studio, and when using the shutter button to focus, it will take a bit longer for the lens to achieve focus. There is a Custom Function (C. Fn-9), “shutter/AE Lock Button,” that uses the AE-LOCK button (also known as Thumb Focus, Rear Button Focus, or FEL (Focus Exposure Lock) Focus, to act as the AF activator.

Wedding photographers, sports photographers, and photojournalists love Option 1, AE LOCK/AF, because they can focus, and change focus, using a thumb. When an index finger is only used to make the exposure, it means that focus can be achieved, held, or changed without waiting for the shutter button to find it. If focus is made with the thumb, the actual exposure will be made faster than if the shutter button AF mechanism had to be activated before making the exposure. Also, when AI Servo is engaged, focus is continuous, as is the ability of the shutter button to shoot, which means you could change the plane of focus during a burst or suspend AI Servo while waiting for your subject to clear a visual obstacle, reacquiring focus when you can and starting a new sequence. It may take a little practice, but once your thumb and forefinger learn to work together you’ll appreciate the fractions of seconds this technique adds to your timing skills.
As with most Custom Functions, there is more than one way to use it. Option 2 is terrific for sports photographers or anyone who may pre-focus on a spot and wait for the action to get there. Option 2 will start the AF function on the shutter button but let the photographer suspend that command by pressing the AE Lock (rear button), effectively locking focus on the predetermined point. I think you will find this option is most useful when exposure is set manually, as subjects entering the frame may skew the exposure value when either Av or Tv is set.
When Option 3 and Rear Button Focus is selected and you’re using Av or Tv for exposure, there is no Auto Exposure lock, so if you’re following a moving subject through changing light conditions, the camera will adjust automatically to the changing light.
MANUAL FOCUS POINT SELECTION (MFPS)
You may find it helpful to select a focus point manually. This is a useful function if you have many shots where the primary focus point will fall in a specific area, such as with a series of head and shoulder

portraits. In such a case, you will not want the focus point to be influenced by body parts or props; you’ll want to keep primary focus on the subject. Whether you’re shooting vertically or horizontally, you can select the proper focus point by pushing the AF button and selecting the correct focus point using the Main Dial as previously noted. As long as your primary focus area falls under this focus point, your subject will be in focus.
WHITE BALANCE AND COLOR SPACE
COLOR TEMPERATURE
Although light may look white to your eyes, the camera may not see it as white. White light is a mixture of all colors and varies in its mix from situation to situation. Our brains automatically neutralize the mix, and we see white as white almost all the time. Unfortunately, no camera is able to do that 100% of the time, and we must set the camera so it can correctly interpret the intrinsic color of any scene as neutral.
Techneutral. Technically, color temperature is expressed in degrees Kelvin (usually noted simply as “K”) and is based on the color of light emitted by a heated bar of pure iron. Daylight, as measured at high noon, is averaged at 5200 K in the Canon system. This means that images made with a Canon that has been preset to Daylight will interpret whatever you shoot as though 5200 K was correct and neutral for that scene. Images made with the Daylight setting but shot under warmer light (less than 5200 K) will have a red/yellow (warm) color cast, whereas images made in light with a higher color temperature will carry a bluish (cool) cast. Using a preset adds a predetermined amount of color to balance your “guesstimated” color temperature to daylight, 5200 K.
WHITE BALANCE
The Rebel has a selection of seven white balance presets plus a Custom White Balance (CWB) that you can measure yourself. Daylight uses Canon’s default color temperature of 5200 K; Shade works at 7000 K; Cloudy at 6000K; Tungsten/Incandescent at 3200 K; White Fluorescent is set to 4000 K (although there are huge color temperature variations in fluorescent lights); Flash at 6000K.

Auto White Balance.
The same scene using the Daylight preset.
Using the Shade preset.
The Tungsten preset cools the image dramatically because it presumed the image was warmer than it was.

Using the Fluorescent preset.
Flash uses the same color temperature as Cloudy.

Custom is the most accurate white balance.
Auto White Balance (AWB) attempts to neutralize the light of any scene with a color temperature between 2000 and 10000 K, but it can be fooled. If there is an overriding color tone in the background or foreground, the camera may see that as a color temperature that needs to be neutralized. The resulting image may not be as neutral as you’d like it to be.

Auto White Balance (AWB) tries to balance the strong background and clothing color against skin tones to create a true neutral but cannot do so.

Custom White Balance (CWB) doesn’t care what colors make up the image, only the color of the light that falls upon it.
CUSTOM WHITE BALANCE (CWB)
Making a CWB is easy with the Rebel (it will even remind you to change the preset if your camera is set for something other than Custom). To do this effectively, you will need to meter and photograph a neutral gray or white card under the light conditions within the frame. If you’re working under studio strobes, you will need to use a calibrated flash meter to accurately measure the strength of the light. Either way, it’s important to purchase a neutral target. Typewriter paper, tablecloths, bridal gowns, or other objects contain chemicals or bluing agents that make them look neutral, but they will not white balance properly because of that chemistry. A commercially available gray target, such as those sold by Lastolite or BalanceSmarter, will produce the most accurate white balance.
Err on the side of caution and fill as much of the frame as you can with the gray target. It’s not necessary for the image to be in focus, although a target like this BALANCESMARTER, with its printed lines, is helpful because you won’t have to disable auto focus to make the shot.

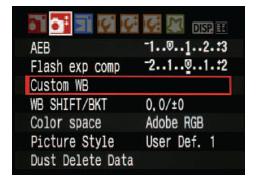
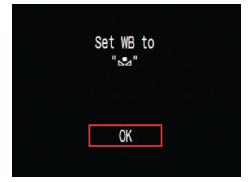
In the Shooting menu choose Custom WB. You will be asked to select an image, but the camera always defaults selection to the last image made. If you’re happy with that image, press the Set button.
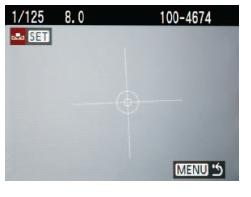
If your White Balance icon is not already set to Custom, you will be told to set it accordingly. You’re now good to go.
FLASH
USING THE BUILT-IN FLASH
Working with the built-in on-camera flash is terrific for snapshots, although the tube is small and produces a bright, specular source that will accent skin shine and show dark (although minimal) shadows. The flash is placed close to the lens and pops up vertically just above the lens axis. Although this guarantees even light over its effective working distance, the look of the images will actually be flat. It’s best, in my opinion, to use the built-in flash only for horizontal compositions. If you turn the camera to its vertical position, the resulting shadows will fall straight across that axis and look unattractive. That said, the built-in flash can be effective as fill flash, a little something to brighten up a shot without overpowering it.

Flash Exposure Compensation is a function on any Canon with a built-in flash. It allows an increase or decrease in the flash output power relative to what the camera tells the flash it needs, a determination the camera will make based on the light at hand and the shooting mode it’s in. You are allowed up to two full stops of exposure compensation, over or under what the camera considers to be correct, when you use this function.
We all know that outdoor exposures, even made under diffused daylight conditions, can show shadows that are not especially attractive
even though the subject may be. If a face is lit from the side, for example, eyes tend to look lifeless because there is no catchlight, no hint of a light source, to give them a spark.
Even if the camera doesn’t automatically raise the flash (there may be so much light that the camera won’t think it’s necessary), push the flash button near the lens and pop it up manually.

Without making any Flash Exposure Compensation, the camera will use the built-in flash as a fill flash. Comparing a non-compensated image with one deliberately set to -1/3 stop would indicate that this is the camera’s default fill flash position.
With further compensation adjustments, at -2/3, -1 and -2 stops, you can easily see how Flash Exposure Compensation can improve your images when used as a supplemental light source. In each case, look at how much life the catchlights in the eyes add to the shots.


When working with built-in flash indoors, there are a couple of things for you to consider in order to improve the quality of your images. Use a shooting mode that will take ambient light into account. If you use Manual, be sure to set a shutter speed and aperture that will include enough ambient detail to show the background. A shutter speed that’s too short or an aperture that’s too small will not allow enough ambient light to register, resulting in dark backgrounds with minimal or no detail. Even though the exposure from the flash will be terrific, the lack of ambient detail will result in “tonal merger, ” a part of the image where dark areas of the subject like hair or clothing
are so dark they become indistinguishable against the background. Photos made with tonal merger lack the three-dimensional quality that makes for a better shot.
Watch for areas where dark objects blend into background shadows.
You’ll get better results working in a mode that supports ambient light exposures. On the Basic side of the dial, Portrait, even Night Portrait, will produce great results because the exposure will be made for both ambient and flash. On the Creative side, Av, Tv, even A-DEP will produce nicely lit, dimensional results that balance ambient light to the flash.
Increasing the amount of ambient light exposure decreases the possibility of tonal merger.
Viewing the Images
ON SCREEN PLAYBACK
You’re not limited to reviewing images one at a time on the LCD screen. The Rebel provides a number of options for your viewing pleasure. Of course, if one at a time is right for you, just push the Playback button to view the last image made. Use the left and right Cross Keys to toggle back and forth through all images on the card.
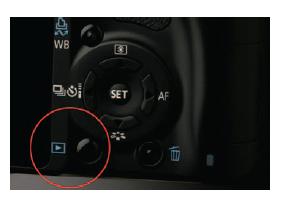
IMAGE MAGNIFICATION
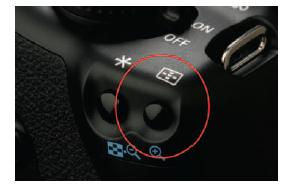
You can zoom, up to 10X, into any picture on the Playback screen by pressing the Magnify button in the upper right corner of the camera back. Use the Cross Keys to navigate through the

image. Press the Reduce button (aka the FEL button) to reduce the level of magnification.
You can spin the main dial to view the next or previous image and maintain the level of magnification. To leave the Playback screen, just press the Playback button again.
REVIEWING MULTIPLE IMAGES
If you’re looking for a particular image and want to see a more encompassing selection, push the Index button (same as the FEL button) and the screen will show the last four images. Push the Index button again, and the selection changes to nine images. The image that came up first will be highlighted with a blue box. Use all four of the Cross Keys to maneuver through the group.

When you arrive at an image you’d like to see, use the Magnify button until your selection fills the LCD. If you’d like to see more of that image, use the Magnify button to zoom into the image. To return to the group selection, use the Index button (which now functions as a Reduce button) to reduce the magnified image until it once again becomes part of the group.
Should you wish to see the next batch of four or nine images, use the Main Dial to move the selection forward or backward.
JUMPING
When you have many images on a card, especially if there are many shots of a similar subject, you may wish to get through them a bit faster. “Jumping” is an option by which you can bypass images in groups of 10 or 100 (even single images) using the Main Dial.
With the Playback button engaged and only one image on the LCD, push the top Cross Key to reveal the Jump menu. Continue to push the top Cross Key until you get the number you want, or push the bottom Cross Key to go back, then push Set. Use the Main Dial to work your way through the card. The progress bar for the function will give you an approximate idea where the selection is relevant to the number of images on the card.

Use the Reduce and Magnify buttons as before. When you get into the group you wanted, use the side Cross Keys to refine your search.
AUTO PLAYBACK
See Menu’s > Playback Menu > Auto Playback for instructions on this feature.
IMAGES ON TELEVISION
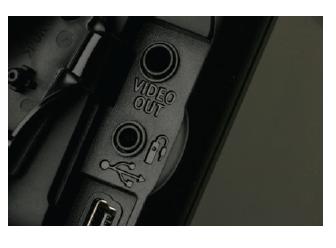
If the Playback screen isn’t big enough for you, use the included video cable to play your images back through your television. With both the television and the camera turned off (important!), use the cable to connect the camera’s Video Out terminal to the television’s Video In.
Turn the television on and set the Line Input to Video In and power up the camera. Press the Playback button, and your images will appear on the TV screen. Don’t forget the popcorn.
Menus
The Digital Rebel’s three menu categories are distin-guished by color. Shooting menus, indicated in red, tell the camera how it should interpret what it sees to create the correct file. The blue Playback menu offers options that tell the camera how you want to see what you’ve shot, whereas the yellow Setup menus allow deep customization of the camera’s operations.

Menu choices are limited for Basic Zone operation and expand to their full potential for all Creative Zone applications. This text examines all options as though the Creative Zone was in play.
SHOOTING MENU 1
Quality The Rebel pro-vides eight choices for image compression, each of which can deliver a quality image. The pri-mary difference between them is that file sizes will be smaller with settings of lesser qual-ity, which means your enlargement opportunities

become more limited as file size is decreased. Personally, I think you should always shoot at the highest level of quality, even though larger files will deplete card storage space more rapidly, but it ultimately depends on what your output will be used for. Folks who shoot strictly for Web-based applications have little use for a full-sized file.
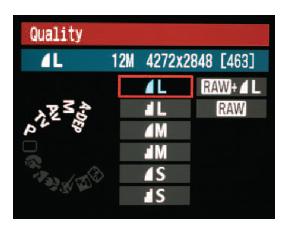
You may also select the RAW option. RAW files represent all the information in an image, and they are like digital negatives. Unlike any of the JPEG selections, wherein the camera makes decisions, you must process RAW files using Canon’s Digital Photo Professional software (supplied at no charge with the camera) or a third-party RAW converter.
You may also shoot both RAW and Large (aka High) JPEGS at the same time. This may be a useful option for you if you can get the image quality you want out of JPEG but want the option of fixing an image that may not be quite right. Frankly, if you’re new to digital photography, this combination is a great way to learn the camera and mess up as little as possible. I’d suggest you shoot both RAW and Large JPEG at the same time. This will burn up card storage space faster than JPEG

This is the Large JPEG image as the camera processed it.
alone, but it will let you compare the two identical files in Canon’s file browser. If you like the JPEG, trash the RAW file. When you’re making prints, there is almost no difference in the quality between an “as is ” processed RAW file and a perfectly exposed JPEG.
The RAW file processed “as is.”
TECH TIP
Whether you’re going to make large prints yourself or send the files off to a lab, it’s probably best not to resize them beyond what you can do when converting a RAW file. Photoshop’s interpolation software, though adequate, is only a small portion of the entire program and shouldn’t be expected to do an A+ job.
Labs use RIP software, programs designed specifically to interpolate imagery, which are much more accurate than what’s gener-ally available to us. True, we can purchase RIP software from third-party manufacturers, which we should if our equipment is going to the do the work, but it’s expensive. I think the expense is justified if the burden is on us; otherwise, let the lab resize the images (be sure to ask your lab how it will interpolate your image, of course).
Red-Eye On/Off Anytime a flash tube fires close to the lens axis and in a low-light environ-ou run the risk of red-e because the flash enters ough the enlarged pupil and illuminates the back wing red. It’s , but neither is ait of a face with huge eduction is pos-y Basic Zone except, Sports, and Flash e reduction is pos-sible in any Creative Zone, but ou must manually push the Flash button, as the flash will not automatically pop up in dim light.
SHOOTING TIP
Look in the viewfinder, just below the Exposure Compensation scale just after the reduction preflashes have fired. You’ll see a series of vertical bars that begin to disappear from the sides toward the center. This rep-resents the average amount of time it takes human pupils to respond to the preflashes. Make the actual exposure when all the bars disappear.
Beep This feature controls thecamera’s audible signal. You can turn the signal off in any situation where noise would be a distraction.
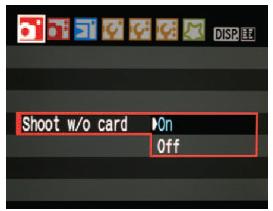
Shoot w/o Card This feature s you preview an image or test a function without writing an image to a card. Don’t forget to load the card before the “Moment of Truth.”
Review Time You can change the amount of time the image will be viewable from none at all (Off) to always on (Hold).
SHOOTING MENU 2
AEB Auto Exposure Bracketing is useful for those moments when you’re not sure you’ll get the correct exposure, no matter how carefully you check it. To use this feature, select AEB and press the Set key. Use the Cross Keys to select the exposure spread and press Set again. Because you must press the shutter button three times, a tripod or other support is a good idea.

AEB will continue to function until deactivated, and the easiest way to do this is to turn off the camera briefly. Otherwise


simply select AEB in the menu, press Set, and dial the compensation amount back to zero.
The camera default is in 1/3-stop increments, up to +/- 2 stops. C. Fn-1:2 will deliver compensation in half stops.
AEB’s first shot will be the low end of your selection.
The second AEB image is “ normal ” , the next will be the high end.
Flash Exposure Compensation Flash Exposure Compensation is useful when you are shooting under stable conditions and wish to change the amount of fill flash reaching your subject or when shooting under conditions that would ordinarily fool the flash, such as a light object on a dark background. Like AEB, it’s adjustable in 1/3- or

Without any flash fill.

Flash fill at – 1/3 stop. Notice how much life the extra light adds to the shot.
1/2-stop increments (via C. Fn-1:2). (See p. 69 for a detailed explanation of fill flash techniques, see Flash for equipment options.)
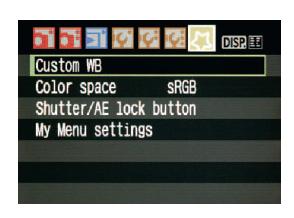
Custom WB As discussed earlier in this chapter (see White Balance for complete details), a custom white balance will always produce the most unbiased, neutral color.
WB Shift/BKT Similar to Auto Exposure Bracket-ing, White Balance Shift/Bracket can produce from one to three color variations from a single exposure. It’s an interesting feature because you don’t need to shoot a complete bracket set. If you routinely like your images a little warmer or cooler, or a little more yellow or green, you can set the screen where you wish, and all images will be made with that bias. From the moment the feature is engaged, all of your images will exhibit the color change, regardless of which White Balance mode you are in, including Custom White Balance.
To access this feature, open the menu and select WB Shift/ Bracket. Entering that screen will get you what is, essentially, a color chart that you can navigate through to select either a Blue/Amber or Magenta/Green bias. If you want a WB shift to

affect every image, use the Cross Keys to maneuver the mark. Want groups of three? Turn the Main Dial clockwise to spread the mark horizontally for a Blue/Amber shift, counterclockwise to move it vertically for a Magenta/Green shift. Press Set to engage. The Rebel will create three frames with the WB Shift for every actuation of the shutter. This feature will remain engaged until you move the mark back to the middle position or turn off the camera.
What the camera produced from the left marker.
The middle marker, no correction.

The far right marker produced the warmest image.

A gray target shot under “bad” light.

The same card in the same light after a Custom White Balance.
SHOOTING TIP
It won’t matter is the picture you make of the gray or white card has an off-color cast. Telling the camera that you want it neutral-ize that tone will effectively change the color temperature of subsequent images. You can prove it by shooting another image of the target using the data from the first image as a CWB. The new shot will show a color-neutral target.
Color Space Here’s where you select either ADOBERGB (1998) or the SRGB color space. As previously discussed, the final reproduction method for your images will determine which color space you should use.
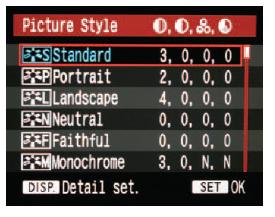
Picture Style Canon has developed a number of fantastic algorithms that add emphasis to various aspects of your images by changing how the camera sees color and further manipulating sharpness, contrast, saturation, and color tone. Standard, my favorite, gives me vivid, saturated colors. I like it, even for most portraiture, because the results look slightly larger than life. I would encourage you to experiment with each Picture Style in the same way I did with the few samples I have room to include here. You may find your favorite to be different from mine.

Standard Picture Style.

Portrait.

Landscape.

Neutral.

Faithful.
Monochrome.
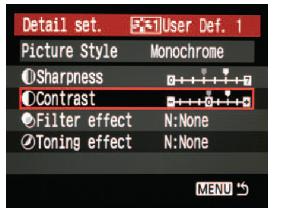
Should you find a favorite but wish to make changes to suit your style, you have two options. First, you can enter the style itself by selecting the Style you wish from the menu. Select Picture Style and press the Set button to reveal all styles. Use the Cross Keys to select the style you want. Press the Display button to open the parameters. Press the Set button again to open the selected parameter. Use the Cross Keys to make the change and press the Set button to make it happen. You can always go back to the original parameters because the original settings show as grayed-out markers. Just shift your marker back to the original position and press Set.
Your second option is to create your own Picture Style, using one of the presets as a base. You can create up to three user-defined styles by first selecting Picture Style and scrolling to User Def. 1, 2 or 3 with the Cross Keys. Press Display to get inside. Select the base Style and press Set again. Set as many of the additional parameters as you need, using the Set button and Cross Keys. Your final user defined style will be ready to use whenever you need it.
Using monochrome without changes.
Monochrome as seen by User Def. 1.
Dust Delete Data The Rebel was the first Canon camera to incorporate Automatic Sensor Cleaning, an ultrasonic system that vibrates dust and grit from the sensor on to a special adhesive strip, and the technology is being adapted to the entire Canon line. Frankly, it’s so effective you may never need to use this feature. It’s also extremely difficult to illustrate a Dust Delete scenario with the small images in this book. Suffice it to say that the instructions that accompany the camera are easy and precise. If you have a persistent dust spot, it’s a simple matter for the camera to make note of it and eliminate it on any image made after the feature is inaugurated.
PLAYBACK MENU
Protect You can protect images from accidental or intentional erasure by selecting this feature, scrolling through your images, and using the Set button to mark each selected image. You’ll see a small icon, a key, appear on the selected images. Images marked with this icon will not be erased, even if you choose “ Erase all images ” from the Erase menu (although you will not see the icon on subsequent viewings of the image unless you view it via the Shooting Information display).

Please note that Protect will not save any image if the card is reformatted. Always be sure your important images are backed up before making any irrevocable change to the original storage media.

Rotate This feature rotates a vertically framed image to a horizontal format for viewing on screen or computer. See Set Up Menu 1, Auto Rotate, for a once-and-for-all solution to this problem.
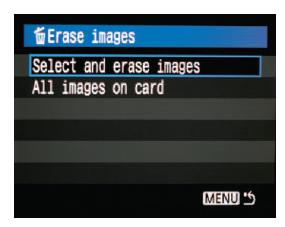
Erase Images
This feature allows you to erase selected images or an entire card.
You can also erase images by initiating the Playback feature and pushing the Trash icon on the back of the camera. Push the Set button to OK the erasure. Note that once an image is erased, the camera cannot recover it.
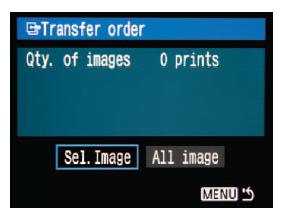
Print Order You can specify the information, if any, that you want to appear on your prints. Working with any PICTBRIDGE Printer, you tell the machine to print single, multiple, or index print images. Note that this feature does not work with RAW images.

Transfer Order This feature allows you to select up to 999 images to be transferred to your computer in or out of order. Note that the phrase “Clear all on card ” only means that images selected for transfer will be deselected, not erased.
Histogram Select either the traditional black-and-white histogram (Brightness) or the RGB histogram, which details brightness levels in each channel.
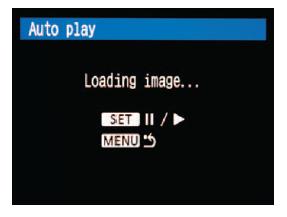
Auto Play You can view each image on the card as an impromptu slide show on the camera’s LCD. Use the Set button to pause or


resume the show. Press the Menu button to exit Auto play.
SET UP MENU 1
Auto Power Off Use this feature to determine how long the camera will stay active before going to sleep. Setting the control to Off tells the camera to be ready indefinitely and will deplete the battery more rapidly (and you’ll have to manually turn the camera off), but choosing a short time span of 30 seconds or 1 or 2 minutes will, I’m sure, prove to be frustrating for you. If you choose Off, the display will automatically turn itself off after 30 minutes.
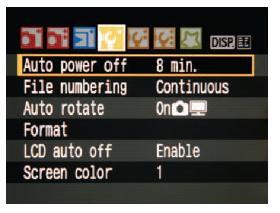
File Numbering Your Rebel has three choices for file numbering: Continuous, Auto Reset, and Manual Reset. Continuous will place a number from 0001 to 9999 on consecutive images. When 9999 is reached, the camera automatically creates a new folder, starting with number 0001, allowing for seamless, continuous shooting. Selecting “Yes ” is a good idea if you have any hope of continuing the shoot.

Auto Reset will start with 0001 whenever you replace an SD card. Manual Reset will create a new folder with images starting at 0001 whenever it is selected. This can be useful if you wish to separate certain portions of a shoot such as pre-wedding, ceremony, and reception.

Auto Rotate You can tell the camera to automatically rotate, on playback, any vertically shot images. Choose the uppermost selection, with the camera and computer icons, and the images will be rotated on your computer screen as well.

Format This feature completely erases all images (even protected images) and reinitializes an SD card. If you’ve adequately backed up all data from a card, format it when you replace it in the camera, as that process is cleaner and more efficient than simply erasing.
LCD OFF/ON Btn By default, the LCD display will turn off when you depress the shutter button, a useful feature if you’re bring ing the camera up to your eye under low light. The second option, Shutter/Disp, will turn the display off until you push the Display button to turn it back on. The final option, Remains On, will maintain the Info screen on the LCD until the camera is turned off or the battery goes dead.
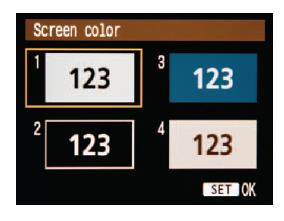
Screen Color Your Rebel allows you to choose four different color schemes for the LCD.
SET UP MENU 2
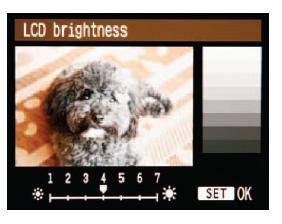
LCD Brightness Maintaining a middle setting will give images viewed on the LCD the best color and contrast range the device is capable of rendering. Still, it’s sometimes useful, especially outside, to boost the brightness. Note that LCD screens are never completely accurate and should never be used to judge critical exposure or color.

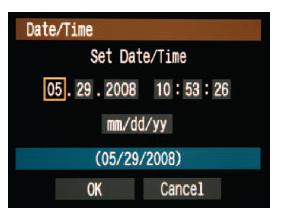
Date/TIme Set the date and time. This may seem about as important as setting the time on a video recorder, but you should do it because the date and time are recorded in the metadata of each image you make. Use the Cross Keys to dial in the correct date and time, and press Set when you’re done.
Language You have your choice of 20 selections for the interface language. Hopefully, this book will be translated into all of them.
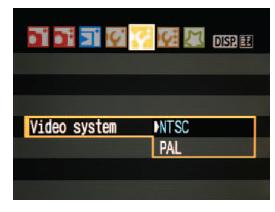
Video System Depending where you are in the world, and if you wish to show your pictures on a television, you’ll need to select the correct video system.
Sensor Cleaning: Auto Canon recommends you leave this feature set to its default, which is automatic cleaning when the camera is both turned on and turned off.

Sensor Cleaning: Manual There may come a time when a persistent little chunk of crud will not respond to automatic cleaning. Canon recommends that you send the camera in for professional cleaning, but that’s
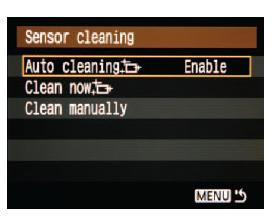
not always practical. If you must clean the machine yourself, follow these instructions. Please note that the sensor is extremely delicate. Do not touch it with anything and do not blow canned air across its surface. Should the canned air’s propellant spray onto the surface of the sensor (it dries immediately), well, you probably will be sending the camera in for service.
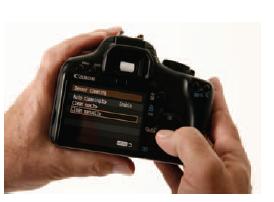
1. Select Sensor Cleaning from the menu.
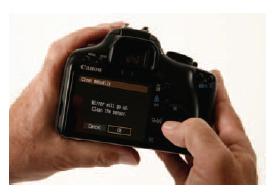
2. Select Clean Manually from the submenu.

3. Click OK and you’ll hear the mirror lock up a second or two later.
4. When you’re finished cleaning, the mirror will return to its normal position once the camera has been turned off.
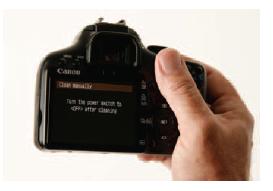
5. Hold the camera upside down to keep dirt from falling onto the exposed sensor, remove the lens, cap it, and set it aside. From below, aim an air bladder at the sensor and the sides of the barrel. Don’t be shy. Squeeze the bladder hard and rapidly to blow crud off the sensor. When you’re

finished with the sensor and while the camera is still upside down, turn the power off and repeat the air treatment to the mirror.
At this point, it’s a good idea to put the body cap on the camera, set it aside, and blow dust off the lens mount. Hold the lens mount-down, so gravity works with you. If you have other lenses, clean them at this time, too.
Live View Function Settings
One of the most significant advances in the Canon line is the ability of most of its DSLR cameras to “see” through the lens to the LCD, much the same as point and shoot cameras. This can be helpful in situations where it’s difficult to look into the viewfinder.
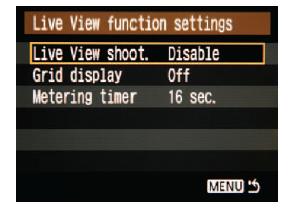
To use Live View, follow these steps:
- Select any mode in the Creative Zone. Live View does not work in Basic Zone.
- Press Set to enter the feature and select Live View Shoot >Enable.
- Press the menu button to exit and press Set again. Your scene will appear on the LCD screen.
Note that shutter speed and aperture can be adjusted, as you watch the screen, by using the Main Dial and the AV button. Before the image is taken, the mirror will drop back into place and auto focus will be performed. Because of the delay, it might be a good idea to use a tripod or other support to eliminate any change in your position.
The Live View function will continue until you disable the feature or turn off the camera. You can also use the function to view live images on your computer or television.
Flash Control This function controls either the built-in flash or an external flash connected via the hot shoe. For example, you can disable the built-in flash so that it won’t pop up under any circumstances. If you manually raise the flash, the red-eye reduction flashes will go off but it will not flash when the shutter is opened.
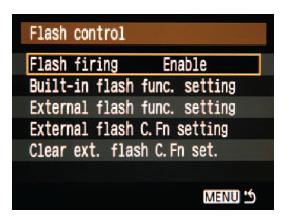
When working with the built-in flash, the most important sub-function for you will probably be Built-in flash func. setting. This sub-function allows you to choose 2nd Curtain Sync, which fires the flash at the end of the shutter actuation rather than at the beginning. If you’re working with moving subjects and longer exposures, this means that subjects that streak will be frozen in place at the end of their motion rather than the beginning.
You can also dial in Flash Exposure Compensation to increase or decrease the strength of the flash regardless of the aperture, useful in fill flash situations.
SETUP MENU 3
CUSTOM FUNCTIONS (C. Fn)
Bend the camera to your will, but only in the Creative Zone. These features are not available to any Basic Zone setting.

By using Custom Functions you can customize many important features of the Rebel until you get a camera that truly fits your requirements and shooting style. Access the Custom Function (C. Fn) screen through the Set Up 3 sub-menu in the menu. Press the Set button to enter each function. Many of these functions are new to the XS series.
Use the left and right Cross Keys to select the C. Fn by number or title. Pressing the Set button again will enter the selected function and highlight the current selection. Use the top and bottom Cross Keys to move through the actual selections. Selections will be highlighted; press the Set key again to register your choice.
Pressing the Menu button will exit Custom Functions with your selections registered and ready to use.
C. Fn 1: Exposure Level Increments The Rebel defaults to 1/3 f-stop increments, but you can select 1/2 stops. Increments of 1/3 leave less room for exposure error.

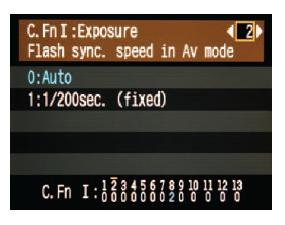
C. Fn 2: Flash Sync. Speed in Av Mode The camera adjusts the intensity of the flash based on the scene and will attempt to balance the ambient light of the scene to the power of the flash in any exposure from 1/200 of a second to 30 seconds. In some cases this results in camera shake because the ambient light is dim and the exposure is long.
C. Fn-2:0 Auto. The flash is adjusted to the scene.
C. Fn-2:1 1/200sec. (fixed) . The flash will pump out as much power as it needs (up to its useful limit, of course) to achieve a perfect exposure at 1/200 of a second. Camera shake is no longer an issue, but ambient light may not register.
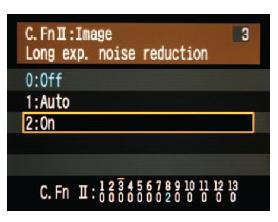
C. Fn 3: Long Exposure Noise Reduction Although the Rebel’s advanced sensor and processing technology do a great job of noise reduction, long exposures can still present some problems. Using this function for exposures that are longer than 1 second reduces (but does not eliminate all) noise, resulting in a smoother image. The downside to this function is that it takes the camera more time to reduce noise than it does to process the image, and additional pictures can not be made until the previous one is processed.
C. Fn 4: High ISO Speed Noise Reduction The camera will look at the image as it’s created and attempt to determine if undetected noise (noise the camera does not automatically compensate for) is present. If it is, the Rebel will automatically apply noise reduction.

With high-speed noise reduction.

Without noise reduction.
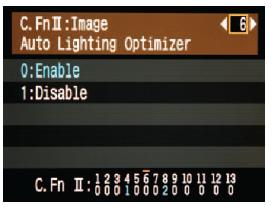
C. Fn 5: Auto Lighting Optimizer This new function looks at your exposures and determines if they are too dark or lacking in contrast; if they are, it corrects them as best it can. Depending on the actual shooting conditions, some additional noise may be generated. Please note that this function will not operate with manual exposures, RAW, or RAW + L files, but it does automatically work in any Basic Zone mode.
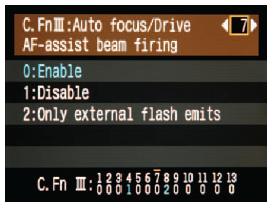
C. Fn 6: AF-ASSIST Beam Firing The camera emits a beam to assist the auto focus mechanism. You can enable it, disable it, or allow it to work only through a Canon Speedlite.
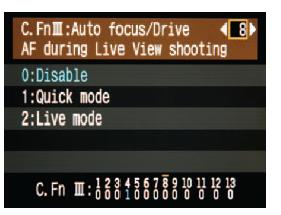
C. Fn 7: AF during Live View Shooting Choosing either the Quick Mode or Live Mode option will allow you to auto focus through the LCD screen when Live View Shooting is enabled. Use the FEL button to achieve focus and press the shutter when the moment is right.
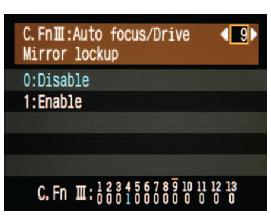
C. Fn 8: Mirror Lockup Long exposures or extreme close-up photography will often display a slightly unsharp image or a faint “ghost” image caused by the slight vibration of the mirror when the shutter opens. When Mirror Lockup is enabled, you will have to press the shutter button twice to take the picture. The first click will lock up the mirror, the second will make the image. It’s a good idea to use an RS-60E3 Remote Switch or the Self Timer to fire the shutter so your fingers will not contact the camera.
C. Fn 9: Shutter/AE Lock Button Using this function allows you to change how focus and exposure are acquired.
C. Fn-9:0 AF/AE lock. Both Auto Focus and Auto Exposure are made at the shutter button. This is the camera’s default setting.
C. Fn-9:1 AE Lock/AF. This function allows you to focus and meter separately, using the AE Lock/FE Lock button on the back of the camera
to focus. Known as Thumb Focus or Back-Button Focus, the benefit is increased speed in shooting because the shutter button does not have to acquire focus before firing. When a photographer uses this function, along with a selected focus point, focus may be selected, held, or changed while exposures are made with the index finger. It takes a little practice, but once you’re used to it you’ll wonder how you got along without it. Use this function with AI Servo and you can focus on a moving object, hold the back-button down, and fire the shutter as you wish. Your subject will stay in focus as long as you don’t release the button.

C. Fn-9:2 AF/AF lock, no AE lock. If you’re using AI Servo AF to track a moving subject in a cluttered environment, you can use the AE Lock/ FE Lock button to stop AF if there is a possibility something will move between you and the subject and throw off the AF. Exposure will be measured as images are made.
C. Fn-9:3 AE/AF, no AE lock. This is similar to C. Fn-9:2 except that AI Servo AF can be turned on and off with the AE Lock/FE Lock button.

Use this function for subjects with repetitive movements. Exposure will be measured as images are made.


C. Fn 10. SET Button When Shooting You may assign some favorite or oft-used tasks to the Set button. Once set, you may call up the chosen feature anytime during the shooting process by pressing the Set key (unless the main menu is active on the LCD), and you can move through its options via the top/bottom Cross Keys, effectively bypassing having to search the menu.
C. Fn 10:0. LCD Monitor On. Off. Assigns the Display button function to the Set button.
C. Fn 10:1. Change Quality. Quickly changes the compression settings for your images.
C. Fn 10:2. Flash Exposure Compensation. You can make the built-in flash deliver (in 1/3stop increments) more or less power than the camera thinks it needs for a perfect exposure. This is useful in situations with a bright object against a dark background or vice versa and allows for faster correction than through the menu. In my opinion, this is the most useful option of C. Fn-1.
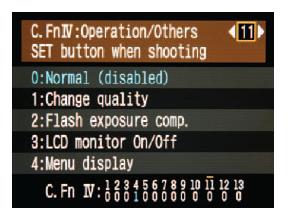
Please note that this function is deactivated if an accessory flash is mounted to the camera’s hot shoe. Use the compensation function of the accessory flash to make any necessary corrections.
C. Fn 10:3. Menu Display. Returns to the last menu item selected.
C. Fn 10:4. Disabled. Disables this Custom Function unless Live View shooting has been enabled. In this case, pushing the Set button will automatically show the live view in the LCD.
C. Fn 11. LCD Display When Power ON For those moments when you do not want the display to illuminate when the camera is powered, select C. Fn 11:1, Retain power OFF status. Push the Display button to turn off the LCD, and turn the camera off as well. When you turn the camera back on, the LCD will not light although you’ll still be able to review your images. Push the Display button again to see the info or to bail out of this selection.

C. Fn 12. Add Original Decision Data Most of you will never need this function. It works in tandem with Canon’s Original Data Security Kit and can prove (to law enforcement, perhaps) that an image is original and unretouched. You’ll need to purchase the OSK-E3 kit separately in order to verify the claim.
CLEAR SETTINGS
You can reset every customizable feature of the camera, or just the Custom Functions, to their default settings.
FIRMWARE VERSION
Canon periodically posts firmware updates on its website. You can use this feature to update by downloading updates to the SD card.

MY MENU
You can register up to six menus and Custom Functions for features you use frequently. For example, I frequently access Custom White Balance, switch from Adobe RGB to the SRGB Color Space, and use C. Fn 9, Shutter/AE Lock Button to vary from front button to back button focus. I can access any of these functions without scrolling through individual menus, so this is a real time-saver for me.
To register your favorites, select Register and scroll through the menu items until you find your favorites. Use the Set button to register them. When you select My Menu, you’ll see the list of your registered favorites. You can access any of them by just selecting them and pushing the Set button.
Cards, Readers, and Batteries
MEMORY CARDS
The Digic III processor in the Rebel XS/1000D supports both Secure Digital (SD) and Secure Digital High Capacity (SDHC) memory card formats. Memory cards are priced based on their Data Transfer Speed (DTS). Cards with a Class 2 rating are guaranteed to sustain a DTS of 2 megabytes/second, whereas Class 4 and Class 6 cards sustain rates of 4 and 6 megabytes/ second, respectively.
The DTS numbers for the Digic III are not available from Canon. Suffice it to say that it’s very fast. I made a simple and totally unscientific test to determine how inexpensive SD cards compare to their faster, more expensive brethren just to see what would happen. The inexpensive card was a free 2GB giveaway from a local office supply store, whereas the other was a 2-GB SanDisk Extreme III card that reads/writes at a minimum DTS of 20MB/second.
I set my Rebel to Continuous Shooting and began firing. The free card was slow enough that the buffer filled after 40 frames and then required approximately 20 more seconds to write the remaining images to the card. The SanDisk card was not able to overpower the buffer, registering more than 100 continu-ous frames before I stopped shooting. The camera needed less than a second to write remaining buffer data.
What does this mean to you? First, any card will work per-fectly well for basic, snapshot applications. There’s no need to spend a lot of money (and you can certainly get great results with a freebie). However, if you plan on shooting sports or any subjects that require continuous shooting, spending more for a better card is a good idea.
CARD CARE
Unlike earlier Rebels, your XS/1000D uses the newer Secure Data (SD) cards. It may be hard to believe that something so small can hold as much data as it does, but it’s actually a precision instrument manufactured to exacting tolerances that can give you years of flawless performance when treated with tenderness, love, and respect.
Notice that there’s a lock slider in the upper left corner. Use this whenever you have stored information that you do not wish to overwrite, even accidentally. When the lock is engaged, the data may not be added to or downloaded.
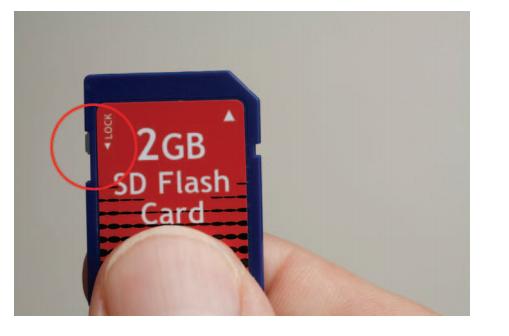
To get the highest level of performance, here are some recommendations for card care:
- Avoid dropping the card. Even tossing it casually onto your desk can damage it.
- Avoid strong vibrations.
- Don’t use or store the card in strong magnetic fields. You could lose data.
- Leaving the card in strong sunlight or heat could warp it.
- If you spill liquid on it or drop it into water, clean it carefully with a damp cloth and let it dry completely before trying to retrieve your data. You may get lucky (and probably will—personal experience).
- Store the cards in their cases to keep dirt off the contact points.
- Don’t flex or bend the card or keep it in your pocket. It’s not a lucky charm.
- Hot, dusty, or humid conditions are bad but hard to avoid. Keep the card as protected as possible.
CARD READERS
Although you can tether your camera to your computer and download using Canon’s software (explained elsewhere), many people prefer to use a card reader. Most efficient card readers are either USB-2 or Firewire devices and are inexpensive.
If you also work with a camera that uses the CF card format, memory stick, or some other format, there are readers on the market that are equipped to read all cards. They are also inexpensive.
Bear in mind when downloading that a high-speed card reader will not make a slow card any faster. Cards can only read and write at their maximum transfer speeds.
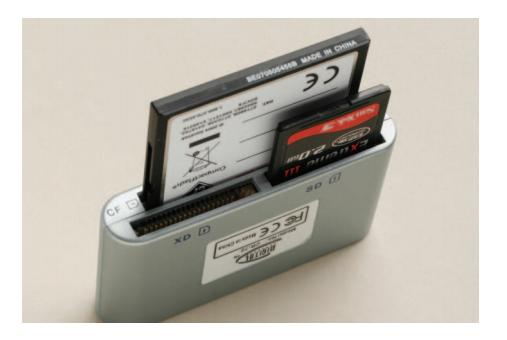
BATTERIES
The XS/1000D takes advantage of ongoing power supply research and uses the new LP-E5 Li-ion battery pack. About the same weight as previous batteries, this new item will give you approximately 20% more exposures per charge than its predecessor while still maintaining a rapid recharge time.

This Rebel no longer requires a separate date/time battery. Instead, a tiny and inaccessible rechargeable battery inside the body draws a small amount of power from the LP-E5 to sustain itself. Bear in mind that if the LP-E5 is stored outside the camera for too long, you may have to reset the Date/Time Function when you replace the battery.
The battery charger that’s supplied with the camera is compatible with any country’s AC power between 100 to 240 volts and 50 to 60 Hz. In some countries, you may have to purchase a commercially available adapter to plug into the wall.
If you are worried about depleting the battery but have access to AC power, you can purchase the AC Adapter Kit (ACK-E5) and run the camera indefinitely off household current. Canon warns you not to connect or disconnect the power when the camera is turned on.
BATTERY CARE
- Even if you recharged the battery after using it the last time, plug it in and top it off before using the camera. A small amount of electricity will be continuously discharged whenever the battery is in the camera.
- Canon recommends you remove the battery when not using the camera. This could be problematic if you consistently leave it out too long and have to reset the DATE/TIME Function every time you get ready to shoot. Unfortunately, there are no data as to what “too long ” actually is.
- Keep the battery covered when not in use. Dirt in the contacts can affect battery performance.
- Like everything else, batteries have a finite life. When yours no longer holds a charge or doesn’t perform like it used to, it’s time to replace it.
CAMERA MAINTENANCE
Your Rebel is a precision instrument, and dirt is its nemesis. Use an air bladder to gently blow off dust from all surfaces, but pay particular attention to areas around the lens mount, as this is where dust will enter the mirror and sensor assembly. Stubborn grit on the camera surface can be removed with a soft brush followed by the air bladder (never use a brush on the sensor). Clean the camera with a lens attached to maintain a seal against outside elements.
Use a clean microfiber cloth to wipe the lens and viewfinder. For the LCD, spray a small amount of glass cleaner onto a clean soft cloth or microfiber cloth. Never spray directly onto the LCD or any other part of the camera. Wipe off any fingerprints.
See Menus > Setup Menu 2 > Sensor Cleaning for detailed instructions on how to properly clean the image sensor.