10. Beautiful Geometry: The Illustrator Projects
If the solution is not beautiful, I know it is wrong.
—Buckminster Fuller
I remember the exact moment I discovered the possibilities afforded by automating Illustrator: I had opened version 10 and found that I could name objects in an Illustrator file—exciting stuff. While earlier versions had let you refer to objects by number (using a command like “Move path item 10 over to the right”), this quickly became confusing since adding a path item to the document meant that item 10 would become item 11 (and so on). This made it impossible to keep track of objects and made the process seem hopelessly frustrating.
With Illustrator 10, however, for the first time I was able to name my object something like BlueCircle and it would always be BlueCircle, regardless of how many other objects I added to the file. I could now move and change BlueCircle and know which object I was manipulating—a simple persistence of names that began my graphics automation journey.
Goofing around with files in this way started as a hobby but quickly became more when I realized I could use automation to produce multiple production files for printing—that is, honest-to-goodness production files that people pay good money for. Then the Web came along, and I found I could export raster images from Illustrator for online use. When I started working in a production environment creating packaging files, I soon realized that there were seemingly thousands of little repetitive tasks that I could use automation to handle. I realized that if I could name the piece of type that contained, say, the sodium content, I could set that number with scripting. While it would be a ton of work to edit just one file with scripting, if I could somehow apply that automation to a batch of files, I could automatically edit the sodium content for 20 files at a time. Furthermore, I figured, I should be able to automate the use of templates to build whole files anew—placing graphics, setting text, and changing colors. It’s not an overstatement to say that I felt like I’d entered a brave new world: It was magic.
That, of course, was before actions and Automator and InDesign and XML and Adobe’s data-driven graphics capabilities. Illustrator has grown considerably in the intervening years, adding tools and capabilities that make it particularly interesting for graphics automation. For instance, you can create live (editable) type that’s distorted in ways that you could previously achieve only by converting that type to outlines or raster art. And you can match that distorted type to the perspective of an image, making it appear part of it (because it’s live), and change it via scripting (or some other method).
The following projects—which employ the same scenario as the Photoshop projects in Chapter 9 (and are for the same gardening and nursery client)—should help you discover the magic of using automation with Illustrator.
Project 1: Direct-Mail Image
Star & Fey went out on a limb a couple of years ago and added in-store coffee shops in an attempt to capture some of the additional traffic that bookstores have enjoyed. All in all, the concept worked, but the company found that casual and potential customers didn’t even know the coffee shops existed. So the company asked your studio to create a direct-mail piece using customization. After some back and forth, you and the client decided to use the customer’s first name and the name of his or her local Star & Fey retail store in a direct-mail piece.
The client wanted the image to convey the European feel Star & Fey strives for in its coffee shops and retail spaces. You came up with a design showing cups and glasses from Star & Fey’s coffee shops, and the client bought it (Figure 10.1). The piece is designed so that the first thing the customer sees is his or her name on a coffee cup. Drawn into the image in this way, the customer will then notice the name of his or her town on the napkin. The idea is to make customers feel that the images have been created just for them.

To keep this project to a manageable size, you’ll concentrate on the image that appears in this mailer, not the entire two-sided piece, and export the output files as TIFFs. Note, however, that if you were producing the whole two-sided piece, you would probably export PDF files.
Creating the Template File
The photograph I used in my example shows no printing on the coffee cup or beneath the logo on the napkin (Figure 10.2). To build the template, you need to add type to both locations, matching the curve of the cup and the perspective of the napkin. You’ll tackle the cup first.

Draw a path on the face of the coffee cup and type in Christy (Figure 10.3). With the type selected, use the Eyedropper tool to sample the green in the logo on the napkin.

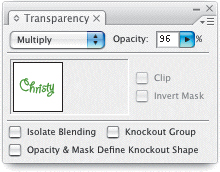
To match the curve of the cup, you’ll need to skew the type a little (Type > Type on a Path > Skew). You’ll probably need to adjust the line to get the skewed type to match the cup. In the Transparency palette, I chose the Multiply blending mode and an opacity of 96 percent to get the type to look more like it was actually printed on the ceramic cup (Figure 10.4). Play with the blending modes (depending on your image, you might try Darken, Hard Light, or even Normal, the default) and transparency to get the right mix for your image.
Although you could use envelope distortion (Object > Envelope Distort) to achieve the same effect, simply distorting type on a path is much easier. If doing it this way doesn’t work for your particular project, try Envelope Distort, but be aware that it doesn’t work as well with dynamic text (as I’ll explain later).
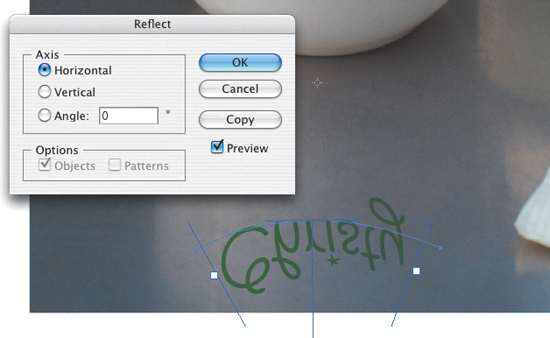
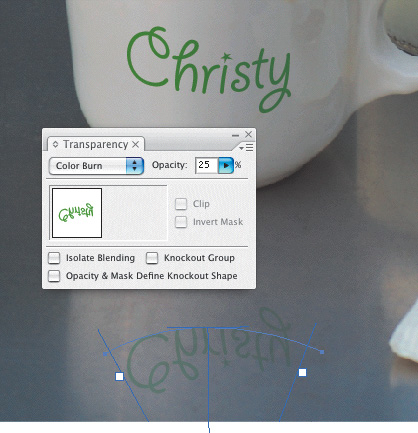
Since the cup is reflected in the surface on which it sits, it will add to the realism if you can also get the variable text to reflect. Select the type on the cup, and then choose the Reflect tool. While holding down the Option key, click under the type, and then in the Axis section of the dialog box choose Horizontal and then click Copy (Figure 10.5). Drag the type into place, and in the Transparency palette choose the Color Burn blending mode and a 25 percent opacity (Figure 10.6).
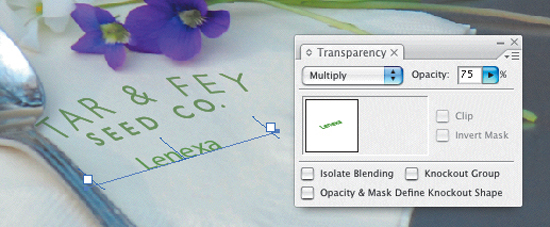
Now, on to the napkin: Draw a straight line and add type to it—in this case, Lenexa (or whatever you like) for the location. To match the perspective of the napkin, use a combination of rotating the line and skewing the type with the Shear tool. Adjust the combination until it fits the perspective. In the Transparency panel, choose the Multiply blending mode and a 75 percent opacity (Figure 10.7).
Creating the Variables
Taking advantage of Illustrator’s data-driven graphics capabilities, you will now create an external file that contains your variable text in a specialized file format called XML (Extensible Markup Language). XML provides a way to structure and identify data in a text file so that different systems on different platforms can read and understand it. Each piece of data is “tagged,” or labeled, so that XML-aware systems can identify it and determine how to handle it. Since our project has only three pieces of variable data, editing the XML file should be fairly easy.
Now that you’ve learned how to make your text into a variable, here are the pitfalls to using it with envelope distortion. First, you must assign a variable to the text before applying the distortion. After you’ve distorted the text, you can edit it (Object > Envelope Distort > Edit Contents), but if you physically move it in either Contents or Envelope mode, the link to the variable will break. You can relink the text to a variable by choosing both the text and the variable in the Variables panel and choosing Make Text Dynamic from the Variables panel menu.
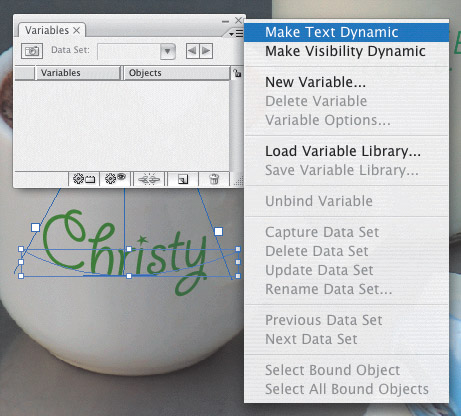
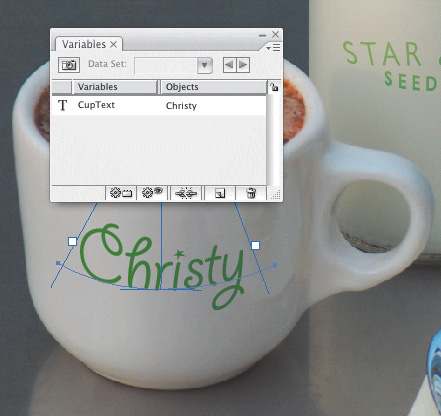
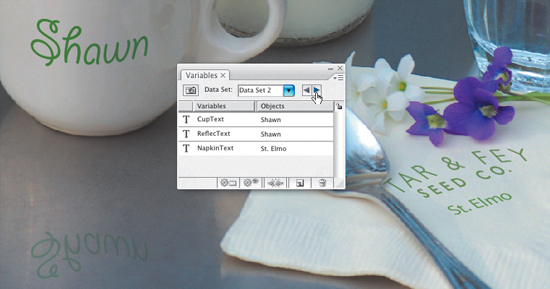
Using the Selection tool, select the type that appears on the cup. Then open the Variables panel (Window > Variables), and from the Variables panel menu choose Make Text Dynamic (Figure 10.8). Variable 1 will now appear in the Variables panel. The T symbol means the variable type is Text String (there are other variable types, which I’ll describe later). Double-click Variable 1 in the panel and change the name to CupText, then click OK (Figure 10.9). Giving this variable a descriptive name here will help you find it when you’re editing the XML file. Now that you’ve made this type object variable, you can change its text in the Variables panel—and you can set up as many instances of the text as you’d like.
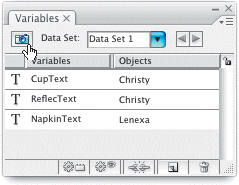
Repeat this same process for both the reflection type, naming it ReflecText, and the napkin type, naming it NapkinText (Figure 10.10).

Building the Data File
The next step in our project may seem complicated, but it’s not. To start, you must create what Illustrator calls a data set, which contains variables (like the CupText, ReflecText, and NapkinText objects you just created) and their associated values. To do so, open the Variables panel and click the camera icon in the upper-left portion (Figure 10.11). Data Set 1 will appear in the window next to the camera.
To see how this works (and to help when it comes time to edit the XML file), change the text in the three variables. (I’ve used Shawn for the name and St. Elmo for the location.) Then click the camera icon again to create a second data set. Both sets of text are now stored in the Variables panel, and you can jump back and forth between them by clicking the Previous and Next Data Set arrows (Figure 10.12). Presto, the different states, or data sets, will appear in the file.
If you wanted to make only a handful of iterations of your illustration, you could just keep entering sets of text and capturing the different data sets. It would all be stored in the Variables panel, so you could work completely within Illustrator (meaning you wouldn’t have to export a data file in XML format or edit in a separate text editor). But if you need to create many data sets, it’s faster to export an XML file, edit it, and import it back into the Illustrator file. You could also have a programmer populate your XML file with additional data using scripting or XML-editing software, and then return the file to you to import back into Illustrator. That scenario—a tagged text file working with a graphics file—demonstrates one of the greatest benefits of data-driven graphics (and XML): the separation of design and content.
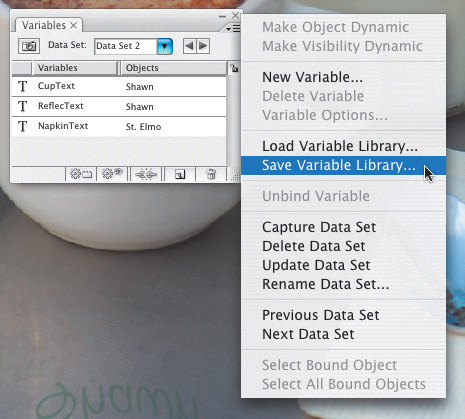
To write an XML file out of Illustrator, from the Variables panel menu choose Save Variable Library (Figure 10.13). Illustrator will then ask you where you’d like to save the file (which is referred to as a library). Keep in mind that it’s fine to change the name, but you should keep the .xml file extension.
Editing the XML File
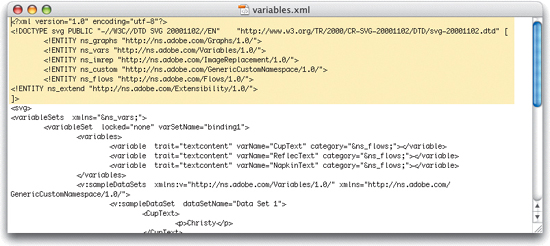
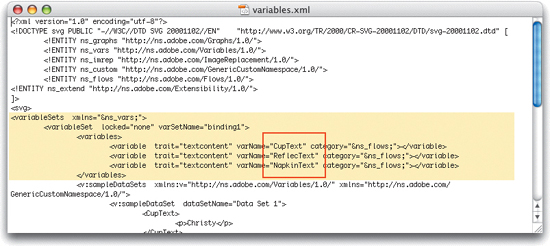
When you open the XML file in a text editor, such as WordPad in Windows or TextEdit on the Mac, you can ignore most of its contents—particularly what appears at the top and bottom of the file—but be careful not to remove or modify anything except the section that relates to your variables (lest you break the document) (Figure 10.14). The first section, which you can ignore, identifies the XML version, how the characters are encoded, and some housekeeping stuff for Illustrator (Figure 10.15).
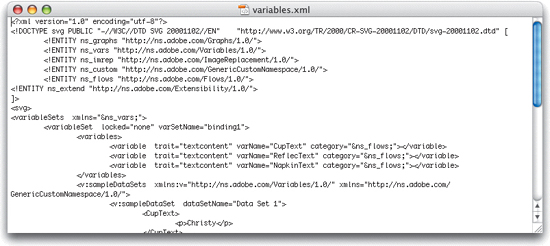
Figure 10.15. Do not edit or delete any part of the top section of an XML file (highlighted in yellow). This will render the file unusable to Illustrator.
Like HTML files, XML files use tags to identify file parts such as title, body, and individual elements (for example, paragraphs and names and addresses). Each part, or element, must be enclosed in opening and closing tags, and tags must be surrounded by angle brackets (< >). For example, our project has a <NapkinText> tag for the type on the napkin. The associated closing tag is </NapkinText>, which has a forward slash between the first angle bracket and the tag’s name (see Figure 10.17 on the next page). The text between these two tags is that variable’s content. Note that in the first data set the text between these two tags—<p>Lenexa</p>—includes its own tags, which indicate a paragraph. The entire file is built in this fashion.
The second section lists the three variables you created in the Variables panel in Illustrator (Figure 10.16). The last section in the middle of the file is what you will edit, because it contains your actual data.
Figure 10.16. In the second section of the XML file (highlighted in yellow), you can see the three variables (inside the red box) that you created in Illustrator.
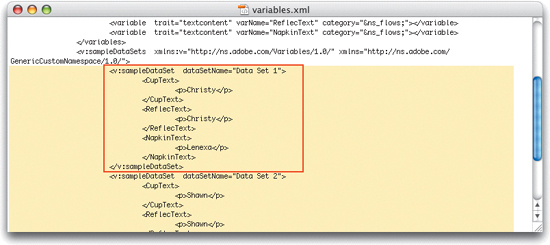
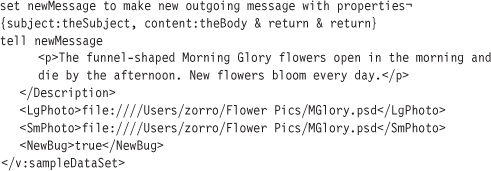
Beginning with the line that starts <v:sampleDataSet dataSetName=”Data Set 1”>, you’ll see your first data set and part of the second, including the three variables (which appear twice, once in each data set) and the text you typed listed between them (Figure 10.17). From here, it’s just a matter of copying, pasting, and editing the right part of this file to create new data sets.
Figure 10.17. The third section of the XML file (highlighted in yellow) shows the first data set (inside the red box) and part of the second.
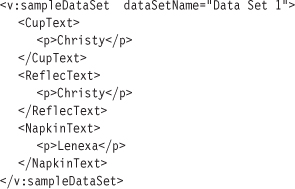
To begin, select and copy Data Set 1 as shown below:
It’s important that you copy and paste the right part of the file and edit it correctly; if you don’t, your data won’t reimport into Illustrator. For instance, if you fail to change the pasted Data Set 2 to Data Set 3, Illustrator won’t import the file—nor will it tell you why, so you’ll have to painstakingly read through the code you created to fix the error. The moral: Check your work carefully.
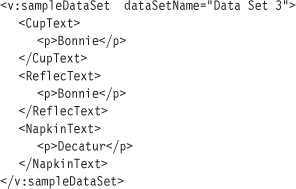
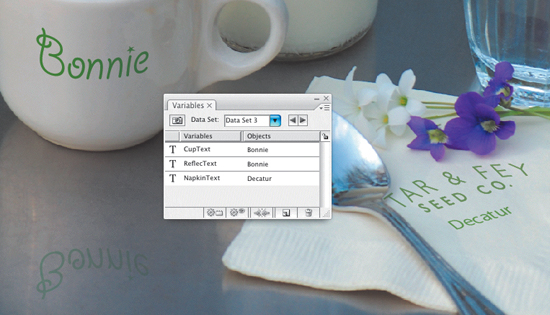
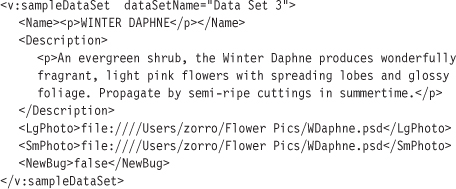
Immediately beneath the closing tag for Data Set 2 (</v:sampleDataSet>), press Return to insert a line space, then paste the block of text you copied: This will become Data Set 3. Now, change the data set name to Data Set 3 (making sure to leave the quotation marks in place), and then change CupText to Bonnie, ReflecText to Bonnie, and NapkinText to Decatur. It should now look like the following:
You can keep pasting the same code block and modifying the text to create as many data sets as you wish, but I’ll stop at three for this project. Save the file in plain-text format with the .xml extension.
Importing the New XML File
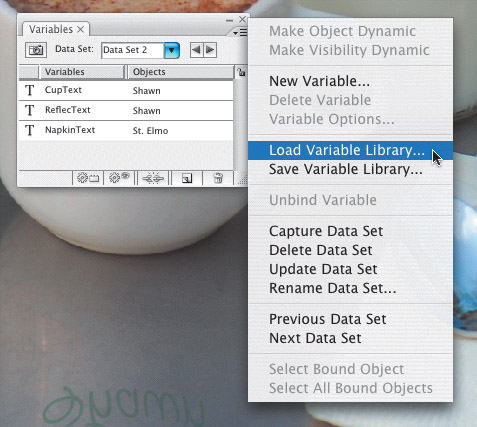
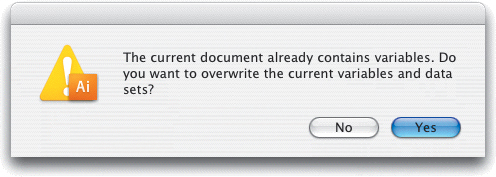
Now you’ll need to import the new XML file back into Illustrator and generate the individual Illustrator files. To import the file, open the Variables panel menu and choose Load Variable Library (Figure 10.18). If the XML file is up to snuff, Illustrator asks if you want to overwrite the current variables and data sets (Figure 10.19); click Yes. The Data Set 1 name does not appear in the Data Set window in the Variables palette, but you can put the data sets into play by clicking on the Data Set pull-down menu and selecting one. You can flip through the data sets by clicking on the Previous and Next Data Set arrows to the right of the Data Set window (Figure 10.20).
Generating the Output Files
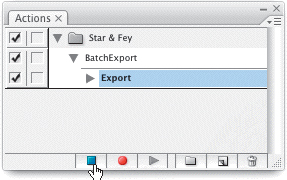
You will now use Illustrator’s Batch feature to output the data-driven graphics files. Make sure your Illustrator file is open, and then open the Actions panel and its panel menu, and choose New Action. In the window that appears, type the name BatchExport and click the Record button (Figure 10.21) to record your action. This action has just one step—exporting the file as a TIFF—so all you have to do is choose File > Export, and from the pull-down menu choose TIFF. In the next window (TIFF Options), select CMYK and High Resolution, and then click OK. After the file finishes writing, click the Stop Record button in the bottom-left portion of the Actions panel (Figure 10.22).

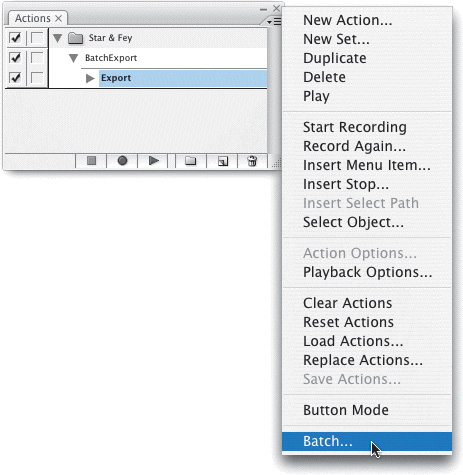
Now, from the Actions panel menu choose Batch (Figure 10.23), and in the Play area of the Batch window that appears, select the Set and the BatchExport Action you just created (Figure 10.24). In the Source area, choose Data Sets, and in the Destination area, click the check box next to Override Action “Export” Commands so that you can specify the kind of filename you want to associate with the radio buttons. Under File Name, choose File + Number to use your original Illustrator filename plus sequential numbering. This option appends numbers by thousands (001000, 002000, 003000, and so forth), and there’s no way to change the numbering scheme. Before you leave the dialog box, click the Choose button (above the Override Action “Export” Commands check box) to specify where you want files to be saved.

When you’ve set up the Batch window to your satisfaction, click OK. You can now watch as Illustrator runs through the data sets, plugging in the different text and exporting the files—a pretty cool thing to witness. You’ll end up with a batch of TIFFs; the number of output files will depend on the number of data sets you built in your Illustrator file (Figure 10.25).

Project 2: Seed Packets
This is another data-driven graphics project, but it produces Illustrator production files for printing instead of TIFFs, like the first project. For this project, you’ll be working with seed packet production files in their flat, unfolded form (Figure 10.26). The flower name, flower description, two photos, and the “NEW” graphic will be your variables. Since I covered most of the mechanics of setting up an Illustrator data-driven graphics file in the preceding project, I’m going to focus on different aspects here.

Creating the Template File
Since this template file is a straightforward Illustrator file—no warping or skewing of type needed—you can build it as you would any other Illustrator file. Note that you’ll be placing the same image twice. For the first data set, you’ll use the Morning Glory name and description and two instances of the morning glory image; the “NEW” graphic will also be visible.
Creating the Variables
In addition to the text variables we created in Project 1, this project will include two other types of variables: placed (or linked) images and visibility (which determines whether an object is visible or hidden). The value for a text variable is text; the value for a linked image is the path to the image; and the value for a visibility variable can be either True, for visible, or False, for hidden.
Variable names must adhere to the following XML naming standards: They must begin with a letter, underscore, or colon, and they cannot contain spaces or special characters (though a few special characters, such as the hyphen and colon, are allowed). Don’t worry, though: If you violate the law, you’ll get an error message; simply click the OK button, and Illustrator will correct the name for you.
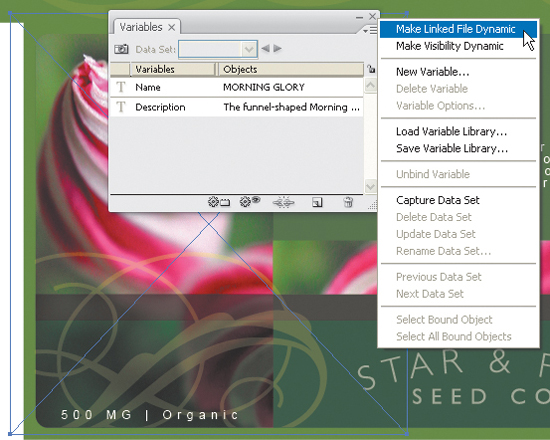
You’ll set up the text variables the same way you did in Project 1. In this project the flower name variable is Name, and the description variable is—hold on to your hats—Description. To create a linked image variable, select the image (using the Direct Select tool—which resembles a hollow arrow—if the image is masked or grouped), open the Variables panel menu, and choose Make Linked File Dynamic (Figure 10.27). Do this now, and name the variables LgPhoto (for the vertical image) and SmPhoto (for the horizontal image). Even though these are the same linked image, we need two variables for the two instances in the file.
Now it’s time to create the visibility variable. Visibility variables work for single objects, groups, and images. Since the “NEW” graphic will only appear on new products, you will manually designate “newness” for each data set. Keep in mind, however, that you could also set “newness” automatically. For example, if you were pulling the product data from a company database, you could evaluate each product by how long (based on date entries) the product had been in the company system.
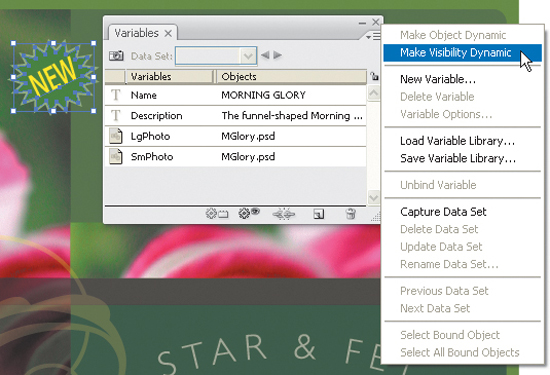
The starburst and type in the illustration are already grouped, so select them with the Selection Tool (solid arrow), and from the Variables panel menu choose Make Visibility Dynamic and then name the variable NewBug (Figure 10.28). Click the camera icon in the Variables panel to create the data set for the first flower. Your Variables panel should now look like Figure 10.29.

Building, Editing, and Importing the XML File
As in Project 1, you will add data sets to your XML file in an external text editor, keeping in mind that it will be easier to see what’s going on in the XML file if you create more than one data set in Illustrator. The second data set you need to create will be for a daylily seed packet (containing the appropriate name, description, and images). Since daylilies are not a new item for Star & Fey, you’ll need to hide the “NEW” graphic by choosing Object > Hide > Selection. After you’ve set up this version, click the camera icon in the Variables panel to create Data Set 2 (Figure 10.30). Note that you don’t have to create more than one data set before you export the XML file; I’ve just found it’s easier to figure out the structure of the XML file if it contains more than one data set.

Save the XML file the same way you did in Project 1 (that is, from the Variables panel menu, choose Save Variable Library) and open it in a text editor. The data set will look a little different than the one in Project 1, but it’s still basically the same animal (see below).
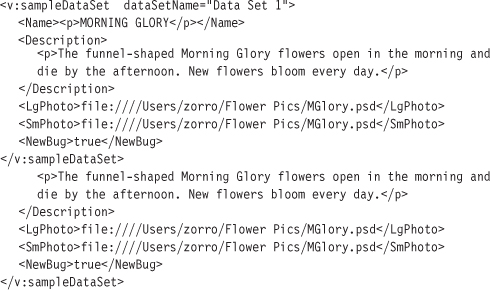
Notice that in this file the opening and closing tags are generally on the same line as the content (except for the Description). In Project 1 the opening tags, contents, and closing tags were all on different lines. In XML land either is acceptable, and Illustrator may arrange them all one way, all the other, or a combination of both.
Now copy and paste this data set to create one for the Winter Daphne, which has the “NEW” graphic hidden. Remember to make a line space and paste your new data set underneath Data Set 2.
Save the XML file in plain-text format with the .xml file extension, and then import the new XML file back into Illustrator (from the Variables panel menu, choose Load Variable Library). Now you can click through the data sets to view your handiwork.
Generating the Output Files
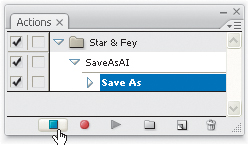
Generating the output files for this project works about the same as it did for the previous one, with the exception that you need to create an action to save the files in the Illustrator format. To do so, open the Actions panel menu and choose New Action, then name your new action SaveAsAI. Now click the Record button to begin recording. Save the file in Illustrator format to anywhere you want (you’ll change the location in the next step) and then click Stop (Figure 10.31).
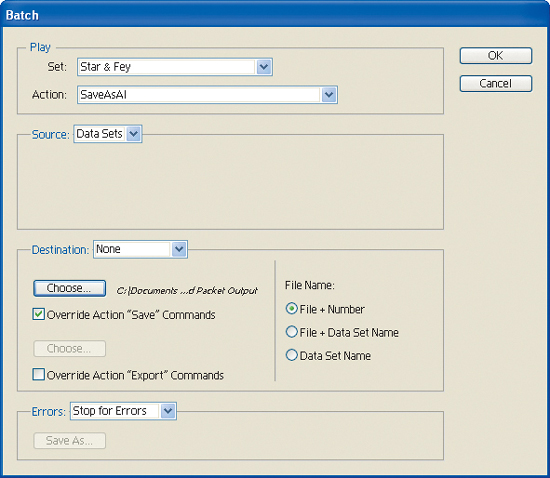
Now open the Actions panel menu and choose Batch. The Batch setup is the same as in Project 1, with the following exceptions: In the Action pull-down menu, choose SaveAsAI, and in the Destination area choose Override Action “Save” Commands (instead of “Export” Commands). The Choose button above the “Save” option should now be highlighted. Click it and select your preferred location (Figure 10.32).
If you wanted to take this packaging project one step further, you could script a bar-code application to automatically generate the bar code. Some bar-code applications generate EPS files; others generate vector art. I prefer working with EPS files, which can be linked to the Illustrator file and dynamically updated.
Project 3: E-Mail Invitation
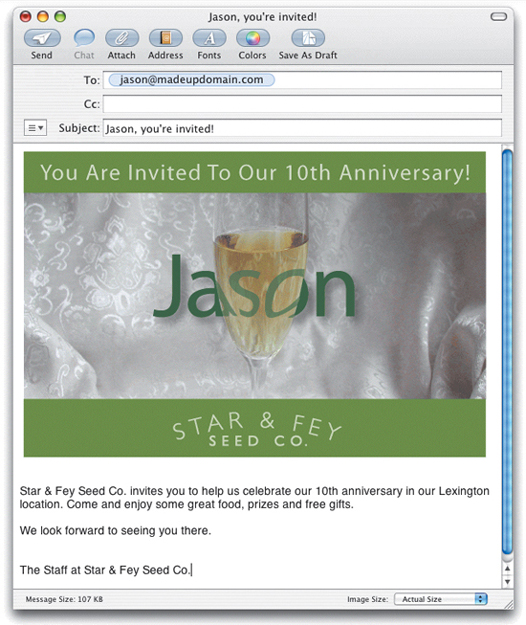
In this project you’ll use scripting to automatically create an e-mail invitation (Figure 10.33). Specifically, your script will create a custom image in Illustrator (incorporating a customer’s first name), save the file and attach it to an e-mail, and fill the e-mail’s To, Subject, and Body fields with custom text. Although you could arrange to send the e-mails automatically, you’re going to inspect each image first, then send it off.
There is a risk in sending an e-mail with an attached image that you want to display in the body of that message (such as in this project) because some e-mail programs don’t display attached images in the Body field, and some users may choose not to display images inline (meaning the attachment might only appear as an icon or text link).
I would like to state in the strongest possible terms that I hope you will not use the techniques demonstrated here to create e-mail spam. This project has a legitimate use for recipients who have opted in to an e-mail list. If you’re sending e-mail to folks who haven’t opted in to such as list, you’re sending them spam. Be a good net citizen and respect people’s rights and privacy.
Your client, Star & Fey, is having 10th anniversary celebrations at each of its retail locations and wants to invite its customers via customized e-mails. To create and distribute this piece, you will work with three pieces of data per customer (which you will export from the company’s customer database): first name, e-mail address, and the retail location the customer has previously visited.
This relatively easy project demonstrates how to build a graphics automation system that involves more than one application—in this case Illustrator and the Mac Mail application.
Setting Up the Illustrator File
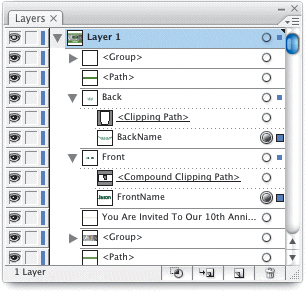
In your invitation design, the customer’s name is displayed to make it look as if it were being viewed through a champagne glass. One name is masked to the inside of the glass using a bulge warp (choose Effects > Warp > Bulge) so that it will appear refracted by the liquid. A second piece of type is masked to the outside of the glass to appear as if it’s the undistorted type peeking out from either side of the glass (Figure 10.34). A standard drop shadow has been applied to this type to make it appear more anchored to the rest of the image and as if it’s behind the glass. In the Layers palette, name these pieces of type BackName (for the undistorted type) and FrontName (for the distorted type) (Figure 10.35).

This project demonstrates why you should always look at a file before sending it out. If a name is too short (like Hal or Jen), it may not be legible because the undistorted part won’t stick out far enough. And if the name is too long, it will run off either side of the image. You can handle such situations by adding routines to adjust the horizontal scaling, tracking, or size, but this requires more advanced scripting.
Writing the Script
Your script will be divided into two parts: The first will insert the names into and export the Illustrator file; the second will build the e-mail. I created this project using AppleScript and Mac Mail on the Macintosh platform, but you can rewrite it for another scripting language or platform. (Keep in mind, however, that although Apple’s Mail program is scriptable, not all are—which means you’ll need to learn about your e-mail application’s capabilities. Microsoft Outlook can be easily scripted using VBScript.)
First, you need to do a little setup by declaring your variables—that is, loading up your variables with lists of customers’ names and e-mail addresses as well as the store locations where they shop. Although our example uses only five customers, the script will handle a virtually unlimited number of records.
One limiting factor may be the need to review the e-mails with the images attached: To avoid overloading your system’s memory by opening too many files at once, you may want to approach this project in batches.
The following portion of the script declares the first three variables:
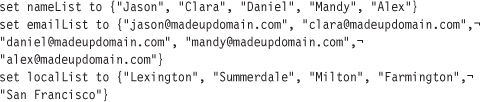
In AppleScript, you must enclose list items of the string class (such as the names in the above code) in quotation marks. This tells AppleScript to treat the item “one,” for example, as text instead of a numeral.
In this tutorial, the lists of names, e-mail addresses, and locations have been entered by hand, but often you will receive this kind of data as comma- or tab-delimited text files that have been exported from a database. It’s easy to build the lists from these text files by cycling through each record (that is, each set of data, such as the personnel information for one employee), picking out the specific data from each, and compiling and storing them in a variable, as in the script above.
Since you want your script to loop through the code for each customer, you’ll start the repeat loop with the following line (the end repeat companion line is the last one in the script): repeat with i from 1 to count of items of nameList
I’m using the PNG (Portable Network Graphics, pronounced ping) file format because I believe it’s underappreciated. Created to replace the GIF (Graphics Interchange Format) format (because the GIF patent holder, Unisys, was planning to charge for its use), PNG is lossless, meaning there’s no degradation of the image when saving as there is with JPEG. And although PNG files can be larger (sometimes much larger) than JPEGs, I’ve found that they retain sharp-edged lines (such as type) better, and they work just fine for this project.
Now that you’re in a loop, you’ll set up the thePerson variable (which will be filled with a different first name with each iteration of the loop) as follows:
set thePerson to item i of nameList
Then you’ll set the theFile variable (which is a file path telling Illustrator where to export the file) as follows:
![]()
The file path is made up of three parts: path to desktop folder as string is AppleScript shorthand for the Desktop; the variable thePerson will insert whatever person’s name is active for that iteration of the loop; and .png is the file extension. On my computer, the “path to desktop folder as string” is Hard Drive:Users:zorro:Desktop: and the first customer’s name is Jason, so the variable theFile will be Hard Drive:Users:zorro:Desktop:Jason.png for the first time through the loop.
The following code instructs Illustrator to insert the customer’s name in two pieces of type and export the file to the desktop in the .png format:
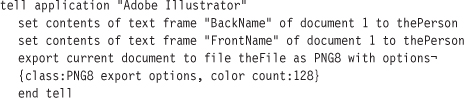
Note that BackName and FrontName are what you named the two pieces of type in the Illustrator template.
Now it’s time to build the e-mail and plug in the image, though first you have to do something that may seem a bit crazy: You must declare the file location variable again, this time as an alias. This is because even though Illustrator works with direct file paths, Mail likes aliases, which provide a way for the Mac operating system to keep track of files even after they’ve been moved in the Mac file hierarchy. Call this second location variable theFile2, and Mail will be happy.
![]()
Now it’s time to talk to Mail: Activate it to bring it to the front (so that you can watch the action—though this isn’t mandatory) and then declare the variables for the e-mail address, subject line (which includes the customer’s name), body, and From line (theSender), as follows:
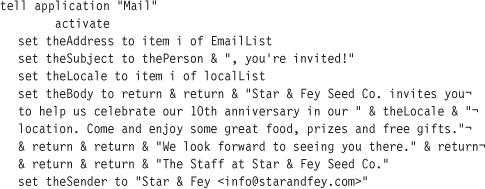
Next, you’ll build the e-mail and attach the image using the following script:
If you read the chapter on scripting, you should recognize many parts of this AppleScript. See if you can make sense of AppleScript’s English-like commands. For instance, even though at before the first character sounds silly, it describes precisely where the image will be attached (before any characters already in the e-mail). Also note how the subject line and message body combine hard-coded, static text with variables to further customize this communication.
If you really want to see this puppy fly, insert two words into the code—send newMessage—on the line before the last end tell line, so that the last three lines of code appear as follows:
![]()
Inserting this code will automatically send the e-mails, so for testing you might want to change the whole list of e-mail addresses to your own e-mail address (in all five places).
Although the customer won’t necessarily think you wrote the e-mail by hand it shows that you think enough of them to use a system like this. In that moment you hope to make a positive connection and plant a seed, so to speak.
Project 4: Unused Swatch Cleanup
Since it’s good housekeeping to clean up files before you send them to anyone—for example, deleting unused swatches (colors), stray points, empty or useless layers, and unused objects—this project creates an action to delete unused swatches. Assigning a keystroke to this small but important task will make it even faster to execute.
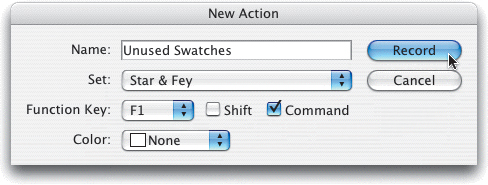
To get started, open the Actions panel and create a new action (or a new Set, if needed). (I’ve named my new action Unused Swatches; you can name yours whatever you want.) Now, from the Function Key pull-down menu choose F1, and click the check box next to Command (for Mac) or Control (for Windows) (Figure 10.36). Now, whenever you want to run this action, you simply press Command-F1 (Control-F1 on Windows). Click the OK button to begin recording the action.
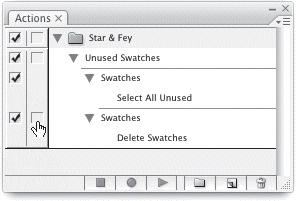
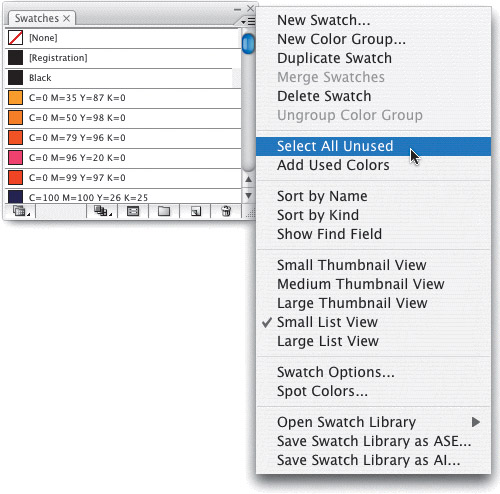
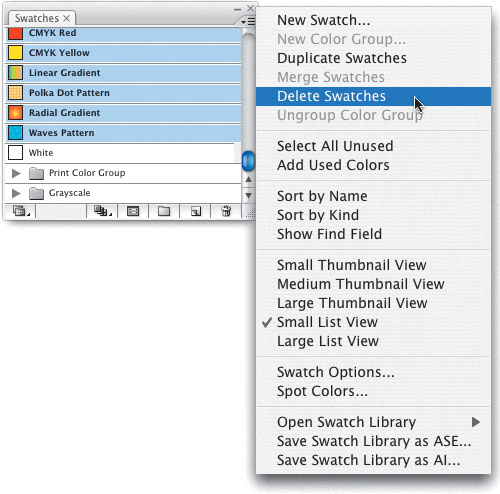
Open the Swatches panel and its panel menu and choose Select All Unused (Figure 10.37). Illustrator will now highlight all of the unused swatches. From the same menu, choose Delete Swatches (Figure 10.38). A dialog box will appear, asking if you really want to delete the swatch; click Yes.
When you play this action back, the same dialog box will appear, asking (once again) if you really want to do this. To get rid of this potentially annoying step, go to your action and click the Toggle Dialog On/Off icon to the left of the second step in your action called Swatches—OK, they’re both called Swatches, so it’s the second one (Figure 10.39). Run the action again, and the dialog box won’t appear.