
Chapter 10. Pluggable Services
The previous chapters have focused on topics that are vital to the development of a production system. We have a bit of functionality, a client that interacts with a back end, and some rudimentary tests. We can even package up Toast and run it as a stand-alone application. To be certain, there is still a lot left to do to make Toast more useful and robust. Of all that remains to be done, there’s one big thing that Toast still lacks: reality.
Toast is based on fake devices. No matter how far you throw your computer or how hard you smash it against the wall, the GPS won’t change, and the airbag won’t deploy. In a real telematics system, we need to interface to the GPS and airbag hardware in the vehicle by way of device drivers.
In the real world, developing device drivers can take quite a bit of time, sometimes longer than the remainder of the system. And deploying real airbags to test software can get pretty expensive. So it makes sense to try to develop the domain logic separate from and in parallel with the device drivers. This is an aspect of development where OSGi really shines. Using OSGi services, you can develop your application in parallel.
In this chapter, as we continue to develop Toast, you will learn
• How to separate the service interface from implementation to enable service pluggability
• How to use the simple simulator framework to create simulators for services
• How to use pluggable OSGi services to run Toast with simulators
10.1 Separating Interface from Implementation
So far in Toast we’ve been using “fake” devices. The FakeGps and FakeAirbag work well enough for us to develop the domain logic that depends on them. Each of these fake devices resides in its own bundle, and each bundle contains both the service interface as well as the fake implementation. This was convenient in the beginning, but there was a hint of awkwardness when we created a mock airbag implementation in our system test. We had to include the bundle in the product definition so that the IAirbag interface would be present, but we had to ensure that the bundle was not started so the test case did not mistakenly bind to the wrong airbag service.
The trouble arises whenever we try to put together a system with an alternative implementation of the service. But because the service interface and the fake implementation are in the same bundle, we cannot use just the service interface without the fake implementation tagging along.
The solution is simple enough—separate the service interface and the fake implementation into distinct bundles.
10.1.1 Separating the Fake Airbag from Its Interface
Follow these steps to separate the fake airbag implementation and the airbag service into two separate bundles:
• Since the name of the project containing the fake airbag implementation is better suited for the service interface, create a new project for the fake implementation called org.equinoxosgi.toast.dev.airbag.fake. Refer to Section 4.2.1, “GPS Bundle,” for detailed instructions on creating bundle projects.
• In the manifest editor, add org.equinoxosgi.toast.dev.airbag and org.eclipse.core.jobs to the Automated Management of Dependencies list.
• In the Required Plug-ins list, add org.eclipse.equinox.common.
• Save the manifest.
• Drag the org.equinoxosgi.toast.internal.dev.airbag.fake package from the src folder of the org.equinoxosgi.toast.dev.airbag project and drop it into the src folder of the newly created project.
• Click the add dependencies link at the bottom of the manifest editor.
• Edit the version range on the imported package org.equinoxosgi.toast.dev.airbag to be 1.0.0 inclusive to 2.0.0 exclusive by clicking the Properties... button.
• Create a new service component for this bundle called component.xml in the OSGI-INF folder of this bundle. Refer to Section 6.4.1, “Modifying the GPS Bundle,” for detailed instructions.
• Use FakeAirbag for the class of the component.
• Use startup and shutdown for the activate and deactivate methods, respectively.
• Add IAirbag as a provided service.
Now the new fake airbag bundle is complete. The original org.equinoxosgi.toast.dev.airbag bundle needs a little cleaning up, since it no longer acts as a service component. When we created the service component, the tooling did most of the work. To remove the service component, we need to manually remove the OSGI-INF folder that contains it, and we also need to modify the manifest to no longer declare the service component and the build configuration to no longer include the OSGI-INF folder. Follow these steps to complete the removal of the service component:
• In the manifest editor of the org.equinoxosgi.toast.dev.airbag project, go to the Build tab and uncheck the OSGI-INF folder. Then remove the OSGI-INF folder from the project.
• On the MANIFEST.MF tab, remove the entire line that declares the Service-Component.
• With the fake implementation no longer in this bundle, we can remove its dependencies from the manifest. On the Dependencies tab, remove all items from the Required Plug-ins, Automated Management of Dependencies, and Imported Packages lists.
10.1.2 Separating the Fake GPS from Its Interface
Now let’s repeat the separation procedure for the GPS. Follow these abbreviated steps:
• Create a new plug-in project for the fake implementation called org.equinoxosgi.toast.dev.gps.fake.
• In the manifest editor, add org.equinoxosgi.toast.dev.gps to the Automated Management of Dependencies list.
• Save the manifest.
• Drag the org.equinoxosgi.toast.internal.dev.gps.fake package into the src folder of the newly created project.
• Click the add dependencies link at the bottom of the manifest editor.
• Edit the version range on the imported package org.equinoxosgi.toast.dev.gps to be 1.0.0 inclusive to 2.0.0 exclusive.
• Create a new service component for this bundle called component.xml in the OSGI-INF folder of this bundle, with FakeGps for the class of the component and IGps as a provided service.
• In the manifest editor of the org.equinoxosgi.toast.dev.gps project, go to the Build tab and uncheck the OSGI-INF folder. Then remove the OSGI-INF folder from the project.
• On the MANIFEST.MF tab, remove the entire line that declares the Service-Component.
10.1.3 Regression Testing
With the device service interfaces now properly separated from the fake implementations, it’s a good idea to run the system test to make sure nothing is broken. But we need to make a few modifications first. Follow these steps to update the system test case and run it:
• Select Run > Run Configurations... and open the Toast System Test launch configuration.
• On the Plug-ins tab, uncheck the Only show selected plug-ins option to see all the bundles in the workspace and target.
• Notice that the new fake device bundles are now available. Check the fake GPS bundle, org.equinoxosgi.toast.dev.gps.fake. It is needed now since it is no longer in the service interface bundle, org.equinoxosgi.toast.dev.gps. Make sure it has Auto-Start set to true.
• There is no need to check the fake airbag because the test case does not need it. Recall that the test case has its own mock airbag as part of the test harness. All it needs is the airbag service interface that resides in org.equinoxosgi.toast.dev.airbag.
• Click the Run button to run the system test case.
10.2 Device Simulation
Separating interface from implementation is not just good architecture; it enables new scenarios. In the case of Toast, it means that the fake devices are no longer the only choice when assembling a system. In the real world, this separation combined with OSGi’s modularity enables parallel development. One team can work on the real device bundles that talk to real hardware while another team works on the layers above the devices. OSGi services allow the consumers of a service to be blissfully unaware that the services upon which they depend are fake, mock, or real implementations.
10.2.1 Concepts
Another type of service that plays an important role in enabling parallel development is the device simulator. A simulator allows developers to control a service manually, usually by way of a user interface available only at development time. Using simulated services aids in development and demonstration of the system. For developing Toast, it would be nice to simulate driving around in the vehicle, with the GPS updating as we drive along. It would also be handy to be able to deploy the airbag when we wanted.
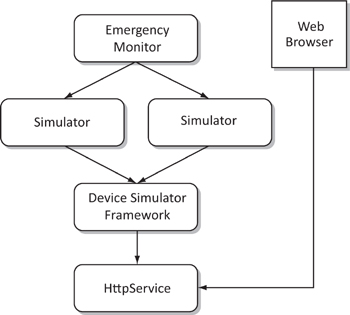
The remainder of this chapter guides you through creating simulators for the GPS and airbag. The simulators plug into a simple device simulator framework that allows the simulators to be controlled by a web interface. Figure 10-1 shows the device simulators and the device simulator framework along with the web interface used for controlling the simulators.
Figure 10-1 Device simulators and the simulation framework
10.2.2 The Device Simulator Framework
The device simulator framework allows other bundles to contribute simulators for particular frameworks—it is itself extensible. Since the internals of the device simulator framework are unimportant here, it’s simplest to just load the device simulator rather than develop it from scratch.
• Use the Samples Manager to load the org.equinoxosgi.toast.devsim project as described in Section 3.4.2, “Comparing.”
The bundle has a component.xml, so that’s a great place to start exploring the framework.
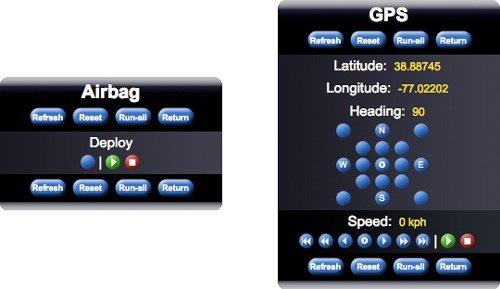
The component provides a single service called IDeviceSimulator. Each simulator registers itself with the framework by way of this service. The simulator framework serves up a web page for each simulator and processes commands that ultimately control the corresponding simulator. To achieve this, the component references a single service, HttpService, and uses this service to publish the DeviceSimulatorServlet. Figure 10-2 gives you a peek at the device simulators we are building.
Figure 10-2 The airbag and GPS simulators
10.3 Simulated Devices as Pluggable Services
With the device simulator framework installed, we need to implement a device simulator for the airbag and another for the GPS. Each of these implements the corresponding service.
10.3.1 The Simulated Airbag
Follow these steps to create the simulated airbag:
• Create a new project for the simulated implementation called org.equinoxosgi.toast.dev.airbag.sim.
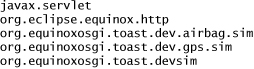
• In the manifest editor, add the following bundles to the Automated Management of Dependencies list:
![]()
• Save the manifest.
Now create the component class:
• Create a new class in this bundle called AirbagSimulator and place it in a new package called org.equinoxosgi.toast.internal.dev.airbag.sim. Fill in the code with the following snippet:
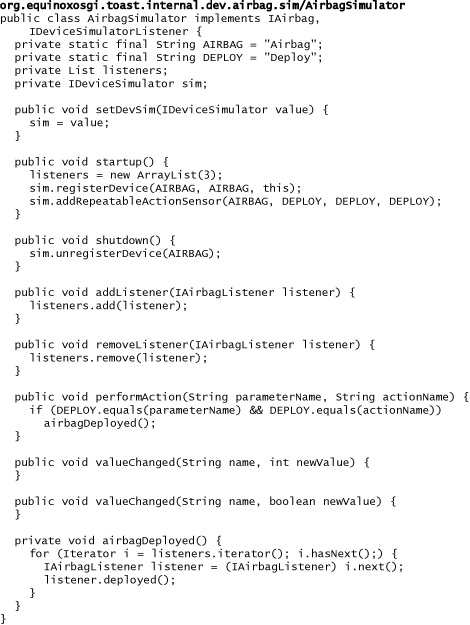
The IDeviceSimulator service is injected in setDevSim. Then, in startup, the simulator registers itself with the device simulator framework, providing a unique device name and a label for the user interface. It adds a single sensor for the airbag deployment, providing the device name (AIRBAG), the sensor name (DEPLOY), a label for the user interface (DEPLOY), and an action for the servlet (DEPLOY). It unregisters itself in shutdown.
When the developer at the web interface clicks the deploy button, the simulator framework calls performAction, which in turn calls airbagDeployed to notify the listeners that the airbag has deployed.
Now finalize the manifest by following these steps:
• Click the add dependencies link at the bottom of the manifest editor.
• Edit the version range on the imported Toast packages to be 1.0.0 inclusive to 2.0.0 exclusive.
• On the Runtime tab of the bundle’s manifest, add the newly created package to the list of exported packages, leaving it hidden from other plug-ins. Then save the manifest.
Now create the service component:
• Create a new service component in OSGI-INF/component.xml of this bundle. Use AirbagSimulator for the class of the component and startup and shutdown as the activate and deactivate methods.
• Add IAirbag as a provided service.
• Add a referenced service of type IDeviceSimulator named devSim with setDevSim as its bind method.
10.3.2 The Simulated GPS
The simulated GPS bundle is structurally comparable to the simulated airbag bundle, but because it’s more internally complex, we won’t bother to walk through creating it by hand. Instead, just use the Samples Manager to load the org.equinoxosgi.toast.dev.gps.sim bundle into your workspace.
Again, a good place to start exploring any bundle is its component.xml. Here you can see that this component is similar to the airbag bundle. It requires the IDeviceSimulatorService and provides the IGps service. From that information alone, you can see how this component fits into the system without delving into the internals. You’ll see how it functions once we run Toast with the simulators.
10.4 Running with Simulated Devices
Before we run Toast with the simulated devices, we need to update the client product to include both the simulator framework and required infrastructure, and to put in our new API and implementation bundles. Follow these steps to make the changes:
• Since the existing client.product in the ToastClient project still uses the fake airbag and GPS, make a copy of it first and name it fake-client.product.
• On the Dependencies tab of client.product, add the following bundles to the list. The first two are needed by the device simulator framework because it provides a web interface. The rest are our new simulator bundles.
• On the Launching tab, add this line to the VM Arguments to assign the port number for the web interface. We don’t want it to conflict with the back end’s use of port 8080.
-Dorg.osgi.service.http.port=8081
We’re ready to try out the new Toast with the simulated devices. First launch the back end and then the client:
• Use Ctrl-Shift-R to open backend.product in the ToastBackEnd project.
• Click the run button in the top right corner.
• Now do the same for the fake-client.product.
You should see an indication on the back end’s console that the EmergencyServlet has come to life. Then, on the client’s console, you should see an indication that the DeviceSimulatorServlet has started at client/devices.
Let’s try deploying the airbag by using the airbag simulator:
• Open a web browser on http://localhost:8081/client/devices.
• Click on Airbag to see the airbag simulator page.
• Click the blue button to deploy the airbag once. Clicking the green button starts the airbag deploying every five seconds. Use the red button to stop the repetition.
Now let’s try using the GPS simulator to change the location of the vehicle:
• Click the Return button to return to the main simulator page.
• Click on GPS to see the GPS simulator page.
• Try clicking the various blue buttons to change the vehicle’s location. If you deploy the airbag again, you should see the new location reflected on the back end’s console.
10.5 Summary
Toast now runs with a simulated airbag and GPS with a web interface to manually control them. While you stepped through the refactoring of the airbag and GPS bundles, you did more than just learn about the PDE tooling. The larger theme at work in this chapter was the importance of separating interface from implementation. It was that initial refactoring that enabled the pluggability of the simulators.
Using OSGi services is the key to enabling this pluggability, and the pluggability in turn enables parallel development on a large scale. While the real device drivers are being developed, development can proceed on the higher layers of domain logic and user interface. With the simulators in place and the domain logic functioning, we next turn our attention to the user interface.