
Chapter 3. Tutorial Introduction
This chapter guides you on the journey of developing a fully functional OSGi-based application, Toast. Using the same application throughout the book adds to the coherence of the samples and more closely matches the situations encountered in real-world software development. The principles and practices discussed throughout are applicable in a wide range of application domains and execution scenarios. Before getting down to the nuts and bolts of Toast development, we set the stage for the application by outlining its nature and evolution. We also ensure that you are set up with a working development environment.
This chapter focuses on three major issues:
• Outlining the sample application and sketching its evolution
• Setting up your Eclipse IDE so you can develop the code yourself
• Getting and using the Samples Manager to compare and manage the sample code
3.1 What Is Toast?
Toast is a sample application in the telematics and fleet management domain. If you’re unfamiliar with the term, you’re almost certainly familiar with the concept. Wikipedia has the following to say about telematics:
[Telematics is] the integrated use of telecommunications and informatics. More specifically it is the science of sending, receiving and storing information via telecommunication devices.
You will have seen this in car navigation and infotainment devices. A typical telematics system interfaces to the devices in the vehicle and provides a user interface for interacting with or managing the devices. More sophisticated systems connect to a fleet management control center over a wireless network and allow remote control of the devices.
In its finished form, Toast covers all of these bases—it interfaces to a simulated GPS and airbag, integrates with Google Earth, and communicates with an OSGi-based fleet management control center using a variety of protocols.
At a high level, Toast consists of a client and a back end. The Toast Client provides a variety of functionality, including an emergency application that notifies the control center of the vehicle’s GPS location when the airbag deploys, an application that tracks the vehicle’s GPS location and periodically notifies the control center, a touch screen interface to control the vehicle’s audio and climate systems, and a turn-by-turn navigation system.
The Toast Back End is developed over the course of the book from a simple emergency monitoring station to an extensible fleet management platform for managing and controlling vehicles. This includes vehicle discovery, tracking, and software management or provisioning.
The attractiveness of Toast as an example goes beyond the familiarity of telematics, fleet management, and the functionality of the various applications. It is compellingly extensible—we can reasonably explore a number of technologies without making it up. More important, this range of scenarios enables us to discuss a variety of real-world OSGi-related challenges:
Bundle granularity—A deployed Toast system, including the in-vehicle client, the device simulators, and the control center, amounts to over 100 bundles. That may seem like a lot, but this architecture both is representative of real systems and allows us to demonstrate a number of best practices in dealing with large numbers of interdependent bundles.
Third-party libraries—Most real-world applications make use of third-party code; Toast is no exception. The full Toast application uses libraries from Eclipse, Apache, the broader Java open-source community, as well as Google JavaScript. We walk you through the process of incorporating non-OSGi-aware third-party libraries into an OSGi-based application and detail the issues to watch for.
Dynamic installation and removal of functionality—Toast is a highly dynamic application with functionality being installed and removed, servers and clients interacting, and user input being handled. Through this example we show how to write bundles that adapt to the appearance of new functionality and to the removal or updating of dependencies. We also show how to use p2, the latest deployment implementation in Equinox, to manage executable Equinox profiles.
Extensibility and collaboration—As you walk through the development of Toast, you’ll see a number of approaches to extensibility and collaboration, including services, Declarative Services, the Whiteboard Pattern, the Equinox Extension Registry, and more. Writing new functionality is relatively straightforward, and Toast combines this with support for the dynamic installation and removal of applications to create a powerful software platform.
Testing and simulation strategies—Throughout the book, Toast develops into a reasonably complex application. Accordingly, we provide examples and best practices for automated testing, from POJO (plain old Java object) development to using mock objects and JUnit in OSGi-based system tests. We also show how to test against simulated devices for situations where real device hardware is either unavailable or cannot be used economically. Deploying real airbags can get very expensive!
Off-board communications—Very few systems today stand alone. Most eventually communicate to off-board servers, peers, or subsystems. For example, Toast clients use HTTP to communicate with the control center running the Jetty web server. The device simulator uses a similar approach but embeds a small web server in the vehicle itself. Provisioning is done using the Eclipse Communications Framework (ECF) to talk to software repositories.
Graphical and web-based user interfaces—Using OSGi certainly does not require a user interface; many real-world applications are “headless.” Nevertheless, Toast provides a number of UI examples—the graphical user interface intended for an in-vehicle touch screen, a simple web UI for the control center, and JavaScript web-based UI for the device simulator.
Finally, Toast is fun. It is simple and easily understood, yet rich enough to provide a basis for a variety of applications and technology integrations. The lessons learned in developing Toast are readily applicable to other domains and applications.
3.2 The Evolution of Toast
In Part II we develop Toast over a number of tutorial chapters. Each chapter presents a new concept and makes incremental progress over the preceding chapter. As development progresses, we supply the code for each iteration. Where it helps to clarify the discussion, the chapter text includes code snippets. The Samples Manager, available from http://equinoxosgi.org, contains the complete code for each chapter and allows you to perform each step on your own, browse the code, or simply read the text.
Hello, Toast (Chapter 4)—The tutorial starts with an empty workspace and walks you through creating a simple emergency application—whenever the airbag deploys, the GPS location is read and displayed along with an emergency message. This simple example is then split into three bundles and the reasoning and tooling explained. By the end of this section, you will have a running application based on a collection of OSGi bundles.
Services (Chapter 5)—This chapter moves beyond the notion of bundles and presents the concept of services and inter-bundle collaboration. More than just code libraries, bundles can register services with the OSGi service registry, allowing other bundles to make use of their provided functionality without being tightly coupled.
Dynamic Services (Chapter 6)—Here we introduce the idea that bundles and services can come and go throughout the lifetime of a running system. This dynamic behavior is one of the hallmarks of OSGi-based systems and figures heavily in many of the design and implementation decisions you make. In this discussion we first present OSGi Service Trackers, followed by a review of a third-party toolkit for service management called the Service Activator Toolkit (SAT). Finally, we present OSGi’s Declarative Services (DS). DS is adopted for the remainder of the tutorial. At the end of this section, Toast embraces the dynamic nature of the scenario.
Client/Server Interaction (Chapter 7)—At this point Toast operates as a stand-alone OSGi application. To fully implement the emergency scenario, we need a control center to receive emergency notifications. In this chapter we implement the control center as a separate OSGi system. We use HTTP for the communication between the client system and the control center. By chapter’s end, Toast runs on separate machines, and the emergency application sends emergency information to the control center.
Testing (Chapter 8)—Even though there is little complex domain logic in Toast at this point, we can begin to write tests for what we do have. This chapter uses EasyMock and JUnit to test the domain logic in the emergency scenario. This demonstrates that when domain logic is clearly separated from the OSGi plumbing, the barrier to creating a suite of automated tests is significantly lowered. We also show how to write OSGi-based system tests.
Packaging (Chapter 9)—It’s time to snip the strings and export Toast so it runs outside the workspace and can be distributed to others. In this chapter you will learn how to build, publish, and zip signed and otherwise exported bundles from your workspace. We also show you how to combine them with prebuilt bundles from others and ultimately distribute your system.
Pluggable Services (Chapter 10)—At this point in Toast, we have only mocked up the devices in our application. In this chapter we add a device simulator that presents a simple web user interface, allowing you to virtually operate the vehicle devices (e.g., GPS and airbag) and thus interact with Toast subsystems. This chapter demonstrates how to structure your system to allow for the pluggability of alternate implementations of the same service.
Extensible User Interface (Chapter 11)—From an end-user perspective Toast is pretty boring so far. Here we add a Standard Widget Toolkit (SWT)-based graphical user interface that allows users to operate the installed Toast Client subsystems. We also add support for audio and climate control and integrate Google Earth for navigation mapping and guidance support. These additions demonstrate a number of interesting OSGi topics, and we are careful to point these out.
Dynamic Configuration (Chapter 12)—Toast is designed to be highly configurable. In this chapter you will learn how to manage this configurability using the OSGi Configuration Admin service by way of an example. We add to Toast a new application that tracks the vehicle’s location and periodically reports to the control center. It uses OSGi’s Configuration Admin service to determine how often the tracking application reports to the control center.
Web Portal (Chapter 13)—In this chapter we add a web UI to the control center. While the web UI itself is quite simple, we create an extensible portal to demonstrate how to effectively use Declarative Services and the Whiteboard Pattern.
System Deployment with p2 (Chapter 14)—A key aspect of OSGi-based systems is their flexibility in deployment. Telematics systems in particular benefit from the ability to remotely manage the software and information. This chapter introduces and demonstrates the use of the Equinox p2 provisioning platform to install, configure, update, and remove functionality from a Toast system.
3.3 Development Environment Installation
The code in this book has been developed and tested using the Galileo SR1 release of Eclipse. You can get this from http://eclipse.org/downloads. Since Eclipse is a tooling platform, several different configurations are available. The Eclipse team has put together a tooling configuration specifically for people building bundle-based applications—people like you—the “Eclipse for RCP/Plug-in Developers” package. Despite the name, this is a comprehensive set of tools for writing OSGi bundles. More generally, any of the packages that include the Java Development Tools (JDT) or Plug-in Development Environment (PDE) will work fine.
Each package is available for a variety of machine configurations and is mirrored across the globe. Choose the appropriate package, platform, and mirror and download the tooling.
Having downloaded Eclipse, extract the file to a location of your choosing. In the examples we assume you have extracted it to c:ide.
To start Eclipse, run the Eclipse application launcher (eclipse.exe or eclipse, depending on your operating system). As Eclipse starts, you’ll be prompted for a workspace location. The workspace is the place your development artifacts are stored. It is typically a good idea to locate the workspace somewhere separate from the Eclipse installation. This simplifies the management of multiple workspaces as well as changing versions of Eclipse. By default a location in your user directory (e.g., c:Documents and SettingsAdministratorworkspace) will be suggested. This is a fine choice if you are just starting out.
3.4 Sample Code
As mentioned earlier, Toast ultimately ends up including many bundles. Many of these evolve quite a bit as the tutorial and deep-dive chapters progress. It turns out that managing a dozen different versions of the same bundles in coherent sets is quite complicated. To help with this, we supply a Samples Manager tool to help you both manage the sample code and move from sample to sample.
The Samples Manager includes all of the code and resources for each sample. To install the Samples Manager, run your Eclipse IDE and follow these steps:
• Open the Software Updates dialog using Help > Install New Software....
• On the Available Software page click the Add... button to add a new software site.
• In the dialog, enter http://equinoxosgi.org, the location of the book’s software site, and click OK.
• Expand the tree for the Equinox OSGi Book site and select the Samples Manager. Pick the most recent version available. (You may need to uncheck the Group Items by Category option to see it.)
• Click Next and go through the following pages of the wizard, carefully reading and accepting the licenses and warnings. After the Samples Manager is installed, a restart dialog appears. Select Restart.
3.4.1 Moving from Chapter to Chapter
When the Samples Manager is installed, an OSGi/Equinox menu appears on the main menu bar. Run the tool by selecting OSGi/Equinox > Samples Manager, and the Samples Manager view as shown in Figure 3-1 will appear.
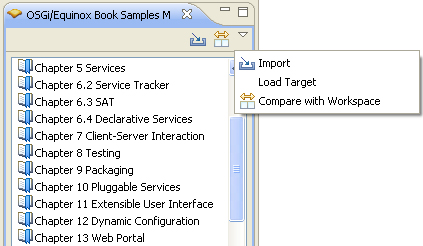
The list shows all chapters of the book that have associated sample code. Note that some chapters have multiple samples. Select a sample and click Import on the toolbar or in the context menu to load all projects related to the selected sample into the workspace.
One goal of the Samples Manager is to ensure that you can move from sample to sample smoothly and with a clean slate. If you have a problem, you can simply reload. As such, the Samples Manager deletes all sample projects that it previously loaded before loading the new projects. It also cleans up the launch configurations related to the samples. This ensures that your workspace contains only the projects for one sample and is in a known state.
The Samples Manager view highlights the chapter that you have loaded to remind you what is in the workspace. The Samples Manager’s Help content includes the most recent instructions and tips for its use.
3.4.2 Comparing
The Samples Manager also supports comparing the workspace to the set of projects for a sample. This is extremely useful when you are following the tutorial steps. For example, while doing Chapter 7, you may find that something is not working or the steps are unclear. Comparing the workspace to the Chapter 7 sample tells you what is left to do or where your setup is different from the expected outcome.
Similarly, you can selectively load parts of a solution into the workspace. Several chapters require sets of resources or large chunks of code that you are not expected to create on your own. Use the Samples Manager’s comparison tool, as shown in Figure 3-2, and the Copy into Workspace action to select files and folders and copy them into the workspace.
Figure 3-2 Comparing Sample 5 to Sample 6.4
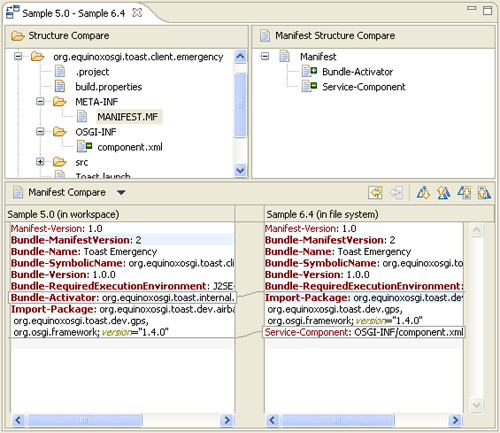
Notice that the compare editor distinguishes between files that have changes and those that exist in only one location. Changes are highlighted in the lower area, and there is a minus sign (-) if a file does not exist in the workspace but does exist in the comparison chapter. Conversely, a plus sign (+) is shown if a file exists only in the workspace. So in this example, the Bundle-Activator header was removed when moving to Sample 6.4 and the Service-Component header was added.
3.5 Target Platform Setup
Before starting to write code, you need to set up the workspace’s target platform. The target platform is the set of bundles against which your code is compiled and from which you will create your systems. The target is distinct from the bundles that happen to make up your Eclipse tooling. In our case, the target includes mostly just the Equinox bundles needed to implement Toast. We can add and remove bundles in the target without affecting the tools.
PDE includes comprehensive support for defining and managing target platforms. The Samples Manager you installed also includes a predefined target suitable for the examples in this book. To get up and running quickly, load the target using the Samples Manager. You can also start from scratch and assemble your own target definition. We describe both workflows in the following sections.
Eventually Toast will have client and server parts. In the examples you will add graphical UIs and do some testing. The target must have all the supporting bundles needed for these activities. Broadly speaking, you need four things:
Equinox SDK—The Equinox team has put together an all-in-one SDK that includes all the Equinox bundles, along with their source and a few supporting bundles such as Jetty and some Apache pieces. This is the core of what Toast needs.
RCP SDK—Later on in Toast we will add a graphical UI. Although the UI will not technically be an Eclipse RCP application, it will use the Eclipse SWT. We will also use a few utility bundles from the base Eclipse platform. It is easiest just to add the whole RCP SDK to the target.
Delta pack—Equinox supports many different hardware and OS platforms. The binary executable and graphical libraries are platform specific. To ease consumption, the Eclipse team has put together a delta pack that contains all of the parts of the basic Eclipse infrastructure that are platform specific. This is of use to Toast when exporting and building.
Testing stuff—In Chapter 8, “Testing,” we use libraries such as JUnit and EasyMock. These need to be in the target as well.
3.5.1 The Predefined Target
The Samples Manager comes with a handy target that includes all of the components just listed. Carry out the following steps to load the predefined target:
• Use the Load Target entry in the Samples Manager’s toolbar menu as shown in Figure 3-1 to initiate the target load. This should show a progress dialog while the target contents are copied into the workspace. When it completes, there will be a project called ToastTarget that contains the target definition and some of the target content.
• Open the Target Platform preferences page, Window > Preferences > Plug-in Development > Target Platform, and look for the entry called Toast Target. Select the check box beside that entry and click Apply or OK to use the Toast target.
3.5.2 Defining Target Platforms
We recommend that you use the predefined target from the previous section, since it will make things easier later on when we add to the target. But at some point you will have to define your own target for your own projects. This section describes how that is done. If you are up and running with the predefined target, skip this section and treat it as a reference to come back to.
A target platform is just a list of bundles and features from various locations. Sources of content include the following:
Directories—Specifying a directory adds to the target all bundles and features found in that directory. Directories of bundles can be acquired by downloading archives from the web, for example, from eclipse.org.
Installations—Pointing the target at an existing Eclipse install adds all elements of the install to the target platform. This includes linked folders, drop-ins, and any other bundles and features that make up the install.
Features—Adding features is similar to adding a directory but with the added ability to select a subset of features found in the directory. All bundles indicated by the selected features are also added to the target.
Software sites—There are many software repositories around the world. Adding a software site allows you to identify a repository from which bundles and features are loaded.
The predefined Toast target uses directories and software sites in its definition. We will next walk you through the steps we used to create the target platform. In a sidebar in the previous section we talked about having targets in the workspace. We illustrate that approach here. If you would rather not, you can put the target content wherever you like, but the target definition file still has to go somewhere in the workspace.
• Create a simple project using File > New > Project... > General > Project. We have called our target project ToastTarget.
• Create a target platform definition using the File > New > Other > Plug-in Development > Target Definition wizard.
• Enter a name for the target file and situate it in the new project.
• Notice at the bottom of the wizard that there are several options for initializing your new target. Select the Nothing option, as we are building this target from scratch. In other scenarios you may wish to prime your new target with content listed elsewhere.
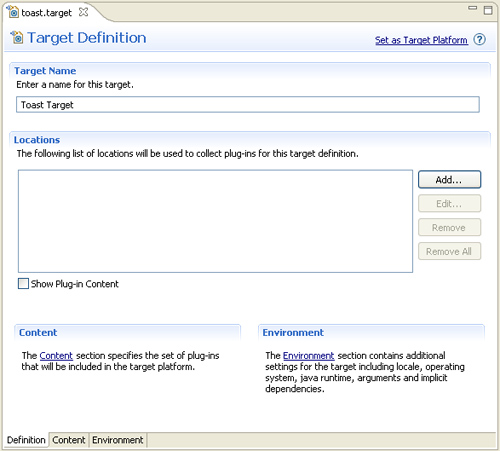
• Click Finish to complete the wizard and open the target editor on the new target definition, as shown in Figure 3-3.
Figure 3-3 Target definition editor
In the editor you can fill in a useful name for the target definition, but the really interesting part is the Locations section. For the Toast target we will need to add a directory for the delta pack and a software site for the Equinox and RCP SDKs. Let’s do the delta pack first:
• Get the delta pack by downloading it from the Eclipse project download site, http://download.eclipse.org/eclipse. Choose Latest Release from the options given. As of this writing it is 3.5.1.
• On the subsequent download page, select Delta Pack on the left navigation bar. This scrolls the page to the delta pack download link. Notice there is only one link since, by definition, it is all the pieces that are platform dependent. Select the link and save the archive to a convenient spot on your local drive.
• When the download is complete, create a new folder called delta.pack in the target project and import the downloaded content into the folder using File > Import... > General > Archive File.
• In the target editor’s Definition page, click Add... and select Directory. Click Next.
• In the Add Content dialog, click Variables... and select workspace_loc from the list. Now append the workspace path to the delta pack content. For example, the location should look like the following, assuming you called your project ToastTarget: ${workspace_loc}/ToastTarget/delta.pack/eclipse
Next we’ll add a software site and get the Equinox and RCP SDKs:
• In the target editor’s Definition page, click Add... and select Software Site. Click Next.
• On the subsequent Add Software Site wizard page, choose Galileo in the Work with drop-down. If there is a more recent release repository available, feel free to choose it. If the site you want is not listed, click the Add... button and enter the Name and URL Location for the site. For example, the Galileo site is at http://download.eclipse.org/releases/galileo.
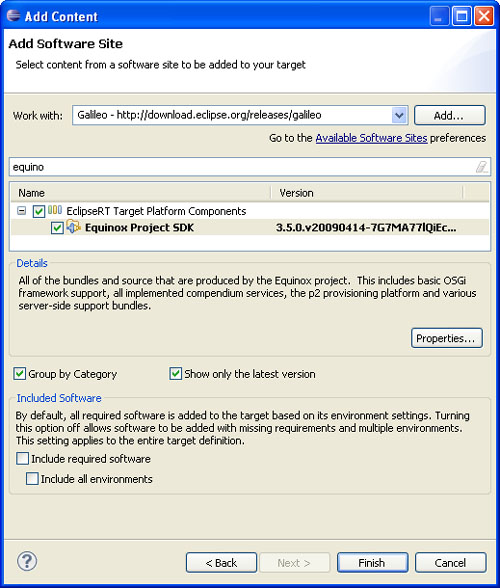
• Once the site is selected, the content area of the wizard should fill in as shown in Figure 3-4. Select the Equinox Project SDK either by expanding the EclipseRT Target Platform Components category or by typing its name in the filter area above the content.
Figure 3-4 Galileo software site content
• To add the RCP SDK, you have to uncheck the Group by Category box under the content area and then type RCP in the filter area. Select Eclipse RCP SDK.
• Important! You must uncheck the “Include required software” box at the bottom left of the wizard. Failure to do this will result in a bloated target that may not work for the Toast scenario.
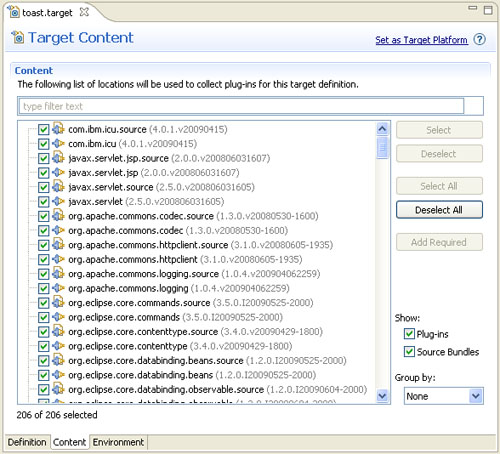
After you click Finish, PDE resolves the target. This may take some time as the content is downloaded from the software site. Once the resolution is complete, take a look at the Content page of the target editor. You should see something similar to the editor shown in Figure 3-5. Notice that we have left the addition of the testing-related bundles as a further exercise for the reader. Basically you add a directory to the target definition and target and then collect the bundles and features you want. Once the target definition is completed, save the file and click Set as Target Platform at the top right.
Figure 3-5 Toast target content
3.6 Learning by Example
One of the most efficient and effective ways of figuring out how to program a system is by browsing examples. We can’t emphasize this enough. It can be overwhelming, but there are various shortcuts and mechanisms you can use to help follow the code. Here is a short list of the workspace navigation operations we use on a day-to-day basis:
Navigate > Open Type... (Ctrl+Shift+T)—Opens the Java type with the name you enter. Wildcards and case-sensitive acronyms, CamelCasing, are supported. Use this to discover where a type is or if it exists.
Navigate > Open Resource... (Ctrl+Shift+R)—Opens a resource with the name you enter. Wildcards and case-sensitive acronyms, CamelCasing, are supported. Use this to discover resources and their location.
Open Plug-in Artifact (Ctrl+Shift+A)—Opens the artifact that defines the plug-in or bundle element that you enter. For example, enter the ID of an extension and the plugin.xml defining the extension is opened.
Ctrl-3—Presents a condensed list of commands, views, preferences, and other facilities. Simply type some words related to what you need and the list is filtered. For example, typing targ finds the target preference page.
Navigate > Quick Type Hierarchy (Ctrl+T)—Pops up a type hierarchy rooted by the type associated with the selection in the current Java editor. For example, if the selection is on a type, a normal type hierarchy is opened. If the selection is on or in a method, all implementers of that method in the hierarchy are shown. Press Ctrl+T again to invert the hierarchy.
Search > References > Workspace (Ctrl+Shift+G)—Searches for references to the selected Java element (e.g., type, method, field) in the Java editor. Ctrl+Shift+U does the same search but local to the file.
Navigate > Open Declaration (F3)—Opens the declaration of the Java element selected in the current Java editor.
OSGi systems are quite decoupled. That’s the whole point! This can, however, make it hard to figure out how various pieces interact. PDE offers various tools and mechanisms for navigating these interconnections. The Plug-in Development perspective (Window > Open Perspective > Other... > Plug-in Development) includes a Plug-ins view. From this you can easily navigate the dependencies and references. From the PDE plug-in editor you can discover the extension-to-extension-point interconnections, navigate to the classes defined in various extensions, and browse extension point documentation.
Adding Types to Java Search
In the Plug-ins view, select all plug-ins and use the Add to Java Search context menu entry or the ![]() view toolbar button to add all known plug-ins to the Java search scope. This is helpful because Java search looks only in projects in the workspace and their dependent projects. This means that if you open an empty workspace and try to open a type, say, using Ctrl+Shift+T, the type selection dialog will be empty. By adding all plug-ins in your target platform to the search, you can more easily navigate example code and classes that you do not reference from your projects.
view toolbar button to add all known plug-ins to the Java search scope. This is helpful because Java search looks only in projects in the workspace and their dependent projects. This means that if you open an empty workspace and try to open a type, say, using Ctrl+Shift+T, the type selection dialog will be empty. By adding all plug-ins in your target platform to the search, you can more easily navigate example code and classes that you do not reference from your projects.
3.7 Summary
Once set up, Eclipse and PDE make it easy to create and run OSGi systems. The setup detailed here is robust in that you can use the IDE to work on many different workspaces, the target platform can be updated independently of the IDE or the workspaces, and the IDE itself can be updated without affecting the workspaces or the target platform.
By adding Samples Manager support, you can jump to any chapter and set up your workspace in seconds. You can also validate the tutorial steps as you go and get quick summaries of all the changes done so far and those left to do.