
Chapter 8. Testing
Despite the best efforts of software engineers, defects occur in even the most carefully crafted applications. And so an entire subset of the software industry has arisen from the need for testing. Books, courses, tools, frameworks, even large teams of seasoned software professionals have been dedicated to the craft of software testing.
Toast needs testing, too. Until now in the development of Toast, we have not paid much attention to testing. We have been careful to make sure that it is possible to test Toast, but we have written no test cases.
Many software developers embrace the notion of writing test cases first (or at least early). While we count ourselves among them, it’s worth noting that we have chosen to take a tutorial-based approach to building Toast as opposed to a test-driven approach. This is because while taking a test-driven approach is a good development practice, it is not necessarily the best way to learn or teach. Now that you have a basic understanding of creating OSGi-based systems, we can cover the elements of OSGi development that relate to testing. In particular, we cover
• General issues around testing Toast that can be applied to OSGi-based applications in general
• The principles and practices around making bundles and systems testable
• Implementing a unit test for one piece of Toast domain logic using the JUnit and EasyMock frameworks
• System-wide testing of Toast as an OSGi-based system
8.1 Making Toast Testable
Before we launch into implementing automated tests for Toast, let’s review some of the practices we have introduced in Toast that enable us to create clean test cases. These points relate to all kinds of software development.
POJOs—The most important practice to make sure your code is testable is to write your domain logic as pure POJOs. Allowing OSGi-specific dependencies into your domain logic makes writing and running simple JUnit tests significantly more difficult.
Dependency injection—In an effort to decouple and allow elements to be reused, we have been using setter-based dependency injection. This allows us to provide alternative implementations and, as we will see, mock objects with relative ease.
Clear APIs—APIs support black-box testing. When your domain logic is defined by an API, it’s clear exactly what needs to be tested. Similarly, if your domain logic references other facilities only by their APIs, it makes it clear what needs to be mocked up as part of the test harness.
8.2 Unit-Testing Toast
Before we take on writing a system-wide test for all of Toast, let’s start by writing a unit test for the EmergencyMonitor. We’ll take a black-box approach, injecting the airbag and GPS that it needs and verifying that it invokes the APIs of its required services properly.
Our testing will use JUnit and EasyMock, both of which conveniently reside in the target platform. We’ll show only enough of these two frameworks as is necessary to get the tests running.
The tests should also abide by the best practices of test-driven development. Specifically, the tests should run quickly with no unnecessary delays. Also, the tests should not rely on any human interaction either in setting up the test or in verifying that the test passed.
8.2.1 Test Strategy
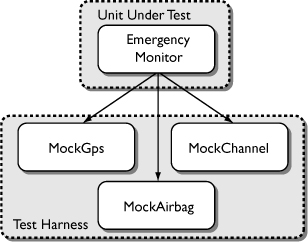
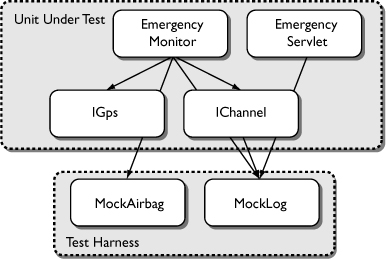
Since the EmergencyMonitor is the unit under test, we’ll need to mock up all the services with which it interacts. With a mock airbag, a mock GPS, and a mock channel in place, we can simulate an airbag deployment. We’ll expect the EmergencyMonitor to gather the location information from the mock GPS and then to invoke the send API on the mock channel.
We refer to the mock objects collectively as the test harness. Figure 8-1 shows the EmergencyMonitor with the three mock objects comprising the test harness.
Figure 8-1 EmergencyMonitor with the test harness
8.2.2 Writing the Test Case
It makes sense to put the test code in a separate project from the emergency monitor code that it tests. But notice that the EmergencyMonitor class itself is not visible to other projects. We can solve this dilemma by using a fragment bundle.
Follow these steps to create the fragment project that will contain the new test:
• Select File > New > Project. Then expand Plug-in Development and select Fragment Project to create a fragment project called org.equinoxosgi.toast.client.emergency.test.
• On the last page of the wizard, select org.equinoxosgi.toast.client.emergency as the Host Plug-in, and select J2SE 1.5 as the execution environment. EasyMock requires Java 1.5.
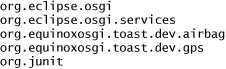
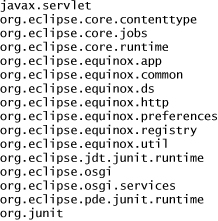
• Open the manifest editor on the fragment bundle and turn to the Dependencies tab. Add the following bundles to the Automated Management of Dependencies section:
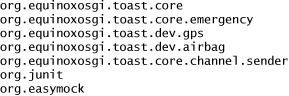
The five Toast bundles provide access to the application code, and the other two bundles provide access to the JUnit and EasyMock testing frameworks.
Next, create the test case class:
• Create an EmergencyMonitorTestCase class in a package called org.equinoxosgi.toast.client.emergency.test with junit.framework.TestCase as its superclass. Use the following snippet to complete the class:
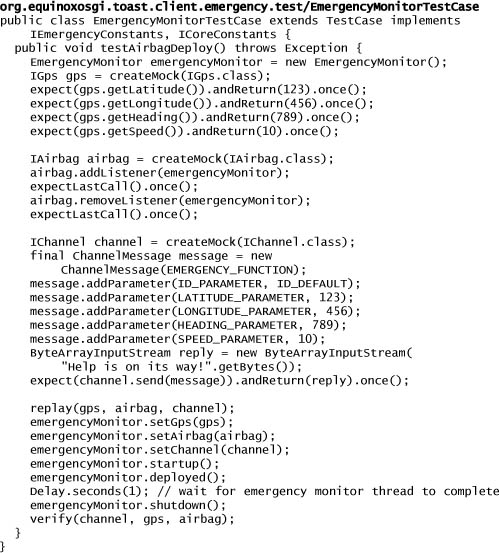
The test creates an EmergencyMonitor and then mocks up a GPS, airbag, and channel using EasyMock. The first three sections of the testAirbagDeploy method set the expectations for the test. This consists of telling each mock object how many API invocations to expect as well as what values to return.
The final section is where the actual testing takes place. The call to replay sets the stage by telling the mock objects that future calls are for real. Next it injects the mock objects into the EmergencyMonitor and triggers its deployed method to simulate an airbag deploy. Along the way, EasyMock compares the results against the original expectations, catching any discrepancies that occur. Finally, the verify call makes sure that all the expectations of the mock objects were met. Any exceptions or unmet expectations that occur cause the test case to fail.
Notice the one-second delay before the test case shuts down the EmergencyMonitor. This delay is necessary because the EmergencyMonitor performs its processing in a separate thread from the thread on which deployed is called. Without a delay, there is a chance that the test case would call shutdown before the emergency processing completed in the other thread. In general, using a delay in a test case is discouraged, since it can lead to situations where the test case may pass on a fast machine and fail on a slower machine. Exercise extreme caution when using a delay in this fashion.
8.2.3 Running the Unit Test
With the EmergencyMonitorTestCase written, it’s easy to run:
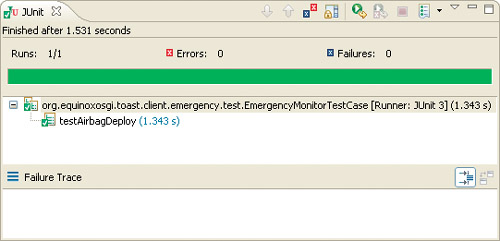
• From the context menu on the test case class, select Run As > JUnit Test, and the results will be shown in the JUnit view. The view should show a green solid bar with zero failures, as seen in Figure 8-2, indicating that the test case passed.
Figure 8-2 Successful test run in the JUnit view
8.3 System-Testing Toast
If the advantage of unit testing is that it can test POJOs outside of OSGi, the advantage of system testing is that it does just the opposite. In other words, unit tests focus on small units of the application functionality, but system tests put the entire application through its paces with all the components in place.
8.3.1 Test Strategy
The strategy in system testing is the opposite of the unit-testing strategy. In this case, to test as much of the application as possible implies mocking up as little of the application as possible.
To get an idea of how the system test should work, think about how we’ve been testing the application in prior chapters. We started with a fake airbag that deployed on its own every five seconds. Then we added some logging to the channel implementation and to the back end so we could verify that the application had reacted correctly by looking at the console.
We can make an automated system test that operates in much the same way but with two changes. First, instead of an airbag that deploys itself, we’ll build our own mock airbag that deploys when commanded by the test case. Similarly, instead of reading the logged messages on the console with our eyes, we’ll create a mock LogService that allows the test case to verify that what was logged matches its expectations. Figure 8-3 shows the system being tested along with the test harness.
Figure 8-3 The system test harness
Furthermore, to take advantage of the fact that our test system will be running as a bundle, we’ll programmatically stop and restart the GPS bundle to verify that the application responds correctly.
8.3.2 Creating the Test Harness
The test harness consists of the mock airbag and the mock Log Service. These need to be provided as services to the rest of the application, so we also need a DS component to provide each of those. To contain all of this, create the system test bundle with the proper dependencies:
• Create a new project for the bundle named org.equinoxosgi.toast.system.test.
• In the manifest editor, add the following bundles to the Automated Management of Dependencies list:
• Save the contents of the editor.
Next, let’s create the mock airbag. It needs to implement the IAirbag interface plus one additional public method, deploy, to allow the test case to trigger an airbag deployment.
• Create a class called MockAirbag in a package called org.equinoxosgi.toast.system.test. Use the following snippet to complete the class:
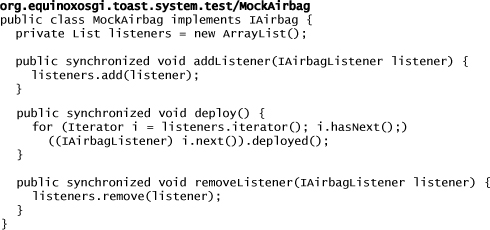
Since we want the rest of the system to use the mock airbag, we need to declare it as a component:
• Create a new service component in OSGI-INF.
• Since we plan to declare more than one component in this bundle, name it airbag.xml.
• Use MockAirbag as the implementation class.
• Add IAirbag as a provided service.
Now let’s create a mock LogService. Chapter 17, “Logging,” talks in detail about the OSGi LogService. Here all we need to know is that we have to implement the LogService interface and a public method that allows the test case to verify that an expected message has been logged.
The LogUtility class is designed to work with or without a LogService. So far we’ve been running without any LogService, so the LogUtility writes application messages to the console. If we include a mock LogService as part of the system test, the LogUtility will write any application messages to this mock LogService. And since the mock LogService is part of the test harness, the test case can verify that the application logs the messages that the test case expects.
• Create a class called MockLog in the existing org.equinoxosgi.toast.system.test package. Use the following snippet to complete the class:
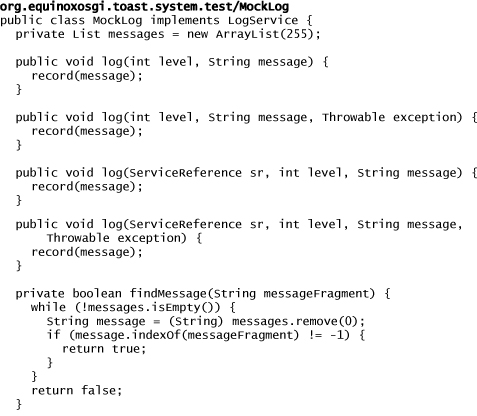
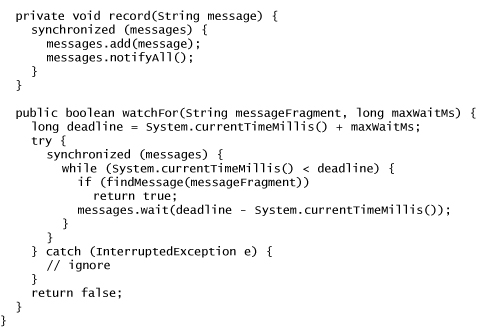
The MockLog stores every message that gets logged. It provides the watchFor method so the test case can easily verify that an expected message has been logged. To make it convenient, it allows the test case to match against just a fragment of the message that was logged. It also provides a maximum wait time so the test can fail if the expected message is not logged within that time window.
We now need to declare the mock log as a component just as we did for the mock airbag:
• Create another component for this bundle in OSGI-INF/log.xml. Use MockLog as the implementation class, and add LogService as a provided service.
8.3.3 Writing the Test Case
With the test harness in place, we move on to writing the test case. Unlike other JUnit test cases, the system test case need not concern itself with starting up the system or even the mock objects. Instead, everything is running as components under DS, so we really only need to think about the test case itself.
The test case needs access to three things. First, it needs the MockAirbag so it can command it to be deployed. Second, it needs the BundleContext so it can locate and stop the GPS bundle as part of its test. Finally, it needs the MockLog so it can verify that the system responded as expected.
To obtain these three objects, the test case must also be a component under DS. It can obtain the bundle context in its startup method and can obtain the mock objects in setAirbag and setLog via the familiar DS dependency injection mechanism.
• Create a class called SystemTestCase in the org.equinoxosgi.toast.system.test package with the class TestCase as its superclass. Use the following snippet to complete the class:
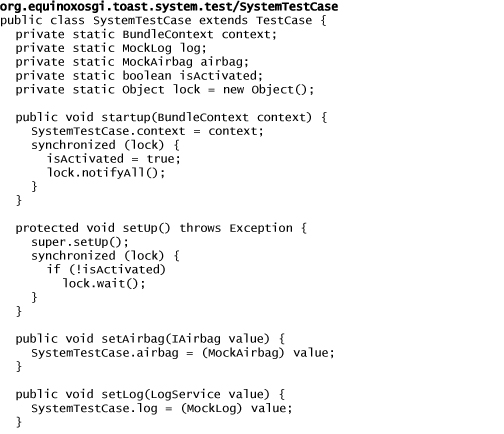
If you take a close look at this code, you may notice some deviations from the typical pattern. The first clue that something is different is that the fields are all declared as static. Also notice the synchronized blocks in startup and setUp. The reasoning for this is a bit tricky.
In essence, our system test uses two competing programming models, OSGi service and Equinox extensions. The PDE JUnit test infrastructure uses Equinox extensions. It instantiates the test case and invokes setUp before invoking testEmergency. But this instance has no way of obtaining the BundleContext, MockAirbag, or MockLog.
Meanwhile, DS has its own way of starting things up. It instantiates a separate instance of the test case as a component and calls setAirbag, setLog, and startup. So while this instance does have access to the BundleContext, MockAirbag, and MockLog, it is never used to actually run any tests.
To solve this dueling instance problem, DS’s test case instance stashes the BundleContext, MockAirbag, and MockLog in static fields while JUnit’s test case instance obtains them from these same static fields.
But this gives us a synchronization problem. If JUnit’s test case tries to access the static fields before DS’s instance sets them, the test will fail. So we use the two synchronized blocks in setUp to make JUnit’s test case instance wait until DS’s test case instance has a chance to set the static fields.
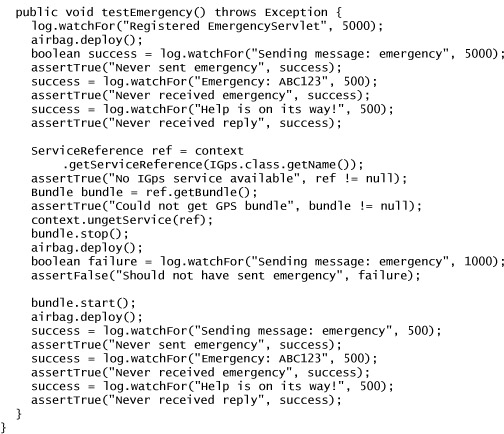
The actual system test resides in the testEmergency method. After waiting for the back end to come up, it deploys the MockAirbag and verifies that the rest of the system responds as expected by watching for specific messages to be logged. It then locates and stops the bundle containing the GPS service. Again, it deploys the airbag, but this time it expects that no messages are logged, since the emergency monitor will have shut down without a GPS. Finally, the GPS bundle is started again and the airbag deployed for a third time. The test verifies that the system correctly logs the emergency.
The last thing we need to do is to declare the test case as a component:
• Create another new component for this bundle in OSGI-INF/test.xml. Use SystemTestCase as the implementation class.
• Use startup as the activate method.
• Add a referenced service called airbag with IAirbag as its interface and setAirbag as its bind method.
• Add a referenced service called log with LogService as its interface and setLog as its bind method.
8.3.4 Running the System Test
With the test and harness code complete, we can turn our attention toward running the test. Running a system test is quite different from running a unit test where the POJO is in isolation. In the case of the system test, we need the entire OSGi platform running along with all the required bundles. So before we can run the system test suite, we need to create a launch configuration.
Follow these steps to create the system test launch configuration:
• Open the Run Configurations dialog and create a plug-in test configuration using Run > Run Configurations... and selecting JUnit Plug-in Test.
• On the Test tab, give it a name, say, Toast System Tests, check the Run all tests in the selected project, package or source folder option, and select the org.equinoxosgi.toast.system.test project.
• Flip to the Arguments tab and enter the following VM Arguments:
![]()
• On the Plug-ins tab, select plug-ins selected below only for the Launch with option.
• Then select the following eight Workspace bundles:
• And select the following 16 Target Platform bundles:
• Ensure that the Default Auto-Start option is set to true on the Plug-ins tab and the Auto-Start entry for the org.equinoxosgi.toast.dev.airbag bundle is set to false. The test uses a mock airbag implementation, so the standard airbag implementation is not needed. We still need the bundle, however, because it supplies the IAirbag interface.
• On the Common tab, select the Shared file option and use /org.equinoxosgi.toast.system.test as the folder.
Now that the launch configuration is complete, press the Run button in the Run Configuration dialog. The JUnit view appears, and when the test is completed, a solid green bar indicates that no failures occurred.
8.4 Summary
In this chapter we finally got around to writing some tests for Toast. We presented two mechanisms for testing: unit testing and system testing. Both are vitally important to the quality of the overall application.
The tests in this chapter are certainly far from comprehensive. Many aspects of Toast are not covered. The goal of the chapter was to demonstrate the steps to making both unit and system tests run. Fleshing out test cases to cover the remaining functionality of Toast as well as the additional functionality presented in the rest of the tutorial is left as an exercise for the reader.