
Chapter 11. Extensible User Interface
If a picture is worth a thousand words, then Toast is long overdue for something more visually interesting than just logging to the console. Toast’s functionality has continued to grow with each chapter, but now it’s high time to get down to the business of creating a user interface.
User interfaces come in a wide variety, from desktop-style widgets to a dashboard of simple indicator lights. While these two extremes are certainly possible, this chapter walks you through the creation of a bitmap-based graphical user interface—the kind of thing that makes sense on an in-vehicle telematics platform like Toast. During this walk-through we show you the following:
• A pluggable SWT-based user interface framework and a set of handy bitmap-based widgets
• The refactoring of the domain layer to better accommodate a user interface
• Various application screens that control vehicle climate, audio, emergency, mapping, and guidance facilities
• The use of an embedded browser to integrate with Google Earth and JavaScript for mapping and guidance functionality
• The OSGi and Equinox application models and how to set up and run an Equinox-based system with a UI
11.1 Crust
Crust is a user interface framework that provides a pluggable application shell, some graphical widgets, and some other useful utilities for running Crust-based applications. We won’t delve into too many details of the inner workings of Crust, but we will take a closer look at how Toast’s user interface sits atop this framework.
Let’s begin the tour by loading the Crust framework into the workspace:
• Use the Samples Manager as described in Section 3.4.2, “Comparing,” to load the following projects:
11.1.1 Crust Shell
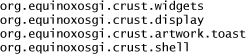
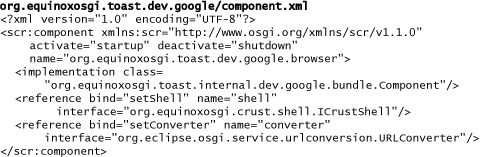
If you’ve been paying attention, you’ve learned that a great way to familiarize yourself with a new bundle is to look at its component.xml. So take a look at the component.xml in the org.equinoxosgi.toast.crust.shell project. You can see that the shell requires one service, ICrustDisplay, and provides one service, ICrustShell.
Since Toast’s user interface plugs into this framework, let’s take a look at ICrustShell. The most important APIs, installScreen and uninstallScreen, are shown in the following snippet. They allow different screens to install and remove their icons from the shell.
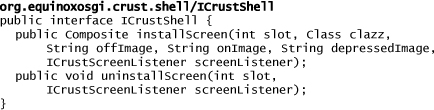
Figure 11-1 shows the top portion of the Crust shell with various application icons installed.
Figure 11-1 The Crust shell with Toast icons
![]()
The org.equinoxosgi.crust.display project is used internally by the CrustShell. We’ll cover this in more detail in Section 11.4, “The OSGi Application Model.”
Finally, the org.equinoxosgi.crust.artwork.toast project is a fragment whose host is org.equinoxosgi.crust.shell. This fragment provides two images needed by CrustShell for the window background and for the pop-up background. All the other artwork in Toast resides in Toast projects.
11.1.2 Crust Widgets
The Crust framework also provides a set of SWT widgets for use in bitmap-based user interfaces like Toast’s. The org.equinoxosgi.crust.widgets project contains the three widget classes ImageButton, ImageProgressBar, and ImageSlider. Figure 11-2 shows a sample of each of these widgets as they appear in the Toast user interface.
Figure 11-2 Crust widgets ImageButton, ImageProgressBar, and ImageSlider

11.2 Emergency
With the Crust framework installed, we’re ready to turn our attention to putting a user interface on the emergency scenario. When the airbag deploys, the EmergencyMonitor communicates with the back end. The UI should display any response messages that may come back. It should also provide the user with a way to make an emergency call to the service center manually, without the airbag deploying.
11.2.1 Making the User Interface Pluggable
Before we implement the user interface, we need to think about how the emergency user interface bundle will fit into Toast’s architecture. Figure 11-3 shows how the emergency user interface bundle plugs into the Toast bundle ecosystem.
Figure 11-3 Emergency user interface
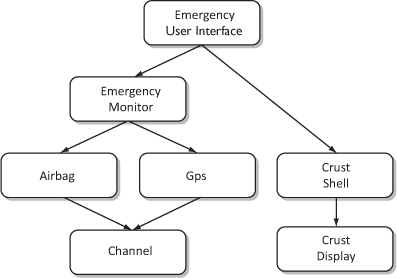
It is important that the user interface depends on the domain logic and not vice versa. Adopting this approach makes the user interface pluggable in two ways. First, it enables us to run Toast with a variety of possible user interfaces or none at all. We can simply plug any user interface on top of the EmergencyMonitor and the CrustShell. Second, it means that the user interface can be divided up by scenario, with each piece of user interface functionality being independent of the others. This will come in very handy when we get to Chapter 14, “System Deployment with p2.”
11.2.2 Refactoring the Emergency Domain Logic
The emergency user interface depends on the EmergencyMonitor, but the EmergencyMonitor does not yet implement any service, so we’ll need to add one. The service needs to provide APIs for the two situations mentioned earlier: listening for relevant events from the EmergencyMonitor and manually causing an emergency message send without the airbag deploying.
Modifying a component to provide a service is a common development scenario, so it’s worthwhile to review the changes in detail. Rather than stepping you through making the changes yourself, we’ll take a guided tour of the refactoring. Start by loading the modified EmergencyMonitor into your workspace:
• Use the Samples Manager to load the org.equinoxosgi.toast.client.emergency project.
First, notice in the component.xml that the component now provides a new service called IEmergencyMonitor. Open this new interface and take a look at the service API:

You can see that it uses the Observer Pattern to allow the user interface, or any other interested party, to add itself to and remove itself from the service’s listeners. Then look at IEmergencyMonitorListener, shown here:

This interface defines the three methods used to notify listeners as interesting events transpire during an emergency session. We won’t show it here, but take a few minutes to use the Samples Manager and compare the current EmergencyMonitor to the same class in “Chapter 10 Pluggable Services.” Notice how the domain logic has changed to implement the new service. The changes consist mostly of a handful of methods for notifying the listeners at various points during the session.
Finally, the manifest also changed. On the Runtime tab of the manifest editor, notice that the bundle now exports the API package that contains the service interface and the listener interface.
11.2.3 The Emergency User Interface
The emergency user interface is contained in a single bundle. Again, here we tour the code since the actual UI code is not central to our OSGi theme.
• Use the Samples Manager to load the org.equinoxosgi.toast.swt.emergency project.
Reviewing the component.xml, you’ll discover that the component requires two services, IEmergencyMonitor and ICrustShell, and is implemented by the EmergencyScreen class.
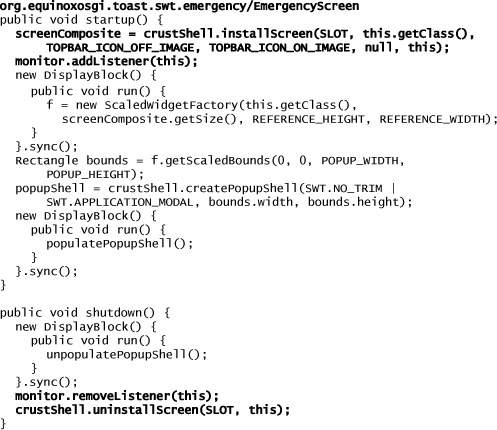
As shown in the snippet that follows, EmergencyScreen’s startup method registers with the shell by calling installScreen. The first argument is a slot index to determine where the screen’s icon is to appear on the shell’s icon bar. The second argument is the EmergencyScreen class, which is used to acquire the image files from this bundle. The next three arguments are relative paths to images for the up, down, and depressed states of the icon. The final argument is the EmergencyScreen itself, used for notifications from the shell. The startup method also registers as a listener to the IEmergencyMonitor service, so it can receive notifications as the emergency session transpires. The shutdown method unregisters from both the ICrustShell and the IEmergencyMonitor services.
11.2.4 Running the User Interface
Before we run Toast with the emergency user interface, we need to modify the client.product. Follow these steps to make the necessary changes:
• Use Ctrl-Shift-R to open the client.product file.
• On the Overview tab in the Application field, select org.equinoxosgi.crust.display.CrustApplication. We’ll talk about the application support in Section 11.4, “The OSGi Application Model.”
• On the Dependencies tab, add SWT, the application support, Crust, and the Toast UI to the product. The required bundles are listed here. If you’re not running on Windows, you’ll need to replace the Windows SWT fragment with the appropriate one for your platform.
• On the Launching tab, remove eclipse.ignoreApp and osgi.noShutdown from the VM Arguments for All Platforms.
• Before you run the client, first bring up the backend.product and click the run button in the top right corner of the editor. Then do the same for the client.product.
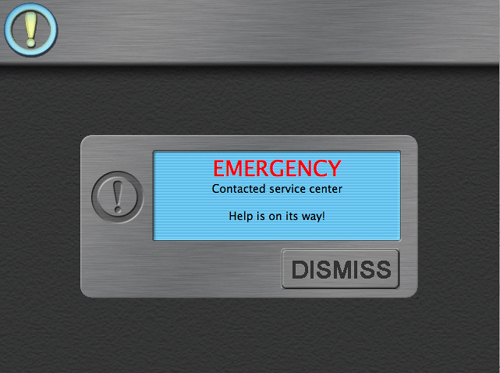
The Toast user interface appears with the emergency icon in the top left corner. Try clicking that button. A pop-up dialog asking for confirmation appears. After confirmation, another dialog appears showing the back end’s response. Figure 11-4 shows the final dialog.
Figure 11-4 The emergency user interface
Try using the airbag simulator we added in Chapter 10, “Pluggable Services,” by pointing your web browser at http://localhost:8081/client/devices and deploying the airbag. Then close the user interface to shut down the client. Leave the back end running, since we’ll need it again later on.
11.3 Climate and Audio
Let’s bring in two more screens to the user interface—one to control the vehicle’s climate and another to control the audio system. Both of these are made up of two layers, a device layer and a user interface layer. Interestingly, these illustrate a case where there is no need for a domain logic layer, since the device layer provides a rich enough API to allow the user interface to sit directly on top.
11.3.1 Climate and Audio Devices
The richness of the device API is captured in a set of bundles representing the individual devices and fake implementations of each device.
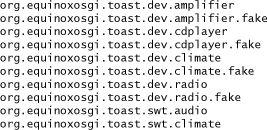
• Use the Samples Manager to load the following projects into your workspace:

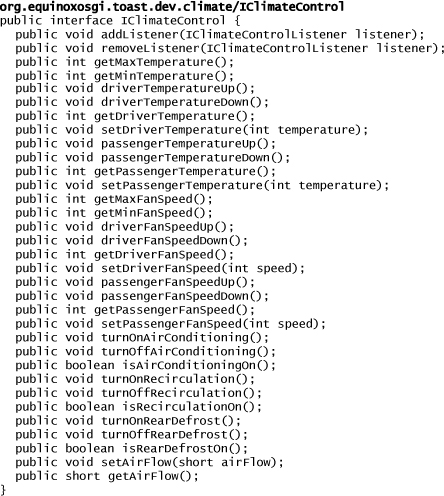
Let’s start with a quick look at the climate device. The first thing to notice is that we have chosen to separate interface from implementation. The org.equinoxosgi.toast.dev.climate bundle contains just the service interface, whereas the org.equinoxosgi.toast.dev.climate.fake bundle contains a fake implementation of that interface. We fully expect there to be many different device drivers, so this will pay off in the end.
As shown in the following snippet, the IClimateControl interface provides various APIs for controlling the climate device as well as the now-familiar Observer Pattern APIs to register and unregister as a listener:
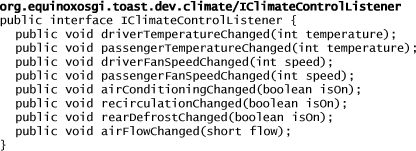
The IClimateControlListener interface defines the contract by which listeners are notified of changes on the device. It is shown in the following snippet:
The FakeClimateControl implementation does just enough to be able to store the device’s state and notify listeners of state changes. The details are not important here, so the source code is not shown.
The audio system consists of three devices: an amplifier, a CD player, and a radio. All of these devices follow the identical pattern as the climate device, with separate bundles for interface and implementation, interface APIs for control and observation, and a minimal fake implementation.
11.3.2 Climate and Audio Screens
With the device layer in place, let’s look at the user interface for the climate and audio:
• Use the Samples Manager to load the two required UI bundles into your workspace:
org.equinoxosgi.toast.swt.audio
org.equinoxosgi.toast.swt.climate
These bundles follow the same pattern as the emergency user interface. The climate bundle requires the IClimateControl service and the ICrustShell service. Similarly, the audio bundle requires the IAmplifier, ICdPlayer, and IRadio services as well as the ICrustShell service. Each bundle listens to its required device services and plugs its UI screen into the CrustShell.
11.3.3 Running the User Interface
Let’s run Toast again with the new screens and devices. Follow these steps to make the necessary changes to the product definition:
• On the Dependencies tab of the client.product, add the following bundles to the list:
• Now click the run button in the top right corner.
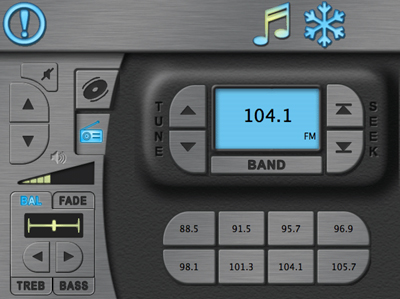
Toast now includes icons for audio and climate on the icon bar, as shown in Figure 11-5. Click around on the new screens. The figure shows the audio screen.
Figure 11-5 The audio user interface
11.4 The OSGi Application Model
In Section 11.2.4, “Running the User Interface,” we updated the client product to identify the CrustApplication. Many OSGi-based systems have no top and no bottom and no main method. Rather they are a community of collaborating bundles. There are, however, circumstances where you want to create and manage particular tasks or function sets. In OSGi we talk about these sets as applications.
The OSGi Mobile Expert Group (MEG) specification includes an application management setup whereby applications register themselves as ApplicationDescriptors. An application container can then discover these applications and can launch, lock, or schedule them. Launching an ApplicationDescriptor also gives you a chance to capture and process command-line arguments—in effect, this is the standard main method entry point. Running applications are represented by ApplicationHandles that allow for the inspection and control of the application.
The original driver for this facility was mobile phone scenarios. Mobile devices typically have many applications installed but only a few running at any given time. They also have some sort of UI that shows the user the available applications and allows them to start and stop them. This sounds perfect for Toast and Crust.
Equinox includes an implementation of this specification in the org.eclipse.equinox.app bundle. This provides an application container and some additions to the application model. Here we touch on the detail but focus mainly on how to hook into this capability.
The Equinox application model allows you to control how and where the application runs. For example, for Toast to run on the Mac, it is important that the UI run on the Main thread created by the JVM. Without this the UI would paint but all events would be lost. This is a quirk of the Mac but must be accommodated. The model also allows for giving exclusive control to an application and controlling the number of applications that can be launched.
To see how this works, open the plugin.xml file in org.equinoxosgi.crust.display and flip to the plugin.xml tab to see the markup shown here:
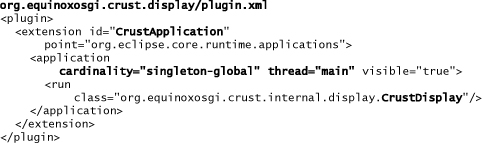
Here we use an Equinox extension to declare the Crust application. Extensions are detailed in Chapter 16, “Extensions.” The key parts of the markup are highlighted. First is the id, CrustApplication. This is based on the value you entered in the product definition. It identifies the application itself.
The cardinality and thread attributes of the application tag indicate that there can be only one CrustApplication running at any time and that it should run in the main thread created by the JVM.
Finally, the class attribute in the run element identifies the class that implements the application. In the Equinox model, this class must implement IApplication, shown here:

For UI applications there must be some thread that sits listening for and processing UI events. Further, to address the main-thread issue on the Mac, that UI thread must be the main JVM thread. Setting thread="main" in the application declaration gets the application on the right thread, so we just have to ensure that the application does the UI processing. The application class is shown in the following snippet. The code is a little daunting but is largely generic, so we’ll just highlight the key parts.
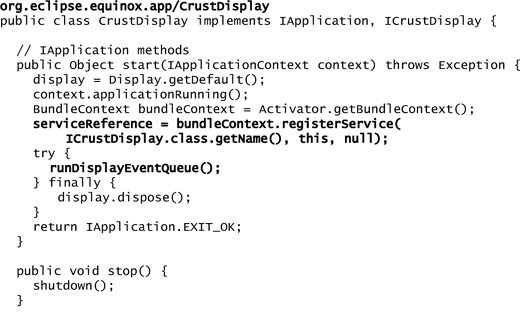
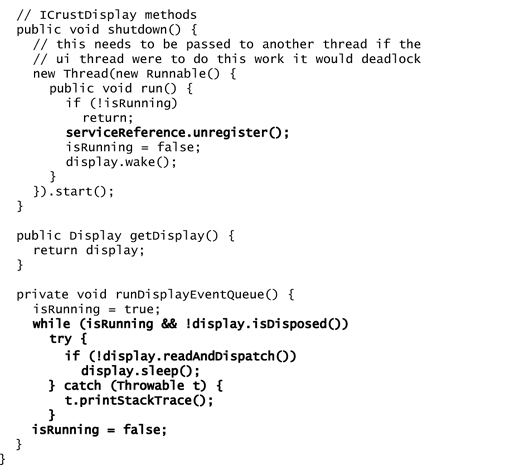
The main entry point for the application is the start method; it’s given an application context from which the command-line arguments and various properties can be retrieved. In the Crust case we need to register the CrustDisplay as a service and then run the UI’s read-eval loop. When the application is stopped, either by closing the last window or by stopping the framework, the display service must be unregistered.
Notice in the code that there are a number of threading issues. In particular, unregistering the display service will cause all of the contributed UI parts to be stopped—one of their required services will disappear. In their cleanup code they will likely want to use the display service to free resources and so forth. Since this cleanup is done synchronously with the unregisterService call, and all UI manipulation must be done on the UI thread, we must ensure that deregistration is not done on the UI thread—otherwise deadlock would occur.
Despite its apparent complexity, CrustDisplay is relatively simple. It is the core of any UI application but really needs to be written only once and then can be reused wherever needed.
11.5 Navigation and Mapping
While OSGi itself is predominantly a Java technology, it can integrate tightly with the underlying platform and systems done in other languages. To illustrate this, we will add navigation and guidance support to Toast using Google Earth facilities. You will have seen this sort of functionality in modern cars and handheld GPS devices. The device displays a map, your location, points of interest, and the like and provides routing information for getting from point to point.
11.5.1 Google Earth Integration
Google Earth is a system that uses Google’s map facilities combined with satellite imagery and 3D modeling techniques to present a pseudo-realistic view of the environment. It comes as both a stand-alone application and a web browser plug-in. We will use the latter and embed a browser in a new Toast mapping screen. As with the other UI screens, here we tour the code:
• Use the Samples Manager to load the following projects into your workspace:

The interesting parts of this are in the device- and SWT-related bundles. Let’s start with org.equinoxosgi.toast.dev.google. This is the main interface to the Google Earth device. Again, an interesting spot to start looking is in the DS components. Here the bundle supplies two, component.xml and google.xml.
The first of these is responsible for setting up and maintaining a Browser service. Browser is an SWT class that interfaces Java to an underlying web browser such as Firefox or Safari. To create a Browser, we need an SWT Shell and a URLConverter:
The code for this component is in the Component class shown in simplified form in the next snippet. The startup method uses the discovered CrustShell to create a Browser. The browser is then initialized with some content that loads Google Earth, and finally it is registered as a service. The initialization requires two steps: First, the required web page is made available, and second, the page is loaded.
Notice the use of toFileURL. OSGi bundles typically ship as JARs. This particular bundle includes a file, index.html, that needs to be loaded directly by a browser. Since browsers do not generally understand JAR files, we have to do something to make index.html available in the normal file system. The Equinox URLConverter service does this for us. By calling toFileURL, we are saying, “Find the content at the given URL and ensure that it can be accessed via a file: URL.” If the input URL is already a file: URL, it is returned. Otherwise the content at the URL is read and stored in a cache. The net result is a URL that browsers understand. The last line of startup sets the browser’s content to this URL.
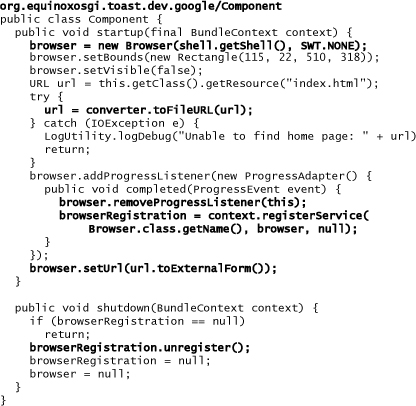
Simply setting the content in the browser does not mean that the browser is fully initialized and ready to use with Google Earth. Loading and processing all the content may take quite some time. Here we defer the registration of the Browser service until the page has completed loading. Note that we do not want to wait synchronously as that would block other unrelated components from activating.
On shutdown we are careful to unregister any Browser that we registered.
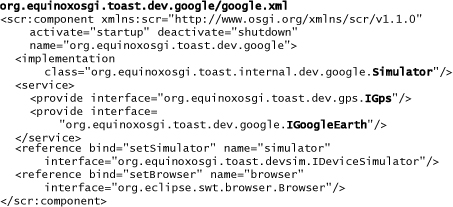
With Google Earth up and running in a browser, we can expose its functionality as a GPS, hook it into the device simulator, and expose a higher-level IGoogleEarth service for routing and viewpoint control. This is done in the component as shown here:
Most of this is quite conventional. The interesting part is the implementation of the two services, IGps and IGoogleEarth. The actual computation for these is done using JavaScript running in the browser. So here we have to call from Java to JavaScript both to effect changes and to get values. It turns out that this is quite straightforward using SWT’s Browser support. The following snippet shows the implementation of IGps.getSpeed and the routing device simulator’s driveRoute method:
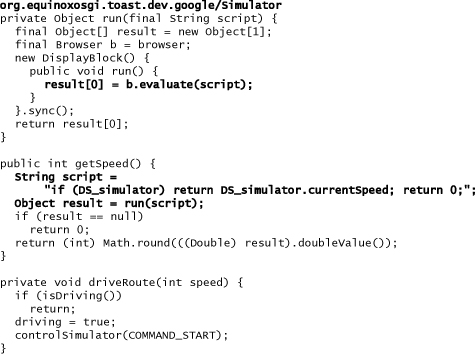
The main work of getSpeed is to create a little JavaScript code fragment that does the needed functionality and then run that code in the browser. Here the fragment accesses the Google driving simulator to get the speed of the vehicle. If the simulator has not been initialized, 0 is returned. The call to run eventually calls Browser.evaluate with that script and returns the result. The inner class blocks and indirection are needed because Browser calls must be done on the SWT UI thread. The implementation of driveRoute is very much the same, but the script is created and run in controlSimulator.
11.5.2 Mapping Support
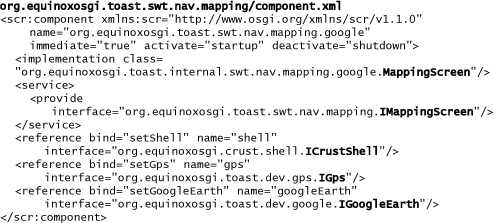
Introducing mapping support now is mostly a job of laying out the UI and hooking controls to the IGoogleEarth service. This is done in the org.equinoxosgi.toast.swt.nav.mapping bundle.
Starting with the component definition shown here, we see that we need the ICrustShell, IGps, and IGoogleEarth services and that we need to provide an IMappingScreen service:
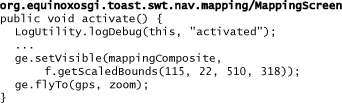
For the most part the implementation of this component is quite conventional. The screen is laid out. When activated, the Google Earth service is told to become visible within a particular bounding box, and the current location is set to the location reported by the GPS service. This is shown in the snippet of the component’s implementation class, MappingScreen:
11.5.3 Application Extensibility and Navigation Support
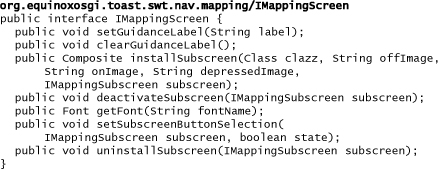
So far these applications have been plugging into the ICrustShell service and using one of the predefined slots on the top toolbar to expose their functionality. In the case of navigation support, routing from point to point, this is really a sub-function of the mapping facilities. In the previous section we did not look at why the mapping support exposed an IMappingScreen service.
The mapping screen is extensible and allows others to augment its appearance with new buttons and sub-screens in much the same way as the CrustShell. The extensibility API is shown in the following code snippet:
The rest of the guidance support is laying out the UI screen and ultimately interaction with Google’s route-planning support, IGoogleEarth.loadDirections, when the user selects a destination.
11.5.4 Running the User Interface
Running the Toast Client with Google-supported navigation and guidance is largely the same as the cases we’ve already seen. There are two important differences:
1. Prior to running you must install the Google Earth browser plug-in.
2. After the client starts, the mapping application takes some time to initialize Google Earth and the browser service.
With that in mind, do the following to set up and run the client with mapping and navigation support:
• Open the standard web browser on your platform—IE on Windows, Firefox on Linux, Safari on Mac—and access the following URL: http://earth-api-samples.googlecode.com/svn/trunk/demos/drive-simulator/index.html. This offers to install the required plug-ins if they are not already installed.
• On the Dependencies tab of the client.product, add the following bundles to the list:

• Run the product. Once it is up and the mapping button shows in the toolbar, click on it to get a UI that looks like Figure 11-6.
Figure 11-6 Google Earth–based mapping

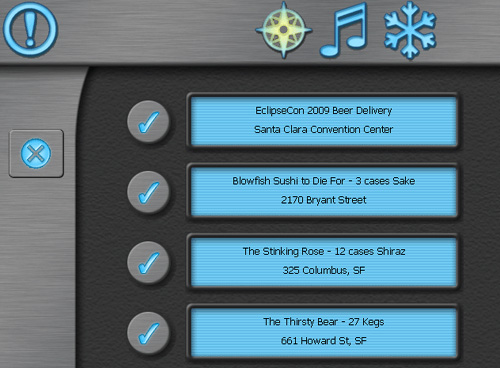
To access the guidance screen, click on the guidance button, in the bottom left of the screen, to get the screen shown in Figure 11-7. The method for inputting destinations is quite simplistic but not particularly material here. When you pick a destination, directions are loaded and the screen closes. The route is then plotted in the map.
Figure 11-7 Google Earth–based guidance
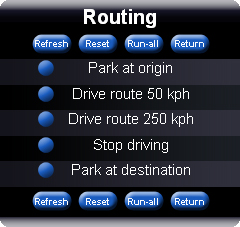
You can then tell the car to drive the course plotted using the routing device simulator. This is analogous to the simulator we saw in Chapter 10, “Pluggable Services,” and earlier in this chapter. Access the UI by opening a web browser on http://localhost:8081/client/devices and opening the routing simulator page shown in Figure 11-8.
Figure 11-8 Toast routing simulator
11.6 Summary
We covered a lot of ground in this tour of the Toast UI. First we saw Crust, the extensible base UI platform, and laid out the overall architecture. We then looked at the refactoring required to surface Toast’s emergency, climate, and audio functions in the UI.
Diving a little deeper, we investigated the OSGi and Equinox application models to see how coherent sets of bundles can be started, stopped, and run on particular threads. Circling back to add more applications, we saw how native UI controls like web browsers can be integrated to create a rich user experience. This drove us to talk about Google Earth integration and Java-to-JavaScript integration. Finally, we observed that notions of extensibility can surface at all levels of an application.
At the end of this chapter the Toast Client is complete. Future chapters tweak a bit here and there, but no substantially new functionality is added to the client—it is already pretty full-featured.