
Chapter 14. System Deployment with p2
One of the main goals of Toast is to be a highly modular base for building dynamic software solutions. By now the Toast Client includes a great deal of functionality, from entertainment to navigation and guidance. Running the client as a preconfigured collection of all available functions is convenient, but it still falls short of being a truly dynamic system.
In this chapter we use the provisioning and management facilities in Equinox p2 to create a system for managing Toast Clients from the Toast Back End. By the end of the chapter Toast will be able to dynamically create and install new vehicles, and users will be able to install and uninstall software on the vehicles using the UI portal on the back end.
This chapter covers the following major topics:
• An overview of p2 components and architecture
• Structuring of Toast for use with p2
• Integration with the p2 mechanisms
• Extending the web UI to manage Toast Clients from the back end
14.1 Introduction to Equinox p2
p2 is the provisioning system developed by the Equinox project at eclipse.org. It is a powerful replacement for the original Eclipse Update Manager included with the Eclipse Platform. While retaining much of the original functionality, p2 allows system designers greater flexibility in how they define, structure, and deploy their systems.
Fundamentally p2 is a provisioning platform; that is, it is not just one provisioning system but rather a collection of provisioning technologies on top of which you can build a fit-for-purpose provisioning solution. Of course, p2 comes with quite a number of preconfigured pieces to make the creation of your solution as straightforward as possible.
This section gives you a quick overview of the major elements of p2 and how they interact. You will use this background knowledge later in the chapter to structure Toast deployments and implement the Toast deployment mechanism.
14.1.1 Architecture
The centerpiece of the architecture is the agent. The agent is a notional concept—there is no actual agent object. Rather the agent is the logical entity that reasons about metadata to manage profiles by coordinating the downloading of artifacts from repositories and using an engine to manipulate the profiles. Figure 14-1 shows an overview of the agent, the large box in the middle, and how the various parts fit together.
Figure 14-1 Architecture of p2
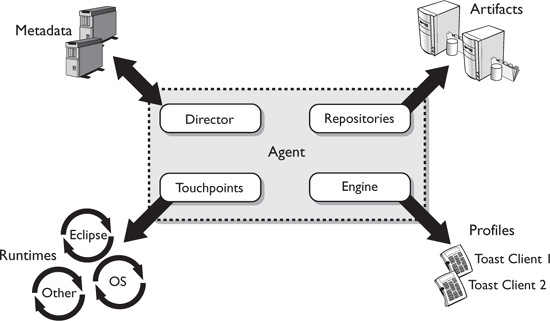
In the Toast context, the client is represented by a profile, a runnable configuration of software. The artifacts being installed and updated are mostly bundles, and the metadata being reasoned about is the dependency information extracted from the constituent bundle manifests and product configuration files. Runtimes include the OS, application servers, and, of course, OSGi frameworks such as Equinox.
The p2 architecture is quite loosely coupled, allowing the overall agent function to be split up and run separately. The metadata and artifact repositories are independent, the director and engine can be remote, profiles can be distributed, and so on. This allows for great flexibility in putting together provisioning solutions. This chapter shows you how p2 fits together and how the different parts interact to provision Toast.
14.1.2 p2 Metadata—Installable Units
One of the key characteristics of p2 is its separation of metadata from the artifacts being manipulated. Think of it as if the bundle manifests, the metadata, had been extracted from all the bundles, the artifacts, being provisioned. Managing these separately allows p2 to reason about vast numbers of artifacts without having to download any. It also allows for the addition of nonfunctional information, such as configuration information or license information, to the provisioning setup without modifying the artifacts themselves.
All metadata is captured in installable units (IUs). Figure 14-2 shows the structure of an IU. An IU has an ID and a version, the combination of which must be globally unique. IUs also have an open set of key/value properties used to capture information such as name and vendor.
Figure 14-2 The structure of an installable unit

The basis of the p2 dependency structure is an IU’s generic capability mechanism. IUs provide and require capabilities. A capability is simply an ID and a version number in a namespace. For example, a bundle that exports the org.equinoxosgi.toast.emergency package at version 1.0 is said to provide a capability with the ID org.equinoxosgi.toast.emergency and version 1.0 in the java.package namespace. Similarly, a bundle that imports that package is said to require the corresponding capability. IUs requiring capabilities can specify a version range. Since the set of namespaces is open, the p2 metadata structure can be used to represent all manner of relationships.
In addition to the dependency information, each IU has a number of related artifacts that are installed when the IU is installed and a set of actions that are executed when the IU goes through an install/configure/unconfigure/uninstall lifecycle.
14.1.3 Artifacts
p2 treats artifacts as opaque blobs of data and knows only about the metadata used to describe them. That being said, p2 is able to store the same artifact in multiple forms and do a number of interesting optimizations to reduce bandwidth and disk space requirements.
14.1.4 Repositories
All artifacts and metadata are stored in repositories in a p2 system. p2 specifies an API for repositories but not their internal representation. A repository may be on disk, in memory, structured using XML, in a database, or pretty much in any other form. For example, p2 includes repository definitions that integrate legacy Eclipse update sites unchanged. Metadata and artifact repositories are often colocated for convenience but need not be. p2 includes several tools for publishing to and mirroring repositories. For more information see the online Eclipse Help and the p2 wiki at http://wiki.eclipse.org/Equinox_p2_Repository_Mirroring.
14.1.5 Profiles
As mentioned before, p2 defines profiles to represent runnable configurations of software. Technically profiles are just descriptions of the system; that is, they list the IUs installed in them. During an actual install operation the relevant artifacts are fetched, installed, and configured into the system. On completion, the fact that the artifact has been installed is recorded in the profile. A p2 agent can manage many profiles representing many different systems.
14.1.6 Director
The director is the brains of the p2 operation. It is responsible for working with the metadata available in the known repositories, the profile being managed, and the provisioning request supplied to it to come up with a set of install, uninstall, and update operations. These operations are then passed to the p2 engine for execution.
14.1.7 Engine
The engine’s job is simply to execute a given set of install, uninstall, and update operations. The engine walks through a set of phases and executes the relevant part of each operation in each phase. For example, when an IU is installed, its related artifacts must first be fetched, then installed, and finally configured. The engine executes each phase for all involved IUs before proceeding to the next phase.
The engine is assisted in executing these phases by a set of touchpoints. A touchpoint is the interface between p2 and some runtime or configuration system. For example, when a bundle is installed into an Equinox system, its start level and auto-start state need to be configured. This is done by the Equinox touchpoint. If p2 were being used to install a web archive (WAR) or RPM, the relevant operations would be carried out by, say, a Tomcat or RPM touchpoint, respectively.
As long as the touchpoints support rollback, the engine offers a transactional way of modifying a system.
14.2 Refining the Toast Structure
Now that you have a basic overview of how p2 works, let’s relate that to Toast and refine its structure to tell p2 all it needs to know. As we have seen, Toast is made up of the back end and the client. Generally there is only one back end, but there may be many clients. Here we want to extend the back end and enable it to install and uninstall various units of functionality on clients that have almost no p2 awareness.
14.2.1 Defining Products Using Features
In the code base for Chapter 13, “Web Portal,” the client and back end products are essentially monolithic. They are defined in terms of discrete bundles, but there is no particular structure to enable the (re)configuration of the system.
One of the main problems is the number of bundles. Each product definition is simply a large list of bundles—more than 20 for the back end and more than 60 for the client! In this chapter we want to ship a bare-bones back end and client shell and incrementally add functionality such as navigation, climate control, and audio as required.
Pragmatically, each of these functions may consist of several bundles. Technically it is not a problem for p2 to manage large sets of bundles—it is simply difficult for humans to grasp. Any provisioning solution must hide this detail just as our natural tendency is to abstract out the detail. Here we create lists or groups of bundles that supply some functional element—audio, climate control, or emergency support.
The traditional grouping notion in Eclipse is the feature. A feature simply lists a set of bundles and other, nested, features—essentially a bill of materials for some coherent function. You then compose a running system by identifying the relevant set of features rather than laboriously listing the individual bundles. Want audio support? Add the audio feature.
So to move toward a dynamically configurable system, we need to break the Toast Client and Toast Back End into sets of features.
14.2.2 Back End Features
To get started on the restructuring, let’s change the back end product to be defined in terms of features using the following steps:
• Open backend.product and on the Overview page, change the product configuration to be based on features, as shown in Figure 14-3.
Figure 14-3 A feature-based product configuration
![]()
• Next, flip over to the Dependencies page and click on the new feature button at the top right to start the New Feature wizard shown in Figure 14-4. You can also create features using New > Project... > Plug-in Development > Feature Project. Enter org.equinoxosgi.toast.backend.feature for the project name. By default, the project name matches the feature ID just as with bundles.
Figure 14-4 Defining the Toast Back End feature
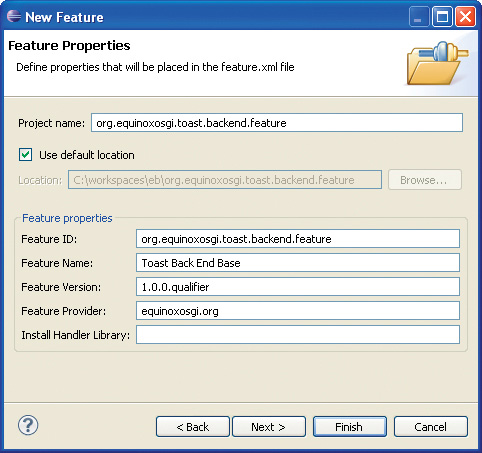
• Fill in the Feature Properties as shown in the figure. Leave the Feature ID matching the project name. The Feature Name should be a human-readable string that is reasonably descriptive. Remember, it will be shown to the user at various points during development and when provisioning. Similarly, the Feature Provider should be the readable name of your organization.
• Click Next, and the Referenced Plug-ins and Fragments page comes up, as shown in Figure 14-5. This page allows you to add bundles to the feature being created. You can either manually select the set of bundles to include or use the Initialize from a launch configuration option. Since we have been launching the back end, your workspace should have a backend.product launch configuration. Use that configuration as the basis for the new feature.
Figure 14-5 Listing feature bundles

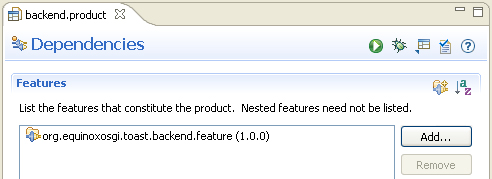
The back end feature project is created and opened in a feature editor. Here you see the values that you just entered in the wizard. If you go back to the back end product editor, you will notice that the org.equinoxosgi.toast.backend.feature you just created is listed in the Features section of the Dependencies page, as in Figure 14-6. We will add more to the product later, but now let’s turn to decomposing the client.
Figure 14-6 The Toast Back End product with its feature
14.2.3 Client Features
Restructuring the client is a little more challenging. The Toast Client is very much of a platform—the shell of a vehicle system onto which sets of vehicle function are installed. Until now we have run this all together. Here we need to tease it apart.
14.2.3.1 The Shell Feature
First, we need to create the shell feature. This is the base for the Toast UI.
• Follow the same process as for the back end feature to create a shell feature called org.equinoxosgi.toast.client.shell.feature. This time use the client.product launch configuration as the basis for the new feature. After following the steps, you should have a new feature with all the client bundles in it. That is too many, but it is easier to trim extras out than to add new ones.
• Go through the list of bundles in the feature and keep only the bundles that start with org.eclipse or are in the following list:

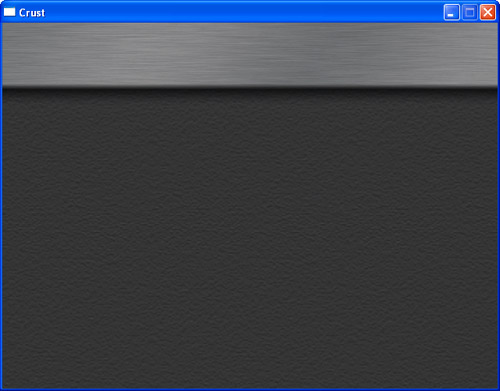
The resulting feature identifies approximately 20 bundles. After the feature is saved, notice that the client product has been updated to point to the new feature. Launch the product as before. Since we just removed all the vehicle function, you should see only an empty Crust shell, as shown in Figure 14-7.
Now let’s add back the vehicle function by creating a new feature for each of the functional elements of the Toast Client.
14.2.3.2 Audio Support
The pattern for creating the add-on Toast features is very similar to that for the other features, but we have to list the features manually. Create a feature for these bundles using the following steps:
• On the Dependencies page of the client.product editor, click the new feature button at the top right to open the New Feature wizard. As with the other features, set the project name and feature ID to be the same—org.equinoxosgi.toast.client.audio.feature in this case. Fill in a useful feature name and description and click Next.
• In the bundles list on the next wizard page, select all the bundles listed here:
• Click Finish to complete the wizard and create the audio feature. Since you launched the wizard from the product editor, the new feature is automatically added to the product’s feature list.
14.2.3.3 Climate Control
Next create the climate control feature:
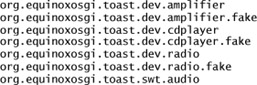
• Follow the same steps as for the audio feature, but use the ID org.equinoxosgi.toast.client.climate.feature and include the following list of bundles in the feature:
org.equinoxosgi.toast.dev.climate
org.equinoxosgi.toast.dev.climate.fake
org.equinoxosgi.toast.swt.climate
14.2.3.4 GPS
The GPS feature is similarly simple:
• Create the GPS feature using the ID org.equinoxosgi.toast.client.gps.feature and include the following bundles in the feature:
org.equinoxosgi.toast.dev.gps
org.equinoxosgi.toast.dev.gps.sim
14.2.3.5 Mapping
The mapping feature is a little different, as the mapping function depends on the GPS function:
• Create the mapping feature as before, using the ID org.equinoxosgi.toast.client.nav.mapping.feature, and include the following bundles in the feature:
org.equinoxosgi.toast.dev.google
org.equinoxosgi.toast.swt.nav.mapping.google
As an additional step for this feature, add a dependency to the GPS feature you created in the previous section:
• Flip over to the Dependencies page in the feature editor and use the Add Feature... button in the Required Features/Plug-ins section to add the GPS feature, org.equinoxosgi.toast.client.gps.feature. This tells the system that the mapping feature works only if the GPS feature is installed.
14.2.3.6 Guidance System
Like the mapping feature, the guidance feature depends on another functional unit—in this case, the mapping feature:
• Create the guidance feature in the same way as the others but using the ID org.equinoxosgi.toast.client.nav.guidance.feature and including the following bundles:
org.equinoxosgi.toast.client.nav.guidance
org.equinoxosgi.toast.swt.nav.guidance.google
Again, here we have to add a prerequisite feature:
• Add org.equinoxosgi.toast.client.nav.mapping.feature to the list on the Dependencies page of the new feature. Note that the dependencies are transitive—guidance requires mapping, which requires GPS, so guidance needs GPS.
14.2.3.7 Emergency Management
Finally, package the emergency management facilities:
• Create the emergency feature as before, using the ID org.equinoxosgi.toast.client.emergency.feature, and include the following bundles:
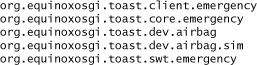
• Add org.equinoxosgi.toast.client.gps.feature to the list on the Dependencies page.
14.2.4 Restructuring Summary
Congratulations. You are now back in exactly the same position you were a few minutes ago! Both the client and the back end products define exactly the same set of bundles as before and run exactly the same way. Run the products and confirm that everything looks and works the same.
There is one very important difference, however. Now each product is described in terms of logical features rather than just a big list of bundles. While p2 can manage bundles independently, logical functions such as audio support are easier for humans to handle and talk about. By creating these groupings, the features, you have laid the groundwork for manipulating Toast configurations.
To get a sense of where we are going, delete the audio or climate feature from the client product definition and launch the client. The function is no longer there. Add the feature back and run. The function is back. The next step is to automate this provisioning by enhancing the back end to install and uninstall features in the client dynamically.
14.3 Writing a Provisioner
There are many different provisioning scenarios. Some have control at the client, some at the server, while still others have blended control. For the Toast example here we want a central management system with the p2 function in the back end and very little p2 awareness in the client.
To make this work, the back end needs a p2 profile representing each vehicle and its installed software. Each vehicle is then managed as a separate install of the Toast Client and any added functions. This models the vehicles as physically distinct software platforms.
Rather than having you write the provisioning code, the following section takes you on a tour of the sample code for this chapter. To take the tour, load the back end provisioning projects from the Chapter 14 sample using the Samples Manager.
• Using the Samples Manager, compare the workspace to the sample for Chapter 14 and load any project that has backend in the name, including ToastBackEnd.
14.3.1 The Provisioner
The first stop is the org.equinoxosgi.toast.backend.provisioning bundle and the IProvisioner interface. Our provisioning requirements are quite simple—a provisioner manages a set of vehicles and software features available to be installed on vehicles. Available software can be installed or uninstalled on each vehicle. This is essentially the p2 agent discussed in Section 14.1, “Introduction to Equinox p2.” The shape of the provisioner is captured in IProvisioner, as shown here:
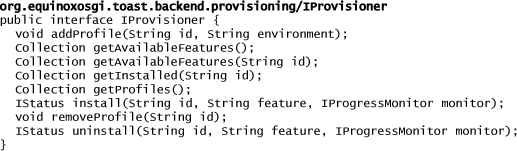
An implementation of this interface can be found in Toast’s Provisioner class. The Provisioner is a DS component that references the following services from p2:
• IProfileRegistry—Manages the list of profiles
• IPlanner—Creates the provisioning plans needed when manipulating profiles
• IEngine—Executes provisioning plans to effect the actual install/uninstall of software
• IMetadataRepositoryManager—Tracks metadata repositories
• IArtifactRepositoryManager—Tracks artifact repositories
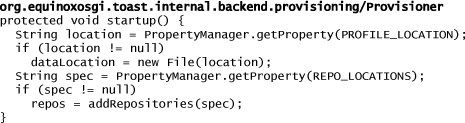
Notice that the component.xml in the bundle has all the appropriate entries for a conventional component requiring these services, and the Provisioner class has all the related set* methods. The startup method in the following snippet does a bit of setup and adds the metadata and artifact repositories given to the component:
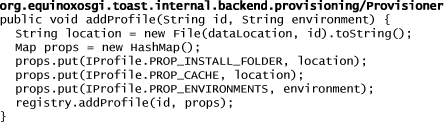
In this setup each vehicle is represented by a p2 profile. Profiles are added to the Provisioner using addProfile, as shown in the next code snippet. The arguments specify the ID of the profile and the computing environment—OS, window system, and chip architecture—for the profile. The method creates profiles by capturing the environment and file system location in a series of properties and adding the result to the profile registry.
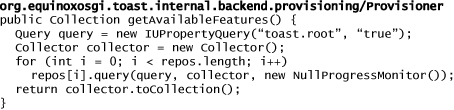
The set of software available to be installed is determined using the getAvailableFeatures() method shown next. The result is computed by querying the known set of metadata repositories for any installable units tagged as Toast roots; that is, any IU that has its toast.root property set to true is available to be installed.
To tag a feature as a Toast root, add the p2.inf file shown in the next snippet to the root of the feature project. When the feature is exported and published to a p2 repository, this file is processed. The content of the snippet causes the property toast.root to be set to true on the published IU. p2 does not interpret these properties.
![]()
The getAvailableFeatures method is useful for a global view of the available features, but in practice users need to know what features are yet to be installed on a given profile. getAvailableFeatures(String) does this by taking the list of all available features and removing those that have already been installed in the given profile:

The next snippet shows the install method. Given a profile ID and feature ID, the code looks up the profile, finds the IU for the feature, and then proceeds to install the IU in the profile. The first step in doing the installation is to create a change request. This describes, in abstract terms, the operations you want to do to a profile—install this, uninstall that, update something else. Once you have the change request, you can ask the planner to create a plan for carrying out the request. If planning is successful, the resulting plan is executable by the engine and the installation is completed.

Notice the addition of a ROOT_TAG to the IU being installed. The profile contains many IUs. By adding the ROOT_TAG profile property to the IU requested by the user, we are remembering what the user did. This way we can later offer the tagged IUs back to the user for uninstalling.
The uninstall and update processes are exactly the same as installing but with a different provisioning request. For now the provisioner does not do explicit update operations.
14.3.2 Configuring the Back End
Before the back end can provision anything, p2 and the provisioner must be added to the backend.product. Since p2 is a provisioning platform, there are many different configurations of the basic infrastructure. As of the Galileo release of Equinox, the p2 team did not supply an easy-to-consume feature for people looking to create a basic provisioning agent. We have included such a feature in the Samples Manager. Load the org.equinoxosgi.toast.backend.p2.feature project now.
This feature is purposely “bare-bones.” It is the basic function needed by a conventional provisioning agent. Depending on your requirements, you may need to add optional p2 functionality such as legacy or UI support or additional ECF transports. Here we are going to programmatically manage vehicle profiles on the same machine as the back end and the repositories, so no additional support is needed.
Next, open the org.equinoxosgi.toast.backend.feature feature and flip to the Plug-ins page. Ensure that the org.equinoxosgi.toast.backend.provisioning bundle is listed—it is now part of the back end function. Again, if it is missing, add it or get the final feature definition from the Samples Manager.
14.3.3 Back End Summary
That’s it. That is all that is needed on the back end to provision client profiles—just over 100 lines of code. We started this section by observing that there are many different provisioning scenarios. This example strikes a balance of simplicity with a hint of sophistication—provisioning the current running profile is even easier, and provisioning and synchronizing with remote systems requires somewhat more effort.
14.4 Adding a Deployment Web UI
Now that the back end is able to manage vehicle software, we need to expose this function to the user. In this case the user is the back end administrator using the portal defined in Chapter 13, “Web Portal.” As you may recall, the portal is extended by adding actions. To add a provisioning UI, we need actions to create vehicles and install, uninstall, and list software features. Again, rather than having you write the code, we take you on a tour of the code to implement this function.
Look in the org.equinoxosgi.toast.backend.provisioning.ui bundle to find the various actions discussed in the following sections. Each of them is a DS component that implements the IPortalAction and requires the IProvisioner service.
14.4.1 The Create Action
So far with Toast the back end has dynamically added vehicles that have reported position information and the like. With the addition of provisioning and the management function, the portal needs a little more lifecycle around the existence of vehicles. In addition, by providing a create action and including provisioning operations, it is possible for users to create vehicle installations from scratch from the back end.
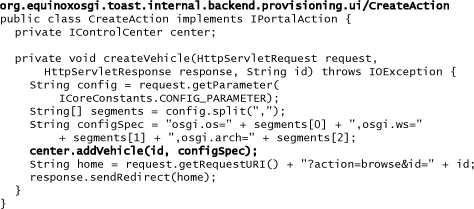
Vehicle creation is implemented by CreateAction, and its DS component is declared in create.xml. It is positioned on the root page by setting the action property to have just one segment, create. The following snippet shows the meat of the class, createVehicle. Ultimately it simply analyzes the request and asks the control center to add a vehicle as specified. You will see how this operates in Section 14.5.3.
14.4.2 The Manage Action
The UI for installing and managing a vehicle’s software is supplied by ManageAction. This action supplies the Software Management page shown in Figure 14-12. The page summarizes the installed and available features for the given vehicle. Features are installed or uninstalled by clicking on the appropriate links. The links themselves are further portal actions, described in the following sections.
The Software Management page is implemented by ManageAction. Its corresponding DS component is declared in manage.xml. The component positions the action under the built-in browse action by setting the action property to browse/manage.
14.4.3 The Install and Uninstall Actions
The implementations of the install and uninstall actions presented on the Software Management page are nearly identical. You can see the component markup in install.xml and uninstall.xml respectively.
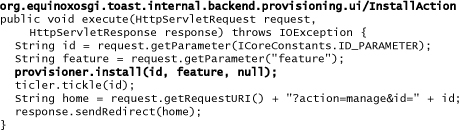
The key code for the actions is shown in the next snippet. Here the request is reviewed and the feature in question identified. Then the requested operation is run on the provisioner. Finally, the response causes the web UI page to update.
14.4.4 Installing the Provisioning UI
The provisioning UI needs to be added to the back end product in the same way as the provisioning function itself. To review, take a look at the Plug-ins page of the org.equinoxosgi.toast.backend.feature editor and spot the back end provisioning UI bundle, org.equinoxosgi.toast.backend.provisioning.ui, in the list. If it is missing, add it. Remember, this feature is part of the backend.product, so adding it to the feature adds it to the product.
14.5 Exporting, Running, and Provisioning
To recap, so far we have refactored the client and back end products to be feature-based, implemented a provisioner on the back end that can manage clients (vehicles), and put in place a web-based UI for our provisioning function. Now is the time to export the components, run the system, and do some provisioning.
14.5.1 Populating a p2 Repository
As was mentioned in Section 14.1.4 “Repositories,” everything in p2 is stored in a repository. Currently the Toast Back End and Client are in your workspace. In Chapter 9, “Packaging,” you exported the client and back end. Here we will follow some very similar workflows but with a focus on populating p2 repositories with the products and features needed.
• Open the backend.product to the Overview page and notice the Exporting section at the bottom right. Click the Eclipse Product export wizard link. The Export wizard shown in Figure 14-8 will appear.
Figure 14-8 The Product Export wizard
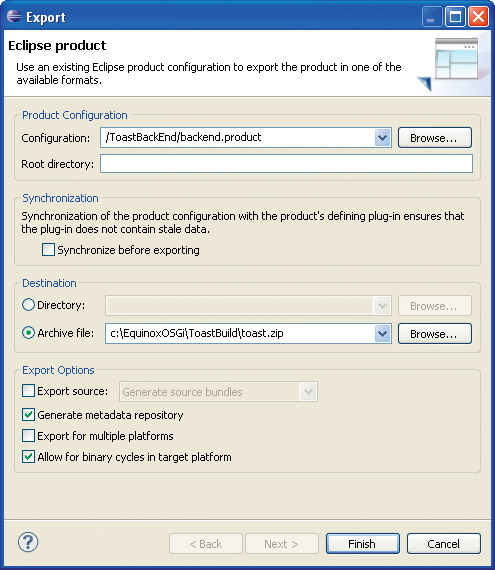
• Set the wizard fields as shown and export the backend.product by clicking Finish.
The wizard allows you to identify a number of values. The only values of interest here are the Archive file field and the Generate metadata repository check box. The archive location determines not only where the runnable product will go but also the repositories. By selecting the repository box, you are saying that you want PDE to publish the product content into a p2 repository. PDE automatically creates a metadata and artifact repository in a repository folder that is a sibling of the location specified in the archive location field.
When the export is finished running, check that there is indeed a repository folder beside the archive location you specified.
Before exporting the client.product, let’s review its content. In Section 14.2.4, “Restructuring Summary,” we saw that the content of the client can be controlled by adding and removing features to the product definition. If you export the client product, including all the client functionality, there will be no way of adding or removing that functionality.
To address this, the client product should be a platform onto which more software is deployed:
• Open client.product and ensure that it contains only the org.equinoxosgi.toast.client.shell.feature in its Dependencies list.
• Having done that, go ahead and export the client using the same settings as for the back end but with a different archive file name, say, client.zip. Here we actually don’t even need the archive but rather just the contents of the p2 repositories to be used in subsequent provisioning operations.
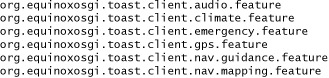
All that is left to do is export the extra client features we created in Sections 14.2.3.2 through 14.2.3.7 to the repository. Ensure that you have added the p2.inf file to each of these projects, as described in Section 14.3.1:
These features can be exported directly using these steps:
• Run the export wizard using Export... > Plug-in Development > Deployable features.
• Multi-select the required features and click Finish to complete the wizard. You should see a wizard similar to that shown in Figure 14-9 with all six of the client features selected.
Figure 14-9 Feature Export wizard
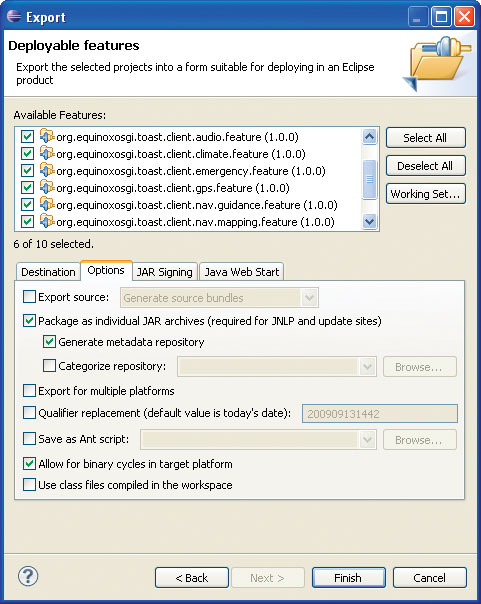
• In the Directory field on the Destination tab, fill in the same location as you used for the product exports. This time, however, add the repository segment to the end of the path. This puts the features directly in the repository.
• On the Options tab, be sure to select both the Package as individual JAR files and the Generate metadata repository check boxes.
• Click Finish and let PDE publish the features and bundles to p2 repositories.
14.5.2 Running the Toast Back End
If you look around the repository you’ve created, you will see all of the bundles and features from the workspace as well as the various branded executables and such. These are all waiting to be deployed and run. During the export, PDE deployed the back end for you, so it is ready to run—expand the back end archive, toast.zip if you used the values in Figure 14-8, and run the backend executable.
For advanced users who need to deploy their systems independently or headlessly, follow the instructions here.
To help you along, the ToastBackEnd project contains a product definition, backendDeployer.product, that runs a mini p2 agent and deploys the back end for you. You can use it to deploy any product in a p2 repository, but here the launch values shown in Figure 14-10 are set up for the back end.
Figure 14-10 Toast Back End deployer arguments
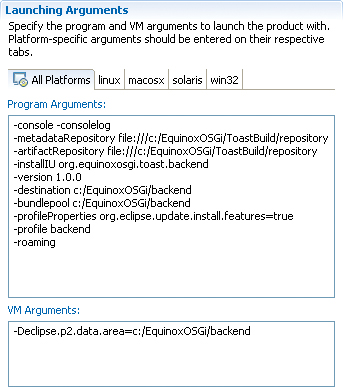
What is not shown is that this product runs the p2 director application, org.eclipse.equinox.p2.director. The repository locations given should match the locations to which you have been exporting your products and features. The destination and bundlepool arguments can point to any location. This is where the back end will be installed. Note that the eclipse.p2.data.area VM argument value must match the destination value, and generally the bundle pool is the same as well.
Once you are satisfied with the argument settings, run the product. The console should show the time taken to complete the install. Next navigate to the destination directory. It should now contain a backend executable and a collection of bundles and features. Run the executable. This starts the back end and registers the servlets as before. You should see the normal console output showing that the back end is running.
14.5.3 Creating and Provisioning Vehicles
Fire up your favorite web browser and open the back end web UI at http://localhost:8080/toast. Since this is the first run, the list will be empty. Create a vehicle by clicking on the Create Vehicle link. That gets you to the form shown in Figure 14-11. There you can enter a name for the vehicle and specify its operating system. Entering an operating system allows you to install for different machines and then run the clients via shared drives or virtualization technology. In most cases it will be the same operating system as the back end.
Figure 14-11 Vehicle creation web UI

Complete the form and click Create to add the vehicle to the system and then go to the new vehicle’s details page. From there you can track the vehicle or go to the Software Management page by clicking on the Manage software link.
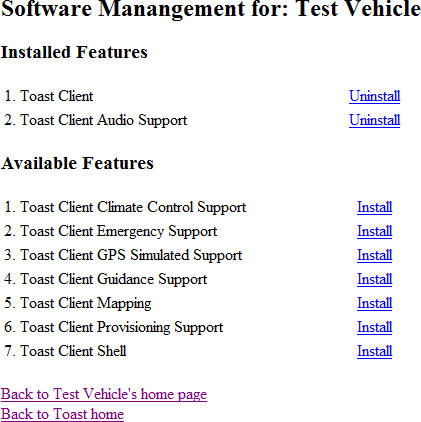
The Software Management page allows users to install and uninstall the software on a particular vehicle. The page summarizes the installed and available features for the profile and will be similar to what is shown in Figure 14-12. Since the vehicle was just created, the car has no software installed. In fact, if you look on disk, you will not even see a location for your car. Select the Toast Client entry in the Available Features list to install the base client software—the client product.
Figure 14-12 Vehicle management web UI
Now check the disk. There should be a ToastClients folder beside the folder containing the back end. This is where the Provisioner installs the client profiles. Notice that there is a directory in there with the same name as your vehicle. Navigate to that directory and run the client executable. The regular Toast Client should start as an empty shell, as shown in Figure 14-7.
Try installing some more functionality into your vehicle using the web UI. Notice that nothing happens in the vehicle UI. There is currently no mechanism to tell the client running in a separate process, or potentially a separate machine, that there are changes in its profile. If you close the vehicle window and restart the client, the provisioning changes should show up. In the next section we talk about how to enable dynamic deployment.
14.6 Client-Side Dynamic Deployment
To make the client respond to changes in its profile immediately, the back end needs a way of tickling the client to tell it about the changes. There are many different possibilities here. For a quick and dirty solution we’ll put an HTTP service on the client and have it wait for messages from the back end.
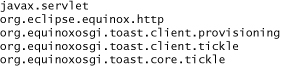
Load the following projects from the Samples Manager content for Chapter 14. The back end part of the tickle mechanism should already be in place.
![]()
Open the FeatureSync class. This is a DS component that uses the tickle mechanism to listen for messages and, when told, reloads the OSGi configuration defined by p2. The key method here is processSync(), shown here:
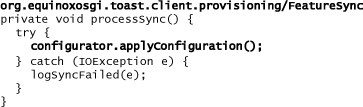
The call to applyConfiguration is the signal that the lineup of OSGi bundles installed in the underlying OSGi framework should be reloaded dynamically. The rest of the code in FeatureSync is related to threading to ensure that the long-running apply call does not abuse the thread broadcasting the notification. To package this up, create a feature and add it to the back end product as follows:
• Create a client provisioning feature to capture the set of bundles listed here. We have called this new feature org.equinoxosgi.toast.client.provisioning.feature.
• Add the feature to the client.product definition and re-export Toast by deleting the repositories and rerunning the steps from Section 14.5.1, “Populating a p2 Repository.”
Now when you modify the software on a running Toast Client, it is immediately notified and the new function is activated or the removed function discarded without the client being restarted.
14.7 Summary
In this chapter you were introduced to the overall architecture of p2, the Equinox provisioning platform. We then refactored Toast into features, logical collections of code that go together to implement some function. This formed the basis of creating a manageable modular software structure. From there we showed how you can easily put together a powerful and flexible provisioning mechanism to manage multiple profiles. This was tested by publishing all of the needed bundles into p2 repositories and then using the provisioning solution in both static and dynamic provisioning scenarios.
You should leave this chapter with a clear impression that p2 has a huge amount of functionality and value in a wide range of scenarios. Having a flexible and functional provisioning mechanism brings to life the overall dynamic modularity story behind Equinox and OSGi.