
Chapter 5. Layer Transforms
In This Chapter
Up to this point, we have discussed how to move elements around the screen, change their color, and various other interesting effects. In this chapter, we take that quite a bit further. Transforms is a catchall to describe applying a matrix transform to a layer for some startling results.
What is a transform? A transform is a term used to include any function that alters the size, position, or rotation of an object, in our case a layer. Transforms scale a layer up or down and rotate a layer along one or more planes. Transforms are applied using a matrix function that fortunately we do not need to interact with directly. Whenever we want to rotate or scale a layer, we must use a transform to accomplish the desired effect.
The topic of matrix transforms can quickly turn into a deeply mathematical conversation that is beyond the scope of this chapter. Instead, this chapter touches on a few of the more common and interesting transforms, such as rotating a layer in 3D space or creating interesting zoom effects, and how to bring them about.
NOTE
Cocoa Touch
Unless otherwise specified, all the transforms discussed in this chapter can be performed both on the desktop and on any device that uses Cocoa Touch. However, it should be noted that transforms can be computationally-intensive, and on a device running Cocoa Touch, it is wise to test the performance of the animation to confirm that it is within acceptable boundaries.
Scale Transform
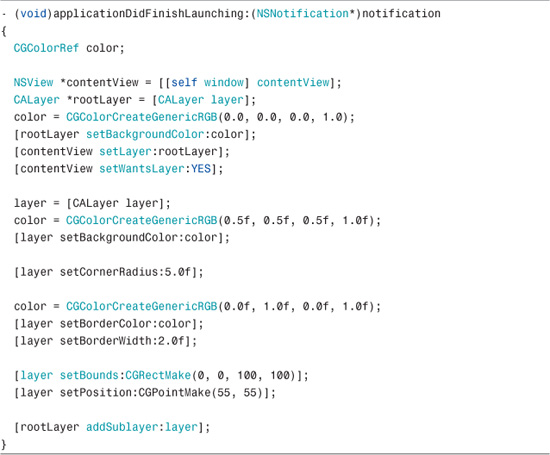
To demonstrate some of the capabilities of matrix transforms we take a simple layer and perform several different transforms on it. The first transform scales the layer from one size to another. To start this example, build the layers shown in Listing 5-1.
Listing 5-1 applicationDidFinishLaunching
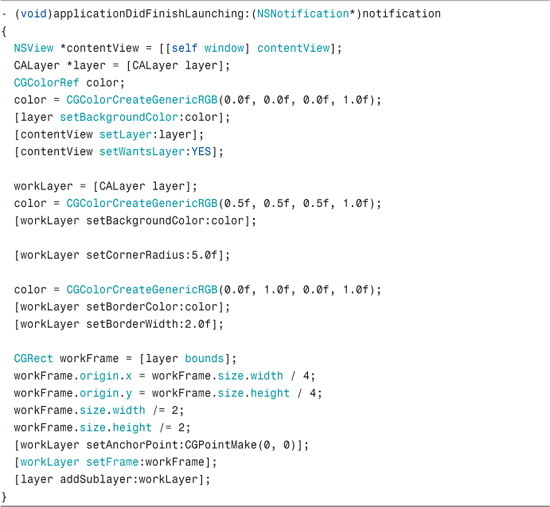
In the –applicationDidFinishLaunching: method, we grab a reference to the contentView, set its layer and flag it as layer backed. By setting the layer, we are guaranteeing what type of layer the view uses for its backing.
When the contentView is set up properly, we next construct the layer that will be manipulated. Its background color is set to gray, and the corners are rounded using setCornerRadius:. Next, the border color is set to green with a width of 2 pixels. Finally, the layer’s frame is set to be a quarter the size of the contentView and centered onscreen.
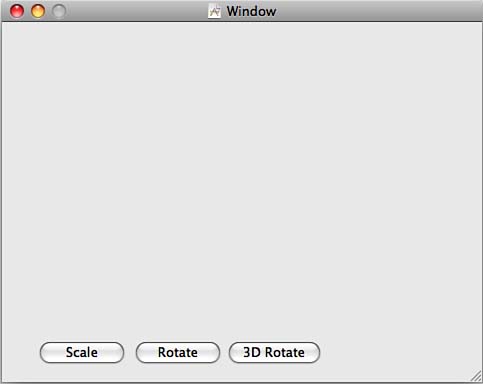
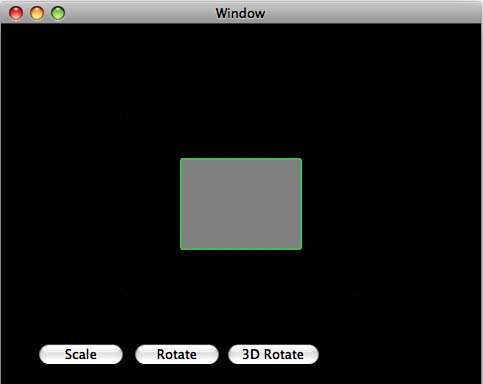
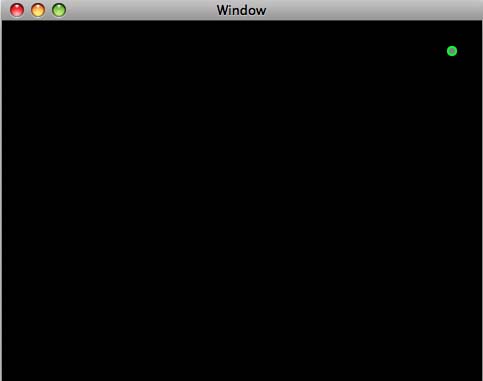
In Interface Builder, add three buttons to the window; one for each transform that we perform: Scale, Rotate, and 3D Rotate. The resulting window is shown in Figure 5-1.
NOTE
On the iPhone, the layer is already in place. You need to override the class method +layerClass instead to control the layer that is used.
Figure 5-1 Interface Builder Window
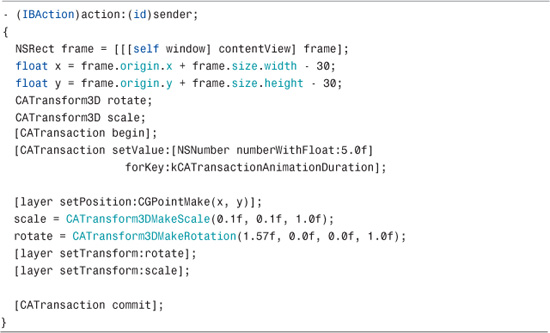
The Scale button is bound to the method -scaleTransform:, implemented as shown in Listing 5-2.
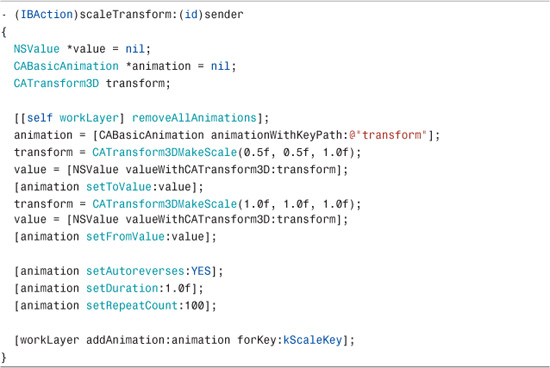
This method removes any existing animations, which keeps the animations from piling up if the user clicks on several of the buttons. Next, we want to construct an animation object that can instruct the layer on how to animate/transform. To do this, construct a CABasicAnimation with a path of transform, which tells the animation that it will be modifying the transform property of whatever layer it is applied to, and then start applying the matrix transforms to the animation. You can use several methods to construct matrix transforms. In this method, we use the CATransform3DMakeScale method and pass it the x-, y-, and z-axis for the transform. As you can see in Listing 5.2, we’ve set the value of CATransform3DMakeScale to 0.5 for both the x- and y-axes, and we’ve left the z-axis alone. To create the shrink effect, set the x and y values of the next CATransform3DMakeScale to 1.0; by setting the values of the x and y to 1.0, we cause the zoom effect to reverse.
NOTE
The returned CATransform3D is wrapped in an NSValue so that it can be used by CABasicAnimation. Core Animation handles pulling the CATransform3D back out of the NSValue for us.
When CATransform3DMakeScale’s values are set, set the autoReverse flag to YES, give it a nice slow duration of 1 second, and set a large repeat count; here we use 100. Finally, we add the newly created animation back to the layer using a key specific to this animation. We want to use a large repeat count here so that we can give the illusion that the animation is going to continue forever. If we actually hit 100 iterations of the animation, it would finally stop.
Using -rotateTransform:
The next transform that we apply rotates the layer. The layer rotates along one axis, and then we auto-reverse the rotation, as shown in Listing 5-3.
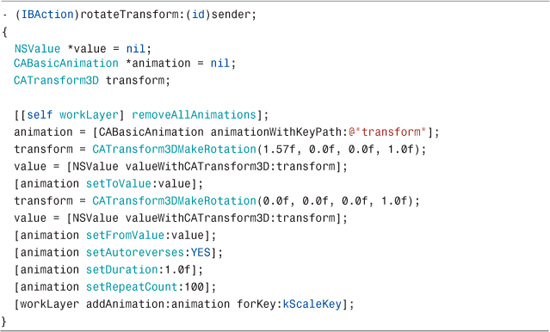
In this example, CATransform3DMakeRotation is applied to the single axis rotation to the layer. Unlike the transform method shown in Listing 5-2, this example uses four parameters: the first parameter is the angle, expressed in radians, and the next three are the x-, y-, and z-axes. The layer is rotated by 1.57 radians (that is, 90 degrees) on the x-axis. The values for the x-, y-, and z-axes are a bit unusual. These values refer to the magnitude of the rotation and accept a value between -1.0 and 1.0. The rotation is set to be a full positive magnitude along the z-axis, which produces what appears to be a 2D rotation in a clockwise direction.
NOTE
What you see when we walk through these examples is that they all follow the same basic flow. We build a CATransform3D using one of the numerous foundation methods and then apply it to the layer.
NOTE
The value 1.57 used in Listing 5-2 represents the radian value of the angle. To translate degrees into radians, use the formula X?/180. For example:
90π/ 180 = 45(3.1415) / 180 = 0.7853
Using -rotate3DTransform:
The next example takes the previous one a step further by rotating the layer along two axes; see Listing 5-4.
Listing 5-4 -rotate3DTransform:
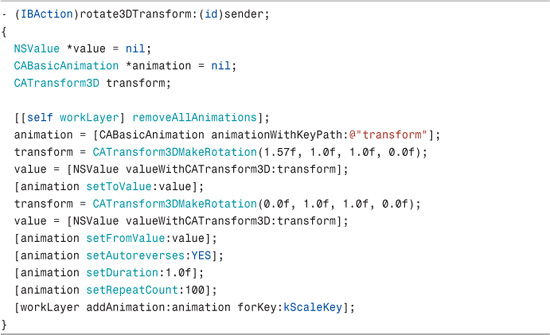
Listing 5-4 is nearly identical to Listing 5-3 except for the values passed into the CATransform3DMakeRotation method. This example sets both the x- and y-axes to 1.0, which produces a rotation on both axes and gives the illusion that the layer is flipping diagonally.
Because we rotate the layer by 90 degrees and auto-reversing, this example appears to be flipping all the way around on two axes. This would be useful when you have a two-sided layer (such as a coin or a poker chip) and want to flip between its sides.
Anchor Points
As previously mentioned in the discussion about layers, anchor points become extremely important when dealing with transforms. When you apply a transform to a layer, the transform uses the anchor point to determine where to rotate, scale, and so on.
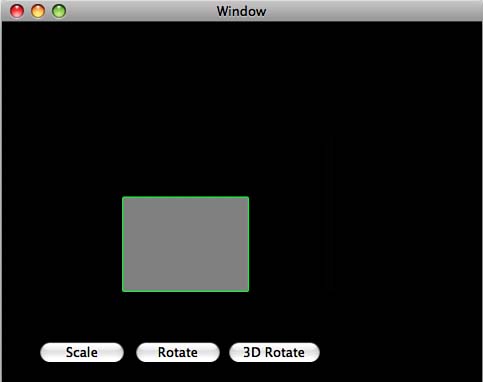
With the examples so far, the scale transform (shown earlier in Listing 5-2) causes the layer to appear to shrink into the middle of the window, as shown in Figure 5-2. This is because the default position of the anchor point of any layer is the center.
However, if we alter -applicationDidFinishLaunching: and move the anchor point to the lower-left corner of the layer, as shown in Listing 5-5, we get a dramatically different effect.
Figure 5-2 Center Anchor Point
Listing 5-5 Updated Anchor Point
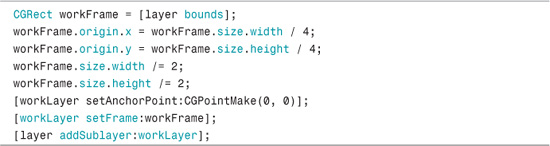
In Listing 5-5, we added the line [workLayer setAnchorPoint:CGPointMake(0, 0)];. This relocates the anchor point to the lower-left corner of the layer. When the scale transform is run, you can see that the layer appears to shrink to the lower-left corner, as shown in Figure 5-3.
By combining transforms along with anchor point manipulation, you can produce some interesting results. For example, we could cause the layer to rotate along the z-axis with a single corner remaining stationary. By moving the anchor point to the desired corner and rotating only along the z-axis, the layer appears to rotate as if it were attached to some object. If we then placed another layer that matches that same corner, it would be a very convincing effect.
Figure 5-3 Lower Left Anchor Point
Combining Transforms
So far, we have covered single transforms, either rotating or scaling the layer. But what if you want to perform more than one transform at the same time? Fortunately for you, we’re about to show you how.
To demonstrate how to combine transformations, we do a slightly different project. We start with a standard Cocoa application from the Xcode template and add an AppDelegate. The AppDelegate retains a reference to the NSWindow so that it can be manipulated. Then, within the -applicationDidFinsihLaunching: method, we set up the layers, as shown in Listing 5-6.
Listing 5-6 applicationDidFinishLaunching
The -applicationDidFinsihLaunching: method grabs a reference to the contentView and adds a CALayer to it before turning on layer backing. The rootLayer’s background color is also black.
Next, create the layer we are going to manipulate and set its color to gray with a green, 2-pixel border and a 5-pixel corner radius. Unlike Listing 5-1, this layer will be 100 × 100 pixels and positioned in the lower-left corner of the contentView.
There’s also one additional change to make in Interface Builder. Add a square NSButton to the contentView, make it transparent, and resize the button to the same dimensions as the window. This enables the user to click anywhere within the window and trigger the action, which we get to next.
Bind the large button’s action to the AppDelegate and its -(IBAction)action:(id)sender method that we are about to declare.
When the user clicks on the window, we want to take the workingLayer and move it to the upper-right corner. While doing that, we want to both rotate the layer 180 degrees and scale it down to one-tenth its current size. The first possible solution to this problem can be found in Listing 5-7.
However, when this code is run, the layer moves and rotates, but it does not scale. This is because calling -setTransform: is only a property, and the last value we set into it wins and discards any previous values that have been set. Although this can be useful in some situations—as both the removal of the old transform and the setting of the new transform are both animated—it is not the effect we look for in this example.
Because the transforms override each other, the transforms need to be combined before applying them to the layer. This is accomplished with the CATransform3DConcat method, which takes two CATransform3D references and returns a single combined CATransform3D, as shown in Listing 5-8.
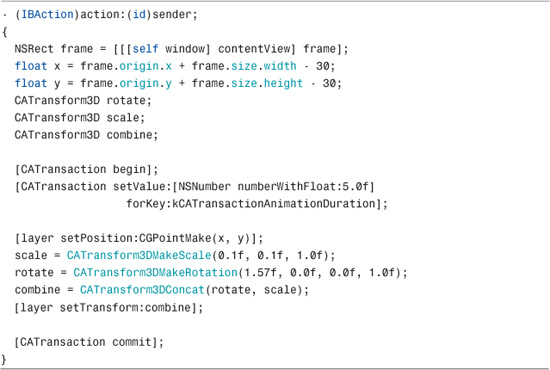
In this completed -action: method, the final resting position of the CALayer is calculated before beginning a CATransaction block. This ensures that the changes animate together and at the same duration. We then set the duration for the CATransaction using its +setValue:forKey: method, passing in the kCATransactionAnimationDuration key.
After the CATransaction has begun, we can set any animatable property on the layer that we want, and it automatically animates for us using CATransaction’s duration. Instead of constructing several CABasicAnimation objects and applying them to the layer, you can just set the properties directly.
The first property to set is the position. Because the anchor point is at the center of the layer, you can easily calculate the position 5 pixels away from the upper-right corner of the window and set the position property of the layer. The layer is moved from its original position in the lower-left corner to the upper-right corner over a period of 5 seconds.
Next, you need to construct the transform that gets applied to the layer. To begin, build the two subtransforms, as such:
• Create a scale transform, which scales the layer to one-tenth its original size.
• Construct a rotation transform, which rotates the layer 1.57 radians (180 degrees).
With both transforms in place, the next step is to combine them using the CATransform3DConcat method.
When the two transforms are combined, apply them to the layer and commit the CATransaction. The result is a layer that gracefully slides from the lower-left corner to the upper-right corner, scaling down to one-tenth its original size and rotating 180 degrees while moving. This gives you the impression that the layer is zooming from nothing while it is sliding into position.
WARNING
The order in which you pass the subtransforms to the CATransform3DConcat is important. If you do not get the expected effect from CATransform3DConcat, try reversing the parameters and then build and run the project again.
Scale Versus Bounds
In the “Combining Transforms” example, we combined the scale and rotation transforms to produce the desired effect. You might ask: Why not just change the bounds of the layer instead and avoid the overhead of combining the transforms?
The reason is because there is a significant difference between scaling a layer and changing its bounds. When a layer is scaled, the layer still thinks it is the original size and draws itself at the original size before the scale is applied. However, if we change the bounds and then scale the layer, the layer won’t look quite right because it knows it is a different size.
For example, if we changed the layer’s bounds in the “Combining Transforms” example instead of doing a scale transform, the end result of the animation would look like Figure 5-4.
Figure 5-4 Bounds and Rotation Animation
Notice that the end layer looks like a circle. This is because we changed the bounds of the layer but did not change the corner radius or the border width. However, when a scale transform is used, the result has the effect we’re looking for, as shown in Figure 5-5.
This gives you a square. One thing you notice when looking at Figure 5-5 is that the border isn’t visible; this is because the scaled border is less than 0.5 pixels. Also, because the corner radius (originally 5 pixels) is less than 1 pixel, it also is no longer visible. When working with a complex layer tree, the difference between changing the bounds and the scale can be quite dramatic. If we had scaled this layer up by 100 percent, the border would be 50 pixels wide!
Figure 5-5 Scale and Rotation Animation

Summary
Transforms can be extremely daunting when you first start working with them. Worse, if you decide to research them online, it can be even more confusing. This walk-through of the concepts has hopefully helped you to realize their usefulness and flexibility.