Chapter 6. Layer Filters
In This Chapter
• Applying Filters to Core Animation Layers
• Controlling Filter Values with Data Bindings
• Applying Filters to Transitions
As with most Apple technologies, Core Animation provides a means to bridge into other core capabilities. One such bridge enables the developer to interface directly with Core Image—Apple’s image manipulation and processing framework. This means that as a Core Animation programmer, you have at your disposal all the Core Image filtering capabilities.
Practically, this means that you can apply, for example, a Gaussian blur to a layer’s contents. You set the blur radius on the filter and apply it, or you can animate the blur radius and cause it to blur and then resolve to clear over a duration that you specify. Or say you want to apply a glass distortion effect on an image. You can create a Core Image filter specifying the name CIGlassDistorion and provide the input parameters that filter needs according to the Core Image Filter Reference.1
1http://developer.apple.com/documentation/graphicsimaging/Reference/CoreImageFilterReference/Reference/reference.html.
In this chapter, we explore in depth how to effectively apply filters to Core Animation layers, how to control filter parameters using key-value coding, and how to use filters for transitions.
At the time of this writing, Core Image filters are not supported on the iPhone, so this chapter covers only what is available on OS X. You can perform graphic manipulations on the iPhone, however, such capabilities are not yet available as part of Core Animation, making that information beyond the scope of this book.
Applying Filters to Core Animation Layers
Apple’s Core Image Programming Guide2 and related Core Image Filter Reference3 provide the full API specification for effectively using filters in layers and views. You need to access those references to see a full list of all the filters available to you.
2http://developer.apple.com/documentation/GraphicsImaging/Conceptual/CoreImaging/CoreImage.pdf.
3http://developer.apple.com/documentation/GraphicsImaging/Reference/CoreImageFilterReference/CoreImageFilterReference.pdf.
To add a Core Image filter to a layer, simply create a CIFilter object and add it to the layer’s filters array parameter, as shown in Listing 6-1.
Listing 6-1 Adding a Gaussian Blur Filter to a Layer
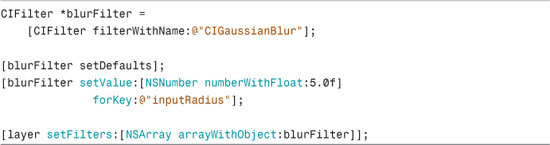
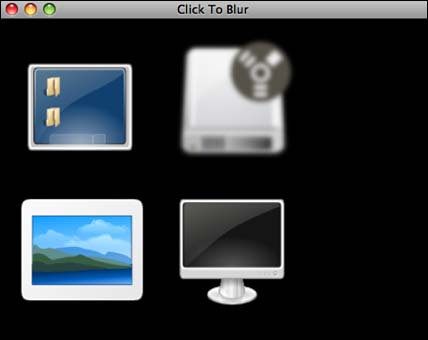
When you run the code in Listing 6-1, the filter is applied to the layer when it is added to the layer tree for whatever view contains it. In this example, the layer’s view has a Gaussian blur with a 5-pixel radius applied to it. You can see what the output of this code looks like in Figure 6-1. From the companion website (informit.com/coreframeworks), open the sample project called GaussianBlurLayer if you want to see the complete code listing.
Many of the filters available don’t require anything except specifying the default parameters through a call to –setDefaults. Simply change the name of the filter to one of the others in the filter reference, and you can see what we mean.
Applying filters to a layer in this way is not terribly useful. As with most technical subjects, the details of mastering filters are more involved. Because this is a book about Core Animation, what we more likely want is a way to apply the filter within the context of animation. What you might want in a real-world application is to animate the filter on the layer rather than simply applying it and leaving it as a static layer with a filter applied. We cover that next.
Figure 6-1 Gaussian Blur Filter Applied to Image

Animating an Applied Filter
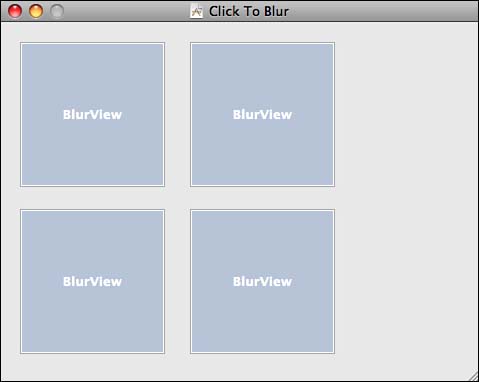
You likely want to apply a filter to a layer in response to user input. For example, you might want to create a Core Animation layer-based button that has a 5-pixel Gaussian blur applied to it when clicked. To do so, create a layer-backed NSView derived view to contain the layer that will be animated. When you add the filter to the layer in your view initialization, set its inputRadius field with an initial value of 0.0 so that no evidence of the effect is visible when the layer first displays. Then, in response to a click, you can animate the inputRadius property to a value that makes the button blur and return to clear. On the companion website, the demo application Click to Blur demonstrates this capability. Open that project now to see this capability in action.
Each image you see in Figure 6-2 represents one view; each view contains a Core Animation layer. The image you see is the contents of the view’s layer. Behind each layer is a view called BlurView that does the following:
• Holds the CALayer-derived layer, called BlurLayer, upon which the animation gets performed
• Receives the mouse-down event we use to trigger the animation
Every layer has a filters field that holds an NSArray of Core Image filter objects. Think of this array as an array of filters that might or might not be used. You can build up a list of filters that you might use, and then you can enable them through key-value coding when you receive user input, such as a button click. We get to the key-value coding in a moment. The Click to Blur demo application causes the icon image to blur and become clear again when the view receives a mouse click.
Figure 6-2 Gaussian Blur Filter Applied to Image
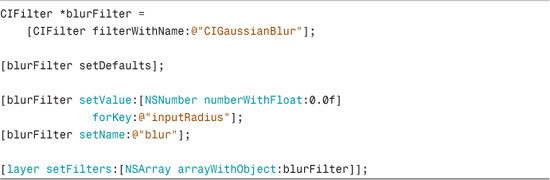
Key-value coding manipulates the values of the filter, but to do so we first need to name each filter we plan to use. The name of the filter is important because it will be used in the key-path to the filter parameters such as inputRadius. For further discussion, take a look at the sidebar, “Key-Paths in Key-Value Coding.” We also need to change the initial input radius (the inputRadius parameter on the CIFilter object) value to 0.0f. This is the starting value for the input radius of the blur. We start at zero, so the blur effect is not initially visible.
Listing 6-2 reflects the code changes. A change is made to the line where we set the inputRadius initial value to 0.0f and we add the line to name the filter so that it can be called later. The complete view initialization code is in Listing 6-3.
Listing 6-2 Adding Filter Name and Setting inputRadius
Listing 6-3 BlurView Initialization Code

We have created a CALayer-derived class called BlurLayer that we add to the BlurView view object. The BlurLayer class simply manages the image content of the layer. The image for each instance of the view is set in the –applicationDidFinishLaunching method, found in the application delegate class, as shown in Listing 6-4.
Listing 6-4 Initialization of BlurView Objects

The instance variables blurView1, blurView2, blurView3, and blurView4 are BlurView instances, and each one has been connected to custom views in Interface Builder. You can see what these custom views look like in Figure 6-3.
Figure 6-3 Custom Views in Interface Builder
Receiving User Input
Core Animation layers cannot receive mouse events; however, their backing views do. In the view initialization code (Listing 6-4), we applied the layer’s filter(s) for later use when the view receives a click.
To receive a click, tell BlurView to accept mouse clicks by adding to the view the code in Listing 6-5.
Listing 6-5 Enable View to Receive Events

A first responder is a responder in the responder chain that is given the first chance to respond to an event such as a mouse click or key press. With this code in Listing 6-5, we are informing the event system that our window should be given a chance to respond to events sent to it. In this case, these are simply mouse clicks. After we have established that our view should handle its own events in this way, we can implement the code that we want to run when we receive the event. In the –mouseDown view delegate, set up a basic animation for changing the value of the blur filter’s input radius, as shown in Listing 6-6.
Listing 6-6 Add Blur Animation to the mouseDown Event
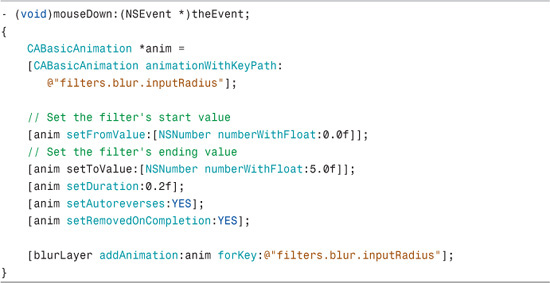
As shown in Listing 6-6, we create a basic animation using the key-path filters.blur.inputRadius. You might have already noticed, but this is where the name of the filter we added in Listing 6-2 becomes important. The filters field is being accessed here, and we are querying for a filter named blur (the name of the Gaussian blur filter we added in Listing 6-2), so we can animate its inputRadius.
The starting and ending values for the blur filter’s inputRadius are set using the -setFromValue: and -setToValue: methods, as shown in the next two lines. We are going to animate the input radius from 0.0 to 5.0. Next, we set the duration of the animation to run quickly; approximately one-fifth of a second, as noted with -setDuration:0.2f.
The –setAutoreverses:YES call tells the animation to loop backward to its original value. If we left this to its default (NO), when the animation finished we would see the layer instantly snap back to its original value, which makes it look jerky. In this situation, it is ideal to have it animate back to the original value to give the animation a much smoother, polished look.
Finally, the animation is automatically set to be removed (-setRemovedOnCompletion:YES) from the animation when it has finished one iteration. This is actually the default behavior so this is a superfluous call. However, we include it here so you understand that this is the desired action.
Now, when the button is clicked, it blurs the entire button layer to a 5.0 pixel radius and returns to its clear state within one-fifth of a second.
Making the Effect “Sticky”
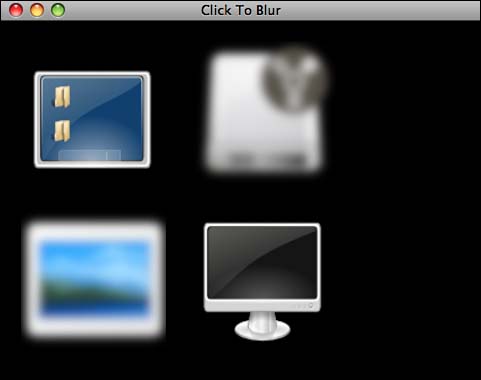
There might be times when you want the animation effect to be sticky, where rather than resetting the animated property back to its original value, you want its new value to “stick.” To see an example of this, go to the companion website and launch the Click to Blur Sticky project in Xcode and click Build and Go. When you click on one of the icons, you notice that the icon stays blurred until you click it a second time, as shown in Figure 6-3.
To create this effect, so the clicked icon stays blurred and then returns to its normal state when clicked a second time, you need to keep track of the button state. This is accomplished using a BOOL value, which for this example is named toggle. The –mouseDown code now looks like what we see in Listing 6-7.
Listing 6-7 Implementing Toggle Functionality
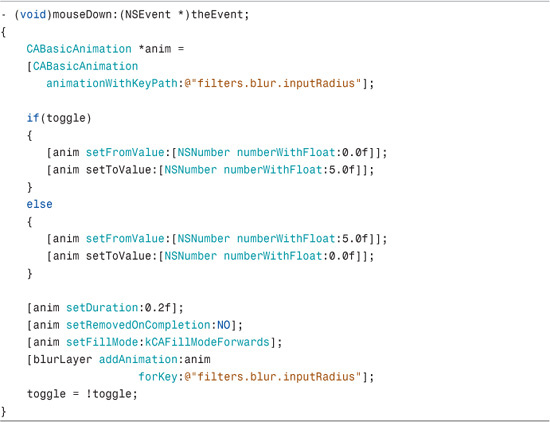
So what changed? The first thing you notice is that depending on the current state of the toggle variable, we determine whether the start value is 0.0 or 5.0 before setting -setToValue: to the opposite value. If our toggle is not yet set, we want to animate to blurry so our starting value, fromValue, is set to 0.0 and our ending value, toValue, is set to 5.0. However, if the toggle is set, we want to animate to clear so the starting value is 5.0 and our ending value is 0.0.
Notice also that Listing 6-7 doesn’t contain the -setAutoreverses call that’s found in Listing 6-6. This call must be removed or set to NO for the effect to be “sticky”; otherwise it returns to its starting value and overrides -setFillMode:.
Next, we have changed the–setRemovedOnCompletion call to NO. This tells the layer not to remove the animation when it has completed.
Finally, we have added a call to –setFillMode:kCAFillModeForwards that tells the animation to leave the resulting value at whatever we specified in the -setToValue field.
Each icon now retains the blur on the first click and returns to its original value on a second click, making the Core Animation layer-based-button “sticky.” In Figure 6-4, you can see that two of the icons are blurry because they have each been clicked once and retain their sticky state.
Controlling Filter Values with Data Bindings
Filter parameters are accessible and modifiable using KVC. This enables you to use data bindings to create layers with complex filtering and control those filters using standard Cocoa controls, such as sliders.
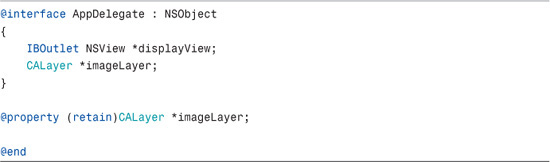
You might recall from the previous section that when we instantiated the CABasicAnimation object on a mouse down event, we used the key-path filters.blur.inputRadius on the layer. filters represents the NSArray of filters available, blur is the name we provided to the filter upon instantiation for later identification, and inputRadius is the name of the filter field we wanted to manipulate. This same key path can be used when setting up bindings in Interface Builder. The difference is that we must first make the CALayer accessible to Interface Builder by making it a property of the AppDelegate class, as shown in Listing 6-8.
Listing 6-8 AppDelegate Declaration
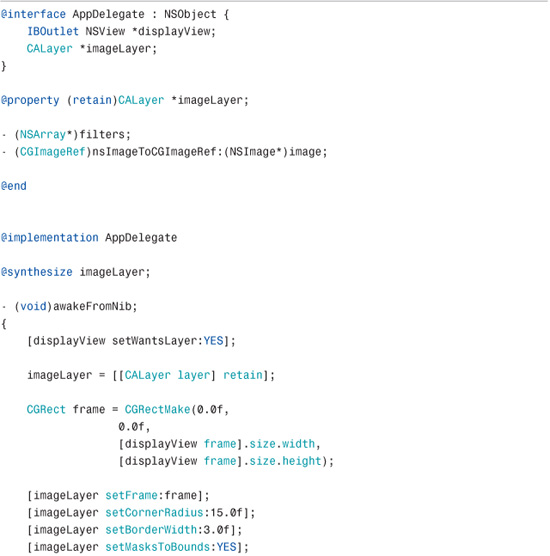
In the AppDelegate implementation, we have to @synthensize the imageLayer object. Prior to Objective-C 2.0, you had to explicitly create setters and getters for your instance variables and you had to wrap changes you made to your instance variables in calls to –willChangeValueForKey and –didChangeValueForKey for your object to be KVC–compliant, which is required for bindings to work. Now, with Objective-C 2.0, this is done automatically when you make your ivar a @property and use the @synthesize keyword. The implementation code to synthesize the imageLayer object is in Listing 6-9.
Listing 6-9 AppDelegate Implementation

Switch to Interface Builder and add a slider for each of the filters we want to apply to the imageLayer object. In Figure 6-5, you can see that we have added sliders for a Gaussian Blur, Hue, Saturation, Contrast, and Brightness.
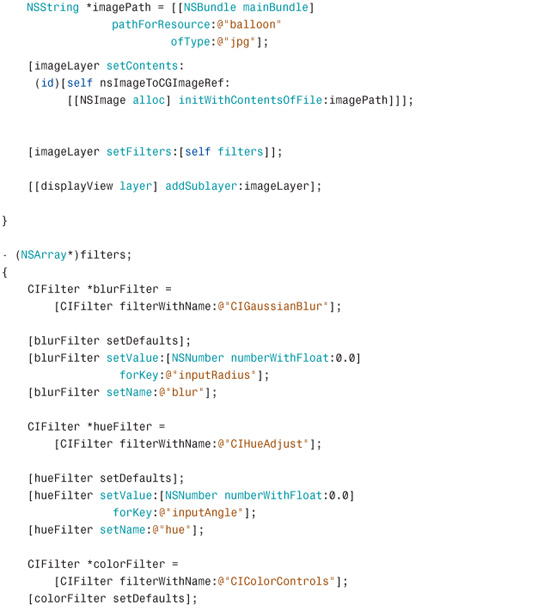
Before we can data bind the sliders, the filters need to be added to the imageLayer. For this, call –setFilters on the layer, as shown in Listing 6-10.
Figure 6-5 Image Adjustment Filter Sliders

Listing 6-10 The Filters Method

This code creates three filters: blurFilter, hueFilter, and colorFilter. The latter, colorFilter, enables us to alter three different values: saturation, contrast, and brightness. Each filter has a set of default values that we can take advantage of by calling –setDefaults. Notice also that we have given each filter a name; these names are used to access filter values with bindings and KVC.
With the filters added to the layer, we can access each filter’s parameters using a key-path. The full key-paths for each slider are shown in Table 6-1.
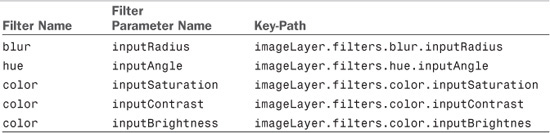
If you look at the bindings menu in the slider inspector in Interface Builder, you can see how these key-paths are applied. Figure 6-6 shows the key path for the hue filter.
Figure 6-6 Bindings for the Hue Filter Slider

The remaining sliders are connected in the same way as specified by the key-paths in Table 6-1.
The complete application has a minimal number of lines of code, largely due to the power of data bindings. The complete AppDelegate implementation is shown in Listing 6-11.
Listing 6-11 Complete AppDelegate Code

Applying Filters to Transitions
The easiest way to start animating properties with Core Animation is by employing the animator proxy object on the view you want to animate. When you apply the animator proxy object, it invokes a number of default transitions that you might or might not notice. If you set the opacity of a layer, for instance, the transition fades by default. (Fade in is for increasing the opacity, and fade out is for decreasing it.) To see this default transition, you call –setOpacity on the animator instead of the view, and the fade transition will animate automatically with no extra coding effort on your part. The true power of transitions, though, comes in when you can specify your own transitions, and this is easily done using filters.
The Default Transitions
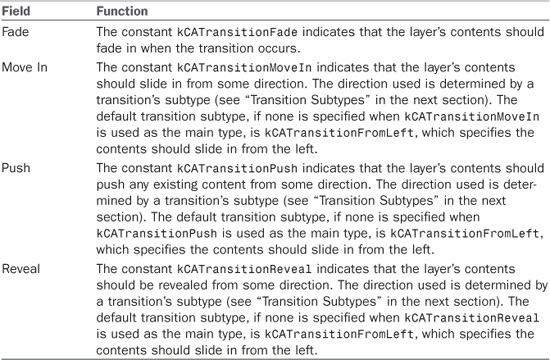
Core Animation provides a set of default transitions (see Table 6-2), which you can specify to use when a property change occurs.
Table 6-2 Default Transition Types and Their Functions
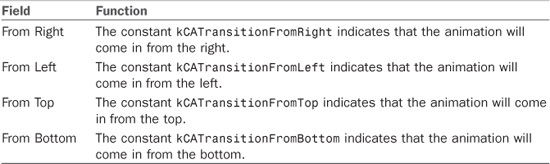
The default transition subtypes are listing in Table 6-3.
Table 6-3 Default Transition Subtypes and Their Functions
If you want to tweak a default transition, simply add the transition to your layer’s actions field, which is an NSDictionary. Specify the property you want to use for your transition by specifying its name as a key-path when you add your CATransition object to the layer’s actions field. When you create the layer that you want to perform the transition on, you can simply set it up there. In the next section, we get into details of returning a specific action for property transitions, but here are the basic steps and the code to alter the transition for a given property change using the default transitions during layer instantiation:
1. Select the property you want to animate, in this case, we use opacity.
2. Create a new dictionary from the layer’s current actions property.
3. Add the transition to the new actions dictionary for the key opacity.
4. Set the layer’s actions property to the newly created dictionary.
The code to set the default transition for the opacity field is in Listing 6-12.
Listing 6-12 Set the Default Transition for Opacity

First, you need to instantiate the CATransition object. Using the default transitions as specified in the Tables 6-2 and Table 6-3, set the type to kCATransitionMoveIn, which causes the transition to move in from some direction. Then, in the subtype field, specify the direction from which the transition should move in; in this example, we move in from the top (kCATransitionFromTop). Next, specify the duration for the transition; in this case, a full second.
At this point, we need to add the transition to the layer’s list of actions. The layer knows to use this transition rather than the default fade because of the key-path. We specify in the dictionary that our key-path is opacity. Any time the layer’s opacity changes, it uses the specified transition rather than the default fade transition.
To make this work, we first instantiate a new dictionary using the original actions field from transitionLayer. We do this just in case some other actions have been specified in the collection.
We know that there isn’t anything else in the dictionary; however, I mention it for clarity. You just need to understand that if you create a new dictionary and set the layer’s actions to it without first grabbing what might have been there previously, you might be confused as to why other transitions are not working correctly.
Finally, set the layer’s actions dictionary to point to the newly created dictionary that contains the CATransition object.
Using Custom Transitions
It is simple to specify the CIFilter you want to use for a transition. To apply the transition, use the CATransition object’s filter parameter to specify the action you want to use on a particular key. When used, the filter parameter overrides the CATransition object’s type and subtype parameters. If you have specified one of the default transitions using these other two parameters, they will be ignored when the filter parameter has been set.
To Delegate or Encapsulate
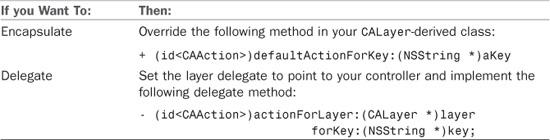
For most applications, you should encapsulate your custom transition functionality by implementing it in your own CALayer-derived class. You can, however, use a delegate method of the CALayer if that is more convenient. That is the only reason to prefer delegation over encapsulation—convenience. For organization and reduced code clutter, choose encapsulation over delegation, but for the quick and dirty approach, delegation is sometimes the way to go. There are two different techniques, and therefore function calls, you can implement, as shown in Table 6-4.
Table 6-4 Methods to Use to Encapsulate or Delegate
It is sometimes quicker and more convenient to simply use a delegate to specify the transition filter you want to use. If you are implementing a custom transition with a delegate, first set the delegate for the layer in question in the application’s delegate code; for example:
[layer setDelegate:self];
Then you implement the delegate method for setting an action for a particular key and layer:
![]()
In this delegate method, you are provided two items that enable you to specify what kind of filter to apply to perform your transition: the layer and the key-path string. You have two options:
• You simply check to see if the layer object passed in is the one you want to work with by comparing memory addresses with the == operator.
• If you’ve assigned the layer a name, you can compare the name string. Then you check to see if the key passed in is the key-path you want to work with.
If you prefer to encapsulate the code in your own CALayer-derived class, you override–defaultActionForKey so that it returns an action for a particular key. The layer is already known because we have encapsulated it; for example:
![]()
The Ripple Transition
We have included two sample projects to demonstrate how to implement the ripple transition in this section. One shows how to implement it using delegation, the other using encapsulation. You might want to open one or both projects now to see the complete solution.
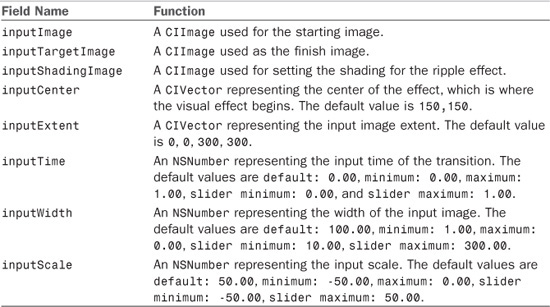
For this example, we change the layer’s transition to use Core Image’s ripple effect filter, CIRippleTransition. It requires the fields shown in Table 6-5 to be specified.
Table 6-5 Ripple Filter Fields
NOTE
For more information about CIRippleTransition, refer to the Core Image Filter Reference document from Apple. This can be found on your system in the Core Reference Library, which you can launch by going to http://developer.apple.com/mac/library/documentation/GraphicsImaging/Reference/CoreImageFilterReference/Reference/reference.html. This opens the Developer Documentation window in Xcode, from which you can search for more detailed information on CIRippleTransition.
The ripple transition seems complex. However, when you create it, you can just call –setDefaults on the filter. The only field you must specify when using this filter on a layer is inputShadingImage. You will probably also want to specify the inputCenter field so that you can specify the location of the transition’s origin point.
In this example, we use the ripple transition filter for the key “bounds.” This means that whenever the bounds field of the layer is changed, the ripple effect will be used instead of the default transition. In Figure 6-7, you can see what the effect looks like in its various stages.
Figure 6-7 Ripple Transition Filter on a Core Animation Layer

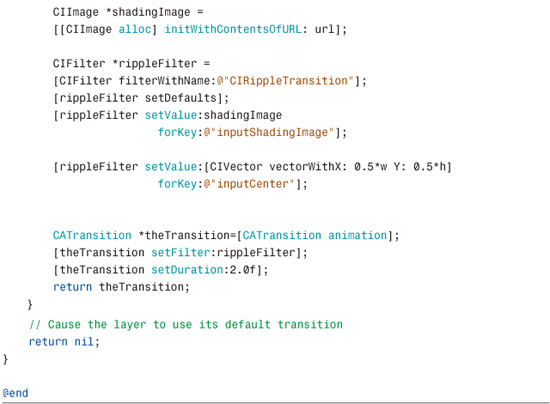
To implement the ripple transition using encapsulation, simply create a derivative layer named RippleLayer. The implementation of this layer code is in Listing 6-13.
Listing 6-13 Ripple Layer Implementation

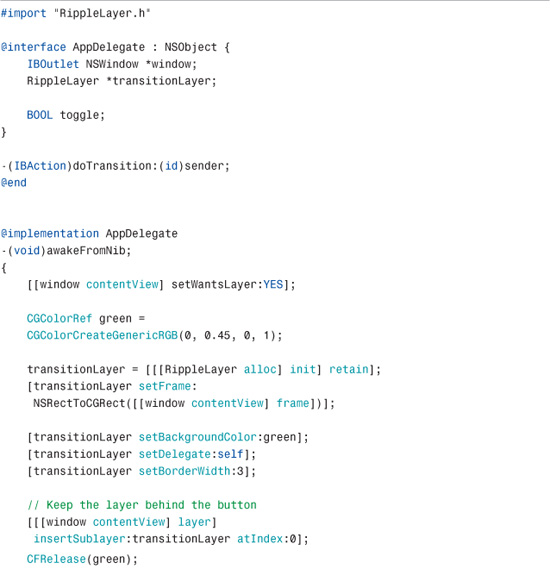
The new RippleLayer class is used in the application’s delegate class. The complete AppDelegate code is in Listing 6-14.
Listing 6-14 AppDelegate Implementation Using Encapsulation
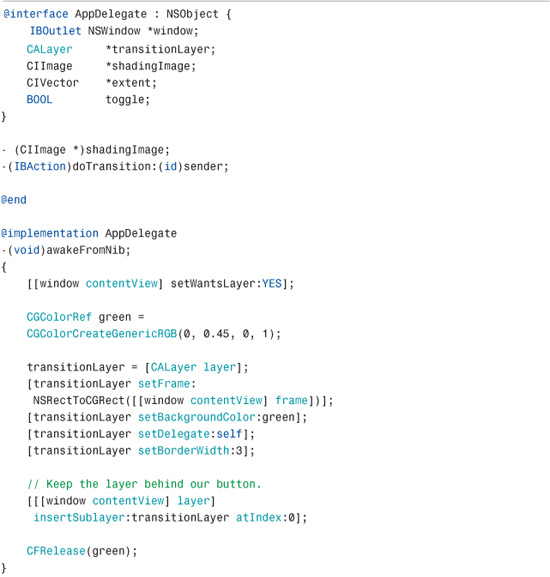
Similarly, you can implement the ripple filter transition when using delegation using the code in Listing 6-15.
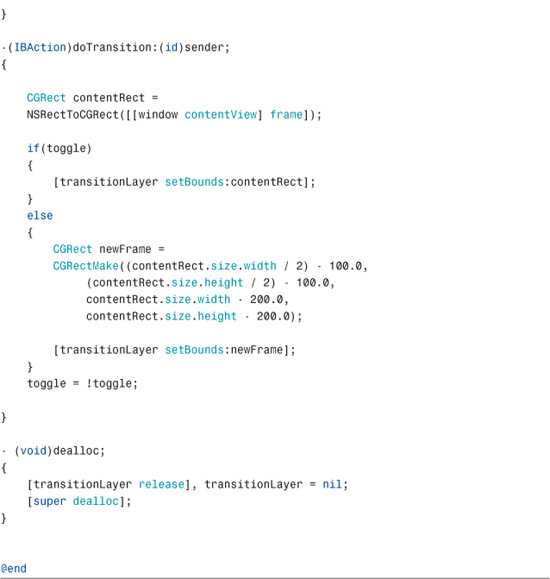
Listing 6-15 AppDelegate Implementation Using Delegation


The –doTransition method is identical regardless of which method you use to implement the transition filter. It uses a variable called toggle that keeps track of whether the layer covers the whole content area or its reduced size. The call to –setBounds on the layer causes the transition animation to occur. When the toggle is set, we transition to the content view frame, and we transition to the smaller frame when it isn’t set. We then toggle the toggle variable.
To summarize, the main differences between encapsulation and delegation follow:
• Encapsulation requires you to create your own CALayer-derived layer class that will override + (id<CAAction>)defaultActionForKey:(NSString *)key;.
• Delegation requires that your application delegate implements -(id<CAAction>)actionForLayer:(CALayer *)layer after setting the layer’s delegate to the AppDelegate instance, usually self.
NOTE
It’s up to you whether you delegate or encapsulate. We tend to choose the encapsulation route as it makes things tidy. However, it is completely legitimate to use the delegation method should that prove to be cleaner or more convenient.
Summary
Whether providing a simple view effect, adding animations based on user interaction, changing filter parameters, or changing the default transition to be something more interesting, Core Image filters are a powerful and valuable component in the Core Animation toolbox.