Chapter 7. QuickTime Layers
In This Chapter
This chapter takes a close look at QTMovieLayer, a lightweight Core Animation layer that provides a simple mechanism for playing QuickTime movies using QTMovie objects from the QTKit framework.
We also look at the QTCaptureLayer, a lightweight Core Animation layer that provides a framework for capturing frames from an imaging device, such as the built-in iSight camera found in most Macs today. Setting up the capture session is the hard part, but after you have it set up, you can use the layer anywhere you want to capture live camera images.
The QuickTime layers provide all the functionality you need at a higher level than their view-based counter parts. This chapter shows you just how much you gain by using layers to take advantage of the QuickTime technologies.
Working with QTMovieLayer
The API for QTMovieLayer is simple. There are only three unique items to a QTMovieLayer:
• + layerWithMovie:
• – initWithMovie:
• – movie
The first two initialize the layer, and the third gets a reference back to the QTMovie object used to initialize the layer. Everything else is simply what you get from the parent CALayer class.
The QTMovie object from QTKit provides all you need for movie control, such as playback, scrubbing, fast forward, and so on. The difference is that QTMovie doesn’t have the visual elements that QTMovieView does. Instead, you must tie your actions to outlets such as sliders and buttons. The action methods available to you in QTMovie are listed in Table 7-1.
Table 7-1 QTMovie’s Action Methods
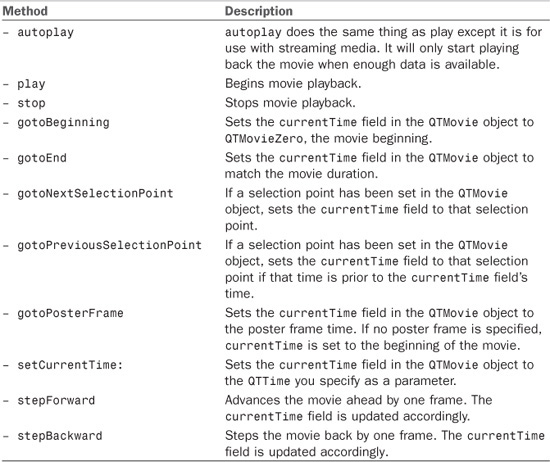
You can simply create an IBAction method in your controller and call any of these methods from those actions. See the upcoming section, “Adding Basic Playback Controls,” to see how this is done.
Creating a Simple QTMovieLayer-Based Player
In the sample project for this chapter called Movie Player with Overlay (on the companion website), we created an application delegate class, called AppDelegate, that we associated with a controller object in Interface Builder. With this set up, the AppDelegate class gives us an entry point to create and display the QTMovieLayer. In this project, in addition to the QuartzCore framework, we added the QTKit framework. It is located at /Developer/SDKs/MacOSX10.6.sdk/System/Library/Frameworks/QTKit.framework if you have the developer tools installed. (Change that path to use MacOSX10.5.sdk if you use Leopard rather than Snow Leopard.)
If all you want to do is play a movie, you simply implement playback on load in the -awakeFromNib method in the AppDelegate using the code in Listing 7-1.
LISTING 7-1 Implementing Simple Movie Playback
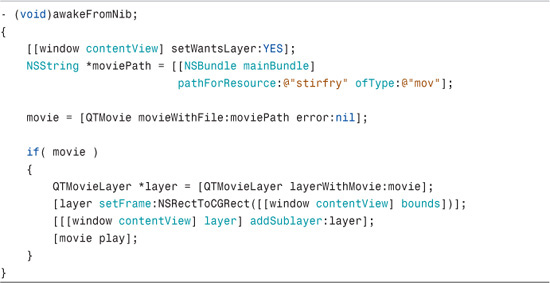
The code begins by informing the contentView the window that it should be layer-backed with –setWantsLayer. Next the code instantiates a QTMovie object from a movie contained in the main bundle. If the movie is valid, we then initialize a QTMovieLayer with it. Next, the code sets the layer’s frame to the content view’s bounds and adds the layer as a sublayer of the content view. It then starts movie playback. That’s it. That’s all you need to display a movie in a QTMovieLayer. That being said, it won’t be a very functional player if we don’t give it some way to control playback.
Adding Basic Playback Controls
Now that we have the basic movie layer created, the next thing we need to do is add some controls to the view so we can play, pause, and go back or forward in the movie. In Interface Builder, add a button to start and stop playback along with two additional buttons: one to advance the frame and one to go back one frame.
NOTE
Note on Sample Code
The sample code in the project called Movie Player with Overlay is complete and shows all the changes we discuss in this section. In other words, all the actions are already connected in Interface Builder for you, and the code reflects only the final state and not the intermediate code we mention.
Listing 7-2 demonstrates the implementation of these button actions.
LISTING 7-2 Control Buttons Implementation
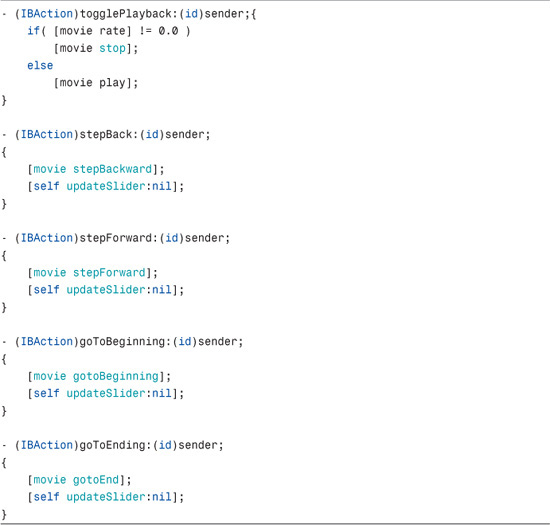
These actions are connected to buttons we created in Interface Builder. Figure 7-1 shows a screenshot of the basic control buttons.
FIGURE 7-1 Playback Control Buttons

When you run the project, notice that the buttons we added to the window in Interface Builder are not visible. The problem is that the buttons are obscured by the movie layer (meaning, the buttons are behind the movie). To bring the buttons to the front, add the movie layer to the root layer, giving it an index of zero with a call to –insertSublayer:atIndex. Finally, change the –awakeFromNib call to –addSublayer to use the –insertSublayer:atIndex call instead, as follows:
![]()
Now if you run the project, the buttons are overlaid on top of the video, enabling you to click them and control the movie.
Tracking Progress and Changing Frames with a Slider
To complete our basic player functionality, we add a slider to the interface that provides a playback progress bar and displays the playback time across the top of the video. First, create an action in Xcode to handle changes to the slider, as shown in Listing 7-3.
LISTING 7-3 Implementing Slider Action
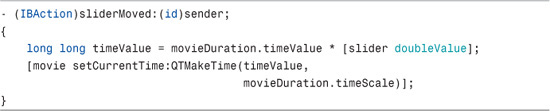
The slider will have a minimum of 0.0 and a maximum of 1.0. Set these values in Interface Builder by selecting the slider with a single mouse click and then providing the values in the slider minimum and maximum fields in the Slider Attributes Inspector. The slider value then provides a decimal fraction that when multiplied by total duration of the movie yields the current time in the movie. Use this time to set the currentTime of the QTMovie object when the slider position is changed. To do so, construct a QTTime structure by calling QTMakeTime with the time value you calculated and pass that to the movie’s –setCurrentTime. This causes the QTMovieLayer to update the view to the current frame.
To obtain the current slider value (between 0.0 and 1.0 as we specified in Interface Builder) in code, you also need to create an NSSlider outlet in the AppDelegate by adding the following line to the header file:
![]()
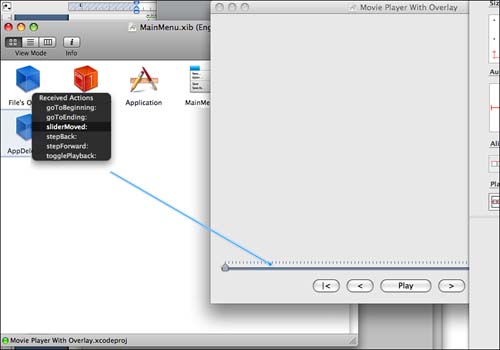
In Interface Builder, add an NSSlider control to the window and make the connections from the AppDelegate to the slider control and from the slider control back to the AppDelegate’s –sliderMoved action. Figures 7-2 and 7-3 demonstrate how to drag these connections in Interface Builder.
FIGURE 7-2 Dragging a Connection from AppDelegate to Slider
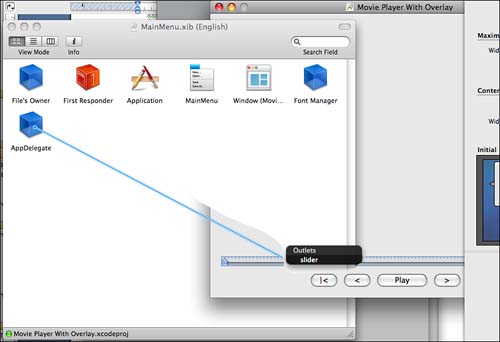
FIGURE 7-3 Dragging a Connection from Slider to AppDelegate
To update the slider’s current position, a timer is implemented whenever playback has started. To add this, update the code for the –togglePlayback action, as shown in Listing7-4.
LISTING 7-4 Implementing a Timer
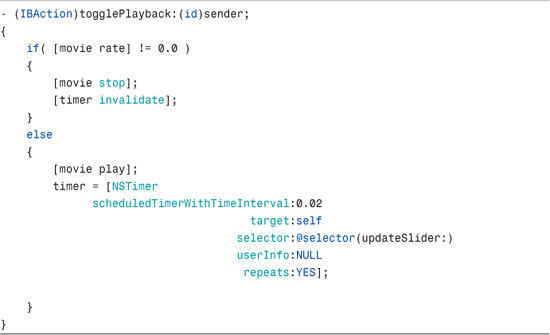
The instance variable timer is instantiated whenever the movie starts playing. When the movie is stopped, we need to stop the timer by calling –invalidate on it.
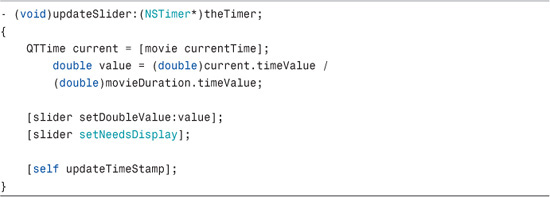
The selector used on each tick of the timer is called –updateSlider. The implementation for this selector is shown in Listing 7-5.
LISTING 7-5 Implementing the Timer Selector
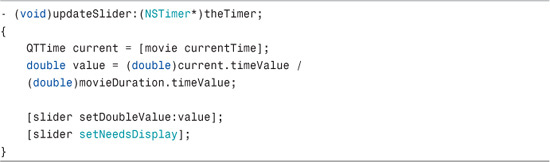
This selector first obtains the current time and divides that by the movie’s total time, which is stored in the movieDuration instance variable. This returns a value between 0.0 and 1.0, which is used directly by the slider. The slider value is set to this percentage, and–setNeedsDisplay is called to tell the slider to update its display.
Adding Overlays
Adding an overlay to a movie is often one of the first things a new QuickTime developer wants to do. This can be a bit of a challenge when using a QTMovieView, as views are heavyweight and don’t provide a simple means for adding a subview that will display properly. If you use views, you either need to create a borderless subwindow that contains the overlay content, or you need to provide it by drawing in an OpenGL context. Both of those solutions add a significant amount of code and complexity to your application, so let’s see how Core Animation can simplify this task.
To add an overlay using Core Animation, create a new CALayer-based layer—either actual or a derivative—and then call –addSublayer on QTMovieLayer. To demonstrate this, the -awakeFromNib call from Listing 7-1 has been modified in Listing 7-6 to add a CATextLayer to overlay the movie.
LISTING 7-6 Implementing an Overlay
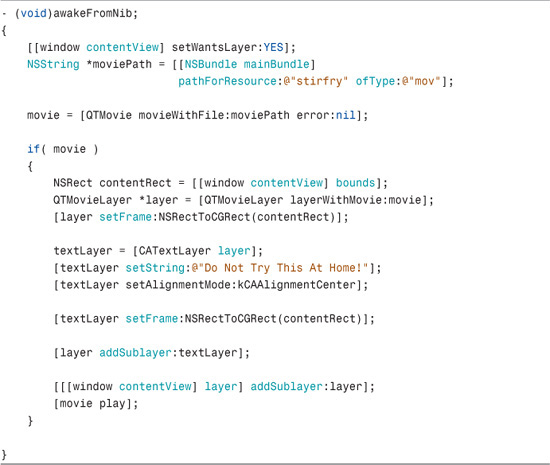
Listing 7-6 adds code to instantiate a CATextLayer as a sublayer of the QTMovieLayer. The text is aligned at the center of the layer frame using setAlignmentMode:kCAAlignmentCenter. Now when the movie plays, you will see the text “Do Not Try This at Home!” displayed at the top of the frame.
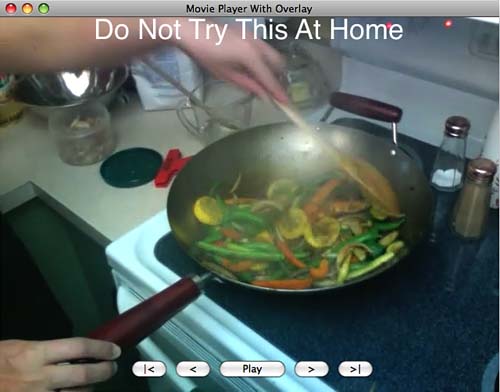
FIGURE 7-4 shows what the basic overlay looks like. Notice that the text layer’s frame is set to the same bounds as the window’s content view. As such, the text displays at the top of the image.
FIGURE 7-4 Displaying “Do Not Try This at Home” Overlay
Overlaying a Time Code
One common requirement when building a movie player is the capability to see a time code for the movie as it is playing. Once again, the code to overlay a time stamp is fairly trivial when using Core Animation layers. To accomplish this, the first step is to create a CATextLayer as in the previous example, and then update the string field of the CATextLayer using –setString on a periodic basis.
In Listing 7-5, we implemented a timer for updating the slider position as the movie played. We can use this same timer to update the text overlay to use the current time of the movie as represented by the value we get back from a call to the movie object’s currentTime.
Now create a function called -updateTimeStamp to update the time code display, as shown in Listing 7-7.
LISTING 7-7 Implementing Timestamp Update

Next, you need to make a few changes to get the time code overlay to work. First, change the -awakeFromNib call to set the overlay text layer’s start string to zero time, QTZeroTime, as shown in Listing 7-8.
LISTING 7-8 Setting the Initial Movie Time
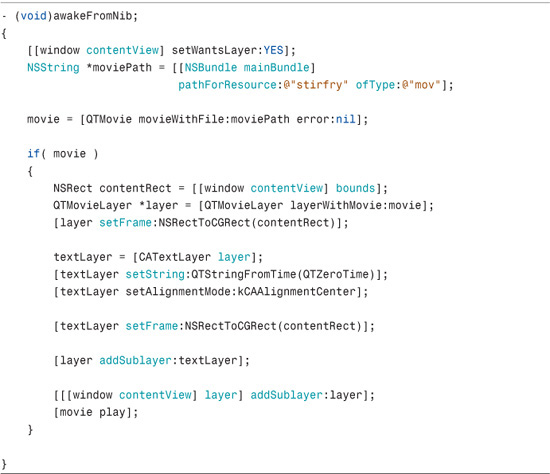
QTZeroTime is a QTTime structure that represents the beginning time of a movie. Next, change the –updateSlider selector that is called by the timer, as shown in Listing 7-9.
LISTING 7-9 Calling Time Stamp Update
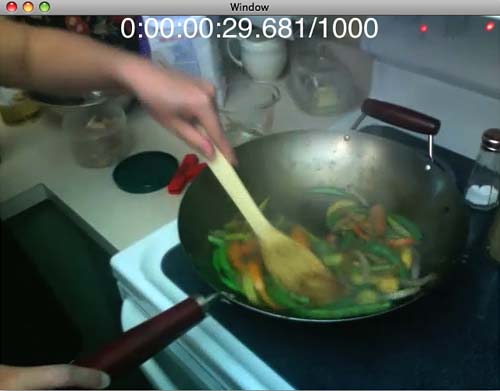
With these changes in place, the time code overlay is updated in real time when the movie is running. In Xcode, load the Movie Player with the Overlay sample project, and click Build and Go to see the overlay in action. Figure 7-5 shows the time code overlay running. As you’ll notice, the time is updated on a regular basis.
FIGURE 7-5 Displaying a Time Code Overlay
QTMovieLayer and contentsRect
In Chapter 2, “What Can and Should I Animate?,” you saw all the different animatable parameters that are available to you. One of the more interesting parameters of a layer we covered there is the contentsRect as it specifies what portion of the layer contents you actually want to display. This is particularly interesting as it relates to the QTMovieLayer because you can duplicate the contents of the QTMovieLayer into another standard CALayer, and while doing so, you can specify which part or rectangle of the QTMovieLayer to display in that layer’s contents.
So you might wonder how that is useful. Say you created a movie that contained a grid of individual videos. You could use this one reference video and duplicate its contents into numerous other CALayers and specify which portion of the layer should display in each CALayer. Or you could take a single movie and slice it up into a grid. Figure 7-6 shows a screenshot of the sample application from the companion website called CopyMovieContents that demonstrates this feature.
FIGURE 7-6 Copy Movie Contents into Individual CALayers
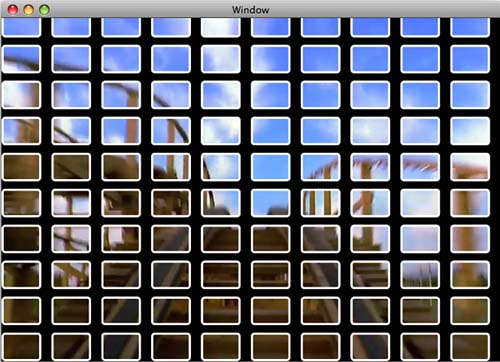
Each of the rectangles you see in the grid are individual CALayers all getting their contents from the same QTMovieLayer. For this application, we create a QTMovieLayer with the roller coaster movie located in /System/Library/Compositions/Rollercoaster.mov. We then add the layer to our view. Then we add each of our individual CALayers with their contents and contentsRect fields set.
The code to implement this is fairly simple. You set the contents of each CALayer to the contents of the movie layer, as shown in the following code:
![]()
Then you set the contentsRect to display only the portion of the movie layer that you want to show in that particular layer. You set the contentsRect field like this:
![]()
As you can recall from Chapter 2, this causes the contents of the CALayer to display one-quarter of the width and height starting one-quarter of the distance from the bottom-left corner of the movie layer.
Interestingly, this trick does not work with the QTCaptureLayer that we cover in the next section.
Working with QTCaptureLayer
QTCaptureLayer provides a means for displaying content from video devices connected to your computer. These devices include your iSight camera or a digital video camera connected via FireWire. To capture the video, you have to set up a QTCaptureSession, which does two things:
• It provides an interface to receive frames from the capture device.
• It enables you to save the images to a movie file and hand that session off to QTCaptureLayer.
The most complicated aspect of capturing video to display in the QTCaptureLayer is not in the layer at all. Rather, the QTCaptureSession object has the majority of the setup. This setup requires several steps that include obtaining a device, opening the device, adding the device to the capture session, and creating a video output object to add raw frames to the capture session.
It will be helpful if you open the sample project called Photo Capture and build the project. When you run it, you see a screen like the one in Figure 7-7.
FIGURE 7-7 Window of Photo Capture Sample Project

Listing 7-10 shows the code needed to create a QTCaptureSession object.
LISTING 7-10 Initializing the Capture Session
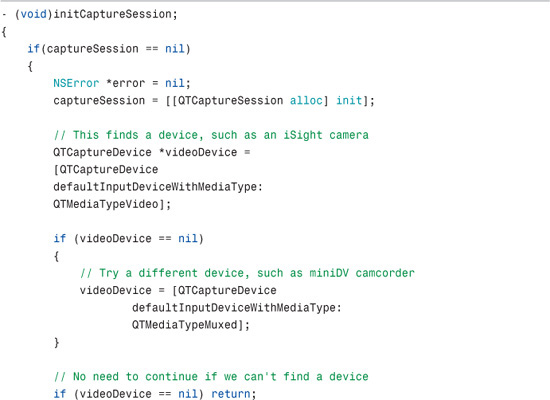

This relatively small amount of code is quite amazing in what it provides. This abstractions Apple enables you to easily capture and display frames in real time. With QTCaptureSession created, the next thing to do is obtain a frame at any given time by setting a delegate for the QTCaptureDecompressedVideoOutput object. After the QTCaptureDecompressedVideoOutput object has been allocated, set its delegate to self using the following:
[output setDelegate:self];
This enables you to capture the output as an image file or to a QuickTime movie object. First, however, let’s take a closer look at how QTCaptureLayer was initialized for the capture session.
Creating and Displaying the QTCaptureLayer
Although it is possible to create a QTCaptureLayer object directly with alloc and init, or with a convenience function such as +layerWithSession, we’re going to subclass QTCaptureLayer so that we can hide QTCaptureSession’s initialization in the init. We do this so that we can encapsulate all our capture functionality in the layer and then reuse the layer wherever we like in our applications that need capture functionality.
In the Photo Capture sample code, we have created this QTCaptureLayer derived class and named it simply CaptureLayer. Listing 7-11 shows the init code used to initialize the layer.
LISTING 7-11 QTCaptureLayer Derived Class Initialization

As you can see, we have called –initCaptureSession here from Listing 7-10. This way, when we initialize a new CaptureLayer object, QTCaptureSession is already fired up and ready to go. Next, add CaptureLayer to the window’s root layer tree. You can see how this code is implemented in the AppDelegate’s –awakeFromNib, as shown in Listing 7-12.
LISTING 7-12 Implementing CaptureLayer in the AppDelegate

When you run this code, you see that the view we created on the left of the window is now filled with whatever your iSight camera or miniDV camera is currently pointing at.
Capturing the Current Image
Naturally, you will likely want to capture the current image to take a picture, just as you would when using Apple’s Photo Booth application. To implement this, the QTCaptureLayer-derived class called CaptureLayer is added to the application. This way, we can implement the –getCurrentImage function to return an NSImage* containing the current image when the action is triggered. Looking back to Listing 7-10, you can see that we set the delegate for the QTCaptureDecompressedVideoOutput object in the –initSession code. We now need to implement its delegate method,–captureOutput, as shown in Listing 7-13.
LISTING 7-13 Implementing the Capture Output Callback
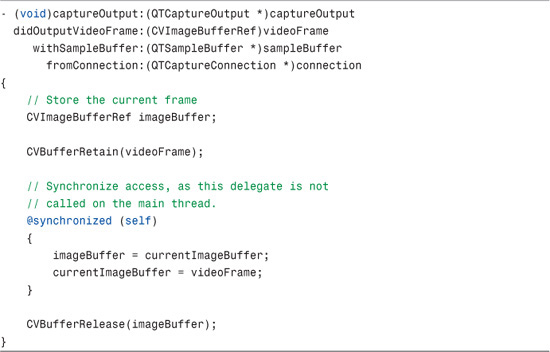
This delegate is continuously called at a regular interval by the QTCaptureSession API behind the scenes. The currentImageBuffer object is kept up to date in this delegate because it needs to be ready for when the user clicks the button to take a picture. When the user clicks the button to take the picture, the QTCaptureLayer-derived class is queried for the current image. To capture the picture into the layer, we have added the –getCurrentImage function, as shown in Listing 7-14.
LISTING 7-14 Implementing Current Image Capture
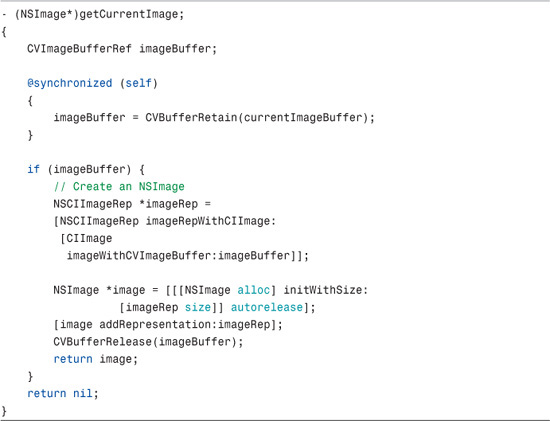
Access to the currentImageBuffer object is synchronized on a regular basis as it is written to by the captureOutput callback function in Listing 7-13. It runs on its own thread, making the synchronized block necessary. If the image buffer was successfully retained, we can convert it to an NSImage* and return it to the calling function.
Finally, we add an action to the AppDelegate that fires when the Capture Image button is pressed. The action grabs the current image from the QTCaptureLayer-derived class (CaptureLayer) and sets the NSImageView’s image with it; Listing 7-15 shows how this is implemented.
LISTING 7-15 Setting the Image View with the Current Image

When you run the Photo Capture application, the view on the left displays the QTCaptureLayer in an NSView. When you click the Capture Image button, the view on the right updates by snagging the current image from the capture layer. When you set the image on the image view, it simply displays the image in its frame. If you want to save the image, you would obtain an NSData object by calling –representationUsingType on the NSImage. When you have this NSData object, you can then call –writeToFile:atomically: to write the file to disk.
Summary
The QuickTime Core Animation layers provide some powerful functionality both for displaying movies on disk and for real-time video display using a variety of supported capture devices. They make these complicated tasks almost trivial to implement in your own video applications.