20. StoreKit: In-App Purchasing
New to the 3.0 SDK, StoreKit offers in-app purchasing that integrates into your software. With StoreKit, end users can use their iTunes credentials to buy features, subscriptions, or consumable assets from within an application after initially purchasing and installing the application from App Store. This chapter introduces StoreKit and shows you how to use the StoreKit API to create purchasing options for users. In this chapter, you read about getting started with StoreKit. You learn how set up products at iTunes Connect and localize their descriptions. You see what it takes to create test users and how to work your way through various development/deployment hurdles. This chapter teaches you how to solicit purchase requests from users and how to hand over those requests to the store for payment. By the time you finish this chapter, you’ll have learned about the entire StoreKit picture, from product creation to sales.
Getting Started with StoreKit
When your application demands a more complex purchase model than buy-once use-always, consider StoreKit. StoreKit offers developers a way to sell additional products from within an application. It offers iTunes payments to create additional revenue streams. There are many reasons to use StoreKit. You might support a subscription model, provide extra game levels on demand, or introduce other unlockable features via this new 3.0 framework.
That isn’t to say that users download new code. All StoreKit-based applications ship with their features already built in. For example, StoreKit purchases might let users access parts of your application that you initially set as off limits. They can also download or unlock new data sets, or authorize access to subscription-based Web feeds. StoreKit provides the way users can pay to access these features, letting them go live after purchase.
It’s important to note that you cannot use in-app purchasing to sell “hard” assets (such as T-shirts) nor intermediate currency (such as store credit for a Web site) at this time. And, yes, real gambling is forbidden as well. Any goods sold via in-app purchase must be able to be delivered digitally to your application.
With StoreKit, you choose the items you want to sell and you set their price. StoreKit and iTunes take care of the details. They provide the infrastructure that brings that storefront into your application through a series of API calls and delegate callbacks.
Unfortunately, StoreKit presents a paradox, which is this: You cannot fully develop and test your in-application purchasing until you have already submitted your application to iTunes. And you cannot fully submit your application to iTunes knowing that you’re not done developing it. So what’s a developer to do? How do you properly develop for StoreKit?
There is, fortunately, a solution. This solution is shown in Figure 20-1. To work around the StoreKit paradox, you upload a somewhat-working but not fully functional application skeleton to iTunes Connect. You do this with the full understanding that you’ll be rejecting your binary and replacing it at some point in the future.
Figure 20-1 The StoreKit development process.
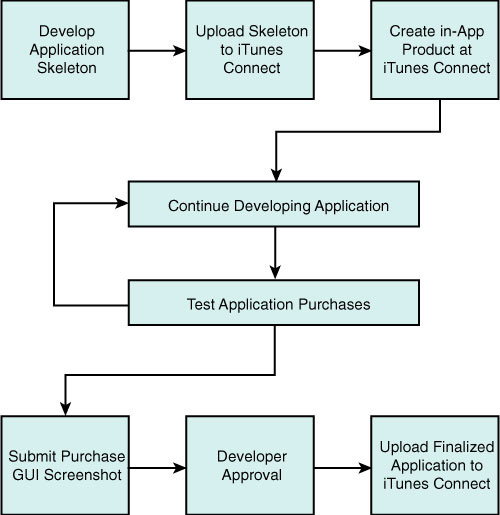
The reason you have to upload that skeleton is that you need an application in active review to begin developing StoreKit applications and products. You cannot create new in-application purchases at iTunes Connect, and you cannot test those purchases with the sandbox version of StoreKit without a “live” application. For purposes of StoreKit, this means you need an application either in review or already accepted at App Store.
Note
When submitting your skeleton application for testing, roll back your availability date in the iTunes Connect Pricing tab. This prevents your “not ready for prime time” app from inadvertently appearing for sale on App Store until you’re ready. Reset that date once you’re ready to go live.
Until October 2009, StoreKit applications could not be free. Before then, you needed to choose at least Tier 1 (corresponding to US$0.99) or higher when pricing your application. StoreKit and iTunes Connect no longer limit in-application purchasing to paid applications.
Once you’ve submitted your application and created at least one in-application purchase item, you can begin to fully develop and test your application and its purchases. Use the sandbox version of StoreKit along with test user accounts to buy new items without charging a real credit card. The sandbox StoreKit lets you test your application features before, during, and after payment.
When you have finished development, and are ready to submit a final version to App Store, you complete the StoreKit development process at iTunes Connect. You must upload a screenshot showing the GUI for your application purchase, you must explicitly approve each in-app purchase item, and you must reject your skeleton and upload a fully working version of your application.
The following sections one walk you through this process. You read about each of these steps in greater detail and learn how to add StoreKit to your application.
Creating Test Accounts
Test accounts play a key role in the StoreKit development scenario. Create one or more new user accounts before you begin developing new StoreKit-enabled applications. These accounts allow you to log in to iTunes to test your application payments without charging real money.
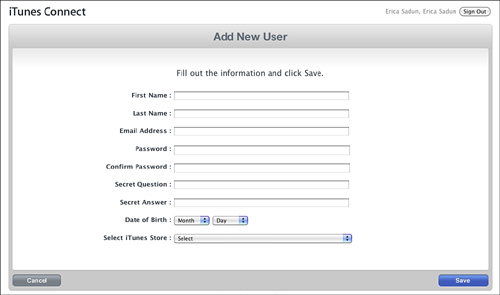
Here’s how you add a new user. Log in to iTunes Connect, and choose Manage Users > In App Purchase Test User. Click Add New User. iTunes Connect presents the form shown in Figure 20-2. When filling out this form, keep the following points in mind.
• Each e-mail address must be unique, but it doesn’t have to be real. So long as the address does not conflict with any other one in the system, you’ll be fine. As you might guess, other developers have already taken the easy to type addresses like abc.com, abcd.com, and so on.
• Names do not have to be real. Birthdates do not have to be real. I use a basic alphabetical naming system. My users are “a Sadun,” “b Sadun,” “c Sadun,” and so forth. Everyone was born on January 1st.
• Passwords must be at least six characters long. If you plan on typing the password in repeatedly, stick to lowercase letters. If you use uppercase, you’ll have to handle the Caps key on the iPhone. If you use numbers, you’ll have to switch between keyboard styles. A single easy-to-remember disposable password can be used for all your test accounts.
• The secret question/answer fields are meaningless in this context, but they cannot be left empty. You cannot enter the same string for both fields, and each field must be at least six characters long. Consider using a question/answer pair like “aaaaaa” and “bbbbbb” to simplify account creation.
• Selecting an iTunes Store is required. This store sets the region for your testing. If you plan to use multiple language support for various stores, make sure you create a test account in each affected region.
• You can delete user accounts and add new ones on the fly. If you run out of users who haven’t yet purchased any items, just create new users as needed.
• You do not want to sign into your “account” in the Settings application. If you try to do so, the iPhone will force you to consent to its standard user agreement and will then try to extract a valid credit card from you. Use Settings to log out of an account but avoid it for logging in to one.
Figure 20-2 Add new test users in iTunes Connect by filling out this form.
Creating New In-App Purchase Items
Each in-application purchase item must be registered at iTunes Connect. To create a new purchase, log in and navigate to Manage Your In App Purchases. Click Create New and choose an application from the list shown. That list reflects all apps, whether already in App Store or currently in review. Select the application by clicking on its icon.
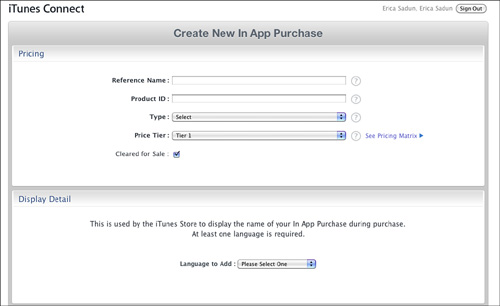
After selecting an application, iTunes Connect prompts you to create a new in-app purchase, as shown in Figure 20-3. This figure shows the two top sections from that screen (pricing and details). A third, review, section appears below this, and you can scroll down to see it.
Figure 20-3 Create new purchase items in iTunes Connect by filling out this form.
Filling Out the Pricing Section
The pricing section specifies how a purchase is identified and priced. You must enter a reference name and a product identifier. The reference name is arbitrary. It is used to provide a name for iTunes Connect’s search results and in the application’s Top In-App Purchase section in App Store. So enter a meaningful name (e.g., “Unlock Level 3 Purchase”) that helps you and others know what the item is and how it is used in your application.
The product ID is a unique identifier, similar to the application identifier used for your app. As a rule, I use my application ID and append a purchase name to that such as com.sadun.scanner.optionalDisclosure. You need this identifier to query the store and retrieve details about this purchase. The same rules apply to the product ID as to application IDs. You cannot use an identifier more than once. You cannot “remove” it from App Store. Once registered, it’s registered forever.
Next, select a purchase type. You may choose any of the following three types. Once you select a type and save the new purchase item, you cannot go back and change it. That type is irrevocably tied to the product ID. If you make a mistake, you must create a new item with a new product ID.
• Non-consumable—Users purchase this item once. Thereafter, they can redownload this purchase for free, as many times as they want. Use this option for features that users can unlock like extra game levels.
• Subscription—Users purchase this item over and over during the lifetime of the application. You can check whether an account has already purchased an item, but you cannot redownload the item without paying again. Use subscriptions to provide paid access to controlled data for a period of time like for-pay newspaper articles and medical database searches.
• Consumable—Consumables work like subscriptions in that each download must be paid for, but they are not used in the same way. Consumables are items that can be purchased multiple times, such as extra hit points or additional CPU time on a primary server. Consumable items can be used up (“consumed”) without an associated time period like you have with subscriptions.
Leave the final item in the Pricing section (Cleared for Sale) checked. The Cleared for Sale check box ensures that your applications, both development and distribution, have programmatic access to the purchase item.
Note
You can change the pricing tier and Cleared for Sale check box at any time during review. You must submit new changes for review once the purchased items have been approved. You cannot edit the identifier or reuse an existing identifier, nor can you change the type of product after creating the purchase item.
Adding Item Details
Each purchasable item must be able to describe itself to your application. The item has to report its price, which was set in the Pricing section, and offer both a display name (the name of the product that is being purchased) and description (an explanation to the user that describes what the purchase is and does). These latter two elements are localized to specific languages. At the time of writing this book, those languages are
• English (also Australian English, Canadian English, UK English)
• Dutch
• French (also Canadian French)
• German
• Italian
• Japanese
• Spanish (also Mexican Spanish)
• Simplified Chinese
You can create data for any or all these languages so long as you define at least one. You cannot submit a new purchase item without creating one or more name/description pairs. For most developers who are targeting the U.S. store, a single English entry should cover your needs.
If your application is sold world wide, you’ll likely want to mirror the existing localizations you use with your app descriptions and in-app features. If your iTunes store marketing material provides a Japanese localization, for example, and your application offers a Japanese language version, you’ll want to create a Japanese-localized in-app purchase description as well. If you do not, you can still use in-app purchases but the language will default to whatever localizations you have provided.
Note
Always use native speakers to localize, edit, and proof text.
When entering this data, keep some points in mind. Your application is the consumer for this information. The text you type in iTunes Connect helps create the purchase GUI that your application presents to the user. The user’s language settings select the localization. If you plan to use a simple alert sheet with a Buy/Cancel choice, keep your wording tight. Limit your verbosity. If you will use a more complex view, consider that as well.
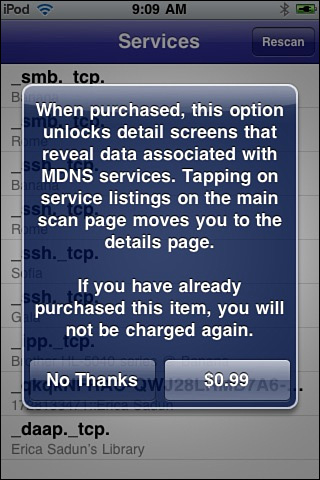
No matter how you will create your GUI, remember that your description has to convey the action of purchasing as well as a description of the item being purchased—for example, “When purchased, this option unlocks this application’s detail screens. These screens reveal even more data about the scanned MDNS services.” A shorter description like “Extra detail screens” or “Unlock more details” doesn’t explain to users how the purchase works and what they can expect to receive.
Note
You can edit item display details at any time during review at iTunes Connect. You must submit new changes for review once the purchased items have been approved.
Submitting a Purchase GUI Screenshot
The For Review section appears at the bottom of the item sheet. You do not use this section until you have finished developing and debugging your application. When you have done so, upload a screenshot into the provided field. The screenshot must show the in-app purchase in action, demonstrating the custom GUI you built.
Figure 20-4 displays the kind of screenshot you might submit. Valid pictures must be 320×480, 480×320, 320×460, or 480×300 pixels in size. (These latter two sizes use screenshots with the 20-pixel status bar removed.) The screenshot highlights how you have developed the purchase feature. Submit an image highlighting the purchase.
Figure 20-4 You must submit a screen shot showing your in-application purchase GUI to Apple when you are ready to have that purchase reviewed.
Developer Approval
After you have finished your sandbox testing and are confident that the application and the in-app purchasing are ready for Apple to review, you must personally approve the application. Go to iTunes Connect > Manage In-App Purchases and select any purchase item. Click the green Approve button.
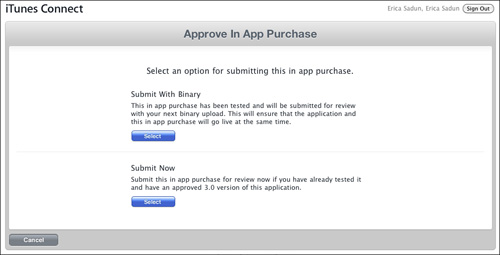
You are prompted to select how you want to submit, as shown in Figure 20-5. Choose Submit With Binary to submit the purchase item with your next binary upload. Choose Submit Now for review with an already-approved 3.x or later application. The first option is meant for applications that have just now added an in-application purchase feature. The second option allows you to add new purchases to an existing, tested product.
Figure 20-5 Choose the way you want Apple to review an in-application purchase choice.
Submitting the Application
Once you approve the application, it’s ready to enter the review queue. If you chose the first option, make sure you follow up by submitting a new copy of your binary. Otherwise, the purchase item and the application will not be reviewed together.
To submit the new binary, reject the current version. Upon doing so, you no longer are able to test your application with the sandbox purchase server. You must have an application that’s in review or accepted to use these services. Go ahead and upload the new fully working version.
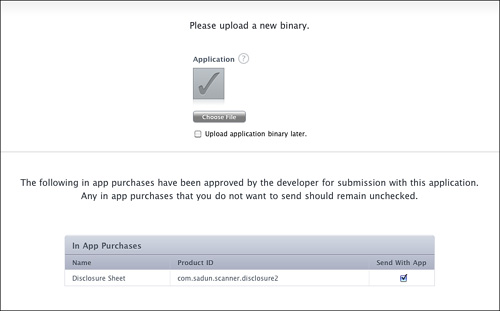
Upon reuploading a binary, iTunes Connect prompts you to submit in-app purchases. Figure 20-6 illustrates this. Check the in-app items you want to use and save your changes. The purchase item and the application will be reviewed together, solving the “which came first” paradox.
Figure 20-6 Choose the in-app purchases you want to have reviewed when you resubmit your self-rejected binary.
Building a GUI
Apple’s StoreKit framework does not provide a built-in GUI for soliciting user purchases. You must create your own, like the one shown previously in Figure 20-4. You retrieve localized prices and descriptions from the App Store by creating SKProductsRequest instances. This class asks the store for that information based on the set of identifiers you provide. Each identifier must be registered at iTunes Connect as an in-app purchase item.
Allocate a new products request instance and initialize it with that set. You can add identifiers for items you’ve already established as well as items you’re planning on adding in the future. Since each identifier is basically a string, you could create a loop that builds identifiers according to some naming scheme (e.g., com.sadun.app.item1, com.sadun.app.item2, etc.) to provide for future growth. This snippet searches for a single item.

When using a products request, your delegate must declare and implement the SKProductsRequestDelegate protocol. This consists of three simple callbacks. Listing 20-1 shows these callback methods for a simple application. When a response is received, this code looks for a product (only one was requested, per the code snippet right before this paragraph) and retrieves its localized price and description.
Listing 20-1 Products Request Callback Methods
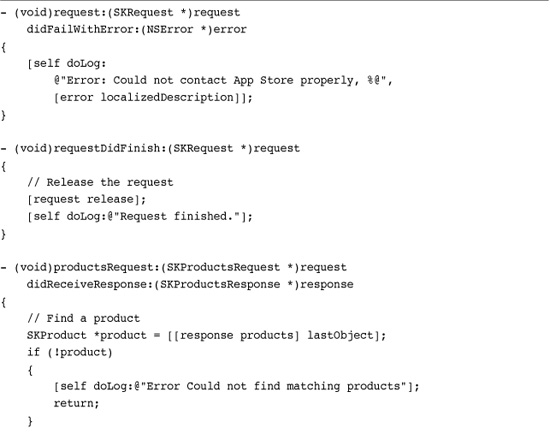
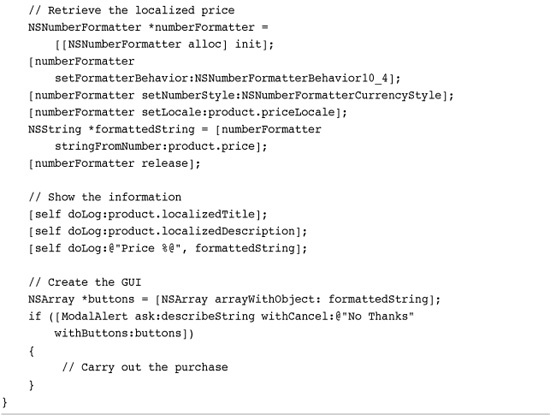
It then builds a simple alert using the description as the alert text and two buttons (the price and “No Thanks”). This alert functions as a basic purchase GUI.
Note
StoreKit will not work if you are not connected to the network in some way. Refer to Chapter 14, “Device Capabilities,” to find recipes that help check for network access.
Purchasing Items
To purchase items from your application, start by adding a transaction observer. The best place to do this is in your application delegate’s finished-launching method. Use your primary model class as the observer and make sure that class declares and implements the SKPaymentTransactionObserver protocol.
[[SKPaymentQueue defaultQueue] addTransactionObserver:mainClass];
With an observer in place, you can use the GUI from Listing 20-1 to begin the actual purchase.
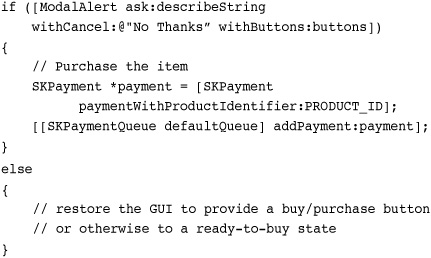
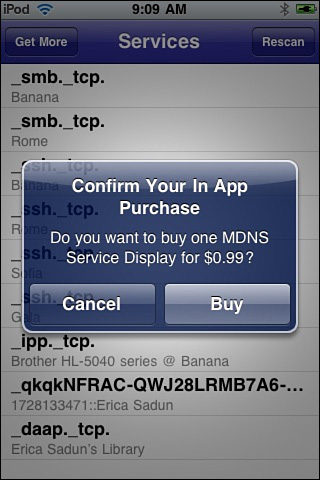
StoreKit prompts the user to confirm the in-app purchase, as shown in Figure 20-7, and then takes over the purchase process. Users may need to log in to an account before they can proceed.
Figure 20-7 Users must confirm the purchase after moving past your user interface into the actual App Store/StoreKit purchasing system.
Signing Out of Your iTunes Account for Testing
To use the test accounts you set up in iTunes Connect, be sure to sign out of your current, real account. Launch the Settings application, choose the Store preferences, and click Sign Out.
As mentioned earlier in this chapter, do not attempt to sign in again with your test account credentials. Just quit out of Settings and return to your application. After clicking Buy, you are prompted to sign in to iTunes. At that prompt, choose Use Existing Account and enter your account details.
Note
You cannot use the simulator to test StoreKit. All testing must be performed on an actual iPhone or iPod touch.
Regaining Programmatic Control After a Purchase
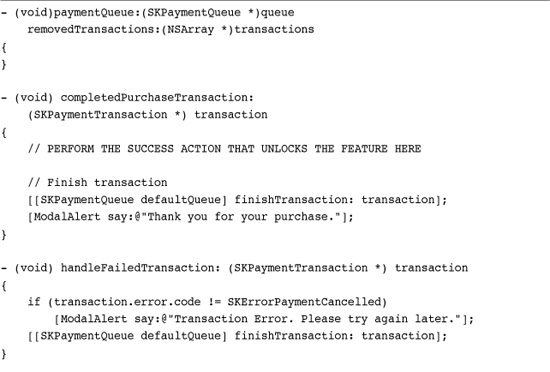
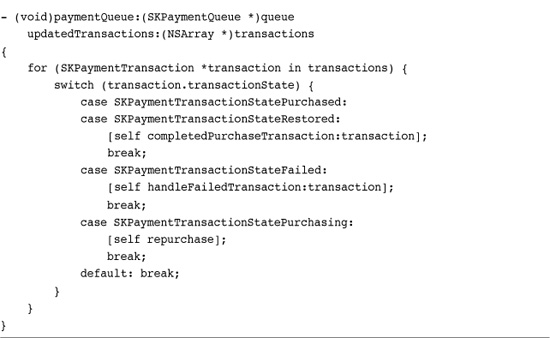
The payments transaction observer receives callbacks based on the success or failure of the payment process. Listing 20-2 shows a skeleton for responding to both finished and unfinished payments. After the user finishes the purchase process, the transaction will have succeeded or failed. On success, perform whatever action the user has paid for, whether by downloading data or unlocking features.
Listing 20-2 Responding to Payments
Registering Purchases
You can use any of a number of approaches to register purchases. You can synchronize with a Web server, create local files, set user defaults, or add keychain entries. The solution you choose is left up to you. Just don’t lose track of purchases. Once a user buys an unlockable feature, subscription, or data, you must guarantee that your application supplies the promised element or elements.
It’s easiest to unlock features through user preferences. This snippet creates a new default, indicating that the user has purchased a disclosure feature. Upon completing the purchase, the code updates the user defaults database and hides the “buy” button from the interface.
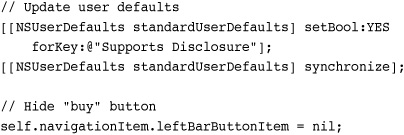
The application can check for this preference each time it launches.
For the most part, users cannot hack their way into your application to update preferences settings by hand. The application is sandboxed (other applications cannot access your files), and the data cannot be edited from the Macintosh backup system. It is possible in jailbroken systems, if you use just a simple preference like this. For anyone worried about piracy, consider a more secure approach.
If you have any concerns, consider using some sort of verifiable authentication key rather than a standard Boolean value. Alternatively, use the system keychain (see Chapter 13, “Networking”). The keychain provides a secure data store that cannot easily be manipulated from the jailbroken iPhone command line.
A simple example of storing the purchase on the keychain would be a routine like this.
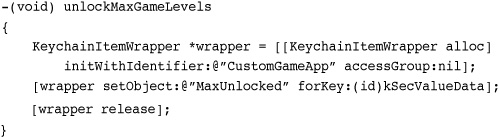
Using the keychain provides the additional benefit that the data stored here will survive an application being deleted and then later reinstalled.
When you use an offsite server to register and authenticate purchases, make sure to echo those settings on the device. Users must be able to use their applications regardless of whether they have network access. A local setting (e.g., “Service enabled until 6 June 2011”) lets the application run and provide proper feedback, even when a subscribed service is inaccessible.
Several start-ups like Urban Airship (urbanairship.com) and Key Lime Tie’s iLime service (ilime.com) now offer support for in-app purchase data delivery. They provide servers that allow you to offload content from your application, handle its delivery to your customers, and allow you to keep that content up to date as needed.
Restoring Purchases
Purchase may be restored on a device where an application was uninstalled and then reinstalled, or where an application was installed on a second device associated with the same iTunes account. If a customer’s iTunes account has multiple devices, like a family with five iPhones and iPods, a purchase by any of the devices allows all the devices to download that purchase with no additional charge.
StoreKit allows you to restore purchases, which is particularly important for consumable and subscription items where you do not want to allow the user to repurchase an already-valid item. In the case of a nonconsumable item, the user can repurchase without cost ad infinitum. For these nonconsumable items, you can simply submit your purchase request. The App Store interface will present a window informing the user that they have already purchased this item, and that they can download it again for free.
To restore purchases associated with an iTunes account, call restoreCompletedTransactions. This works just like adding a payment and involves the same callbacks. To catch a repurchase separately from a purchase, check for SKPaymentTransactionStateRestored as the payment transaction state, as in Listing 20-2.

That’s because purchase events provide not one but two possible successful outcomes. The first is a completed purchase. The user has bought the item and the payment has finished processing. The second is the restored purchase described here. Make sure your payment queue handler looks for both states.
There’s a loophole here. Consider providing a consumable purchase item such as a credit to send a FAX. Should the user uninstall the application and then reinstall, any repurchase functionality may restore an asset that has already been used. Applications with consumable products must be designed with more thought for the security infrastructure and demand server-side accounting that keeps track of user credits and consumed assets.
Go ahead and restore purchases but ensure that those purchases properly coordinate with your server database. As you’ll read about shortly in the section that follows this one, Apple provides a unique identifier for each purchase by way of a purchase receipt. A repurchased item retains that original identifier, allowing you to distinguish between new purchases and restored ones.
Purchasing Multiple Items
Users can purchase more than one copy of consumable items and subscriptions. Set the quantity property for a payment to request a multiple purchase. This snippet adds a payment request for three copies of a product, perhaps adding three months to a subscription, 3,000 hit points to a character, or so forth.

Handling Delays in Registering Purchases
If your purchase connects with a server and you cannot complete the purchase registration process, do not finalize the transaction. Do not call finishTransaction: until you are guaranteed that all establishment work has been done for your customer.
Should you fail to set up your user with his or her newly purchased items before the application is quit, that’s okay. The transaction remains in the purchase queue until the next time the application launches. You are given another opportunity to try to finish your work.
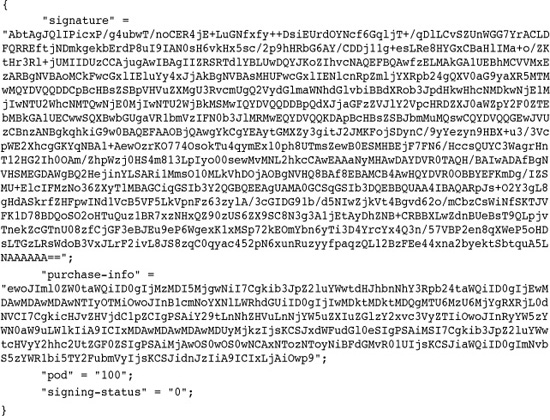
Validating Receipts
A successful purchase transaction contains a receipt. This receipt, which is sent in raw NSData format, corresponds to an encoded JSON string. It contains a signature and purchase information. Here is a sample receipt, from one of my purchases.
Apple strongly recommends that you validate all receipts with their servers to prevent hacking and ensure that your customers actually purchased the items they are requesting. Listing 20-3 shows how.
Listing 20-3 Checking a Receipt
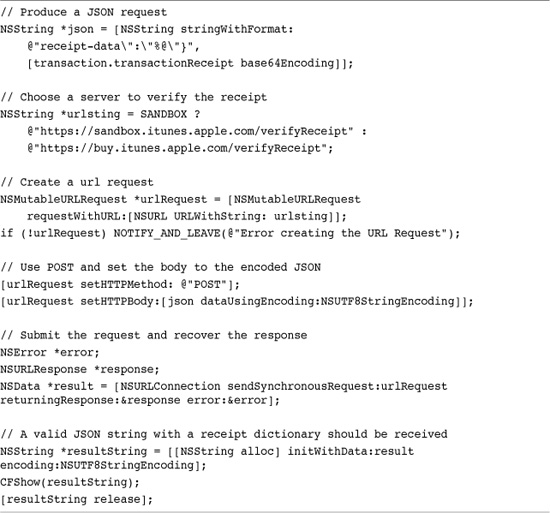
You must POST a request to one of Apple’s two servers. The URL you use depends on the deployment of the application. Use buy.itunes.apple.com for production software and sandbox.itunes.apple.com for development.
The request body consists of a JSON dictionary. The dictionary is composed of one key (“receipt-data”) and one value (a Base64-encoded version of the transaction receipt data. I normally use the CocoaDev NSData Base 64 extension (from http://www.cocoadev.com/index.pl?BaseSixtyFour) to convert NSData objects into Base64-encoded strings. CocoaDev provides many great resources for Mac and iPhone developers.
A valid receipt returns a JSON dictionary similar to the following. The receipt includes the transaction identifier, a product ID for the item purchased, the bundle ID for the host application, and a purchase date. Most importantly, it returns a status.

A valid receipt always has a 0 status. Any number other than 0 indicates that the receipt is invalid.
Simply checking for the status may not be sufficient for validation. It’s not too difficult to set up a proxy server to intercept calls to the validation server and return JSON {“status”:0} to all requests. What’s more, the receipt data that is sent along with the validation request can be easily deserialized into exactly the same data shown in the “receipt” portion of the JSON dictionary shown above. For that reason, you should always use receipt validation cautiously and as part of the overall purchase process, where it’s less likely that proxy servers can override communications with Apple.
Summary
The StoreKit framework offers a great new way to monetize your applications. As you read in this chapter, you can set up your own storefront to sell services and features from your application. Here are a few final thoughts:
• Although the entire setup and testing process may seem a little “Which came first? The chicken or the egg?” it is demonstrably possible to develop and deploy a StoreKit-based application with a minimum of headaches.
• Remember to reject and then resubmit your binaries after adding new purchasable items. You want to ensure that both the application and the items are ready for Apple to review.
• Avoid finalizing transactions until your new-purchase setup is completely, utterly, 100% done, even if that means waiting for an application relaunch. At the same time, inform the user that the purchase process is experiencing unexpected delays.
• Your methods can only request product information from in-app items that are registered to the currently running application. You cannot share requests across apps.
• Don’t forget to set up the purchase observer! More heads have been banged against desks and hair pulled out over that one step than any other StoreKit issue.