
Microsoft Project is an enormously popular software package. It has millions of users around the world, and among them are both fierce opponents and ardent proponents. That's to be expected when you consider how central a role Project plays in the actual practice of project management. It's used in every industry and on projects of all sizes, including some worth hundreds of millions of dollars. It can be used as informally as a whiteboard in a meeting room or it can be the official repository of cost data used for paying project vendors.
Whether Project is the best project management software tool is certainly subject to debate—there are many, many excellent competitive offerings. Suffice it to say that Microsoft has successfully leveraged its market share of desktop applications to make Project the most commonly used project management software in the world. This chapter is included for all readers who are trying to get the greatest value from Microsoft Project while minimizing the time spent entering and updating the data. As an adjunct to this chapter, owners of this book are entitled to download several simple tutorials for using Project, and these may be found at www.versatilecompany.com/FFMBAinPM.

If you've read the previous chapters of this book, you know that managing a project involves keeping track of a lot of data and making calculations—both excellent tasks for computers. Project management software is designed specifically to apply project management principles. If you are committed to practicing project management, you'll want to master some project management software tool.
One of the primary benefits of using a project management software tool consistently is that it both enables you and requires you to be disciplined in the way you collect and present project management information. Consistency builds habits and eventually leads to a culture that rigorously practices project management.
The challenge is that all project management software requires data—both initial planning data and project control data such as task completion reporting. The amount of data can seem overwhelming when you consider that on projects, the plan can change every day. In practice, however, the amount of data is not the real obstacle; people struggle with Project because they just don't understand how it works! The amount of effort required to use Project drops dramatically when it is used properly. The intent of this chapter is to make sure you know enough to make Project a practical tool.
Conventions for Navigating Project Used in this Chapter
This chapter does not contain any step-by-step instructions for using Project. However, it does reference specific menu options for navigation, both in the text and in the figures. These references are all in bold. For example, the instructions View > Window > Split, is instructing you to select the View option on the menu bar at the top of the screen, then select the Window option on the drop down menu, then select the Split option on the resulting menu.
Project is a powerful software application, and because of that it is also complex. The many features and options can make this tool seem daunting and far from intuitive. However, understanding a few basics about its design can remove a lot of the mystery.
Project is essentially a database with charting tools. As a database, it stores information about tasks, information about resources, and assignments—which connect tasks and resources. All of the various charts available just present different combinations of task information, resource information, or both.
Task information includes dates (start, actual start, baseline start, etc.), costs, and relationships to other tasks, such as which task is a predecessor (necessary to make a network diagram).
Resource information can apply to human resources as well as equipment and consumable materials (like lumber or gasoline). We can know the name of a resource, several kinds of costs (standard rate and overtime rate), and the availability of the resource.
Of course, combining task and resource information is incredibly useful. We can know who is working on tasks or how many hours a week some people are working. The foundation of all the features of Project consists of collecting and presenting data about tasks and resources.
Tip
Split Panes Provide More Power
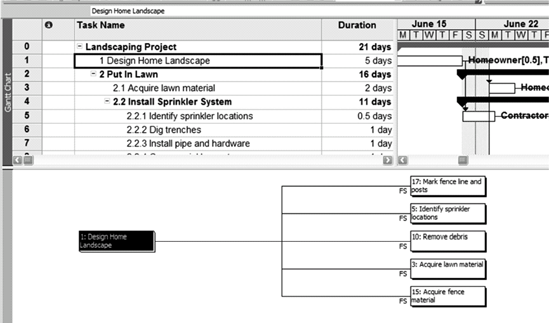
There are many ways that Project presents information. Use the View tab on the toolbar to take a look at all the choices. Then use the split pane to really open up your choices. Under the Window menu on the toolbar, select Split. Now you have a wide variety of combination views for analyzing the project. For example, Figure 19.1 shows the Gantt chart in the top pane and the relationship diagram in the bottom pane. As you select different tasks in the top pane, you see the task's immediate predecessors and successors in the bottom pane. If you want to be a power user, combination views are a must.
If you are planning a project, you can save a lot of keystrokes by making some basic decisions before you begin to enter task or resource data. Project will make many calculations for you, but you need to make sure the calculations are based on the right assumptions. Here are two settings to enter for each project so you don't risk having the default settings work against you.
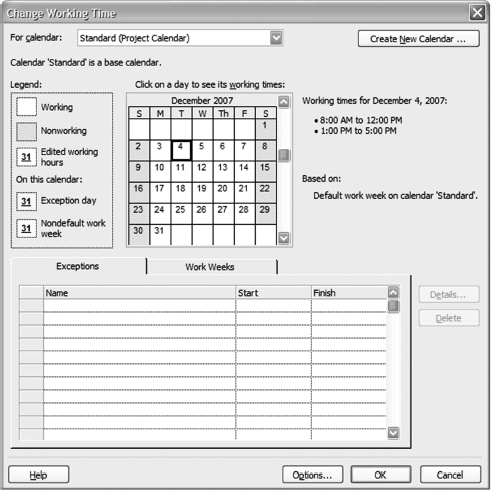
Establish calendars. When Project calculates a schedule it won't make you work on weekends or holidays (unless you want to). To achieve this, Project relies on some calendars that are established for each project and for some project resources. When you set up your project, start by opening the Project Calendar (see Figure 19.2) Use the project calendar to establish working and nonworking days and to set the number of work hours per day. These two parameters will affect all the tasks on the project. If you have some team members whose working days or work hours per day must be different than the standard, make a resource calendar for them. For example, if part of your team works Saturday through Wednesday so you have seven-day-a-week coverage, set up a resource calendar to reflect that. Then, whenever that crew is scheduled, tasks will occur on Saturdays and Sundays but not on Thursdays or Fridays. Resource calendars trump project calendars for all scheduling calculations.
Set the project's start date. Just about the only precise date you should enter into Project is the project start date. Project will use this as the beginning and calculate all other task dates from here. This enables you to enter the start date, link all tasks (establish predecessor relationships), and have Project determine all task start and finish dates. If the project start gets delayed or accelerated, you change that one date, and all other dates are recalculated. (To set the Project's Start Date, Project > Project Information).
If you've read and understood Chapters 6, 7, 8, and 12 of this book, you already have the conceptual understanding necessary to build and manage a plan in Project. All of the advice from those chapters applies when using project management software. What follows are additional tips and strategies for hitting that sweet spot where the effort of plan upkeep is minimized and the value of information is maximized.
Summary Task Rules
In Chapter 6, we established the difference between summary tasks and work packages (Project refers to them as summary tasks and tasks.) Project allows you to treat summary tasks the same as regular tasks—by assigning people, work, and predecessor relationships to them. Don't do it. The only values you should assign to summary tasks are notes in the task description. Every other value for a summary should be calculated by Project. Assigning a person to a summary task may duplicate work assigned to that person in the same time period. Assigning predecessor-successor relationships to summary tasks can cause a variety of problems, including unnecessarily extending the project schedule.
Tip
The WBS Is Your Communication Plan
The levels of the work breakdown structure (WBS) can be collapsed so that only certain levels of detail are exposed. As you develop the WBS, collapse it so only tier-one tasks are visible: Is this a meaningful view of the project to somebody important? If not, reconsider your tier-one task names, or break up some of these tasks. Do the same exercise for all tier-two tasks.
Tip
Format the WBS to Improve Communication
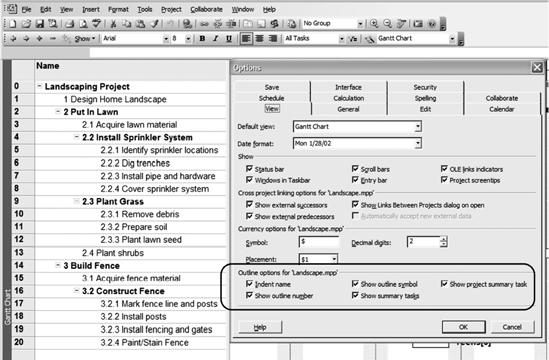
There are a few options for formatting the WBS that make a big difference to its value as a communication tool. Figure 19.3 shows the dialog box for formatting the WBS.
Network Diagrams: Establishing Task Relationships
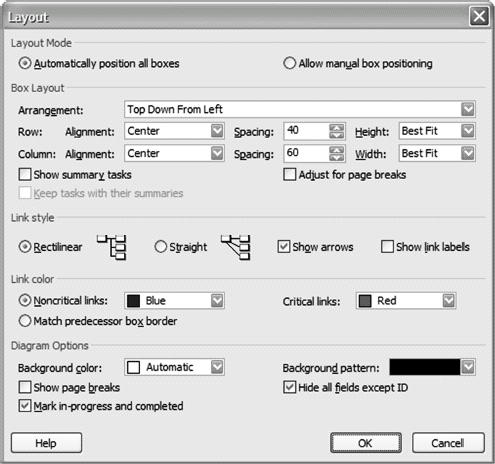
One of the most important reasons to use project management software is to be able to set the predecessor successor relationships between tasks. Once entered, these act as constraints. In the Gantt view and Network Diagram view, you can see how predecessor relationships drive the schedule. Figure 19.4 is the dialog box for formatting the network view, providing a lot of flexibility for the way information is presented in the network diagram. For example, since you don't want to put summary tasks on the network, hide them with options found in the Format menu under Layout.
Tip
Analyze Task Relationships with Combination Views
Figure 19.1 shows how a combination view helps you analyze all task relationships. The lower pane shows predecessor and successor tasks for each view.
Warning
Don't Enter Task Start or Finish Dates
There is only one start or finish date that you should enter in your project, and that is the project start date, as described earlier. For all the other tasks, Project will calculate the start and finish dates using the task relationships and the task durations. If you enter schedule data, those dates will become fixed constraints—and you will destroy the power of the scheduling engine. If specific dates must be entered, use milestones (just set a task's duration to zero and it will become a milestone).
Estimating Task Cost and Duration
The guidelines for estimating task cost and duration that were presented in Chapters 7 and 8 still apply when using Project. Understanding the difference between fixed duration, fixed units, and fixed work is important for entering estimates. That topic is covered later in this chapter.
Critical Path and Float Analysis
Obviously this is one powerful feature of Project that you want to leverage. If you've entered tasks, linked them (established predecessors), and entered a duration for each task, Project will have established a schedule, including the float and critical path. Once you've reached this point, you can analyze the schedule you've built using a Gantt chart or the Network view. If you use the Gantt, it is easy and useful to display float: Use the Gantt Wizard or simply right-click in the Gantt chart to format the bar styles. Add a bar for float that begins on the Early Start and ends on the Late Finish.
In Chapter 7, we saw how our assumptions about resources can affect the duration of a project. As an example, if an analyst is working 50 percent on one project, it will take two weeks to accomplish a 40-hour task. Increase that analyst to full time and the task can be performed in one week. Project takes these variables into account using the following formula:
| Work = duration × units |
| where Work = total hours of labor on a task |
| Duration = the number of calendar days for the task |
| Units = how many resource hours per day will be applied to the task |
For example, if you have a person working 50 percent (4 hours per day) on a task for five days, for a total of 20 hours, all three variables have been set. If the task changes, you can change one of the variables and Project will recalculate one of the other variables—but one of them is held constant. The task type determines which one is held constant.
Table 19.1. TASK TYPES AFFECT THE WAY PROJECT RESPONDS TO USER CHANGES
How Will Project Respond to a User Change? | |||
|---|---|---|---|
Task Type | User Changes Units | User Changes Duration | User Changes Work |
Fixed-units task | Project recalculates duration | Project recalculates work | Project recalculates duration |
Fixed-work task | Project recalculates duration | Project recalculates units | Project recalculates duration |
Fixed-duration task | Project recalculates work | Project recalculates work | Project recalculates units |
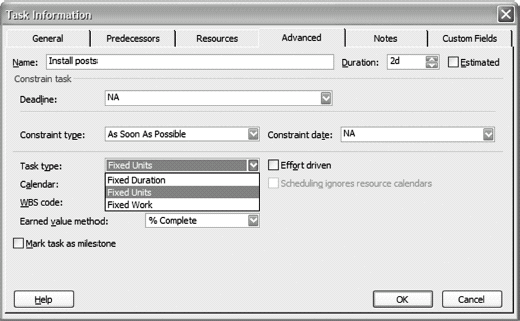
Figure 19.5 shows the task dialog box, one place to set the task type. It is essential to understand how Project uses the task type setting. Table 19.1 explains how fixing one variable will affect the other two.
Tip
Set the Default Task Type
Every task you add to your project is one of the three task types. If you expect most of your tasks to fall in one category, then set that as the default task type (Tools > Options > Schedule). You can always change the task type for individual tasks, but using the right default will save you a lot of clicks.
Resources are the people, equipment, and materials used to accomplish tasks. The best approach to adding these to your project is to first put all expected resources in the Resource Spreadsheet and then assign them to specific tasks.
Adding Resources
The Resource Spreadsheet view is shown in Figure 19.6. Add each resource here. You'll have to make a decision at this point whether you are going to use generic resources, specific resources, or a combination. For example, if your team members are pretty interchangeable, such as the number of painters on a commercial tenant improvement project, you could just add "painter" as a resource name. In this case "painter" is a generic resource. But if you are running the painting company and want to know where all your people will be working, you'll have to put the individual painters in as specific resources and assign each of them to the tasks. In practice, you may use both: entering in a generic resource to plan a project before your team is assigned, then changing assignments to specific resources when you have people assigned to your project.
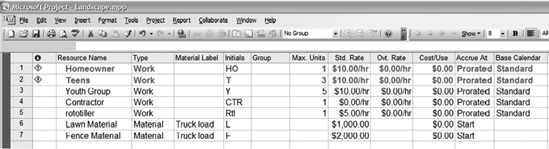
Figure 19.6. The Resource Spreadsheet. Two resource types are highlighted because they are overallocated.
Tip
All Human Resources Have Costs
Project allows many types of costs to be entered into the Resource Spreadsheet, not all of which apply to your projects. There is one cost that you should use for every human resource: standard rate. Too many Project users leave all these cost fields blank, either because each project manager doesn't know the cost or because the human resource is a salaried employee and thus "free" to the project. Whether we have salaried employees or not, when the project is under way we'll want to know whether we are spending more or fewer hours than originally planned. Several report formats are available within Project that track cost, including earned value—if the cost of resources is zero, there will be no variance. Therefore at least set the standard rate for every human resource at $1 per hour.
Assign a Resource to a Task
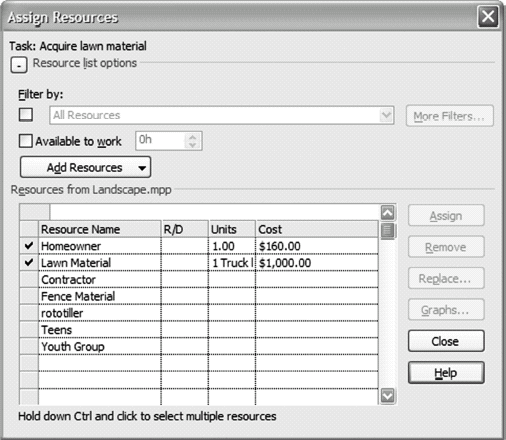
You don't need to have resources entered into your Resource Spreadsheet before assigning them to a task, but it is the recommended practice. After that, you can assign one or more resources to any task. Figure 19.7 shows two resources assigned to a task. Note that the homeowner will be working full time (eight hours per day) for two days on this task. The materials needed for the lawn have been calculated as one truckload that will total $1, 000.
Chapter 7 provided the explanation of what resource leveling is and why it's so important. Project can assist you in this process using several features.
First, recognize that when you start to level resources within the schedule, you are using the power of the tool to do some what-if analysis. For example, what if we changed some task relationships and had more concurrent tasks? What if we assign fewer people to a task but let the duration expand? What if we take Sue off of one task and replace her with Ivan? In each case, you need a before and after picture so you understand the effect of the change.
Tip
Use a Copy of Your Project for What-If Analysis
When you are ready to start the what-if analysis, save your project file, make a copy of it, and make the changes to the copy. This allows you to make lots of changes without corrupting your original plan.
The Level Resources Feature
Project actually has a one-click method of leveling your project resources. Tools > Level Resources ... > Level Now will analyze your project, and for every resource overallocation found, Project will add delay to one or more tasks until the overallocation is removed. Sometimes adding delay to tasks is the right strategy for leveling resources, but not always. If enough delay is added, it could change the completion date of the project. To get the most from this feature, be sure to use the Leveling Gantt view before and after leveling. It shows the amount of float and delay for every task.
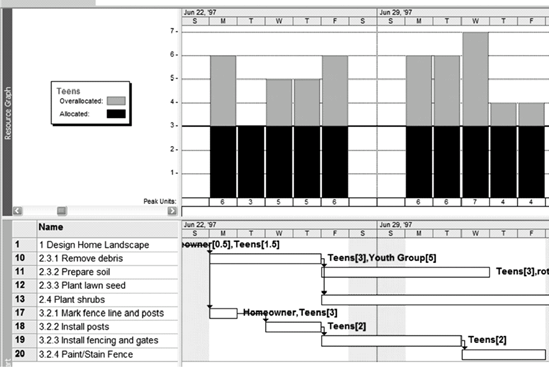
It is often necessary to manually level a project schedule. The combination view in Figure 19.8 allows you to scroll through the calendar to find the tasks that are causing a particular resource to be overallocated.
A lot of people use Project to build a schedule, but after the work begins, they abandon Project because it just takes too much time to keep the plan up-to-date. The time invested in keeping the plan current can be minimized if you follow these guidelines.
First, establish regular reporting periods—when the team members are expected to report in and when the project manager needs to report upward. Accept that no matter how often you update it, the plan will always be out-of-date, but it can still be a useful management tool. Pick update periods such as every week or once a month when the plan will be brought up-to-date. These should be frequent enough that the plan is useful for managing even if it is not completely accurate. Stick with the reporting process until it becomes a habit. It gets easier with regular practice.
Tip
Remaining Work Is the Key Variable
The plan contains work (hours of labor) for every task. When recording progress against these tasks, enter Actual Work first, then change the remaining work field. If a task goes more quickly than you'd expected, you'll decrease the remaining work field. If a task is going to take more effort than originally expected, then increase remaining work. Project will use the actual work and remaining work to calculate the Percent Complete for the task.
The best advice for minimizing your ongoing effort to keep the plan up-to-date is to not let it get too far out-of-date. Part of the value of project management software is that by keeping it up-to-date, it keeps you in touch with the details of the project.
In Chapter 12, we discussed the value of a baseline—it is a record of our original plan. Progress compared to the baseline tells us whether work is going according to plan. Project allows you to set the baseline for all task data (cost and schedule) as a basis for comparison to actual performance (Figure 19.9). Just remember the following guidelines about setting the baseline.
Set the baseline before you start to track! The baseline is the target at which your team will be aiming. Once work begins, the plan starts to move and it becomes too late to record the real baseline.
When a new task is added to the plan, you can baseline just that task without having to baseline the entire project.
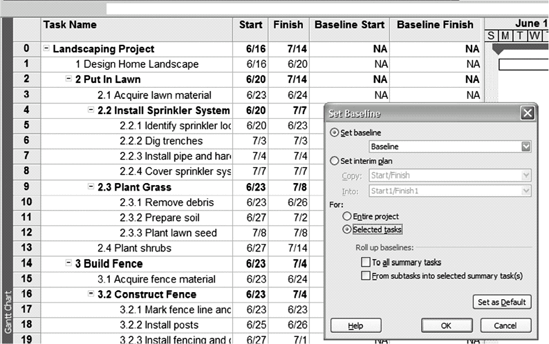
Figure 19.9. Set the project baseline. Tools > Tracking > Set Baseline. The baseline copies the planned schedule and cost information to baseline fields. The baseline is the basis for variance and earned value reporting.
Allow Team Members to Update the Plan
Wouldn't it make sense for team members to update their own tasks, rather than making the project manager perform all that data entry? Project Server, Project Professional, and Project Web Access make that possible. Microsoft's Enterprise Project Management solution is explained in greater detail at the end of this chapter.
We began this chapter by pointing out that Project is a database. One of the benefits of a database is that it makes reporting easy. Project includes some basic reports already formatted for you (accessible from the Reports menu on the toolbar). Here are a few of the most useful reports:
Project Summary Report: This report provides an overview of the entire project. It's useful for providing the team a snapshot at the highest level.
Cash Flow Report: Analyze your predicted versus actual costs over each time period in the project. This is a good planning and management tool.
Overbudget Tasks Report: This is one example of an exception report. It identifies the tasks that have costs exceeding the baselined costs.
Slipping Tasks Report: An exception report focusing on schedule problems. It identifies the tasks that have a start date later than their baseline start date.
Earned Value: If you've followed all the planning and control advice in this book you have all the information you need to produce accurate earned value reports.
Tip
Earned Value Requirements for Project
Chapter 12 explained why so many firms want to use earned value reporting. There are only a few things you need to know to have Project support earned value on your project. First, tasks must have resources applied to them, and second, those resources must have a cost applied (even if it is only $1 per hour!) so that every task has a cost. If your WBS follows our guidelines for small work packages with clear completion criteria, just baseline the plan and enter actual hours and Project will calculate earned value.
Microsoft has developed its own Enterprise Project Management solution based on Project. The company has added two products that work with Project that extend the capability of Project in two important ways:
Resource visibility and management is available across multiple projects. All of the resource analysis we have performed for individual projects can now be performed for the enterprise. For people assigned to more than one project, a manager can see if their workload is too big or too small. Resource forecasts for particular skill types, such as technical writer, painter, or software engineer, can be developed across all projects that are being planned into the future.
Communication between the project manager, team, and resource managers (functional managers) is streamlined. Team members can see their specific assignments within the plan and provide their own task updates, reducing the effort required by the project manager to maintain an accurate plan. Resource managers can more easily see what their people are working on and collaborate with project managers to build project teams with the best available people. All stakeholders gain increased visibility on risks and issues.
These two capabilities are added when organizations use Project Professional, Project Server, and Project Web Access. Project Professional is the version of Project that is designed to interface with the other two products. Project Server is a database product. When individual project plans are saved to the database, all the task and resource data of each project becomes available to qualified users. Project Web Access is a browser-based application that enables team members, resource managers, and executives to read and update the data in the database.
The practice of project management has benefited immensely from the constant evolution of project management software applications. Microsoft Project makes it far easier to develop and maintain detailed plans with cost, schedule, and resource information. The many features of Project can make it confusing to learn. This chapter has pointed out some of the most important practices for using Project correctly. With these best practices, as well as the downloadable tutorials available at www.versatilecompany.com/FFMBAinPM, you will be able to leverage this popular tool more efficiently.