Appendix A
Introduction to Deploying SharePoint Designs
—by John Ross
A number of very important topics have been covered in this book relating to professional SharePoint design. Your head is probably filed with ideas that you are ready to implement as soon as you finish this book. You have probably come up with an idea for a design and even have an idea about how to make it. Before you run off, there is still one big question remaining: How do you implement your design/brand into production? Better yet, how should you implement your design/brand into a production environment?
This appendix will discuss the final piece of the design process called deployment. You might be thinking “Isn't this a topic for developers?” The answer to that question is yes; traditionally the topic of SharePoint deployment is covered in texts for developers and administrators. But this is exactly why the topic of deployment is important to designers; the way that the design elements for a SharePoint site are created will directly impact both developers and administrators.
Specifically, this appendix will explore the various options available for deployment of design elements and the pros and cons of each option and how it can affect your SharePoint implementation now and in the future. And no discussion on deployment would be complete without mentioning file customization, including what it is and why it matters to you as a designer. Best of all, this appendix will give you some perspective into how the other members of your team might be thinking and help to shed some light on their world.
Customized and Uncustomized Files
Before you start reading about deploying your SharePoint design, it is probably best to clarify the differences between customized and uncustomized files. While this might not be the first time you have seen these terms, you might have heard them referred to as ghosted (uncustomized) and unghosted (customized) files. These terms (ghosted and unghosted) were used in WSS 2.0 and SharePoint Portal 2003 but have since been deprecated. However, if developers were around back then, they might still use these terms, so it's good to understand what they mean in today's SharePoint installations. And, after all, it's all semantics anyway.
Uncustomized Files
All of the files used to create the out-of-the-box sites in SharePoint are uncustomized. This means that the source of the file lives on the file system and not in the content database. However, an uncustomized instance of the file resides in the content database and acts as a pointer to the file on the file system. This means that when an uncustomized page is rendered, SharePoint will first look to the content database, but since the instance of the page does not include a source, the file will be rendered from the file system.
Uncustomized files make it possible to have many copies of a file point to the same source, similar to how a template for a document works. For example, if you had many sites that used the same page layout, you could make modifications to a single file and every place that the uncustomized page layout was used would be updated. This is very helpful from a design perspective because it allows you to make changes very easily.
For a more information on customized and uncustomized files, see Andrew Connell's MSDN article at: http://msdn.microsoft.com/en-us/library/cc406685.aspx
Customized Files
A customized file is one where the source of the file lives in the content database. A file becomes customized if it is modified in any way through the SharePoint user interface or by using SharePoint Designer 2007. When a file becomes customized, a version of that file is saved to the content database even if the file was originally uncustomized. Once a file has been customized, the source of the page is saved to the instance. When the customized page is rendered in the browser, the source is being pulled from the content database. As discussed in Chapter 5, files can be reverted to an uncustomized state easily with SharePoint Designer.
An example of how this might occur in the real world is looking at the default master page of your site collection, typically default.master. In your project, you might have a business need that requires you to add some custom code to the page, which is typically done through the code-behind file for the page. This might be something as simple as needing to perform some calculations on data in the background to report at the top of the content area for all pages. It could also be something considerably more complicated. The point is that you need to add custom code to your master page.
In this example, default.master starts off as an uncustomized page. However, to implement your custom code, you will open up the page in SharePoint designer and change the @Master directive for default.master to point to a custom class file in the Global Assembly Cache you created with the custom code. As soon as you save the file in SharePoint Designer, it becomes customized.
Conversely, a file created using SharePoint Designer or through the SharePoint user interface will be a customized file and cannot be reverted to an uncustomized state. To continue the previous example, you could revert default.master to its original, uncustomized, state by right-mouse clicking the file name in the Folder List pane of SharePoint Designer and selecting Reset to Site Definition in the options presented. Doing this would remove the new @Master directive property you set and, consequently, remove the ability to use the custom code-behind file you created for default.master. In other words, default.master would reset back to its original code.
The initial implementation of a SharePoint site will likely require time from designers, developers, and administrators to deploy the site into production. The decisions made prior to going live will directly impact how the site is updated in the future and this is especially important to administrators. For example, as a designer you might create a custom master page, custom CSS, and custom page layouts using SharePoint Designer and then save everything customized in the content database. Once completed you will have an attractive custom branded SharePoint site. However, what happens in a few months when requests for changes come from the business or when Microsoft releases a future version of SharePoint? It is the responsibility of the designer to have an idea about how this will happen and what the level of effort required to do ongoing maintenance to the various design elements is.
Many companies have a person who wears the SharePoint administrator hat exclusively. Others take a more hybrid approach. In either case, the administrator's perspective is the same on the topic of deployment of design elements. As long as the chosen approach does not take up too much of their time, require them to compromise server security, or modify any SharePoint system files, they are fine with just about anything.
Be prepared to answer the following questions from your administrator:
- Where do you need me to put the files?
- How long will it take to deploy everything?
- What happens if we need to make changes to the files in the future?
- Did you modify any of the system files?
Developers will play a very different role in the implementation process. The instinct for most developers seems to be to set up SharePoint to work as they go through the development process and then replicate the same thing when they are ready to take their code to production. Most developers do not realize how important a role they will play in the deployment of design elements. If your team decides to deploy your design files in an uncustomized manner, then it will be the developer who will need to learn how to do it. To create this deployment package, the developer will use a combination of Windows SharePoint Services solutions and Features.
Learning how to create deployment packages can be a daunting task, even for experienced developers. The process is very time consuming and also can be very frustrating. We will talk more about solutions and Features in the next section. However, as a designer it is important for you to have a good working relationship with your developer because every time you make a small change to any of your design files, you will need to send them to your developer.
If you would like to learn more about the specific tasks that are required for creating solutions and Features, refer to Wrox's Real World SharePoint 2007, specifically Chapter 4, “Developing Publishing Sites the Smart and Structured Way.”
Also note that if your team decides to use customized files, the role of deploying design elements will lie almost entirely with you, the designer. Regardless of the decision, it is important to include all members of the team as part of the discussion.
Creating Uncustomized Files with Features and Solutions
If files created by SharePoint Designer and the SharePoint user interface are always customized, then how are uncustomized files created? The mechanism used to provision uncustomized instances of files in SharePoint is called a Feature. It is difficult to define what a Feature is, but it is easy to describe what they do. A Feature allows a developer to deploy site customizations or functionality to a site collection or individual site by placing files on the SharePoint server's file system. The Feature can then be activated through the user interface, which deploys the files in an uncustomized state.
To create a Feature, you need to collect all of the files you want to deploy and place them in a new folder in the Features directory in the 12 Hive (\Program FilesCommon FilesMicrosoft SharedWeb server extensions12TEMPLATEFEATURES). So if, for example, you wanted to create a new Feature to deploy a new Master Page, you might create the following folder: C:Program FilesCommon FilesMicrosoft SharedWeb Server Extensions12TEMPLATEFEATURESMyMasterPage.
The primary file of every Feature is its feature.xml file, which provides basic information (title, description, scope of deployment, and so on), a unique ID, and the name and location for the element manifest file. So, to continue the previous example, you would need to create a new XML file in the MyMasterPage directory called “feature.xml” that might have code similar to the following in it:
<?xml version=“1.0” encoding=“utf-8” ?>
<Feature xmlns=“http://schemas.microsoft.com/sharepoint/”
Id=“13b88dd0-29be-11dd-bd0b-0800200c9a66”
Title=“My Master Page”
Description=“This Feature contains a new Master Page.”
Hidden=“FALSE”
Scope=“Site”
Version=“1.0.0.0”>
<ElementManifests>
<ElementManifest Location=“MyMasterPage.xml”/>
</ElementManifests>
</Feature>
This file just defines the Feature and tells SharePoint where to find the manifest XML file, which defines the components of the Feature. In this case, feature.xml has referenced the Feature manifest as “MyMasterPage.xml.” So, in the MyMasterPage directory created earlier, you would need to add a new file called MyMasterPage.xml and give it code similar to the following:
<?xml version=“1.0” encoding=“utf-8” ?>
<Elements xmlns=“http://schemas.microsoft.com/sharepoint/”>
<Module Name=“MyMasterPage”
Url=“_catalogs/masterpage”
Path=“”
RootWebOnly=“TRUE”>
<File Url=“ MyMasterPage.master”
Type=“GhostableInLibrary”>
<Property Name=“ContentType”
Value=“$Resources:cmscore,contenttype_masterpage_name;”/>
<Property Name=“PublishingPreviewImage”
Value=“∼SiteCollection/_catalogs/masterpage/Preview Images/
MyMasterPage.jpg,
∼SiteCollection/_catalogs/masterpage/Preview Images/
MyMasterPage.jpg” />
<Property Name=“Description”
Value=“New Master Page provisioned from the MyMasterPage
Feature.”/>
</File>
</Module>
<Module Name=“MyMasterPagePreviewImage”
Url=“_catalogs/masterpage”
Path=“”>
<File Url=“ MyMasterPage.jpg”
Name=“Preview Images/MyMasterFile.jpg”
Type=“GhostableInLibrary”/>
</Module>
</Elements>
This is a fairly simple example, but it is doing two things. First, it is provisioning the new master page, MyMasterPage.master, as part of this Feature. That is the purpose of the first module. The second thing it is doing is provisioning a new image for the Feature, MyMasterPage.jpg. This Feature will be used as the preview image for the Master Page and is referenced as such in the Master Page module (look at the PublishingPreviewImage property reference). You will need to add these physical files (MyMasterPage.master and MyMasterPage.jpg) to your Feature directory (MyMasterPage), but upon doing so your Feature is ready to be deployed. Doing it this way allows you to introduce modified pages to your site without turning them into “customized” files. This means that, when you deploy MyMasterPage.master to your site, it will be treated as an uncustomized file, even though it includes custom code (potentially).
Features are very powerful and can be used to provision other SharePoint elements such as site columns, content types, and lists. Features can even call custom code.
By themselves, Features allow you to deploy elements in an uncustomized state, but in an environment with multiple Web front ends (WFEs), you still need to get the files to each of the servers. Also, what if you have multiple environments for development, testing, and production? How can you easily move files between environments or servers? To address this issue, Microsoft added the solution framework to the latest release of SharePoint. A solution is simply a cabinet (.cab) file with a .wsp extension. To create a solution, you need to include all of the files to be deployed along with another file (manifest.xml) which tells SharePoint where everything needs to go.
Once the solution package has been created, it is then added to the farm and deployed. In a farm with multiple WFEs, this allows you to simultaneously push all of the files it contains to all of the servers in the farm. So there is no need to manually drop the files on each server; the solution does it for you. When you combine solutions and Features together, the solutions deliver the files to the server and the Features enable the functionality. The result is that all of your files are deployed in an uncustomized manner.
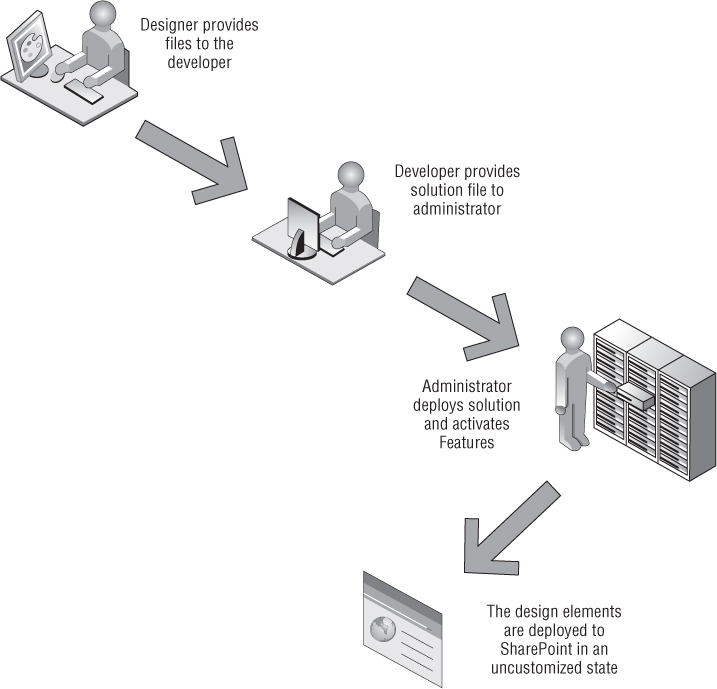
The process to create uncustomized files is certainly more complex than the process to create customized files. Typically, design elements are created by a designer in SharePoint Designer (or Visual Studio, Dreamweaver, a text editor, or so on) and then exported to a file. Next, the designer gives the files to the developer to create the deployment package, which typically includes a combination of Features and solutions. Then, the completed solutions are given to the administrator, who deploys them to the appropriate instance of SharePoint and activates the Features, which results in uncustomized files in all the places you need them. Figure A-1 shows a diagram of the process for creating a deployment package.
After the initial deployment, changes can be made by providing the new or changed files to the developer, who simply adds or updates their existing project in Visual Studio. The developer then provides a new solution to the administrator, who upgrades the existing solution with the new one.
For more information on the commands you use when actually upgrading solutions, see http://technet.microsoft.com/en-us/library/cc262014.aspx.
The Designer's Role in Solutions and Features
As mentioned earlier the process of deployment of design elements begins with the designer. But how exactly does a designer give files to the developer to make them into a solution and Feature? You might think it's a silly question, but try it without reading the rest of this section. This seemingly simple task has given heartburn to many SharePoint designers and developers alike.
To create a solution or Feature, the developer needs all of the files used in the design including:
- Master pages
- Page layouts
- Cascading style sheets
- Images
- JavaScript files
- Pre-configured web parts
In addition to getting all of these files, they are also going to ask where they need to put them. All of this information should be simple to provide; by the time they ask for it, you will probably have a version of the site running in a development environment. Just be prepared ahead of time to save yourself the extra time and energy on email.
If you stopped at the beginning of this section and attempted to figure out the easiest way to give your files to the developer, how did it go? You might have opened SharePoint Designer and attempted to publish the files to a local drive. Or you might have tried to export the files from SharePoint Designer. Or you might have opened up the SharePoint site and downloaded the files from the various document libraries. Most graphic, CSS, and JavaScript files will exist outside of SharePoint and can easily be saved to a ZIP file. However, the best practice for pulling custom master pages and page layout files is to open SharePoint Designer and use the Save As function from the file menu. Although other methods may seem to work, they are much more cumbersome and less reliable.
After providing the files to the developer, all you have to do is sit back and wait for them to complete their deployment package. Once it is completed, you will need to review all of the sites to make sure everything looks as it should. Don't expect that developers or administrators have the keen design eye that you do!
It is also important to remember that like developers, you will want to make sure to version the design elements you are working with. Whether you choose to use one of the many options for source control software or simply use a folder structure with a naming schema, it is important to use something! You never know when someone will realize that some later version of a master page caused some strange behavior that definitely wasn't there in the version from two weeks ago.
The Downside to Solutions and Features
The case for using solutions and Features sounds compelling, but it is not perfect. There are some big disadvantages to using solutions and Features for deployment.
The biggest is that the process is more complicated. Learning to create solutions and Features can be a difficult task even for the most seasoned ASP.NET developer. This fact alone can rule out the possibility of using this option for deployment, causing project timelines to simply become too long. However, once a developer gets the hang of it, the speed at which solutions and Features can be created will increase dramatically.
Another drawback is that the process just takes longer. Once the designer finishes creating all of the design elements, the files need to be given to the developer to create the solutions and Features. The additional step to create a deployment package is something that would need to be figured into project plans. Over time this process will go much faster. It isn't magic, but it does require that hours are allocated to the task to accommodate this step in the SharePoint development lifecycle.
Finally, there is no real mechanism for debugging. If an error occurs when you are installing or activating your Feature/solution, it will likely be a generic error that gives you no real detail that will allow you to figure out what went wrong. This means that you have to modify your XML files (Feature and manifest files) and keep retrying until you figure out where it is breaking. In other words, you use trial-and-error and hope for the best. Hopefully your Features and solutions will deploy without incident, but in the cases where they do not, this can be a real headache.
There is no single answer for the right way to deploy content in a SharePoint environment. Every company is going to have a unique set of circumstances that are going to directly impact the decision that is made. For example, if you only have a designer and an administrator and neither are interested in learning how to write solutions and/or Features, then you probably won't be using solutions and Features.
Small Farm and Single Server Installations
Small farm and single server installations seem to make up the majority of the installations in the wild. In this case, there is only one Web front end and often only one SharePoint environment. The deployment scenario is wide open with this type of implementation since moving files between servers is not much of an issue. Although the deployment scenario is not as critical for this scenario, SharePoint designers should still be aware of the files they are customizing.
Medium Farms and Multi- Level Server Environments
Companies that have more than one Web front end and/or server environments should carefully consider solutions and Features as a deployment option. This would make moving files between servers and environments much easier, but companies have to weigh the ramp-up costs associated with learning the more complicated process. For simple implementations that will only be done once, you still might choose to use a more manual deployment method. But keeping the manual process in a multi-server farm can produce some deployment and maintenance headaches since each change would have to be manually uploaded and installed on each server. For example, take a custom master page. Without Features and solutions, you will probably manually modify the default master page for every site on every server. However, with Features and solutions, you have one handy package that you can install to as many sites and servers as you need to. In fact, once a solution has been added to a SharePoint solution store, administrators can deploy that solution to as many sites as necessary through the Central Administration application. Obviously, with a multi-server farm, this makes things much simpler.
Large Farms
The large farm environment will include several Web front ends and a multi-tiered server environment. Companies that invest in large farm architectures will benefit greatly from the deploying files with solutions and Features. Manually moving files between servers and environments is simply not a practical option.
Microsoft strongly recommends the use of Features and solutions for deploying files in medium and large farm architectures.
Now that you know a little more about the topic of deploying SharePoint design elements, you should have enough information to determine what will make sense for your projects. Each project presents its own unique set of requirements that need to be carefully considered with all members of your team. It is important to talk about deployment issues relating to the initial implementation as well as issues that might arise during post implementation, including changes to the design and upgrades.
If your project has the time, it is recommended that you use solutions and Features to deploy your design elements, regardless of whether you have a single server installation or a large farm. The benefits of this method greatly outweigh the negatives. Additionally, the negatives will soon become insignificant after your team becomes familiar with the process. If your project is on a tight timeframe or you simply don't have a developer, that is just fine, too. The most important thing is to understand the deployment story for your implementation so that you can plan accordingly.