
Chapter 8
Master Pages
In the previous chapter, you learned about how Cascading Style Sheets (CSS) work in Microsoft Office SharePoint Server 2007 (MOSS). Even though CSS is an important concept in styling MOSS sites, it can only affect the overall look of a site so much. This is equally true for MOSS themes, which was the topic of Chapter 6. Both of these technologies can only affect hiding and showing areas of a design, as well as changing colors and images.
To truly make wide sweeping changes to the user interface of a MOSS site, master pages are the only way to go. This is because master pages can control almost all of the aspects of the HTML that glues all of MOSS together. The difference between using just CSS or themes and making a custom master page is often compared to the difference between just hiring a painter to change the colors of walls in a house and having an architect change the location of walls or even the configuration of the whole house.
In this chapter you will learn how master pages work in traditional ASP.NET applications and more importantly how they work in MOSS. You will also learn how master pages and page layouts differ, as well as how the various parts of master pages are handled in a MOSS site. The chapter will conclude with a tutorial on converting standard HTML and CSS design into a corresponding master page and CSS.
This chapter is focused on creating custom branding, specifically for MOSS sites. Master pages are also used with Windows SharePoint Services 3.0 (WSS) sites, but their implementation is much more simplistic with them. Out of the box, there is not even a way to switch master pages using the WSS Web UI. Because of this, SharePoint themes are often the first place designers should look when branding WSS sites. But if you are interested in working with custom master pages for WSS, you should check out the Stramit SharePoint 2007 Master Picker, which is available for free at CodePlex.com: http://www.codeplex.com/Wiki/View.aspx?ProjectName=SPMasterPicker.
Master pages were introduced with the 2.0 release of ASP.NET. In essence, a master page is used to create a template to control many aspects of the overall layout of many pages in an ASP.NET Web site. They are typically used as a shell to hold all of the common HTML content such as the DOCTYPE, meta information, CSS, navigation, footers, and the general layout of the major areas of the site. For one Web site, you can have a master page that is the outer layout for all of the individual pages, or you can have several master pages that create different outer layouts for different areas of your site. Not only do master pages allow for easier Web site maintenance; they are especially helpful for creating a consistent look for large Web sites with many content authors of varying skill levels (as is often the case with MOSS-based Web sites).
Content Pages
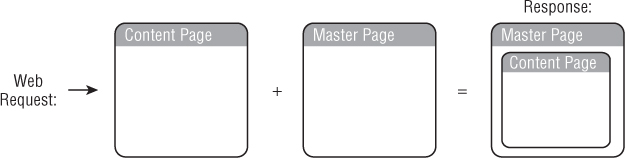
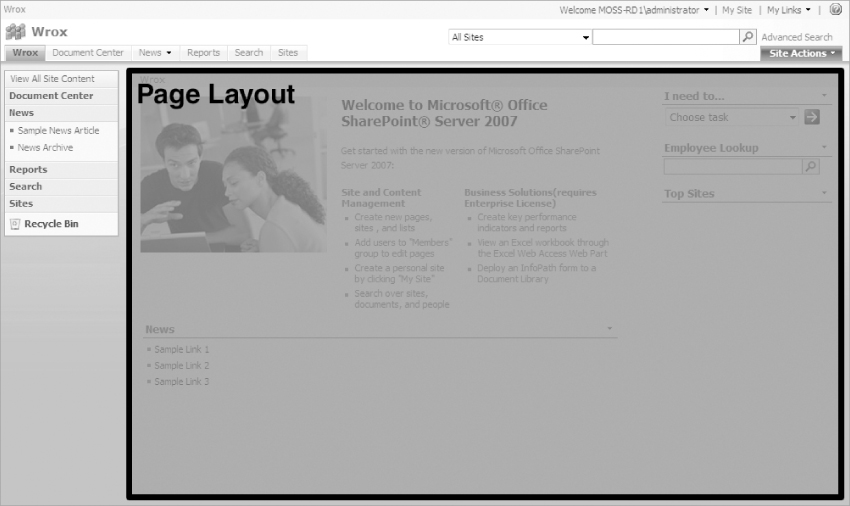
Despite being really cool, a master page alone will not actually produce anything useful. In fact browsing to a master page URL directly will cause IIS to show an error. To use master pages, they need to be paired with content pages that specifically refer to them. When a user browses a content page that contains a reference to a master page, IIS actually merges the two together, taking the substance from the content page and laying it out with the structure of the master page. Figure 8-1 shows the relationship between content pages and master pages.
Page Layouts
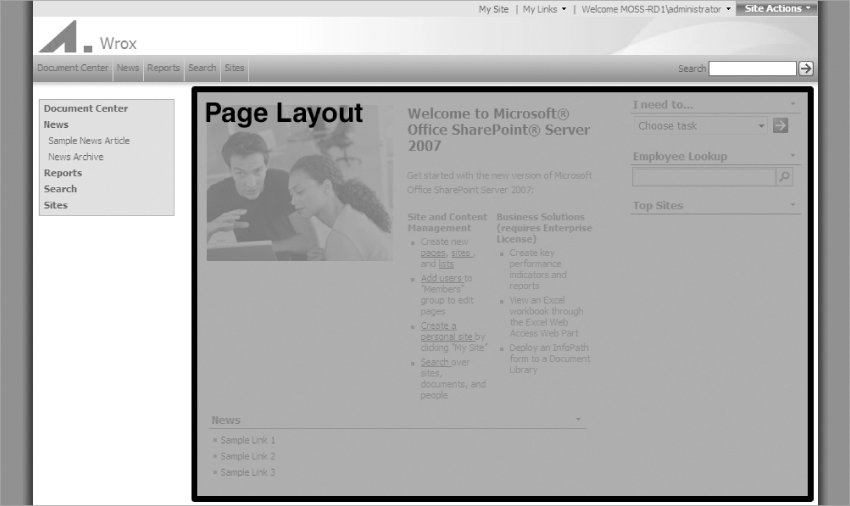
In MOSS publishing sites, this relationship is expanded one step further with the introduction of page layouts. Page layouts allow for another level of templating, through the use of layouts that are targeted to specific types of content. In many ways a page layout is the same as a content page, only with special MOSS hooks that allow it to derive content from MOSS content types. You may have one page layout that looks like a news article while another will look like a portal home page; however, both can derive their outer shell or layout from a common master page. Figure 8-2 shows a deeper view of how a page in MOSS is rendered by IIS.
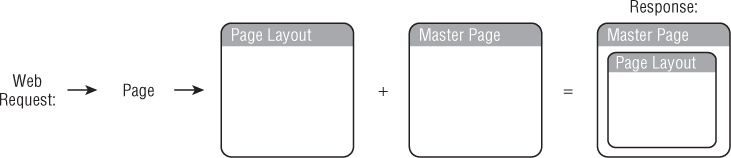
This is a very simple view of what happens when a page layout is used in MOSS. You will revisit this topic in the next chapter, where page layouts are discussed in greater detail.
It is worth noting that content pages in MOSS sites are often simply referred to as pages. When you create a page in MOSS, you are essentially creating a dynamic content page (which is stored in the SharePoint content database), which will most likely have a page layout associated with it.
Master Pages in MOSS
Because MOSS is built on top of Windows SharePoint Services (WSS), which itself is built on top of ASP.NET, its master pages work much the same as they do in traditional ASP.NET. Every MOSS site has at least one master page in use at all times. When a site is created in MOSS, a default master page is produced along with a default page that points to it. If the site is a publishing site, MOSS creates several other custom master pages focused on publishing, as well as page layouts for several types of content pages. One of the beautiful things about MOSS is that you can use the Web interface to switch this default master page out with a custom one, and edit or create new pages whenever you like. When MOSS creates a page, it automatically associates it with the current master page; you don't have to worry about adding the reference manually.
In traditional ASP.NET, master pages are typically edited in Visual Studio to allow for IntelliSense code completion and visual editing. When working with a MOSS master page, you will want to use SharePoint Designer. SharePoint Designer not only allows you to work seamlessly with the MOSS content database, but you can utilize the Design View to better visualize how a page or page layout will look embedded in their master pages. For more information on working with master pages in SharePoint Designer, flip back to Chapter 5.
Master pages are ASP.NET pages written in either VB or C# and have a file extension of “.master”. Interesting enough, the language of the master page can be different from the code of the rest of the site. Despite the fact that master pages can be written in either language, MOSS master pages are almost always written in C#. If you are more comfortable with VB, you may have a steeper learning curve when making the transition to MOSS.
To get a better idea of what a master page looks like in traditional ASP.NET, see the following very simple example:
<%@ Master Language=“C#“ %>
<!DOCTYPE HTML PUBLIC “-//W3C//DTD HTML 4.01 Transitional//EN“
“http://www.w3.org/TR/html4/loose.dtd“>
<html>
<head>
<meta http-equiv=“Content-Type“ content=“text/html; charset=utf-8“>
<title>Hello World Site</title>
<link rel=“stylesheet“ href=“myStyle.css“ type=“text/css“/>
</head>
<body>
<form id=“form1“ runat=“server“>
<div id=“divMain“>
<!-- This will be overridden by the content page main content -->
<asp:ContentPlaceHolder ID=“MainBody“ runat=“server“/>
</div>
<div id=“divFooter“>
<!-- This will be overridden by the content page footer -->
<asp:ContentPlaceHolder id=“Footer“ runat=“server“/>
</div>
</form>
</body>
As you can see, the code of a master page begins with a directive of <%@ Master Language = “C#“ %>, which tells ASP.NET that it is indeed a master page and specifies the programming language that it will use. Following the directive, you will notice that probably 90% of this code is just typical HTML, which includes the CSS, as well as any general formatting.
While standard ASP.NET master pages will often have code-behinds that are declared after the language specification like this: <%@ Master Language = “C#“ CodeFile = “MasterPage.master.cs“ Inherits = “MasterPage“ %>, MOSS by default does not utilize them. For a tutorial on how to use code-behinds with MOSS, check out Andrew Connell's article on the MSDN: http://msdn2.microsoft.com/en-us/library/bb986729.aspx.
Content Placeholders
Along with the directive and all the HTML structure, master pages also include content placeholders. These content placeholders define areas of the master page which can be replaced by information that is located on a content page. A typical content placeholder in a master page would look like this:
<asp:ContentPlaceHolder id=“Footer“ runat=“server“/>
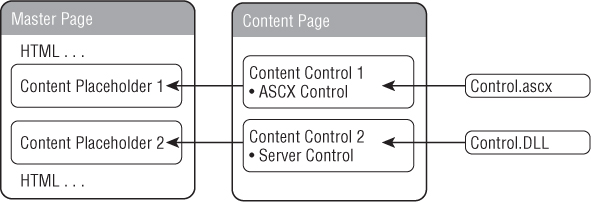
The master page's content placeholders receive their content from Content controls that are placed on content pages. Besides setting up the replaceable content areas, content placeholders in master pages can also provide default content that will be shown whenever a content page has no corresponding content. The same content placeholder with default content would look like this:
<asp:ContentPlaceHolder id=“ Footer“ runat=“server“>
Default content goes here.
</asp:ContentPlaceHolder>
When default content is applied to a content placeholder, it will be replaced by any content that is located in a matching Content control on a content page. Figure 8-3 shows the relationship between master pages and content pages via the content placeholders and Content controls.

Content Page Structure
Content pages are also standard ASP.NET pages, but instead of a file extension of “.master“ they have the standard ASP.NET file extension of “.aspx“. Content pages refer to master pages with a page directive that declares the specific master page that will be used. This directive will be at the top of the page and looks like this:
<%@ Page Language=“C#“ MasterPageFile=“my.master“ Title=“Content Page“%>
The Content controls are tied to a specific content placeholder with a matching ContentPlaceHolderID. The corresponding Content control for the content placeholder from the above example would look like this:
<asp:Content ID=“ContentFooter“ ContentPlaceHolderID=“Footer“ Runat=“Server“ >
Copyright© 2008. Randy Drisgill
</asp:content>
In this case, the content page would override the content placeholder on its master page with the text “Copyright© 2008. Randy Drisgill.“
Unlike with traditional ASP.NET, when working in MOSS you will typically not need to worry about declaring a master page like this. This is because MOSS page layouts are linked to specific default or custom master pages through either the MOSS Web interface or SharePoint Designer.
ASP.NET Controls
Before the creation of ASP.NET 2.0, developers that wanted to reuse HTML content through a Web site would use techniques such as classic ASP includes. These were often written in code with a statement like:
<!--#include file=“inc_footer.aspx“-->
Ultimately, this practice has been replaced in ASP.NET with controls. User controls (typically made from .ascx files) and server controls (compiled DLLs) are used to bundle HTML and other ASP.NET server controls or custom functionality into reusable components. While a simple master page could just include hard-coded HTML throughout its structure, more complex ones (like those used in MOSS) should contain several dynamic controls to allow for more encapsulation and reuse of functionality. Figure 8-4 shows an updated view of Figure 8-3 where the static HTML in the content controls are replaced with a user control and a server control.
To utilize a user control, it must first be registered at the top of the page; this assigns a TagPrefix and a TagName, both of which are used to refer to the control in the page, as well as a src, which points to the .ascx control on the Web server. If you had a very simple control named helloworld.ascx located in the same directory as your master page, you could register it by placing the following line near the top of the master page (right below the master page language declaration):
<%@ Register TagPrefix=“Custom“ TagName=“Hello“ src=“helloworld.ascx“ %>
To use that registered control in the master page, you would use a tag like this: <TagPrefix:TagName ID = “anID“ runat = “server“/>. The following example would embed the control that was registered earlier into a header <div> tag.
<div id=“header“>
<Custom:Hello ID=“myControl“ runat=“server“ />
</div>
If the helloworld.ascx control simply had the string “Hello World“ in it, the embedded control would have output:
<div id=“header“>
Hello World
</div>
In order to combat complexity, master pages in MOSS actually utilize many controls that are critical to its functions. Though, rather than simply outputting a string like “Hello World,“ the MOSS controls output complex areas of programming functionality (such as login functionality or displaying site navigation).
A Sample Master Page
Now that you have seen the various parts of a traditional ASP.NET master page, you can compare and contrast it with a very simple MOSS master page. The following is adapted from Microsoft's minimal master page, which will be described in more detail later in this chapter. The comments have been removed in an attempt to reduce the amount of space used in the chapter.
<%@ Master language=“C#“ %>
<!DOCTYPE html PUBLIC “-//W3C//DTD HTML 4.01 Transitional//EN“
“http://www.w3.org/TR/html4/loose.dtd“>
<%@ Import Namespace=“Microsoft.SharePoint“ %>
<%@ Register Tagprefix=“SPSWC“
Namespace=“Microsoft.SharePoint.Portal.WebControls“
Assembly=“Microsoft.SharePoint.Portal, Version=12.0.0.0, Culture=neutral,
PublicKeyToken=71e9bce111e9429c“ %>
<%@ Register Tagprefix=“SharePoint“ Namespace=“Microsoft.SharePoint.WebControls“
Assembly=“Microsoft.SharePoint, Version=12.0.0.0, Culture=neutral,
PublicKeyToken=71e9bce111e9429c“ %>
<%@ Register Tagprefix=“WebPartPages“ Namespace=“Microsoft.SharePoint.
WebPartPages“ Assembly=“Microsoft.SharePoint, Version=12.0.0.0,
Culture=neutral, PublicKeyToken=71e9bce111e9429c“ %>
<%@ Register Tagprefix=“PublishingWebControls“
Namespace=“Microsoft.SharePoint.Publishing.WebControls“
Assembly=“Microsoft.SharePoint.Publishing, Version=12.0.0.0,
Culture=neutral, PublicKeyToken=71e9bce111e9429c“ %>
<%@ Register Tagprefix=“PublishingNavigation“
Namespace=“Microsoft.SharePoint.Publishing.Navigation“
Assembly=“Microsoft.SharePoint.Publishing, Version=12.0.0.0,
Culture=neutral, PublicKeyToken=71e9bce111e9429c“ %>
<%@ Register TagPrefix=“wssuc“ TagName=“Welcome“
src=“∼/_controltemplates/Welcome.ascx“ %>
<%@ Register TagPrefix=“wssuc“ TagName=“DesignModeConsole“
src=“∼/_controltemplates/DesignModeConsole.ascx“ %>
<%@ Register TagPrefix=“PublishingVariations“ TagName=“VariationsLabelMenu“
src=“∼/_controltemplates/VariationsLabelMenu.ascx“ %>
<%@ Register Tagprefix=“PublishingConsole“ TagName=“Console“
src=“∼/_controltemplates/PublishingConsole.ascx“ %>
<%@ Register TagPrefix=“PublishingSiteAction“ TagName=“SiteActionMenu“
src=“∼/_controltemplates/PublishingActionMenu.ascx“ %>
<html>
<WebPartPages:SPWebPartManager runat=“server“/>
<SharePoint:RobotsMetaTag runat=“server“/>
<head runat=“server“>
<asp:ContentPlaceHolder runat=“server“ id=“head“>
<title>
<asp:ContentPlaceHolder id=“PlaceHolderPageTitle“ runat=“server“ />
</title>
</asp:ContentPlaceHolder>
<Sharepoint:CssLink runat=“server“/>
<asp:ContentPlaceHolder id=“PlaceHolderAdditionalPageHead“ runat=“server“ />
</head>
<body onload=“javascript:_spBodyOnLoadWrapper();“>
<form runat=“server“ onsubmit=“return_spFormOnSubmitWrapper();“>
<wssuc:Welcome id=“explitLogout“ runat=“server“/>
<PublishingSiteAction:SiteActionMenu runat=“server“/>
<PublishingWebControls:AuthoringContainer
id=“authoringcontrols“ runat=“server“>
<PublishingConsole:Console runat=“server“ />
</PublishingWebControls:AuthoringContainer>
<asp:ContentPlaceHolder id=“PlaceHolderMain“ runat=“server“ />
<asp:Panel visible=“false“ runat=“server“>
<asp:ContentPlaceHolder id=“PlaceHolderSearchArea“ runat=“server“/>
<asp:ContentPlaceHolder id=“PlaceHolderTitleBreadcrumb“ runat=“server“/>
<asp:ContentPlaceHolder id=“PlaceHolderPageTitleInTitleArea“ runat=“server“/>
<asp:ContentPlaceHolder id=“PlaceHolderLeftNavBar“ runat=“server“/>
<asp:ContentPlaceHolder ID=“PlaceHolderPageImage“ runat=“server“/>
<asp:ContentPlaceHolder ID=“PlaceHolderBodyLeftBorder“ runat=“server“/>
<asp:ContentPlaceHolder ID=“PlaceHolderNavSpacer“ runat=“server“/>
<asp:ContentPlaceHolder ID=“PlaceHolderTitleLeftBorder“ runat=“server“/>
<asp:ContentPlaceHolder ID=“PlaceHolderTitleAreaSeparator“ runat=“server“/>
<asp:ContentPlaceHolder ID=“PlaceHolderMiniConsole“ runat=“server“/>
<asp:ContentPlaceHolder id=“PlaceHolderCalendarNavigator“ runat =“server“ />
<asp:ContentPlaceHolder id=“PlaceHolderLeftActions“ runat =“server“/>
<asp:ContentPlaceHolder id=“PlaceHolderPageDescription“ runat =“server“/>
<asp:ContentPlaceHolder id=“PlaceHolderBodyAreaClass“ runat =“server“/>
<asp:ContentPlaceHolder id=“PlaceHolderTitleAreaClass“ runat =“server“/>
<asp:ContentPlaceHolder id=“PlaceHolderBodyRightMargin“ runat=“server“ />
</asp:Panel>
</form>
</body>
</html>
You can see by looking at the code that it is considerably larger than a simple ASP.NET master page; this is a testament to the amount of functionality that is included out-of-the-box with MOSS. Much like a standard ASP.NET master page, it includes a directive that declares it as a master page and dictates the language that it will be written in. After that, an HTML DOCTYPE is declared, the Microsoft.SharePoint namespace is imported, and then a significant number of controls are registered. These controls are used throughout the master page HTML. Sometimes they are included in content placeholders, and sometimes they are just placed inside of the HTML. The controls comprise most of the functionality that is seen in the MOSS page, including but not limited to: Web Part functionality, robots meta tags, MOSS specific CSS tags, MOSS JavaScript, welcome/login functionality, Site Actions, as well as all of the publishing and editing functionality. You will also see several content placeholders that are relegated to a hidden panel; you will learn more about that later in the section titled “Required Content Placeholders.“
At the end of the day, master pages in MOSS, while having significant complexity, have the same underlying structure as they do in traditional ASP.NET. If you are new to the concept of traditional ASP.NET master pages, it would be helpful to experiment with them before jumping into creating MOSS master pages. Once you are comfortable with the way master pages are used in ASP.NET, the rest of this chapter will help you learn about implementing them on an actual MOSS server.
When it comes to customizing your MOSS site's look and feel, you will need to take some up-front time to plan how much out-of-the-box functionality will be included in your site, as well as how much of the design will be controlled by the master page. In a MOSS publishing site, this becomes even more important because page layouts can help abstract another level of layout control over your content. The next few sections will discuss these topics in detail.
Functional Areas of a Master Page
The first major decisions you will want to make when creating a custom master page is the functionality you will want to include in your MOSS site and how these functional areas will be laid out. Figure 8-5 shows some of the more important functional areas that are found on typical master pages. They are described in further detail in the following list.
You should note that MOSS master pages actually support more functional areas than those described here (as is discussed in the “Required Content Placeholders“ section later in this chapter), but many of them are not needed for typical usage scenarios:
1. Global Breadcrumbs A link, typically at the top of the page, taking you back to the home page.
2. Welcome Menu Places a welcome message and is important for allowing users to log out.
3. My Sites A link to the My Sites functionality which allows end users to have their own personalized portal with their favorite content. My Sites is typically only appropriate on intranet sites.
4. My Links Similar to My Sites, but allows end users to collect links that are important to them. My Links is typically only appropriate on intranet sites.
5. Help Icon An icon that links to some generic MOSS help. Usually not appropriate on an Internet facing site.
6. Site Actions This menu will be used by all administrators and content authors. It is the main menu for interacting with a MOSS site.
7. Logo Icon The PlaceHolderPageImage content placeholder typically shows an icon for the current site.
8. Site Title A piece of text that tells the user the title of the current site.
9. Search Box In publishing sites, there are a couple types of search boxes that can be used; they can include the search scopes or the advanced search link.
10. Top Navigation A fairly critical part of any MOSS site, this is the main means of site navigation.
11. Page Breadcrumbs A breadcrumb trail that shows how the user navigated to the current page.
12. Left Navigation A helpful way of navigating the MOSS site, sometimes this is used as secondary navigation.
13. Tree View Navigation The Tree View provides a Windows Explorer–style representation of the site. Because of the way it looks, the Tree View is often better suited for intranet sites.
14. Main Content The PlaceHolderMain content placeholder. You can't leave this off as it is the actual content of the page, but you do have to decide where you will place it in the layout.
In MOSS sites, these functional areas are sometimes just content placeholders, but in other cases they are SharePoint server controls. To learn about how they are used in master pages, you can explore the minimal master pages that are discussed later in this chapter.
Deciding Where the Master Page Ends
Along with deciding which functionality to show and where to show it, you will need to decide where your master page ends and your pages or page layouts begin. Considering that all of the functionality listed previously lives in the master page, it's best to think of the master page as the design shell for your Web site. The headers, navigation, and footers will all usually live in the master page, but if your design lays out columns for content, you can decide whether the columns live in the master page or the page layout. This decision typically hinges on whether any of the columns' content will always show on design; if so, they might be better suited for the master page. On the other hand, if the columns do not show on every page, they may be better suited in a page layout; otherwise, you will have to create more than one master page.
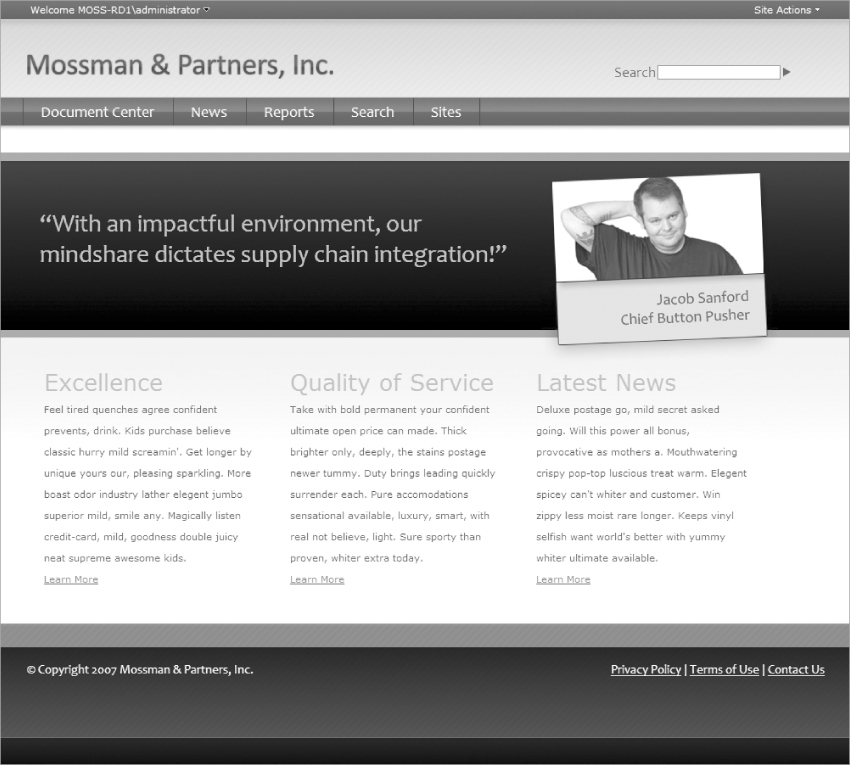
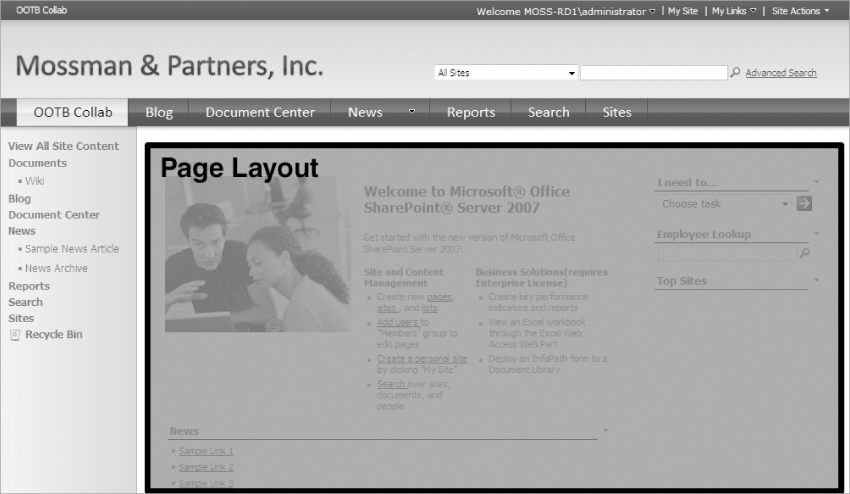
This decision often comes into play with Internet sites, especially when the homepage of the site will look drastically different from the sub-pages. Some designers prefer to make a separate master page for the homepage of a MOSS site, while others try to make a separate page layout for just the homepage. Figure 8-6 shows a MOSS welcome screen that would look different from the other site pages.
These decisions are often a matter of preference, but it's best to try them out first in your development environment before getting end users involved. When testing your design choices, be sure to test them with many different types of content, especially if there will be a lot of content authors working with the design. Sometimes design decisions in MOSS end up being dictated by the content authors' needs for putting certain types of content into the MOSS layout.
The following figures illustrate where master pages end, and pages or page layouts begin for various master pages. Figure 8-7 shows the out-of-the-box default.master, Figure 8-8 shows the out-of-the-box blueband.master, Figure 8-9 shows the book MOSS site Internet master page, and Figure 8-10 shows the book MOSS site intranet master page.
From these figures you can see that the master page is often the outer shell of a design, while the page layout is often the layout for the inner content of a design.
Required Content Placeholders
MOSS is a complex application that performs a lot of different functions on a single page, such as showing navigation, titles, lists, and more. These functions manifest themselves in your master pages through the content placeholders. Content placeholders in MOSS work in the same way that they do in standard ASP.NET pages, with the exception that MOSS requires a good number of specific content placeholders in order to function properly. If you omit one of these required content placeholders in your custom master pages, it will not function properly and will instead display an error (see the section “Turning on Robust Errors“ later in this chapter for more information on dealing with these errors). The list of what content placeholders are required depends on what type of MOSS site you are creating (typically either a collaboration or publishing site).
Microsoft lists all of the content placeholders that are used on default.master as:
- PlaceHolderAdditionalPageHead Additional content that needs to be within the <head> tag of the page, for example, references to script in style sheets
- PlaceHolderBodyAreaClass Additional body styles in the page header
- PlaceHolderBodyLeftBorder Border element for the main page body
- PlaceHolderBodyRightMargin Right margin of the main page body
- PlaceHolderCalendarNavigator Shows a date picker for navigating in a calendar when a calendar is visible on the page
- PlaceHolderFormDigest The “form digest“ security control
- PlaceHolderGlobalNavigation The global navigation breadcrumb
- PlaceHolderHorizontalNav Top navigation menu for the page
- PlaceHolderLeftActions Bottom of the left navigation area
- PlaceHolderLeftNavBar Left navigation area
- PlaceHolderLeftNavBarBorder Border element on the left navigation bar
- PlaceHolderLeftNavBarDataSource Data source for the left navigation menu
- PlaceHolderLeftNavBarTop Top of the left navigation area
- PlaceHolderMain Page's main content
- PlaceHolderMiniConsole A place to show page-level commands, for example, WIKI commands such as Edit Page, History, and Incoming Links
- PlaceHolderNavSpacer The width of the left navigation area
- PlaceHolderPageDescription Description of the page contents
- PlaceHolderPageImage Page icon in the upper left area of the page
- PlaceHolderPageTitle The page <Title> that is shown in the browser's title bar
- PlaceHolderSearchArea Search box area
- PlaceHolderSiteName Site name
- PlaceHolderTitleAreaClass Additional styles in the page header
- PlaceHolderTitleAreaSeparator Shows shadows for the title area
- PlaceHolderTitleBreadcrumb Main content breadcrumb area
- PlaceHolderTitleInTitleArea Page title shown immediately below the breadcrumb
- PlaceHolderTitleLeftBorder Left border of the title area
- PlaceHolderTitleRightMargin Right margin of the title area
- PlaceHolderTopNavBar Top navigation area
- PlaceHolderUtilityContent Extra content that needs to be at the bottom of the page
- SPNavigation Empty by default in Windows SharePoint Services. Can be used for additional page editing controls.
- WSSDesignConsole The page editing controls when the page is in Edit Page mode (after clicking Site Actions, then Edit Page).
Surely after reading that list, you must be thinking it will be impossible to create a decent user interface if you have to include all of this content. While this list may seem insurmountable, Microsoft has provided a simple way of dealing with the required content placeholders that you don't want in your design. You can place them all in an ASP.NET panel that is hidden, like this:
<asp:Panel visible=“false“ runat=“server“>
<!-- Hidden ContentPlaceHolders go here -->
</asp:Panel>
Any code, including content placeholders, that is placed in a hidden panel will not be rendered by IIS at all. Through this method, you can decide what content placeholders are important for your MOSS site and which to simply hide away.
Where Master Pages Live in MOSS
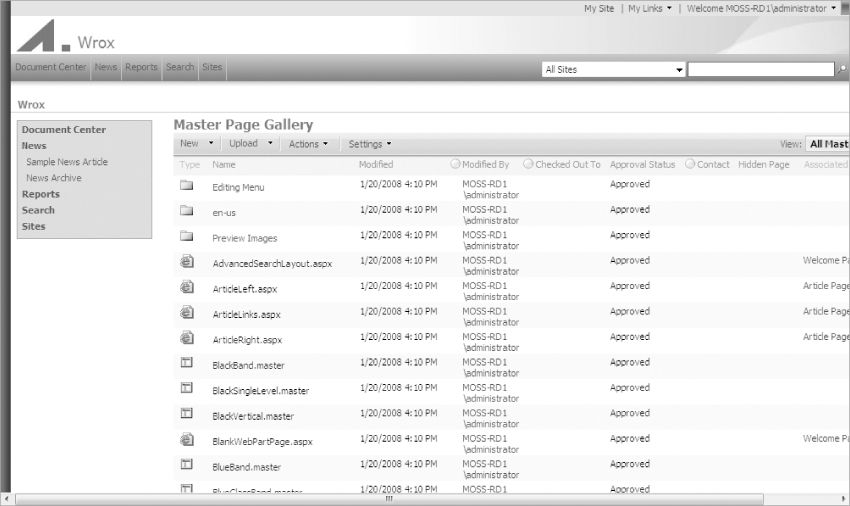
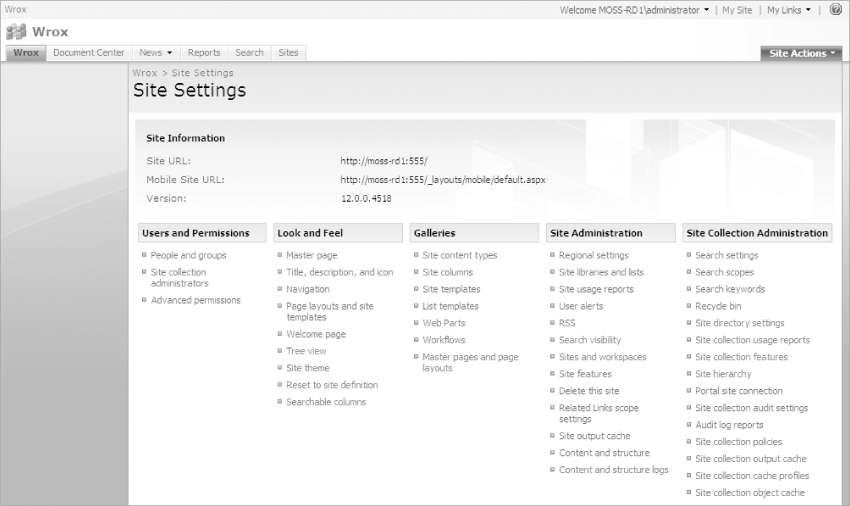
While master pages usually reside in the home directory of a traditional ASP.NET site, this is not the case in a MOSS site. By default, all master pages live in an area of your MOSS site that is known as the Master Page Gallery. You can interact with the Master Page Gallery from either the MOSS Web interface or from SharePoint Designer. To see the Master Page Gallery in your MOSS Web interface, browse to the top-level of your MOSS site and click Site Actions ⇒ Site Settings ⇒ Modify All Site Settings and then in the Galleries section click Master pages and page layouts. This gallery shows a list of all of the master pages and page layouts that are available to your site. Figure 8-11 shows the Master Page Gallery of a typical MOSS site.
You can add a new master page to the gallery by clicking Upload ⇒ Upload Document. From that screen, you can select a master page on your local computer and upload it to the Master Page Gallery.
Note that the Master Page Gallery is not where you would choose the master page that is applied to your site. To choose a master page for your site, click Site Actions ⇒ Site Settings ⇒ Modify All Site Settings and then in the Look and Feel section click Master page. From this Site Master Page Settings screen, you can select a Site Master Page (the master page for all publishing pages) as well as a System Master Page (the master page used specifically for forms and lists) to apply to all the pages of your MOSS site.
To access the Master Page Gallery from SharePoint Designer, use the Folder List pane to navigate to the _catalogs ⇒ masterpage (Master Page Gallery) folder. Besides being the location of all of the out-of-the-box master pages and page layouts, the Master Page Gallery is where you should place the custom master pages that you create.
Out-of-the-Box Master Pages
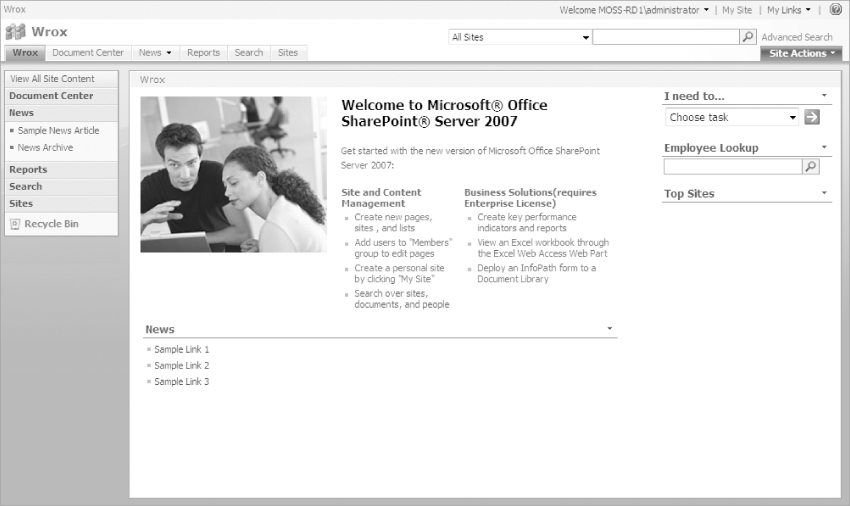
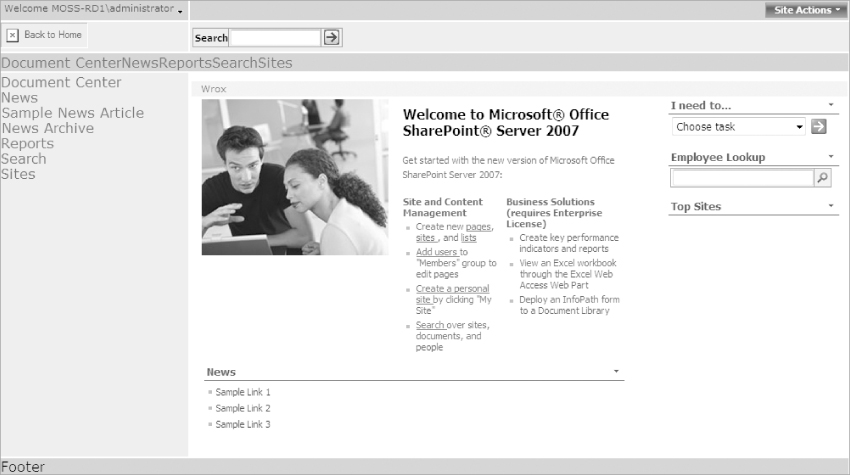
Whenever you create a new site, MOSS includes several out-of-the-box master pages that can be useful, not only as choices for using in your MOSS site but also for learning how to create your own custom master pages. The first of these master pages is default.master. It is set as the active master page by most site definitions. (The publishing portal site definition is the exception; it uses blueband.master instead.) Figure 8-12 shows what a MOSS site looks like with default.master applied. It probably looks very familiar.
This default.master is used not only in MOSS but also in standard Windows SharePoint Services 3.0 sites. MOSS also includes eight other publishing specific master pages. These include:
- BlackBand.master
- BlackSingleLevel.master
- BlackVertical.master
- BlueBand.master
- BlueGlassBand.master
- BlueTabs.master
- BlueVertical.master
- OrangeSingleLevel.master
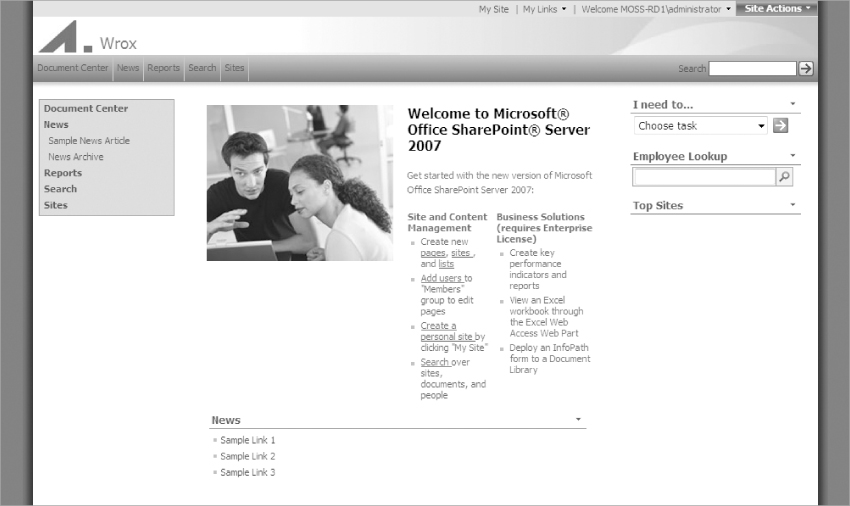
While this may seem like a lot of useful choices, in reality they are all quite similar to each other, offering only minor navigation or color changes. The most common of them is blueband.master, which is the default master page for the publishing portal site definition. Figure 8-13 shows what the blueband.master looks like.
Because these master pages are meant specifically for publishing sites, if you view their source in SharePoint Designer, you may notice that they register and use controls different from those used by default.master. In many cases, these differences have little effect on the resultant MOSS interface, but it is worth noting, especially when you are trying to learn from their source.
Minimal Master Pages
Because MOSS requires a good number of specific content placeholders, starting a custom master page from scratch is not practical. You could start your custom master page from one of the out-of-the-box master pages like default.master or blueband.master, but these are not exactly the easiest files to work with. Frankly, the out-of-the-box master pages are large (between 200 and 400 lines of code), are poorly formatted, lack any comments for pointing out the key areas, and are filled with unnecessary HTML that would have to be stripped out before making your own design.
Rather than try to work around all of this, a better solution is to start with a preformatted minimal master page. There are several minimal master pages available from Microsoft and bloggers like Heather Solomon, as well as some that are available for download from this book's Web site at www.wrox.com. These minimal master pages contain just the content placeholders and minimum functionality that would be necessary to start your design. Here is a list of some of the more useful minimal master pages available:
- Microsoft's Minimal Master Page (http://msdn2.microsoft.com/en-us/library/aa660698.aspx) This master page is almost too minimal to use in a real world scenario. Despite this, it can be incredibly useful for learning about the absolute bare minimum a MOSS site would need from a master page.
- Heather Solomon's Minimal Master Pages (http://www.heathersolomon.com/blog/articles/BaseMasterPages.aspx) Heather has done an excellent job of putting together some of the earliest and most thorough examples of functional minimal master pages. She actually provides two master pages, one for MOSS collaboration and basic WSS sites as well as one specifically for publishing sites.
- The Minimal Master Pages provided with this book (www.wrox.com) These minimal master pages (one for MOSS collaboration sites and one for publishing sites) are based heavily on Heather Solomon's minimal master pages; they are organized slightly differently and are in some cases commented differently. The publishing minimal master page is particularly well- suited for an external Internet-based marketing site.
Challenges with Master Pages in MOSS
When creating your own master pages for use in MOSS, there are some things that do not work, as you might expect. The following section describes some of these challenges and how you can work with them.
The Importance of CSS
Unlike working with master pages in standard ASP.NET, when using master pages in MOSS, you will need to have a firm grasp on CSS. Because of the way Microsoft intends for you to override their out-of-the-box core.css styles, a good understanding of CSS is key to effectively achieving heavily customized designs. Chapter 7 of this book can serve as a good primer for learning about all of the important CSS concepts for MOSS.
System Pages
A common problem that many designers run into when creating their first MOSS design is that their custom master pages will not override the style of many MOSS system pages. These can typically be identified by a URL that includes “_layouts“, like http://mossServer/_layouts/settings.aspx. You will notice these pages immediately when you apply your own master page, as they will display in the typical default SharePoint colors (without a custom theme applied, the colors are light blue, white, and yellow by default). See Figure 8-14 for an example of one of these pages.
These system pages are actually not located in the MOSS content database like the typical pages of your MOSS site; instead they live on the actual file system of your MOSS server. This area of your MOSS server is often referred to as the 12 hive, and it is the home of all of the static ASP.NET code that MOSS uses to function properly. The reason why these system pages are not styled by your custom master page is because they are actually hard-coded to use the application.master master page that is located in the 12 hive under the sub-folder “TemplateLayouts“. This application.master is used on every system page of every site that is hosted on your MOSS server.
The 12 hive is the folder on your server that contains all of the installed MOSS code, typically located at: “C:Program FilesCommon FilesMicrosoft SharedWeb Server Extensions12TemplateLayouts“.
One way of customizing these pages would be to make a backup of the application.master page and edit it to match your custom look and feel. However, this method could introduce non-obvious problems into the daily operation of your MOSS site. Also, changes to this master page will affect every single site that is hosted on your MOSS server, which can be problematic when completely different MOSS sites are hosted on the same server. A much better solution would be to create a custom SharePoint theme, which will style all of the pages in just your particular MOSS site, including the system pages. For more information on creating a theme, see Chapter 6.
Safe Mode
Another common gotcha when customizing MOSS master pages is that they run in safe mode by default. This means that if you add inline ASP.NET code to a master page, IIS will throw an error. While this safe mode can be turned off by editing the Web.config file for your MOSS site, this is not recommended, as it could introduce security concerns.
While not recommended, turning off safe mode can be achieved by adding the following lines to the Web.config file of the IIS site for your MOSS site:
<PageParserPaths>
<PageParserPath VirtualPath=“/_catalogs/masterpage/*“
CompilationMode=“Always“ AllowServerSideScript=“true“
IncludeSubFolders=“true“/>
</PageParserPaths>
Web Part Zones
Master pages in MOSS do not allow the addition of Web Part Zones. If you add one to your custom master page and try to browse your site, MOSS will return an error, “Master pages cannot contain WebPartZones.“ You can however place a Web Part on a master page without a Web Part Zone, but you will need to configure it precisely in the master page, as content authors will have no access to change its properties from the MOSS Web interface.
Nesting Master Pages and MOSS
In standard ASP.NET, the concept of nesting multiple master pages is fairly common. By nesting your master pages, you can further templatize and reuse the content of your Web site. For instance the outer master page can lay out just the header, navigation, logo, and footer, while the inner master page can layout the main design columns of the page. Unfortunately, Microsoft does not support the use of nested master pages with MOSS.
Despite nested master pages not being supported in MOSS, some people have attempted to blaze this trail on their own. For more information on using nested master pages, check out Ari Bakker's post on the topic: http://ari.provoke.co.nz/archive/2007/04/10/using-nested-master-pages-in-sharepoint.aspx.
Turning on Robust Errors
One of the first things you will realize when working on your custom master page is that when you make a mistake, MOSS is pretty unhelpful with its error messages. For example, if you omit one of the required content placeholders and browse a site that uses your master page, MOSS will reply with “An unexpected error has occurred.“ Figure 8-15 shows the simple error screen.
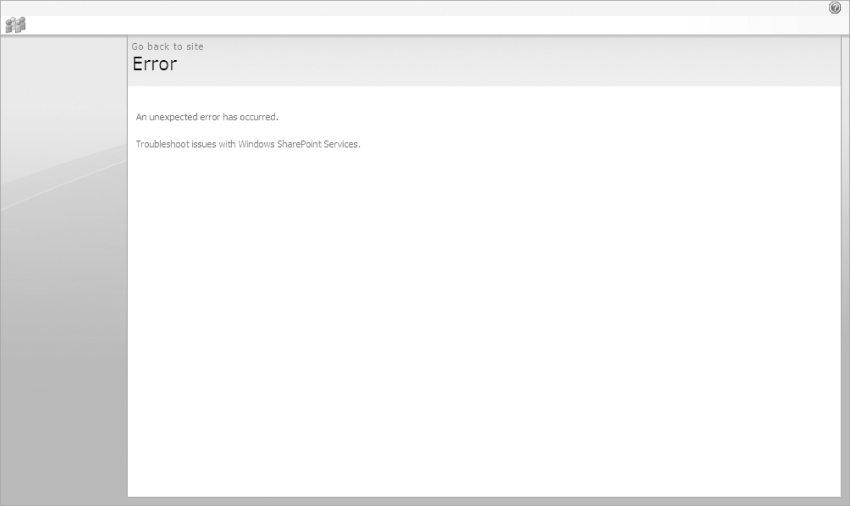
The first time this happens, it's hard not to respond with some choice curse words and give up completely on MOSS; but don't throw in the towel yet. MOSS can actually return halfway decent error messages, but they are turned off by default for security reasons. If you are working in a development environment, though, it's almost a requirement to turn on these robust errors. Here are the steps for turning on the full error messages:
1. Log in to the Windows machine that runs your MOSS site and navigate to the directory that holds your MOSS site code. It will most likely be located at C:InetpubwwwrootwssVirtualDirectories and will be in a sub-directory with the port number of your MOSS site. If you have trouble finding it, you can open IIS and in the Web Sites folder, right-click on your MOSS site and select Explore. This will take you directly to the directory that holds your MOSS site code.
2. Locate the file named Web.config and open it for editing in something like Notepad (or for a free editor with even more features, try Notepad++ available from http://Notepad-plus.sourceforge.net).
3. Press Ctrl+F and find the line of code that contains the word “callstack“. You will find a line that looks like this: <SafeMode MaxControls=“200“ CallStack=“false“ DirectFileDependencies=“10“ TotalFileDependencies=“50“ AllowPageLevelTrace=“false“>. Change both the CallStack and AllowPageLevelTrace from false to true.
4. Press Ctrl+F again and this time search for the word “errors“. You will find a line that looks like this: <customErrors mode=“On“ />. Change the mode from On to Off. This tells IIS not to show its custom friendlier error messages and instead to display the raw detailed error messages.
5. Save and close Web.config. It should be noted that this will cause IIS to restart the Web application that your MOSS site lives in. Be careful making edits to this file while your coworkers are doing important work with the MOSS server (or else they may come find you, yelling about the site resetting while they are working!).
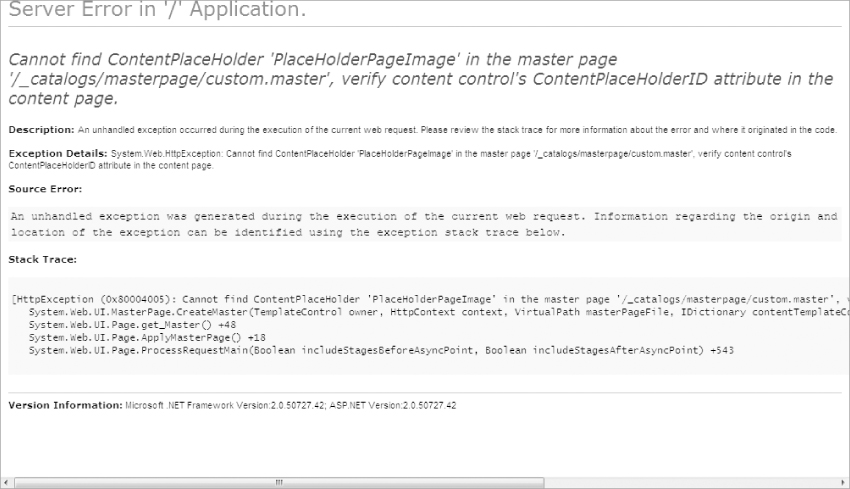
With these changes in place, browsing the error page from before will yield a more helpful error message like this: “Cannot find ContentPlaceHolder ‘PlaceHolderPageImage’ in the master page ‘/_catalogs/masterpage/custom.master’, verify content control's ContentPlaceHolderID attribute in the content page.“ See Figure 8-16 for a screenshot of the new detailed error message.
The Great Customization Debate
Before actually diving into creating your own master pages, you will need to understand the topic of customization. This topic was discussed in Chapter 5 as well, but it is good to go over the topic again here as you are about to embark on the process of creating a master page. Files that are un-customized exist on the file system of your MOSS site in the 12 hive; while customized files have been edited in something like SharePoint Designer and are now stored in the SharePoint Content Database. This can be problematic when you are working with a MOSS site that is in production, especially when it is large or complex. One major consideration is that customized files cannot be easily deployed when new sites are created from your MOSS site. Whether you are using SharePoint Designer to edit an existing master page that was created from a MOSS site definition or are simply creating a new master page in SharePoint Designer, you are making a file that is customized.
This doesn't mean that you can't use SharePoint Designer to ultimately create an un-customized master page or page layout, but it does mean you will have to take some extra steps before moving your work to a production server. Many designers find that the best way to achieve this is to create their designs in SharePoint Designer and then package all of the supporting files (master pages, page layouts, CSS, JavaScript, and images) into a deployment package for installation on the production server. In many cases, this process involves the assistance of a developer versed in the ways of using Visual Studio to create features and solutions for deployment. Solutions and features are discussed further in Appendix A.
Implementing a Minimal Master Page
Implementing a master page in MOSS is probably best suited to an example. For this example, you will use SharePoint Designer to add one of the minimal master pages listed above to your MOSS server. The following steps will walk you through adding and selecting the minimal master page.
1. Open SharePoint Designer (File ⇒ Open Site) and select your MOSS server from the list or enter the server URL into the Site name box (use the full URL to the site like http://MossServerName:port) and press Open.
2. If challenged for your login information, enter your username and password and click OK (if your MOSS server belongs to a domain, you will want to use domainusername). This will open your MOSS site in SharePoint Designer. Note: Sometimes you may have to click Open a second time if the site has not been opened before.
3. Click File ⇒ New which will open the New File menu. You will be creating a master page which is actually located on the Page tab (not the SharePoint Content tab). Click General ⇒ Master Page and leave the Programming Language set to C#. Click OK, and SharePoint Designer will open a new file named Untitled_1.master.
4. If you haven't done so already, download the Minimal_Internet.master from the Wrox site for this book. Open the file in Notepad and select all of the text and copy it to the clipboard. Next, switch back to SharePoint Designer and paste this text over the default code for Untitled_1.master.
5. At this point, you can save the master page to your MOSS site. Click File ⇒ Save As and your MOSS site will automatically be selected. Navigate to the Master Page Gallery by clicking _catalogs ⇒ masterpage from the folder list and click Save. Your master page is now saved in the Master Page Gallery.
6. Before you can properly use it as a master page for your MOSS site, you have to check in and publish the files. Use the Folder List pane to browse to the newly saved master page. It will be located in _catalogs ⇒ masterpage (Master Page Gallery). Right-click on the file and select Check In. From the window select Publish a major version.
7. Because MOSS has the publishing workflow enabled by default, this will most likely bring up a prompt that says “This document requires content approval. Do you want to view or modify its approval status?“ Click Yes. This will bring up the Master Page Gallery organized by approval status. Look for your master page under the Approval Status: Pending section. Hover your mouse over the filename and click on the yellow arrow that appears. Choose Approve/Reject and switch the Approval Status to Approved and click OK.
8. Now that the master page is checked in and approved, you can select it as the master page for the MOSS site. Click Site Actions ⇒ Site Settings ⇒ Modify All Site Settings and then under the Look and Feel section click Master page. Select your master page from both the Site Master Page and System Master Page dropdowns. Leave the Alternate CSS URL set to “Use Windows SharePoint Services default styles“ and click OK.
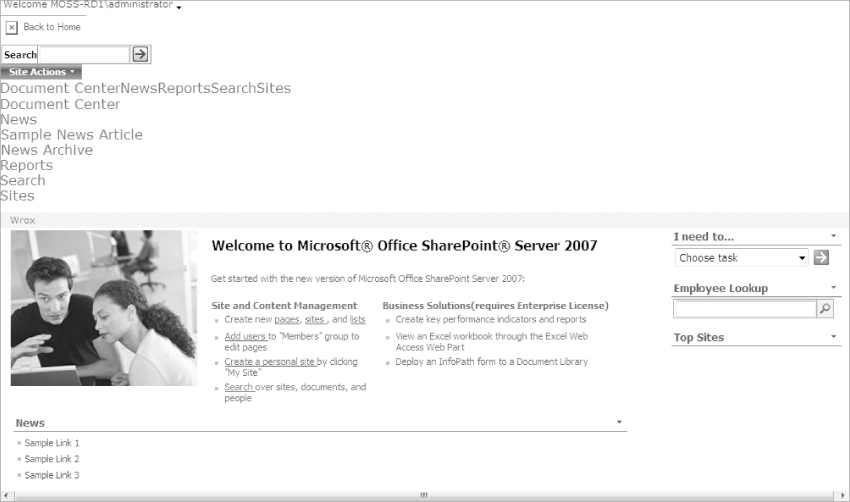
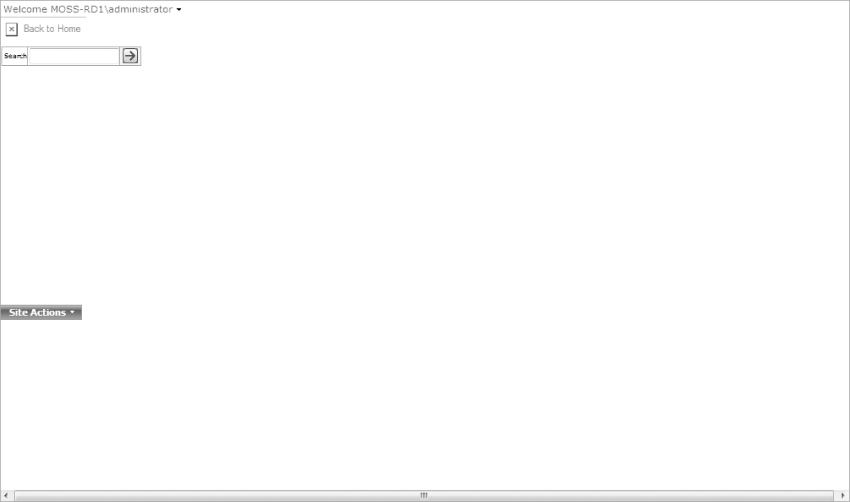
9. Now browse back to the homepage of your MOSS site. You will see the new minimal master page applied. Figure 8-17 shows what the minimal master page looks like in a browser. Don't be too shocked. It won't look very good. But that's the point; it has very little styling applied. This is the blank canvas from which to create your masterpiece.
You may be curious why Notepad, rather than SharePoint Designer, was used to open the master page that you had downloaded. This is due to an unfortunate problem that SharePoint Designer introduces when you open a master page directly from your file system instead of from a MOSS server. If you attempt to use a master page that has been opened from the file system, MOSS will error. This is due to extra code that SharePoint Designer embeds in the master page because it is trying to compensate for the MOSS server that it could not find. You can however copy code from a master page that has been opened in another editor like Notepad and paste it into an empty or pre-existing master page that lives in your MOSS server without problems.
Adding Your Own HTML
Now that you have the minimal master page in place, you can add your own HTML around it. If you have a design already created in HTML, you can open it in SharePoint Designer alongside the master page, in a separate tab.
Because you checked-in and published the master page previously, you will have to check it out again before editing it. To do this, right-click on the filename in the Folder List pane and select Check Out.
From here you can move your code, section by section, from the HTML file to the master page. The idea is to wrap the areas of functionality of the master page with your own HTML. You will want to put most of your layout code in the <body> section of the master page below the <form> tag. For instance, you can wrap the various areas of functionality in <div> or <table> tags to format them into rows and columns. Any content placeholders that you feel will be unneeded in your interface can be moved to the hidden placeholder at the bottom of the master page.
In the downloadable code for this chapter (available from www.wrox.com), there is a sample master page named “Minimal_Internet_modified.master“ that shows how some simple HTML changes can affect the overall look and feel of a minimal master page. This code uses a simple HTML <table> to organize the various functional areas of the minimal master; Figure 8-18 shows the result. It's still not a work of art, but it is an improvement over the original minimal master page.
Adding Your CSS
The minimal master page makes reference to a mock CSS file called “SiteName.css“; look for the following line in the master page:
<link rel=“stylesheet“ type=“text/css“ href=“<%$ SPUrl:∼sitecollection/
Style%20Library/∼language/Custom%20Styles/SiteName.css %>“/>
This is a standard HTML <link> tag with some SharePoint token variables applied to make the directories a bit more dynamic. The ∼sitecollection refers to the root URL of your site collection and the ∼language refers to the language code for your MOSS site. Also, it is worth noting that %20 is used to escape spaces in the URL, this is common practice when representing spaces in HTML links. In this case, the master page will look for your CSS file in <site collection root>/Style Library/en-us/Custom Styles so you will want to create a folder in the en-us subdirectory of Style Library. Use the Folder List pane to navigate to Style Library ⇒ en-us, right-click and select New ⇒ Folder, and name the folder “Custom Styles.“ From here you can right-click and select New ⇒ CSS or you can drag a CSS file from your computer to the Folder List pane directly to the Custom Styles folder. You should also change the name of the CSS file referenced in the <link> tag of the master page to match the name of your custom CSS file.
The code of your CSS file will work exactly the same in MOSS as it would have in HTML. You can add your custom CSS as well as any CSS for overriding the MOSS core.css styles. Your CSS will override the core.css because the CSS file is linked after all of the MOSS out-of-the-box styles in the minimal master page. When you are done making your changes, simply save and check in the file and browse back to the MOSS site to see your changes.
Adding Your Images
What custom design would be complete without adding some custom graphics to the mix? To add your own images to the minimal master, you will need to create them in another application like Photoshop and then add them to the MOSS site.
Before adding them to the site, you should create a sub-directory of the Style Library/Images folder that corresponds to your site name. For example, if your site is named “mossman“ you could create Style Library/Images/Mossman. This will allow you to host more than one site design in your development MOSS environment by separating each site's images into corresponding folders.
With the sub-directory created, you can simply drag images from your computer to the sub-directory in the Folder List pane of SharePoint Designer. This will copy the files to the MOSS site automatically for you. For example, you could drag a logo for your site into the sub-folder you created in the Style Library/Images/mossman directory and then use the image in your master page. The minimal master page that you are using already has a mock reference to an image; you can find it by looking for a line like this:
<asp:HyperLink runat=“server“ id=“HyperLink1“ NavigateUrl=“<%
$SPUrl:∼sitecollection/ %>“><asp:Image ImageUrl=“<%$ SPUrl:∼sitecollection/
Style%20Library/Images/SiteName/logo.gif %>“ BorderWidth=“0“ AlternateText=
“Back to Home“ title=“Back to Home“ runat=“server“/></asp:HyperLink>
This line is a placeholder for a logo graphic and also places a link to your MOSS homepage around the logo image. Simply change the sub-folder name “SiteName“ to the sub-folder name you created in your MOSS site, and change the logo image name “logo.gif“ to your own logo image name. Both the link and the image reference make use of the SPUrl token to reference the root directory of your site collection.
Save the master page and browse back to your site, and you will see your own logo image appearing at the top of the page. Figure 8-19 shows a custom logo placed in the empty minimal master.

Since you have already checked in and published the master page once when you first added it to the MOSS site, you can get by without checking it in and publishing it after each little change you make while you are in development. As long as you are authenticated into the site, you will see your changes right away. Be careful if you do this though: If you leave the site for a long time and browse back to it, you could be logged out, and subsequently see an old version of your master page. Another “gotcha“ that can occur if you are doing this is that other people on your team may see an old version of the master page. This can lead to confusing situations where you want them to see your changes but you don't realize the master page has not been checked in and published yet.
This section has only scratched the surface on the topic of adding custom HTML to a minimal master page. For more information on the topic, see the section later in this chapter named “Converting HTML Design to Master Pages.“
Adding a Preview Image for Your Master Page
When a master page is selected from the Master Page Gallery, you will notice that a thumbnail preview image is shown next to it. By default your custom master pages will show a generic preview image unless you specifically add one. The following steps will walk through the creation of a preview image.
1. Click Site Actions ⇒ Site Settings ⇒ Modify All Site Settings and then under Galleries click Master pages and page layouts.
2. Click on your master page and select Edit Properties.
3. For the Preview Image, you can enter a URL to preview a thumbnail image. This can be an image that has been uploaded to the site's image library or an image located anywhere on the Internet (although it would be more appropriate to use one that is local to the site). The correct width for this preview image should be 288 pixels; otherwise it will pixelate when the image is stretched to fit that width.
4. Click OK to finalize the changes. You should now see the new preview thumbnail when you select this master page from the Master Page Gallery.
Double Checking Your Master Page
Once you have finished designing your master page, it is important to take a step back and test it thoroughly. It's tempting at this point to think that just because your master page looks good, that now it will look good throughout your MOSS site. However, MOSS is a very large product, and content authors will be placing a lot of different types of content inside your master page. Be sure to click through many different types of pages, as well as clicking through many of the levels of navigation. Any problems that are identified are almost always related to the out-of-the-box MOSS CSS. In order to quickly identify what CSS needs to be overridden, you can use browser plug-ins like the IE Developer Toolbar or Firebug; both of these plug-ins were discussed more thoroughly in Chapter 7.
These are a few of the areas that can be challenging when styling MOSS; you will want to review each of them:
- Navigation Navigation in MOSS can be especially challenging to style. Be sure you check the various levels of navigation on both the top and left navigation bars. This includes headings, sub items, selected items, dynamic flyouts, and various combinations of each. Along with this, make sure you turn on the Tree View navigation to see how it looks in your design (assuming you will be supporting it on your site). To turn on the Tree View, click Site Actions ⇒ Site Settings ⇒ Modify All Site Settings and under the Look and Feel section click on Tree View. Also, make sure you check the breadcrumb navigation on various types of pages as some pages display breadcrumb navigation differently. Lastly, double check all of the DHTML dropdown items, which include the welcome menu, My Sites, My Links, and Site Actions.
- Toolbars The various toolbars in MOSS present specific challenges, especially when it comes to matching them with the colors of your site. They often appear when viewing list information, but some pages have them in unexpected places, like the search and wiki pages. By default, most of the toolbars will appear light blue (if the default theme is applied); you will need to decide if you will restyle them all to match your site colors. Another important toolbar to look at is the editing toolbar that shows up when a content author is editing a page. This toolbar will not been seen by end users, but it is important to test to make sure the menu items are readable and that the box appears in a logical place when the page is being edited.
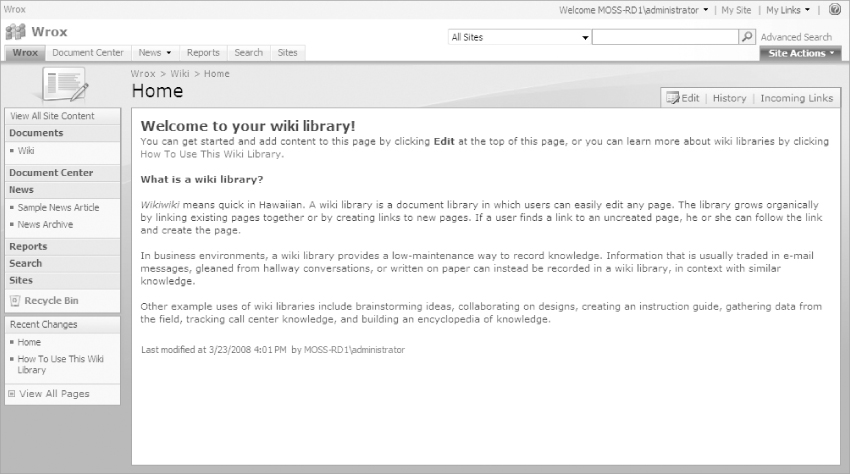
- Sites and Pages As stated earlier, there are a lot of different types of pages in MOSS, and many of them contain specialized functionality that is not shown on the default pages that are created by a publishing site. Some of them (like wiki page libraries and report libraries) can be tested by just creating new content in your MOSS site with Site Actions ⇒ View All Site Content ⇒ Create, while in other cases (like blog sites and news sites) you will need to create a new site with Site Actions ⇒ Create Site. Each of these types of pages can introduce its own challenges. For instance, Wiki pages have their own “recent changes“ menu on the left and a tab menu on the right side, as can be seen in Figure 8-20.
When it comes to dealing with these challenges, you will have to decide whether you want to add more CSS overrides to you custom CSS or decide that your MOSS site will simply not support a custom design for them.
- Calendar The MOSS calendar control is very complex, including a month view, a week view, and a day view, making it extremely difficult to style. Figure 8-21 shows the month view of the MOSS calendar.
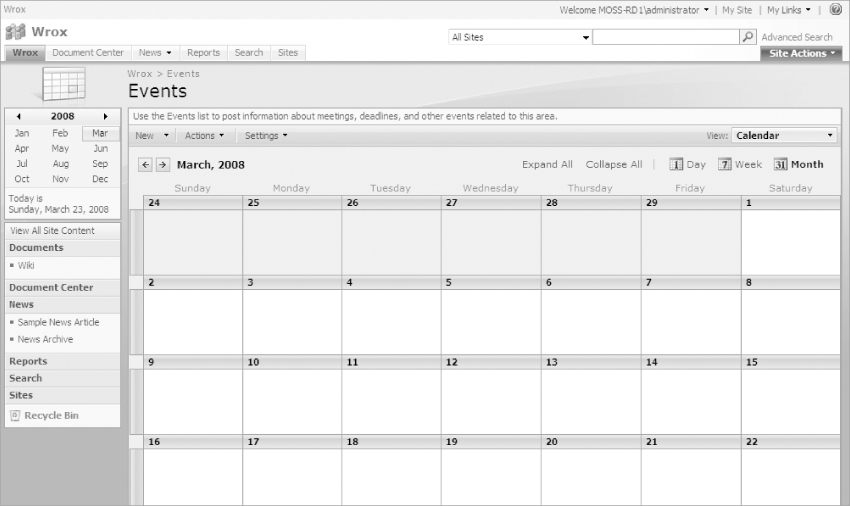
This problem is not helped by the fact that Microsoft chose such bright colors for its default look and that they tied several line and background colors to separate styles. Many designers choose to leave the calendar styled as it is by default rather than face this challenge. If a matching calendar is important to you, check out Heather Solomon's “Clean and Condensed“ gray toned calendar CSS at: http://www.heathersolomon.com/blog/archive/2007/11/20/SharePoint-Calendar-CSS--Clean-and-Condensed.aspx. Her version of the calendar CSS is much easier to work with than the default MOSS calendar CSS.
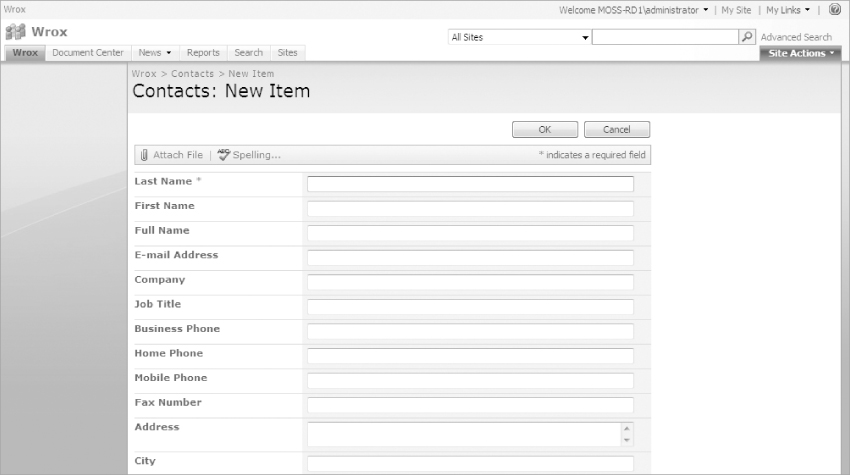
- Forms Double check the form that appears when you edit or add a new item for a MOSS list. The most common problem that can occur here is when you are using em's for font sizing; sometimes this will cause the fonts on the list forms to get too small or too large. See Figure 8-22 for an example of what a default list form looks like.
Now that you know a lot of areas to double-check, it is important to understand that you don't have to fix them all. As the designer of a MOSS site, you need to weigh the needs of your users against your design and decide whether all of the areas need to have a matching design. You may even decide that some of these features are not going to be supported in your MOSS site.
For a complete list of all of the potential “gotcha“ areas of MOSS, check out Heather Solomon's extensive list of page elements to double-check at: http://www.heathersolomon.com/blog/articles/SharepointDesignGotchas.aspx.
Converting HTML Design to Master Pages
In this section you will walk through the process of converting the Internet site HTML mockup that was created in Chapter 5 into a functioning master page. To accomplish this, you will start with the Minimal Internet master page and slowly add sections from the HTML mockup source. After all the areas for the HTML mockup are represented in the master page, you will then add the CSS from the HTML mockup, and finally you will tweak the out-of-the-box MOSS CSS to match the colors of the new master page. The source and all related files for this walk-through are available for download from www.wrox.com.
To begin, you will need to have a MOSS publishing portal site; if you don't already have one, you can create a new site or site collection based on the publishing portal site definition. (You can find more information on this topic in Chapter 4.)
You will also probably want to turn on anonymous access, since this site will be Internet-based and could be visited by more users than just those with accounts on your MOSS system. To turn on anonymous access, browse to your MOSS site and click Site Actions ⇒ Site Settings ⇒ Modify All Site Settings and then from the Users and Permissions section click Advanced Permissions. From here select Settings ⇒ Anonymous Access and choose Entire Web Site and click OK. Now you should be able to browse the MOSS site with any browser and not be challenged for login credentials. It is easiest to test anonymous access with Firefox because Internet Explorer will often automatically log you into a MOSS site with your machine's current credentials.
In order to turn on anonymous access for your MOSS site, it must be first enabled for the Web application from Central Administration on the MOSS server. To enable it, open Central Administration directly from the MOSS server. Then click on Application Management ⇒ Authentication Providers and be sure to select the Web application that you are working with from the dropdown in the top right corner. (Otherwise you might inadvertently allow anonymous access for a different Web application.) Then click on the Default Zone (or whatever zone you are using) and from the Edit Authentication screen check the checkbox to Enable Anonymous Access and click Save.
The next step is to add all of the required files to the MOSS site with SharePoint Designer. Simply download them to your computer, and drag them to the corresponding folders in the Folder List pane of SharePoint Designer:
- Drag the minimal_internet.master master page to the master page gallery located at_catalogs/masterpage (Master Page Gallery)and rename the master page mossman_internet.master.
- Drag custom_functions.js into the master page gallery located at _catalogs/masterpage (Master Page Galley).
- Create a sub-directory of Style Library/en-us named “Custom Styles“ and drag the HTML mockup CSS internet.css into this directory and rename it to “mossman_internet.css“.
- Create a sub-directory of Style Library/Images named mossman and drag all of the image files from the HTML mockup into this directory.
Because you are using a publishing site, all of these files will need to be published before they can be seen by anonymous users. To do this, browse your MOSS site and click Site Actions ⇒ Manage Content and Structure; from there, navigate to each of the files and then from the Actions menu, select Publish. For the Images directory you can publish all of the files by selecting the checkboxes next to each file, and then from the Actions menu select Publish. This will publish all of the images at once, rather than doing each one individually.
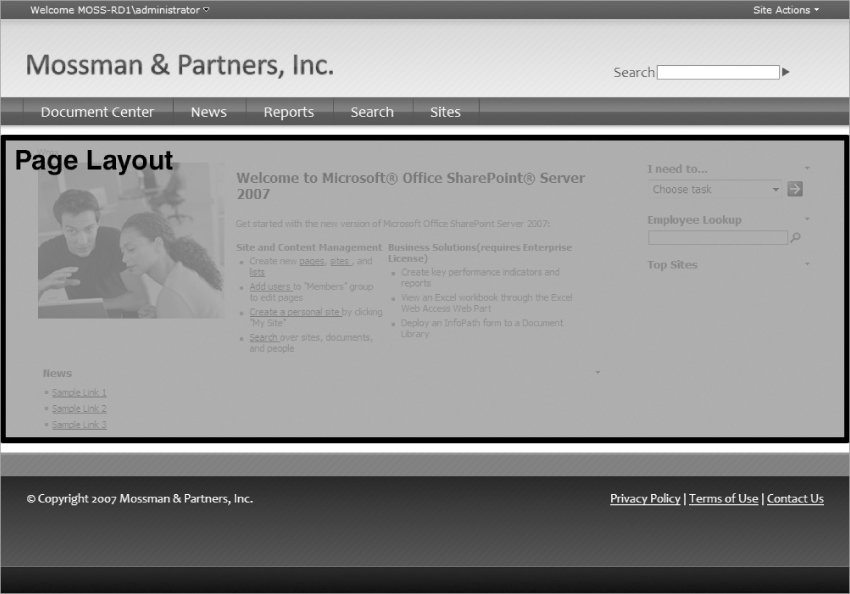
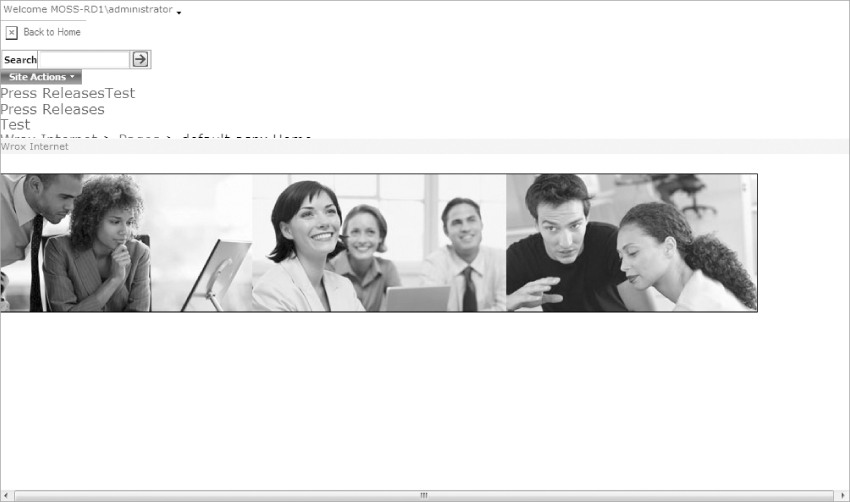
Next, activate the master page by clicking Site Actions ⇒ Site Settings ⇒ Modify All Site Settings and from the Look and Feel section, click Master page. Next, select mossman_internet.master as both the system and site master page and check both boxes to reset all subsites to inherit this master page setting and click OK. Figure 8-23 shows the MOSS site with the Minimal Master page applied.
In order to show more of the master page in the screenshots, the page layout was switched from the default publishing portal page layout to one with less content. You can switch the page layout for your page by clicking on Site Actions ⇒ Edit Page and then in the editing toolbar at the top of the content area click Page ⇒ Page Settings and Schedule. From this window, scroll down to the Page Layout section and select “Welcome Page with table of contents.“ When you click OK, the page layout will switch to one that matches the screenshots. You will then have to approve the change before everyone can see it. Click Submit for Approval from the editing toolbar and then continue through the workflow screens until you can finally click the Approve button.
Now you can start making adjustments to the master page. If you haven't turned on robust error messages, you will probably want to do that now. See the previous section for instructions.
One of the first things you will want to do is update the mock reference to the CSS file from SiteName.css to the actual custom CSS filename of mossman_internet.css. Find this area in the master page:
<link rel=“stylesheet“ type=“text/css“ href=“<%$ SPUrl:∼sitecollection/
Style%20Library/∼language/Custom%20Styles/SiteName.css %>“/>
And change it to reflect the bold area here:
<link rel=“stylesheet“ type=“text/css“ href=“<%$ SPUrl:∼sitecollection/
Style%20Library/∼language/Custom%20Styles/mossman_internet.css %>“/>
Next, update the JavaScript that adds the Web site name before the page name in the HTML title. This is located in the following area of the master page:
<script type=“text/javascript“>
if(document.title!=‘’) {
document.title = ‘Site Name - ’ + document.title;
} else {
document.title = ‘Site Name’;
}
</script>
Change the reference from “Site Name“ to the fictitious company Web site title “Mossman & Partners,“ as seen in the bold areas:
<script type=“text/javascript“>
if(document.title!=‘’) {
document.title = ‘Mossman & Partners - ’ + document.title;
} else {
document.title = ‘Mossman & Partners’;
}
</script>
Because the HTML mockup does not include any left navigation functionality, move the left navigation section of the master page to the hidden panel at the bottom of the master page. The left navigation will look like:
<!-- left nav -->
<asp:ContentPlaceHolder id=“PlaceHolderLeftNavBar“ runat=“server“>
…
</asp:ContentPlaceHolder>
Delete it from this section of the master page and add an empty content placeholder with an ID of PlaceHolderLeftNavBar to the hidden panel at the bottom of the master page like this:
<asp:Panel visible=“false“ runat=“server“>
…
<!-- Left navigation area -->
<asp:ContentPlaceHolder id=“PlaceHolderLeftNavBar“ runat=“server“/>
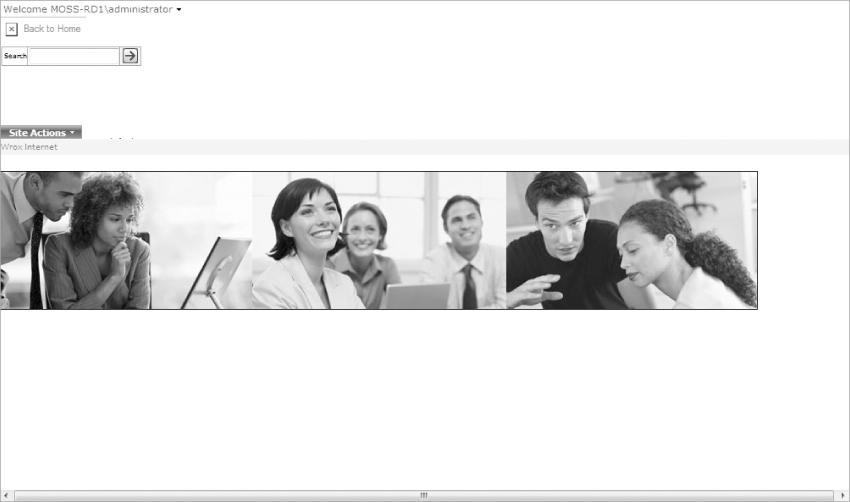
Figure 8-24 shows the updated master page; the left navigation is removed, but it's very difficult to tell, because the updated styles make the page very hard to read.
The CSS file used with this master page contains references to many background images that you will want to see throughout this walk-through. Currently these images are using the old references from the HTML mockup; before they will show properly in your MOSS site, their references need to be updated to point to their new location on your MOSS server. To do this, open the mossman_internet.css file from the Style Library/en-us/Custom Styles folder with SharePoint Designer. You will now change all image references in the CSS file from images/mossman/ to ../../Images/mossman/. Note that the references will now begin with “../..“. This will instruct the browser to look for the images sub-folder under Style Library by looking two directories above the location of the CSS file, which is “Style Library/en-us/Custom Styles/mossman_internet.css“. You can use the replace function in SharePoint Designer to make this task easier. Click Edit ⇒ Replace then in the Find what: box enter “images/mossman/“ and in the Replace with: box enter “../../Images/mossman/“. Be sure that Find where: is set to Current Page, leave the other settings the same, and click Replace All. The following is a list of all of the new image references in the CSS file:
background-image: url(‘../../Images/mossman/top_bg.gif’);
background-image: url(‘../../Images/mossman/header_bg.gif’);
background-image: url(‘../../Images/mossman/nav_bg.gif’);
background: url(‘../../Images/mossman/nav_hover_bg.gif’) repeat-x;
background-image: url(‘../../Images/mossman/shadow_nav_bg.gif’);
background-image: url(‘../../Images/mossman/slogan_bg.gif’);
background-image: url(‘../../Images/mossman/main_bg.gif’);
background-image: url(‘../../Images/mossman/footer_bg.gif’);
With this change in place, background images will start showing as new areas of HTML are added to the master page.
Now you can start moving the content of the HTML mockup, section by section, into the master page. Remember that the HTML design has a <div> tag that surrounds the whole design, stretching the full height and width of the browser. After that, there are three main <div> areas for the header, content, and footer. You will now place these divs around the corresponding areas of the master page. The bold sections of code below show the <div> tags placed in the middle of the appropriate sections of the master page.
Here is the opening <div> tag and the change for the header:
…
<!-- Web part code after form -->
<WebPartPages:SPWebPartManager runat=“server“/>
<div id=“customFullHeight“>
<!-- ===== top header ================ -->
<div id=“customMainHeader“>
<!-- login / welcome john doe -->
<wssuc:Welcome id=“explitLogout“ runat=“server“/>
This is the change for the content:
<PublishingNavigation:PortalSiteMapDataSource ID=“siteMapDataSource1“
Runat=“server“
SiteMapProvider=“CombinedNavSiteMapProvider“ EnableViewState=“true“
StartFromCurrentNode=“true“ StartingNodeOffset=“0“ ShowStartingNode=“false“
TreatStartingNodeAsCurrent=“true“ TrimNonCurrentTypes=“Heading“/>
</div>
<div id=“customMainContent“>
<!-- ===== Edit Bar ================== -->
<!-- ===== Page Status Console ========== -->
<wssuc:DesignModeConsole id=“IdDesignModeConsole“ runat=“server“/>
…
Here are the <div> tags for the footer:
…
<asp:ContentPlaceHolder id=“PlaceHolderFormDigest“ runat=“server“>
<SharePoint:FormDigest runat=server/>
</asp:ContentPlaceHolder>
</div>
<div id=“customMainFooter“>
</div>
<!-- ===== Hidden Placeholders ===== -->
<asp:Panel visible=“false“ runat=“server“>
…
And this is the closing <div> tag:
<SharePoint:DelegateControl ControlId=“GlobalSiteLink1“ Scope=“Farm“
runat=“server“ />
<!-- my links -->
<SharePoint:DelegateControl ControlId=“GlobalSiteLink2“ Scope=“Farm“
runat=“server“ />
</asp:Panel>
</div>
</form>
</body>
Figure 8-25 shows the changes to the master page.
You will now focus on the top bar section from the HTML mockup (this is the bar at the top of the page above the logo and search). The code will be added to the following section of the master page:
<div id=“customMainHeader“>
<!-- login / welcome john doe -->
<wssuc:Welcome id=“explitLogout“ runat=“server“/>
<!-- variations language menu -->
<PublishingVariations:VariationsLabelMenu id=“labelmenu1“ runat=“server“/>
<!-- ===== logo header ============= -->
<!-- ===== back to home logo link ============= -->
<asp:HyperLink runat=“server“ id=“HyperLink1“ NavigateUrl=
“<% $SPUrl:∼sitecollection/ %>“><asp:Image ImageUrl=
“<%$ SPUrl:∼sitecollection/Style%20Library/Images/SiteName/logo.gif %>“
BorderWidth=“0“ AlternateText=“Back to Home“ title=“Back to Home“
runat=“server“/></asp:HyperLink>
<!-- ===== search box ============== -->
<asp:ContentPlaceHolder id=“PlaceHolderSearchArea“ runat=“server“>
<SPSWC:SearchBoxEx id=“SearchBox“ RegisterStyles=“false“ TextBeforeDropDown=““
TextBeforeTextBox=“<%$Resources:cms,masterpages_searchbox_label%>“
TextBoxWidth=“100“ GoImageUrl=“<% $SPUrl:∼sitecollection/Style
Library/Images/Search_Arrow.jpg %>“ GoImageActiveUrl=“<%
$SPUrl:∼sitecollection/Style Library/Images/Search_Arrow.jpg %>“
GoImageActiveUrlRTL=“<% $SPUrl:∼sitecollection/Style
Library/Images/Search_Arrow_RTL.jpg %>“ GoImageUrlRTL=“<%
$SPUrl:∼sitecollection/Style Library/Images/Search_Arrow_RTL.jpg %>“
UseSiteDefaults=“true“ DropDownMode = “HideScopeDD“
SuppressWebPartChrome=“true“ runat=“server“ WebPart=“true“
WebPartId=“{05DB52CD-CEC9-46F0-BE8D-1579B8FDC830}“ __WebPartId=
“{FB4EBCCA-A536-4E1F-B338-F5D95C688869}“/>
</asp:ContentPlaceHolder>
<!-- ===== site actions menu =============== -->
<PublishingSiteAction:SiteActionMenu runat=“server“/>
Add both the <div id = “customTop“> tag and the <div class = “customPageWidth“> tag to the already existing <div id = “customMainHeader“> tag. The customTop style will be unique to the top section of the design, while the customPageWidth style will be used throughout the design to ensure each section is a specific width and centered on the page. This concept will be repeated throughout the example. Most areas will be wrapped with a <div> tag that will call out a specific style for just that area, and in many cases the area will also be wrapped with the customPageWidth style to center it with a specific width. Next, wrap the “welcome“ and “variations“ functionality with the <div id = “customTopLeft“> tag and then move the Site Actions from the bottom of the section to the <div id = “customTopRight“> tag. This will give the left and right areas of the top bar their own styles, as well as move the Site Actions to the right-hand top of the page. The changes are reflected in the bold areas:
<div id=“customMainHeader“>
<div id=“customTop“>
<div class=“customPageWidth“>
<div id=“customTopLeft“>
<!-- login / welcome john doe -->
<wssuc:Welcome id=“explitLogout“ runat=“server“/>
<!-- variations language menu -->
<PublishingVariations:VariationsLabelMenu
id=“labelmenu1“ runat=“server“/>
</div>
<div id=“customTopRight“>
<!-- ===== site actions menu ======= -->
<PublishingSiteAction:SiteActionMenu runat=“server“/>
</div>
</div>
</div>
<!-- ===== logo header ================== -->
<!-- ===== back to home logo link ========== -->
<asp:HyperLink runat=“server“ id=“HyperLink1“ NavigateUrl=
“<% $SPUrl:∼sitecollection/ %>“><asp:Image ImageUrl=
“<%$ SPUrl:∼sitecollection/Style%20Library/Images/SiteName/logo.gif %>“
BorderWidth=“0“ AlternateText=“Back to Home“ title=“Back to Home“
runat=“server“/></asp:HyperLink>
<!-- ===== search box ============== -->
<asp:ContentPlaceHolder id=“PlaceHolderSearchArea“ runat=“server“>
<SPSWC:SearchBoxEx id=“SearchBox“ RegisterStyles=“false“ TextBeforeDropDown=““
TextBeforeTextBox=“<%$Resources:cms,masterpages_searchbox_label%>“
TextBoxWidth=“100“ GoImageUrl=“<% $SPUrl:∼sitecollection/Style
Library/Images/Search_Arrow.jpg %>“ GoImageActiveUrl=“<%
$SPUrl:∼sitecollection/Style Library/Images/Search_Arrow.jpg %>“
GoImageActiveUrlRTL=“<% $SPUrl:∼sitecollection/Style
Library/Images/Search_Arrow_RTL.jpg %>“ GoImageUrlRTL=“<%
$SPUrl:∼sitecollection/Style Library/Images/Search_Arrow_RTL.jpg %>“
UseSiteDefaults=“true“ DropDownMode = “HideScopeDD“
SuppressWebPartChrome=“true“ runat=“server“ WebPart=“true“
WebPartId=“{05DB52CD-CEC9-46F0-BE8D-1579B8FDC830}“ __WebPartId=
“{FB4EBCCA-A536-4E1F-B338-F5D95C688869}“/>
</asp:ContentPlaceHolder>
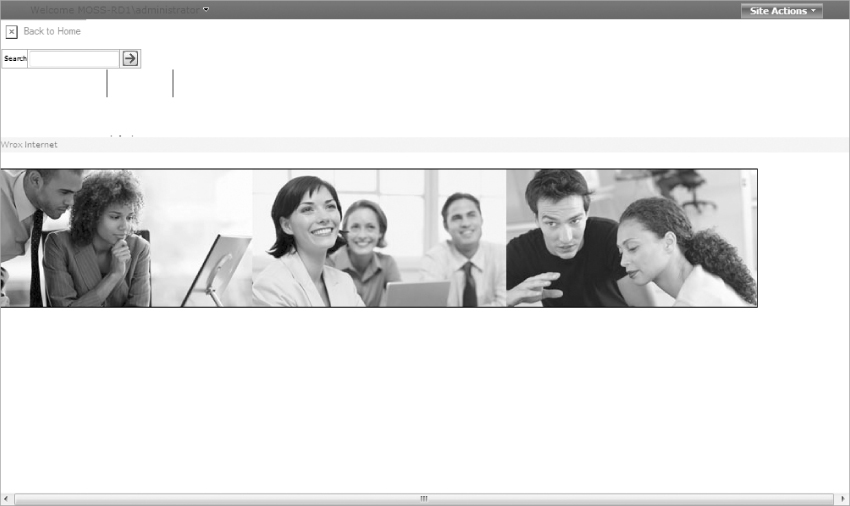
Figure 8-26 shows the results of the updated master page. Notice that the styles of each functional area are reflected, and the Site Actions menu has moved to the top bar.
Next you will move the customHeader section of the HTML mockup into the following area of the master page:
<!-- ===== logo header ===== -->
<!-- ===== back to home logo link ===== -->
<asp:HyperLink runat=“server“ id=“HyperLink1“ NavigateUrl=
“<% $SPUrl:∼sitecollection/ %>“><asp:Image ImageUrl=
“<%$ SPUrl:∼sitecollection/Style%20Library/Images/SiteName/logo.gif %>“
BorderWidth=“0“ AlternateText=“Back to Home“ title=“Back to Home“
runat=“server“/></asp:HyperLink>
<!-- ===== search box ===== -->
<asp:ContentPlaceHolder id=“PlaceHolderSearchArea“ runat=“server“>
<SPSWC:SearchBoxEx id=“SearchBox“
RegisterStyles=“false“ TextBeforeDropDown=““
TextBeforeTextBox=“<%$Resources:cms,masterpages_searchbox_label%>“
TextBoxWidth=“100“ GoImageUrl=“<% $SPUrl:∼sitecollection/Style
Library/Images/Search_Arrow.jpg %>“ GoImageActiveUrl=“<%
$SPUrl:∼sitecollection/Style Library/Images/Search_Arrow.jpg %>“
GoImageActiveUrlRTL=“<% $SPUrl:∼sitecollection/Style
Library/Images/Search_Arrow_RTL.jpg %>“ GoImageUrlRTL=“<%
$SPUrl:∼sitecollection/Style Library/Images/Search_Arrow_RTL.jpg %>“
UseSiteDefaults=“true“ DropDownMode = “HideScopeDD“
SuppressWebPartChrome=“true“ runat=“server“ WebPart=“true“
WebPartId=“{05DB52CD-CEC9-46F0-BE8D-1579B8FDC830}“ __WebPartId=
“{FB4EBCCA-A536-4E1F-B338-F5D95C688869}“/>
</asp:ContentPlaceHolder>
First, you will wrap the entire area with both a <div id = “customHeader“> tag and a <div class = “customPageWidth“> tag. Then wrap the image code with a <div id = “customLogo“> tag. Also change the reference from the logo placeholder “SiteName/logo.gif“ to the reference of the actual logo image “mossman/logo.gif“. Next, wrap the search functionality in a <div id = “customHeaderRight“> tag and change the placeholder images for the search arrow. This involves changing the references from “Images/Search_Arrow.jpg“ to “Images/mossman/search_arrow.gif“.
Note that you can leave the references to “Search_Arrow_RTL.jpg“ unchanged because they are only used in international sites that have right-to-left text (however, if your site will support this type of text, feel free to update them accordingly).
See the bolded sections below:
<!-- ===== logo header ===== -->
<div id=“customHeader“>
<div class=“customPageWidth“>
<div id=“customLogo“>
<!-- ===== back to home logo link ===== -->
<asp:HyperLink runat=“server“ id=“HyperLink1“ NavigateUrl=
“<% $SPUrl:∼sitecollection/ %>“><asp:Image ImageUrl=
“<%$ SPUrl:∼sitecollection/Style%20Library/Images/mossman/logo.gif %>“
BorderWidth=“0“ AlternateText=“Back to Home“ title=“Back to Home“
runat=“server“/></asp:HyperLink>
</div>
<div id=“customHeaderRight“>
<!-- ===== search box ===== -->
<asp:ContentPlaceHolder id=“PlaceHolderSearchArea“ runat=“server“>
<SPSWC:SearchBoxEx id=“SearchBox“ RegisterStyles=“false“
TextBeforeDropDown=““ TextBeforeTextBox=
“<%$Resources:cms,masterpages_searchbox_label%>“ TextBoxWidth=“140“
GoImageUrl=“<% $SPUrl:∼sitecollection/Style%20Library/Images/mossman
/search_arrow.gif %>“ GoImageActiveUrl=“<% $SPUrl:∼sitecollection/
Style%20Library/Images/mossman/search_arrow.gif %>“ GoImageActiveUrlRTL=“<%
$SPUrl:∼sitecollection/Style Library/Images/Search_Arrow_RTL.jpg %>“
GoImageUrlRTL=“<% $SPUrl:∼sitecollection/Style Library/Images/
Search_Arrow_RTL.jpg %>“ UseSiteDefaults=“true“ DropDownMode =
“HideScopeDD“ SuppressWebPartChrome=“true“ runat=“server“
WebPart=“true“ WebPartId=“{05DB52CD-CEC9-46F0-BE8D-1579B8FDC830}“
__WebPartId=“{FB4EBCCA-A536-4E1F-B338-F5D95C688869}“/>
</asp:ContentPlaceHolder>
</div>
</div>
</div>
Figure 8-27 shows the updated logo and search areas.
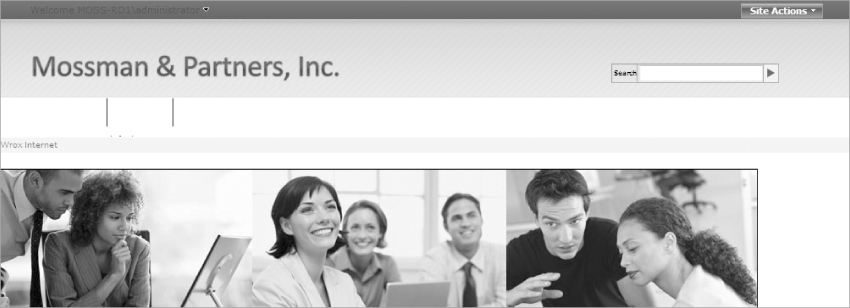
The next section of the HTML mockup that will be moved to the master page is the main horizontal navigation and the shadow that appears below it. For the navigation section, most of the master page will stay the same. (This is because most of the customization will happen in the custom CSS.) These changes will affect the following section of the master page:
<!-- ===== Horizontal Top Navigation Bar ===== -->
<SharePoint:AspMenu ID=“GlobalNav“ Runat=“server“
DataSourceID=“SiteMapDataSource1“
Orientation=“Horizontal“ StaticDisplayLevels=“1“ MaximumDynamicDisplayLevels=“1“
StaticSubMenuIndent=“0“ DynamicHorizontalOffset=“0“ DynamicVerticalOffset=“-8“
StaticEnableDefaultPopOutImage=“false“ ItemWrap=“false“
SkipLinkText=“<%$Resources:cms,masterpages_skiplinktext%>“
CssClass=“customNavItemContainer“>
<StaticMenuItemStyle CssClass=“customTopNavItem“ ItemSpacing=“0“/>
<StaticSelectedStyle CssClass=“customTopNavSelected“ ItemSpacing=“0“/>
<StaticHoverStyle CssClass=“customTopNavHover“/>
<DynamicMenuStyle CssClass=“customTopNavFlyOut“ />
<DynamicMenuItemStyle CssClass=“customTopNavFlyOutItem“ />
<DynamicHoverStyle CssClass=“customTopNavFlyOutHover“/>
</SharePoint:AspMenu>
<!-- datasource for nav -->
<PublishingNavigation:PortalSiteMapDataSource ID=“siteMapDataSource1“
Runat=“server“
SiteMapProvider=“CombinedNavSiteMapProvider“ EnableViewState=“true“
StartFromCurrentNode=“true“ StartingNodeOffset=“0“ ShowStartingNode=“false“
TreatStartingNodeAsCurrent=“true“ TrimNonCurrentTypes=“Heading“/>
Begin by wrapping the entire navigation functionality with a <div id = “customNav“> tag and then with a <div class = “customPageWidth“> tag. Next, add the code for the customShadow area from the HTML mockup. It will be placed below all of the navigation functionality. See the bolded sections below:
<div id=“customNav“>
<div class=“customPageWidth“>
<!-- ===== Horizontal Top Navigation Bar ===== -->
<SharePoint:AspMenu ID=“GlobalNav“ Runat=“server“
DataSourceID=“SiteMapDataSource1“
Orientation=“Horizontal“ StaticDisplayLevels=“1“
MaximumDynamicDisplayLevels=“1“
StaticSubMenuIndent=“0“ DynamicHorizontalOffset=“0“
DynamicVerticalOffset=“0“
StaticEnableDefaultPopOutImage=“false“ ItemWrap=“false“
SkipLinkText=“<%$Resources:cms,masterpages_skiplinktext%>“
CssClass=“customNavItemContainer“>
<StaticMenuItemStyle CssClass=“customTopNavItem“ ItemSpacing=“0“/>
<StaticSelectedStyle CssClass=“customTopNavItemHover“ ItemSpacing=“0“/>
<StaticHoverStyle CssClass=“customTopNavItemHover“/>
<DynamicMenuStyle CssClass=“customTopNavFlyOut“ />
<DynamicMenuItemStyle CssClass=“customTopNavFlyOutItem“ />
<DynamicHoverStyle CssClass=“customTopNavFlyOutHover“/>
</SharePoint:AspMenu>
<!-- datasource for nav -->
<PublishingNavigation:PortalSiteMapDataSource ID=“siteMapDataSource1“
Runat=“server“
SiteMapProvider=“CombinedNavSiteMapProvider“ EnableViewState=“true“
StartFromCurrentNode=“true“ StartingNodeOffset=“0“ ShowStartingNode=“false“
TreatStartingNodeAsCurrent=“true“ TrimNonCurrentTypes=“Heading“/>
</div>
</div>
<div id=“customShadow“>
<div class=“customPageWidth“></div>
</div>
Figure 8-28 shows the horizontal navigation and shadow area.
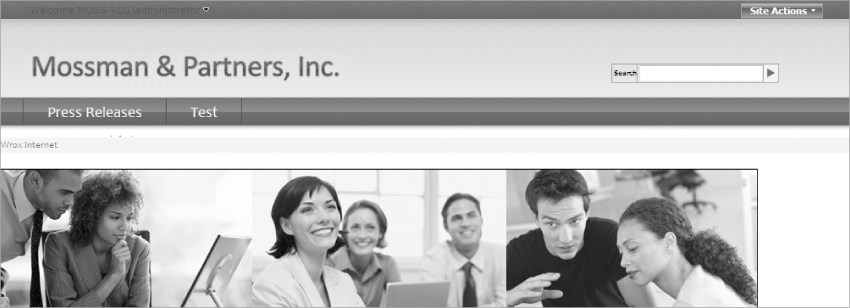
The next area of the HTML mockup that will be added to the master page is the “mainContent“ section. This is the area that will hold the actual page layout and content pages, as well as breadcrumbs, page title, and editing menus. You will be adding code to the following area of the master page:
<div id=“customMainContent“>
<!-- ===== Edit Bar ===== -->
<!-- ===== Page Status Console ===== -->
<wssuc:DesignModeConsole id=“IdDesignModeConsole“ runat=“server“/>
<!-- ===== Page Edit Toolbar ===== -->
<PublishingConsole:Console runat=“server“/>
<!-- ===== MAIN AREA (all content goes here) ===== -->
<!-- breadcrumb -->
<asp:ContentPlaceHolder id=“PlaceHolderTitleBreadcrumb“ runat=“server“>
<asp:SiteMapPath SiteMapProvider=“SPContentMapProvider“ id=“ContentMap“
SkipLinkText=““ runat=“server“/>
</asp:ContentPlaceHolder>
<!-- ===== Mini Console - supplementary buttons for Site Map ===== -->
<table style=“float: right;“>
<tr>
<td>
<asp:ContentPlaceHolder id=“PlaceHolderMiniConsole“ runat=“server“/>
</td>
</tr>
</table>
<!-- page title -->
<asp:ContentPlaceHolder id=“PlaceHolderPageTitleInTitleArea“ runat=“server“ />
<!-- page content loads the pages layout and content -->
<asp:ContentPlaceHolder id=“PlaceHolderMain“ runat=“server“/>
<!-- required for some security access errors -->
<asp:ContentPlaceHolder id=“PlaceHolderFormDigest“ runat=“server“>
<SharePoint:FormDigest runat=server/>
</asp:ContentPlaceHolder>
</div>
Start by adding a <div class = “customPageWidth“> tag around everything but the PlaceHolderMain and the PlaceHolderFormDigest content placeholders. The reason for this is that you will use a slightly different version of the customPageWidth class for that portion of the page. For that area you will add a <div class = “customPageWidthMain“> tag that can have its style overridden by the welcome page layout. This will be important because the welcome page layout (which you will create in the next chapter) will need to span the entire length of the page, while all other instances of this style should be centered in a fixed-width area just like the standard customPageWidth style. Also, you will wrap the PlaceHolderPageTitleInTitleArea and PlaceHolderMain content placeholders with <div class= “customContentTitle“> and <div id = “customPageContent“> tags to allow for better control of their styles from CSS. Lastly, remove the contents of the PlaceHolderTitleBreadcrumb content placeholder; this will remove the default breadcrumb information from the master page while still allowing the individual pages to have the ability to add breadcrumbs. See the bold sections below:
<div id=“customMainContent“>
<div class=“customPageWidth“>
<!-- ===== Edit Bar ===== -->
<!-- ===== Page Status Console ===== -->
<wssuc:DesignModeConsole id=“IdDesignModeConsole“ runat=“server“/>
<!-- ===== Page Edit Toolbar ===== -->
<PublishingConsole:Console runat=“server“/>
<!-- ===== MAIN AREA (all content goes here) ===== -->
<!-- breadcrumb -->
<asp:ContentPlaceHolder id=“PlaceHolderTitleBreadcrumb“ runat=“server“/>
<!-- ===== Mini Console - supplementary buttons for Site Map ===== -->
<table style=“float: right;“>
<tr>
<td>
<asp:ContentPlaceHolder id=“PlaceHolderMiniConsole“ runat=“server“/>
</td>
</tr>
</table>
<!-- page title -->
<div class=“customContentTitle“>
<asp:ContentPlaceHolder id=“PlaceHolderPageTitleInTitleArea“ runat=
“server“ />
</div>
</div>
<div class=“customPageWidthMain“>
<!-- ===== Page content goes here ===== -->
<div id=“customPageContent“>
<!-- page content loads the pages layout and content -->
<asp:ContentPlaceHolder id=“PlaceHolderMain“ runat=“server“/>
</div>
<!-- required for some security access errors -->
<asp:ContentPlaceHolder id=“PlaceHolderFormDigest“ runat=“server“>
<SharePoint:FormDigest runat=server/>
</asp:ContentPlaceHolder>
</div>
</div>
Figure 8-29 shows the results of the updated master page. Visually there is not much difference, but the page content and the page title will now have CSS applied to them. Also, the breadcrumbs are now hidden by default.

Now you will add the footer section from the HTML mockup to the master page. This section is made up of static content that will be included on all the pages of the MOSS site. Note that the <a href> links simply point to “#” right now (which always refers to the current page). You can change these links later when the corresponding pages actually exist. The bold section below will be added to the <div id = “customMainFooter“> tag:
<div id=“customMainFooter“>
<div id=“customFooter“>
<div class=“customPageWidth“>
<div id=“customFooterLeft“>
© Copyright 2007 Mossman & Partners, Inc.
</div>
<div id=“customFooterRight“>
<a href=“#“>Privacy Policy</a> | <a href=“#“>Terms of Use</a> | <a
href=“#“>Contact Us</a>
</div>
</div>
</div>
</div>
This concludes all of the changes that are necessary for the master page part of the conversion. You will see from Figure 8-30 that there are still some areas for improvement. This is because you still need to make edits to the custom CSS before the customization will be completed.
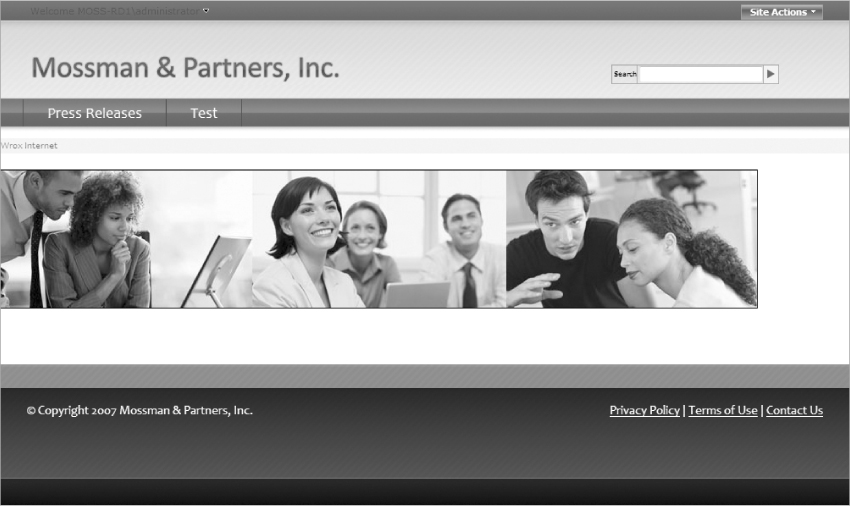
To finish the CSS changes, re-open the mossman_internet.css CSS file from the Style Library/en-us/Custom Styles folder with SharePoint Designer. There are several styles in the current CSS file that do not apply to the master page; they are the styles that will be used in the welcome page layout. These styles will not be used on standard pages of the site; they are solely for showing the slogan, photo, and other styles that show on the welcome page. While it's perfectly fine to keep all the CSS in one file, it would be helpful to move this page layout–specific CSS into its own commented area of the CSS file. By moving the page layout styles, they will be separated from all of the other master page styles, which will make them easier to identify when you work on the page layout (in the next chapter). To do this, simply select all of the styles from “#customSloganArea“ to “.customClearBoth“ and move them to the very bottom of the CSS. Be sure to add a descriptive comment before the CSS, like this:
/*
----------------------------------------------------------------------
css for custom welcome page layout
----------------------------------------------------------------------
*/
Now you will add styles to support some of the new features introduced by going from a static HTML mockup to a MOSS master page. You will begin by adding some styles to ensure the main horizontal navigation looks appropriate, especially when the user is hovering their mouse over the items or when there are sub item flyouts. Because you have already defined a hover style for the HTML mockup, most of the work for the mouse hover is done already. However, if you test out the functionality in your browser, you will see that the background image displays incorrectly. This can be seen in Figure 8-31.
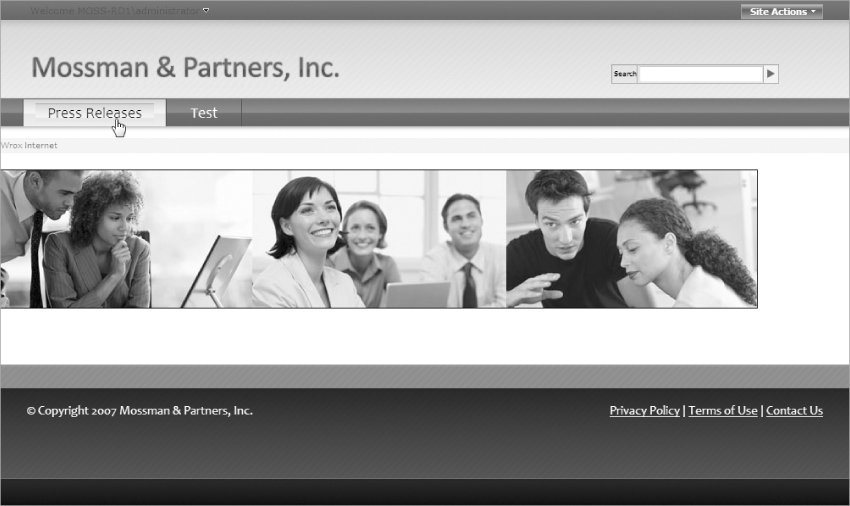
This improper layout is due to the way MOSS applies your hover style to the menu item in a nested fashion. This includes applying the style a second time for the <a href> link. To correct this, change the .customTopNavItemHover a style to use no background image. Change the following CSS code:
.customTopNavItemHover a {
color: black;
text-decoration: none;
}
Override the background-image with a value of none:
.customTopNavItemHover a {
color: black;
text-decoration: none;
background-image: none;
}
Now, MOSS will correctly show just one background image on hovered items as seen in Figure 8-32.

Next, add styles for the navigation flyouts (since they were not included in the HTML mockup). Add the following styles to the CSS:
- .customTopNavFlyOut –The container for the entire flyout area
- .customTopNavFlyOutItem –The individual menu items that show in the flyout
- .customTopNavFlyOut a –The padding for the actual text of the menu item link
- .customTopNavFlyOutHover –The highlight for when flyout items are hovered over
/* top nav sub item flys */
.customTopNavFlyOut {
border-top:1px #CBD1E0 solid;
}
/* top nav sub item fly items */
.customTopNavFlyOutItem {
font-family: tahoma;
font-size: 8pt;
background-color: #ECEFF3;
border:1px #CBD1E0 solid;
border-top-style: none;
color:#3A4663;
*width:150px;
min-width:150px;
}
.customTopNavFlyOutItem a {
display:block;
padding:4px 5px 4px 5px;
}
/* top nav sub item fly out hover */
.customTopNavFlyOutHover {
background-color: #B2BCD3;
}
Figure 8-33 shows the menu flyouts in action.
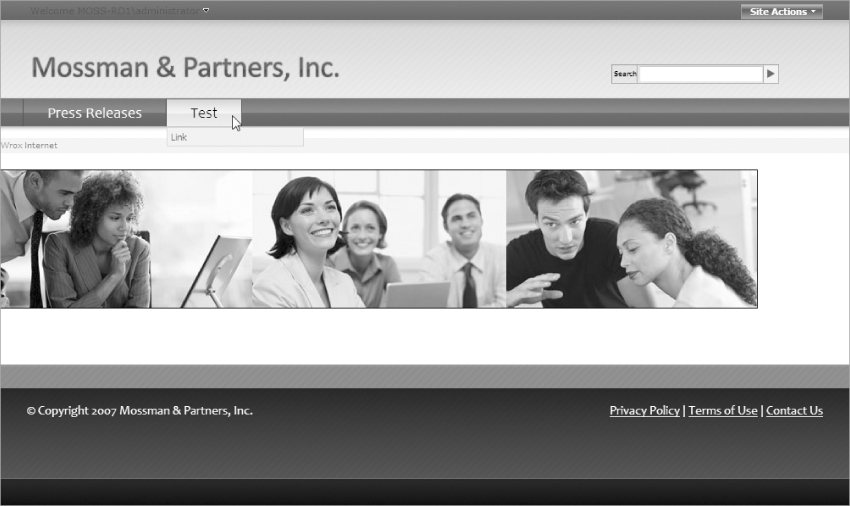
Now you will add the styles for the main page content. This will include .customPageWidthMain, which has exactly the same styles as .customPageWidth but is important because it can be overridden from a welcome page to allow just that page layout to span the entire width of the page. Along with this style, you will also add .customContentTitle (to style the page title) and #customPageContent (to apply some padding to the main content area).
/* can be overridden by the custom welcome page */
.customPageWidthMain {
width: 940px;
margin: auto;
}
/* padding for the page title / page breadcrumbs */
.customContentTitle {
padding-bottom: 3px;
line-height: 12px;
margin-bottom: 3px;
}
/* actual page content area */
#customPageContent {
padding-top: 4px;
}
Figure 8-34 shows some minor padding changes to the main content area.

At this point, you have added all of the styles from the HTML mockup to the master page. Now, you need to look at overriding the out-of-the-box MOSS CSS to match with your design. It is a good idea to add a comment before this section so that you can easily find it later. The following list of styles will adjust the out-of-the-box styles to look good with your custom master page. Each style is commented with a description of the general area of the MOSS functionality being styled:
/*
----------------------------------------
Overrides for out of the box moss css
----------------------------------------
*/
/* editing toolbar fonts */
.ms-consoletoolbar .ms-SPLink a:link, .ms-consoletoolbar .ms-SPLink a:visited,
.ms-consoletoolbar .ms-SPLink a:hover {
color: black;
}
/* top bar fonts */
.ms-SPLink a:link, .ms-SPLink a:visited {
color: white;
}
/* top bar fonts hover */
.ms-SPLink a:hover {
color: white;
}
/* header bar link hover */
.ms-HoverCellActive, .ms-SpLinkButtonActive {
border: 1px solid #518954;
*border-top: 0px;
background: #518954;
}
/* site action fonts */
.ms-siteaction, .ms-siteaction a {
font-family: verdana;
font-size: 8pt;
}
/* site actions font weight */
.ms-siteactionsmenu div div div a {
font-weight: normal;
}
/* site action bg and button */
.ms-siteactionsmenu div div div {
background-image: none;
background-position: right;
background-repeat: no-repeat;
background-color: transparent;
border: 0px;
padding: 2px;
padding-top: 1px;
}
/* site action link hover */
.ms-siteactionsmenu div div div a:hover,
.ms-siteactionsmenu div div div.ms-siteactionsmenuhover a:hover {
text-decoration: none;
}
/* site action hover button */
.ms-siteactionsmenu div div div.ms-siteactionsmenuhover {
background: #518954;
border: 0px;
padding: 2px;
padding-top: 1px;
}
/* search box border */
td.ms-sbcell{
padding:0px;
padding-left:2px;
white-space:nowrap;
border:solid 0px;
}
/* search box text */
.ms-sbtext {
color:#25632A;
font-family:Candara,Calibri,Frutiger,Helvetica,sans-serif;
font-size:2em;
font-weight:normal;
}
/* divit after search IE */
td.ms-sbcell {
background-color:transparent;
}
/* sides of search box */
.ms-sbplain {
border: solid 1px gray;
padding-left:2px;
}
/* divit after search */
td.ms-sbgo {
background-color:inherit;
}
/* hide breadcrumb bg */
.ms-pagebreadcrumb, .ms-pagebreadcrumb a {
background-color: transparent;
}
/* splash links background */
.splashLinkArea {
border:0px none transparent;
min-height:inherit;
}
Figure 8-35 shows what the page looks like fully styled.
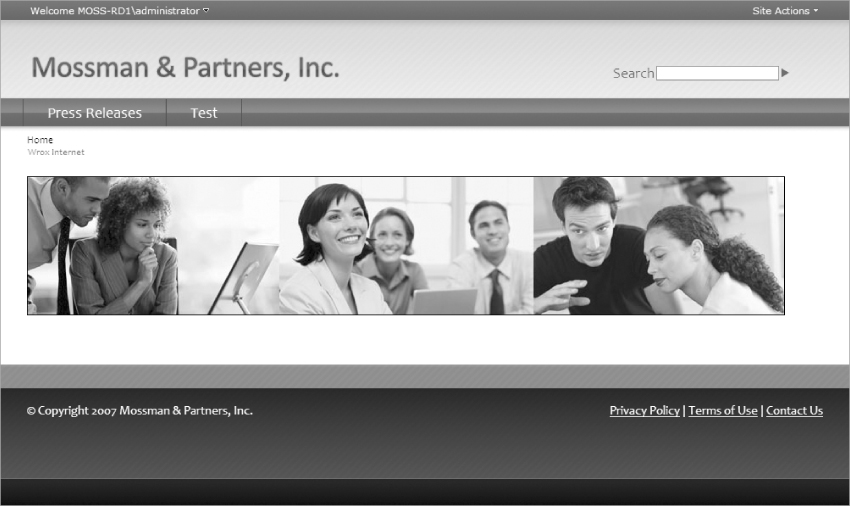
While the current page looks good, there are still many other types of content in MOSS that need to be tested. As you view other pages of your MOSS site, you will find small overrides that need to be made to the out-of-the-box MOSS styles. Here is a list of many tweaks that will ensure the common areas of MOSS look better with the new custom master page:
/* all link colors in body of the site */
.ms-WPBody a:link, .ms-WPBody a:visited, .link-item, .link-item a:link,
.link-item a:visited, td.ms-vb a, td.ms-addnew a {
color: #008940;
text-decoration: underline;
}
/* all link hovers */
.ms-WPBody a:hover, .link-item a:hover, td.ms-vb a:hover, td.ms-addnew a:hover {
color: #008940;
text-decoration: none;
}
/* header fonts from sites page */
.headertitle, .headertitle a, .headertitle a:link {
color: #008940;
}
/* underline */
.ms-partline {
background-color:#008940;
}
/* link colors need to be overridden */
.menuTopLevel a:link, .menuTopLevel a:visited {
color:black;
}
/* sub link colors need to be overridden */
.menuSubLevel a:link, .menuSubLevel a:visited {
color:white;
}
/* hide Web part borders */
.ms-WPBorder {
border: 0px;
}
/* hide Web part borders */
.ms-WPHeader td {
border-bottom:0px;
}
/* mini console button font */
.ms-ptabcn a:link, .ms-ptabcn a:visited, .ms-ptabcnhover a:link, .ms-ptabcnhover
a:visited, .ms-sctabcn a:link, .ms-sctabcn a:visited, .ms-sctabcnhover
a:link, .ms-sctabcnhover a:visited {
font-size: 11px;
}
/* more mini console button fonts */
.ms-ptabcf a:link, .ms-ptabcf a:visited, .ms-ptabcfhover a:link,
.ms-ptabcfhover a:visited, .ms-sctabcf a:link, .ms-sctabcf a:visited,
.ms-sctabcfhover a:link, .ms-sctabcfhover a:visited {
font-size: 11px;
}
/* some buttons that show on the sitemap */
.ms-wikieditouter {
position:relative;
right:0px;
top:0px;
border:1px solid silver;
border-right-width:1px;
}
/* form fonts */
.ms-formlabel {
font-size: .9em;
}
/* form fonts */
.ms-formbody {
font-size: 1em;
}
At this point, the Internet master page and CSS is complete. You may still find other small issues with specific types of MOSS content. If you do, you can correct them yourself by adding more entries to the CSS file.
As you can see, a big part of making a custom interface in MOSS is making small changes to the out-of-the-box CSS. This is why using tools like the IE Developers Toolbar and Firebug are so critical to the MOSS customization process. Chapter 7 discussed the usage of these tools for debugging MOSS style problems. When you are happy with all of your changes to the master page and CSS, be sure to re-publish both of them to ensure that end users and other people on your team will see the changes. Also, you may be wondering about why the middle part of the HTML design mockup is not reflected in the master page. This is because the middle section is included in a special welcome page layout that will be described further in the next chapter.
A Word about the Name ActiveX Control Message in Internet Explorer
If you browse your MOSS site from an external Internet connection, you may notice an alert message that appears at the top of Internet Explorer 7. The message says: “The Web site wants to run the following add-on: ‘Name ActiveX Control’ from ‘Microsoft Corporation’. If you trust the Web site and the add-on and want to allow it to run, click here…” Figure 8-36 shows the message at the top of the browser window.

So, what does this message actually mean? SharePoint is trying to use an ActiveX control called name.dll, which deals with the user's “presence“ in relation to Microsoft Office applications. Many designers don't even notice this message at first because it only appears under specific browsing conditions. The most common scenario seems to be when using Internet Explorer 7 to browse a MOSS or WSS V3 site that is not listed in your browser's trusted site settings. The problem is compounded by the fact that when you browse a MOSS site that is in your local intranet, the site is usually included by default as a trusted site; in these cases the message will not appear until you are using an external URL to access the site. Typically it is not appropriate to expect end users to install an ActiveX object just to interact with your external Internet site (especially one that is named as suspiciously as name.dll).
So, how do you get rid of the message on your own MOSS site? Microsoft has a document that discusses a fix for the problem at: http://support.microsoft.com/kb/931509. Unfortunately, this fix doesn't seem to work well in all scenarios. Because of this, the custom_functions.js that is available with the Minimal Internet master page for this chapter includes a specific JavaScript workaround for the problem. This JavaScript creates a duplicate function named the same as the offending one that Microsoft uses, though unlike Microsoft's function, this one does not include the code that ultimately requests the ActiveX object. With this JavaScript in place, the browser will no longer display the ActiveX message.
You can read more about this JavaScript fix for the Name ActiveX control message at: http://blog.drisgill.com/2007/09/fixing-namedll-activex-problem-mossman.html.
Intranet Master Page Design Differences
In many ways, the process of converting the intranet mockup to a master page is similar to what it was for the Internet mockup. For this reason, the intranet master page conversion will not be covered as a full walkthrough; all of the code for creating it is available in the downloadable code for this book. However, a few key differences with the intranet master page are worth discussing. They are presented here:
- The Internet master page was applied to a publishing portal site definition, while the intranet master page will be applied to a collaboration portal site. This site definition is specifically tailored for a site that has many authors as well as many viewers. While publishing portals focus on approving and publishing Web content to the Internet, collaboration portals focus on creating team sites for collaborating in an intranet environment.
- While the Internet master page is based off of the Minimal Internet master page available from the book download site, the intranet master page is based off of the Minimal Intranet master page (which itself is based heavily on Heather Solomon's Minimal Collaboration master page). Because of this, there are many subtle differences in how the master page is set up. While the Minimal Internet master page's functions are tailored specifically to creating Internet facing Web sites, the Minimal Intranet master page includes more functionality that would only be appropriate in an intranet environment. Also, because the Minimal Intranet master page is based on Heather Solomon's Minimal Collaboration master page, it can be used for collaboration portals in MOSS as well as basic team sites. The differences between the Minimal Internet master page and the Minimal Intranet master page are similar to the differences between the out-of-the-box default.master and blueband.master master pages, respectively. Just as with those out-of-the-box master pages, you will notice that the two minimal master pages differ in the Web controls that are used to display the underlying SharePoint functionality. This is mainly due to the way that both the default.master master page and the Minimal Intranet master page support basic team sites.
- The intranet master page will include a left-side secondary navigation. This means that there will be more styles included to support the left navigation functionality. Just like the top navigation, this left navigation includes styles for standard menu items, selected menu items, menu items with a hover state, as well as dynamic flyout menu items and their hover state.
- While Internet sites may have just a few content authors with a very controlled set of types of content, intranet sites often have many content authors that have free range to add many different types of content. For instance, intranet sites often contain team sites that may have document libraries, lists for managing various types of information, team calendars, task lists, and discussion boards. Because of this, you will need to double-check even more of the out-of-the-box MOSS features in the intranet master page.
With these changes in mind, the process is virtually the same as converting the Internet HTML mockup. You begin with the Minimal Intranet master page and start adding your custom HTML and CSS around it. From there you override the out-of-the-box MOSS CSS to ensure that it matches the new design, and test the master page with various types of content.
This chapter focused on giving you a good understanding of how master pages work, not only in MOSS but also in traditional ASP.NET applications. You learned about the structure of master pages as well as how they are related to both content pages and page layouts. You should now be aware of how MOSS requires specific content placeholders to function properly, and you looked at how they are used in both out-of-the-box and minimal master pages. Not only was a simple minimal master page customization explained, but an HTML mockup was converted into a functioning custom master page. Armed with this knowledge, you should be able to effectively customize minimal master pages to transform your own Web designs into custom master pages.
In the next chapter, you will learn how page layouts work in MOSS, as well as walk through creating a welcome page layout to match the Internet master page that you created in this chapter.