Chapter 12
Customizing Search
Google has ruined search.
Not just Google search, Yahoo! search and any other Web-based search engine that you've ever used. Ruined it for business users, for SharePoint administrators, and for portal and Web designers.
Let's say, for instance, that your significant other really likes fondue. So, on a little weekend jaunt to Des Moines, you're trying to surprise him with some melted cheese and a nice bottle of wine. You go to your favorite search page and type in “Best Fondue Des Moines” and you get back a list of 18 restaurants. Odds are, you'll end up going to the restaurant, have some darn fine cheese and chocolate-covered strawberries, and thank the fine people of Google/Yahoo!/Microsoft Live for pointing you in that direction and getting you a few points with your boyfriend/girlfriend/spouse.
An unmitigated success for Web-based search, right? The search engine found exactly what you were looking for, right? Not necessarily. There's a dirty little secret in the whole multi-billion-dollar-a-year search process. How can you be sure that you really found the best fondue restaurant in all of Des Moines? What makes it the best? Does Google factor in meat quality or the quality of the service? Of course not. Do they rank the wine lists and the wait times? No. Do they have an index of all your likes and dislikes? Well, knowing Google, they probably do. But as of today, most search engines simply catalog the number of times that Web pages list that restaurant with the words Best, Fondue and Des Moines, run it through a fancy algorithm, and then return the list of links. You're relying on the wisdom of the all the people who make Web pages about fondue to tell you which restaurant should be classified as the “best.”
In the vast majority of cases, you're going to be more than happy with the result. The search engine you used may or may not have pointed you to the best fondue in Des Moines, but you still had a really good meal and impressed your date, so you can go on thinking that Yahoo! magically read your mind, calculated all the factors, and delivered exactly what you asked for. As with horseshoes and hand grenades, sometimes close is good enough.
Business search requirements are different. In some ways, enterprise search would seem much easier to calculate. Your company doesn't need to index the entire Internet. After all, wouldn't it be easier to run the numbers on a 30 Gigabyte pile of documents rather than hundreds of Terabytes? That, unfortunately, is not necessarily the case.
The problem lies in two areas: accuracy and the availability of resources. Let's do the same thought experiment again, but instead of “Best Fondue Des Moines,” say you want to find your “2006 Q4 Southeast Sales Forecast.” Replace that “boyfriend/girlfriend/spouse” with “really demanding boss.” You go to your SharePoint portal, crack open your Search Center page, and type “2006 Q4 Southeast Sales Forecast,” which returns back a list of 30 documents.
The first question that you have to ask yourself is this: How accurate was my search? Odds are that your boss knows exactly which document he or she is looking for. If all goes well, you may have a pretty good idea yourself. Hopefully, you can spot the document in the first few entries, send it to your boss, and avoid the wrath for another day. In this case, you don't need a hand grenade, you need a sniper rifle.
Another issue with SharePoint search is that you don't have the resources that Google/Microsoft/Yahoo! have. No, this isn't about the billions of dollars or the squadrons of Ivy League math geeks. The resources in this case are countless millions of people that make Web pages every day, cross linking between corporate sites, private sites, blogs, and photo collections of people's cats. Each search engine bets on the fact that high-quality information gets more attention than low-quality information does, and assigns a “page rank” accordingly. The pages that are unlinked (the “dark Web”) are left out on any search results.
Most SharePoint sites have at most a few thousand users. There may not be the critical mass of links needed to build significantly between the documents on a SharePoint portal. And unfortunately, there is no room for a “dark Web” on a SharePoint portal. Every document may be the single most important bit of information for the company at a given point in time.
That being said, let's go back to our thought experiment, the one with the demanding boss. How can you be sure that you pick the right document? How can you make it easier for the people who use your portal to find the information that they're looking for?
Before going any further, let's start with two words: relevancy and accuracy. They are the standards by which your search capabilities will be measured.
Relevancy is what Google and Yahoo have in spades. When you type in “chicken soup,” they give you back a list of links that are in the ballpark of what you're looking for. With a well-crafted search phrase, you're pretty likely to get a link that's relevant to what you need.
In casual searches, such as the search for chicken soup, relevancy is all you need. Relevancy is good, and in the grand scheme of things, relatively easy to supply to searchers. They may not get exactly what they were looking for, but maybe they'll find something that will work.
Accuracy is giving people exactly what they want. Most people who use business search aren't looking for something that's almost the Q4 2010 Forecasting Worksheet. They're looking for the document that's exactly the Q4 2010 Forecasting Worksheet. That's accuracy.
If accuracy is so hard, what good is Search in a business scenario? Well, SharePoint Search has two very big things working for it. Firstly, having search capabilities on your portal certainly beats the alternative, which is having no search functionality at all. Secondly, the big brains at Microsoft that built WSS and MOSS had the foresight to realize that there are challenges to providing accurate search and ensured that nearly every aspect of the search functionality is configurable and customizable. That's where the whole design aspect of this chapter comes in.
Designing for SharePoint Search has a single goal: getting the users the item that they need. A good design can help in two ways. First there's the stuff that happens on the back end. This involves giving SharePoint better ways to slice, dice, and categorize the information (to teach it how to think about your data). This chapter discusses content sources, rules, scopes, managed properties, best bets, and keywords. Each of these helps you refine the actions that SharePoint takes behind the scenes to ensure that the best information appears at the top of every search queue.
The second part of search is the front end, including all of the interfaces that users encounter when they try to search. In a standard install of WSS 3.0 or MOSS, a few available interfaces provide very broad search capabilities. The trick is to give your users a customized arsenal of tools that will help them find what they need. This will include not only general search pages, but custom search pages and Web Parts, and if you're using MOSS, the Search Center site.
This should give you enough to create a global search strategy, and if you're lucky, people will think that you're as smart as the people at Google.
SharePoint Search is like soup. Go with me on this one.
Anyone can make soup. Take water, chicken, noodles, veggies, or whatever else you like, throw it in a pot, and its soup, right? Maybe. But if you start with really good ingredients, take your time, and set things up just right, you'll get really good soup.
(To extend this metaphor way too far: What's an out-of-the-box search setup? Canned soup. Yes, you can live on it, but why would you want to?)
So, what's the first step to designing for search? The same as making good soup: Get good ingredients. The key in this case is to give search the right data to index and cross reference so that it can serve your users the most relevant and accurate results.
SharePoint can look at three things when it comes to your data. First, of course, is the content. Unfortunately, you don't have much control over what users put into documents, forms, and list items. This is probably for the best, as the users who make them are the subject matter experts. That leaves you with two tools you can control: metadata and content types.
Metadata
Document library column data is SharePoint's bread and butter. This is the document's metadata (the data that describes your data). It allows you to tag documents, images, forms, and list items with whatever data you need. Use metadata. Embrace it. The key to good search, however, is using standardized metadata.
A good place to start with the metadata definition is listening to how your users speak about what they do. For business to get done well, everyone must have the same vocabulary. A customer invoice will have a “customer name” and an “invoice date.” A marketing plan will have a “target demographic” and a “marketing budget.” Again, you probably already have a good bit of this in place.
Make a list of all these items; then check it over with your users. The better this list is, the better your search will be. Be sure to keep track of the data type that each kind of column holds (text, number, date/time); this will be important when you create the document library columns.
There are a few ways to maximize how that metadata is used by search. In most places, the vocabulary used to describe one document or data item is used elsewhere as well. Metadata properties are managed behind the scenes using their textual name and data type. An “invoice date” in one list will be treated the same as an “invoice date” in another, so long as both are dates. By ensuring that the metadata columns are the same, SharePoint search can group these items together.
Also remember that though you can easily add same-named columns to your lists and libraries, it's probably easier to set up site columns to ensure that column name spelling is identical on every list and library.
One last thing: If possible, make these columns required. SharePoint can't find data if it's not there.
Content Types
How do you classify and describe the results of all the work you do? If your company makes bicycles, for instance, you probably create invoices for vendors, receive order sheets from customers, keep track of inventory spreadsheets, and so forth. There are probably more than a few handfuls of other types of documents and data.
Out of the box, SharePoint (and Search in particular) is oblivious to these differentiations in how you do business. Searching your portal for the word “Inventory” may give you back the spreadsheet you're looking for, but it will also return every other document that refers to the word “Inventory.” Everything in your search results is relevant, but probably not very accurate.
Hopefully, each of the specific kinds of data that you use means the same thing to everyone in your company. This is important and is missed in far too many implementations of SharePoint. This is your business's taxonomy. Taxonomy used to be the realm of biologists, who'd go into the field and classify everything they saw: blue-footed pigeons or ruby-throated mice or whatever else it was they ran into. That's what you need to do—classify your data. Make a list, check it twice, as this is where you'll start telling SharePoint how to slice up your data.
For example, suppose you're tasked with evaluating the taxonomy for the bicycle manufacturer noted above. There are distinct types of documents that are used throughout the product development process from beginning to end, each with:
- Specification documents to store plans for bicycle frames and parts
- Cost Analysis documents that help determine if the bicycle is worth making
- Marketing Plans to help sell the products
- Invoices to log sales to each of the company's clients
And so forth.
With the advent of WSS 3.0 and MOSS 2007, you can use Content Types to inform your portal on what kinds of information you have. Content Types are SharePoint's way of flagging a document as a named part of your taxonomy. Each of the items listed below can (and should) be set as a content type in your portal. If you can limit the documents or list items that you search to just the content type you'll need, you can improve your accuracy greatly.
Before getting deeper into how to customize SharePoint Search, it's probably best to have a clear understanding of how it works. Searching every document, form, page, and list item in real time is, of course, just not practical. Like every other search engine on the planet, SharePoint Search creates an index of information that it can quickly access and display. You probably already knew that. But there's actually quite a bit more to it than that, and in the immortal words of G.I. Joe, knowing is half the battle.
List data is quite easy to break apart because it consists of tidy piles of typed data. On the other hand, SharePoint needs help reading documents. When processing a document, the first thing SharePoint does is determine how to read it. There are a host of built-in protocols and readers (iFilters) for different document types. Because SharePoint is a Microsoft product, most Office document types are supported out of the box.
Many common file types are not supported natively, but there are a large number of third party iFilters that you can install to expand on the range of supported file types. There is a good bit of momentum in the market for the people who make document creation tools to release their own iFilters. If your company uses a file type that is not natively supported by SharePoint, check with the vendor; you may find that they have one for free.
You can find a free iFilter for Adobe PDF files, for instance, by searching for iFilter on Adobe's site (www.adobe.com). There are several different versions depending on things like processor type, so check which one you'll need. (They'll also have a neat article or two about adding the little PDF icon for use in SharePoint document libraries.)
Another excellent resource is iFilter.org (www.ifilter.org/). This is a clearing house of links for free and not-so-free iFilters, including file types such as HLP files and ZIP files. There are even iFilters for TIF and JPG files that use pattern recognition and other OCR technologies to extract text from images, but realize that implementing these can be processor intensive.
In the end, a SharePoint index is essentially a glorified word list, cross-referenced with key columns of list metadata and stacked in a way that it can be easily sorted and picked through for easy retrieval. That's what metadata is for right?
The problem is that SharePoint doesn't look at all your metadata in the same way. Some list columns get preferential treatment. You can imagine a search index to be like a big stack of spreadsheets, with a very big spreadsheet for each managed property. This allows for speedy search for key metadata. By default, SharePoint recognizes a handful of prefabricated columns as managed properties, such as Modified By, Created, and Assigned To.
Want to make your metadata special? Make it a managed property.
Once SharePoint begins crawling your data, it creates or updates two separate piles of information: the content index and the properties store. The content index is simply a database of all the words in all the lists, libraries and such, stored on your SQL server to allow for quick search on each word. It's what most people think of when they are asked about search indexes.
The properties store is where your work with managed properties will start to pay off. SharePoint keeps a separate set of information that allows it to quickly find information that pertains to managed properties. A list item that has a managed property, say, “Customer Name,” will merit a special entry in the properties store. If you allow users to search on just that property, you've eliminated all the other information in the system that isn't what they're looking for, making the search more accurate.
Adding Managed Properties
Okay, you've got standardized lists and library columns all over your portal. How do you utilize this to your advantage? The first step is telling SharePoint which columns are the most important. And the way to do that is through managed properties.
Setting up a managed property allows you to target search within a specific metadata column.
To add a managed property to your portal:
1. Open SharePoint Central Administration and select your Shared Service Provider; then open your Search Settings.
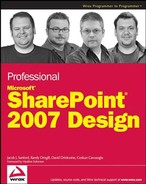
2. On the list of options shown, select Managed Properties. You'll see a form similar to Figure 12-1.
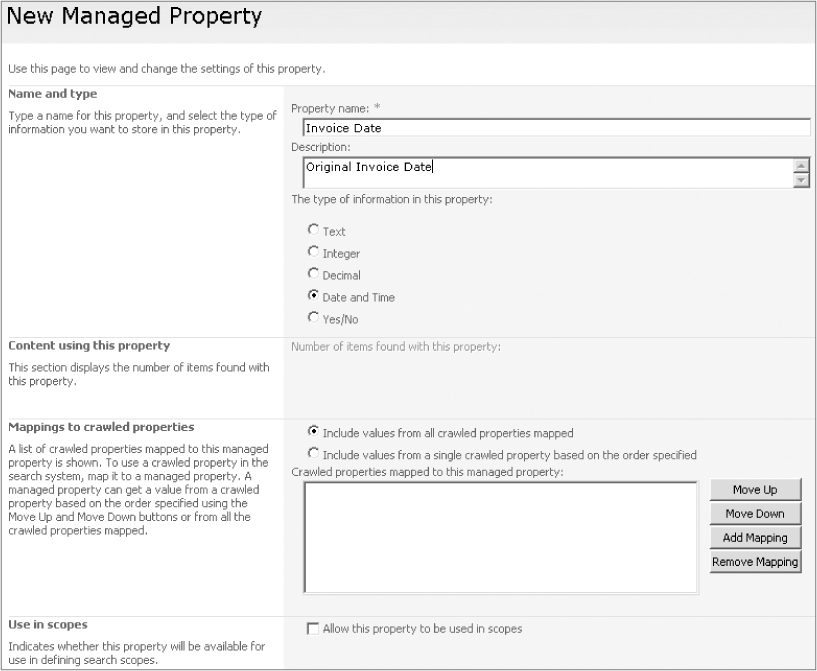
3. Fill out the form as needed (name, description, and the type of data that the property will store). Now comes the fun part. Click the Add Mapping button in the Mapping to crawled properties section. You should see a list of all column names from every list or library in every site on your entire site collection and every other site collection for which Shared Services Provider provides services. (See Figure 12-2.)
Deep inside its inner workings, SharePoint actually uses two names for every column: an external name used for display and an internal name used for its own tracking purposes. Note that the columns are displayed using SharePoint's internal name for the column, which can be a little confusing. You can pare down the list by selecting a category or search for a specific column name by clicking the Find button. This should help you wade through the list.
By selecting the column's internal name, you are telling SharePoint that the column you selected should be associated (or “mapped” in SharePoint parlance) to your new managed property. You do have some wiggle room when mapping metadata. Once you've selected the first column to be handled under your new managed property, you can also add others. For instance, if your company uses the terms “Inception Date” and “Start Date” to describe roughly the same thing, you can map them both to your managed property.
Take special note of the “Allow this property to be used in scopes” checkbox at the bottom of the New Managed Property form shown in Figure 12-1. As you'll see in the upcoming section on scopes, this may be one of the most powerful tools in SharePoint.
Setting up solid metadata, content types, and managed properties can be a hassle for organizations with complex data, but when we move on to some of the more visible parts of search like scope creation and custom search Web Parts, this work will pay off in spades. Designing a good place for data to live is the first step in helping your users find the things they need.
Content Sources
On WSS 3.0 and MOSS, search is broken into two separate functions: getting search data and serving search data. The service that gets the data is affectionately called the gatherer, though it's often referred to as the indexer or the crawler. Before the gatherer can go about its business, you'll have to tell SharePoint exactly what it is you'll want it to search. This means setting up content sources.
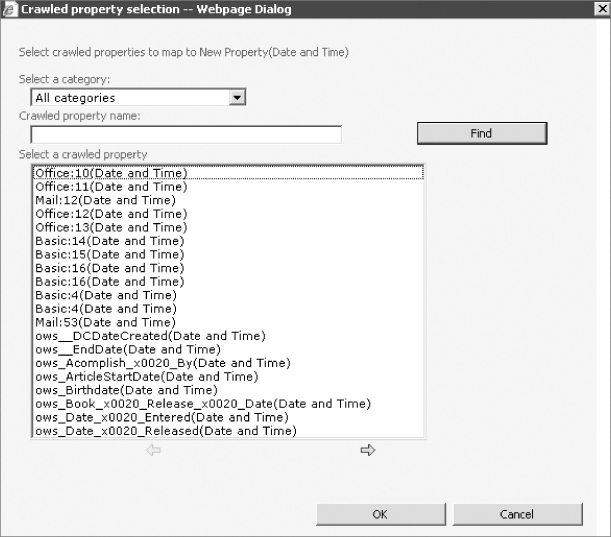
To add a content source, open SharePoint Central Administration and select Shared Services Administration ⇒ Search Settings ⇒ Content sources and crawl schedules. This opens the Add Content Source page shown in Figure 12-3. By default, SharePoint creates a content source for your entire portal, but you may wish change this or add additional sources. Of course, to create a new content source, click Add New.
For WSS 3.0, you're limited to gathering information from SharePoint, but MOSS allows a much more robust selection of content sources, including other Web sites, file shares, Exchange public folders, user profiles, and Business Data Connectors. This is probably reason enough for most companies to make the leap to MOSS.
A few things to remember when creating content sources:
- Crawling is voracious when it comes to system resources. If you're running WSS or MOSS in a single server configuration, opening and crawling several potentially large documents at a time will take memory and processing power away from other things. Placing the search crawler on a separate server will help alleviate these issues, as will restricting search crawls to off hours.
- Crawling takes time. By default, content sources are scheduled to perform a full crawl of content once a week, and check for changes every five minutes. As your portal increases in size, it will take more and more time to crawl the information. Once again, a separate search indexing server will reduce impact for users.
The incremental crawl schedule is also something that you may wish to modify. In environments with low document turnover, you can increase this value to reduce system resources. In any case, you'll want to train users to be patient (if this is even possible). It can take several minutes for search to be aware of changes in a document library, list, or any other data source.
Adding a SharePoint Site Content Source
This is the most common use for SharePoint search and the reason you're probably reading this chapter. By default SharePoint adds a content source for all local site information. You can extend this by creating content sources that point at specific areas of your portal as well. For instance, you can set up a search scope for a group of marketing sites or an area open specifically to outside vendors.
On the Add Content Source screen, select SharePoint Sites as the Content Source Type and enter in the URL of your search portal and schedule accordingly. You can also configure the content source to crawl only the specified site or include all its sub-sites. Easy as pie.
The only catch here is that the gatherer will run under the same security credentials named in the Default content access account on the Search Settings page. It most cases, this is as the worker account was used when the portal was created, and this account should have the God-like powers needed to get at your documents. It is possible to configure shared service providers to use other accounts that may in fact not have sufficient rights to access your lists and libraries.
Bear in mind that it's possible to create content sources that overlap. This will result in items appearing more than once in a set of search results.
Adding a Web Site Content Source
MOSS allows content sources to be pointed at sites outside of your portal. Adding the site is simple enough. Select Web Sites as the Content Source Type and enter in the URL of your target Web site and schedule accordingly.
Configuration options include:
- Within the server of each start address (default)
- Only the first page of each start address
- Custom: Specify page depth and number of server hops.
Also, very easy to configure, but there are a few caveats:
- You may not have control over these content sources, and people who do may not like the fact that you're crawling their site. If they should contact you about this, play nice and stop crawling their site.
- If you opt for a custom configuration and select an unlimited depth and/or more than one or two server hops, SharePoint will attempt to search links found on those sites, and the links found on those sites, and so forth. Due to the high amount of interconnectivity of today's Internet, two server hops can bring back an astounding amount of information. And though it may seem like a good idea to create a back-up copy of the Internet just in case the current one ever goes away, your IT department may frown on this.
Adding a File Share or Exchange Public Folder Content Source
Up until now, this was what passed for collaboration in the enterprise. Big piles of files on a shared network drive. No metadata, no workflow, no spiffy branded interface. How quaint. And your business probably still keeps a large portion of its data there.
If you have MOSS, it's time to bring this data into the fold. Hopefully, you've got a plan in place to migrate this data into SharePoint document libraries, but in the meantime, you can still make the data searchable. In the Add Content Source page, select File Shares or Exchange Public Folders as the Content Source Type and enter in the URL of your target Web site. Once again, you may want to restrict the gatherer as it indexes the data. You can opt to limit the scale of the content source to the folder at which you're pointing, or have the gatherer recursively search the folder and all its subfolders.
Security may be a concern here. The gatherer crawls using the same security credentials named in the Default content access account on the Search Settings page. As such, it doesn't respect user rights to display results in search results. Users will, however, be blocked from accessing files if they try to open documents that they don't have rights to. This can be frustrating for users, so you may want to set expectations accordingly.
Adding a Business Data Catalog Content Source
One of the greatest features in MOSS is its ability to tie together business data from other lines of business applications. Though setting up a Business Data Catalog (BDC) application is beyond the scope of this book, getting at the data for search is not. In the Add Content Source page, select File Business Data to start this process. You have the option of searching all BDCs on the server or manually selecting one or more previously added items.
Once again, security may be an issue. The gatherer will index and show data based on the identity used by the BDC to retrieve data. This could lead to the exposure of sensitive material if not handled properly.
Setting Gatherer Rules
Now that your content is lined up and ready to go, let's clean things up a little. There are a few additional options that you can set to keep unnecessary information from showing up in search results. To refine the rules that the crawler uses when indexing a content source, select Crawl Rules on the default Search Settings page. A form similar to Figure 12-4 appears.
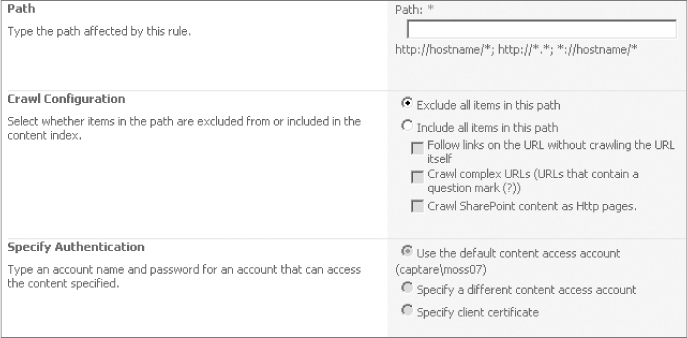
Crawl rules accomplish a few things for you:
- As you'd expect from Figure 12-4, you can exclude chunks of your Content Source from search results.
- You can add back sub-sections of excluded data. One of the key tricks to setting up rules is to identify the correct order in which rules are applied. For instance, let's say that a company keeps sensitive patent data in a hierarchy of sites. Excluding the branch of the site collection is easy; use the Exclude option shown in Figure 12-4. This would be entered as the first rule.
However, one of the sub sites—Published Patents—should be available for search. By creating a second rule to include the data, that particular site is returned to service, ready to show up in searches.
- The Crawl Complex URLs option is useful if you commonly place a lot of links on pages that contain parameters, such as links to static documents or list items. Otherwise, SharePoint ignores any parameters in each URL.
- The Crawl SharePoint Content as HTTP option should be used with caution. The gatherer stores list and library information differently from regular Web pages as it has to include other data such as list item permissions. Crawling as HTTP forces the gatherer to “pretend” that each item is a standard Web page, ignoring security.
- Using the Specify Authorization option, you can overwrite the account used for crawling, a quite useful feature to restrict access to key data within a specific site or set of sites.
Keep in mind that you can also exclude a list or library from appearing in a search by altering the Search settings on the Advanced Settings section of each list or libraries settings. This prevents items such as lookup lists from appearing in search results.
Crawl Settings
When the gatherer wakes up, it checks the server's registry to see what it's supposed to do and how it's supposed to do it. There are a ton of settings, most of which you probably won't need to play with. However, there are a few useful items in the registry, including:
- RobotThreadsNumber This sets the number of documents/list items/images that SharePoint tries to index at once. You can imagine these as separate crawlers themselves. The default number is four, but you can tweak this up or down if you want to control how much processing power your servers are throwing at indexing.
- ConnectTimeout and DataTimeout Protocol handlers and iFilters can be finicky beasts and often lock or bog down. These settings determine how long the gatherer should wait before it stops attempting to crawl a specific unit of data and moves on to the next one. In most cases, items that cause faults are noted in the gatherer log.
Creating Scopes
The first thing every new SharePoint Search administrator does is dive into creating scopes, bypassing all the other things that have been discussed here so far. It makes sense. Scopes are highly visible, they are easy to set up, and they give a big bang for the buck.
The catch is that unless you've done the rest of the setup, the capabilities of a scope can be pretty limited.
Search scopes are the goal line. The last thing you set up before you can let Search loose on your users.
Adding a scope is easy: Open the Shared Services Administration section of SharePoint Central Administration page, select Search settings, and then View Scopes. When you select New Scope, you'll see a form similar to Figure 12-5.
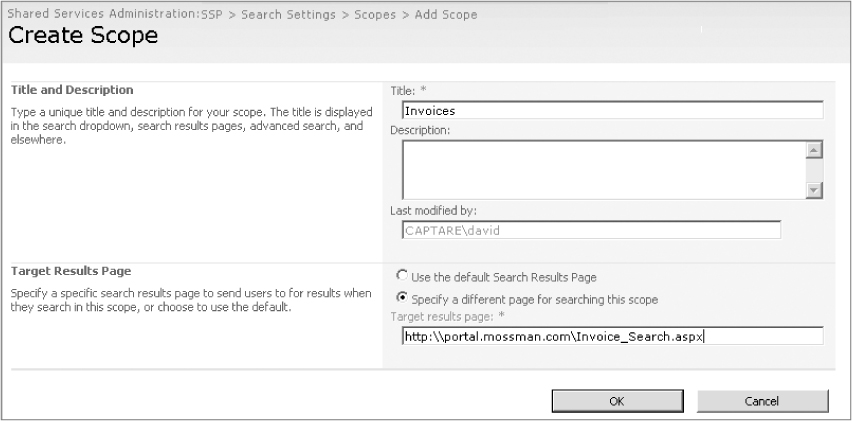
In this part of setup, you supply the name and description of the scope. But pay attention to the Target Results section at the bottom of the form. As you would expect, this is where SharePoint will redirect all search calls made on this scope. As you'll see later in this chapter, this can be extremely useful.
That's the first part of setting up a scope. It's basically a placeholder for scope rules. And what are scope rules, you may ask? They're the heavy lifters of SharePoint Search.
Because search accuracy is difficult, the goal of scopes is to pare down the massive pile of documents and list items to a manageable number before the search engine does its thing. Up to this point, you've laid down the foundation for different ways to pare down that pile.
To add a scope rule, select the scope you'd like to modify, then select Scope Properties and Rules from the available dropdown list. You'll see a form similar to that shown in Figure 12-6.
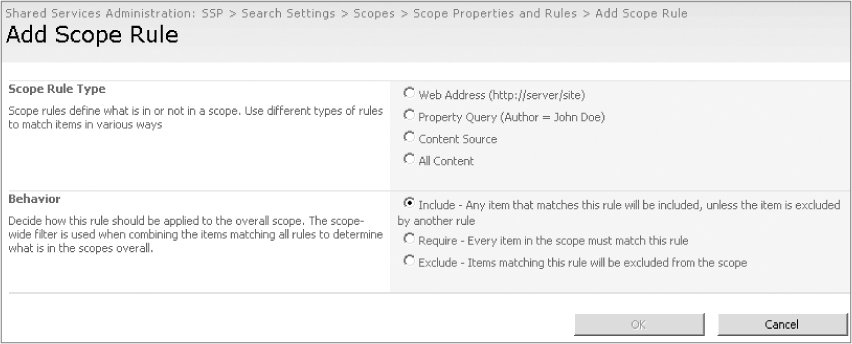
There are four different kinds of scope rules:
- Web Address This is the most commonly used scope rule, and is dependent on how you've set up your portal. If you've read Chapter 2 and taken care to set up a nice, orderly portal topology, this should be a piece of cake. Using the items in the Behavior section (shown in the previous figure) will let you slice off a piece of your site collection and serve it up in Search or keep something from appearing at all.
- Property Query This rule type allows you to limit a search scope to a particular column of metadata. This is an extremely powerful tool, and the possibilities here are endless. This will allow you to automatically filter items based on one of the prefabricated properties that SharePoint uses across all lists and libraries, such as Author or Company, or you can use any custom managed properties that you created.
Unfortunately, there are some limitations. Property Query rules cannot contain complex match criteria. No “greater than,” no “less than,” no wildcard searches. This makes creating a filter based on date or numerical thresholds impossible to set up. For instance, you can't set up a rule to include every item less than 90 days old.
For example, you may want to create a scope that only displays items with a status of “Approved,” or hides everything with a status of “Draft.”
- Content Source Again, an extremely powerful type of rule. If you've set up your content types to match the way your company does business, the gains of using this type of rule should be self-evident. It should be trivial for your users to search for every “Invoice” on a site collection with hundreds of sites and thousands of documents and not have to wade through every document that contains the word “Invoice.”
- All Content This rule includes, well, all the content on your site collection. Not much to add here.
The nice thing about scopes is that they each can contain a multitude of rules. For instance, it's possible to create a scope that allows users to search for “Contract” content types in which the “Status” managed property is set to “Pending Approval” but only on the specific section of your portal dedicated to the Legal department.
Making Scopes Available
So far, you've implemented good ways to store data and told SharePoint how to slice up your pile of documents in as many different ways as you need.
The last “behind the scenes” task that needs to be done is to make the scopes available for users. Your newly created scopes must be enabled for your site collection.
To enable a scope, open the Site Settings interface on the top-level site of your site collection. Click the Search Scopes item in the Site Collection Administration column. You should see the View Scopes page similar to Figure 12-7.
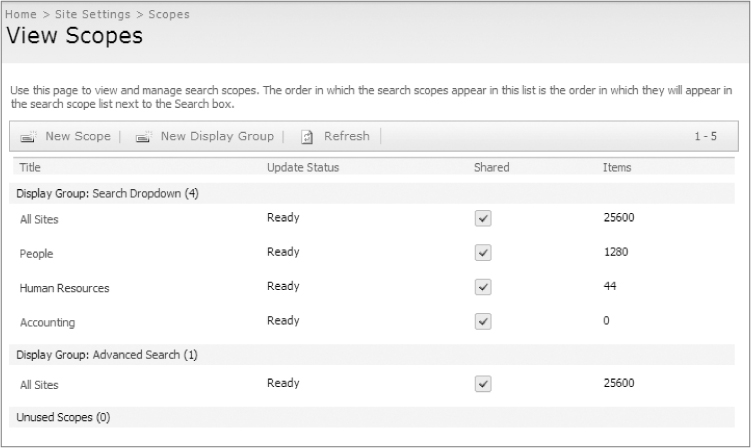
This interface show all scopes available to your site collection and a few additional tidbits of information that may be useful as well, such as the scope's update status and how many items appear in the scope.
Search scopes are made available to users as part of a display group. Display groups are simply named groups of scopes that allow you to control where scopes are available. By default, MOSS contains two groups: Search Dropdown, which drives the standard Search control that shows up on nearly all SharePoint pages, and Advanced Search, which allows users to create a more granular search query.
To enable a Scope within a Display Group, click the group's name. The Edit Scope Display Group form similar to Figure 12-8 appears.
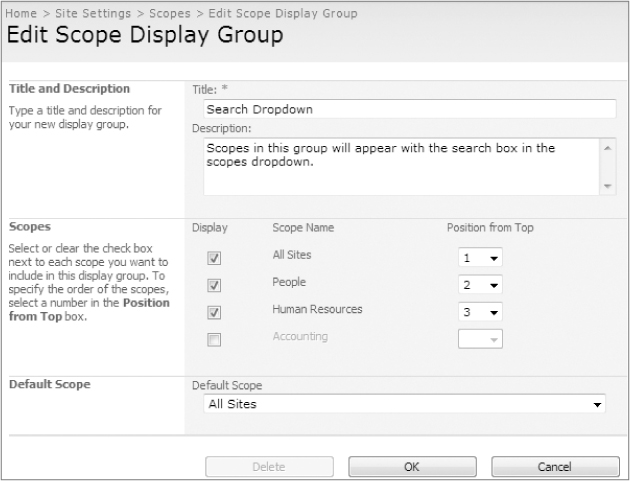
By modifying the information in the Scopes section, you'll be able to control which scopes appear as part of the Display Group and in which order they should appear. You can even select which scope is used by default.
You're not limited to the default display groups. Creating custom groups is an excellent way to target searches for particular users. As you'll see in the next section, this can be used within the Advanced Search Box Web Part to create custom search interfaces.
Most of what has been discussed here has occurred behind the scenes. But so far, all that's been covered is optimizing SharePoint's innate search indexing features. The next step is to customize the user interface, to streamline search even further by allowing users to access the functionality that you've just built into the SharePoint Search index.
First, before I hammer out how to make things look nice and shiny, you need to learn a bit more about how SharePoint serves up search results. When a user types in a search term and requests search results, SharePoint passes the search query and all the parameters to a search service. The search service, in turn, pours over the index that the gatherer has been so diligent in building and keeping up to date and carefully considers everything that it receives and builds a set of results. This set is then passed to the part of SharePoint that actually builds Web pages and such in the form of a chunk of XML, where it is rendered and sent down to the user.
So, basically, all you have to do is control that chunk of XML, and you can make your search results look like anything you'd like.
There are a few ways to do this, including:
- Search Web Parts
- The Content Query Web Part
- The MOSS Search Center
The next section details these methods and walks you through configuring and customizing these interfaces to target search results to best meet your needs. So far in this chapter, most of the topics on SharePoint Search Service's work have centered on indexing content. From here, you move into getting information out of that index.
There are two aspects to getting search results: telling SharePoint what you want, and managing the results when they're returned. Luckily, there are Web Parts ready and able to do both these tasks.
Using Search Web Parts
MOSS (and to a lesser degree, WSS 3.0) comes with a selection of customizable Search Web Parts. These Web Parts are, with a few key exceptions, relatively easy to configure and will probably cover most of the needs of your overall search design requirements.
Search Web Parts are divided into three groups: entry point parts, result display parts, and search data parts. Due to the scope and size of this chapter, this section doesn't include detailed design guides for every Web Part, largely because they don't easily lend themselves to customization. The following sections do target the two most commonly customized Web Parts: the Advanced Search Box and the Search Core Results Web Parts. These two parts provide access to the bulk of SharePoint's search functionality.
That being said, here's an overview of SharePoint search parts. Entry point parts allow users to enter search terms. They include:
- Search Box This is the search that most users are familiar with: a text box, a scope selector, and a button. Simple and straight to the point. Not much to discuss here, just a simple way to enter search terms.
- People Search Box (MOSS only) Again, nothing complex but allows users to find people rather than documents.
- Advanced Search Box (MOSS only) Here's where things start to get good. The Advanced Search Box exposes all the bells and whistles that you've prepared up to this point: scopes, managed properties, and so on. The next section details the configuration of this Web Part.
Result display Web Parts do just that: display results. They include:
- Search Core Results This is the part that you're probably used to seeing when you enter a search in WSS or MOSS. It displays key bits of information in a fairly orderly manner. As you see later in this chapter, you can customize the look and feel of this Web Part, as well as leverage additional functionality for helping target search.
- People Search Core Results (MOSS only) As you'd expect, this Web Part displays key data from SharePoint profiles. As such, it's only available within MOSS.
Search data Web Parts offer insight into your search results. They're used in combination with a result display Web Part to display information about your search.
- Search High Confidence Results (MOSS Only) This Web Part displays keyword definitions and best bet links, if they exist for the searched terms. (Keywords and best bets will be discussed later in this chapter, so stay tuned.)
- Search Paging (MOSS Only) Large result sets can be cumbersome to load in a single page. When combined with a results Web Part, the Search Paging Web Parts allows users to display a set number of results at a time.
- Search Statistics (MOSS Only) This Web Part displays key metrics on your search results, including the number of hits your search term has returned and the time it took to perform the search. Not exactly gripping information, but it can prove useful in diagnosing any problems that you're having with Search.
- Search Summary (MOSS Only) This Web Part not only displays a brief summary of search results, but also displays a “Did you mean…” section for near misses.
The Advanced Search Box Web Part
Probably the easiest way to give users access to custom search functionality is through the Advanced Search Web Part (Figure 12-9). With a little help, it can let users at all the bells and whistles that you spent so long configuring.
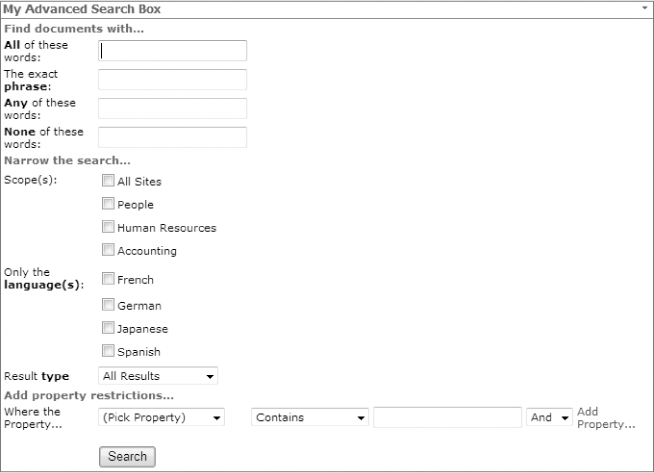
If you haven't cut ahead in this chapter, at least some of the fields on this Web Part should look pretty familiar. (If you have cut ahead, shame on you. No cutting.)
Let's take a look the modifiable options of this Web Part to see what makes it tick. To access the Web Part's properties, click the “Edit this Page” link on your search page; then click the “Modify this Web Part” link. As with most Web Parts, the options are subdivided into separate sections in the edit section. The items included next pertain specifically to the Advanced Search Box Web Part. General Web Part options such as Layout and Appearance are not noted here.
The Web Part properties that configure search are broken into the following categories:
- Search Box Options
- Scopes
- Properties
- Miscellaneous
Search Box Options
This section enables you to control the text boxes that will be displayed for user input and their description labels. They're fairly self-explanatory. The options included are discussed in the following table:
| Item | Description |
| Search box section label | This option controls the label that appears at the top of this section. The default is “Find documents with…,” but you may wish to change it, as not only documents will be returned. |
| Show “All words” search box | This allows you to turn the field that allows users to search on all entered keywords. This is the default state of search boxes in SharePoint and the one that most users are familiar with. |
| “All of these words” search box label | This controls what is displayed next to the All words search box. |
| Show “exact phrase” search box | This allows you to display a text box that users can use to search for a phrase with multiple keywords. |
| The e phrase search box label | As you could probably guess, this controls what is displayed next to the “Exact phrase” search box. |
| Show “any words” search box | This allows you to display a text box that users can use to search for results that may relate to one or more of multiple keywords. |
| Any of these words search box label | This controls what is displayed next to the “Any words” search box. |
| Show “none of these words” search box | This allows you to display a text box that users can use to exclude search results that contain the included text. |
| None of these words search box label | This controls what is displayed next to the “None of these words” search box. |
Scopes
Though the section title refers to scopes in particular, this section encompasses a bit more. It controls items that relate to how the search results should be filtered, sliced, and diced by SharePoint Search before passing them along to the user. The following table defines the options in the Scopes section.
| Item | Description |
| Scope section label | This controls the text that appears at the top of the Scopes section. The default is …wait for it …“Scopes.” |
| Show the scope picker | This option will allow you to control whether scopes should be displayed. It will display a checkbox option for every scope that has been included in the Display group option below. If this option is not selected, the default scope of the Display group will be used. |
| Scopes label | Allows you to control the text that appears above the list of scopes. |
| Display group | This option allows you to set which groups of scopes should appear in the scopes section. A previous section of this chapter details how to set up display groups. This is a very useful option. It allows you to create a custom search Web Part for different core functions of your portal. For instance, you could create a page that allows users to search within a selection of content type based scopes, or search within a selection of search scope-enabled Business Data Catalogs. |
| Show the languages picker | The languages picker will allow users to limit their search to documents written is a specific language. The items shown here w/are editable in the XML included in the Properties section of this Web Part's options. The next section will go over this in more detail. |
| Languages label | This option lets you control the text shown with the language picker control. |
| Show the result type picker | This allows users to limit search results to a specific document type. |
| Result Type label | This option lets you control the text shown with the Result Type selection control. To add, remove or modify these, you'll need to alter to XML included in the Properties section of this Web Part's options. The next section will go over this in more detail. |
Properties
The Properties section provides access to additional means to allow users to be more specific when searching for documents, list items, or other data. The options here are shown in the following table:
| Item | Description |
| Properties section label | This controls the text that appears at the top of the Properties section. |
| Properties | This option displays as a text box that expands to a text edit control. It contains a chunk of XML that not only controls which items are displayed in the properties dropdown box, but the Language and Result types options as well. The next section will go over this in more detail. |
Miscellaneous
Last but not least, there's a Miscellaneous option for the Web Part: Results URL. As you would expect, this dictates the URL that will be used to display the user's search results in a Search Core Results Web Part.
Advanced Search Box Web Part Properties XML
There is a block of XML data included in the Properties section of the Web Part's options. To access the block, click on the “…” button in the Properties section. This XML data contains four sections and is laid out as follows:
<root>
<LangDefs> … </ LangDefs >
<Languages> … </ Languages >
<PropertyDefs> … </ PropertyDefs>
<ResultTypes> … </ ResultTypes >
</ root>
As you can see from the XML block's node names, several functions of the Web Part's fields are controlled by its contents.
Controlling the Language Picker
The first two sections, the <LangDefs> and <Languages> nodes, contain the information needed to display or hide items in the Language Picker control.
The <LangDefs> section contains an entry for every language currently available as a SharePoint Language Pack. It looks similar to this:
<LangDefs>
<LangDef DisplayName=“Arabic” LangID=“1”/>
<LangDef DisplayName=“Bengali” LangID=“69”/>
<LangDef DisplayName=“Bulgarian” LangID=“2”/>
<LangDef DisplayName=“Catalan” LangID=“3”/>
<LangDef DisplayName=“Chinese” LangID=“4”/>
…(and so forth) …
</LangDefs>
There are, of course, many more languages listed in this section, but this should give you a pretty good idea of how languages are defined. Each language is explicitly named in the DisplayName attribute and given a number in the LangID attribute. The LangID value is the internal code that SharePoint uses for each language. This section of the XML will come pre-populated for you, and it's unlikely that you'll need to change much there.
The second node in the Properties XML, the <Languages> node, is more interesting from a design aspect. It controls the items in the Language Picker, and will look something like this:
<Languages>
<Language LangRef=“12”/>
<Language LangRef=“7”/>
<Language LangRef=“17”/>
<Language LangRef=“10”/>
</Languages>
As you can see, each language displayed on the Language Picker has an entry in this block of XML, as referenced by the number in the LangRef attribute. In the example shown, the line containing LangRef = “12” enables French, the line containing LangRef = “7” enables German, and so forth. To add another language, add another entry to the <Languages> node with the appropriate number from the <LangDefs> section.
Controlling Properties
The next section of the Properties XML block controls the items in the first dropdown that appears in the Properties section of the Advanced Search Box Web Part. It looks similar to this:
<PropertyDefs>
<PropertyDef Name=“Path” DataType=“text” DisplayName=“URL”/>
<PropertyDef Name=“Size” DataType=“integer” DisplayName=“Size”/>
<PropertyDef Name=“Write” DataType=“datetime” DisplayName=“Last
Modified Date”/>
<PropertyDef Name=“FileName” DataType=“text” DisplayName=“Name”/>
<PropertyDef Name=“Description” DataType=“text” DisplayName=“Description”/>
<PropertyDef Name=“Title” DataType=“text” DisplayName=“Title”/>
<PropertyDef Name=“Author” DataType=“text” DisplayName=“Author”/>
<PropertyDef Name=“DocSubject” DataType=“text” DisplayName=“Subject”/>
<PropertyDef Name=“DocKeywords” DataType=“text” DisplayName=“Keywords”/>
<PropertyDef Name=“DocComments” DataType=“text” DisplayName=“Comments”/>
<PropertyDef Name=“Manager” DataType=“text” DisplayName=“Manager”/>
<PropertyDef Name=“Company” DataType=“text” DisplayName=“Company”/>
<PropertyDef Name=“Created” DataType=“datetime” DisplayName=“Created Date”/>
<PropertyDef Name=“CreatedBy” DataType=“text” DisplayName=“Created By”/>
<PropertyDef Name=“ModifiedBy” DataType=“text” DisplayName=“Last
Modified By”/>
</PropertyDefs>
Each item that appears in the list of properties has its own node in this section.
The Name attribute refers to the name of the property as listed in the Managed Properties section in SharePoint's Search Settings. The DataType attribute describes what kind of data SharePoint should expect. Lastly, the DisplayName attribute controls how the property will show up in the list. You can add any attribute that SharePoint manages, including your own custom managed properties, by adding a new <PropertyDef> node to the XML block, using the same format as existing items.
This is a particularly powerful feature and is the culmination of all the groundwork that's been laid out for managed properties. The possibilities are endless. Search for items that have a Status of “Incomplete” and a Due Date of “Today.” Search for documents assigned to a specific user and flagged as pertaining to a key client. Search for documents assigned to a particular vendor. This is targeted search at its best.
Controlling Result Types
Last but not least is the <ResultTypes> section of the XML block. It controls the items listed in the Result Type dropdown box on the Advanced Search Box Web Part. It looks similar to this:
<ResultTypes>
<ResultType DisplayName=“All Results” Name=“default”>
<Query/>
<PropertyRef Name=“Author” />
<PropertyRef Name=“Description” />
<PropertyRef Name=“FileName” />
<PropertyRef Name=“Path” />
</ResultType>
<ResultType DisplayName=“Documents” Name=“documents”>
<Query>IsDocument=1</Query>
<PropertyRef Name=“Author” />
<PropertyRef Name=“Description” />
<PropertyRef Name=“DocKeywords”/>
<PropertyRef Name=“FileName” />
<PropertyRef Name=“Path” />
<PropertyRef Name=“CreatedBy” />
<PropertyRef Name=“ModifiedBy” />
</ResultType>
<ResultType DisplayName=“Word Documents” Name=“worddocuments”>
<Query>FileExtension=‘doc’ Or FileExtension=‘docx’ Or
FileExtension=‘dot’</Query>
<PropertyRef Name=“Author” />
<PropertyRef Name=“DocComments”/>
<PropertyRef Name=“Description” />
<PropertyRef Name=“DocKeywords”/>
<PropertyRef Name=“FileName” />
<PropertyRef Name=“Size” />
<PropertyRef Name=“DocSubject”/>
<PropertyRef Name=“Path” />
<PropertyRef Name=“Created” />
<PropertyRef Name=“Write” />
<PropertyRef Name=“CreatedBy” />
<PropertyRef Name=“ModifiedBy” />
<PropertyRef Name=“Title”/>
<PropertyRef Name=“Manager” />
<PropertyRef Name=“Company”/>
</ResultType>
…
</ResultTypes>
Each kind of document displayed in the dropdown list has its own <ResultType> node. This node contains the information that SharePoint needs to find and display the information the user is looking for. There are a few key bits of information here:
- DisplayName: This is what the user will see. For example, you may see entries such as Word Document, SpreadSheet, or Presentation.
- Query: This is where the display name is translated into the file type. For example, the following code snippet would be used for Word documents:
<Query>FileExtension=‘doc’ Or FileExtension=‘docx’ Or
FileExtension=‘dot’</Query>
The previous query will limit the results to items that have doc, docx, or dot file extensions.
This can easily be modified or copied. For example, to add a section for Adobe Acrobat files, you could add in a section very similar to the Word Document section but updated to match the PDF file extension.
<ResultType DisplayName=“Adobe Documents” Name=“PDFdocuments”>
<Query>FileExtension=‘pdf’</Query>
<PropertyRef Name=“Author” />
<PropertyRef Name=“DocComments”/>
<PropertyRef Name=“Description” />
<PropertyRef Name=“DocKeywords”/>
<PropertyRef Name=“FileName” />
<PropertyRef Name=“Size” />
<PropertyRef Name=“DocSubject”/>
<PropertyRef Name=“Path” />
<PropertyRef Name=“Created” />
<PropertyRef Name=“Write” />
<PropertyRef Name=“CreatedBy” />
<PropertyRef Name=“ModifiedBy” />
<PropertyRef Name=“Title”/>
<PropertyRef Name=“Manager” />
<PropertyRef Name=“Company”/>
</ResultType>
The remaining rows in this section, the PropertyRef rows, are used by the Search Results Web Part to determine which items should be displayed. Once again, this refers to the Managed Properties list in SharePoint's Search Settings administration and can include any custom managed properties that you've added.
What This All Means
Okay, pay attention. This is the part you've been waiting for. This is where SharePoint Search gets good. Most people come at portal search with the goal of imitating Web search functionality. SharePoint allows you to do so.
Based on the items covered in this chapter so far, you should be able to create as many search pages as your portal needs, each with a specific purpose, anywhere on your portal that you'd like.
Let's imagine, for instance, that you owned a manufacturing company. You make widgets, and lots of them. You've got hundreds or thousands of sites, each of which governs the production of a single widget model.
It would be quite possible to create a search page that allows users to easily find Specification Sheets (a content type), written in Norwegian (a specific language) using MS Word (a result type), for widgets available on a vendors' extranet site (a content source), are in Preproduction (a scope), and are metallic blue (a managed property).
Okay, that's an extreme example, but it's certainly possible. And very, very accurate.
The Search Core Results Web Part
The Search Core Results Web Part is probably why you're reading this chapter. People don't come to a really cool search site to admire your finely tuned scopes or your brilliantly envisioned system of managed properties. They want results. And while you're at it, they better be pretty.
Sigh.
As was noted before, SharePoint returns a chunk of XML every time a search request is issued. The trick is to make that XML look pretty. The Search Core Results Web Part provides two ways to do this. The first is relatively simple: through the Web Part's standard modification options. The second is as complicated as you'll let it be, and that's through the standard method of displaying XML data: an XSL style sheet.
So, to begin, create a new page and drop on a Core Results Web Part. To make things simple, make sure the page has the same URL as you entered when configuring your Advanced Search Box Web Part.
Core Results Web Part Options
The Core Results Web Part, like any other Web Part, has a multitude of switches, toggles and the like for modifying its display. To access these options, place your results page in edit mode and modify the Web Part. As always, the options for this Web Part are broken into sections.
Results Display/Views
The Results Display/Views section governs options that dictate some of the part's high level display options. The available options are shown in the following table:
| Item | Description |
| Results Per Page | As you can imagine, some searches can return a vast number of results. This option dictates how many to display to the user at a time. |
| Sentences In Summary | This dictates the length of the summary information. This must be a value between 1 and 10. |
| Highest Result Page | This number puts a cap on how many pages of search results will be made available to the user. As you can imagine, this can get quite large. Putting a limit on how many results are returned can preserve system resources. |
| Default Results View | This option dictates the default sort order of results, either by Relevance (default) or Modified Date. |
| Display Discovered Definition | This is a very neat and underutilized feature in search. When SharePoint is busy indexing everything in your portal, it keeps an eye out for definitions of terms. For instance, somewhere in a document on your portal, there may be a phrase such as “An expense is…” or “a widget is …” SharePoint tries to identify the best of these for each word and mark them as definitions. If this item is checked, an additional link is added at the bottom of the search results that reads “What people are saying about X,” where X is the user's search term. Clicking on that link navigates the user to the document that contains the “definition.” |
Results Query Options
This section dictates a few additional options on which items to include or remove from the search results, as discussed in the following table:
| Item | Description |
| Remove Duplicate Results | This is fairly straightforward. If your search spans multiple content sources, a single result may show up repeatedly. This option eliminates those instances. |
| Enable Search Term Stemming | SharePoint can use advanced word parsing techniques to try to guess what a user is trying to search for. In this case, SharePoint can extend the range of a search to include additional variations on the word's root. For instance, let's say a user is searching on the word “climbing.” If this option is checked, results that match the word “climb,” “climbed,” or “climber” may also be included. |
| Permit Noise Word Queries | By default, SharePoint ignores noise words like “the,” “and,” or “a.” Due to their ubiquitous nature, they're usually not very useful in search. Selecting this option, however, allows noise words to be permitted in search. |
| Selected Columns | This option provides access to an XML block that defines which properties to include in the search results XML.
<root xmlns:xsi=“http://www.w3.org/2001/XMLSchema-instance”> <Columns> <Column Name=“WorkId”/> <Column Name=“Rank”/> <Column Name=“Title”/> <Column Name=“Author”/> <Column Name=“Size”/> <Column Name=“Path”/> <Column Name=“Description”/> <Column Name=“SiteName”/> <Column Name=“CollapsingStatus”/> <Column Name=“HitHighlightedSummary”/> <Column Name=“HitHighlightedProperties”/> <Column Name=“ContentClass”/> <Column Name=“IsDocument”/> <Column Name=“PictureThumbnailURL”/> </Columns> </root> |
| As you can see, including a <Column Name> node for a particular column instructs SharePoint to include that data in its search results set. Note that making the item available for display does not actually add it to the search results. That must be done by editing the XSL code that drives the Web Part display. | |
| Cross-Web Part query ID | In some cases, SharePoint allows results Web Parts to pass search parameters to other results Web Parts. This option helps SharePoint keep track of which Web Part is which. |
Fixed Keyword Query
Search Core Results pages don't have to get their input from an Advanced Search Box. You can embed the search terms and parameters directly into the results page and make some very functional interfaces. For instance, suppose you have a scope directed at a specific content type and a managed property. You could display all Contracts that have a status of “Approved.” SharePoint could automatically retrieve this list from across countless sites and display the most recently approved contracts automatically. They are discussed in the following table:
| Item | Description |
| Fixed Keyword Query | This text box allows you to enter the search terms that will always be displayed in the search results. It's also possible to include additional parameters here by including a managed property name and a value, separated by a colon. For instance, the text entered might be: Contract IsDocument:1 Status:Approved This would return all documents relevant to the keyword “Contract” that have a status equal to “Approved.” |
| More Results Link Text Label | This is the link text displayed next to the “More Results” link. |
| More Results Link Target Results Page Url | This is the target for the link that appears next to the “More Results” link. |
Miscellaneous
This section covers the remaining options for the Search Core Results Web Part. They are discussed in the following table:
| Item | Description |
| Scope | This option limits search results to a particular scope, and will override any scopes that are set in the Advanced Search Box Web Part. This can become a powerful reporting option when paired with the Fixed Keyword Query option. |
| Show Messages | This option allows you to show or hide the No Results or No Keyword messages. |
| Show Search Results | Yes, it's possible to perform a search and not actually display item level results. It may actually even be useful. For instance, you may wish to show a count of search results rather than display each and every item. To go back to our fixed query example, you may wish to display the number of approved contracts but not the full search results. |
| Show Action Links | Action links are the sorting, alert, and RSS links displayed at the top to the search results. Though you can modify the display of each on an item by item basis, this option allows you to enable and disable the lot of them in a single click. |
| Display “Relevance” View Option | This option allows you to show or hide the Results By Relevance sorting link at the top of the search results. |
| Display “Modified Date” View Option | This option allows you to show or hide the Results By Modified Date sorting link at the top of the search results. |
| Display “Alert Me” Link | This option allows you to show or hide the Alert Me link at the top of the search results. |
| Display “RSS” Link | This option allows you to show or hide the “RSS” link at the top of the search results. |
| Sample Data | This field is a place to store a small sample XML block that can be used to test the display XSL. |
| XSL Link | By default, this Web Part uses an embedded XSL document to render the XML search results. This allows you to reference an external XSL document instead. This can be very useful if you'd like to create a single XSL and reference it from various search results pages around and about your portal. |
| Enable Data View Caching | To make sure that search results are not constantly changing when paging through results (and to ease the load on the search server), SharePoint automatically caches the set of search results when the search is initially performed. Turning this option off may present more up-to-the minute data, but due to the fact that most Search content sources are set to crawl every 5 to 10 minutes or so, the results are unlikely to change while a user pages through results. The only thing this is likely to change in most scenarios is the amount of processing power the Search server is utilizing as it issues the same query over and over again. |
| Data View Caching Time-out (seconds) | This sets the duration of the time out for Data View Caching, in seconds. |
| Send first row to connected Web Parts when page loads | Another neat yet underutilized feature. SharePoint allows Search Web Parts to be connected. They can pass data back and forth. This option allow the search results page to automatically trigger the sending of the first row of results data to another Web Part on the same page. |
The Search Core Results XSL
If the Web Part options that the Search Core Results Web Parts provide don't make a pretty enough search page for you, there's one more step, and it's not necessarily for the timid. The Search Core Results Web Part exposes the embedded XSL used to render the XML search results into a Web-friendly format.
XSL is a fairly complicated transformation language that has a fairly steep learning curve. If you're an XSL jock, fire up Notepad and have at it. The rest of us, however, need to tread a little more lightly.
The XSL used by the Search Core Results Web Part is actually three pages in one:
- A No Keywords page that will be displayed if no keywords have been passed to the Web Part.
- A No Results page that will be displayed if the Web Part received keywords for search, but nothing was returned.
- A Results page that renders each search result in a nice tidy list format.
To modify the XSL, open the page in Edit mode; then modify the shared Web Part that is your Search Core Results Web Part. You'll find a section labeled Data View Properties, which, when clicked, reveals an XSL editor button.
Altering the No Keywords Display
Updating the text that is displayed when no keywords have been passed to the Web Part is quite simple. First, find the section of the XSL with the following tag:
<xsl:template name=“dvt_1.noKeyword”>
Immediately below that tag, you'll find code that should look similar to this:
<xsl:template name=“dvt_1.noKeyword”>
<span class=“srch-description”>
<xsl:choose>
<xsl:when test=“$IsFixedQuery”>
Please set the “Fixed Query” property for the webpart.
</xsl:when>
<xsl:otherwise>
Enter one or more words to search for in the search box.
</xsl:otherwise>
</xsl:choose>
</span>
</xsl:template>
You'll notice that two sentences in particular stand out. If your Web Part uses fixed keywords, update the top sentence. If your Web Part does not use fixed keywords, use the bottom sentence.
Altering the No Results Display
This update is a little more complicated, as the page displays additional options. First, find the section of the XSL with the following tag:
<xsl:template name=“dvt_1.empty”>
Immediately below that tag, you'll find code that should look similar to this:
<xsl:template name=“dvt_1.empty”>
<div class=“srch-sort”>
<xsl:if test=“$AlertMeLink and $ShowActionLinks”>
<span class=“srch-alertme” > <a href =“{$AlertMeLink}” id=“CSR_AM1”
title=“{$AlertMeText}”><img style=“vertical-align: middle;”
src=“/_layouts/images/bell.gif” alt=“” border=“0”/><xsl:text
disable-output-
escaping=“yes”>&nbsp;</xsl:text><xsl:value-of
select=“$AlertMeText” /></a>
</span>
</xsl:if>
<xsl:if test=“string-length($SrchRSSLink) > 0 and $ShowActionLinks”>
<xsl:if test=“$AlertMeLink”>
|
</xsl:if>
<a type=“application/rss+xml” href =“{$SrchRSSLink}” title=“{$SrchRSSText}”
id=“SRCHRSSL”><img style=“vertical-align: middle;” border=“0”
src=“/_layouts/images/rss.gif” alt=“”/><xsl:text disable-output-
escaping=“yes”>&nbsp;</xsl:text><xsl:value-of
select=“$SrchRSSText”/></a>
</xsl:if>
</div>
<br/> <br/>
<span class=“srch-description” id=“CSR_NO_RESULTS”>
No results matching your search were found.
<ol>
<li>Check your spelling. Are the words in your query spelled correctly?</li>
<li>Try using synonyms. Maybe what you're looking for uses slightly different
words.</li>
<li>Make your search more general. Try more general terms in place of specific
ones.</li>
<li>Try your search in a different scope. Different scopes can have different
results.</li>
</ol>
</span>
</xsl:template>
Okay, if you're not an XSL jock, don't be intimidated. This is still pretty straightforward. There are a few things you update here. The top section (everything within the first set of <div> tags) governs the Action Links. These can be updated using the Web Parts options.
To alter the text displayed, update this section inside the <span> tags as follows:
<span class=“srch-description” id=“CSR_NO_RESULTS”>
No results matching your search were found.
<ol>
<li>Check your spelling. Are the words in your query spelled correctly?</li>
<li>Try using synonyms. Maybe what you're looking for uses slightly different
words.</li>
<li>Make your search more general. Try more general terms in place of specific
ones.</li>
<li>Try your search in a different scope. Different scopes can have different
results.</li>
</ol>
</span>
Altering the “No results …” code should be fairly self-explanatory. The items below that are a list of suggestions for the user. The <ol> tag starts the list. Each list item is surrounded by <li> and </li> tags. Feel free to modify or delete the text or add new list items if needed. For instance, you might try adding another line item by inserting the following:
<li>If you feel your search results are in error, feel free to
contact Bill Gates at his
home number (206) 55 . .</li>
Altering the Results Display
This is where things can get a little tricky. The search results section of the XSL code gets a bit complex. To directly edit the XSL requires an in-depth knowledge of XSL syntax that is well beyond the scope of this book.
However, all is not lost. There's a bit of sleight of to hand that you can use to get a more attractive layout for search results. If you recall, there are two parts the search results: the XML search results and the XSL that renders the results into a readable format.
Great news: There are free and not-so-free WYSIWYG XSL editors, such as Treebeard (http://treebeard.sourceforge.net/) or <oXygen/> (oxygenxml.com/). All you would need is a chunk of search result XML code to convert.
But, you say, the XML is converted to HTML before it's sent to the browser, before it can be displayed. If only there was some way to get the XML data directly. The Search Core Results Web Part won't run without XSL to translate the XML.
Fortunately, there is. The trick, in this case, is to use a pass-through style sheet. This will allow the XML code to be displayed directly in the Web browser. It's a bit of a hack, but like all other great hacks, it actually works. To implement this hack, do the following:
1. Open the XSL editor in your Web Part's properties menu.
2. Select all the text in the XSL section and delete it. You could save it if you'd like, but if all goes well, you won't need it again.
3. Paste in the following XSL code:
<?xml version=“1.0” encoding=“UTF-8”?>
<xsl:stylesheet version=“1.0” xmlns:xsl=“http://www.w3.org/1999/XSL/
Transform”>
<xsl:output method=“xml” version=“1.0” encoding=“UTF-8”
indent=“yes”/>
<xsl:template match=“/”>
<xmp><xsl:copy-of select=“*”/></xmp>
</xsl:template>
</xsl:stylesheet>
This style sheet simply passes the search results directly to the page.
4. Click OK to exit the XSL editor, then OK again to leave the page's Edit mode.
5. Run a search query. Rather than displaying well-formatted HTML, you'll get something similar to this rather unappetizing chunk of XML:
<All_Results>
<Result>
<id>1</id>
<workid>3189</workid>
<rank>892</rank>
<title>Search</title>
<author>Coskun Cavusoglu</author>
<size>0</size>
<url>http://www2.mossman.com/Search</url>
<urlEncoded>http%3A%2F%2Fwww2%2Emossman%2Ecom%2FSearch</urlEncoded>
<description></description>
<write>4/15/2008</write>
<sitename>http://www2.mossman.com/Search</sitename>
<collapsingstatus>0</collapsingstatus>
<hithighlightedsummary>
<c0>Search</c0> <ddd /> <c0>Search</c0> <ddd /> <c0>Search</c0>
<ddd /> Advanced
<c0>Search</c0> <ddd /> <c0>Search</c0> <ddd /> <c0>Search</c0>
<ddd />
<c0>Search</c0> <ddd /> <c0>Search</c0> </hithighlightedsummary>
<hithighlightedproperties>
<HHTitle>
<c0>Search</c0>
</HHTitle>
<HHUrl>http://www2.mossman.com/<c0>Search</c0></HHUrl>
</hithighlightedproperties>
<contentclass>STS_Web</contentclass>
<isdocument>0</isdocument>
<picturethumbnailurl></picturethumbnailurl>
<imageurl imageurldescription=“Result of type:
site”>/_layouts/images/STS_Web16.gif</imageurl>
</Result>
<Result>
<id>2</id>
<workid>4087</workid>
<rank>887</rank>
<title>Search</title>
<author>David Drinkwine</author>
…
</ All_Results>
If you look closely, you start to see a pattern. Each <Result> node corresponds to an individual search result.
6. Copy the entire block of XML and paste it into a text file. Save the file with an XML extension.
7. Open up your WYSIWYG XSL editor and go to town. Make whatever changes or modifications that you like.
8. When you're done copy the XSL text to your clipboard.
9. Re-open the XSL section of your Web Part's properties.
10. Delete all text in the XSL section.
11. Paste in your nest XSL text from the clipboard.
12. Save and close.
The Content Query Web Part, Revisited
One of SharePoint's longstanding limitations is its difficulty in sharing information between sites. It's possible to construct custom Web Parts that would function as a crawler and walk through a large number of list items on request, but this approach would be cumbersome and slow.
As you saw in Chapter 10, the Content Query Web Part is a nice way to aggregate information from across your portal. One of the best things about this Web Part is that it pulls information from the search index avoiding the need to crawl portal information in real time.
There are a few key Web Part properties that you can set to leverage your search index customizations. To access the Web Part properties of your Content Query Web Part, change the page to Edit mode, and click the Modify Shared Web Part link on the Web Part's dropdown.
The key areas you'll be interested in will be the Content Type section and the Additional Filters section.
Content Type
At last, you can start to leverage your search customizations. The following table shows available options.
| Item | Description |
| Show items of this content type group: | This dropdown helps pare down the list of selectable content types into manageable chunks. |
| Show items of this content type: | This dropdown will display a subset of content types, including custom types that may be available on the server. You must choose one and only one content type. |
| Include child content types | This gives a little flexibility. If the content type you selected has child content types, they also will be included for display. For instance, a Vacation Request content type may be a child of an HR content type. |
Additional Filters
SharePoint allows you to filter based on properties. This functionality looks and acts just like the filter and grouping functionality used to create views for SharePoint lists. Remember, of course, that any custom fields must be manually added.
Content Query Parts vs. Fixed Keyword Core Search Results
As noted previously, the Content Query Web Part can display information that spans your portal, but is extremely limited in how it can refine the data. The Search Core Results Web Part, when configured with a fixed keyword, on the other hand, is extremely robust in its ability to display complex data. The following table compares the functionality of the Search Core Results Web Part with that of the Content Query Web Part:
| Feature | Search Core Results Web Part (Fixed Keyword) | Content Query Web Part |
| Displays information from multiple sites using the search index? | Yes | Yes |
| Can take advantage of content types? | Yes | Yes |
| Interface can be customized? | Yes | Yes |
| Easy to use? | As complex as you'll let it get | Yes |
| Can limit display to certain list types? | No | Yes |
| Can limit display to specific scopes? | Yes | No |
| Can utilize Managed Properties? | Yes | No |
| Can access Business Data Catalog information? | Yes | No |
As you can see, both Web Parts have their advantages. Your needs will determine which Web Part you use.
The Search Center
A brief note on the Search Center site template: This site template is featured prominently in SharePoint's product literature and understandably so. It provides for a prefabricated set of search and search results pages that are conveniently separated into tabs. It can be a real time saver.
However, as you've seen upto this point, the Search Center site need not be the only place for search. Creating a blank SharePoint site and adding a selection of search and result pages would achieve the same results.
Unfortunately, SharePoint doesn't read minds. Let's assume for a moment that you've done everything listed in this chapter and the search results still aren't what you'd like them to be. Fear not; there are still a few things that you can do to override SharePoint's search algorithms.
But first, let's look at how SharePoint ranks search results. There are a large number of variables that go into deciding which end of a set of search results to put any particular item. It is programmatically possible to alter the search algorithm, but that is well beyond the scope of this book. Besides, there are more than a few ways to alter the way that search results are returned without having to crack open Visual Studio.
Search Ranking Factors
First, let's look at some of the factors that the Search uses to rank results:
- Text Analysis This is what most people think when they think of search. It uses things like word frequency, variations on words and matching terms to place things with a set of search results. If one document uses the search term three times and another uses a term 50 times, the document with 50 hits is ranked higher.
- Hack Use Keywords and Best Bets. See the following section on this topic. Make sure your documents use key search terms as many times as possible. This is not necessarily a good hack, but it will work.
- Metadata If the search term is featured in the item's metadata, it's more likely to be ranked highly.
- Hack Train users to use metadata or make the column required in every list.
- Metadata Extraction Documents created by Microsoft Office applications (as well as a few third-party applications) automatically tag some document metadata, such as Title or Author. In some cases, the list or library metadata will be populated when the user uploads the document, but not in all cases. SharePoint Search, on the other hand, extracts this metadata when it can and figures it into the search rankings.
- Hack There's not a lot that can be done in this area, other than training users to enter metadata on their documents.
- URL Depth The farther the item is from the top-level site, the farther down the ranking the item will be. The assumption is that top-level sites are more important.
- Hack Place key document libraries or lists as close to the top-level site as possible.
- URL Matching If a search result's URL contains the search term you're looking for, it will be ranked higher than those without the search term. For instance, if a user is searching on the phrase “Accounting,” anything on a site that has “accounting” in the URL will win over those placed elsewhere.
- Hack Name key sites carefully and use descriptive URLS.
- Generically Named Content Office documents create a default name if they're saved without intervention from a user. It's a pretty safe assumption that you have a few “document1.doc” or “book1.xls” files on your hard drive somewhere. These are automatically ranked lower. The assumption is that if the user didn't take the time to name the document, it's probably not all that important.
- Hack Train users to name their documents. SharePoint is all about sharing, and not naming your documents isn't very conducive to this. Strangely, this is still a problem in some organizations.
- File Type Bias SharePoint considers some file types to be more important than others. PowerPoint presentations are ranked higher than Excel spreadsheets, and HTML documents are ranked higher than Word Documents.
- Hack Unfortunately, not very hackable. After exhaustive research, a definitive list of file bias could not be found before this book was completed. Though this can affect search results, most file types are created for a very specific purpose. Presentations work best in PowerPoint, spreadsheets work best in Excel. That being said, testing has shown that Microsoft Office documents consistently ranked higher than PDF equivalents.
- Distance from Authoritative Pages SharePoint allows you to define some pages in your portal as more important than others.
- Hack Not much of a hack, as it's pretty well documented, but making the most of Authoritative Pages can help keep key documents at the top of search rankings. See the following section on this topic.
- Demoted Sites Functionally the opposite of Authoritative Pages. SharePoint also allows you to designate some sites as poor candidates for search.
- Hack Again, not much of a hack, but demoted sites do affect ranking.
Key Words and Best Bets
Keyword and best bets allow you to override SharePoint's built-in ranking algorithms. They let you decide what the best results are, regardless of what data users have put in the portal, and this is not without risk. It removes the dynamic nature of search. So, unless there are documents or pages in your portal that remain fairly static, you may need to manually update keywords, best bets, or both on a fairly frequent basis.
How do you define keywords? Unlike most other search functions, keywords are set in the site collections Site Settings section. Click Search Keywords under the Site Collection Administration section to navigate to the Manage Keywords section, and click Add Keyword. The Add Keyword page shown in Figure 12-10 opens.
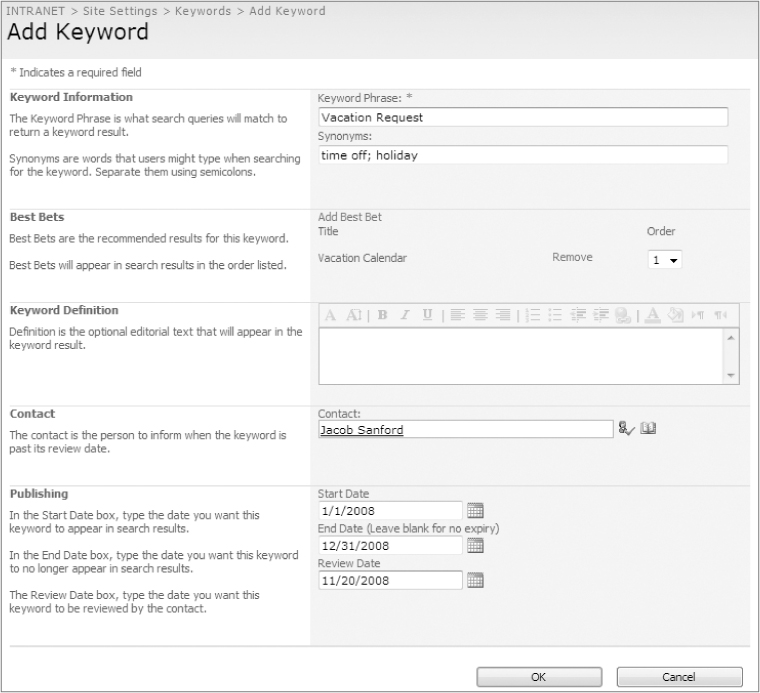
Like most SharePoint forms, the Add Keyword page is fairly self explanatory. It allows you to not only define a specific keyword, but also to define synonyms, saving considerable time if you have many keywords that mean essentially the same thing.
The next step is to start adding best bets for the keyword. In the Best Bet section, click the Add Best Bet link and fill out the resulting form. (See Figure 12-11.) Again, the form is fairly simple: Enter the target URL, a Title, and if you'd like, a description for the target page; then save the best bet. Note that you can add multiple best bets as needed.
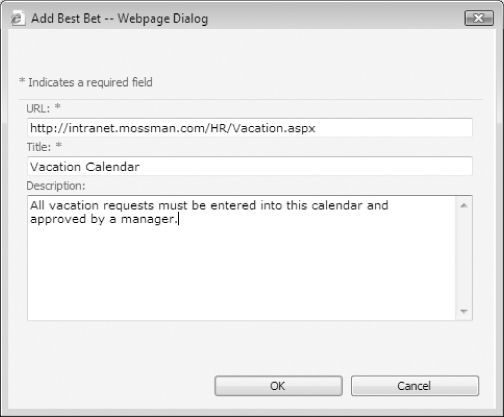
There are a few other fields on the page that should help you administrate keywords and best bets as you move on, but they are not required.
That's it. You've successfully overridden SharePoint's search ranking.
Authoritative Pages and Demoted Sites
Kids love playing “Hot and Cold.” You probably played it as well. To help find something hidden, one kid (the hider) would yell out “Cold,” or “Warm” or “BURNING UP” the farther or closer you were from whatever was hidden. That's what you're doing when you set up authoritative pages and demoted sites. You're yelling “HOT” or “COLD” to SharePoint Search.
To set up an Authoritative Page, open your Shared Service Provider in SharePoint Central Administration and open the Search Settings. Click Specify Authoritative Search Pages. The Specify Authoritative Pages page will appear as shown in Figure 12-12.
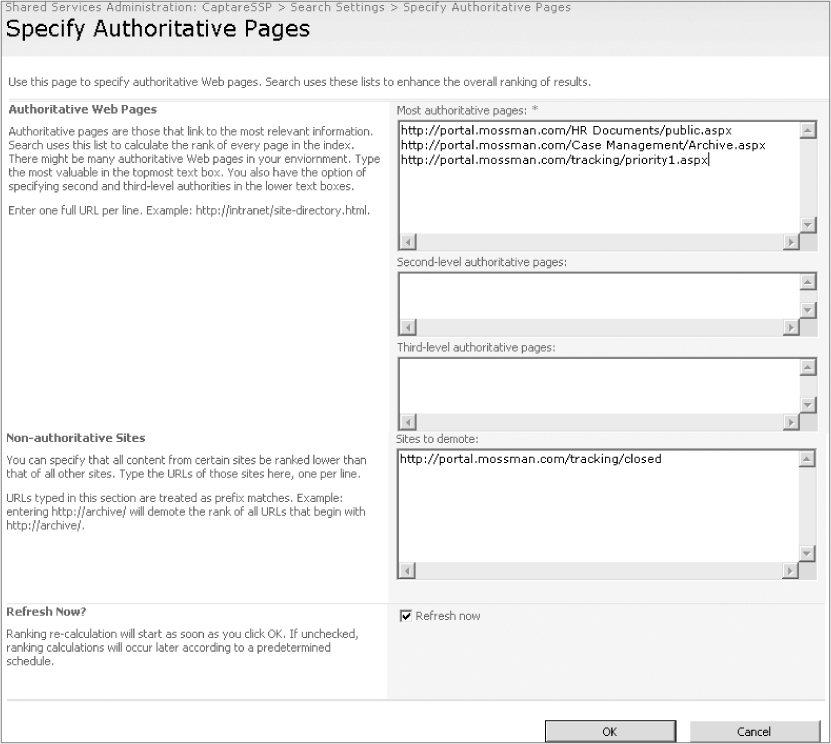
To add an authoritative page, simply add its URL to the Authoritative Web Pages section. You can also specify a ranking to your pages by placing them in the second-level and third-level authoritative page sections. These correspond to “Pretty Hot” and “Warm,” respectively.
Lastly, the equivalent of “Cold” is the Non-authoritative Sites section. Placing a URL in this box tells SharePoint to rank results lower for items that are on or near the site in question.
If this chapter teaches you anything, it's that providing great enterprise search capabilities is all about planning. Good preparation should include:
- Getting good data Plan ahead to use your company's taxonomy to make the best use of metadata, content types, and managed properties.
- Tell SharePoint how to carve up your data Use content sources and scopes to take advantage of segregating your search into logical chunks. The less SharePoint has to pour over every time it gets a search request, the more accurate the results will be.
- Give your users the tools they need to access search A Search Center, advanced search and results interfaces, and Content Query Web Parts.
And that, at the end of the day, is how you give your users an accurate search.