Chapter 8: Shipping and Transportation
This chapter covers the Distribution part of SD Module. The processes and configuration discussed in this section are grouped in SAP under a separate application called Logistics Execution. In this chapter, you will study the order fulfillment process steps, including creating a delivery document, picking, packing, shipment, goods issue, and transportation of the goods to the customer. The same steps are also applicable to handling customer returns, which result in an inbound delivery and goods receipt.
In most cases, a delivery is created with reference to a sales order. A lot of business data must be copied from order to delivery. We will cover the copy control in this chapter. We will also be referring to certain topics covered in Chapter 7, “Sales.” Other settings that are applicable to deliveries are covered in Chapter 4, “Partner, Text, and Output Determination,” and Chapter 5, “Pricing and Tax Determination.”
Shipping is part of the order fulfillment process. It starts with the creation of a delivery document. This document can be created with or without reference to a preceding sales document.
The typical process consists of delivery document creation (commonly called delivery creation), followed by picking, packing, shipment, and goods issue:
Delivery creation In a sales order, when the material availability date or transportation scheduling date is reached, the order becomes due for delivery, and it is time for various planning and execution activities to start. The delivery document is the medium of conveying the information to the Logistics Execution team. In most organizations, this team is located at a different location (a plant, shipping point, or warehouse) from the sales team.
Picking Picking is an optional step. It involves the physical pickup of goods from their storage place and setting them aside for shipping. Hence, some of the items in the delivery document (such as services) may not be relevant for picking. The picking process can be done automatically during delivery creation or can be a scheduled activity that takes place in batches at regular intervals.
Packing Packing is the step of assembling all the picked items and packing them. It can be a multistep process, such as packing musical instruments into a special box, then packing six such boxes into a crate, and finally loading ten crates into a truck. All of these groupings are called handling units. Each one can be located and managed by a unique identification number.
Shipment Shipment is the step of transportation planning and execution. In this step, one or more deliveries are grouped into a shipment document. The transportation for the various legs is then planned, and as each leg is executed, the shipment document status is updated until the goods reach the customer.
Goods issue Goods issue is the last step. When you post a goods issue, the delivery has physically been shipped. The material and accounting documents get created in the background, and the user cannot change or influence any data at this stage.
With this overview out of the way, we’ll now cover how the process is carried out in SAP. Then we will proceed with the configuration of this process.
Delivery Creation
A delivery document can be created in several ways. Based on your requirements, you can create an individual delivery manually or use a batch program that runs a delivery-due list and creates deliveries.
Before a delivery is created for a sales order, the system carries out the following checks:
- Is the sales order data complete?
- Are the items in the order relevant to delivery creation?
- Is there a credit block or a delivery block?
- Are the schedule lines for one or more items in the order due for delivery?
- Has the customer asked for complete delivery?
The Delivery Creation Process
In SAP, a delivery can be created as an individual document or in batch mode by running periodic jobs.
Creating Individual Delivery from the Logistics Execution Menu
To access this menu, the menu path is as follows: SAP Menu Logistics Logistics Execution Outbound Process Goods Issue For Outbound Process Outbound Delivery Create Single Document Create With Reference To A Sales Order (VL01N).
Take a look at Figure 8-1. The shipping point is the most important organizational unit in delivery creation. Specify the shipping point from where the delivery would originate. Also enter the sales order number and (if needed) the range of items for which this delivery is to be created.
Figure 8-1: Creating a delivery using VL01N
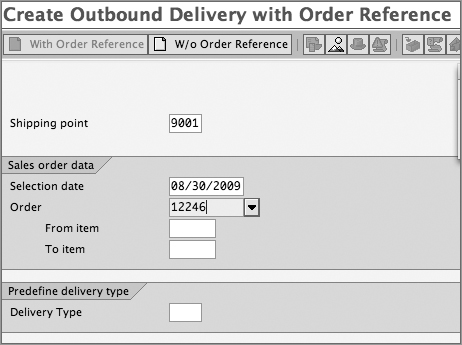
You can also create a delivery without any sales order reference. Follow the same menu path as shown earlier, and choose Create Delivery Without Order Reference (VL01NO). In this case, because there is no reference sales order, you also have to specify the sales area.
Creating Individual Delivery from Within the Sales Order Screen (VA01 or VA02)
From the sales order screen, you can use the menu Sales Document Deliver to create a delivery.
You can use this option only if you are authorized to create sales orders and deliveries.
Collectively Processing Documents Due for Delivery
When the volume of sales transaction is very high, it is convenient to create deliveries in batches by executing a delivery-due list. To access the transaction codes, the path is as follows: SAP Menu Logistics Logistics Execution Outbound Process Goods Issue For Outbound Process Outbound Delivery Create Collective Processing Of Documents Due For Delivery.
As you can see, there are several transaction codes in the list in Figure 8-2, offering various selections to choose from. The program called up in each case is the same; the variations are controlled from the User Role tab. Thus, the transaction codes offer different selection criteria to call up and execute a list of documents due for delivery. Figure 8-3 shows one such transaction—VL10A—from the list.
Figure 8-2: Collective delivery processing menu
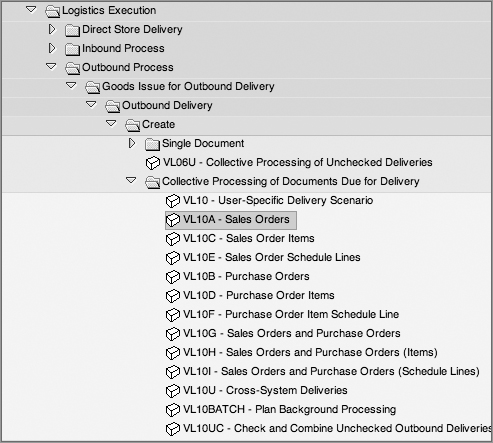
Figure 8-3: Collective processing with VL10A
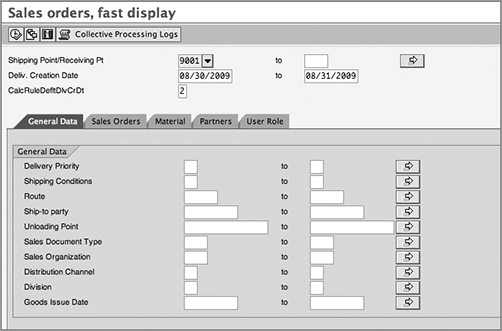
Using these variants, you can also set up a batch job to run at certain intervals and create deliveries in the background.
Customizing Delivery Documents
We’ll now cover the important settings required to configure a delivery document and control the data flow in it.
Setting Up the Delivery Type
The first step in the configuration is to set up a delivery document. The path to configure delivery types is IMG Logistics Execution Shipping Deliveries Define Delivery Type (0VLK).
You can create a new delivery type or copy from an existing entry. You can refer to the SAP standard delivery type LF.
Figure 8-4 shows the configuration screen for delivery types. We’ll discuss some of the critical settings in this screen. Please note that we are not discussing every option on this screen here—just the most important ones.
Document Category The Document Category field at the top of the screen is used by the system to classify various documents (such as sales documents, deliveries, billing documents, and so on). For a standard delivery, this category is J.
Number Systems tab This is where the delivery documents can be assigned an internal or external number range
NR Int. Assgt Assign the internal number range in this field.. In the case of an internal number, the system assigns the next available number to each new delivery that is saved.
No. Range Ext Specify an external number range in this field. For external number ranges, the user can specify a number from within the number range specified. As in the case of number ranges for sales documents, you can define the number range intervals for delivery in a separate transaction.
ItemNoIncrement This field is used to specify the interval between successive items in the delivery.
Order Reference tab The following are the important fields on this tab:
Order Required field The Order Required field is used to specify the document type to be referenced in the creation of this delivery. In the case of standard SAP delivery LF, you would specify X (Sales Order Required). However, other deliveries, such as NLCC (a cross-company replenishment delivery), are created with reference to a purchase order. Hence, the value is B (Purchase Order Required). Some deliveries are created without reference to any preceding document. An example is document type LO. In this case, the field is blank (meaning no preceding document is required).
Default Ord. Ty. Specify the default order type here. If a delivery is to be created without reference, you need to specify a “pseudo” order type, which is a reference order type that is required from an internal control point of view. For example, in the case of delivery type LO, the default order type is DL. This order type is configured like any other sales document.
ItemRequirement This is a provision to attach a requirement routine for delivery items without reference to a sales document.
Figure 8-4: Setting up a delivery type
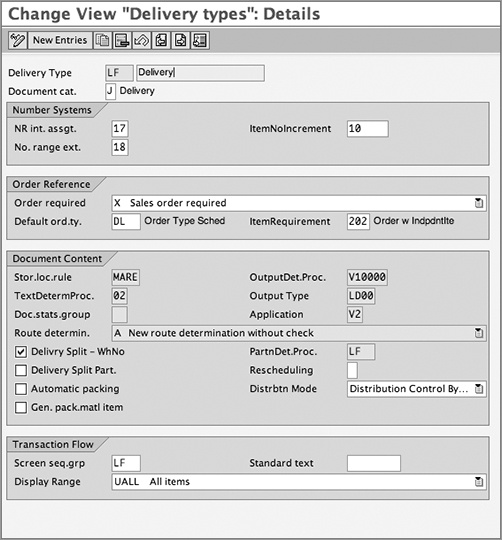
Most of the fields on the Document Content tab cannot be changed from this transaction. They appear here in display mode only.
Defining Delivery Item Categories
The Item Category field controls how the system processes the delivery item. It is conceptually similar to the Item Category field in a sales document.
To set up item categories, the path is IMG Logistics Execution Shipping Deliveries Define Item Categories For Deliveries (0VLP).
If you have to define a new item category, it is advisable to copy it from an existing standard one. This ensures that all the critical fields are copied over, and then you only have to change those fields that you want to change from original.
We’ll now discuss some of the major fields in the delivery item categories screen, as shown in Figure 8-5.
Figure 8-5: Setting up a delivery item category
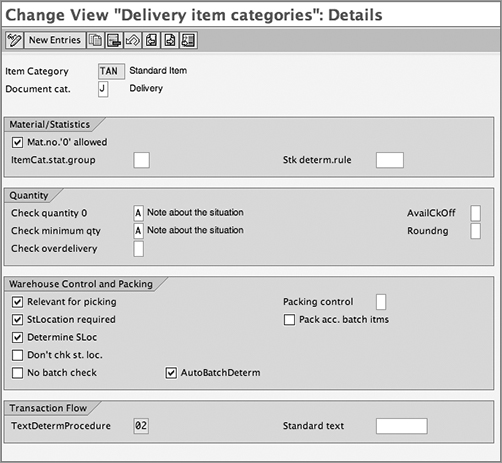
Quantity tab There are certain controls based on quantity in the delivery. Through the settings on the Quantity tab, the system can check for zero quantity and respond with an error or a notice. Similarly, you can control the checks for a minimum delivery quantity and over-delivery situation.
Warehouse Control And Packing tab On the Warehouse Control And Packing tab, you can decide whether picking and packing are relevant for this item category. In the case of packing relevance, you can also specify whether it is mandatory or optional. We will discuss the processes of picking and packing later in this chapter. You can also control the role of storage location in the delivery. You can make it a mandatory field in the document. You can also request automatic determination of storage location. (We will return to this a little later in this chapter.)
Determining Item Category
In Chapter 7, we discussed item category determination in sales documents. In deliveries, the item category is determined along similar lines. The following are the determining factors:
- Delivery type
- Item category group
- Item usage
- Higher-level item category
In the case of items copied from a sales document into a delivery, the item category determined in the order is copied over. Items created without reference or added new in the delivery would follow the rules of item category determination.
The Item Category Group setting comes from the material master record. Item category usage, however, can be defined using the path IMG Logistics Execution Shipping Deliveries Define Item Category Usage. Specify a four-character usage. You can then use this as a key in item category determination.
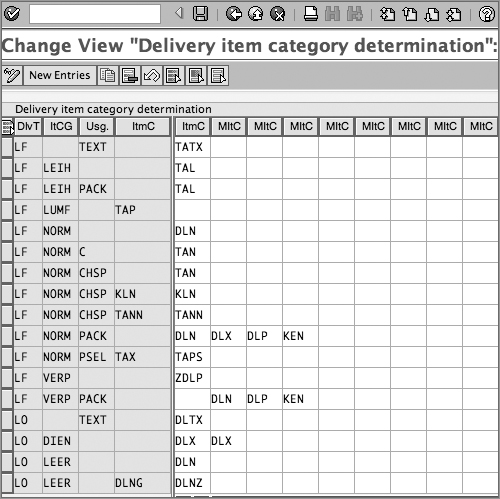
To set up item category determination, the path is IMG Logistics Execution Shipping Deliveries Define Item Categories Determination In Deliveries (transaction 0184).
As shown in Figure 8-6, for each combination, you can specify a default item category and other permitted item categories that the user is allowed to change in the delivery document.
Figure 8-6: Item category determination
Setting Up Copy Controls for Deliveries
In the case of deliveries that are created with reference to a sales document, you have to control the flow of data into the delivery. This step ensures continuity of data, copies essential information, and avoids manual data inputs in delivery creation. The copy controls between sales and delivery documents can be controlled at the Header and Item levels using copy routines. The copy controls can be set up as follows: IMG Logistics Execution Shipping Copying Controls Specify Copy Controls For Deliveries (VTLA).
Select the source and target documents.
At the Header level screen, there are three tabs, as shown in Figure 8-7.
Conditions tab Here is a summary of the main options on the Conditions tab:
Order Requirements routine On the Conditions tab, there is an Order Requirements field. The copy routine assigned here checks whether certain prerequisites are fulfilled before a delivery can be created from a sales document.
Combination Requirement routine The Combination Requirement routine checks for certain conditions to be met before multiple sales documents can be combined into a single delivery.
Data Transfer tab Here is a summary of the main option on the Data Transfer tab:
Header Data routine The Header Data routine controls the data that is copied from order to delivery. Technically speaking, if you want certain data to be copied from the VBAK (order header) table, for example, and the destination is the LIKP (delivery header) table, you can set up a routine and attach it here.
Control Data tab If you select the check box Copy Item Number on the Control Data tab, the items would retain the same item number as in the sales document. It would make sense to keep this check box selected if you are dealing with large orders that may result in multiple deliveries and post-delivery analysis is required.
At the item level, you have to specify the Item category and select the Details view, as shown in Figure 8-8.
Figure 8-7: Order to delivery, copy controls at Header level
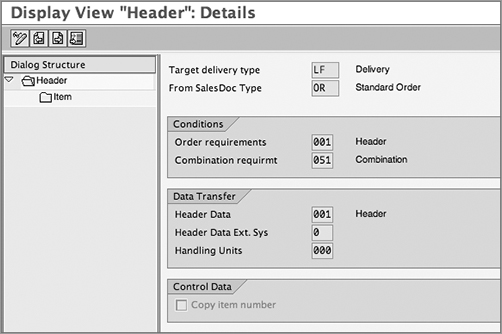
Figure 8-8: Order to delivery, copy controls at Item level
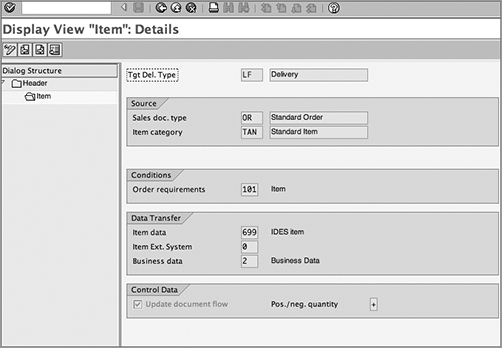
Conditions tab The Conditions tab has an Order Requirement routine that performs item-level checks before the order is copied into the delivery.
Data Transfer tab Here is a summary of the main options on the Data Transfer tab:
Item Data routine The Item Data routine on the Data Transfer tab controls the data that will be copied at the Item category level. Technically, the data in the LIPS (delivery item) table is controlled here.
Business Data routine The Business Data routine controls the copying of business data. If you need any data stored in the VBKD table to be copied over into your delivery, this is the routine you can use.
Control Data tab The Update Document Flow setting on this tab controls whether the source and destination documents will be shown as linked in the document flow.
Determining the Shipping Point
The shipping point is the organizational unit for a delivery. In Chapter 2, “Enterprise Structure,” we discussed the relevance of shipping points.
A shipping point is determined based on the following criteria:
- Plant
- Shipping conditions
- Loading groups
We’ll now discuss each of these determining factors and how they influence shipping point determination:
Plant The delivering plant is determined in the sales order line item. To determine a plant, the system looks up the customer-material information records. If the plant is not specified there, it then checks the customer master for a preferred plant. If no such preference is maintained for a customer, it is determined from the delivering plant field in the material master.
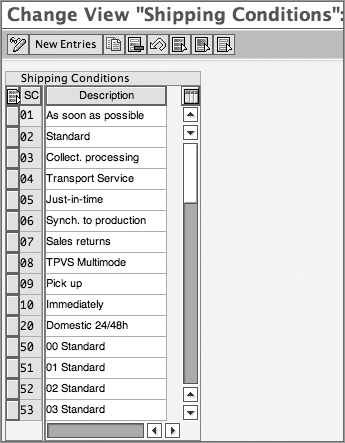
Shipping conditions The shipping condition defines the strategy for the delivery. For example, there can be different shipping conditions for regular delivery and express delivery. This field is specified in the customer master record on the Shipping tab. You can also assign a shipping condition to a sales document type. In the sales order, a user can manually override shipping conditions.
To define a shipping condition, follow the path IMG Logistics Execution Shipping Basic Shipping Functions Shipping Point And Goods Determination Point Determination Define Shipping Conditions. As shown in Figure 8-9, you can either use an existing set of conditions or define a new one here.
Figure 8-9: Defining shipping conditions
You can assign a shipping condition to a sales document type and overrule the value coming from the customer master. The menu path is as follows: IMG Logistics Execution Shipping Basic Shipping Functions Shipping Point And Goods Determination Point Determination Define Shipping Conditions By Sales Document Types.
Select the document type from the list. Assign a shipping condition to the document type. Now, whenever this order is created, the shipping condition will be picked up from this setting rather than referring to the customer master.
As shown in Figure 8-10, we have assigned shipping condition 07, which is Sales Returns, to the sales document type RE. In this case, the returns can be diverted to a different receiving point.
Figure 8-10: Assigning shipping conditions to a sales document type

Loading group A loading group is a grouping of materials with same loading requirement. For examples, materials that require the same equipment (cranes, forklifts) can be placed together in a common loading group. The loading group is copied from the material master record. To define a loading group, follow the path IMG Logistics Execution Shipping Basic Shipping Functions Shipping Point And Goods Determination Point Determination Define Loading Group.
As shown in Figure 8-11, you can create loading groups that are four characters long. This field is then used in the material master, specifically, in the Sales: General/Plant data view. For example, we have used the manual loading group 0003 (Manual Loading) for the material master 1628, as shown in Figure 8-12.
Once you have configured the factors that influence shipping point determination, you have to set up the determination rules.
Follows the menu path IMG Logistics Execution Shipping Basic Shipping Functions Shipping Point And Goods Determination Point Determination Assign Shipping Points.
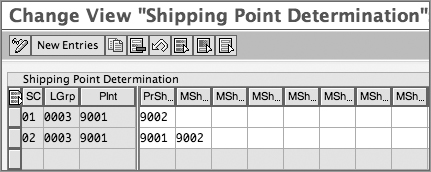
Click New Entries, and specify a combination of plant, shipping condition, and loading group. Assign a default shipping point. You can also specify other shipping points that the user will be allowed to change manually (Figure 8-13). See the case study “Galaxy Musical Instruments: Shipping Point Setup” for an example of how this works.
Shipping point determination can also be carried out based on storage location, in addition to the factors mentioned earlier. The settings are similar to those you have already seen. The menu path is IMG Logistics Execution Shipping Basic Shipping Functions Shipping Point And Goods Determination Point Determination Set Up Storage Location–Dependent Shipping Point Determination.
Figure 8-11: Define loading groups
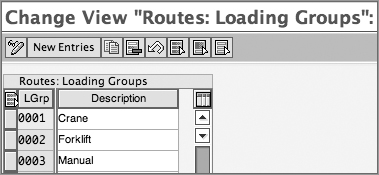
Figure 8-12: Key fields in material master, Sales: General/Plant view
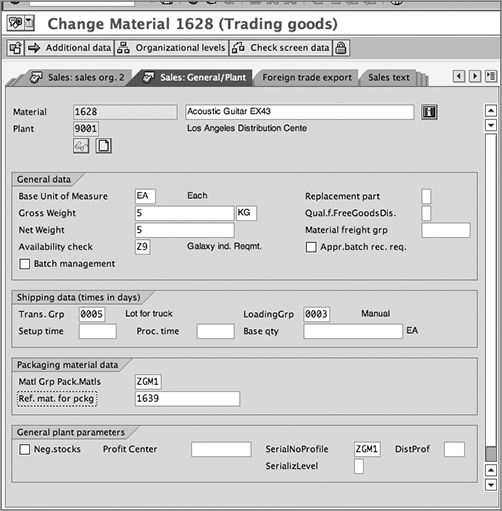
Figure 8-13: Shipping point determination
Defining Delivery Blocks
It is sometimes necessary to block an order from being delivered. You can either block an entire order or certain schedule lines from delivery. We discussed the definition and assignment of delivery blocks in Chapter 7.
Note that besides defining the block reasons, it is important to assign it to a delivery type.
The menu path is as follows: IMG Logistics Execution Shipping Deliveries Define Reasons For Blocking In Shipping Delivery Blocks.
CASE STUDY—Galaxy Musical Instruments: Shipping Point Setup
There are two shipping points defined for the Los Angeles Distribution Center (Plant 9001) of Galaxy Musical Instruments:
- 9001: Regular shipping point
- 9002: Express shipping point
This enables Galaxy to segregate and prioritize urgent shipments. The delivery-due list for the express shipping point is run every hour.
The shipping conditions are used to show the urgency of the order. The following shipping conditions are used:
- As soon as possible
- Regular
Loading group 0003 is used in the material master for all the products.
The shipping point determination is as follows:
Plant + Shipping Condition + Loading Group = Shipping Point
9001 + 01 + 0003 = 9002
9001 + 02 + 0003 = 9001
Thus, the shipping condition for expedited shipping (01) points to the express shipping point (9002).
Also note that in the case of the regular shipping condition (02), the user is allowed to manually change the shipping point to 9002. Galaxy uses the Manual Shipping Point field for this purpose.
Picking
Picking is the process of physically collecting the items to be shipped. It can be done in the plant or in a warehouse location. If the Warehouse Management (WM) module of SAP has been implemented, then the picking process is carried out there, through a document called transfer order.
The Picking Process
You can access the picking screen in delivery create/change transactions. When picking has been completed in the warehouse, you can update the quantity in the picking tab of the delivery document.
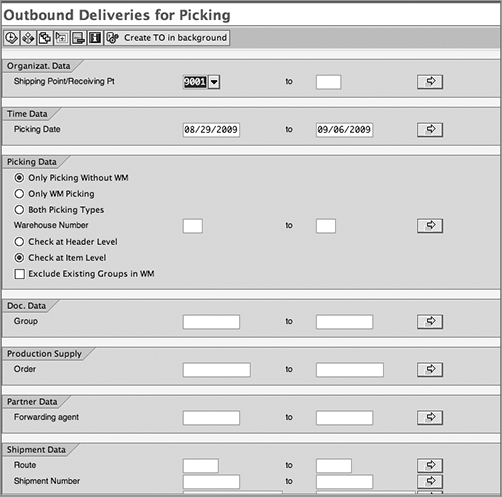
The transaction VL06P generates a list of all deliveries that are due for picking. This list helps in planning the workload for the day. Used in conjunction with WM, you create transfer orders en masse with this transaction.
Customization for Picking
The following sections describe some important settings you will need to know in order to configure the picking process in SAP.
Determining Relevance for Picking
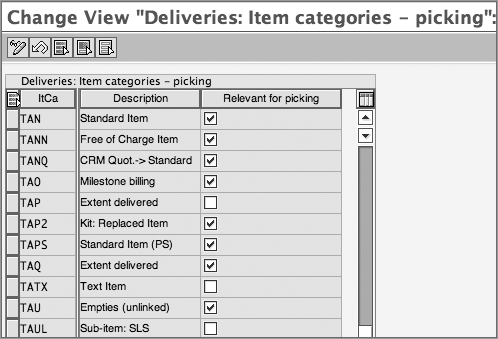
You can activate picking using the transaction OVLP. The path is IMG Logistics Execution Shipping Picking Define Relevant Item Categories.
Refer to Figure 8-14. On this screen, select the item categories that are relevant to picking, and activate the picking flag.
Figure 8-14: Item categories relevant to picking
Specifying Rules for Picking Location
When you mark an item as relevant to picking, you have to specify the location from where it is to be picked up. In SAP, this is the storage location. To make these settings, you need to work in consultation with your WM or MM/IM team to get the list of storage locations where the finished product will be stored.
Storage locations can be determined automatically in the delivery. Two options, or rules, are predefined in SAP (the MM module) for this purpose:
- MALA rule: The storage location is determined based on plant, shipping point, and storage condition.
- RETA rule: The storage location is determined based on plant, shipping point, and situation.
The details of these rules are not in the scope of SD. For purposes of this discussion, we will use the MALA rule. To select the rule, the path in customization is as follows: IMG Logistics Execution Shipping Picking Determine Picking Location Define Rules For Picking Location Determination.
In this setting, you can assign the rule for every delivery type.
Setting Up Automatic Picking Location Determination
The factors that determine the picking location (storage location) are the plant, shipping point, and storage condition. By now you should be familiar with the terms plant and shipping point. These have already been determined in the delivery. We’ll now cover the third factor, storage condition.
This field is maintained in the material master and is used to signify the conditions in which the item is to be stored. (For example, refrigeration is a special storage condition.)
To define the possible storage conditions in customization, the menu path is IMG Logistics Execution Shipping Picking Determine Picking Location Define Storage Conditions.
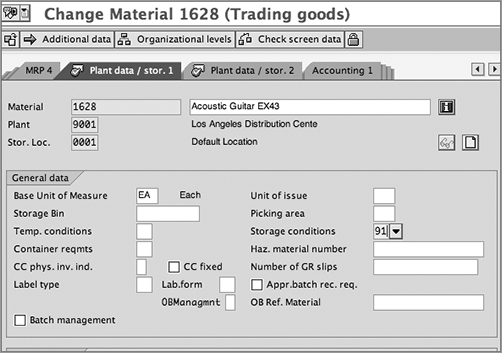
As shown in Figure 8-15, you can define a two-digit code for the new storage condition and add a description. In the case of Galaxy, there are two special storage conditions: 90 and 91. This field appears in the material master in the Plant Data/Stor. 1 view (see Figure 8-16).
Next, we will cover how to set up the actual determination of storage locations.
Use the menu path IMG Logistics Execution Shipping Picking Determine Picking Location Assign Picking Location. Then, specify the storage location for each combination of plant, shipping point, and storage condition.
Figure 8-15: Defining a storage condition
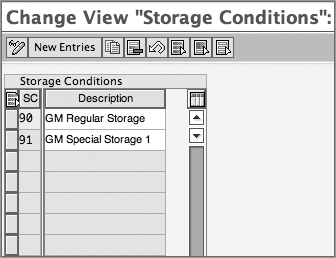
Figure 8-16: Assigning a storage condition in the material master
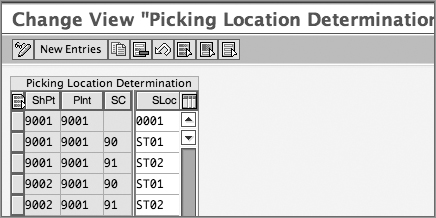
In Figure 8-17, we specified a storage location for plant 9001, shipping points 9001 and 9002, and each storage condition.
Also note that we included a general record (in the first row) without specifying any storage condition. This means that for materials for which we haven’t specified any special storage condition, the default storage location 0001 will be picked up based on plant and shipping point alone.
Figure 8-17: Storage location determination
Picking with Transfer Orders in Warehouse Management
If warehouse management has been implemented for a storage location, the picking process will be carried out in the Warehouse Management application of SAP.
If this is the case, there is an additional transaction: creating a transfer order (LT03). The picking process is then carried out in WM. Based on the requirements in the transfer order, the stock is physically picked up from the storage bins in the warehouse. Once the process is completed, the transfer order is confirmed using transaction LT12.
The remaining steps in the logistics execution process are then carried out in the delivery document.
Wave Picking
In large warehouses or plants, picking runs are planned in advance. The deliveries that are due for picking at around the same time are grouped together. This process, called wave picking, enables the picking team to go around the warehouse and gather products for all deliveries at one time.
Now refer to Figure 8-18. Transaction VL06P allows you to run a periodic job to pick up all the deliveries that are due for picking during a specified time interval. As you can see from the results, if WM is enabled, a transfer order for all the deliveries can then be created in batches, or waves.
Figure 8-18: Picking due list
Packing
After picking the items, the next step is to pack them for shipment. The packing functionality in SAP covers the aspects of planning and execution of this process.
Packaging materials such as boxes and crates are also set up in SAP, using unique material master records. These materials are distinguished by a different material type: VERP. During the course of packing, you have to select the appropriate packaging material for the items being shipped. Certain customers may also send you special packaging instructions to follow for all shipments sent to a specific ship-to location. You can control these factors through customization steps. We’ll now discuss these steps in detail.
The Packing Process
Packing can be done for each delivery or by using a special transaction designed for packing stations.
Packing in Individual Delivery Documents
In the delivery document, you can reach the packing screen (Figure 8-19) by selecting the Edit Pack option in VL02N.
The items that are due for packing appear in the lower window, whereas the new handling units (HUs) will appear in the upper window as the packing progresses.
Figure 8-19: Packing overview screen
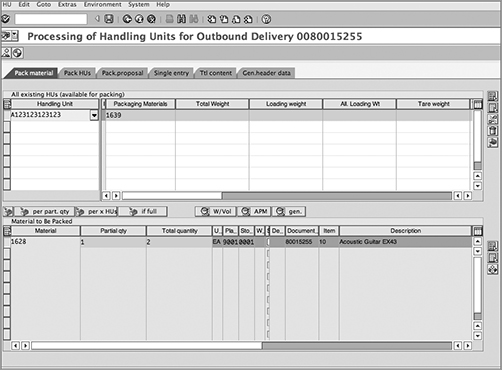
On the Pack Material tab, you can enter packaging material(s) and continue creating handling units until all items have been packed.
On the Pack HUs tab, the handling units can be packed into higher units. For example, you can pack several boxes into a crate, or several crates into a truck, using this feature.
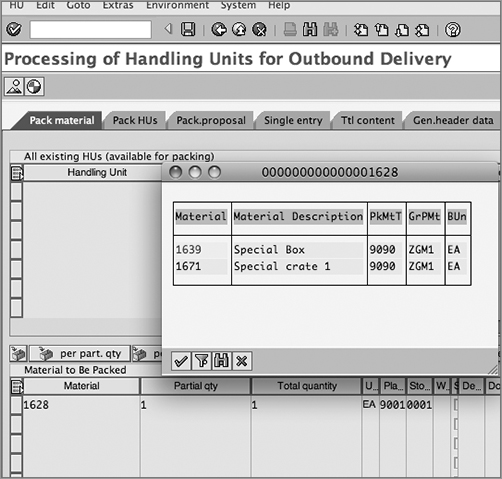
As shown in Figure 8-20, the New HU Per X HUs button allows you to pack two boxes (packaging material 1639) into a crate (packaging material 1671).
At any point, you can see which packing materials can be used to pack the item. For this, use the menu path Extras Allowed Packaging Material. When you follow this path, a dialog box like that in Figure 8-21 will appear, giving you the options that are available for packing your products. This narrows down the search easily and prevents mistakes.
Figure 8-20: Packing handling units
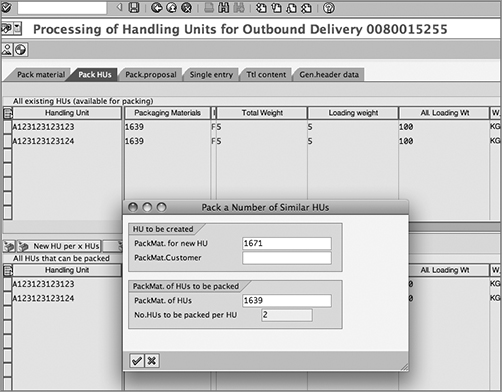
Figure 8-21: Using allowed packaging material to limit options
Packing Stations
We have just described the process of packing from within a delivery document.
However, it is also possible to configure and use a separate transaction code for packing that is specially meant for packing stations, which are special locations in the plant or warehouse where packing is being carried out.
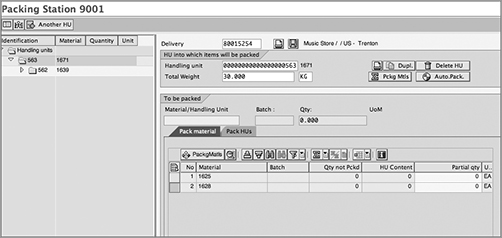
To access the packing station transaction, follow the path SAP Menu Logistics Execution Outbound Process Goods Issue For Outbound Delivery Pack Packing Station (transaction HUPAST). Specify the packing station, and hit Enter. As shown in Figure 8-22, a complete packing cockpit screen appears, where you can pack materials into HUs and further pack the HUs into higher handling units.
You can also create or change handling units in a delivery or create a new HU without any reference. This is useful if any excess picked material is to be returned to the warehouse. You can also print labels and update or modify weights of HUs that are already created.
Figure 8-22: Packing station
We’ll now cover the customization settings for packing.
Customizing for Packing
You’ll start the customization by identifying the items that are due for the packing process. Then you will configure the packaging materials and the packing station.
Setting Relevance for Packing
To start, you have to identify whether packing is relevant for the material being delivered. Like picking relevance, this is controlled at the item category level. Follow this menu path: IMG Logistics Execution Shipping Packing Packing Control By Item Category.
Select the item category that you plan to use. On the packing control screen, you can choose from three options. As you can see in Figure 8-23, packing can be made mandatory, optional, or disallowed totally. Choose the appropriate option for your requirements. If you are not certain, it is advisable to leave this field blank, in which case it will automatically default to optional packing.
If you chose mandatory packing, the system will not allow goods issue until this step has been completed.
Figure 8-23: Packing relevance at the item category level

Determining Allowed Packaging Material
There can be a wide variety of packaging material. In the packing stage, it is important to have rules to determine the right type of packaging materials that are allowed for a particular delivery item.
Before you set up these rules, you’ll have to configure two grouping terms: packaging material types and material groups for packaging materials.
Packaging material types Packaging material type is a grouping term for similar packaging materials. This term can be used to identify a family of packaging materials that would then be allowed or disallowed. To configure this, use the menu path IMG Logistics Execution Shipping Packing Define Packaging Material Types. To create a new entry, specify a four-character alphanumeric code and description, as shown in Figure 8-24.
Figure 8-24: Defining the packaging material type
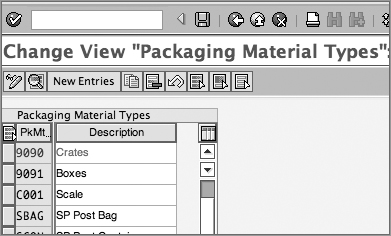
In the case of Galaxy Musical Instruments, there are several packaging materials. Galaxy has set up two groups:
- 9090: Crates
- 9091: Boxes
When you set up material master records for packaging materials, this field will appear in the Sales: General/Plant data. You will maintain this field for all packaging materials.
Material groups for packaging materials This term groups together materials that require similar packing. For example, all string instruments require special boxes for secure packing. You can define a grouping term and assign it in the material master record for all the string instruments. To configure this, you can use the menu path IMG Logistics Execution Shipping Packing Define Material Groups For Packaging Materials.
In the case of Galaxy Musical Instruments, we have set up group ZGM1 for all the string instruments (Figure 8-25).
Figure 8-25: Defining material groups for the packaging material
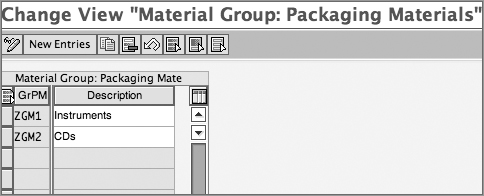
This field appears in the material master in the Sales: General/Plant data. Refer to Figure 8-12; like Acoustic Guitar (Material 1628), you will find this field in the Packaging Material section. The group ZGM1 has been attached here.
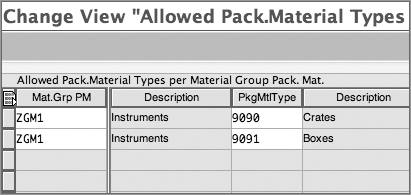
Setting rules for allowable packaging materials The next step is to set up rules to control the list of packaging materials users will be allowed to choose from. To set up the rules, use the menu path IMG Logistics Execution Shipping Packing Define Allowed Packaging Materials. As shown in Figure 8-26, we have specified that material group ZGM1 can be packed using packaging material 9091 (Boxes) and 9090 (Crates). This rule helps you in selecting the correct packaging material.
Figure 8-26: Rules for allowable packaging material
Configure Packing Stations
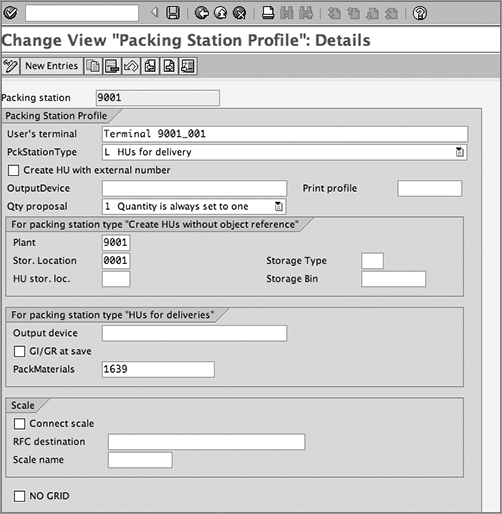
Packing station transactions can be customized for your organization. To configure a packing station, the menu path is IMG Logistics Execution Shipping Packing Set Profile For Packing Station.
Define a new packing station. You can customize the settings as shown in Figure 8-27. The default plant, storage location, and packaging material can be set up in this screen so that default data is proposed when a user logs on to this station. Also note that on the Scale tab there is a provision to link to external systems (such as a scanner or a weighing scale) that are commonly used at packing stations.
Figure 8-27: Configuring a packing station
The shipment document is the basis of transportation planning and execution. This document contains all the shipping-related information for the end customer and the other business partners, such as forwarding agents and vendors.
Depending on the complexity of your distribution model, the shipments can be the following types:
Individual shipment One or more deliveries are combined in one shipment document. It starts from the same starting point (such as a shipping point) and ends at a common destination. For example, all deliveries originating from the same shipping point A and going to the same destination, transportation zone C, by truck can be clubbed together into the same shipment.
Collective shipment One or more deliveries, originating from different starting points (such as different plants) and shipped to different destinations, may be clubbed together in a common shipment. An example is milk-run shipments in which a single truck travels from plant A to plant B and then continues to the final customer destination C. Some of the deliveries are to be carried from A and dropped at B. Other deliveries may originate in B and be added to the truck. Then the total deliveries are taken to the customer location C.
Transportation chains The scenario gets complex when more than one mode of transport is used for shipment. You may need to plan each leg separately with different sets of documents and instructions to each driver. Within the organization, there can be different teams doing transportation planning, such as for air cargo, ocean, and surface. In such cases, you can create multiple shipment documents. For example, deliveries originating from plant A and plant B are carried in different trucks to an international airport cargo hub C. These are called preliminary legs of the journey. From there, they are combined in a second shipment and carried by air on the major leg of the journey. On arrival at airport D, they are then picked up by different trucks and shipped to end locations E and F, respectively. These are called subsequent legs.
The shipment process requires mapping of major routes in the system. The duration of travel by each route would play a role in planning the date of arrival at the customer location. We’ll now discuss the configuration of routes in SAP before proceeding with the setup for the shipment process.
Maintaining Routes
Most organizations use predefined routes in conveying material from source to destination. You can set up and maintain a central repository of your primary routes in SAP. This master record contains all details about the route such as the duration, the means of transport, and the service provider. SAP’s automatic route determination functionality populates the appropriate route in the sales document. We’ll discuss the process of defining and determining routes.
Before you configure route setup, you should ask the following questions:
- Does the organization use predefined routes?
- What are the modes of transport being used? Road? Air?
- Do you want to plan shipments by taking transit time into account? If so, do you know the transit duration of each route?
- How should you group the destination regions into transportation zones? What should be the right level of aggregation? For example, transportation zones could be regions (northeastern United States), states (New York state), cities (New York), ZIP codes, and so on. Increasing the level of detail may improve accuracy, but the number of routes would increase as well.
- Does the choice of transportation route depend on weight of the shipment? What are these weight groups (1 to 99 pounds, greater than 99 pounds, and so on)?
- Do any specific vendors (freight forwarders or logistics service providers) cater to a specific route? If so, can they be mapped to the route?
- Are there any major transportation connection points to be mapped with the routes? These could be airports, transportation hubs, customs office, harbors, and so on. What is the length of stay at each point?
Based on the answers to these questions, you can then configure the routes at the right level of detail.
Configuration of Routes
The configuration of routes consists of two major steps:
1. Route definition: Setting up routes and defining attributes such as distance, time, and so on
2. Route determination: Setting up rules for automatic determination of routes in sales documents
We’ll now discuss the configuration steps that you should carry out before you can define and assign routes.
Defining Modes of Transport
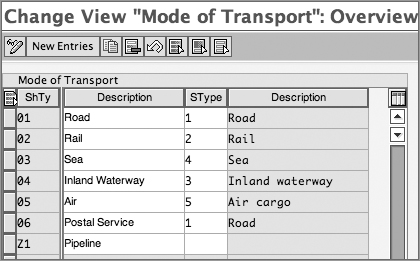
To configure the modes of transport, use the following path: IMG Logistics Execution Shipping Basic Shipping Functions Routes Define Routes Define Modes Of Transport. On this screen, (which will look like Figure 8-28), you can specify the mode of transport in the column ShTy using a two-digit alphanumeric code. If needed, you can assign a mode-of-transport type in the column SType. This field is relevant only in the case of movement of dangerous goods.
Figure 8-28: Defining modes of transport
Defining Shipping Types
After defining the modes of transport, you define the shipping types (such as trucks, trucks with trailers, and so on) and assign them to modes (such as Road).
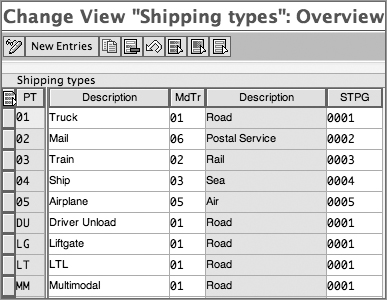
Follow the menu path IMG Logistics Execution Shipping Basic Shipping Functions Routes Define Routes Define Shipping Types. On this screen (Figure 8-29), define the shipping type in the column PT using a two-digit alphanumeric code. Assign it to the mode of transport (MdTr) defined earlier.
Another field, STPG (shipping type procedure group), shown in the figure is used during shipment cost calculation.
Figure 8-29: Defining shipping types
Setting Up Transportation Connection Points
In this step, you can set up all major transportation connection points. As you will see later, you will use them as transit points during the setup of routes. The menu path in customization is IMG Logistics Execution Shipping Basic Shipping Functions Routes Define Routes Define Transportation Connection Points.
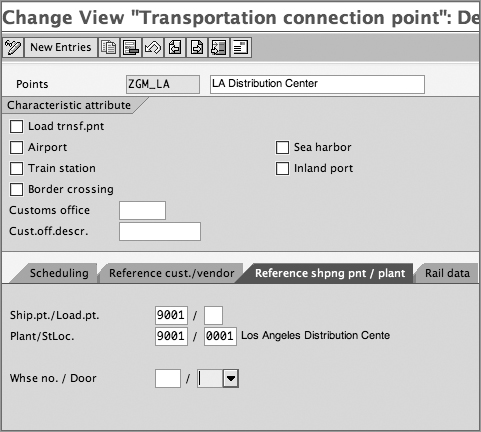
Define a new entry, identified by a unique name and description (as shown in Figure 8-30). You can specify the type of location, such as an airport, train station, and customs office, as well as other relevant attributes and details such as transit time at the location.
Figure 8-30: Defining the transportation connection point
Defining Transportation Zones
Define the transportation zones to specify all the regions that you plan to cover with your routes. Routes will flow from a departure zone to a destination zone. The menu path in customization is IMG Logistics Execution Shipping Basic Shipping Functions Routes Route Determination Define Transportation Zones.
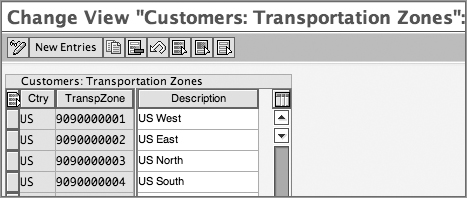
Here you can select a country and define transportation zones with a meaningful description, as shown in Figure 8-31.
The zones you set up here will be used in the master data. The location of each customer and vendor will be identified using the Transportation Zone field on the Address tab in the customer (or vendor) master record.
Figure 8-31: Defining transportation zones
You can also specify the zones for each of your shipping points by following the menu path IMG Logistics Execution Shipping Basic Shipping Functions Routes Route Determination Maintain Country And Transportation Zone For Shipping Point.
On the screen shown in Figure 8-32, select the shipping point, and specify the country and transportation zone.
As an alternative, when you define a shipping point as discussed in Chapter 2, you can specify the transportation zone on the address screen.
Figure 8-32: Specifying the transportation zone for each shipping point

Creating Transportation Groups
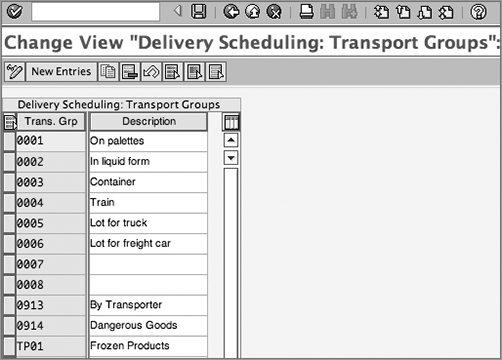
A transportation group combines all materials that share the same transportation requirements. For example, you can group all liquids into a transportation group that requires special tankers for transport. To create transportation groups, use the menu path IMG Logistics Execution Shipping Basic Shipping Functions Routes Route Determination Define Transportation Groups.
Figure 8-33 shows the screen for defining transportation groups.
Figure 8-33: Defining transportation groups
Setting Up Weight Groups
If the exact weight of the delivery plays a role in route determination in your organization, you can set up weight groups in SAP by following the menu path IMG Logistics Execution Shipping Basic Shipping Functions Routes Route Determination Define Weight Groups.
On the default screen, Maintain Weight Group, create a new weight group with a meaningful description. From the navigation menu on the left, you can go to Maintain Details For Weight Group. On this screen, you can specify the maximum weight that is allowed in each weight group.
At the time of delivery creation, the system will take into account the weight and then determine an appropriate route. This is an optional setting. If you choose not to use it, route determination will take place in the sales order and be copied into the deliveries.
Configuring Shipping Conditions
We discussed shipping conditions earlier in this chapter. They also play a role in route determination.
Defining and Assigning Routes
Now that you have explored how to configure these key factors, we will show you how to define and assign routes.
Defining Routes
The path to set up routes is as follows: IMG Logistics Execution Shipping Basic Shipping Functions Routes Define Routes Define Routes And Stages (transaction 0VTC).
This will bring you to an overview screen that lists all the routes that have been defined in the system. To define a new route, click New Entries, or copy from an existing route. A screen similar to Figure 8-34 appears. On this screen, identify the new route with a unique number. Other fields in this screen are discussed here:
Identification tab Use these fields to add a meaningful description of the route.
Processing tab If the route is managed by a specific vendor, you can specify it in the Service Agent field. You can also fill in the Shipping Type field here.
Scheduling tab These are the important fields on the Scheduling tab:
TransitTime Transit Time is the total time taken for the goods to reach the customer following the route. It is specified in calendar days. The time entered here is taken into account for planning purposes and for determining the date on which the product will reach the customer.
Trav.Dur. Travel Duration, expressed in hours, is a subset of the total transit time. It is the time taken for the actual travel along the route.
TransLdTm. Transportation Lead Time is the time needed for planning and arranging transportation. SAP uses it to arrive at the transportation planning date. It is specified in calendar days and in hours.
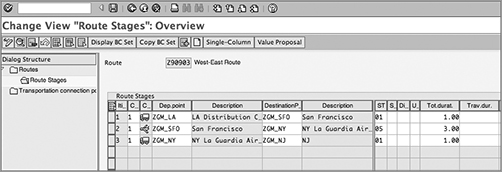
When you have defined the attributes of the route, click the Route Stages tab in the left menu in Figure 8-34. You will see a screen that looks like Figure 8-35. On this screen, specify the departure and destination points from the list of transportation connection points defined earlier. Also specify the duration and shipping type details for each stage.
TIP A route can have either a single stage (from point A to point B) or multiple stages, each of which is likely to involve a different means of transport. You can specify all these details in the route stages.
Figure 8-34: Defining routes
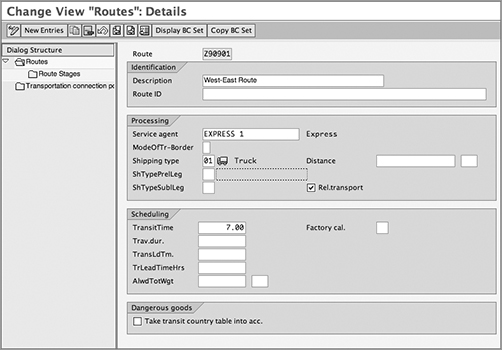
Figure 8-35: Defining route stages
Determining Routes
Automatic route determination is based on the following factors:
- Country/departure zone (picked up from the address of shipping point)
- Country/destination zone of the recipient (from the ship-to party address)
- Shipping condition
- Transportation group (from the material master)
In the case of deliveries, you can also add weight groups to the list of controlling factors, if that is applicable to your organization.
The menu path for route determination is as follows: IMG Logistics Execution Shipping Basic Shipping Functions Routes Route Determination Maintain Route Determination.
To set up a new record, enter the country and transportation zone of the source and destination locations. You can also specify generic routes between countries, leaving the Transportation Zone field blank.
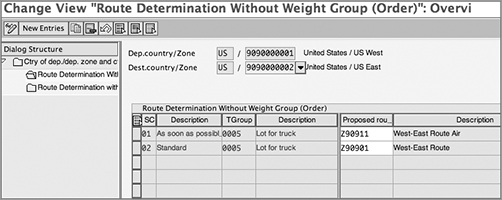
Click Route Determination Without Weight Group (Order), as shown in Figure 8-36, and then click the New Entries button. This enables you to specify a route for every combination of shipping condition and transportation group.
Figure 8-36: Setting up route determination
You can also choose Route Determination With Weight Group (Deliveries) if it is applicable. During delivery creation, the routes will be redetermined based on the weight of the delivery.
TIP The shipping condition comes from the customer master record of the sold-to party, and the destination address (transportation zone) comes from the customer master record of the ship-to party.
CASE STUDY—Galaxy Musical Instruments: Configuration of Routes
We’ll now discuss how Galaxy Musical Instruments set up some of its major routes.
All the major transportation connection points were set up. The Los Angeles distribution center as well as other major hubs, airports, and load transfer points have been set up (as shown in Figure 8-30).
The regions were divided into transportation zones (such as 9090000001 for the Western United States). Galaxy assigned this transportation zone to the shipping points of the Los Angeles–based plant. This specified the country and transportation zone of the source location.
Similarly, the addresses of major customers were updated with corresponding transportation zones. This completed the setup of destination locations.
There are two major shipping conditions: regular shipment and express shipment.
As shown in Figure 8-36, Galaxy assigned express (air) routes such as Z90911, corresponding to the express shipping condition.
The regular shipping condition was mapped to ground routes such as Z90901.
The Shipment Process
You can create individual shipment documents or use a collective processing option.
Follow the path SAP Menu Logistics Logistics Execution Transportation Transportation Planning Create Single Document (VT01).
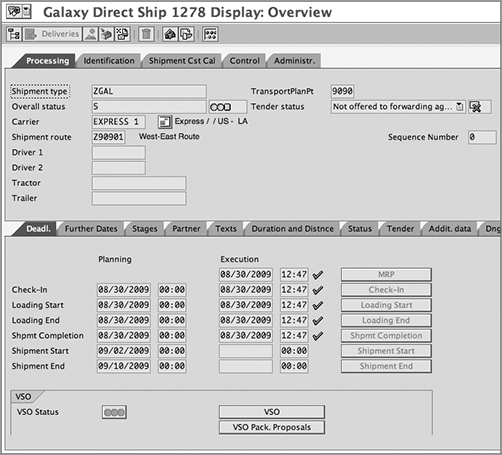
On the selection screen, specify the transportation planning point and shipment type. The next screen is the overview of the new shipment document. As shown in Figure 8-37, various activities in shipment planning and execution are recorded and updated in the shipment document. One or more deliveries can be added to the shipment. The leg determination functionality (on the Stages tab) will help you plan the stages of the shipment. The document status is updated on completion of every step of the process. You can also assign activity profiles so that certain activities (such as posting goods issue) happen once a certain status has been reached.
Figure 8-37: Shipment overview
To access collective processing, use the path SAP Menu Logistics Logistics Execution Transportation Transportation Planning Create Collective Processing (VT04).
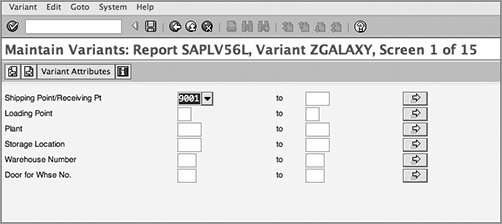
This transaction allows collective processing for creating shipment documents. On the selection screen (Figure 8-38), you can specify a variant for selection of delivery documents that are due for shipment. Specify a meaningful name for your variant, and click the Maintn option to create it. This will take you to a screen similar to Figure 8-39. You can choose from several selection criteria to select the deliveries. For example, in the case of Galaxy, we have specified that the shipping point in the delivery should be 9001. Technically, the system uses the report SAPLV56L to select deliveries.
Figure 8-38: Creating shipments in collective processing
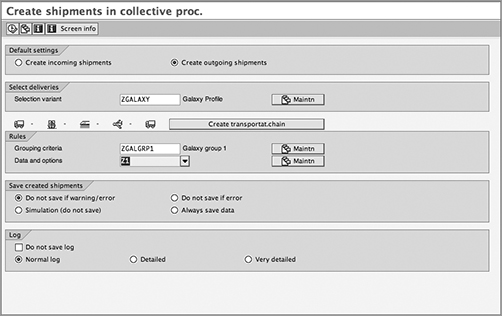
Figure 8-39: Maintaining variants for delivery selection
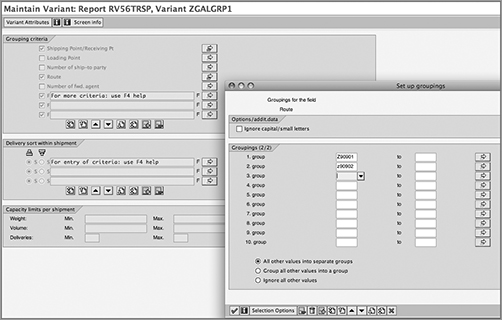
You can use the grouping criteria to specify rules for combining deliveries together in a shipment. You can also specify the weight and capacity limitations per shipment. Use the Maintn option to define a selection variant, as shown in Figure 8-40. If you select Routes as a criterion for combination, you can specify the routes that can be grouped together in the same shipment.
Figure 8-40: Maintaining variants for grouping criteria
Configuration of Shipments
The following are the steps in the configuration of shipments.
Maintain Transportation Relevance
Before we move on to configuring shipment documents, we have to select the relevance to our business processes. To carry out this activity, the menu path is IMG Logistics Execution Transportation Shipments Maintain Transportation Relevance.
There are three activities listed here. Follow the sequence, and select the relevance of the following:
- Delivery type
- Delivery item type
- Route
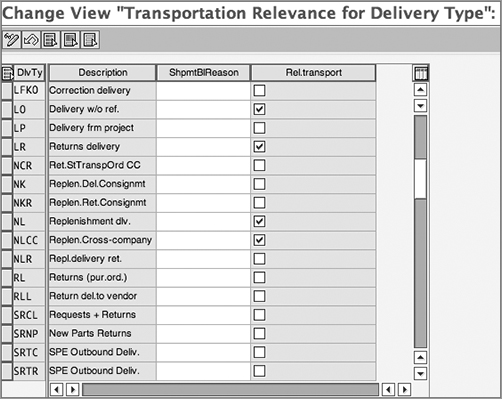
Figure 8-41 shows the screen for marking delivery types relevant to transportation.
Figure 8-41: Setting up relevance for transportation
Set Up Transportation Planning Points
After you decide on transportation relevance, you need to configure the organizational elements that look after transportation. The shipment documents are created for a transportation planning point.
We discussed the steps to set up a transportation planning point in Chapter 2.
Define Shipment Type
To configure the shipment type document, the menu path is IMG Logistics Execution Transportation Shipments Define Shipment Types.
Define a four-character alphanumeric code and description for the shipment type.
Figure 8-42 shows some of the critical fields to be configured.
Number Systems tab On this tab, you can specify an internal and external number range for the shipment documents that will be created. This is identical to any other number range settings that we covered earlier.
Document Content Perhaps this is the most important tab that defines the shipment type in detail. The following are some of the important settings on this tab:
Shipment Completion Type The field ShpmtComplType specifies the type of shipment being created. You can specify whether it is an inbound or outbound shipment and whether it is filled or empty.
Shipping Type The field Shipping Type signifies whether the shipment will be by road or air or other means of transport. (We covered this when talking about route definition.)
Process Control The field Process Control defines the way the shipment will be planned. The options here are as follows:
- Individual Shipment With Single Mode Of Transport
- Individual Shipment With Multi Mode Of Transport
- Collective Shipment With Single Mode Of Transport
- Collective Shipment With Multi Mode Of Transport
Figure 8-42: Defining the shipment type
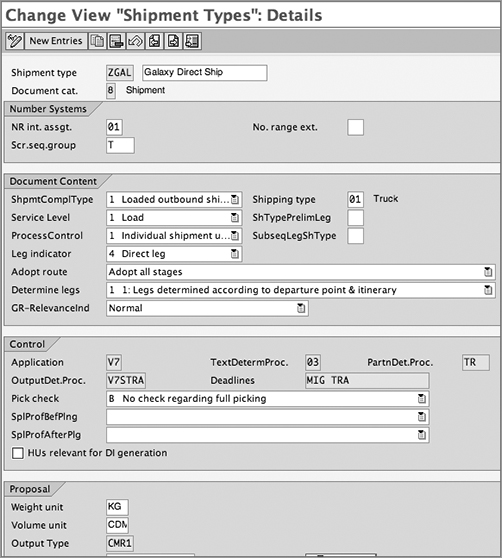
Leg Indicator In the field Leg indicator, you can specify whether a leg is a direct leg of a shipment or whether it is a primary leg, mail leg, or subsequent leg of a transportation chain. If you select Direct Leg or Return Leg, the entire process will be carried out in a single shipment document. However, if you select Primary Leg, Main Leg, or Subsequent Leg, it will be a transportation chain with multiple shipments interlinked to complete the shipment. You can also specify the transportation type of the preliminary and subsequent legs through the fields ShTypePrelimLeg and SubseqLegShType.
Determine Legs Using the field Determine Legs, you can select a rule; based on this, the system then tries to structure the legs of the shipment. For example, if you choose type 1 (1: Legs Determined According To Departure Point & Itinerary) for a collective shipment, leg determination will be carried out on the basis of the sequence of departures and destinations. In other words, assume there are two deliveries in a shipment. Both originate from the same shipping point, 9001, in Los Angeles. The first delivery is being sent to a customer in New York. The other is being shipped to New Jersey, which is near New York. The first leg of the journey is from Los Angeles to New York (carrying both the deliveries). After the first delivery is offloaded at the customer’s location, the subsequent leg is from New York to New Jersey (with the second delivery only). In the shipment document, if you click Leg Determination, the system will check the points of origin and destination of each delivery and automatically propose the stages of the journey. You can override or modify the proposal manually. Note that leg determination is not an optimization algorithm. Rather, it is a simple tool to help create legs on the basis of rules that you specify.
Define and Assign Activity Profile
You can use activity profiles to define which actions are to be performed once a shipment reaches a particular status. For example, once the shipment reaches “completion” status, the system should perform the goods issue activity for each of the constituent delivery documents.
There is a provision to attach different activity profiles for each status of the shipment.
To maintain and assign an activity profile, the path is IMG Logistics Execution Transportation Shipments Define And Assign Activity Profiles.
Select your shipment type. The columns in Figure 8-43 denote the various statuses of a shipment document, such as check-in, completion, and so on. For each status, you can specify an activity profile. Select from the list of available profiles. To set up a new activity profile, enter a profile name, and click the Maintain button.
Figure 8-43: Assigning activity profiles to shipment types

As shown in Figure 8-43, on the Activity Profiles For Shipment Types screen, we chose shipment type ZGAL. Against the status At Completion, we want to set up a custom activity profile named ZGAL. We enter the name and click Maintain.
On the next screen (Figure 8-44), we have selected the post goods issue and billing options.
Figure 8-44: Defining activity profiles
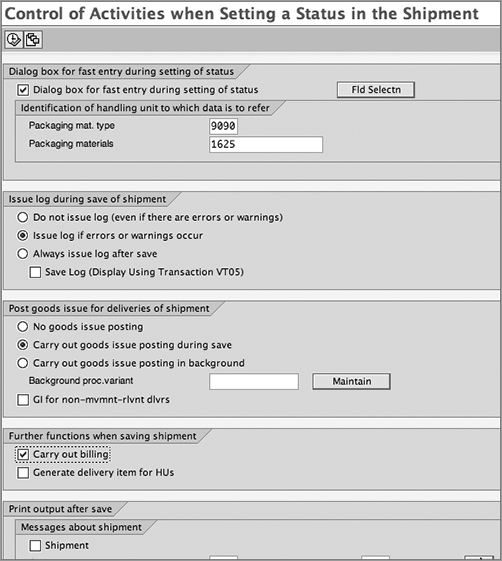
Technically, the program RV56ABST is being called in this transaction. You can set the options on the selection screen of this program and save the variant for further use.
CASE STUDY—Galaxy Musical Instruments: Configuration of Shipments
Galaxy Musical Instruments has marked all the delivery types and routes as relevant for shipment. The organizational setup at Galaxy is such that it has two different groups to manage air transportation and road/rail transportation, respectively. Hence, we have set up two transportation planning points:
- 9090: Galaxy Transportation Road
- 9091: Galaxy Transportation Air
Both entities are assigned to company code 9090.
The shipment type defined is ZGAL. It is an example of individual shipment. Deliveries that are being shipped to the same destination are grouped together in a single shipment. For example, all deliveries for customers in New York City are loaded in the same truck, from LA to NY.
Galaxy’s requirement is that, once shipment is completed, the goods issue and billing should occur in the background, without further manual intervention. We have achieved this through configuring activity profile ZGAL, as shown in Figure 8-44.
Once we create shipments of type ZGAL, we will find that once it reaches the completion, the goods issue and billing will be carried out in the background.
Goods issue is the last step in the shipment process. Once the goods leave your shipping point, you confirm it by posting a goods issue. In the background of this transaction, several important updates are occurring in the system:
- The physical stocks are updated. The inventory in the shipping plant/warehouse is reduced by the quantity that was shipped.
- The requirements in the stock requirement list are updated. The delivery quantity is no longer “open,” and the requirement is now marked as completed.
- Accounting documents are posted in the background, reducing the value of inventory and increasing the cost of goods sold.
If the delivery contains service items or items that have no physical inventory, the transactional equivalent of goods issue is the confirmation of service. There is no inventory update in this case.
In SAP, the Post Goods Issue button appears in delivery processing transactions (such as VL01N or VL02N). The entire process is carried out by a single click of this button. If you are using Returns Delivery (document type LR), you will find the Post Goods Receipt button instead. It allows you to receive returned goods.
For collective posting of goods issue for a batch of deliveries, you can use the transaction VL06G.
If the goods issue is to be reversed, you can do this using transaction VL09.
TIP When we defined schedule line categories (using transaction VOV6) in Chapter 7, we specified a movement type for updating inventory. When a goods issue is done, the system posts the movement type based on this setting.
System Modifications in Deliveries
There are several routines, user exits, and business add-ins available in shipping if you need to modify the system setup.
You have already seen (when we talked about copy controls) that VOFM routines are required to control the flow of data from sales documents into deliveries. You can reach this menu from Logistics Execution, using the path IMG Logistics Execution Shipping Copy Controls Define Copying Requirements.
Similarly, you can define a custom routine with specific requirements for the picking process. You can attach it at the following location: IMG Logistics Execution Shipping Picking Define Picking Requirements (OVB6).
For packing, you can attach the Requirements routine using the menu path IMG Logistics Execution Shipping Packing Define Requirements For Packing (VPBD).
For the list of Business Add-Ins (BAdIs) and user exits, refer to the menu path IMG Logistics Execution Shipping System Modifications.
Another resource on this topic is SAP Service Marketplace note 198137, which explains the enhancements and user exits available to customize the delivery-due list. For example, you can follow the guidelines in this note to set up custom rules to control the delivery dates (From date and To date) that appear as the default in the VL10 set of transactions.
In this chapter, we covered the process of shipping, starting with delivery creation and moving on to picking, packing, shipment and transportation, and finally goods issue. This vast process is part of the Logistics Execution module in SAP.
After goods issue, the delivery becomes due for billing. We will cover the billing process in the next chapter.
