
Berkeley Systems released the famous "Flying Toasters" screen saver in 1989. It was part of the After Dark package for Apple's Macintosh computers.
Flying toasters!
Wow!
It was stunning. Companies lost lots of productivity to employees staring at their screen savers. Screen savers brought a lighthearted element to the cold world of electronics.
Later, businesses realized that screen savers were a great place to leave branding. Company logos floating around screens became common. Also, marketing and sales information appeared scrolling across the screens of unused computers in retail outlets.
Eventually someone realized that with the power of the Internet, screen savers could extend the number-crunching capabilities of financially limited research institutions. Projects such as SETI@home and Climateprediction.net turn hordes of unused computers into massive distributed supercomputers with screen saver applications. IBM's involvement in the World Community Grid uses a similar approach for medical research, creating a grid with more power than many supercomputers.
When a computer is not in use, the screen saver activates. In most cases, your computer is not using its CPU to crunch numbers when in screen saver mode. In even a small organization, that is lots of idle time wasted, unless, of course, you write or install your own screen saver to make use of that idle time.
Screen savers range from whimsical diversions to marketing applications to number-crunching research devices. Watching screen savers is fun. Writing screen savers is even more fun.
At the time of this writing, no Java libraries are specifically made for writing screen savers on OS X. This does not mean you cannot write screen savers for Java. In fact, using the techniques I discuss in this book, writing a simple wrapper around OS X's Cocoa Screen Saver Framework is easy.
After you have a short JNI wrapper around an Objective-C screen saver class, the entire world of Java opens up to writing screen savers for OS X.
In this chapter, I explain the basics of the Screen Saver Framework. I explain the internals of SAVER packages. I also (most important) explain how to use Java to write your own screen savers.
Do not think for a moment that because you write Java, you cannot write OS X screen savers. Java and OS X screen savers are a great combination. Whether you want to explore visually entrancing screens or number-crunching applications, I explain how to get started with your Java screen saver dream project.
Before implementing a Java screen saver for OS X, you need to understand the basics of implementing native Objective-C screen savers for OS X. The Screen Saver Framework for OS X is small. It takes only a couple of minutes to understand the framework itself.
You can find Apple's Screen Saver Framework Reference Web site, shown in Figure 10.1, here:
http://developer.apple.com/mac/library/documentation
/UserExperience/Reference/ScreenSaver/ObjC_classic/

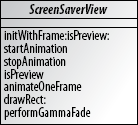
All OS X screen savers extend the Objective-C ScreenSaverView class, shown in Figure 10.2. The ScreenSaverView class extends NSView. NSView allows drawing on ScreenSaverView instances.
Note
You may remember NSView classes from Chapter 8. The CocoaComponent class enables the embedding of NSView objects in Java GUIs. However, I do not use the CocoaComponent in this chapter.
When a screen saver starts up, the initWithFrame:isPreview: method initializes the screen saver. The second BOOL parameter indicates whether the computer is actually idle or just running the screen saver in preview mode. If your screen saver does number crunching or data processing, you only want to draw pretty pictures (without crunching numbers) in preview mode. System Preferences starts screen savers in preview mode when users set the screen saver preferences and set the active screen saver.
After initialization, OS X calls the screen saver's startAnimation method. Depending on how your screen saver works, there may be overlap between the purpose of the startAnimation and initWithFrame:isPreview: methods.
Each time the screen saver view refreshes, the animateOneFrame method is called. The animateOneFrame method equates to the AWT paint() method. The main difference between animateOneFrame and the paint() method is that the animateOneFrame method is called at regular intervals, such as 30 times per second, whereas the paint() method waits for a repaint() request to redraw.
Implementing the drawRect: method also refreshes the screen saver view. The drawRect: method is useful for graphics-intensive situations where you need only part of the screen refreshed. The drawRect: method requires the animateOneFrame method to invalidate the current screen with a call to setNeedsDisplay:. Implementing the drawRect: method is much more involved than implementing just the animateOneFrame method.
The stopAnimation method indicates that the screen saver is shutting down. For number-crunching screen savers, make sure your numbers get saved quickly after OS X calls this method. If the stopAnimation method does not return quickly, expect OS X to shut down your screen saver for you.
Warning
Screen saver development changed with the release of Snow Leopard (OS X 10.6). Screen savers built for previous versions of OS X do not run on Snow Leopard. Screen savers built for Snow Leopard do not run on older versions of OS X.
Xcode has a screen saver project template for Objective-C-based screen savers, as shown in Figure 10.3. Whether implementing an Objective-C screen saver or a Java screen saver, this project template is a good starting point.
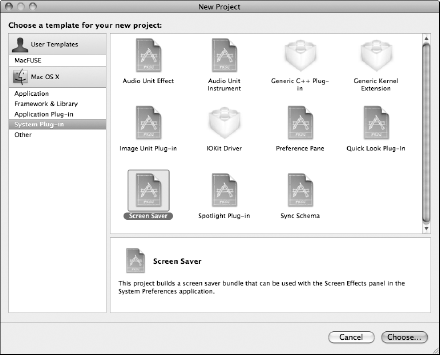
Create an Objective-C screen saver project by following these steps:
Open Xcode.
Select File
New Project....
Select Screen Saver as shown in Figure 10.3.
Click the Choose... button in the bottom corner of the dialog box.
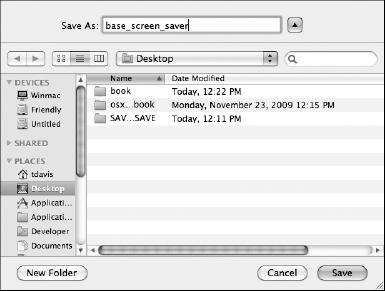
Name your project, as shown in Figure 10.4.
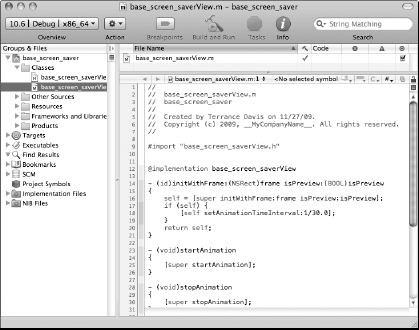
After creating a screen saver project, Xcode's project window opens. If you do not use Xcode as your standard IDE, the Groups & Files tree on the left side of the Xcode project window may look a little intimidating. It looks scarier than it is. The only folder that concerns you is the Classes folder.
In the Groups & Files tree, find the Classes folder and expand it. You should see two files in the folder: a *.m file and a *.h file. The *.m file is the screen saver class implementation. Select the screen saver class implementation, and your Xcode project window should look similar to Figure 10.5.
Note
In Objective-C, the classes have separate declarations and implementations. The declaration is called an @interface and placed in a *.h file. The implementation is called a @implementation and placed in a *.m file.
The screen saver implementation your project starts with is a fully functional screen saver. It draws only a black screen, so it's not very exciting, but it still makes a good starting point. Try the following steps to test your screen saver:
Select Build
Build to create a screen saver from your project.Navigate to your newly built screen saver in the Finder.
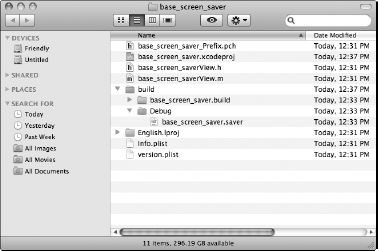
The new screen saver is most likely in your project at
build/Debug/<project name>.saver, as shown in Figure 10.6.Copy the screen saver to your ~/Library/Screen Savers/ directory.
Open System Preferences, and select the Desktop & Screen Saver preferences.
Select your screen saver.
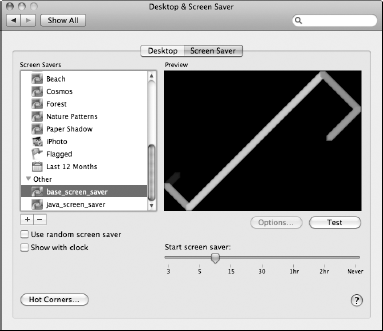
Your new screen saver is under the Other node near the bottom of the list, as shown in Figure 10.7. Your screen saver should produce a perfectly unexciting solid black screen.
In this chapter, I make the assumption that you are a Java programmer and not necessarily familiar with Objective-C. The next few sections explain the Objective-C source for the screen saver project you created and tested. Objective-C, like Java, is an Object-Oriented Programming language (OOP). Many concepts you already know from Java apply to Objective-C.
Note
The source for the projects in this chapter is on the book's Web site.
You can use two methods for initializing screen savers. They are the initWithFrame: method and the initWithFrame:isPreview: method. I use the initWithFrame:isPreview: method for the examples, because it is used for previews as well as non-preview initialization. The default source in the Xcode project template for initWithFrame:isPreview: is as follows:
- (id)initWithFrame:(NSRect)frame isPreview:(BOOL)isPreview
{
    self = [super initWithFrame:frame isPreview:isPreview];
    if (self) {
        [self setAnimationTimeInterval:1/30.0];
    }
    return self;
}
Objective-C does not always translate directly to Java, but the equivalent code using Java syntax might look like this:
public Object initWithFrameAndIsPreview(NSRect frame, boolean
   isPreview)
{
   ScreenSaverView ssv = super.initWithFrameAndIsPreview (
                                   frame,
                                   isPreview );
   if (ssv != null)
   {
      ssv.setAnimationTimeInterval( 1/30.0 );
   }
   return ssv;
}
Methods in Java are called using a dot notation, such as this:
someObject.myInstanceMethod();
In Objective-C, the same call looks like this:
[someObject myInstanceMethod];
The dot is replaced with a space, and the whole expression is surrounded with square brackets. This part of Objective-C is easy enough for Java programmers.
Methods that begin with init in Objective-C are closely related to class constructors in Java. Objective-C class instantiation typically looks like the following:
MyClass *mcObject = [[MyClass alloc] init];
The same code in Java looks like this:
MyClass mcObject = new MyClass();
The class init method is responsible for calling other appropriate init methods. This eventually leads to the calling of your initWithFrame:isPreview: method.
In Java, this refers to the current class instance executing. The Objective-C equivalent is self. In the default Xcode template, self is used to call the following:
[self setAnimationTimeInterval:1/30.0];
This code calls the setAnimationTimeInterval: method and sets the time interval for calls to animateOneFrame. The argument is in parts of a second. The default setting updates the screen 30 times per second. Thirty redraws per second should be plenty for most screen savers.
Note
Colons in Objective-C method signatures indicate an argument to the function. Objective-C method names actually split into parts describing each parameter the method takes. Objective-C methods that don't have colons in their names don't take any arguments.
Before animateOneFrame is called, startAnimation is called. The stopAnimation method indicates the screen saver is stopping. The default template source for both methods follows.
- (void)startAnimation
{
    [super startAnimation];
}
- (void)stopAnimation
{
    [super stopAnimation];
}
The equivalent code using Java syntax looks like this:
public void startAnimation()
{
   super.startAnimation();
}
public void stopAnimation()
{
   super.stopAnimation();
}
Objective-C methods begin with either a minus sign or a plus sign. The minus sign indicates the method is an instance method. The plus sign indicates the method is a class method. The Java equivalent to the Objective-C class method is the static method. The Java equivalent to the minus sign starting Objective-C methods is a non-static method.
The Objective-C animateOneFrame method is called in time intervals you specify. The default set by the Xcode template is 30 times per second. Here is the default Xcode screen saver template code for the animateOneFrame method:
- (void)animateOneFrame
{
    return;
}
The equivalent code using Java syntax looks like this:
public void animateOneFrame() { }Tip
Many graphics techniques are available for drawing screen savers. The Objective-C animateOneFrame method is a great place to test drawing code. Then after you are sure the drawing code works, wrap your drawing methods with JNI and make them available to your Java screen savers.
This chapter contains two example screen saver projects. The first is a basic screen saver that draws a woven pattern on the screen with one line. The project is called base_screen_saver.
I use the base_screen_saver to illustrate simple Objective-C screen saver implementation. Later in the chapter, I wrap the first project in Java code and move the drawing logic (the control logic) to the Java code. Understanding the base_screen_saver is important, because the Java screen saver expands on this first example. After you understand the two screen saver examples in this chapter, the types of Java screen savers you can create are limitless.
The following source is the @interface for the Objective-C base_screen_saverView class found in the base_screen_saverView.h file. The Java equivalent of the Objective-C @interface is the Java interface. However, @interfaces are meant for use with one and only one class.
Tip
The features of the Java interface are encompassed in Objective-C by a combination of the @interface and the @protocol.
#import <ScreenSaver/ScreenSaver.h>

@interface base_screen_saverView : ScreenSaverView
{
   double x1;
   double y1;

   BOOL nw;
   BOOL ne;
   BOOL sw;
   BOOL se;

   CGFloat redChoice;
   CGFloat greenChoice;
   CGFloat blueChoice;

   NSSize screenSize;
}
- (void) drawScreen;
- (void) pickColor;
- (void) drawRectangleX: (CGFloat) x
                      y: (CGFloat) y
                  width: (CGFloat) width
                 height: (CGFloat) height;
- (void) setColorRed: (CGFloat) red
               green: (CGFloat) green
                blue: (CGFloat) blue
               alpha: (CGFloat) alpha;
@end
In Objective-C, *.h files contain #imports, variable declarations, and method declarations. The #import in Objective-C is very similar to Java's import. The main difference between C's #include and Objective-C's #import is that #import takes care of duplicate #imports automagically.
Understanding the base_screen_saverView.h file is a bit easier if you understand the format of Objective-C header files. The typical structure of Objective-C *.h files is as follows:
#import <Some/Libraries.h>
@interface MyClassDeclaration : MySuperClass
{
   // variable declarations go here
}
// method declarations go here
@end
If you create a header without an @interface definition, then you may choose to ignore most of this format and stick to a more traditional C-style header format. Remember, if you stick to using #import instead of #include, you do not need to worry about duplicate #includes.
In the base_screen_saverView source, only the methods and variable unique to the base_screen_saverView class are defined. Other methods and variables that exist in the ScreenSaverView and NSView super classes are not redefined even if they are overridden in the child.
The following source is the implementation of the base_screen_saverView class found in base_screen_saverView.m. The full source is a bit long, so I break it up with explanations to make it more readable.
#import "base_screen_saverView.h"
Notice that the file includes only one import statement. The only import that should exist in an Objective-C implementation file is the import of the interfaces file for the class. All the other imports should appear in the *.h file.
@implementation base_screen_saverView
- (id)initWithFrame:(NSRect)frame isPreview:(BOOL)isPreview
{
    self = [super initWithFrame:frame isPreview:isPreview];
    if (self) {
        [self setAnimationTimeInterval:1/30.0];
    }
    return self;
}
The initWithFrame:isPreview: method is untouched from the Xcode screen saver project template. I place all the initialization code for the screen saver in the startAnimation method.
- (void)startAnimation
{
    [super startAnimation];
   NSLog( @"started animation" );
screenSize = [self bounds].size;
x1 = SSRandomFloatBetween( 0.0, screenSize.width - 10.0 );
y1 = SSRandomFloatBetween( 0.0, screenSize.height - 10.0 );
int direction = SSRandomIntBetween(1, 4);
switch ( direction )
{
case 1:
nw = YES;
break;
case 2:
ne = YES;
break;
case 3:
sw = YES;
break;
default:
se = YES;
break;
}
[self pickColor];
}In the startAnimation method, I obtain the size of the display area using the call to [self bounds].size. Then I generate the starting point of the weave from the width and height of the display. After obtaining the display size, I randomly generate the initial direction of the weave. I finish off by calling the pickColor method that randomly sets the current drawing color.
The functions SSRandomFloatBetween() and SSRandomIntBetween() are provided by the Screen Saver Framework as utility calls. Random-number generation is so common in screen savers that the creators of the Screen Saver Framework included both methods to make life easier on screen saver developers.
- (void)stopAnimation
{
    [super stopAnimation];
   NSLog( @"stopped animation" );
}
The stopAnimation method does not require any extra code in this example. In the next example, the stopAnimation calls the Java wrapper to handle screen saver cleanup.
The NSLog() function is useful for debugging the Objective-C side of screen savers. Open the Console application found at /Applications/Utilities/Console.app, and any output from NSLog() is displayed.
- (void)drawRect:(NSRect)rect
{
    [super drawRect:rect];
}
- (void)animateOneFrame
{
   [self drawScreen];

   return;
}
In the animateOneFrame method, I call the drawScreen method to take care of painting. Doing the drawing in a separate method is just one step closer to the Java screen saver wrapper. In the next example, the screen saver drawing method is moved to the Java code.
- (BOOL)hasConfigureSheet
{
    return NO;
}
- (NSWindow*)configureSheet
{
    return nil;
}
Configure sheets provide users the ability to change the screen saver options. Neither of the examples in this chapter uses configure sheets. When not providing a configure sheet, return NO from hasConfigureSheet and return nil from the configureSheet method.
- (void) drawScreen
{

   // set current color

   [self setColorRed: redChoice
               green: greenChoice
                blue: blueChoice
               alpha: 0.5];

   // draw current position

   [self drawRectangleX: x1
                      y: y1
                  width: 10
                 height: 10];

   // move square

   if (nw)
   {
x1--;
y1++;
}
else if (ne)
{
x1++;
y1++;
}
else if (sw)
{
x1--;
y1--;
}
else if (se)
{
x1++;
y1--;
}
// bounce off walls
if (y1 < 1)
{
if (se)
{
se = NO;
ne = YES;
[self pickColor];
}
else if (sw)
{
sw = NO;
nw = YES;
[self pickColor];
}
}
if (y1 > screenSize.height - 11.0)
{
if (ne)
{
ne = NO;
se = YES;
[self pickColor];
}
else if (nw)
{nw = NO;
sw = YES;
[self pickColor];
}
}
if (x1 < 1)
{
if (sw)
{
sw = NO;
se = YES;
[self pickColor];
}
else if (nw)
{
nw = NO;
ne = YES;
[self pickColor];
}
}
if (x1 > screenSize.width - 11.0)
{
if (se)
{
se = NO;
sw = YES;
[self pickColor];
}
else if (ne)
{
ne = NO;
nw = YES;
[self pickColor];
}
}
}The drawScreen method sets the current fill color and then draws a rectangle at the currently selected location. After taking care of drawing, the method goes on to set the next location and of the rectangle, and if necessary, select the next fill color.
Notice the use of YES and NO where in Java you see true and false. YES and NO are the Objective-C equivalent of Java's true and false.
- (void) pickColor
{
   redChoice = SSRandomFloatBetween( 0.0, 1.0 );
   greenChoice = SSRandomFloatBetween( 0.0, 1.0 );
   blueChoice = SSRandomFloatBetween( 0.0, 1.0 );
}

- (void) drawRectangleX: (CGFloat) x
                      y: (CGFloat) y
                  width: (CGFloat) width
                 height: (CGFloat) height
{
   NSRect rectToDraw;
   rectToDraw = NSMakeRect (x, y, width, height);
   [NSBezierPath fillRect: rectToDraw];

}
Using NSBezierPath is only one of the methods for drawing your screen saver. Both example screen savers in this chapter use NSBezierPath's fillRect: method to draw. I explain other options NSBezierPath provides, near the end of this chapter.
- (void) setColorRed: (CGFloat) red
               green: (CGFloat) green
                blue: (CGFloat) blue
               alpha: (CGFloat) alpha;
{
   NSColor *colorToSet;
   colorToSet = [NSColor colorWithCalibratedRed: red
                                          green: green
                                           blue: blue
                                          alpha: alpha];
   [colorToSet set];

}
@end
The two files in this chapter contain the source necessary to create the first screen saver example. In order to explore Objective-C screen saver creation, I recommend that you modify the behavior of this example and test it as your system screen saver. Modifying code teaches you more about OS X screen saver creation than any amount of documentation.
Now that you have seen an Objective-C screen saver, you are ready to explore Java-based screen savers. Java screen savers on OS X wrap the Objective-C Screen Saver Framework. Java screen savers wrap the framework by creating a child of ScreenSaverView that exposes desired drawing methods, and then using JNI's Invocation API, Java takes control of the screen saver's startAnimation, animateOneFrame, and stopAnimation methods.
Note
In Chapter 9, I explain and demonstrate the JNI Invocation API. The Invocation API is required for creation of Java screen savers on OS X. If you do not already understand the Invocation API, read Chapter 9 before attempting to understand the java_screen_saver project. The java_screen_saver project builds on information found only in Chapter 9.
In this section, I explain Java screen saver creation using the java_screen_saver project found on the book's Web site. I describe all the code necessary to set up a Java screen saver. After the initial wrapping of the Objective-C screen saver is complete, any additional Java code is just standard Java. The tricky bit is setting up your JNI to wrap the functionality of the Objective-C screen saver that is invoked by your system.
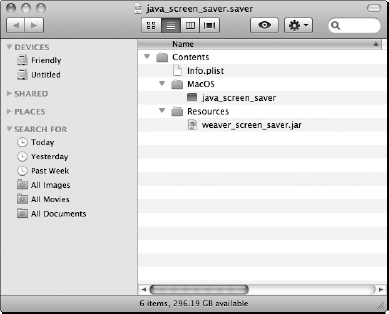
The components of the java_screen_saver project are shown in Figure 10.8.
In the java_screen_saver project, I create a child of the Objective-C ScreenSaverView class and name it ScreenSaverChild. I then integrate the ScreenSaverChild class with the code in SSWrapper.m.
SSWrapper uses some Objective-C syntax, but it's written more in C fashion. SSWrapper is not a class; it is a collection of functions. I take care of the JNI Invocation code in SSWrapper.
SSWrapper starts or obtains a JVM and obtains a global reference to the Java OSXScreenSaverWrapper class. The OSXScreenSaverWrapper class is responsible for handling calls from the underlying Objective-C and for making callbacks to the native code from Java. Because of the brevity of this example, the OSXScreenSaverWrapper class also creates the WeaveSS objects. In a more flushed out program, the JNI wrapper should hand off this responsibility to a controller class of some sort.
The Java WeaveSS class draws the actual woven patterns on the screen. Each WeaveSS instance draws one path. The more instances of WeaveSS that OSXScreenSaverWrapper creates, the more lines of color the screen saver has weaving at the same time.
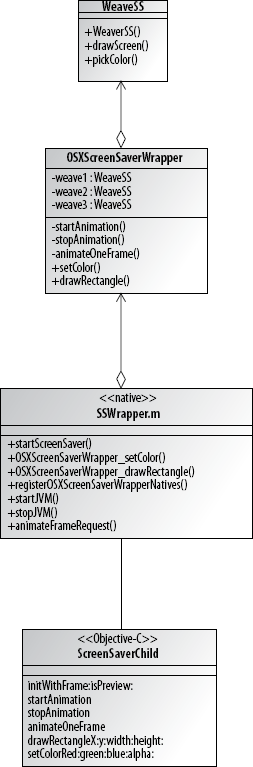
OS X needs a screen saver configuration it recognizes, so the first step of creating a screen saver is creating the OS X interface. In this case, the interface is an Objective-C object extending the ScreenSaverView class. The name of my ScreenSaverView child is ScreenSaverChild. (It is an easy name to remember, anyway.)
Note
Remember that Objective-C classes are often split into two files, an @interface file and an @implementation file. The interface is a *.h file and the implementation is a *.m file. For example, the ScreenSaverChild interface is contained in a file named ScreenSaverChild.h. The ScreenSaverChild implementation is contained in a file named ScreenSaverChild.m.
The following source is for the Objective-C ScreenSaverChild interface:
#import <ScreenSaver/ScreenSaver.h>
#include "SSWrapper.h"
@interface ScreenSaverChild : ScreenSaverView
{
}
- (void) drawRectangleX: (CGFloat) x
                      y: (CGFloat) y
                  width: (CGFloat) width
                 height: (CGFloat) height;
- (void) setColorRed: (CGFloat) red
               green: (CGFloat) green
                blue: (CGFloat) blue
               alpha: (CGFloat) alpha;
@end
As you can see from the ScreenSaverChild @interface, I expose methods allowing the drawing of rectangles and the setting of colors. Both the drawRectangleX:y:width:height: method and the setColorRed:green:blue:alpha: method are used by callbacks from the Java code.
The following source is for the Objective-C ScreenSaverChild implementation. This example is very similar to the base_screen_saverView class in the first example. The main difference is that the logic from the drawScreen method in base_screen_saverView is now in the Java WeaveSS class.
#import "ScreenSaverChild.h"

@implementation ScreenSaverChild
- (id)initWithFrame:(NSRect)frame isPreview:(BOOL)isPreview
{
   self = [super initWithFrame:frame isPreview:isPreview];
   if (self) {
      [self setAnimationTimeInterval:1/30.0];
}
return self;
}
- (void)startAnimation
{
[super startAnimation];
NSSize screenSize = [self bounds].size;
int x1 = screenSize.width;
int y1 = screenSize.height;
setScreenSaver(self, x1, y1);
startJVM();
}
- (void)stopAnimation
{
[super stopAnimation];
stopJVM();
}
- (void)drawRect:(NSRect)rect
{
[super drawRect:rect];
}
- (void)animateOneFrame
{
animateFrameRequest();
}
- (BOOL)hasConfigureSheet
{
return NO;
}
- (NSWindow*)configureSheet
{
return nil;
}
- (void) drawRectangleX: (CGFloat) x
y: (CGFloat) y
width: (CGFloat) width
height: (CGFloat) height
{
NSRect rectToDraw;
rectToDraw = NSMakeRect (x, y, width, height);
[NSBezierPath fillRect: rectToDraw];
}
- (void) setColorRed: (CGFloat) redgreen: (CGFloat) green
blue: (CGFloat) blue
alpha: (CGFloat) alpha;
{
NSColor *colorToSet;
colorToSet = [NSColor colorWithCalibratedRed: red
green: green
blue: blue
alpha: alpha];
[colorToSet set];
}
@endThe next step in the process of creating a Java screen saver is creating a JVM. Also, you need to hook up the Java and Objective-C methods. I divided this task into two files named SSWrapper.m and SSWrapper.h. The SSWrapper.m file is a little complex, so I break up the source with annotations explaining the code.
The following source is for the SSWrapper.h header file. The SSWrapper.h file contains all the #includes and #imports for the SSWrapper.m file. The SSWrapper header does not contain an interface definition because I did not define SSWrapper as an Objective-C class. Nothing prevents you from making SSWrapper into a class in your Java screen savers. Above all else, clarity in the code is most important. Make your decision based on code maintainability.
#import <Cocoa/Cocoa.h>
#include <jni.h>
#include <stdio.h>
#include <unistd.h>
#import "ScreenSaverChild.h"
I used #include instead of #import for jni.h, stdio.h, and unistd.h, because they are all written to handle multiple includes. However, #import works in these cases too. Using #include is just a stylistic choice here.
The following source is for the SSWrapper.m file. The SSWrapper.m file is extremely important to the process of creating a Java screen saver. SSWrapper.m obtains the JVM reference and the jmethodIDs, and it registers the names and function implementations of Java's native callbacks.
#include "SSWrapper.h"
// shutdown flag
jboolean shutdown_requested = JNI_FALSE;

// reused JNI variables
JavaVM *jvm;
jmethodID midAnimate;// an ID not a reference!
jclass javaWrapperClass;// a global, not local, reference
// Screen Saver variables
ScreenSaverChild *myScreenSaver;
jint ssWidth;
jint ssHeight;

void setScreenSaver(ScreenSaverChild *ss, int w, int h)
{
   myScreenSaver = ss;
   ssWidth = w;
   ssHeight = h;
}
The jvm variable is literally the variable that holds a reference to the JVM. The midAnimate jmethodID holds an ID to the Java method for animating the screen saver. The javaWrapperClass reference holds a global reference to the OSXScreenSaverWrapper class. The setScreenSaver() function stores a reference to the ScreenSaverChild instance, along with the width and height of the screen.
// Java "native" callbacks from JNI
// header file

//Class:     com.genedavis.OSXScreenSaverWrapper
//Method:    void setColor(double,double,double,double)
JNIEXPORT void
JNICALL OSXScreenSaverWrapper_setColor
(JNIEnv * env, jclass jc, jdouble red, jdouble green, jdouble
blue, jdouble alpha)
{
   [myScreenSaver setColorRed: red
             green: green
              blue: blue
             alpha: alpha];

}
//Class:     com.genedavis.OSXScreenSaverWrapper
//Method:    void drawRectangle (double,double,double,double)
JNIEXPORT void JNICALL OSXScreenSaverWrapper_drawRectangle
(JNIEnv * env, jclass jc, jdouble x, jdouble y, jdouble width,
   jdouble height)
{
   [myScreenSaver drawRectangleX: x
                               y: y
                           width: width
                          height: height];
}
The SSWrapper file creates two native implementations for Java callbacks:
OSXScreenSaverWrapper_setColor
OSXScreenSaverWrapper_drawRectangle
Looking at the names of both functions, it is obvious that javah did not create these method names. The function names are far too simple to be javah-generated. Both methods are registered native methods set up by this function:
registerOSXScreenSaverWrapperNatives
Conveniently, that is the next function in the code.
JNIEXPORT void registerOSXScreenSaverWrapperNatives
(JNIEnv * env, jclass jc)
{
   // fill with Java's native names,
   // followed by javp style signature
   // and the C version of the method
   // names
   JNINativeMethod natives[] =
   {
      {
         "setColor",
         " (DDDD)V",
         &OSXScreenSaverWrapper_setColor
      },

      {
         "drawRectangle",
         " (DDDD)V",
         &OSXScreenSaverWrapper_drawRectangle
      }
   };

   // adding the methods from the C
   // side instead of the Java side
   (*env)->RegisterNatives(env, jc, natives, 2);
}
The registerOSXScreenSaverWrapperNatives function creates a JNINativeMethod array containing the two native methods defined by the Java OSXScreenSaverWrapper class. The two methods are then registered by the RegisterNatives() function. These two function implementations are statically linked instead of dynamically linked.
void startJVM(void)
{
NSLog( @"Called startJVM()" );
// declaring the JVM and environment
// variables
JNIEnv *env;
// setting up arguments to JVM
JavaVMInitArgs jvm_args;
// Always declare the newest version of
// JNI you want to use. JNI_VERSION_1_6
// corresponds to Java 6.
jvm_args.version = JNI_VERSION_1_6;
// JavaVMOptions are the properties
// you are already familiar with
// from the command line
JavaVMOption options[1];
// The Java JAR file is placed in the Resources
// directory of the *.saver bundle. This code
// locates the JAR file in the bundle and then sets
// the -Djava.class.path= option so that the
// JVM knows where to find the Java classes.
NSString * javaOption = @"-Djava.class.path=";
NSBundle* myBundle =
[NSBundle bundleForClass:[myScreenSaver class]];
NSString* myJar = [myBundle pathForResource:@"weaver_screen_saver" ofType:@"jar"];
javaOption = [javaOption stringByAppendingString:myJar];
options[0].optionString = (char*) [javaOption UTF8String];
// The option array length MUST be declared.
// Remember this is C, and array lengths
// are not known unless your program explicitly
// stores them.
jvm_args.nOptions = 1;
// setting the options
jvm_args.options = options;
jvm_args.ignoreUnrecognized = JNI_FALSE;At this point, you are ready to create a JVM. However, screen savers are modules in a larger process, which implies that a JVM may already exist. Never assume you are the only one creating JVMs. Only one JVM can be created per process, so if a JVM already exists, you cannot create a second one. Also, if a JVM was created and destroyed, you are still barred from creating another JVM. If you are running in preview mode, because the user is using System Preferences to choose a screen saver, and the user clicks the Test button to test your screen saver, your test needs to grab the existing JVM from the preview screen saver instance.
In short, look for existing JVMs before creating JVMs. When finished with a JVM, remember not to destroy it unless you are certain it is not still needed. In the case of screen savers, don't destroy your JVMs.
// checking for existing JVM
 // This is a must! Multiple JVMs cannot be created
// in one process
jsize jvmCount = 0;
int foundJVM = JNI_GetCreatedJavaVMs(&jvm, 1, &jvmCount);
if (foundJVM == 0 && jvmCount > 0)
{
   // succeeded in getting an existing JVM
   // attaching this thread
   (*jvm)->AttachCurrentThread(jvm, (void**) &env, NULL);
}
else
{
   // no JVM found, ... creating the JVM
   // this thread is automatically attached
   JNI_CreateJavaVM(&jvm, (void**)&env, &jvm_args);
}
Now, you have a JVM with a reference in your jvm variable. All that remains in this function is to obtain a global reference to the OSXScreenSaverWrapper class and use the reference to obtain method IDs for the startAnimation() and the animateOneFrame() methods.
// obtaining the Java class com.genedavis.
OSXScreenSaverWrapper
jclass localJavaWrapperClass =
   (*env)->FindClass(env, "com/genedavis/
OSXScreenSaverWrapper");
javaWrapperClass = (*env)->NewWeakGlobalRef(env,
localJavaWrapperClass);// make reference permanent
// don't need reference anymore
(*env)->DeleteLocalRef(env, localJavaWrapperClass);

// registering the statically linked native methods
// for com.genedavis.OSXScreenSaverWrapper
registerOSXScreenSaverWrapperNatives(env, javaWrapperClass);

jmethodID mid =
(*env)->GetStaticMethodID(env, javaWrapperClass,
"startAnimation", " ()V");
(*env)->CallStaticVoidMethod(env, javaWrapperClass, mid);

midAnimate =
   (*env)->GetStaticMethodID(env, javaWrapperClass,
"animateOneFrame", " (IIZ)V");
}
The previous function handled starting the screen saver. This includes calling the startAnimation() method in the Java code. The code in the next two functions calls the Java methods for animating the screen saver and stopping the screen saver.
void stopJVM(void)
{

   NSLog( @"Called stopJVM()" );


   JNIEnv *env = NULL;
   jint env_error = JNI_OK;

   // Use the JVM reference to get an up-to-date
   // JNIEnv. JNIEnv variables need constant
   // updates
   env_error = (*jvm)->GetEnv(
                              jvm,
                              (void **)&env,
                              JNI_VERSION_1_6);

   jmethodID mid =
   (*env)->GetStaticMethodID(env, javaWrapperClass,
   "stopAnimation", " ()V");
   (*env)->CallStaticVoidMethod(env, javaWrapperClass, mid);
   // cleaning up the JVM. Do NOT destroy the JVM!
   (*env)->DeleteWeakGlobalRef(env, javaWrapperClass);
}
void animateFrameRequest(void)
{
   JNIEnv *env = NULL;
   jint env_error = JNI_OK;

   // Use the JVM reference to get an up-to-date
   // JNIEnv. JNIEnv variables need constant
   // updates
   env_error = (*jvm)->GetEnv(
                              jvm,
                              (void **)&env,
                              JNI_VERSION_1_6);
if ([myScreenSaver isPreview])
{
(*env)->CallStaticVoidMethod(env, javaWrapperClass,
midAnimate, ssWidth, ssHeight, JNI_TRUE);
}
else
{
(*env)->CallStaticVoidMethod(env, javaWrapperClass,
midAnimate, ssWidth, ssHeight, JNI_FALSE);
}
}That completes the native code and JNI necessary for the Java screen saver. When you make your own Java screen savers, you need to create additional native methods to register with the RegisterNatives() functions. Make sure you understand how the Java callbacks to the native screen saver code work, and you will do fine.
Tip
If this is your first experience with the Invocation API, it may seem a bit confusing. Again, review Chapter 9, and keep at it. The Invocation API and JNI are not very difficult. Learning JNI and the Invocation API is mostly a matter of patience.
In the java_screen_saver project, the Java code is about the same length as the native code. In more complex screen savers, the Java code grows much larger than the native code. Most of your variations from this example project will exist in the Java code and the implementation of OSXScreenSaverWrapper's native methods.
All the Java communication from and to Objective-C goes through the OSXScreenSaverWrapper class. The OSXScreenSaverWrapper class acts as the wrapper for all the native code in the screen saver. The following source is for the Java OSXScreenSaverWrapper class:
package com.genedavis;
public class OSXScreenSaverWrapper
{
   private static WeaveSS weave1;
   private static WeaveSS weave2;
   private static WeaveSS weave3;

   @SuppressWarnings("unused")
   private static void startAnimation()
   {
      // creating objects that control the drawing
      weave1 = new WeaveSS();
      weave2 = new WeaveSS();
      weave3 = new WeaveSS();
}
@SuppressWarnings("unused")
private static void stopAnimation()
{
// cleaning up
weave1 = null;
weave2 = null;
weave3 = null;
}
@SuppressWarnings("unused")
private static void animateOneFrame(
int width,
int height,
boolean isPreview)
{
weave1.drawScreen();
weave2.drawScreen();
weave3.drawScreen();
}
public static native void setColor(
double red,
double green,
double blue,
double alpha);
public static native void drawRectangle(
double x,
double y,
double width,
double height);
}The first three methods, startAnimation(), stopAnimation(), and animateOneFrame(), are called from the native code. They correspond to similarly named methods in the Objective-C ScreenSaverChild class. I set these three methods as private to discourage their use in the Java code. They are meant to be called only from the native code.
The last two methods, setColor() and drawRectangle(), are declared as native methods. These are the callbacks from Java to the native ScreenSaverChild. This example screen saver requires only two Java native methods. NSViews accept many drawing-related commands, so the potential list of useful native methods is very long. I give additional ideas related specifically to NSBezierPaths, later in this chapter.
All that's left is the code for drawing the screen saver animation. WeaveSS instances handle drawing the screen. The following source is for the Java WeaveSS class. I break up the code with explanations of what is occurring.
package com.genedavis;
public class WeaveSS {
   private double x1;
   private double y1;

   private boolean nw;
   private boolean ne;
   private boolean sw;
   private boolean se;

   private double redChoice;
   private double greenChoice;
   private double blueChoice;

   private int screenWidth;
   private int screenHeight;


   public WeaveSS()
   {
      int direction = (int)(Math.random()*4+1);
      switch ( direction )
      {
         case 1:
            nw = true;
            break;
         case 2:
            ne = true;
            break;
         case 3:
            sw = true;
            break;
         default:
            se = true;
            break;
      }

      pickColor();

      x1 = Math.random()*(screenWidth-12)+1;
      y1 = Math.random()*(screenWidth-12)+1;
   }
Each WeaveSS object represents one woven line on the screen. The WeaveSS constructor chooses a random movement direction for this instance. WeaveSS chooses a random starting color for itself by calling the pickColor() method. Finally, WeaveSS chooses a starting location for itself.
public void drawScreen()
{
      // set current color

      OSXScreenSaverWrapper.setColor(
            redChoice,
            greenChoice,
            blueChoice,
            0.5);

      // draw current position

      OSXScreenSaverWrapper.drawRectangle(
            x1,
            y1,
            10,
            10);

      // move square

      if (nw)
      {
         x1--;
         y1++;
      }
      else if (ne)
      {
         x1++;
         y1++;
      }
      else if (sw)
      {
         x1--;
         y1--;
      }
      else if (se)
      {
         x1++;
         y1--;
      }


      // bounce off walls
if (y1 < 1)
{
if (se)
{
se = false;
ne = true;
pickColor();
}
else if (sw)
{
sw = false;
nw = true;
pickColor();
}
}
if (y1 > screenHeight - 11.0)
{
if (ne)
{
ne = false;
se = true;
pickColor();
}
else if (nw)
{
nw = false;
sw = true;
pickColor();
}
}
if (x1 < 1)
{
if (sw)
{
sw = false;
se = true;
pickColor();
}
else if (nw)
{
nw = false;
ne = true;
pickColor();
}
}if (x1 > screenWidth - 11.0)
{
if (se)
{
se = false;
sw = true;
pickColor();
}
else if (ne)
{
ne = false;
nw = true;
pickColor();
}
}
}The drawScreen() method sets the screen saver's drawing color and draws a rectangle in the current drawing location. After taking care of drawing based on the current color and location, the drawScreen() method moves the drawing location one point. The drawScreen() method finishes by determining whether the motion direction and color should change.
public void pickColor()
   {
      redChoice = Math.random();
      greenChoice = Math.random();
      blueChoice = Math.random();
   }
}
The pickColor() method randomly chooses a new color for the current WeaveSS instance. New colors are chosen when the WeaveSS object is constructed and when it reaches the edge of the screen and changes direction.
Note
Drawing to NSViews (such as a ScreenSaverView) is completely resolution-independent. All monitors on OS X are considered to have 72 dots per inch (DPI), no matter what the actual screen resolution is. This means that your drawing does not get bigger or smaller based on the resolution of the screen.
That is all the code necessary to make your own screen saver. Only one task remains. You must package screen savers on OS X in *.saver bundles. Creating custom SAVER bundles is the topic of the next couple of sections.
Use any common build tool to assemble an OS X screen saver. Before setting up Ant or Xcode to assemble your screen saver, you should know the manual steps for assembling SAVER bundles. Assembling savers by hand is so simple that you may not get around to automating it for a while.
For a quick screen saver prototype, follow these steps:
Create and build your native screen saver code.
Build your native code in Xcode using the Screen Saver project template that I discussed earlier in this chapter.
Build your Java code separately in your favorite Java IDE.
Jar your Java code.
Move the
*.saverfile from Xcode project to a safe directory.Every time you rebuild your Xcode screen saver project, your
*.saverbundle is overwritten. Until you are prepared to integrate your Java and Objective-C builds, be careful not to overwrite your fully assembled Java screen saver.Place your JAR in the Resources directory of the *.saver bundle, as shown in Figure 10.9.
Your Xcode-generated SAVER bundle probably contains a language-specific resource directory, such as
English.lproj. I removed theEnglish.lprojdirectory for thejava_screen_saverexample, but you may choose to use it, depending on your project.Update the SAVER's Info.plist.
This step is explained in the next section.
Tip
If you reuse a previously assembled build of your Java screen saver project, you only have to modify the Info.plist the first time you assemble the bundle. On subsequent builds, just copy the new JAR into the Resources folder.
Tip
Control-click a *.saver file to see the Finder context menu. Select Show Package Contents to see the directory structure of the SAVER bundle.
Warning
When creating your own Java screen savers, remember to update the name and search location of the project JAR in the invocation of the JVM. In the java_screen_saver project, this code is in the SSWrapper.m file.
When setting up a SAVER bundle, you need a properly configured Info.plist, as shown in Figure 10.10. The Info.plist contains key information, such as the name of the Objective-C ScreenSaverView implementation. A SAVER bundle without a properly configured Info.plist does not work.
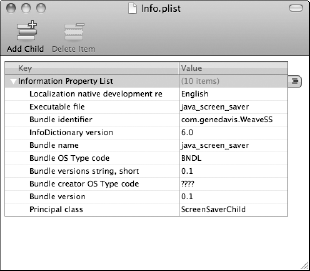
At a minimum, set the following properties in the Info.plist:
The Executable file is the name of the file containing the native screen saver and JVM invocation. The Bundle identifier is a unique name for OS X to internally identify your screen saver. I suggest using the fully qualified name of the main Java class in the Java screen saver. The Bundle name is the name of the bundle as displayed by the System Preferences. The Principal class is the name of the Objective-C class that extends the ScreenSaverView class.
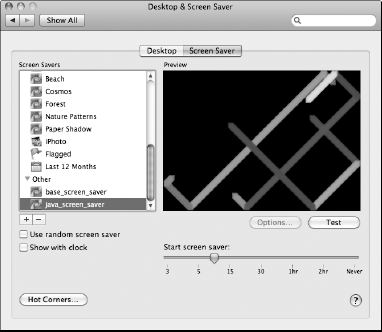
After you set up your SAVER bundle and properly configure your Info.plist, copy your screen saver bundle to the ~/<username>/Library/Screen Savers directory. You can now set your screen saver to your default screen saver. For instance, opening your screen saver preferences after placing the java_screen_saver.saver file in the Screen Savers directory gives you the option of selecting a screen saver named java_screen_saver, as shown in Figure 10.11.
Screen savers on OS X are NSViews. Because they are NSViews, all the drawing techniques available to NSView (and there are many) are available to your Java-based screen savers. The only catch is that you need to write wrappers for the native drawing code. Most of the hard work is already taken care of for you in the java_screen_saver sample project. Just add to actual wrappers to make the native drawing methods available in your Java code.
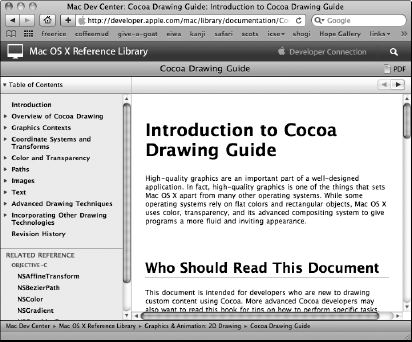
Drawing in NSView classes is detailed in Apple's Cocoa Drawing Guide, shown in Figure 10.12. This is the address for Apple's Cocoa Drawing Guide Web site:
http://developer.apple.com/mac/library/documentation/Cocoa
/Conceptual/CocoaDrawingGuide/Introduction/Introduction.html
In the java_screen_saver project, I use a sindle NSBezier command to draw the screen saver. The command is found in the Objective-C ScreenSaverChild class and looks like this:
[NSBezierPath fillRect: rectToDraw];
The NSBezierPath class is capable of much more than drawing filled rectangles. Three of NSBezierPath's class methods for drawing are fillRect:, strokeRect:, and strokeLineFromPoint:toPoint:. The strokeRect: method creates an open rectangle without a fill. The strokeLineFromPoint:toPoint: creates a line.
NSBezierPath also supports full resolution-independent vector drawing. Vector drawing consists of creating curved and straight lines in the same way that Adobe Illustrator does with its pen tool.
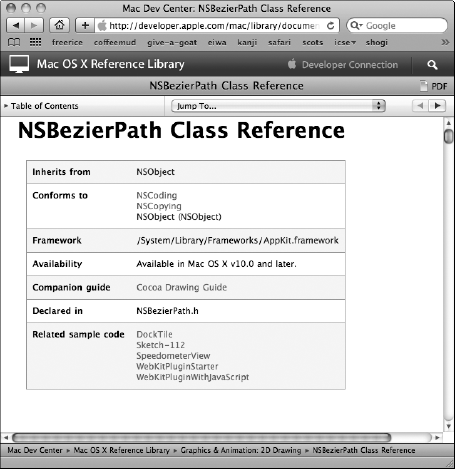
For more information on the advanced features of NSBezierPath, see Apple's Cocoa Drawing guide, and check the class reference for the NSBezierPath on Apple's Web site. Find Apple's NSBezierPath Class Reference Web site, as shown in Figure 10.13, here:
http://developer.apple.com/mac/library/documentation/Cocoa
/Reference/ApplicationKit/Classes/NSBezierPath_Class/Reference
/Reference.html
Screen savers must extend the Objective-C ScreenSaverView class. This does not prevent you from writing Java-based screen savers. It just adds an additional step. By using the JNI Invocation API, you can interface a Java controller with a normally Objective-C framework.
I began this chapter with a simple Objective-C-based screen saver example. The example demonstrated stopping and starting screen saver animation. The first example also demonstrated animating frames of the screen saver.
The second example in this chapter expanded upon the first example. The second example is a fully functional Java screen saver. The Objective-C screen saver is stripped of all control code and wrapped by a second set of native code that invokes a JVM. All of the drawing logic is moved to the Java code.
Screen savers must be bundled in SAVER bundles. The Saver bundles have the naming convention of *.saver. The SAVER bundles are set up similarly to other application bundles, except that the class that starts the screen saver is a child of the ScreenSaverView class. Screen saver bundles must have a properly configured Info.plist file in order to be used as a system screen saver.