
Apple ships Java on every Mac. Java is an important part of OS X. Many applications for OS X are Java-based. Apple has a very strong commitment to providing a stable OS X-integrated Java experience to its users.
However, Java is just a small part of OS X. I describe in earlier chapters the Cocoa frameworks, Carbon frameworks, and Unix libraries. Many of these libraries are written for C or C-based languages.
Thankfully, Java is not a C-based language. Normally, you don't have to worry about pointers, cleaning up memory, allocating memory, and a host of other nasty little details that C-based languages deal with all the time.
Still, access to Cocoa, Carbon, and POSIX libraries is useful sometimes. The standard approach on OS X to access Cocoa, Carbon, and Unix libraries from Java is Java Native Interfaces (JNI). JNI provides access to all Cocoa frameworks, Carbon frameworks, and POSIX libraries from Java.
JNI tends to frighten beginning and advanced Java programmers. Visions of pointers to pointers and function callbacks passed around with esoteric #define statements cause dread, and even hardened Java programmers cringe when the acronym "JNI" is spoken.
Remember, the famous words of Douglas Adams. "DON'T PANIC. JNI really isn't any more difficult than creating Java GUI layouts by hand. JNI just takes practice." (OK, he didn't say that last bit, or the center part either.)
In Chapter 8, I explain using CocoaComponents. CocoaComponents require JNI, so I gave a quick introduction to C and Objective-C integration with Java in the context of CocoaComponents.
In this chapter, I explain the basics of JNI. I introduce several opaque structures provided by JNI. I explain in detail the use of JNI in communicating from Java to C. I also explain communicating from C to Java.
In this chapter, I explain use of the Invocation API. The invocation API allows C-based programs to create Java Virtual Machines dynamically. The full importance of the invocation API becomes apparent in Chapter 10, when I demonstrate wrapping the Cocoa Screen Saver Framework in Java. Using the invocation framework, you can create custom Java launchers for your OS X application bundles. You can even use the techniques in this chapter (and in Chapter 10) to wrap Interface Builder-created views for use as your front end in otherwise pure Java applications.
Java Native Interfaces (JNI) give Java access to native C-based programs. Consider the ubiquitous nature of C. Every modern programming language with any sizable user base can interface with C. By extension, any modern language of any import also can interact with Java, because Java can speak C.
The key, of course, is JNI. Java programmers don't generally like C, so JNI isn't discussed much. It is basically the embarrassing relative no one talks about. However, the bad reputation is mostly unjustified.
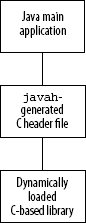
In less than 50 lines of code, you can produce a fully functional JNI program. Admittedly, it won't do much, but you have to start somewhere. The most basic JNI program, diagramed in Figure 9.1, contains a Java native method, a javah-generated C header, and a short C library.
When your Java program needs to call native libraries, follow these steps:
Declare your native methods in Java.
This is the easiest of the steps and requires merely that you use the
nativekeyword when declaring unimplemented Java methods.Generate any needed C header files.
Perform this step with a call to
javah. Thejavahcommand-line tool examines a Java class looking for methods declared asnative. All native method signatures are translated intoCfor use in theCimplementations.Implement the C header files.
The
CJNI libraries have several defined types that mirror Java's primitives and objects. Implementing the native end of Java methods requires some knowledge of the Java types available inC.
JNI requires native methods and static blocks. Native methods and static blocks don't typically get used in Java, except when creating JNI-based calls. If this is your first experience with JNI, you may never have heard of static blocks or the native keyword.
On the Java side, JNI uses an unimplemented native method to indicate methods implemented in the C code as functions. This little bit of magic sounds too good to be true, but that is pretty much all there is to creating a JNI method signature in Java. (Obviously, the C implementation is a little more complex, but not much.)
A native method is declared like this:
public native void someName();
The return type and the parameters passed to the method can be anything found in other methods. Native methods can be declared as static or as regular instance methods. Access to the method can be private, protected, public, or the implicit package-private. For all practical purposes, the method signature is similar to an abstract method signature, except that native code contains the implementation, instead of a subclass written in Java.
The other common task on the Java end is loading native libraries that contain the implementations of native Java methods. Loading libraries for use in JNI usually happens before the program starts. Loading the native libraries occurs in static blocks of code.
A static block of code looks like a normal static method stripped down to the curly braces. Usually static blocks of code are placed near the top of a method declaration, to make them stand out. A static block of code looks like this:
static
{
   // expressions go here ...
}
Note
Sometimes JNI uses no native methods or static blocks of code. For instance, in the first invocation example in this chapter, C starts the JVM and calls a Java method. No static block or native methods are in the first invocation example.
The two approaches most often taken when loading native libraries are calling the System class method named loadLibrary() and calling the System method load(). The loadLibrary() method is used when your library is in a predefined location specified during JVM start up. The load() method is used when you load a library from a file system location defined while your Java program is running.
The first approach to loading native libraries looks something like this:
System.loadLibrary("SomeLibrary");The second common approach is a little more complex and looks like this:
try
{
   File lib = new File("objc_bin/libSomeLibrary.jnilib");
   String path = lib.getCanonicalPath();
   System.load( path );
}
catch (IOException ioe)
{
   ioe.printStackTrace();
}
Warning
Remember to get the native library name correct when loading it. The filenames of dynamic JNI libraries take the form lib<name>.jnilib. However, when using the System class method loadLibrary(), refer to the library name, not the filename.
C programs often start a JVM and call Java methods. Starting JVMs from C is rather involved, so I save that discussion for later in the chapter. Starting a JVM and supplying that JVM with statically linked native method implementations is the realm of the Invocation API. For now, I stick to explaining how Java programs load and call native libraries, not how C programs load and call Java libraries.
After declaring your native methods, compile your Java class. You must now create your native C header files. For the examples in this book, one header is all you create. Even in real-world setting, programs commonly have only one class that defines native methods and only one header file generated from that class.
Generate your C header file using javah. The javah command takes classes as arguments. Remember to use fully qualified class names with javah. For instance:
javah com.mycompany.MyClass
C implementations of native Java methods must #include the C header generated by javah. Also, the implementing C file must #include the jni.h header, but this is usually done indirectly by the javah-generated header. The C code itself need not be complex.
Explaining JNI doesn't teach you JNI. You need to see and try some code examples. The following example is found on the book's Web site. The project uses Ant, but you can build and run just as easily from the command line or any Java-aware build tool of your choice.
The first example is the hello_darwin project. The project is split into three source files: HelloDarwinExample.java, native_greeting_jni.h, and darwin.c. The project implements the basic JNI example diagrammed in Figure 9.1.
The following source is the code for the HelloDarwinExample class.
package com.genedavis;
public class HelloDarwinExample {
   // executed during class load
   static
   {
      // used to load from a system library path
      System.loadLibrary("NativeGreeter");
   }

   public static void main(String[] args)
   {
         HelloDarwinExample hde = new HelloDarwinExample();
         hde.hi();
   }

   // native method call
   private native void hi();
}
The HelloDarwinExample class contains the following:
a
staticblocka
main()methoda
nativemethod
I load the native library using the static block. I chose to use the shorter method of loading the library, mostly because short code is easier to read. Some programmers demand that you use the longer version. Both methods work fine.
The native method is private but does not need to be private. I could have given it any visibility. I made this native method simple. It does not contain arguments or a return value. However, there are no restrictions on the arguments and return values defined by native methods.
Creating a C header file from the HelloDarwinExample class is a simple call of javah. From the Terminal, cd to your compiled Java class directory and use the following command:
javah com.genedavis.HelloDarwinExample
In the case of the chapter's sample code from the book's Web site, run the command from the hello_darwin/java_bin/ directory.
If you want to specify a name for your header file, use the -o option. Your command might look like this:
javah -o my_jni_header.h com.genedavis.HelloDarwinExample
Note
The javah command does not create a native declaration of the main() method, only the hi() method. That is because the hi() method is declared as native.
In the example's project, I force the header file to the name of native_greeting_jni.h. The following source is for the native_greeting_jni.h file. The native_greeting_jni.h file is generated using the javah tool from the HelloDarwinExample class.
/* DO NOT EDIT THIS FILE - it is machine generated */
#include <jni.h>
/* Header for class com_genedavis_HelloDarwinExample */
#ifndef _Included_com_genedavis_HelloDarwinExample
#define _Included_com_genedavis_HelloDarwinExample
#ifdef __cplusplus
extern "C" {
#endif
/*
 * Class:     com_genedavis_HelloDarwinExample
 * Method:    hi
 * Signature: ()V
 */
JNIEXPORT void JNICALL Java_com_genedavis_HelloDarwinExample_hi
  (JNIEnv *, jobject);
#ifdef __cplusplus
}
#endif
#endif
Looking at the javah-generated header, you may notice that the header is designed to work with C++ as well as C. This is convenient for diehard OOP programmers that want to avoid procedural programming all together. C makes tutorials easier to follow than C++, so I avoid C++ in this book.
Notice that the file starts with this line:
/* DO NOT EDIT THIS FILE - it is machine generated */
You can ignore this line. Yes, the file is automatically generated. However, if you know you won't be rewriting the header or modifying method signatures, there is nothing mystical about the header file. In fact, you can easily copy the relevant C header source to a new header file and use it instead. The new header might look like this:
#include <jni.h>
#ifndef _Included_com_genedavis_HelloDarwinExample
#define _Included_com_genedavis_HelloDarwinExample
/*
 * Class:     com_genedavis_HelloDarwinExample
 * Method:    hi
 * Signature: ()V
 */
JNIEXPORT void JNICALL Java_com_genedavis_HelloDarwinExample_hi
  (JNIEnv *, jobject);
#endif
Do whatever makes sense for your project.
Warning
If you modify the javah-generated header, be careful not to destroy your changes by running javah to generate a new version of the same file you modified. Move your changes to a new file that won't disappear if you accidentally (or intentionally) run javah again.
In case your C is rusty or you are learning C as you read this chapter, I provide a blow-by-blow explanation of the header file. You can start off by thinking of C header files as similar to Java interfaces. (I just made lots of C programmers very angry by making that statement.) As your C improves, you will find header files to be far more interesting than Java's interfaces.
Note
C header files are filled with preprocessor directives and not much C. These directives are typically handled before the C program compiles. Preprocessor directives modify the C in your native application, preparing it for compilation. Many C books (and classes) ignore preprocessor directives, but no one writes useful C programs without a large number of directives.
All the lines that look like Java comments are exactly that. They are C comments. Even if the compiler complains a bit, most C compilers support both // and /* */ style comments. C does not have an equivalent to Javadoc comments. Sorry.
This is the first line that influences the program:
#include <jni.h>
The #include (pronounced "pound include") acts like import does in Java. Commonly, angle brackets surround names of system library headers and quotation marks surround library headers you created.
This is the next important line:
#ifndef _Included_com_genedavis_HelloDarwinExample
In Java, you import classes, enums, interfaces, and packages without any concern that duplicate import statements might cause duplicate code to actually appear multiple times in the final running program. Java takes care of preventing duplicate imports from resulting in actual duplicate code loading into the JVM.
C has no such guarantee. If you #include a header twice, the library can end up in memory twice. C programmers use preprocessor directives to check for multiple #includes and eliminate the duplicates.
In pseudo code, the preprocessor check looks like this:
Does the variable named after this header file exist?
No?
Define the variable and name it after this file.
Define the methods and do other stuff
Yes?
Return without doing anything.
You probably notice it is an if statement and has similarities to a synchronized block in Java. The behavior is very similar, though no multithreading is involved. These statements are of note:
#ifndef _Included_com_genedavis_HelloDarwinExample
#define _Included_com_genedavis_HelloDarwinExample
/* header source goes here. */
#endif
The most important bit of the header is the function signature. It looks like this:
JNIEXPORT void JNICALL
Java_com_genedavis_HelloDarwinExample_hi
(JNIEnv *, jobject);
This function represents the Java method hi() in the HelloDarwinExample class. The return type is void. The function name is as follows:
Java_com_genedavis_HelloDarwinExample_hi
The two arguments to the function are a JNIEnv pointer and a jobject. JNIEXPORT and JNICALL are defined in jni.h, but you can almost always ignore them. (Ignore them, but don't delete them.)
You are already familiar with most of the common return types and arguments to JNI functions, as shown in Table 9.1. The one argument that is probably new to you is the JNIEnv *. JNIEnv is literally the JNI environment. It is an opaque type containing functions relating to the JNI environment. Supposing the JNIEnv * variable is named env, the syntax for calling JNIEnv functions usually looks like this:
(*env)->SomeFunction();
The actual implementation of your native Java method is contained in the darwin.c file. The following source is for the darwin.c file. The darwin.c file implements the function definition found in the javah-generated header.
#include <stdio.h>
#include "native_greeting_jni.h"

JNIEXPORT void JNICALL Java_com_genedavis_HelloDarwinExample_hi
   (JNIEnv * a, jobject b)
{
   printf("

Hello Darwin!!!

");
   return;
}
I have described the use of the JNIEnv *, but not the purpose of the jobject. Whenever a native Java method is implemented in C as a function, the first two arguments represent the caller of the function. JNIEnv is the JNI environment that called the function. The second argument is the Java object or class to which the native method belongs.
In other words, if the native method was static, a reference to the containing class is passed to the native implementation as a jclass. If the native method was in an instance (an object, not a class), then the second argument to the native implementation is a jobject. The jobject is a reference to the actual object that contained the native Java method.
Compiling the mixed Java-C applications by hand is a good way to get familiar with how all the pieces fit together. It doesn't take long to get old, though. All the JNI examples in the chapter come with Ant projects to take care of the details for you. I describe using Ant to build JNI projects later in this chapter.
Note
I describe Ant builds in detail in Chapter 4.
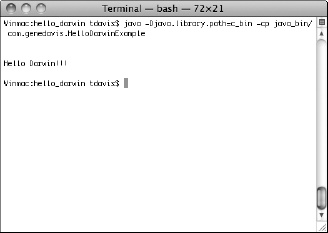
After building the HelloDarwinExample application, run it from the command line with the following command:
java -Djava.library.path=objc_bin -cp java_bin/ ¬
com.genedavis.HelloDarwinExample
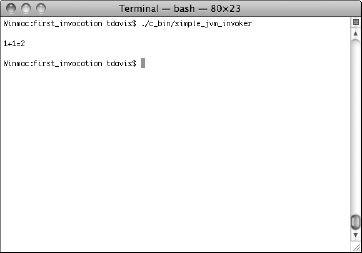
The results are shown in Figure 9.2.
JNI involves more work than pure Java. Writing JNI is worth your time only if it saves you time or if it adds features to your program not available in Java. Believe it or not, some tasks are impossible from Java, so they require JNI or similar technologies.
One example of an impossible task is single character input from the Terminal. The Terminal (like consoles in other operating systems) enters a line of text to the running program with the user presses Return or Enter. You cannot retrieve characters as they are typed in the Terminal from a pure Java program.
A simple JNI program provides single character reading from the Terminal. The next JNI example is the SingleCharReader application. The SingleCharReader provides Java with the capability to instantly read keystrokes as the user types them in the Terminal. This is useful for command-line utilities, Terminal User Interfaces, text-based games, and any application that is not GUI-based. (Yes, they still exist.)
Looking at the source, you see that this application is not much more complex than the first example in this chapter. Yet, this application extends the Java API in a useful way. JNI has that kind of power. Sometimes, just a few lines of JNI can save you tons of work, or even save a project from failure.
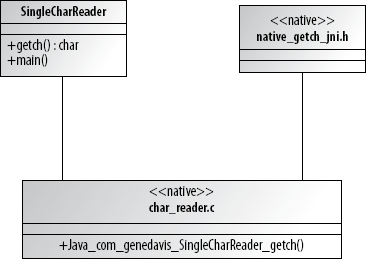
The SingleCharReader project consists of one Java class, one C header file, and one C source file, as shown in Figure 9.3. As you have already guessed, the Java class is named SingleCharReader. The javah-generated C header is called native_getch_jni.h. The C source file is called char_reader.c.
The following source is for the SingleCharReader class:
package com.genedavis;
public class SingleCharReader {
   // executed during class load
   static
{
// used to load from a system library path
System.loadLibrary("CharGrabber");
}
public static void main(String[] args)
{
SingleCharReader scr = new SingleCharReader();
System.out.println(
"Enter characters (type 'q' to quit)
");
char myChar = ' ';
while (myChar != 'q')
{
// use native call
myChar = scr.getch();
System.out.println(
"-->" +
myChar +
"<--
");
}
}
// native method call
private native char getch();
}The SingleCharReader class starts with a static block. The static block loads the dynamic library named CharGrabber using the System.loadLibrary() method. As I mentioned earlier, static blocks execute before the main method in a program, so the library is already loaded before the application's main() method executes.
Note
Because the library CharGrabber is a dynamic library, the actual filename is libCharGrabber.jnilib.
Warning
Remember to include the native libraries when running your Java applications. For instance, you can add an argument to the java command, such as -Djava.library.path=<path to lib>.
The SingleCharReader contains one native method. The native method is getch(). The method signature is as follows:
private native char getch();
Notice the getch() method has a return value of char. The native code returns a char to the Java code. This is the char representing the user's most recent keystroke.
The SingleCharReader also contains the application's main() method. The main() method instantiates an instance of the SingleCharReader. Then loops read characters from the user's keystrokes until the user types q.
Note
The SingleCharReader's native method could easily be a static method, instead of an instance method. Making an instance method is more a matter of style, and it's up to the individual programmer.
I generate the C header with the javah tool. As I mention earlier, there is nothing magical about this header or any header generated by javah. In fact, after you are used to the headers generated by javah, you may choose to save yourself a step and write your own JNI headers by hand.
The following source is for the native_getch_jni.h header file generated with javah from the SingleCharReader class.
/* DO NOT EDIT THIS FILE - it is machine generated */
#include <jni.h>
/* Header for class com_genedavis_SingleCharReader */
#ifndef _Included_com_genedavis_SingleCharReader
#define _Included_com_genedavis_SingleCharReader
#ifdef __cplusplus
extern "C" {
#endif
/*
 * Class:     com_genedavis_SingleCharReader
 * Method:    getch
 * Signature: ()C
 */
JNIEXPORT jchar JNICALL
Java_com_genedavis_SingleCharReader_getch
(JNIEnv *, jobject);
#ifdef __cplusplus
}
#endif
#endif
The header file is very similar to the preceding header file. It has a check for C++ and a check for prior #includes. The header #includes jni.h, and the header defines the project's sole native method implementation, getch().
The function name is as follows:
Java_com_genedavis_SingleCharReader_getch
The name is certainly long. Glancing at it, you can see the parts easily enough. "Java" means this is a Java native method implementation. "com_genedavis" means the implemented method is from the com.genedavis package. "SingleCharReader" is the name of the class containing native method definition. Finally, "getch" is the name of the actual native method implemented.
Tip
You do not have to use long function names for native implementations of JNI methods. With a little extra code, you can associate custom names with your native Java methods. I explain registering native methods later in this chapter when I discuss Java callbacks to C applications.
The following source is for the char_reader.c file. The char_reader.c file implements the getch() method from the SingleCharReader class.
#include <stdio.h>
#include <termios.h>
#include <unistd.h>
#include "native_getch_jni.h"
JNIEXPORT jchar JNICALL
Java_com_genedavis_SingleCharReader_getch
(JNIEnv * my_jenv, jobject my_jobj)
{
   jchar ch;
   struct termios old_term, new_term;
   //storing the old settings
   tcgetattr ( STDIN_FILENO, &old_term );
   // making a copy of the old settings
   // to modify
   new_term = old_term;
   // modifying the copy of the terminal settings
   // so there is no echoing and no buffering
   // just flipping bits here
   new_term.c_lflag &= ~( ICANON | ECHO );
   // setting the modified terminal settings
   // to be active
   tcsetattr ( STDIN_FILENO, TCSANOW, &new_term );
   // getting the character
   ch = getchar();
   // resetting the terminal settings to the old settings
   tcsetattr ( STDIN_FILENO, TCSANOW, &old_term );

   return ch;
}
The Java_com_genedavis_SingleCharReader_getch() function starts by defining a jchar and two termios structs. The jchar type is the JNI version of a Java char primitive. Structs of type termios represent the behavioral configuration of the terminal I/O. (That's terminal with a lowercase "t".) Think of termios as the developers' terminal I/O preferences.
The tcgetattr() function populates a provided termios struct with the current internal termios structure. I use the tcgetattr() function to save the current state of the terminal settings before modifying them. Changing the terminal I/O behavior in a program and not resetting it after the program is finished is generally frowned upon.
I set the new_term struct to the same values as the old_term, making a clone of the current terminal I/O settings. I modify the new termios structure so that echo is no longer set and buffering is turned off; then I make the new_term settings active.
Now, I can call getchar() and receive characters as the user types them. After I have a character from the user, I reset the terminal I/O settings with the original settings I stored in old_term.
Note
I flesh out the SingleCharReader application in Chapter 11 for use in an example Terminal User Interface application.
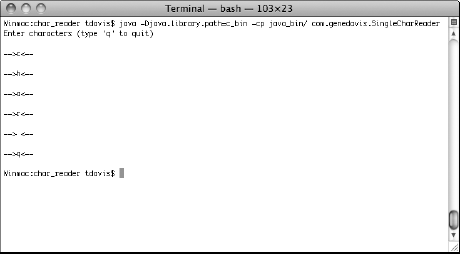
If you are working from the project from the book's Web site, use the following command to run the SingleCharReader application:
java -Djava.library.path=c_bin -cp java_bin/ ¬
com.genedavis.SingleCharReader
Execute the java command from the char_reader directory. The output looks similar to Figure 9.4.
Native code takes the form of fully modern Cocoa applications, pure C-based command-line tools, or legacy code, just to name a few. Sometimes you want to run Java code from inside native applications. Sometimes, you want to incrementally port C applications to Java. Creating Java Virtual Machines (JVMs) from inside native applications involves JNI's Invocation API.
The first two examples in this chapter deal with calling native code from an existing JVM. Both of those examples assume that you are running a Java application. If you want to execute Java from a native application, those examples don't solve your problem. When you write a program in C and execute it, no pre-existing JVM is available to execute Java byte code. In order to call Java from native code, you need a JVM.
But where do new JVMs come from? (Admit it. You've always wanted to ask.)
New JVMs come from calls to the JNI_CreateJavaVM() function. When JVMs get old, you get rid of them with calls to DestroyJavaVM(). There are more details, of course, but knowing those two functions is a good start.
Warning
You can create only one JVM for any process. If your program or another programmer's plug-in might need to reuse a JVM created with the Invocation API, do not destroy it with the (*jvm)->DestroyJavaVM(jvm); call.
Tip
The Jar Bundler discussed earlier in this book uses a small native application to launch the JVM and execute the bundled JAR file. Using the Invocation API, you can write your own custom Java application launcher. A bonus of creating your own launcher is that you can choose a custom entry method or methods other than the traditional main() method. Many languages besides Java run on JVMs. (For a short list, see http://en.wikipedia.org/wiki/List_of_JVM_languages.) If you run a language other than Java on a JVM, creating a custom application launcher may make sense for your language.
Another use of custom Java application launchers is simple obfuscation of code. Starting your application from a method other than main() gives hackers one more hurdle to overcome when cracking your software security.
Follow these steps for calling Java byte code from inside native applications:
Minimally,
JavaVMInitArgscontain the version of JNI (1.6) and theJavaVMOptionarray.Create a JavaVMOption array.
These options are commonly passed to the
javacommand in the Terminal, so you probably already know them. At the very least, you should pass in the location of your Java classes using the-Djava.class.path=some/path/argument. Add these options to theJavaVMInitArgsin preparation for creating the JVM.Calling
JNI_CreateJavaVM()creates a JVM. Your new JVM just sits there doing nothing useful until you actually call a method on it. When you execute thejavacommand from the Terminal, it creates a JVM with this function call and then finds the specified class with astatic main()method to call. However, you are under no obligation to call amain()method.Find the class containing the method you want to call.
Use the environment generated with the creation of the Java VM to call
FindClass(). When callingFindClass(), the naming convention for Java classes is to name the classes as you do in Java, except that the periods are replaced with forward slashes.Get the ID of the method you want to call.
Methods in Java are often overloaded. That means multiple methods exist in the same class with the same name, but different method signatures. When getting methods, you must specify both the method name and the method signature.
Call your Java method from your native program.
Call your static method from one of the many
CallStaticMethod()functions. Pass theJNIEnv*, thejclassreference, and thejmethodID, followed by the actual arguments to the Java method.Destroy your JVM.
Destroy your JVM only if you know for sure it is not needed again. Programs can create JVMs only once. If your application or another developer's plug-in requires the JVM after you destroy it, that's too bad. It's not coming back.
Creating a JVM from native code requires lots of steps. Here is an example. The project is called first_invocation, and of course it is found on the book's Web site.
The first_invocation project consists of a C application and a single Java class with one short static method, as shown in Figure 9.5. The C application calls the Java method with two ints as parameters and receives an int as a return value.

Note
When examining the first_invocation project, notice that the project has no header files. When creating a JVM and calling a Java method, you likely won't need to run javah.
The following code is the source for simple_jvm_invoker.c. This application is a native application that starts a JVM, so the main() function is found in this C source file:
#include <jni.h>
#include <stdio.h>
int main(void)
{
   // declaring the JVM and environment
   // variables
   JavaVM *jvm;
   JNIEnv *env;
   // setting up arguments to JVM
   JavaVMInitArgs jvm_args;
   // Always declare the newest version of
   // JNI you want to use. JNI_VERSION_1_6
   // corresponds to Java 6.
   jvm_args.version = JNI_VERSION_1_6;
   // JavaVMOptions are the options
   // you are already familiar with
   // from the command line
   JavaVMOption options[1];
   // in this project the Java classes are
   // all contained in the java_bin directory
   options[0].optionString = "-Djava.class.path=java_bin/";
   // The option array length MUST be declared.
   // remember this is C, and array lengths
   // are not known unless your program explicitly
   // stores them.
   jvm_args.nOptions = 1;
   // setting the options
   jvm_args.options = options;
   jvm_args.ignoreUnrecognized = JNI_FALSE;

   // creating the JVM
   JNI_CreateJavaVM(
                    &jvm,
                    (void**)&env,
                    &jvm_args);
   // obtaining the Java class com.genedavis.FirstInvocation
   jclass fiClass = (*env)->FindClass(
                                      env,
                                      "com/genedavis/
   FirstInvocation");
// obtaining a reference to
// com.genedavis.FirstInvocation.advancedMath()
jmethodID mid = (*env)->GetStaticMethodID(
env,
fiClass,
"advancedMath",
"(II)I");
// calling com.genedavis.FirstInvocation.advancedMath()
int result = (*env)->CallStaticIntMethod(
env,
fiClass,
mid,
1,
1);
// printing the result returned from Java call
printf("
1+1=%d
", result);
// shutting down the JVM
(*jvm)->DestroyJavaVM(jvm);
}You create the JVM with a call to JNI_CreateJavaVM(). The source looks like this:
JNI_CreateJavaVM(
                    &jvm,
                    (void**)&env,
                    &jvm_args);
The three arguments are jvm, env, and jvm_args. They are references to a JavaVM, a JNIEnv, and a JavaVMInitArgs. The jvm and env variables are populated by the call to JNI_CreateJavaVM(). The jvm_args variable helps initialize the JavaVM.
After you have a JavaVM and a JNIEnv, you can find any class loaded by the JVM. Use the FindClass() function. As I mentioned earlier, the first argument is the JNIEnv*. The second argument is the fully qualified Java class name as a string. Use forward slashes instead of periods in the fully qualified class name.
JNI identifies Java methods by their containing class, their method name, and their type signature. Overloaded methods share class name and method name. The only distinguishing trait for overloaded methods is their type signature.
Type signatures combine the return type and the arguments to a method in one symbolic string. The type signature string contains a whole bunch of symbols that are a bit tricky to decipher. For instance, this method
void myMethod() { ... }has a type signature of
()V
The parentheses surround the arguments, and the V is the void return type.
In this example
public int myMethod(
   java.lang.Object,
   byte bt,
   char c,
   boolean bn) { ... }
has a type signature of
(Ljava/lang/Object;BCZ)I
You may be worried about how to come up with type signatures on your own. Beginners usually use the javap tool with the -s and -private arguments. This tool displays a list of all type signatures in the requested class.
Warning
Dealing with voids in type signatures is tricky. If a return type is void, use a capital V. If the argument list is empty, use empty parentheses, not (V). The type signature ()V is valid. The type signature (V)V is never valid.
Tip
Run javap -s <fully qualified class name> to find the type signatures of the class's methods.
Coming up with type signatures on your own is not hard. Keep these points in mind:
Type signatures end with a return type (like UML), rather than begin with a return type as standard Java does.
Type signatures contain no spaces or commas.
Type signatures with no parameters contain a set of empty parentheses.
Type signatures with a void return type end in
V.Use Table 9.2 to look up symbols you don't know.
I call the Java method in the simple_jvm_invoker.c file with the following C code:
int result = (*env)->CallStaticIntMethod(
                                            env,
                                            fiClass,
                                            mid,
                                            1,
                                            1);
The function name is CallStaticIntMethod(). The word "Static" in the function name indicates that the Java method called is a static method. The word "Int" indicates the return type of the function. Table 10.3 shows the JNI types used as return types to all the CallStatic*Method() functions provided by JNI.
The CallStaticIntMethod() function is one of many Call*Method() functions. Call method functions come in four varieties. One variety eliminates the word "Static" from the function name. Those functions are for calling instance methods. Two other versions of call method functions end in V and A. These accept Java method arguments differently than the method I show. Table 9.3 contains a list of all the common CallStatic*Method() functions conforming to this section's example code.
Note
Functions are associated with procedural programming, and methods are associated with OOP programming. Therefore, C has functions and Java has methods—never the other way around.
Table 9.3. JNI Call Static Methods
JNI Return Type | |
|---|---|
CallStaticVoidMethod (JNIEnv *env, jclass clazz, jmethodID methodID, ...) | void |
CallStaticObjectMethod (JNIEnv *env, jclass clazz, jmethodID methodID, ...) | jobject |
CallStaticDoubleMethod (JNIEnv *env, jclass clazz, jmethodID methodID, ...) | jdouble |
CallStaticFloatMethod (JNIEnv *env, jclass clazz, jmethodID methodID, ...) | jfloat |
CallStaticLongMethod (JNIEnv *env, jclass clazz, jmethodID methodID, ...) | jlong |
CallStaticIntMethod (JNIEnv *env, jclass clazz, jmethodID methodID, ...) | jint |
CallStaticShortMethod (JNIEnv *env, jclass clazz, jmethodID methodID, ...) | jshort |
CallStaticCharMethod (JNIEnv *env, jclass clazz, jmethodID methodID, ...) | jchar |
CallStaticByteMethod (JNIEnv *env, jclass clazz, jmethodID methodID, ...) | jbyte |
CallStaticBooleanMethod (JNIEnv *env, jclass clazz, jmethodID methodID, ...) | jboolean |
As mentioned earlier, implementing Java methods for calls from native code is the same as writing normal Java. From the Java side, it is no different than writing normal Java code.
The following is the source code for the FirstInvocation class. The FirstInvocation class contains no static blocks and no native methods. You use static blocks to load native implementations of native methods. There are no Java callbacks to the native code, so there are no native methods and no static blocks of code.
package com.genedavis;
public class FirstInvocation {

   public static int advancedMath(int a, int b)
   {
      return a+b;
   }
}
Tip
In this chapter's invocation examples, I call static Java methods from native C code. I recommend sticking with static methods when calling Java code from native applications because it is simpler. If you have a compelling reason for calling an instance method instead, you can instantiate jobjects from jclasses and call the methods on the jobjects instead.
If you use a Java method for calls from C, don't use that same method for calls from Java code. Eventually, you will find bugs in your JNI. You do not want to complicate debugging by sharing Java methods with C and Java.
Tip
When creating Java methods for native code to call, I usually declare the methods as private to discourage calls to the same method from inside my Java code. This may make it harder for the JIT compiler to optimize the JNI, but it's worth it in adding clarity to the code.
Tip
Always javadoc comment your Java methods that accept calls from native code. Make it as obvious as possible that the Java method is accepting native calls.
When you run the simple_jvm_invoker from the Terminal, the output is similar to that shown in Figure 9.6.
If you build a custom Java launcher, then you might get away with only C calls to Java. However, if you want to wrap an Interface Builder project, or as in Chapter 13, a Screen Saver Framework project, then you need to know how to make Java call callbacks to native code.
The next example is in the callback_from_java project on the book's Web site. The callback_from_java project is set up as a Model View Controller (MVC), as shown in Figure 9.7. The example project actually contains no view code, but that is irrelevant for the example. Use a file such as app_starter.c to wrap your favorite C-based view. Your view can be anything from a Cocoa Interface Builder project, a Screen Saver Framework project (demonstrated in Chapter 13), or a cross-platform Qt project.
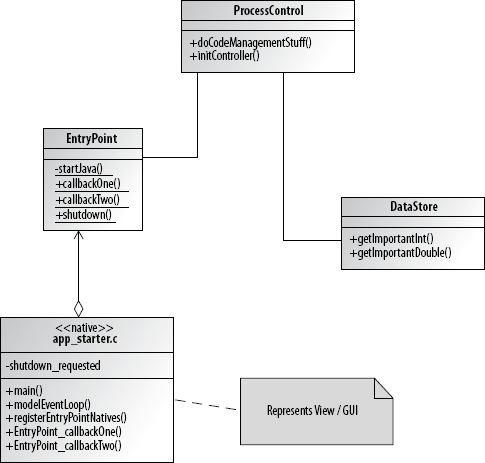
The key to the callback_from_java project is that the view is written in a C-based language and completely separate from the model and controller. Only events and view updates exchange between the controller and the view. All communication takes place through a simple EntryPoint class that acts as a wrapper around the view.
In the callback_from_java project, the application starts in the view, but very quickly passes control to ProcessControl that acts as the MVC model's controller. Starting the application from the view allows the view to act as a wrapper to a host of C++, C, and Objective-C centric frameworks. Don't bother figuring out a way to launch your project differently from the original C-based technology; just wrap the technology and pass control quickly to the application's Java controller.
Note
By wrapping a C-based GUI and starting the GUI from C, you are turning your view into an extended Java application launcher.
The following source is for the app_starter.c file. In the callback_from_java project, this file acts as the Java launcher and wraps the view in the EntryPoint class:
#include <jni.h>
#include <stdio.h>
#include <unistd.h>
// shutdown flag
jboolean shutdown_requested = JNI_FALSE;

// loops waiting for the controller to
// finish and request shutdown
void modelEventLoop(void)
{
   int secs = 0;
   // check for exit request
   while (! shutdown_requested)
   {
      // sleeps for 1/10 second
         usleep(100000);
         printf("woke...
", (secs/10));
   }
}
// Java "native" callbacks from JNI
// header file

//Class:     com.genedavis.EntryPoint
//Method:    void callbackOne(int)
void
JNICALL EntryPoint_callbackOne
(JNIEnv * env, jclass jc, jint data)
{
   printf("important int from data store: %d
", data);
}
//Class:     com.genedavis.EntryPoint
//Method:    void callbackTwo (float)
void JNICALL EntryPoint_callbackTwo
(JNIEnv * env, jclass jc, jdouble data)
{
   printf("important double from data store: %f
", data);
}
//Class:     com.genedavis.EntryPoint
//Method:    void shutdown (int)
void JNICALL EntryPoint_shutdown
(JNIEnv * env, jclass jc, jint data)
{
   // ignoring the data, but in a real
   // application, the data variable
   // represents an exit value
shutdown_requested = JNI_TRUE;
}
void registerEntryPointNatives
(JNIEnv * env, jclass jc)
{
// fill with Java's native names,
// followed by javp style signature
// and the C version of the method
// names
JNINativeMethod natives[] =
{
{
"callbackOne",
" (I)V",
&EntryPoint_callbackOne
},
{
"callbackTwo",
" (D)V",
&EntryPoint_callbackTwo
},
{
"shutdown",
" (I)V",
&EntryPoint_shutdown
}
};
// adding the methods from the C
// side instead of the Java side
(*env)->RegisterNatives(env, jc, natives, 3);
}
int main(void)
{
// declaring the JVM and environment
// variables
JavaVM *jvm;
JNIEnv *env;
// setting up arguments to JVM
JavaVMInitArgs jvm_args;
// Always declare the newest version of
// JNI you want to use. JNI_VERSION_1_6
// corresponds to Java 6.
jvm_args.version = JNI_VERSION_1_6;// JavaVMOptions are the options
// you are already familiar with
// from the command line
JavaVMOption options[1];
// in this project the Java classes are
// all contained in the java_bin directory
options[0].optionString = "-Djava.class.path=java_bin/";
// The option array length MUST be declared.
// remember this is C, and array lengths
// are not known unless your program explicitly
// stores them.
jvm_args.nOptions = 1;
// setting the options
jvm_args.options = options;
jvm_args.ignoreUnrecognized = JNI_FALSE;
// creating the JVM
JNI_CreateJavaVM(&jvm, (void**)&env, &jvm_args);
// obtaining the Java class com.genedavis.EntryPoint
jclass entryPointClass =
(*env)->FindClass(env, "com/genedavis/EntryPoint");
// registering the statically linked native methods
// for com.genedavis.EntryPoint
registerEntryPointNatives(env, entryPointClass);
// obtaining a reference to
// com.genedavis.EntryPoint.startJava()
jmethodID mid =
(*env)->GetStaticMethodID(env, entryPointClass,
"startJava", " ()V");
// starting controller with a call to
// com.genedavis.EntryPoint.startJava()
(*env)->CallStaticVoidMethod(env, entryPointClass, mid);
// announcing success
printf("
Started Conroller
");
// Model's event loop
modelEventLoop();
// shutting down the JVM
(*jvm)->DestroyJavaVM(jvm);
}In the last section, I described most of the code found in the app_starter.c file. The important addition is the registerEntryPointNatives() function. In this function, I do away with both dynamic loading and long function names for native implementations of native Java methods. The registerEntryPointNatives() function sets up the Java callbacks to C.
I use these steps for creating Java callbacks to C:
Create function stubs for the native C implementations of your Java callbacks.
Note that you can create short function names. The naming convention is up to you.
Create and populate a JNINativeMethod array.
The
JNINativeMethodarray is a list of methods you want to register. EachJNINativeMethodcontains the name of the Javanativemethod you are implementing, the method type signature, and a function pointer to the local C implementation of the method.Call RegisterNatives().
RegisterNatives()takes arguments ofJNIEnv*, jclass, JNINativeMethod[], and your array length.
Note
This example statically links the native methods called by Java, so no dynamic libraries are called. No static blocks of code are needed in the Java source, because of the static linking of the native method implementations.
The RegisterNatives() function allows you to statically link your C implementations of Java callbacks. That is why the EntryPoint class has no static block, as the first two examples in this chapter contained. No rule says you have to statically link this type of project; I merely want to demonstrate that you can statically link libraries in JNI projects.
The following source is for the EntryPoint class:
package com.genedavis;
/**
 * This class is a link between the Java
 * based controller and C (or Objective-C)
 * startup code. The C-based code could
 * also be a full-fledged View built in
 * Interface Builder or another C-accessible
* tool.
 *
 * @author T. Gene Davis
 */
public class EntryPoint
{
   /**
    * Simply starts the Java-based
    * controller of this application.
    *
    * In more advanced applications, this
    * could represent events from a GUI
    * or from a C library.
    */
   @SuppressWarnings("unused")
   private static void startJava()
   {
      ProcessControl pc = new ProcessControl();
      pc.doCodeManagementStuff();
   }

   /**
    * View update. This call is non-blocking.
    * However, in cases that the thread
    * potentially blocks, make Model updates on
    * a separate thread!
    *
    * @param i just an int
    */
   public static native void callbackOne(int i);


   /**
    * View update. This call is non-blocking.
    * However, in cases that the thread
    * potentially blocks, make Model updates on
    * a separate thread!
    *
    * @param d just an double
    */
   public static native void callbackTwo(double d);

   /**
    * Exiting the entire application.
    */
   public static native void shutdown(int exitValue);
}
The EntryPoint class acts as a wrapper for the C code. The C code in this example equates to a view in similar projects. This starts the ProcessControl in the startJava() method. From that point on, the control of the application passes to the ProcessControl, and the C code returns to its primary function as GUI.
The startJava() method is called from the C code. It is the only method called from the C code in this project. In a real project, you might have many events from the GUI calling several Java methods, or you might describe all your events in such a way that they are funneled through one Java method to the controller for handling.
The callbackOne() method, callbackTwo() method, and shutdown() method are all native methods. Each method has a C implementation set up by the RegisterNatives() function call in the app_starter.c file.
The following source is for the ProcessControl class. The ProcessControl class represents the controller in a complex Java project:
package com.genedavis;
/**
 * This class represents the controller in
 * a traditional Model View Control design.
 * Obviously, in a real application, the
 * elements of the Model View Control are
 * more complex, but this simplified model
 * serves to illustrate the concept.
 *
 * @author T. Gene Davis
 */
public class ProcessControl
{
   /**
    * If the C-based code is a GUI, give
    * it back its thread!
    */
   public void doCodeManagementStuff()
   {
      // creating a separate thread for
      // the controller to use
      Thread controlThread =
         new Thread(new Runnable(){
            public void run()
            {
               initController();
            }
         });

      // starting the new controller thread
      // the native code's thread is then
// returned.
controlThread.start();
}
/**
* If there is a control loop, it
* goes here.
*/
public void initController()
{
// initializing data store
DataStore ds = new DataStore();
// represents data retrieval
int intData = ds.getImportantInt();
double doubleData = ds.getImportantDouble();
// Updating View ... Could be a GUI
// in some cases. If there is a potential
// for blocking, make GUI updates on a
// separate thread.
EntryPoint.callbackOne(intData);
EntryPoint.callbackTwo(doubleData);
// All done. Let C code know it's
// time to shut down the JVM.
EntryPoint.shutdown(0);
}
}When starting a Java application from a C GUI, the GUI almost always contains some sort of application event thread. Never hold onto event threads. Whether from Cocoa applications or Swing projects, quickly create a new thread to handle your code and return the event thread to its proper owner. Failing to do so often results in blocking code, and at the very least it makes the application appear unresponsive to the user.
The first call to ProcessControl is to the doCodeManagementStuff() method. I create and start a new Java Thread immediately. Then I return the native thread to its owner. Meanwhile, my new Java Thread calls initController(). In a real application, the initController() method is where controller setup begins and any controller application loops start.
The following source is for the DataStore class. This class represents the model in this MVC-based project. It contains two methods that return important numbers. Had this been a real application, it would have hooked into a database, flat file, directory service, or other common data store.
package com.genedavis;
/**
* This class represents the data store in
* a traditional Model View Control design.
*
* @author T. Gene Davis
*/
public class DataStore
{
/**
* Returns int 42.
*/
public int getImportantInt()
{
return 42;
}
/**
* Returns double PI.
*/
public double getImportantDouble()
{
return Math.PI;
}
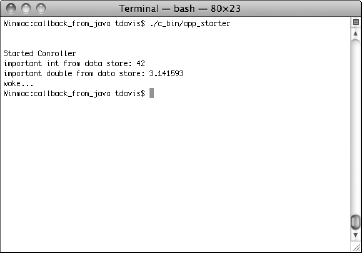
}The output from the callback_from_java project is shown in Figure 9.8.
Building JNI projects baffles many popular IDEs, so I use Ant build projects to handle the complex details. Ant projects integrate into all common IDEs. By using an Ant build, the developers on your project are not constrained to use a particular IDE, thus improving their productivity.
The following source is the build.xml file for building the HelloDarwinExample from the beginning of this chapter:
<?xml version="1.0" encoding="UTF-8"?>
<project name="Hello World" default="run" basedir=".">
   <property name="java.source" value="java_src" />
   <property name="c.source" value="c_src" />
   <property name="java.bin" value="java_bin" />
   <property name="native.bin" value="c_bin" />

   <target
      name="explain"
      description="Explains the objective of the build">

      <echo>Building the full Java and Native source.</echo>

   </target>

   <target
      name="clean"
      description="Removes previous build">

      <echo>Cleaning Java and Native bin folders...</echo>

      <delete dir="${java.bin}" />
      <delete dir="${native.bin}" />

   </target>

   <target
      name="java-build"
   depends="clean"
      description="Builds the Java source">

      <echo>Building Java...</echo>

      <mkdir dir="${java.bin}"/>
      <javac srcdir="${java.source}" destdir="${java.bin}" />
   </target>

   <target
      name="native-header-build"
description="Builds the native headers file">
<echo>Creating native header file...</echo>
<mkdir dir="${native.bin}"/>
<javah
outputfile="${c.source}/native_greeting_jni.h"
classpath="${java.bin}">
<class name="com.genedavis.HelloDarwinExample" />
</javah>
</target>
<target
name="native-build"
description="Builds the native lib*.jnilib">
<echo>Creating native lib*.jnilib</echo>
<!--
gcc
-bundle
./c_src/darwin.c
-o ./c_bin/libNativeGreeter.jnilib
-I/System/Library/Frameworks/JavaVM.framework/Headers
-I ./objc_src/
-framework JavaVM
-->
<exec executable="gcc">
<arg value="-bundle"/>
<arg value="./${c.source}/darwin.c"/>
<arg line="-o ./${native.bin}/libNativeGreeter.jnilib"/>
<arg value=
"-I/System/Library/Frameworks/JavaVM.framework/Headers"/>
<arg line="-framework JavaVM"/>
</exec>
</target>
<target
name="build"
depends=
"explain, java-build, native-header-build, native-build"
description="builds full Java and Native byte code.">
<echo>Build complete</echo></target>
<target
name="run"
depends="build"
description="cleans, builds, and then runs app">
<!--
java
-Djava.library.path=objc_bin
-cp java_bin/
com.genedavis.HelloDarwinExample
-->
<java
classpath="${java.bin}/"
classname="com.genedavis.HelloDarwinExample"
fork="true">
<jvmarg value="-Djava.library.path=${native.bin}" />
</java>
</target>
</project>This Ant build.xml file contains examples of all the targets necessary to build any of the JNI projects described in this chapter. The native-header-build target handles the javah commands. The native-build target handles the gcc commands. The java-build target handles the javac commands.
In a JNI project, I usually handle running the application outside the actual Ant project. Don't feel constrained to do this. With a little messaging, you can run your compiled project from within your IDE or Ant project, if you wish.
Note
In Chapter 4, I give details of Ant project creation and use.
Apple encourages Objective-C as a primary language for OS X development. Many of the frameworks provided by OS X are written for Objective-C programs. These frameworks have no Java equivalent.
After reading this chapter and picking up some basic Objective-C, wrapping Objective-C frameworks in Java using JNI should not be a problem. None of the Objective-C frameworks that OS X offers are a barrier to Java development.
When wrapping Objective-C (and C-based libraries), don't worry about wrapping every feature. Wrap only the objects and functions that you actually plan to use. Otherwise, you'll get bogged down in endless details that don't pertain to your project.
I recommend avoiding direct calls to Objective-C classes from Java. Instead use a C-based buffer file (or files), as shown in Figure 9.9. Placing the JNI code in a C file keeps the code simple to understand and promotes easy maintenance of your JNI.
The first rule of thread safety in JNI is not to hang onto threads. This is especially the case with AWT and Cocoa application threads. Pass your data through JNI, and then spawn a new thread to process the data. Failing to do so may result in a deadlocked application.
A thorough quality assurance cycle to your development process is likely to catch any threading issues you didn't think of. However, consider the rules in this section while writing your JNI code. Most have to do with the life of JNI references and IDs.
JavaVM references created with JNI go bad only if you destroy the JVM. Destroy a JVM if only the application definitely doesn't need to use it again. OS X processes can create a JVM only once. (This limitation prevents potentially horrible memory leaks.)
Be aware that if you are working with an application that uses plug-ins, another developer may provide a plug-in that uses Java, too. The other module may have already created a JVM before your code loads. It also is possible that the other developer's module may need the JVM after you are completely done with the JVM.
The proper way to create a JVM in Java is to first check for the existence of a JVM. Then, if a previously created JVM doesn't exist, create your own. Here is a code snippet that accomplishes just that:
JavaVM *jvm;
// checking for existing JVM
// This is a must! Multiple JVMs cannot be created
// in one process
jsize jvmCount = 0;
int foundJVM = JNI_GetCreatedJavaVMs(&jvm, 1, &jvmCount);
if (foundJVM == 0 && jvmCount > 0)
{
   // succeeded in getting an existing JVM
   // attaching this thread
   (*jvm)->AttachCurrentThread(jvm, (void**) &env, NULL);
}
else
{
   // no JVM found, ... creating the JVM
   // this thread is automatically attached
   JNI_CreateJavaVM(&jvm, (void**)&env, &jvm_args);
}JNIEnv references are thread-specific. Never store or reuse a JNIEnv. Some attributes of JNIEnv are thread-specific, so always use the provided JNIEnv.
In some cases, you may need a new JNIEnv, because none was provided or it was not passed on to your implemented method. Don't despair. You can always get the current JNIEnv from the JNI JavaVM. The following code snippet grabs the current JNIEnv from the JavaVM:
JNIEnv *env = NULL;
jint env_error = JNI_OK;

// Use the JVM reference to get an up-to-date
// JNIEnv. JNIEnv variables need constant
// updates
env_error = (*jvm)->GetEnv(
                           jvm,
                           (void **)&env,
JNI_VERSION_1_6);Both jclass and jobject are local references. These references cannot be reused in other threads. However, both jclass and jobject local references may be changed into global references. Global references work across threads just fine.
Two types of global references exist: strong and weak. Strong global references refer to classes and objects that are not unloaded by the JVM until destroyed with a call to JNI's DeleteGlobalRef() function. Weak global references may be loaded or unloaded by the JVM, but the reference is still valid throughout the process. Weak global references are cleaned up with a call to DeleteWeakGlobalRef().
The following code snippet is an example of creating a weak global reference from a local jclass reference:
jclass localJavaWrapperClass =
   (*env)->FindClass(env, "com/genedavis/OSXScreenSaverWrapper");
// make reference global (multi-thread accessible)
jclass javaWrapperClass =
   (*env)->NewWeakGlobalRef(env, localJavaWrapperClass);
// don't need local reference anymore
(*env)->DeleteLocalRef(env, localJavaWrapperClass);
Follow these steps to create a global jclass or jobject:
Obtain a local reference.
Make a global reference from the local reference.
Delete the local reference.
Java methods in JNI are referred to by ID, not reference. The code for obtaining method IDs is discussed earlier in this chapter. It usually looks something like this:
jmethodID mid =
(*env)->GetStaticMethodID(env, someClassRef, "myMethod", " ()V");
JNI method IDs do not change or expire. Also, JNI calls to obtain method IDs are relatively expensive. Always save your method IDs to reuse in other threads.
JNI uses jstrings. Cocoa uses NSStrings. Carbon uses CFStrings. Sometimes it seems that every C-based framework and language has different conventions for handling strings. The problem for you as a programmer is that you need to transfer string variables between these different conventions.
On the bright side, Java and OS X character conventions both use UTF-16. If you run into conversion examples using UTF-8 standards, be aware that the examples are outdated.
The best source for string conversion info is Technical Note TN2147 located on Apple's developer site. The current address is:
http://developer.apple.com/mac/library/technotes/tn2005/tn2147.html#TNTAG6
Here is an example of converting a JNI jstring to an NSString, based off Technical Note TN2147.
Follow these steps for this example:
Obtain the Java String as a jchar*.
Accomplish this with a call to the
GetStringChars()function contained in the JNI environment.Get the length of the string.
The length of the string is obtained with another call to the JNI environment. Strings are essentially character arrays in C. Because C does not track the length of arrays, strings in C contain a value of
0at the end of the string. (This is referred to as null terminating.) You must manually place this value of0when creating strings in C. That is why I need the string length.Create an NSString by providing a pointer to the raw unicode characters and the length of the final string.
Free the JVM resources in the JNI environment.
Now that I have the string's value safely copied to a shiny new
NSString, it is time to release the JNI environment's string resources. Again, I call a function in theJNIEnv*variable, namedjenv, to release the resources.
Here is the source for the preceding steps:
const jchar *chars = (*jenv)->GetStringChars(
                                             jenv,
                                             my_jstring,
                                             NULL);
NSUInteger str_len = (*jenv)->GetStringLength(jenv, my_jstring);
NSString *message = [NSString
                          stringWithCharacters:(UniChar *)chars
                          length:str_len];
(*jenv)->ReleaseStringChars(jenv, my_jstring, chars);JNI is a rich and complex subject. Using the information found in this and other chapters in this book, you can create many useful OS X integrated applications. Even so, you may find the need for even more information. Several Web sites give additional details about JNI. I mention three specifically in this section.
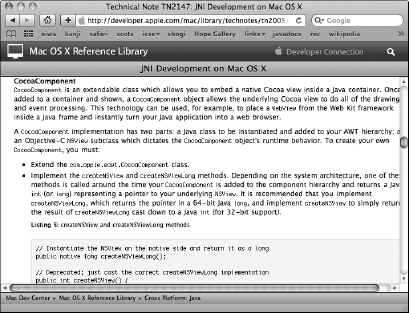
Apple provides technical notes on many Java-related topics, including JNI. Look for Technical Note TN2147, shown in Figure 9.10. Its title is JNI Development on Mac OS X. This technical note gives additional information on string conversions, graphics, thread safety, and invoking JVMs from Carbon-based and Cocoa-based applications.
Here is the current link for Technical Note TN2147:
http://developer.apple.com/mac/library/technotes/tn2005/tn2147.html
Sun provided a Java Native Interfaces book with the release of Java 1.2, shown in Figure 9.11. It has wonderful detail, and explanations cover most of the JNI specification. I especially recommend reading Chapter 10: Traps and Pitfalls. Because it's written for Java 1.2, the book is a little out of date, but still very useful.
This is the current link for the HTML version of the book found on the Web:
http://java.sun.com/docs/books/jni/html/jniTOC.html
No list of JNI resources is complete without the site for the Java 1.6 JNI Specification, shown in Figure 9.12. The code examples in the specification tend to be C++ oriented. The main difference between using C and C++ versions of JNI is that when calling the C versions of the JNI functions, the first parameter is usually JNIEnv * env. The JNIEnv* is not present in the C++ versions of the same JNI function calls.
The current link to the Java 1.6 JNI specification is here:
http://java.sun.com/javase/6/docs/technotes/guides/jni/spec/jniTOC.html
Finally, browse the jni.h header file. All the JNI C functions are in there. Locate a copy of jni.h by using the Finder to search for it. Not all jni.h files are the same, though. Find the one supplied with the Java 1.6 implementation. Open the jni.h header in Xcode for syntax coloring.
Java applications interface with native code using JNI. C is the typical native language with which Java interfaces. However, Java may use JNI to interface with Objective-C and C++.
JNI applications use static blocks to load dynamically linked libraries. Dynamic libraries load using the System.loadLibrary() method. The filename of dynamic libraries takes the form of lib<name>.jnilib. Dynamic libraries contain the native implementation of native Java methods.
C-based applications create Java Virtual Machines using JNI's Invocation API. When creating a JavaVM for use in native applications, create the JavaVMOptions and place them in the JavaVMInitArgs. Create the JavaVM with a call to the JNI_CreateJavaVM() function.
Understanding how javah and javap work helps the development process. Building JNI applications from the command line is a good learning experience, but it's slow. Use a build tool such as Ant to automate the process.
All but the simplest JNI applications need to anticipate threading issues. Avoid blocking OS X application threads and Java AWT threads. When in doubt, spawn a thread to return AWT and native application threads.