
WHAT'S IN THIS CHAPTER?
Prototyping workflows in Visio 2010
Creating declarative workflows in SharePoint Designer 2010
Developing custom actions in Visual Studio 2010
Importing reusable workflows to Visual Studio 2010
Using association, initiation, and task InfoPath forms in workflows
Developing site workflows in Visual Studio 2010
Building Pluggable Workflow Services
Developing workflow event receivers
The SharePoint 2010 workflow platform is built on the engine that's provided by Microsoft .NET Framework 3.5. The improvements made to this platform will allow greater flexibility for creating powerful workflow scenarios.
Think of workflow in SharePoint 2010 in three primary scenarios:
A workflow model is created as a draft or prototype by a business user in Visio or SharePoint Designer. The business user hands this model off to workflow developers at some point, and they take over in Visual Studio 2010. After the developers take over, they work to complete the workflow, add any required code, and modify it to match the business requirement and their server deployments. All further development on the workflow model is done in Visual Studio 2010.
A developer builds activities in Visual Studio 2010 (known as SharePoint Designer Actions) for deployment to SharePoint. These activities can be used by a nontechnical person who owns the workflow business logic, and that person puts together the workflow in either SharePoint Designer or Visio.
A developer builds and implements a workflow model in Visual Studio 2010 and packages it for deployment. In this scenario, all development on the workflow model is done in Visual Studio 2010.
These three scenarios will be the focus of the rest of this chapter.
First, take a look at the scenario you are going to tackle. In this chapter, you'll continue on the example presented in Chapter 9 with one exception. You will create a content type named Training, and you'll add it as the default content type to the Trainings custom list. Following is a quick orientation about the use cases that will be discussed throughout this chapter.
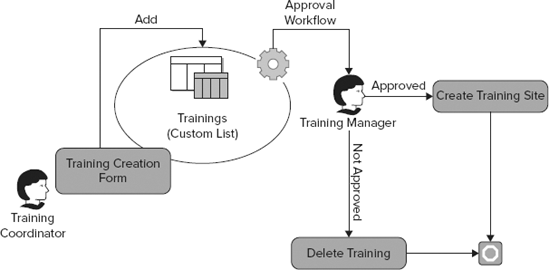
The Human Resources (HR) department at the fictitious Adventure Works company uses SharePoint to implement a training-course-offering system. Figure 12-1 illustrates part of this application where an HR training coordinator can create trainings and add them to a SharePoint list named Trainings.
Note
If you need a refresher on how to create the Human Resources site and the Trainings list, please refer to Chapter 9.
The process starts when the training coordinator creates a training course and starts an instance of the Training Approval workflow. The running instance of the workflow adds a task to the Tasks list, which notifies the training manager that a new training course is waiting for his approval. The training manager interacts with the running instance of the workflow to complete the assigned task. This interaction requires approving the suggested training course, but the interaction could be other things such as rejecting it, reassigning the task, or requesting a change. If the approval decision is made, the workflow execution branches into one of the following two processes:
If approved, a training site is created.
If not approved, the suggested training is deleted from the Trainings list.
In either case, the workflow terminates in the final step.
Before diving into modeling the approval workflow, first you need to create the Training content type and add it to the Trainings list. Use the out-of-the-box Item content type as the parent and the following information to create the Training content type:
Title: A title for the training opportunity (OOTB Site Column)
Code: A code that uniquely identifies the training (unique eight-character fixed)
Description: The description of the training (OOTB Site Column)
Start Date: The training's start date (OOTB Site Column)
End Date: The training's end date (OOTB Site Column)
Cost: The cost of the training (American dollars)
Level: The difficulty level associated with the training (a number from one to five)
Enrollment Deadline: The date that enrollment ends
Address: The address of the training facility (OOTB Site Column)
Additional Information: Optional information about the training itself (enhanced rich text with pictures, tables, and hyperlinks)
Note
If some of the fields are not available in the available site columns pane, activate the SharePoint Server Publishing Infrastructure Feature.
With the Training content type, you should now be able to create a new custom list called Trainings, enable content type management in the list, and add the Training content type as the default content type to the list.
If you have been doing workflow development or design for any amount of time, you have almost assuredly been engaged in some kind of communication and collaboration exercise with business stakeholders who own the process. Maybe you have been given a flowchart on a piece of paper, so you can look at it and come to a level of understanding on the business requirements or, even worse, maybe everything has been verbally communicated to you.
Furthermore, you may have had a lot of discussions with the business people to make sure that all stakeholders are clear on what is being implemented and that the development path is completely aligned with what they expect to see as the final product. The bottom line is that workflow development, just like any other development task, requires a two-way communication channel between the business people and the developer, and quite frankly, a channel that's always open! In practice, maybe this wasn't that hard, but the good news is, this process is a lot easier now. The new workflow lifecycle is one of the most exciting new features in SharePoint 2010 and is empowering the business user. All this has been made possible by introducing a series of new features along with a much tighter integration between Visio, SharePoint Designer, and Visual Studio 2010. Add to this many enhancements made to each tool for building workflows with the emphasis on developer experience, spending less time trying to solve challenges caused by each tool's specific shortcomings, and instead, spending more time on the business problem itself.
This section shows how these tools come together to help you model and implement a business process. You start by learning how to envision your workflow in Visio and then import it into SharePoint Designer and carry on working on it. Finally, you will learn how you can take things to the next level by extending the same workflow in Visual Studio 2010.
Visio has always been a wonderful tool for diagramming business processes, but for a long time it has suffered from having just a small number of people using it inside organizations for very limited use cases.
In the current wave of products with SharePoint 2010 and Office 2010, one of the new features is that business analysts can leverage Visio diagrams to model a workflow and draw its business process before it has gone through the implementation phase. Perhaps most important, business analysts who design and orchestrate a business process are already familiar with flowcharting in Visio and they don't necessarily need to know about the details of workflow implementation or SharePoint.
In this section, you will model the Training approval workflow in Visio 2010 and export it into an interchangeable file format so that it can be imported into SharePoint Designer in the next section.
And, with that, let's get started.
Launch Visio 2010 and, from the template categories, select the FlowChart template. Within the FlowChart template category, create a new file using the Microsoft SharePoint workflow drawing template, a brand-new template just for SharePoint workflows.
Once the new Visio file is created, notice that all workflow activities are divided into in three separate stencils, as follows:
SharePoint Workflow Actions
SharePoint Workflow Conditions
SharePoint Workflow Terminators
Note
Think of activities as building blocks of a workflow. It's important to understand that every workflow activity in Visio directly maps to an activity in SharePoint Designer and Visual Studio.
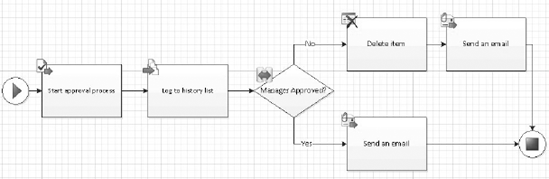
From the SharePoint Workflow Terminators stencil on the left-hand side of the window, find and add Start and Terminate shapes to the Drawing canvas. All the other shapes are going to go between these two shapes.
Open the SharePoint Workflow Conditions stencil and add a Compare Data Source shape to the Drawing canvas between the Start and Terminate Shapes. Then, change the name of the shape to "Manager Approved?"
Open the SharePoint Workflow Actions stencil and add Start Approval Process and Log to history list shapes between Start and Compare Data Source shapes. There are still three more shapes to add to the Drawing canvas after the Compare Data Source shape: one Delete Item shape and two Send an email shapes.
Add the process flow connections between the shapes, by hovering over each shape, clicking and dragging one of the arrows to the next shape. Use Figure 12-2 as an example. Finally, right-click the connection from the shape that says "Manager Approved?" to the one that says "Delete Item" and select No. Do the same thing for the other process flow, but this time around select Yes.
Save the process diagram to your local drive and name it
TrainingApprovalWF_VisioModel.vsd.Lastly, you should export the workflow to a Workflow Visio Interchange (
.vwi) file, which can then be used in the next section ("Customizing the Workflow in SharePoint Designer"). To export the workflow, click Export button in Process tab, and save the Visio diagram with a name such asTrainingApprovalWF_VisioModel.vwi.
In case you didn't notice, clicking the Export button does something before it actually lets you save the interchangeable file format. It validates the Visio diagram and stops you from saving it if the diagram has any issues, such as loose connectors. Sometimes validation happens quickly, so depending on the complexity of your diagram, you may or may not see it.
At any point during the modeling process, you can manually validate the diagram simply by clicking the Check Diagram button in the Process tab of the Ribbon.
After a workflow is modeled in Visio, it can be handed off to IT professionals who are more technical and can extend the workflow using SharePoint Designer. This step of the workflow lifecycle starts out with importing the Visio workflow into SharePoint Designer and completing it in this tool. This includes defining initiation and association forms, variables, the parameters of each step, as well as adding some new steps. Finally, they will publish the complete workflow back to SharePoint. That was the short story.
When you opt to build your workflow using SharePoint Designer, there is one important thing to understand: Although SharePoint Designer 2010 offers many new improvements for building workflows, it doesn't replace Visual Studio under any circumstances. The primary purpose of SharePoint Designer is to build rules-based workflows in a declarative way, whereas Visual Studio is still the preferred tool for building powerful, enterprise-scale workflows, as you'll see later in this chapter.
To get started, follow these steps:
Browse to the Human Resources site where the Trainings list resides.
From Site Actions menu, click Edit in SharePoint Designer. This will open SharePoint Designer 2010 against the Human Resources site that you are currently in. As you can tell, SharePoint Designer is no longer constrained to a folder-based hierarchy, which means that you can click the Workflows section on the Navigation collections on the left-hand side of the window to display all the workflows scoped at the current site.
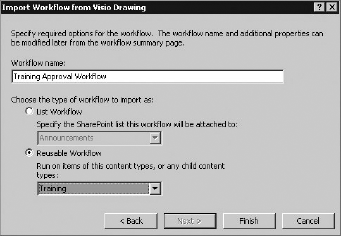
Click the Import from the Visio button in the Ribbon and point the dialog to the location where you saved
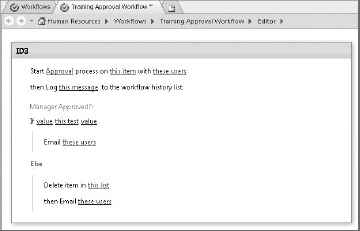
TrainingApprovalWF_VisioModel.vw, and then click Next. This will take you to the next step of the Import Wizard, where you should give the workflow a name (e.g., Training Approval Workflow), choose Reusable Workflow option, and select the Training content type as the workflow target, as shown in Figure 12-3. You will learn about reusable workflows in the next section.Click Finish to import the workflow. This will open the workflow design surface and display all activities defined in the Visio diagram with empty values, as shown in Figure 12-4.
That's it. In just a short amount of time, you imported the workflow model created in Visio into SharePoint Designer and made it ready for further customization. Now the real fun begins!
One major item not covered in this chapter is the round trips between Visio and SharePoint Designer. What this means to you is that you can sync changes made to the workflow in SharePoint Designer with the original Visio diagram or vice versa. Perhaps most important, you can do this as many times as you wish.
Before going any further in this chapter, let's shift gears and talk about a new feature called reusable workflows.
When you create a declarative workflow in SharePoint Designer 2010 against a SharePoint 2010 site, you don't need to strongly associate the workflow with a list; instead, you can point it to all content types or just a content type of your choice, as you did with the Training content type in the previous section.
The ability to make the workflow available for later attachment to any list across the site is referred to as "reusable workflow." In the previous version of SharePoint, a workflow could be reused only if it was developed in Visual Studio. Reusability has been a major request from customers who want to put the business logic modeling in the hands of those that are the most familiar with the business processes.
Reusable workflows offer more than just being loosely coupled from lists. Just keep this in mind as you read the rest of this section.
First of all, reusable workflows can be used as templates for creating other workflows. If you have worked with other workflow tools, such as K2, the notion of workflow templatization should be familiar to you. Much like these tools, SharePoint Designer 2010 now supports workflow templates and gives you the ability to use existing reusable workflows as a starting point for developing new ones. There are two ways you can use a reusable workflow as a template for building other workflows:
Right-click a reusable workflow inside SharePoint Designer, and from the context menu select copy and modify.
Save the workflow as a WSP solution file (aka a template) and then import it into Visual Studio 2010. This will be covered later in this chapter.
Not many people know this, but by default, when you create a reusable workflow, it's only reusable within the site in which it was created. If, however, you create a reusable workflow at the root web, you can convert your reusable workflow to a globally reusable workflow, which publishes a copy of the workflow to the global workflow catalog (the one that contains the out-the-box workflows). This process makes the workflow available to all sites in the current site collection. This can be done by clicking the Publish Globally button in the Ribbon next to our famous Import from Visio button. Needless to say, this option is dimmed if you are not in the root site.
Note
Globally reusable workflows cannot be directly imported to Visual Studio using the Import Reusable Workflow template.
So, the out-of-the-box workflows are reusable. Even though an OOTB workflow is read-only, you can unlock and drill through each one, see the At-a-Glance overview of the workflow, and further configure it using SharePoint Designer. Once again, for all practical purposes, this was almost impossible in the previous version of SharePoint.
With that understanding of when and why to use reusable workflows, let's get back to the Training approval workflow.
Workflows can collect data when they are initiated or associated. They can collect a number of different types of information in a number of different stages during their lifecycle.
Before you get into the workflow logic customization in SharePoint Designer, you must collect information from the person who associates the workflow with the Training content type. Additionally, you must collect information from the training coordinator when he or she initiates (starts) the workflows in order to allow the training course to go through the approval process.
For the example presented in this chapter, this includes:
The training manager username (Association Form)
A brief description on why the training coordinators think the training is important (Initiation Form)
Setting up the parameters for association and initiation forms is a simple matter of following a couple of steps. From the Workflow tab in the Ribbon, click Initiation Form Parameters and then click Add to set up the parameters as shown in Tables 12-1 and 12-2.
Table 12.1. Configuration Settings for the Why Important Parameter That Appears on the Initiation Form
ITEMS | VALUE |
|---|---|
Field Name | Why Important |
Information Type | Multiple lines of text |
Collect form parameter during | Initiation (Starting the workflow) |
Default value | Please describe why this training course is important. |
Table 12.2. Configuration Settings for the Training Manager Parameter That Appears on the Association Form
ITEMS | VALUE |
|---|---|
Field Name | Training Manager |
Information Type | Person or Group |
Collect form parameter during | Association (Attaching to the content type) |
Show Field | User name |
Allow selection of | People Only |
SharePoint Group | Approvers |
Allow blank Value | No |
When you have set up the parameters, your workflow Association and Initiation Form Parameters should look like the ones shown in Figure 12-5.
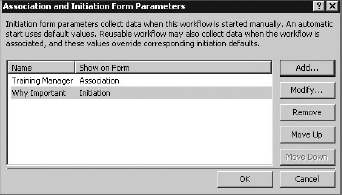
Click OK to close the Association and Initiation Form Parameters window and return to the workflow design surface.
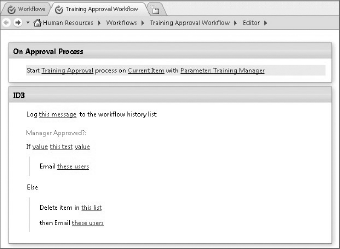
With the Initiation and Association parameters created, you can now begin customizing the logic your workflow requires. As you saw in Figure 12-4, the imported workflow currently has one step marked "ID3." However, to make things cleaner, you will change the workflow so that it has two steps named as follows:
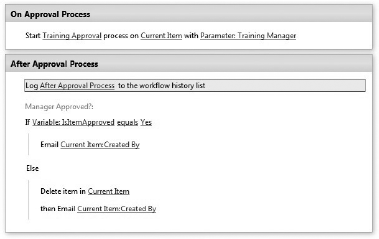
On Approval Process
After Approval Process
This step will start an approval process and notify the training manager that a training course needs to be approved. To accomplish this part of the example, follow these steps:
Position the insertion point (orange line), on the top of the step that says "ID3."
From the Ribbon, click Step to insert a new step.
Rename the step to On Approval Process.
Click the action that says "Start Approval process on this item with these users" to highlight it.
From the Ribbon, click Move up to move this action from the ID3 step to the Approval Process step.
With the focus on the Approval Process step, click the first link that says Approval or Approval (2), etc. This takes you to a page where you can customize the OOTB Approval action and its overall task process. A sample is shown in Figure 12-6.
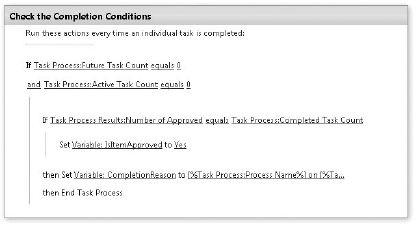
In the Settings section, there are options to allow the training manager to reassign the approval task or to send the training back to the coordinator requesting that he or she make changes to the submitted training and send it back for approval. Notice also Task Outcomes, where you are given more options for interacting with the training approval process than just approving or rejecting it. For example, you can have a "To be Considered" outcome that stores the suggested training in another list for future use. Then, you can have your workflow treat these types of training courses completely differently than the rejected ones. Perhaps, if you want to see how powerful the OOTB Approval action really is, then you should click on one of the bottom three links in the Customization section. Each link leads you to a lot of configurations and options that are used for controlling the behavior of this action. For example, Figure 12-7 shows the Completion Conditions. Notice how the
isItemApprovedvariable is set toYeswhen the task is approved. You will use this variable later on to implement your own condition.Leave everything else at its defaults in Figure 12-7 and click the left arrow on the workflow header (the breadcrumb) to go back to where you left off in Step 6. Resuming with step 7:
In the Task Information section, change Approval to Training Approval. Optionally, you can define who owns the approval process (if different from the training manager).
In the Task Form Fields section, click New to set up a task parameter as shown in Table 12-3. Essentially, a task parameter allows you to collect some information in the task form. For example, if the training is approved or rejected, you probably want the manager who is doing the approving or rejecting to rate the training suggestion.
Table 12.3. Configuration Settings for the Suggestion Rate Task Parameter That Appears on the Task Form
ITEMS
VALUE
Field Name
Suggestion Rate
Information Type
Choice (menu to choose from)
Add to default view
Yes
Choices
Good, So-So, Poor (one per each line)
Default Value
Empty
Display as
Drop-down menu
Allow "Fill-in" choices
No
Allow blank Value
No
Click the "this item" link and select Current Item.
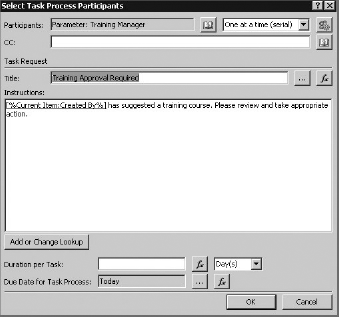
Click the "these users" link to open the Select Task Process Participants dialog box.
Configure the Participants parameter by clicking the lookup icon to the right of the field and selecting the participants.
Or select from existing Users or Groups: Workflow Lookup for a User
Data Source: Workflows Variables and Parameters
Field from source: Parameter: Training Manager
Return field as: Login Name
In Title parameter, type Training Approval Required.
For the body of the message, enter the information shown in Figure 12-8. The information in the bracket can be automatically generated by placing the cursor in the beginning of the instruction message and clicking the Add or Change Lookup button. Select the following Source and Field combinations:
Data source: Current Item
Field from source: Created By
Return field as: Display Name

The first step in your workflow is now complete. The Workflow Designer surface should now look similar to Figure 12-9.
Before implementing the next step of the workflow, note three more things about the extra options that SharePoint Designer gives you for building workflows:
Look back at Figure 12-6. Notice that, if you check the box to only allow task recipients and process owners to read and edit workflow tasks, then the training manager and the process owner are the only people who will see the task and perhaps the sensitive information residing in it. This means that the permission level for the task is broken, and it's created with a set of unique permissions. Previously this could be only accomplished programmatically by using the
CreateTaskandCreateTaskWithContentTypeactivities and theirSpecialPermissionsproperty, as shown in Listing 12-1. For more information on creating tasks with custom permissions, see my blog post athttp://www.devhorizon.com/go/24.Example 12-1. Item-Level Permission in Workflow CreateTask Activity
private void createTask(object sender, EventArgs e)
  {
    //Code Omitted for brevity
    CreateTask task1 = sender as CreateTask;
    HybridDictionary permsCollection = new HybridDictionary();
    permsCollection.Add(taskProps.AssignedTo,
     SPRoleType.Administrator);
    task1.SpecialPermissions = permsCollection;
}
Look back at Figure 12-8. In right top corner of the dialog there is a button with a plus sign on it that allows you to have multiple assignment stages with serial or parallel participants (the default is one serial assignment stage). So, technically, you can have multiple training managers reviewing approval tasks in serial or parallel.
One more tip about Figure 12-8. In the scenario provided in this chapter, the person who creates the training course (the coordinator) is the person who initiates the workflow, so it's safe to use
[%Current Item: Created By%]lookup in the body of the task instruction. However, if the training course is created by someone other than the coordinator, you can look up the initiator, too. Among the new data-binding enhancements made in SharePoint Designer 2010, there is a Workflow Lookup for the person who initiates the workflow. To look up the initiator, click the Lookup icon to the right of the Participants field and select the following:Data source: Workflow Context
Field from source: Initiator
Return field as: Display Name
Step 2 won't execute until the approval process in the previous step has been completed. To be technically accurate, after the approval action creates a task for the training manager, the workflow is serialized, or dehydrated, to the SharePoint database, waiting for the task to be approved or rejected. When the training manager approves or rejects the training course, the workflow wakes up (rehydrates, or is deserialized) and continues to the second step. To complete Step 2, follow these steps:
Rename the step from ID3 to After Approval Process.
Click on the "this message" link to define the message logged when the flow enters Step 2. Type Inside After Approval Process in the textbox.
Click the value link in the
Ifstatement, and then click the function (fx) button to define a workflow lookup, by selecting the following combinations:Data source: Workflow Variables and Parameters
Field from source:
Variable:IsItemApproved
Click this test and select equals.
Click the second value link in the
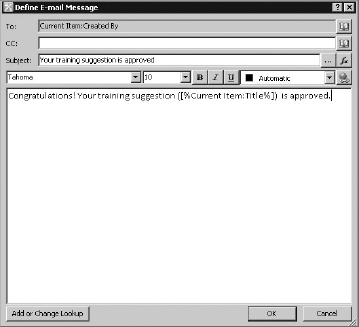
Ifstatement, then select Yes.Click on the "these users" link to open the Define Email Message dialog box. This is more or less just like it was in SharePoint Designer 2007.
In the
Toparameter, define the following lookup:Data Source: Current Item
Field from source: Created By
Return field as: Email Address
In the Subject parameter, type Your training suggestion is approved.
For the body of the message, enter the information shown in Figure 12-10. The information in the bracket can be automatically generated by placing the cursor in the appropriate place and clicking the Add or Change Lookup button with the following Source and Field combinations:
Data source: Current Item
Field from source: Title
In the
Elsestatement, click this list link and set it to Current Item.Repeat Steps 6 through 9 for the second Email action with one exception: you need to compose a message to let the training coordinator know that the suggestion has been rejected.
That takes care of the second step in your workflow. When you are done, the workflow designer surface should look like Figure 12-11.
All you need to do now is save and publish the workflow. First, click the Save button to save the workflow settings, and then click the Publish button in the Ribbon to publish the workflow back to the HR site.
At this point, the workflow has been published to the SharePoint site and is listed as a reusable workflow in the workflows home page in SharePoint Designer 2010. Unfortunately, there is still some cosmetic and plumbing work left before you can really say that you are done.
If you recall, the training approval workflow needs some extra information passed into it to function properly. Specifically, it needs to know which user will be assigned the approval tasks (the training manager). In addition, it needs to collect some information from the person initiating the workflow (the training coordinator) about why he or she thinks the suggested training is important, so it can be displayed to the training manager.
To satisfy these requirements, it makes sense to have some forms within the workflow lifecycle. The training approval workflow requires three types of forms:
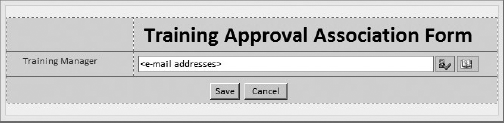
Association Form: A form that collects some default settings used throughout the workflow lifecycle. This form is filled out once when an administrator configures the workflow and every time the default settings must be modified.
Initiation Form: A form that collects information from the person who starts the workflow. If the workflow is configured to start automatically, this form can be omitted.
Task Form: A form that collects information from people who are assigned a task by workflow.
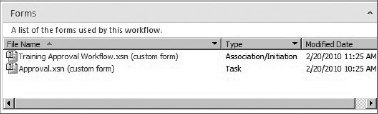
Fortunately when you publish your workflow, SharePoint Designer generates all these three types of forms for you. To see how these forms look, click the Workflow Settings button in the Ribbon. This will take you to the training approval workflow home page, where all three forms are available in a section called Forms.
The word three is not a typo in the preceding paragraph, because there are really three forms there, even though there appear to be only two. The Training Approval Workflow.xsn file is a single InfoPath form that lumps the initiation and association forms together using two distinct views; one named Start (the default) is used for the initiation form and Associate is used for the association form. The Approval.xsn file represents the task form.
Go ahead and click on each form to open it in InfoPath Designer 2010. The process of customizing and publishing these forms back to SharePoint is covered in much greater detail in Chapter 9. Needless to say, you really don't need to make any changes except for applying some basic formatting and adding new titles to each form.
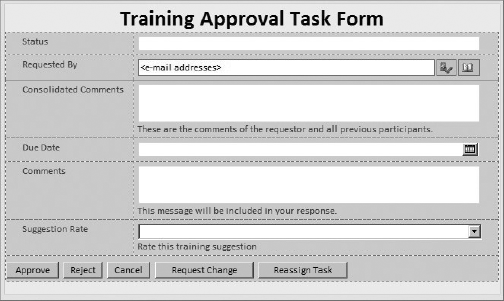
Figures 12-12 through Figures 12-14 illustrate all three forms after your artworks are completed.
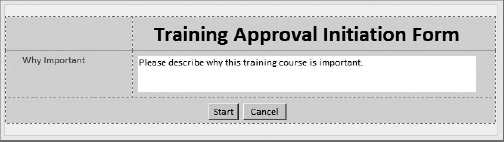
Note in the task form that, for each outcome, the Reassignment and Change Request options, you'll get a button. Notice also the Suggestion Rate field, which is used for rating the training suggestion, has a drop-down list and appears at the bottom of the form.
When you are done changing the look and feel of these forms, save them locally and then click Quick Publish, the big button in the Backstage, to sync your changes back to the original form templates in SharePoint. Additionally, you may need to save and publish the workflow again to see both form templates labeled as "custom form," as shown in Figure 12-15.
You have just created your first workflow in SharePoint Designer 2010 with three InfoPath forms. It's great that you have the workflow completed, but truth to be told, it doesn't do anything until it's glued to the Training content type.
The last thing you need to do to wrap up your workflow customization foray in SharePoint Designer is to associate it with the Training content type. All you need to do is click the Association to Content Type button in the Ribbon and select Training. Essentially, what happens behind the scenes here is that SharePoint Designer attaches the workflow to the Training content type (not just the Training list).
Note
The capability to attach declarative workflows to content types was the number-one feature request for SharePoint Designer 2010.
To do so, SharePoint Designer takes you directly to the workflow association page, where you should configure a few settings, such as workflow name, task list, and workflow history (standard stuff). You can leave pretty much everything in the first page set as their defaults and click Next to go to the page that contains your custom InfoPath association form, as shown in Figure 12-16. Enter the login name for the training manager (or look it up using the People Picker control), and then click Save when you are done.
This takes care of the workflow and the content type association and takes you to the final step: testing!

With the workflow published and added to the Training content type, it can finally be tested. Navigate to the Trainings list and create a new training. Select the new training and, from the Ribbon, click Workflows.
This takes you to a page that shows all the workflows that are available for the Training content type. Go ahead and click your workflow's name to get it started. The first screen that you will see is the initiation form that SharePoint Designer created for you and that you customized using InfoPath Designer.
Fill in your comment for the Why Important field, and click start.
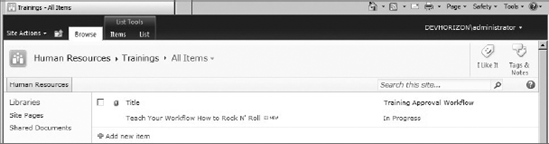
Your workflow will start, and you will be returned to the Trainings custom list. You'll also notice that a new column has been added to the list schema (and the current view) after your workflow name. It contains the current status of your workflow, In Progress, as shown in Figure 12-17.
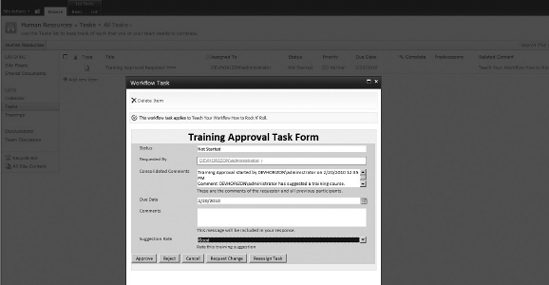
Back in the browser, if you check the Tasks list, you will see that a new task is created with the title of Training Approval Required. This task is assigned to the training manager you set up in the association form. Figure 12-18 demonstrates this task, as well as all the buttons that are provided to allow you to interact with the submitted training course. Go ahead and click the Approve button now.
At this point, you should be able to see that the workflow's status is changed to Approved in the Trainings list, as well as see an email sent to the coordinator indicating that his training suggestion has been approved.
The workflow that you have built up to this point has a problem.
The problem is that it doesn't fully satisfy the business requirement of the Training Approval Workflow. Refer to Figure 12-1 again. Your workflow is missing the most important step of the process: Create Training Site.
In this section, you will learn how to build a custom workflow activity in Visual Studio 2010 that creates a training site. Then, you will learn how to use this activity in your SharePoint Designer reusable workflow (as a workflow action). Finally, you will learn how to import the whole workflow into Visual Studio 2010 and take it from there.
Your first coding task in this chapter is to take care of the Create Training Site use case in your workflow. Unfortunately, SharePoint Designer doesn't have an action to create sites, so you need to code it yourself (finally!).
To make this process flexible so it can be reused in multiple scenarios, you will create a custom workflow activity. This activity will be used in the Training Approval reusable workflow inside the If statement of the "After Approval Process" step.
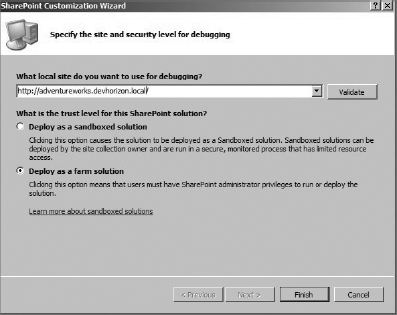
To get started, open Visual Studio 2010 and create an Empty SharePoint Project from the SharePoint 2010 template; name it AdventureWorksWFs.
When the SharePoint Customization Wizard dialog opens, go ahead and select Deploy as a farm solution, as shown in Figure 12-19.
Before you begin, you need to add the following three references to your project:
Microsoft.SharePoint.dllMicrosoft.Office.Workflow.Actions.dllSystem.Workflow.ComponentModel.dll
Next, add a new Workflow Activity or just a C# class to the project and name it CreateTrainingSite.cs.
Note
In this chapter, we only cover custom activities that are deployed in a farm solution. For creating sandboxed custom activities that show up as actions in SharePoint Designer, see Microsoft Patterns and Practices SharePoint Guidance at www.microsoft.com/spg.
Replace the class declaration with the following line:
public class CreateTrainingSite : Activity
In addition, add the following three using statements:
using System.ComponentModel;
using System.Workflow.ComponentModel;
using Microsoft.SharePoint;
With the project now created, the next step you are going to tackle is creating the custom properties for your activity to capture some information. To make this activity work, you need two pieces of information at minimum:
URL: This will be the location where the training site will be created.
Site Name: This will be the name of the training site created by the activity. (In this example, it's the training code.)
To capture this information at design time, you need to create two custom properties of type DependencyProperty with appropriate setters and getters. Think of custom properties for an activity like custom properties on any other .NET component; there is nothing special about them. To create property dependencies, you can use the built-in workflow snippets. Just type wdp and then press the Tab key twice.
Listing 12-2 shows CreateTrainingSite.cs after both properties have been added.
Example 12-2. The CreateTrainingSite Class
public class CreateTrainingSite : Activity
  {
     public static DependencyProperty UrlProperty =
     DependencyProperty.Register("Url", typeof(string),
     typeof(CreateTrainingSite));

     [Description("Url of training site")]
     [Category("Chapter 12 Workflow")]
     [Browsable(true)]
     [DesignerSerializationVisibility
      (DesignerSerializationVisibility.Visible)]
     public string Url
       {
         get
           {
             return ((string)
              (base.GetValue(CreateTrainingSite.UrlProperty)));
           }
         set
           {
              base.SetValue(CreateTrainingSite.UrlProperty, value);
           }
       }
      public static DependencyProperty SiteNameProperty =
      DependencyProperty.Register("SiteName", typeof(string),
      typeof(CreateTrainingSite));

       [Description("Training site name")]
       [Category("Chapter 12 Workflow")]
       [Browsable(true)]
       [DesignerSerializationVisibility
        (DesignerSerializationVisibility.Visible)]
       public string SiteName
         {
           get
             {
return ((string)
(base.GetValue(CreateTrainingSite.SiteNameProperty)));
}
set
{
base.SetValue(CreateTrainingSite.SiteNameProperty, value);
}
}
}

Each of the attributes decorating your dependency properties in Listing 12-2 means something different in Visual Studio and the SharePoint Designer workflow Designer surface. They are explained briefly in Table 12-4.
Table 12.4. Property Attributes
ATTRIBUTE | DESCRIPTION |
|---|---|
| A description of what the property does. |
| A category in which the property belongs within the Properties window of Visual Studio. |
| Indicates whether or not the property is visible within the Properties window of Visual Studio. Possible values are True or False. |
| Specifies the visibility of the property to the design-time serializer. Possible values are Visible, Hidden, and Content. |
The next thing you need to take care of is overriding the Execute method in your activity, as shown in Listing 12-3. This code uses the dependency properties to retrieve the URL and the name for the training site and just creates it. The code for creating the site is relatively simple.
Example 12-3. Code to Create the Training Site
protected override ActivityExecutionStatus Execute(
ActivityExecutionContext executionContext)
  {
    using (SPSite siteCollection = new SPSite(Url))
      {
        using (SPWeb web = siteCollection.OpenWeb())
          {
            using (SPWeb trainingWeb = web.Webs.Add(SiteName))
              {
                trainingWeb.Description = "This site is
                created using the CreateTrainingSite activity.";
                 trainingWeb.Title = SiteName;
}
}
}
return ActivityExecutionStatus.Closed;
}

With the Execute method created, the custom activity needs to be placed inside a WSP package so that it can be deployed to any SharePoint environment. That's what you will do in the next section.
Configure the AdventureWorksWFs project to be signed with a strong name key and then compile it. Next, right-click on the project and click Add
Right-click on the mapped Workflow folder, and select Add
Replace the contents of the new XML file with the XML fragment in Listing 12-4.
Note
Ensure that the PublicKeyToken within the SPDCustomActivities.actions file (24cb177bb81fb105) is updated with the public key token from the AdventureWorksWFs.dll assembly in your development machine.
Example 12-4. Workflow Actions Schema File
<WorkflowInfo>
<Actions Sequential="then" Parallel="and">
    <Action Name="Create Training Site"
            ClassName="AdventureWorksWFs.CreateTrainingSite"
            Assembly="AdventureWorksWFs, Version=1.0.0.0,
            Culture=neutral,
           PublicKeyToken=24cb177bb81fb105"
            AppliesTo="all"
            Category="Adventure Works">
      <RuleDesigner Sentence="Create a training site using the name %1 at %2.">
        <FieldBind Field="SiteName" Text="The name of the
         training site (i.e. Code Field)"
           DesignerType="TextArea" Id="1"/>
        <FieldBind Field="Url" Text="Full url of the parent site" Id="2"
           DesignerType="TextArea"/>
      </RuleDesigner>
      <Parameters>
        <Parameter Name="SiteName" Type="System.String, mscorlib" Direction="In" />
        <Parameter Name="Url" Type="System.String, mscorlib" Direction="In" />
</Parameters>
</Action>
</Actions>
</WorkflowInfo>

In Listing 12-4, you define a custom workflow action with the code behind in the AdventureWorksWFs.dll assembly. RuleDesigner instructs the Workflow Designer about what needs to go where on the design surface.
Note
You can add a <Condition> element to Listing 12-4 that points to a class containing a method to perform a specific condition check. For example, you can use this to check for the existence of a training site before it's created. The condition you define this way will appear in SharePoint Designer and you can reuse it when building declarative workflows. Refer to Microsoft Patterns and Practices SharePoint Guidance at www.microsoft.com/spg for instructions on how to implement conditions for your custom actions.
It's obvious that when you add this activity to the workflow design surface, it's going to have two textboxes used in collecting the training site name and URL as input parameters (defined in the <Parameters> element). Note that these parameters are bound to the dependency properties you defined in Listing 12-2 using <FieldBind> elements.
To see everything in action, you need to complete the last piece of your custom activity: deployment. So, to get started, simply follow these steps:
Right-click on the Features folder, and select Add Feature. This will open the Feature Designer.
Rename the new Feature file and its Title to AdventureWorksWFsFeature.
Change the Scope to
Farm.Right-click on the AdventureWorksWFsFeature file in Solution Explorer, and select Add Event Receiver.
Replace the contents of the
FeatureReceiverclass with the code shown in Listing 12-5.Build and Deploy the AdventureWorksWFs.
Example 12-5. Adding the Custom Activity as authorizedType to the Web.config
public class AdventureWorksWFsFeatureEventReceiver : SPFeatureReceiver
  {
    public override void FeatureActivated(
     SPFeatureReceiverProperties properties)
{
SPWebService contentService = SPWebService.ContentService;
contentService.WebConfigModifications.Add(GetConfigModification());
contentService.Update();
contentService.ApplyWebConfigModifications();
}
public override void FeatureDeactivating(
SPFeatureReceiverProperties properties)
{
// Code Omitted for brevity
}
public SPWebConfigModification GetConfigModification()
{
string assemblyValue = typeof
(CreateTrainingSite).Assembly.FullName;
string namespaceValue =
typeof(CreateTrainingSite).Namespace;
SPWebConfigModification modification =
new SPWebConfigModification(
string.Format(CultureInfo.CurrentCulture,
"authorizedType[@Assembly='{0}'][@Namespace='{1}']
[@TypeName='*'][@Authorized='True']",
assemblyValue, namespaceValue),
"configuration/System.Workflow.ComponentModel.WorkflowCompiler
/authorizedTypes");
modification.Owner = "AdventureWorksWFs";
modification.Sequence = 0;
modification.Type = SPWebConfigModification.
SPWebConfigModificationType.EnsureChildNode;
modification.Value =
string.Format(CultureInfo.CurrentCulture,
"<authorizedType Assembly="{0}"
Namespace="{1}"
TypeName="*" Authorized="True" />",
assemblyValue, namespaceValue);
Trace.TraceInformation(
"SPWebConfigModification value: {0}",
modification.Value);
return modification;
}
}

There are a few last things to look at in Listing 12-5 before you move on to the next section. First of all, as you can tell, the code uses its own public key token. As always, update this key (24cb177bb81fb105) with the correct key from your own assembly. Second, the code uses the SPWebConfigModification class to programmatically add the custom activity declaration as an authorizedType to the web application's web.config file across your farm.
Note
For more information about SPWebConfigModification class, see my blog post at www.devhorizon.com/go/25.
But, what's the authorizedType element, and why do you need it?
During the validation phase of workflow compilation, if this entry is not present in the web.config file, for reasons of security your request to access the CreateTrainingSite type will be rejected and you won't be able to add the action in SharePoint Designer. The authorizedType element indicates an Assembly, a Namespace, a TypeName, and an Authorized flag with possible values of True or False. Notice that, just as when you are adding a SafeControl element, wildcard characters are allowed, to include or exclude complete namespaces. For instance, using Type="*" indicates that all types within the AdventureWorksWFs namespace in the AdventureWorksWFs assembly are good to go (not any other namespaces).
When executed, the chunk of code in Listing 12-5 adds the following XML element to the web.config file of the content Web applications.
<authorizedType Assembly="AdventureWorksWFs, Version=1.0.0.0,
Culture=neutral, PublicKeyToken=24cb177bb81fb105" Namespace="AdventureWorksWFs"
TypeName="*"
Authorized="True"/>
The last step would be to build and deploy your solution. That wraps up your foray into custom activity development.
With the custom activity built and deployed to the SharePoint farm, you should now be able to go back to SharePoint Designer and finish where you left off before creating your custom activity.
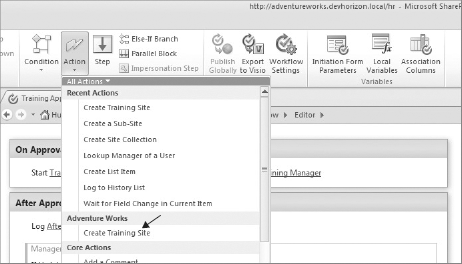
Open SharePoint Designer and from the Workflows category, open the training approval workflow. Next, place the insertion point inside the If statement, just before the Email Current Item:Created By action. Click Action in the Ribbon and from the drop-down list click Create Training Site under the Adventure Works category, as shown in Figure 12-20.
In the Name of the training site (i.e., Code field) link, define the following lookup:
Data Source: Current Item
Field from source: Code
In the full URL of the parent site link, type a fixed URL where the training sites will be created. You will end up with a surface that looks like Figure 12-21.
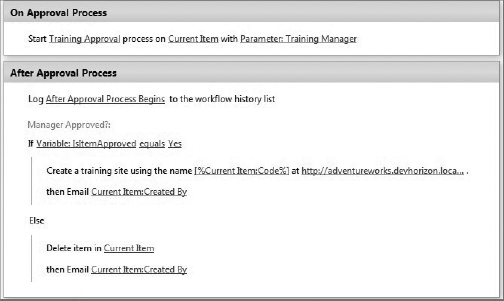
For the sake of simplicity, the URL of the trainings' parent site is hard coded in the workflow action. When you are doing this for real, however, you will want to make the URL configurable either as an association parameter or persisted somewhere else such as in the SPSite or SPWeb property bags.
Before you take the new changes in the workflow and publish them back to SharePoint again, let's take a look at just one more setting to change: Workflow Visualization.
If you have been doing workflow development for a while, you probably know that it's not unusual for companies to want to visually track their key business processes and instantly assess the current state of each process in real time.
Put yourself in their shoes and think about it for a second. A workflow is a model to represent a business process. As an owner of that process, don't you want to know where the process is at a given point in time?
Note
It's easy to forget, but those small and simple pieces of functionality, such as business process updates, when missing, result in decreased technology adoption.
Unfortunately, in the previous versions of SharePoint this was not that easy to implement. Sure, you could provide an event system inside your workflow that raised events during the workflow lifecycle and persisted some information about the current stage of a workflow in a SharePoint list or database, and then build a nice UI based on the persisted information, but how easy would this be?
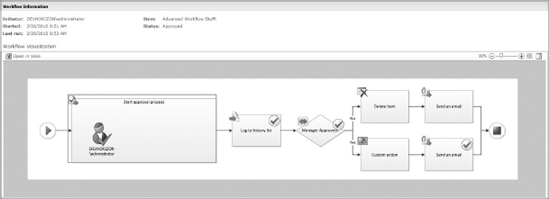
Thankfully, in SharePoint Server 2010, things are much clearer and easier. If you recall from earlier discussion in this chapter, you can use Visio 2010 to model your workflow. Well, that was just a warm-up and not the only way you can benefit from the Visio-Workflow love relationship in SharePoint Server 2010.
Similar to Excel Services in concept, a new service in SharePoint Server 2010 named Visio Services allows developers to build and publish data-driven visual diagrams to SharePoint. The underlying data for a data-bound Visio diagram can come from a variety of data sources, including the workflow tracking information. So, Visio Services has the ability to produce real-time visual diagrams of workflow steps and present them to process owners in the workflow status page.
To enable this functionality, simply go to the workflow settings page, and ensure that the checkbox "Show workflow visualization on status page" is checked. To render the workflow visualization component in the status page, you need to ensure that the following three pieces are in place:
Activate the Visio Web Access farm feature.
Activate the SharePoint Server Enterprise Site Collection features.
Install Silverlight.
With the visualization option checked, you can push the workflow back into the HR site again by republishing it. At this point, you should be able to kick off another instance of the Approval Training process and see the visualization in action, as shown in the diagram in Figure 12-22.
If everything goes smoothly and your workflow instance completes successfully, you can browse to the URL you specified for the training's parent site and see the custom team site that is created as part of the workflow execution.
Visualization aside, SharePoint workflows come with some reports to monitor how they are running based on the history information of their execution. Same as the visualization component, these reports are accessible in the Workflow Status page
These reports are generated on-demand and they are in Excel format. You have the option to store the Excel file in a document library of the current site and either download it to Excel client or view it online using Office Web App, as shown in Figure 12-23.
Cancellation & Error Report: As implied by the name, this report is used to record information about a workflow being cancelled or when it encounters errors before completion.
Activity Duration Report: This report gives you information about the time taken by a workflow instance to complete as well as for each activity within the workflow.

If you've made it this far in this chapter, you probably agree that, with the powerful combination of Visio and SharePoint Designer 2010, you have a nice, wizard-based approach to creating your custom workflows in your hands. You saw that extending the SharePoint Designer workflows using custom actions (developed in Visual Studio) was not that difficult either. Easy development aside, SharePoint Designer 2010 made it really easy to reuse your workflow in the site in which you created it or in the entire site collection.
What if you need to implement more sophisticated use cases? For this reason, and quite frankly many others, enterprise developers may need another tool. Thankfully, rather than using a third-party tool or developing your workflow completely from the ground up in Visual Studio, you can export your SharePoint Designer 2010 workflow to Visual Studio (every developer's best friend) and further extend it there.
In this section, you will export the Training Approval workflow to a WSP solution package, import it into the same Visual Studio solution that contains your custom activity, and then learn how to deal with a few nuances surrounding the importing process.
Note
Even if you don't find yourself importing declarative workflows into Visual Studio, I still recommend you read this section. An imported reusable workflow project is a fantastic example to learn how various workflow items, such as InfoPath forms, declarative rule conditions, and custom fields, are associated with and deployed alongside the workflow itself. This journey is quite an adventure!
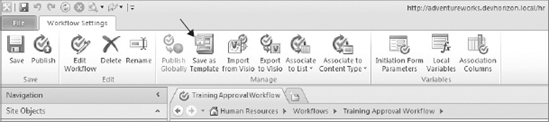
To export your workflow to Visual Studio, first you need to save it as a template. To do so, click the Save as Template button in the Ribbon, as shown in Figure 12-24. One thing to keep in mind is that, in order to save a workflow as template, you need to publish it to SharePoint and then save it as template. Just saving a workflow to the site's workflows catalog won't cut it.
This would save the workflow as WSP file in the Site Assets library. In your site, browse to the Site Assets library (View All Site Content
Now, go back to AdventureWorksWFs Visual Studio solution, right-click on the solution node, and select Add
Select Deploy as farm solution, and click the Next button until you reach the step where you need to point the wizard to the location of the Training_Approval_Workflow.wsp file on your local drive. After you click Next, you should see the Training Approval workflow selected and ready to be converted to a sequential workflow. At this point, all you need to do is to click Finish.
Note
Visual Studio is the finish line in the marathon of the workflow development lifecycle. Once the workflow is imported into Visual Studio, it can't go back to SharePoint Designer or Visio.
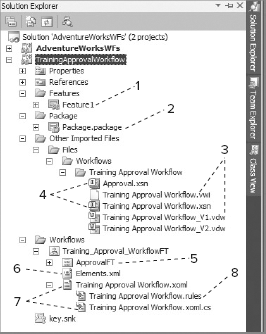
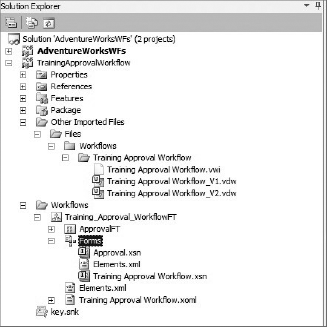
Figure 12-25 shows the Visual Studio structure of the imported workflow project.
As you may notice, your workflow was imported to Visual Studio and converted to a code-separated workflow.
When you create a workflow in SharePoint Designer, it is an XOML-only workflow (aka a declarative workflow) with bunch of XML content and no code modules. Sure, you developed a custom action and used it in your workflow, but don't forget that the custom action was developed and kept in a separate assembly and you just referenced it in your workflow, again declaratively.
In code-separated workflows, the markup and the implementation logic of the workflow are kept in two separate files with different extensions, .xoml and .xoml.cs (or xoml.vb). They also compile differently than XOML-only workflows. When you build your code-separated workflow, the markup file (.xoml.cs file) is compiled into a partial class. This partial class, along with the partial class from the code file (.xoml.cs file), is entered into the C# compiler and a .NET assembly is generated as the result of compilation. In XOML-only workflows, there is no code behind, so obviously the compilation process is different.
There is one more type of workflow that was not mentioned earlier because it had no relevancy to the discussion: code-only workflows. Typically, those are the workflows that most developers are familiar with. They just contain C# (VB.NET) code.
So with that understanding of different types of workflows, let's see what's available inside the imported project:
Feature1: The feature used in adding the Approval Training workflow. This will be covered in more detail later.
Package.package: This is the WSP package that contains the converted workflow feature.
The
.vwiand.vdwfiles: The Visio diagram and the interchangeable file you created in the "Prototyping in Visio section." These visualization files are only for XOML-only workflows that are created and they are of no use once they are ported over to the Visual Studio project.The
.xsn?files: Initiation, association, and task InfoPath forms.ApprovalFT content type: The Approval content type that's added to the Tasks list when Feature1 is activated. This will be explained later.
Element.xml: The element manifest file for the Approval Training workflow. This will be covered in much greater detail later (See Listing 12-8).
The
.xomland.xoml.csfiles: The .xoml file contains the markup to declare various workflow activities (differentiated by the namespace). The.xoml.csfile is the code behind.The
.rulesfile: This file contains RuleConditions associated with the workflow. As alluded to earlier, the Training Approval file doesn't have any custom conditions, so the XML fragment in this file contains only the OOTB conditions that are generated for the workflow by SharePoint Designer.
The .xoml file is the XML representation of your workflow (aka the markup), including all parameters and activities.
Note
The XOML is like food for your body. If you don't feed the workflow engine with XOML, it won't function.
Listing 12-6 shows the Feature definition file in the imported project. Note a few things about the Feature definition. First, the Feature's scope is set to site collection. This is required for adding workflow templates to SharePoint. Second, there are some element manifest files referenced in the Feature definition as follows:
The first highlighted line is used to define a custom content type named ApprovalFT.
The ApprovalFT content type references a custom field called Suggestion Rate, which is defined by the second highlighted element manifest. This file contains the actual field definition for suggestion rating. Note that this file is not shown in Figure 12-25, but it does exist under the ApprovalFT content type folder.
The third highlighted line is the element manifest file for the workflow itself.
Example 12-6. Feature Definition for the Training Approval Workflow
<Feature xmlns="http://schemas.microsoft.com/sharepoint/" Title="Converted workflows" Id="2ee76467-59c3-4e7d-8321-19f6029c5ea5"Scope="Site"> <ElementManifests><ElementManifest Location="ApprovalFTElements.xml" /><ElementManifest Location="Suggestion_RateElements.xml" /><ElementManifest Location="Training_Approval_WorkflowFTElements.xml" /></ElementManifests> </Feature>
The next element manifest to review is the one used for defining the ApprovalFT content type. Listing 12-7 shows this element manifest file.
Notice the first highlighted line in Listing 12-7. The ApprovalFT content type inherits the OOTB SharePoint Server Workflow Task content type and will be added to the Tasks list when Feature1 is activated. The Training Approval workflow creates task items based on this content type.
The second highlighted line references the Suggestion Rate custom filed. This field maps to the Task Parameter that you created with the same name when you customized the workflow earlier in this chapter. It is used to store the training coordinator's feedback (Good, So-So, or Bad) about a training. This field will show up as a custom site column when you deploy the workflow later to a desired site collection (Under the Custom Site Columns group).
Example 12-7. ApprovalFT Content Type
<?xml version="1.0" encoding="utf-8"?> <Elements xmlns:xsi="http://www.w3.org/2001/XMLSchema-instance" xmlsn:xsd="http://www.w3.org/2001/XMLSchema" xmlsn="http://schemas.microsoft.com/sharepoint/"><ContentType ID="0x010801004395428BE5AF4279A724EE6F59495385"Name="ApprovalFT" Description=""><FieldRefs><FieldRef Description="Rate this training suggestion"DisplayName="Suggestion Rate" ID="{92dfa913-154f-4531-87b7-5ed663631a17}"Name="FieldName_D59F504A_088C_4ADB_8947_3CE524791AF0_"Customization="" /></FieldRefs> <Forms xsi:nil="true" /> <XmlDocuments>
<XmlDocument NamespaceURI=
    http://schemas.microsoft.com/sharepoint/v3/contenttype/forms/url">
      <FormUrls xmlns=
      "http://schemas.microsoft.com/sharepoint/v3/contenttype
      /forms/url">
        <Display>
          _layouts/TrainingApprovalWorkflow/ApprovalFT/
        </Display>
        <Edit>
        _layouts/TrainingApprovalWorkflow/ApprovalFT/
        </Edit>
      </FormUrls>
    </XmlDocument>
  </XmlDocuments>
</ContentType>
</Elements>

Listing 12-8 shows the element manifest file for the Training Approval workflow. Note the following in Listing 12-8.
The
Nameattribute of theWorkflowelement is the name of the workflow template that will appear in the list of available workflows when associating the workflow to the Training content type. You may want to rename the value to something shorter, for exampleApprovalTrainingWorkflow.Leave the value of the
InstantiationURLattribute at its default. When you start the workflow manually, SharePoint examines theInstantiationURLattribute to determine the proper.ASPXpage. The default value points to an out-of-the-box page at_layouts/IniWrkflIP.aspx. This page examines the value of theInstantiation_FormURNelement, looking for an InfoPath form to load into an InfoPath form web part that's on the page. Yes, you guessed right! TheInstantiation_FormURNattribute is currently missing. Don't worry; you will take care of this a bit later. When users start the form,IniWrkflIP.aspxpasses the data it collects (i.e., the Why Important field) back to the SharePoint object model, which in turn starts the associated workflow and passes the information to the workflow instance.The same thing applies to the
AssociationUrlattribute. It's pointing to a page at_layouts/CstWrkflIP.aspxthat loads the association form specified inInstantiation_FormURNattribute — which obviously has gone missing during the import process, too!The
TaskListContentTypeIdattribute refers to the ApprovalFT content type ID.The second and third highlighted lines are the association and initiation parameters you created when you customized the workflow in SharePoint Designer. They are just two custom fields used as the metadata of the workflow forms. Don't expect to see them in the site columns.
The third highlighted line shows the
StatusPageUrlattribute. This points to the workflow status page where you saw the Visio Silverlight visualization component along with other information about the workflow such as the workflow history data.
Example 12-8. Element Manifiest for the Training Approval Workflow
<?xml version="1.0" encoding="utf-8"?> <Elements xmlns:xsi="http://www.w3.org/2001/XMLSchema-instance" xmlns:xsd= "http://www.w3.org/2001/XMLSchema" xmlsn="http://schemas.microsoft.com/sharepoint/"><Workflow Name="TrainingApprovalWorkflow - Training Approval WorkflowFT"CodeBesideAssembly="$assemblyname$"CodeBesideClass="TrainingApprovalWorkflow.Training_Approval_WorkflowFT"Id="{3B395925-FA07-47CC-861E-62C28428E833}"AssociationUrl="_layouts/CstWrkflIP.aspx"InstantiationUrl="_layouts/IniWrkflIP.aspx"TaskListContentTypeId="0x010801004395428BE5AF4279A724EE6F59495385"><MetaData> <AssociationCategories>List</AssociationCategories> <Instantiation_FieldML> <Fields><Field Name="TrainingManager" Required="TRUE"DisplayName="Training Manager"Description="" Direction="None"Type="User" Hidden="TRUE" ReadOnly="TRUE"FormType="Association" /><Field Name="WhyImportant" Required="TRUE"DisplayName="Why Important"Description="" Direction="None"Type="Note" Hidden="TRUE" ReadOnly="TRUE"FormType="Initiation"><Default>Please describe why this training course isimportant.</Default></Field></Fields> </Instantiation_FieldML> <Initiation_Parameters> <Parameters /> </Initiation_Parameters> <StatusPageUrl>_layouts/WrkStat.aspx</StatusPageUrl> </MetaData> </Workflow> </Elements>
With your tour of the imported project completed, it's now time to begin your investigation.
Of course, the devil is always in the details. . . .
Although you may expect that you can just press F5 and expect the full-blown workflow to deploy and run in a SharePoint site, this is not the case in 99% of scenarios (I left 1% there just in case I missed something after testing 15 different importing scenarios).
Note
The imported project is just a template. Don't expect it to be more than just a starting point to work from, as opposed to starting from scratch.
The following is the list of major issues related to the imported workflow project.
WHAT ARE THE MISSING PIECES? | |
|---|---|
1 | Two references are missing, so the project won't compile. |
2 | InfoPath forms are not packaged and deployed alongside the generated Feature definition and manifest files. |
3 | InfoPath forms are not specified in the element manifest file for the Training Approval workflow. Three |
4 | Initiation form is the default view in the imported |
5 | The tasks created by the workflow are not shown using the InfoPath task form. |
6 | The workflow is not associated with the Training content type. When you deploy the workflow, the Training Approval workflow won't show up in the list of the available workflows for the Training content type. |
Let's address the missing items one at a time. First, the references.
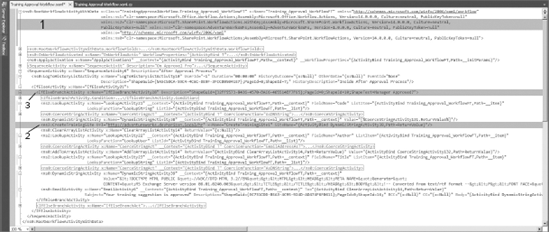
Figure 12-26 shows the Training Approval Workflow.xoml file. The XML fragment in this file is quite lengthy, but it's not very difficult to understand. To help you understand this file better, three line numbers have been added for the important parts.
Line #1 declares some CLR namespaces that contain the public types exposed as elements within the .xoml file. For example, CreateTrainingSite is a public type in AdventureWorksWFs.dll, so it's being declared at the beginning of this file and used as an attribute later on.
Line #2 is the declaration of your CreateTrainingSite activity. It's the child element of the IfElseBranchActivity element with the ShapeText attribute with the value of "Manager Approved?", as shown in Line #3.
When you import your workflow to Visual Studio, some of the required assemblies are not referenced correctly. To compile the project, you need to add the following references manually:
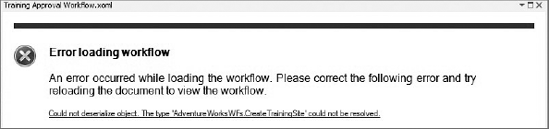
Compilation aside, if you don't add the AdventureWorksWFs project reference, you won't be able to see the Designer canvas for the workflow. To prove the point, delete the reference (if added), and then click on the Training Approval Workflow.xoml file. You should receive a very common error message like the one shown in Figure 12-27.
With the references in place, you should now be able to compile the project successfully (finally!).
Moving right along . . .
That brings us to the second item on the list of things to take care of.
At this point, if you attempt to build and deploy the workflow, it will deploy just fine, but the InfoPath forms won't be included in the WSP package. Obviously, if they are not in the package, they won't be available in the Feature folder when everything is deployed. If they are not deployed, then they won't be published and made available to your workflow either. Blame it on the Import Wizard; it's just a chain of problems it has caused for us.
Resolving this issue is a simple matter — just include the forms in the WSP package and modify the Feature definition file to include a Feature receiver that publishes the forms.
Start with the easy one: including the forms in the WSP Package:
In the Workflows folder, right-click on the node that says "Training_Approval_WorkflowFT" and select Add

From the available SharePoint 2010 templates, select Module and name it Forms. Note that if you choose a different name, you must modify the code snippets presented in the rest of this chapter and replace the word "Forms" with your own.
Drag the
Approval.xsnandTraining Approval Workflow.xsnfiles from Other Imported Files
The next thing that you are going to tackle is to add a specific Feature receiver to the ApprovalTrainingworkflow feature (formerly known as Feature1). You don't need to code this Feature receiver, because it's is already shipped with the product. You will reuse it to publish the InfoPath forms.
Go to the Feature Designer, and then click the Manifest button. This will bring up the Manifest Editor dialog, where you can add the code in Listing 12-9 to the Edit Options textbox, as shown in Figure 12-29.
Example 12-9. Feature Definition for the Training Approval Workflow
<?xml version="1.0" encoding="utf-8" ?> <FeatureReceiverAssembly="Microsoft.Office.Workflow.Feature,Version=14.0.0.0, Culture=neutral,PublicKeyToken=71e9bce111e9429c"ReceiverClass= "Microsoft.Office.Workflow.Feature.WorkflowFeatureReceiver"xmlns="http://schemas.microsoft.com/sharepoint/"> <Properties><Property Key="GloballyAvailable" Value="true" /><Property Key="RegisterForms" Value="Forms*.xsn" /></Properties> </Feature>
Note three things about the Feature definition file shown in Listing 12-9:
The Feature receiver is used when workflow contains InfoPath 2010 forms. It will publish the forms specified in the
<Properties>element into InfoPath Forms Services 2010 when the Feature is installed. Note the version number, as it has been changed since the previous version (12.0.0.0). The public key is the same as before.The
Valueattribute for theRegisterFormskey indicates the path to the InfoPath forms, which is relative to the Feature file location. This tells the Feature receiver where your forms are located.Leave the
GloballyAvailableproperty set totrue, so the forms are globally available across all site collections when they are published.
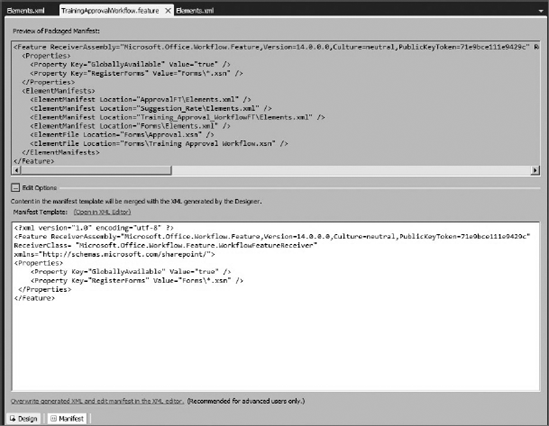
While you are in the Feature Designer, take a look at the Preview of Packaged Manifest textbox. Note the relative references to the forms within the <ElementFile> element that result from dragging and dropping the .xsn files to the Forms module folder.
As mentioned previously, the element manifest file for the Training Approval workflow is missing three FormURN elements that are used in specifying the workflow InfoPath forms for the workflow.
Listing 12-10 shows the changes that you need to make to the element manifest file for the Training Approval workflow to include the InfoPath forms.
Note the extra child elements in the <MetaData/>. Each element references an ID that points to a specific InfoPath form as follows:
To specify the association form, the
Association_FormURNelement is used.To specify the initiation form, the
Instantiation_FormURNelement is used.To specify the task editing form, the
TaskID_FormURNelement is used.
Keep that in mind, though, the initiation and association forms are located within the same InfoPath form, and that's why they both have the same ID. URN is like GUID in the sense that's it's unique to the form. To find the unique ID, you need to open each form in InfoPath 2010 in Design mode. From the Backstage, click the Info tab, and then in the Form Statistics billboard, click on the button that says Form Template Properties. You'll see the URN in the ID textbox of the modal dialog that appears.
Example 12-10. Element Manifest for the Training Approval Workflow (some elements and attributes are not included for brevity)
<?xml version="1.0" encoding="utf-8"?>
<Elements xmlns:xsi="http://www.w3.org/2001/XMLSchema-instance" xmlns:xsd=
"http://www.w3.org/2001/XMLSchema"
xmlsn="http://schemas.microsoft.com/sharepoint/">

  <Workflow>
     <MetaData>
      <Association_FormURN>urn:schemas-microsoft-
      com:office:infopath:workflowInitAssoc:-AutoGen-2010-02-
      26T14:48:51:568Z</Association_FormURN>

      <Instantiation_FormURN>urn:schemas-microsoft-
      com:office:infopath:workflowInitAssoc:-AutoGen-2010-02-
      26T14:48:51:568Z</Instantiation_FormURN>

      <Task0_FormURN>urn:schemas-microsoft-
      com:office:infopath:workflowInitAssoc:-AutoGen-2010-02-
      20T09:36:06:585Z</Task0_FormURN>

      <AssociationCategories/>
      <Instantiation_FieldML>
        <Fields>
          </Fields>
      </Instantiation_FieldML>
      </Initiation_Parameters>
      </StatusPageUrl >
    </MetaData>
  </Workflow>
</Elements>

With the URNs properly referenced in the element manifest file, you can now move on to the fourth item in the list of things to take care of.
The fourth problem is that, when the Training Approval Workflow.xsn form is loaded, it always defaults to the Start view, which in turn loads the initiation form. This is great when users start the workflow, but it's certainly not the expected behavior when the workflow needs to be associated with the Training content type. To resolve this issue, you need to set up a rule that runs when the form loads, and changes the view to the right one based on the workflow context.
To prove the point, open Training Approval Workflow.xsn in InfoPath 2010 in Design mode and navigate to the Page Design tab in the Ribbon. In the Views drop-down list, notice how the Start view is set to default and the Associate view is set as the second view of the form, as shown in Figure 12-30.

Navigate to the Data tab and go to the section called Rules. Click on the Form Load button to open the Rules pane for the Form Load event.
Click the New button and select Action. First, enter a meaningful name, such as SwitchView, in the textbox that says Details for.
Note
This chapter is on workflows. Creating declarative rules for use in an InfoPath form is covered in great detail in Chapter 9.
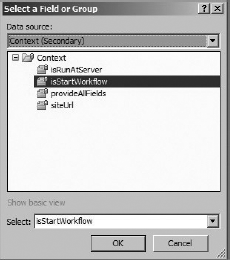
Second, you need to set the condition of the rule. The condition is clear: you want to switch the view to Associate when the workflow is in association mode. To do so, you will use the isStartWorkflow field from the form's secondary data source named Context, as shown in Figure 12-31.
Use the isStartWorkflow field as the left operand, "is equal to" as the operator, and the string(false()) function as the right operand in the condition, as shown in Figure 12-32.

Third, click the Add button and select Switch views from the list of actions. Select Associate in the dialog box that appears and click OK.
That's it. Publish the form back to SharePoint using quick publish; you're done with it. Quick publish will also save the form locally in your Visual Studio project folder.
Listing 12-11 shows the changes that you need to make to the element manifest file for the ApprovalFT content type to display the tasks created by the workflow using the custom InfoPath task form.
Note the <Display> and <Edit> elements in Listing 12-11. The values point to an out-of-the-box page at _layouts/ WrkTaskIP.aspx. This page examines the value of the Task0_FormURN element, looking for an InfoPath form to load into an InfoPath form web part that's on the page. When users approve or reject an item, WrkTaskIP.aspx passes the data it collects (i.e., Suggestion Rate field) back to the workflow instance.
Example 12-11. ApprovalFT Content Type (Some elements and attributes are not included for brevity.)
<?xml version="1.0" encoding="utf-8"?>
<Elements xmlns:xsi="http://www.w3.org/2001/XMLSchema-instance"
xmlsn:xsd="http://www.w3.org/2001/XMLSchema"
xmlsn="http://schemas.microsoft.com/sharepoint/">
  <ContentType ID="0x01080100FA9090DE01D349CC8E81891FF66E43F2"
    Name="ApprovalFT" Description="">
    </FieldRefs>
    </Forms>
    <XmlDocuments>
      <XmlDocument NamespaceURI=
      "http://schemas.microsoft.com/sharepoint/v3/
      contenttype/forms/url">
        <FormUrls
        xmlns="http://schemas.microsoft.com/sharepoint/v3/
        contenttype/forms/url">
          <Display>_layouts/WrkTaskIP.aspx</Display>
          <Edit>_layouts/WrkTaskIP.aspx</Edit>
        </FormUrls>
      </XmlDocument>
    </XmlDocuments>
  </ContentType>
</Elements>

The last issue you need to fix is modifying the element manifest file for the workflow and associating it with the Training Approval workflow. SharePoint uses the value of the <AssociationCategories> element to display only the appropriate workflows for a list or content type.
To keep the focus on the workflow concept, this chapter assumes that the Training content type is already deployed and made available in the desired site collection where you will deploy the Training Approval workflow. You also need to know the Training's content type ID beforehand to specify it in the workflow element manifest file.
Optionally, you can add the necessary code to your project to create the Training content type declaratively or programmatically.
Note
Another point worth emphasizing is that SharePoint 2010 allows developers to create content types programmatically and assign content type IDs. This is an improvement over the past when the only way a content type could be created and assigned an ID was declaratively.
For more information about creating content types using the SharePoint 2010 object model, refer to Microsoft Patterns and Practices SharePoint Guidance at www.microsoft.com/spg.
The values that goes inside the <AssociationCategories> element may include a character-delimited string, using the character ";" as the delimiter. This string can be up to 256 characters in length. Workflows associated with a specific list type and defined in a specified Feature have the following pattern:
Pattern: "List;" + Feature ID + ";" + List ID
Example:
<AssociationCategories>
  List; c3cce3c5-468c-4ad6-991c-c2d9936e409f;1300
</AssociationCategories>
Workflows that are associated with a content type, however, follow a different pattern.
Pattern: "ContentType;" + Content Type ID
Example:
<AssociationCategories>
  ContentType;0x0100E2C74F14CF94E2408485F68D42E58A1A
</AssociationCategories>
In contrast, a pattern defining a site workflow with no association to a list or content type has no delimiter. Site workflows will be covered in much greater detail later in this chapter.
Pattern: "Site"
Example:
<AssociationCategories>Site</AssociationCategories>
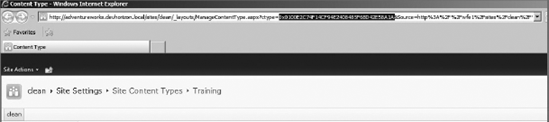
There are several ways to get the Training content type ID, but most likely the easiest way is through the browser. Browse to the Site Content Types gallery and click on Training content type. Highlight the value of the ctype query string parameter and copy it to the clipboard, as shown in Figure 12-33.
Listing 12-12 shows the element manifest file for the Training Approval workflow. Note the <AssociationCategories> element with the Training Content Type ID pasted from the clipboard.
Example 12-12. Element Manifest for the Training Approval Workflow (Some elements and attributes are not included for brevity.)
<?xml version="1.0" encoding="utf-8"?>
<Elements xmlns:xsi="http://www.w3.org/2001/XMLSchema-instance"
xmlsn:xsd="http://www.w3.org/2001/XMLSchema"
xmlsn="http://schemas.microsoft.com/sharepoint/">
  <Workflow>
     <MetaData>
        </Association_FormURN>
        </Instantiation_FormURN>
        </Task0_FormURN>
           <AssociationCategories>
             ContentType;0x0100E2C74F14CF94E2408485F68D42E58A1A
           </AssociationCategories>
        <Instantiation_FieldML>
          <Fields></Fields>
        </Instantiation_FieldML>
        </Initiation_Parameters>
        </StatusPageUrl >
    </MetaData>
  </Workflow>
</Elements>

Congratulations! Looks like your long list of things to take care of finally has come to an end. At this point, you can go ahead and add some code to the workflow.
Right-click the Training Approval Workflow.xoml file and select View Designer to open the workflow Designer canvas. In the Toolbox, in the Windows Workflow v3.0 section, drag a Code activity to the Designer and drop it directly below the EmailActivity6 activity, as shown in Figure 12-34.
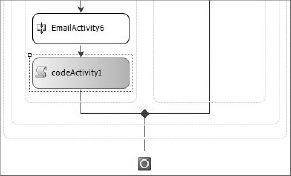
This will add an activity named codeActivity1 to the workflow Designer canvas. Double-click the CodeActivity1 activity to generate an event handler. Replace codeActivity1_ExecuteCode with the code in Listing 12-13.
The code simply creates a sample announcement in the Announcements list in another site each time a training course is approved.
Example 12-13. Approval Training Workflow Partial Class
using Microsoft.SharePoint.WorkflowActions;
using Microsoft.SharePoint;
using System;

public partial class Training_Approval_WorkflowFT :
RootWorkflowActivityWithData
{
    protected override void Initialize(System.IServiceProvider provider){}

    private void codeActivity1_ExecuteCode(object sender,
     System.EventArgs e)
    {
        using (SPSite site = new SPSite("http://wf1/sites/clean"))
        {
            using (SPWeb web = site.OpenWeb())
            {
                SPList announcementsList = web.Lists["Announcements"];
                SPListItem aListItem = announcementsList.Items.Add();
                aListItem["Title"] = "Imported reusable workflow is up
                there!";
                aListItem.Update();
            }
        }
    }
}

Now that you have all the plumbing work done, you should be able to package the workflow, with all its bells and whistles, and deploy it to a desired site collection. The business requirements of the Training Approval workflow dictate that everything must be deployed using a single package.
To satisfy this requirement, you need to take the following steps:
Go to the Package Designer for the
TrainingApprovalWorkflowproject.In the Package Designer, select the
AdventureWorksWFsFeature mapped folder andWorkflow(AdventureWorksWFs)Feature from the Items in the Solution pane, and click the add button (>) to move them to Items in the Package pane.
This will cause these artifacts to be deployed with the WSP solution that you will build from the TrainingApprovalWorkflow project. The Package designer now should look as shown in Figure 12-35.
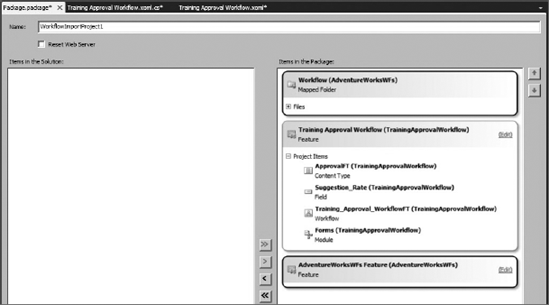
That's it. Save the Visual Studio solution, and you are ready to deploy it. Right-click on the TrainingApprovalWorkflow project in the Solution Explorer and select Deploy. Your workflow Feature should be successfully installed in all site collections.
Browse to a site collection other than the one used in SharePoint Designer and activate the Feature. Next, browse to Site Settings
Figure 12-37 proves that the custom rule you added to the InfoPath form kicks in here and switches the form to the right view. Specify the training manager and click Save to associate the workflow to the Training content type.
Figure 12-38 shows the new Training Approval workflow started for a training suggestion.
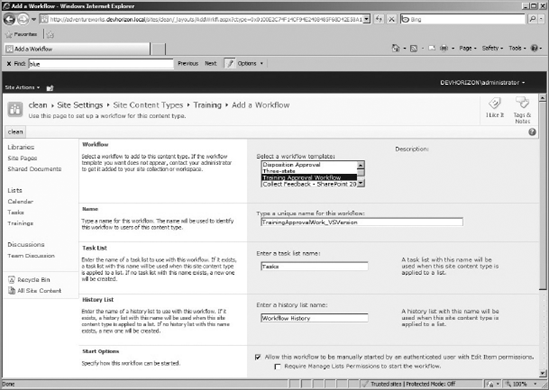
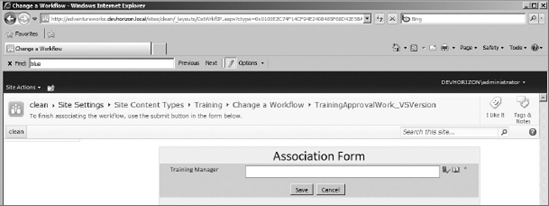
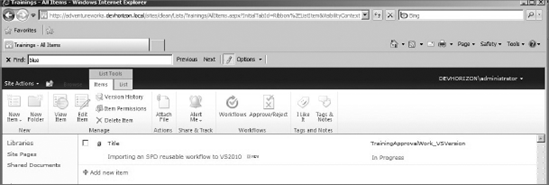
SharePoint Designer workflows are very powerful for modeling business processes, and the people who create them don't require any knowledge of code. However, the workflows lose their effectiveness in the broader spectrum of enterprise-scale applications, where more control over processes is key.
As mentioned previously, using Visual Studio is an extremely attractive option for workflow development. In Visual Studio 2010, there are four new areas for workflow developers that matter the most and, therefore, are the focus of the rest of this chapter:
Site Workflows
ASP.NET Association and Initiation Templates
External Data Exchange Services (aka Pluggable Workflow Services)
Workflow Events
Still staying at a high level, let's have a refresher on reusable workflows again. You need it for this section.
In SharePoint 2010, workflows don't necessarily need to be strongly associated with a list instance. Instead, you can associate a reusable workflow to all content types, a specific content type in the current site, or across multiple sites in a given site collection, which makes it a globally reusable workflow. Reusable workflows have addressed many issues customers had in the previous versions of SharePoint. However, they are still very list-centric. Sure, you can assign the workflow to a content type, but unless that content type is attached to a list, the workflow itself is nothing more than just a bunch of code sitting around doing absolutely nothing.
Too much dependency on the list infrastructure comes with its own limitations. For instance, if you wanted to use workflows to model a business process in a site with no list, you would have to create a dummy list, hide it from the end users, and deal with the management issues and all kinds of other headaches. In the majority of the cases, developers ended up using other functionalities, such as event handlers, or even took the business process outside the SharePoint context and implemented it there.
Let's face it, although the previous version of SharePoint was an easy-to-use workflow host and got many people involved in workflows, it was not the greatest general-purpose host for workflows. In another words, SharePoint, as a workflow host, was not flexible enough.
Thankfully, Microsoft didn't stop there, though; they came up with a new breed of workflows in SharePoint 2010, named Site workflows.
Note
The idea of site workflows is to cut the dependency of a workflow on a SharePoint list item and let it run on literally any SharePoint object.
To give you some flavors of what you can accomplish using site workflows, let's jump right on few very common scenarios:
Scenario 1: Accessing backend data sources — Picture this: every time a site workflow kicks off, a number of new customers are retrieved from a customer relationship management (CRM) application and added to the visitors group of the company's extranet site. The data access can be provided through Business Data Connectivity Services or a custom data access layer.
Scenario 2: Managing site permissions — Imagine this: you want to automate the process of adding users to departmental sites and giving them permissions to the appropriate lists based on their job title. You can create a site workflow that runs in the portal site and let users start it directly from the View All Site Content page where there is a link to Site Workflows. Users are then routed through an approval process and finally given access or denied access to the requested site.
Scenario 3: Implementing general business logic — Dream this: upon the creation of a project team site, a group work site is created along with it and added as a subsite.
Scenario 4: Managing business process on folders — Love this: you want to create a workflow that runs on folders rather than individual items. When you start the workflow, it will assign a number of tasks to the owners of the documents within the folder. While the workflow instance is running, you can go to the workflow status page and find out about the outstanding tasks. Barbara Decker, who is one of the document's owners, receives an email, which includes a link pointing to the document that she's tasked to review. She opens the document in Word, reviews and modifies the document, and then completes her task from within the Word client without even visiting the site.
The scenario you are going to tackle in this section is similar to the one that was presented at the beginning of this chapter, with one exception: it breaks the dependency of the Training Approval workflow on the Trainings list context.
This means that training coordinators no longer need to go to the Training list, create a new training course, and kick off the workflow manually. Instead, they suggest the training course through an application page that starts a site workflow, as shown in Figure 12-39. The workflow routes the training suggestion through an approval process and finally creates the training site if necessary.
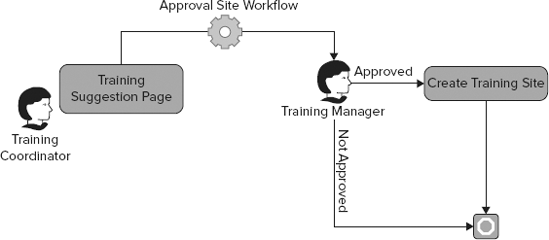
Now that you know what you are building, get started by creating a workflow project in Visual Studio. Select a Sequential Workflow template from the SharePoint
In the SharePoint Customization Wizard, select the option to deploy the project as a farm solution, and click Next. In the second step, change the default name to TrainingApprovalSiteWorkflow and choose the second option, which says Site Workflow.
In the third step, you specify what lists to use for tasks created by the workflow and workflow history information. Leave everything at its default and click Next. The last step is about how to start the workflow. Again, leave the selected option (start manually) and click Finish.
Note
This is probably the best time to fill you in on two key tips. First, you cannot add workflow templates to Sandboxed Solutions. Second, unlike list-based workflows, site workflows cannot be started automatically.
After the project is created, rename the default workflow1.cs to TrainingApprovalSWF.cs. Make sure that you rename it in the code behind and the Designer class. The easiest way is to find the word workflow1 and replace it with TrainingApprovalSWF in the entire project.
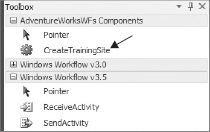
Next, add a reference to AdventureWorksWFs project where you created the CreateTrainingSite custom activity. This should immediately add the custom activity to the toolbox, as shown in Figure 12-40.
With the project now created, the next logical step is to model the workflow in the Designer canvas. Conceptually, this step is pretty similar to what you did in Visio 2010 when you built your declarative workflow earlier in this chapter.
Open the workflow in the Designer canvas and perform the following activities:
Add a
CreateTaskactivity directly below theOnWorkflowActivited1activity.Add a
logToHistoryListActivityactivity after theCreateTaskactivity.Drag and drop an
OnTaskChangedactivity directly below thelogToHistoryListActivityactivity.Add an
ifElseActivityactivity after theOnTaskChangedactivity.Add a
CreateTrainingSiteactivity inside theifElseActivityactivity to the right branch.Add a
SendEmailactivity inside theifElseActivityactivity to the left branch.
When you are done dropping activities into place, your Designer canvas should look like Figure 12-41. Notice that there are little red exclamation icons next to some of the activities. This is because they all failed in the design-time validation process. Don't worry about them; you will fix these errors next.
Note
Notice that the Visual Studio Workflow Designer is based on .NET 3.5 Framework, not .NET Framework 4.0.
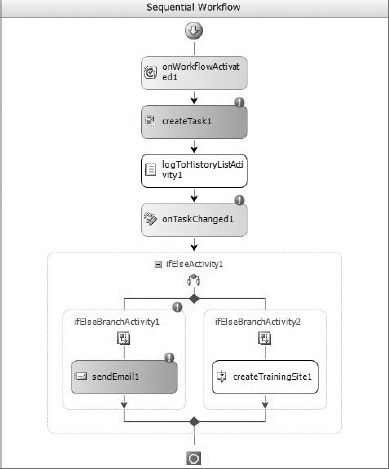
Click on CreateTask1 and in the property windows, find the Correlation Token property. You need to type in "taskToken" as the value of this property. You also need to specify an owner for the OwnerActivityName subproperty. Select the value from the drop-down list and set it to the name of the workflow class (TrainingApprovalSWF). Repeat the same steps for the OnTaskChanged1 activity to set the Correlation Token and OwnerActivityName properties. The correlation token of the OnTaskChanged1 activity must match with the CreateTask1 activity, so make sure that you select "taskToken" from the drop-down list. If this is not available, type it in again. With the correlation tokens properly set, the error icons should disappear from both activities.
Now you should be able to configure the TaskId and TaskProperties properties of the CreateTask1 activity.
Go back to the property window for CreateTask1 activity and find the TaskId property. Click the ellipse button to bring up the property binder dialog, then select the Bind To a new member tab. A member can be a field or a property of type "System.Guid". Type in approvalTask_TaskId as the member name, select the Create Field radio button, and click OK. The TaskID property ensures that each task gets its own GUID, which can be identified and used in the workflow later (you will see the usage in the OnTaskChanged1 activity). Repeat the same steps for the TaskProperties property of the CreateTask1 activity, and name it approvalTask_TaskProperties. This property represents the properties of a task created by the workflow and allows the workflow instance to set specific values in it.
The next activity to configure is the LogToHistory activity. There are two properties that you need to set: HistoryOutcome and HistoryDescription. Both properties are set the same way that TaskId was set in CreateTask1.
The review by the training manager introduces a natural delay where the workflow runtime engine is waiting for any change to the task item. While waiting for the training manager to complete his task, the workflow instance dehydrates and no longer remains in memory on the server it is running on. At this point, the state of the workflow instance is written to the SharePoint content database in such a way that it can be retrieved later.
Once the workflow wakes up (rehydrates), it continues on and the OnTaskChanged1 activity is executed. To configure the OnTaskChanged activity, you need to wire up one more property: TaskId. This time, instead of creating a new field, bind it to approvalTask_TaskId field you created before.
Notice that the OnTaskChanged1 activity has no TaskProperties property. This makes sense, because this activity doesn't create any task that the workflow needs to set values on it. Instead, it has two other properties: BeforeTaskProperties and AfterTaskProperties. In this example, you will only use the AfterTaskProperties property. To set this property, use the binding dialog box and create a new field named onApprovalTaskChangedAfterProperties.
Note
Think of BeforeTaskProperties and AfterTaskProperties like a "before and after" picture of someone who has had a hair transplant. The BeforeTaskProperties property contains a picture of the task before it's changed (pretty thin!). The AfterTaskProperties contains a picture of the task after it's changed. After a task is completed, it is thicker in terms of information, because it has the approval status, approver's comment, and probably some custom data. The bottom line: you should realize the difference!
Configuring the SendEmail activity is very similar to other activities. The only point worth emphasizing here is the correlation token. In this activity, set the correlation token to workflowToken. The workflowToken token is the workflow's default correlation token, and it is generated automatically when you create a workflow project. Typically, this token is used in activities that do not correlate directly to workflow tasks. Using this token will automatically set the OwnerActivityName sub property. Type an email address in the From property and give the Subject property a meaningful value such as "Your training suggestion is rejected."
The last activity that you need to configure is your own activity. Setting up this activity is the simplest of all. It only exposes two properties: Url and SiteName. For both these properties, use the binding dialog box and create new fields of type "System.String" with proper names such as createTrainingSiteName and createTrainingSiteUrl. That's it for the CreateTrainingSite1 activity.
At this point, all of your activities are configured. Don't worry about the red little exclamation error in ifElseBrnachActivity1. This will be fixed later by code.
If you look at the code behind, you will see that Visual Studio has generated the following variable declarations and maybe some methods if you have double-clicked on any activity.
You are going to leave the workflow alone for a little while and come back to it after the next section. The next step is to create the initiation form.
Your workflow needs an initiation form to be displayed to the training coordinators when they start it. This form allows the workflow to gather information about the training before it gets started. To keep things simple, this section only covers the initiation form creation, but nothing prevents you from following the same steps for creating the initiation form and creating association and task forms as well.
It's worth mentioning that the form that you will build is not an InfoPath form. It's an ASPX page that will be coded completely from scratch (for the most part, anyway. Read on.).
Thankfully, Visual Studio 2010 ships with new SPIs (SharePoint Project Items) for workflow forms. First, right-click on the TrainingApprovalSWF SPI in Solution Explorer and choose Add
This will fix some of the namespace conflicts that will occur later when you code the activities, so it is important that you take care of it here.
Notice how the new form is automatically associated with the workflow by the changes made to the element manifest file, as shown in Listing 12-14. If you need a refresher on the InstantiationUrl attribute, see the "Importing to Visual Studio" section earlier in this chapter.
Example 12-14. Training Approval Site Workflow Element Manifest File
<Elements xmlns="http://schemas.microsoft.com/sharepoint/">
  <Workflow
    Name="TrainingApprovalSiteWorkflow"
    Description="My SharePoint Workflow"
    Id="398fa8cf-ac70-4958-af59-a910da11bc9c"
    CodeBesideClass="TrainingApprovalSiteWorkflow.TrainingApprovalSWF"
    CodeBesideAssembly="$assemblyname$"
    InstantiationUrl=
    "_layouts/TrainingApprovalSiteWorkflow/TrainingApprovalSWF
    /start.aspx">
    <Categories/>
    <MetaData>
      <AssociationCategories>Site</AssociationCategories>
      <StatusPageUrl>_layouts/WrkStat.aspx</StatusPageUrl>
    </MetaData>
  </Workflow>
</Elements>

The form you just added is an ASPX page with code behind and all the wiring already done. Open the code-behind file and take a peak. The GetInitiationData method sends the data from the initiation form to the workflow instance. The returned value of this method is what you reference in your workflow, using the workflowProperties.InitiationData property.
By default, this method returns an empty string, which is most likely not adequate in real-world solutions. Instead, you should use the XML serialization functionality included in the Microsoft .NET Framework to pass the form's data into the workflow. It is not enough to pass in the initialization form data to workflow; you also need to write the appropriate code in the workflow that pulls the XML data submitted by initiation form and deserializes it into an object. The deserialization part will be taken care of later when you code the activities.
The first step is to create a new C# class and add two references to the System.IO and System.Xml.Serialization assemblies. Next, add the code shown in Listing 12-15 to the class.
Example 12-15. Code to Serialize and Deserialize the Initiation Form Data
[Serializable()]
public class TrainingInfo
  {
private string title = default(string);
private string code = default(string);
private string description = default(string);
public string Title
{
get {return this.title;}
set {this.title = value;}
}
public string Code
{
get { return this.code;}
set { this.code = value;}
}
public string Description
{
get { return this.description;}
set { this.description = value;}
}
}
public class TrainingInitFormHelper
{
public static string SerializeTrainingForm(TrainingInfo training)
{
XmlSerializer serializer = new XmlSerializer(typeof(TrainingInfo));
using (StringWriter writer = new StringWriter())
{
serializer.Serialize(writer, training);
return writer.ToString();
}
}
}

Listing 12-15 contains two classes: TrainingInfo and TrainingInitFormHelper. The TrainingInfo class represents a training object. For the sake of simplicity, the code only implements three fields, title, code, and description, with their getter and setter assessors. As implied by the name, the TrainingInitFormHelper class is a helper class to facilitate the process of persisting data collected by the workflow initiation form. There is nothing really special to this code; it just contains standard .NET code for serializing an object of type TrainingInfo.
The second step is to insert the following HTML markup inside the main content placeholder of the page:
<asp:Label id="lblTitle" Text="Title:" runat="server"/>
<asp:TextBox ID="txttitle" runat="server" />
<br />
<asp:Label id="lblCode" Text="Code:" runat="server"/>
<asp:TextBox ID="txtTrainingCode" runat="server" />
<br />
<asp:Label id="lblDes" Text="Description:" runat="server"/>
<asp:TextBox ID="txtDescription" runat="server"/>
<br />
While you are in the HTML markup, you may also want to change the title of the page, button labels, and other elements. Next, go to the form's code behind and insert the following lines of code in the GetInitiationData method to collect and return the form's data:
TrainingInfo tInfo = new TrainingInfo();
tInfo.Title = txttitle.Text;
tInfo.Code = txtTrainingCode.Text;
tInfo.Description = txtDescription.Text;
string xmlString = TrainingInitFormHelper.SerializeTrainingForm(tInfo);
return xmlString;
Note one thing about the start.aspx code behind: the StartSiteWorkflow() method contains the code to programmatically start an instance of the Training Approval workflow, as shown in Listing 12-16.
The first line gets a collection of the workflow association object that represents the workflow that is associated with the initiation form. The second line starts a new instance of the workflow, passing in the association object and returned data from the GetInitiationData method, and tells the workflow to run synchronously. The other two possible values for running the workflow are SynchronousAllowPostpone and Asynchronous. The former is used to run the workflow instance synchronously, but switches to asynchronous if the synchronous execution fails. The latter enables the workflow to run synchronously.
The third line uses the SPUtility.Redirect method to redirect the user who starts the workflow back to a URL. This URL is the one that's specified in the source query string parameter of the original request. You will use this redirection later, but for now just keep in mind that, after starting the workflow, users don't have to stay in the initiation form or look at the boring workflow information in the status page. They can be redirected to anywhere you wish.
Example 12-16. Code Used in Starting the Site Workflow Programmatically
private void StartSiteWorkflow()
{
  SPWorkflowAssociation association =
    this.Web.WorkflowAssociations
    [new Guid(this.associationGuid)];
  this.Web.Site.WorkflowManager.StartWorkflow
    ((object)null, association, GetInitiationData(),
    SPWorkflowRunOptions.Synchronous);
  SPUtility.Redirect(this.Web.Url, SPRedirectFlags.UseSource,
    HttpContext.Current);
}

With the initiation form complete, the next step is to take care of the coding aspects of the workflow and go through the process of implementing the business logic.
With the workflow activities in place, properties bound to fields, and ASPX initiation form created, you can now start coding. Most of your coding here involves creating event handlers for the activities used in the workflow.
To avoid confusion, it's very important to understand that some of these event handlers are called during or after their associated activity is executed. For instance, the event handler for the sendEmail1 activity is run when the activity begins executing but before the email is sent out to the recipients. As another example, the event handler for the OnTaskChanged1 activity is called after the activity is executed. As mentioned previously, you can always access the values contained in the afterProperties property collection representing the changes made to the task.
And with that, let's begin coding.
The first activity you are going to implement is onWorkflowActivated1. In the Designer canvas, double-click the activity to generate the event handler. Click in the method body and insert the code shown in Listing 12-17. This code will deserialize an object of type TrainingInfo, passed by the ASPX initiation form, and store it in a class-scoped private variable named twInfo. The private variable is then used by other activities in the workflow to deliver the functionality they need. In this stage of the workflow, the name of the training site and its URL are also set using the fields created in the CreateTrainingSite1 activity.
Example 12-17. Coding the onWorkflowActivated1 Activity
private TrainingInfo twInfo = default(TrainingInfo);

private void onWorkflowActivated1_Invoked(object sender,
 ExternalDataEventArgs e)
  {
    XmlSerializer serializer = new XmlSerializer(typeof(TrainingInfo));
    XmlTextReader reader = new XmlTextReader(new
     System.IO.StringReader(workflowProperties.InitiationData));
    twInfo = (TrainingInfo)serializer.Deserialize(reader);
    createTrainingSiteName = twInfo.Code;
    createTrainingSiteUrl = workflowProperties.WebUrl;
  }

The next step is to create the task and assign it to the training manager. This task is created by the CreateTask1 activity. To set the initial attributes associated with the approval task, double-click the activity to generate the event handler and add the code shown in Listing 12-18. Most of the attributes represent the common fields in the task list of SharePoint.
Keep in mind that if you need to add custom data to the task, the SPWorkflowTaskProperties object contains a hash table to store extra information in the task in key-value pairs. You can set or get a specific custom property by using the property name as an index in the ExtendedProperties property. This mechanism really opens your hand to store information in the workflow task and use it later in the task form.
Example 12-18. Coding the createTask1 Activity
private void createTask1_MethodInvoking(object sender, EventArgs e)
  {
    createTask1.TaskId = Guid.NewGuid();
    approvalTask_TaskProperties = new
     Microsoft.SharePoint.Workflow.SPWorkflowTaskProperties();
    approvalTask_TaskProperties.AssignedTo =
     workflowProperties.Web.SiteAdministrators[0].LoginName;
    approvalTask_TaskProperties.DueDate = DateTime.Now.AddDays(1.0F);
    approvalTask_TaskProperties.Title = "Approval Required for " +
     twInfo.Title ;
    approvalTask_TaskProperties.Description =
     "Specify the approval result here.";
     createTask1.TaskProperties = approvalTask_TaskProperties;
  }

One warning on Listing 12-18: the AssignedTo property is set to the first administrator in the SiteAdministrators collection. In your production system, you want to read this value from the association data submitted to the workflow by the association form. The steps required to send and receive the association data are identical to those for the initiation form. Again, XML serialization is always your best friend; let it help you.
With the task created, the next step is to write an information entry in the workflow history list using the logToHistoryListActivity1 activity. Right-click the activity and, from the context menu, click Generate Handler. Set the values of the HistoryDescription and HistoryOutcome properties, as shown in Listing 12-19.
Example 12-19. Coding the logToHistoryListActivity1 Activity
private void logToHistoryListActivity1_MethodInvoking(object sender,
 EventArgs e)
  {
    logToHistoryListActivityHistoryDescription =
     string.Format(" Training = {0}/{1} is waiting for
     approval",twInfo.Code,twInfo.Title);
    logToHistoryListActivityHistoryOutcome =
     string.Format(" A task is created for training {0}
     and assigned to the training manager ", twInfo.Title);
  }

Now, it's time to add the required logic to respond to the task changes. When the OnTaskChanged1 activity is executed, you can access the values contained in the beforeProperties or afterProperties property collection objects. To access these properties, first add an event handler.
Before adding the necessary logic to the handler, create two additional local variables to help store the result of the task:
private bool bTrainingApproved = false;
private string strTrainingManagerComment =
 default(string);
Next, add the code in Listing 12-20 to the empty onTaskChanged1_Invoked method. The code determines whether the training manager has indicated that the task is complete and if the training course is approved. The Boolean evaluation of this condition is stored in a class-level variable named bTrainingApproved. For the sake of simplicity, the code assumes that when a workflow task is complete, it's either approved or rejected and the approval decision is specified in the description column of the task using the word "Approved" or "Rejected."
Example 12-20. Coding the onTaskChanged1 Activity
private void onTaskChanged1_Invoked(object sender, ExternalDataEventArgs e)
  {
    if (onApprovalTaskChangedAfterProperties.PercentComplete == 1.0F &&
    onApprovalTaskChangedAfterProperties.Description.Contains("Approved"))
      bTrainingApproved = true;
    else
      bTrainingApproved = false;
  }

For the sendEmail1 activity, you have essentially three properties to set: Subject, From, and Body. However, because the former two properties are already configured, the process is much easier. Add the code in Listing 12-21 to the sendEmail1_MethodInvoking method that is created when you double-click the activity. The code creates some information about the suggested training course and includes it in the body of the email message.
Example 12-21. Coding the sendEmail1 Activity
private void sendEmail1_MethodInvoking(object sender, EventArgs e)
  {
    sendEmail1.Body = string.Format
     ("Sorry , but your suggestion {0}/{1}
     has been rejected by the training manager. ",
     twInfo.Code, twInfo.Title);
  }

At this point, all the activities are handled except for the final activity: ifElseActivity1. If you recall, the configuration of this activity was postponed, so it's now about time to get it coded, too.
In this activity, the workflow determines whether the training manager approved or rejected the training course subject to the workflow and takes a different path, depending on his decision.
The logic of branching is no different than in any IF ELSE statement. When the condition is evaluated, a true or false statement is returned and the workflow branches to one of the ifelsebranchactivity activities. There are two kinds of conditions that can be set for this activity:
Declarative Rule Condition: This requires coding the logic in the workflow's built-in Condition Editor. The logic must always result in a Boolean evaluation.
Code Condition: This requires an event handler just like all the other activities. The event handler must always result in a Boolean evaluation.
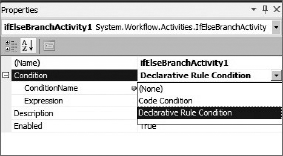
Select the branch that contains the ifElseBranchActivity1 activity and set the Condition property to Declarative Rule Condition, as shown in Figure 12-42.
There are two more additional properties to set: ConditionName and Expression. Clicking in the textbox next to the ConditionName property will display the ellipses where you can click and launch the workflow's built-in Condition Editor. This dialog contains all of the declarative rule conditions in your workflow, and obviously it should be empty for now. Click the New button to launch the Rule Condition Editor dialog.
The Rule Condition Editor dialog is where you can type in the conditional expression. Notice that the editor comes with IntelliSense, which displays a list of properties, fields, and methods in the workflow class. Enter the following expression to determine whether the training course is rejected:
!this.bTrainingApproved
Clicking the OK button will return you to the Select Condition dialog, where you will rename the condition, giving it a more descriptive name. Repeat the same steps for the ifElseBranchActivity2 branch, using the following expression:
this.bTrainingApproved
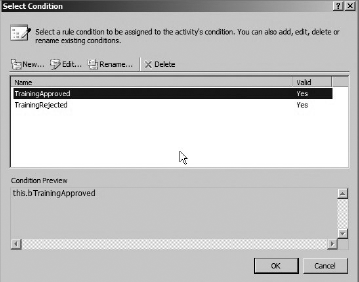
The conditions that you created above can be reused by other activities, too. Figure 12-43 shows the workflow's built-in Condition Editor after both conditions are created.
After all these button clicks, if you check the content of the .rules file, you will find the XML fragment of the condition you just wrote.
All of your activities are coded now. All you need to do is press F5 and wait for the workflow to compile and be deployed. The packaging process is no different from any other SPI, as everything will be bundled into a WSP solution.
Note
Depending on the changes you've made to the deployment configuration, you may need to go to the site collection Features gallery and activate the Feature manually. Workflow templates are defined at the site collection level.
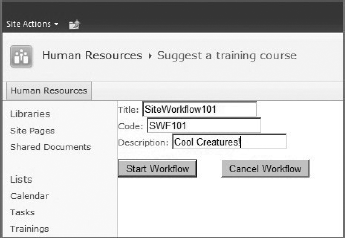
Once the SharePoint site shows up, browse to the View All Site Content page and click Site Workflows. You should see all of the site workflows, as well as the workflow that was just deployed. Click on the workflow to start it. This redirects you to the workflow initiation form, as shown in Figure 12-44. Type in some information and click the Start Workflow button.
Go ahead and approve or reject the task. If the training suggestion is approved (include "Approved" in the description column), a site is created for the training. If not, the workflow simply terminates, but it sends an email to the training coordinator before doing so.
I will be the first one to admit that the initiation form is totally unstyled and looks horrible, quite literally. But, then again, this chapter is not meant to teach you branding 101!
Figure 12-45 shows the log entry created by the logToHistoryListActivity1 activity.

Last, but certainly not least, there is one option available to direct users back to where they came originally from after starting a site workflow. If you have been using SharePoint for any amount of time, you probably know that URLs are everywhere and play an important role in many forms in SharePoint. On most SharePoint forms, you can simply add your own URL to the Source query string parameter and SharePoint will automatically redirect the user to that URL when the form is submitted. The same rule applies to site workflow initiation forms.
As mentioned previously, the initiation form code-behind file contains the redirection logic that redirects the workflow originator to the URL specified in the Source query string parameter. Take a look at the initiation form URL. It should be similar to the following URL, except that it contains your own site URL:
http://wfe1/hr/_layouts/TrainingApprovalSiteWorkflow/TrainingApprovalSWF/
TrainingApprovalSWF.aspx?TemplateID={a4a00127-4e88-47d2-9d0f-8388d70bb6e7}&
Source=http%3A%2F%wf1%2Fhr%2F%5Flayouts%2Fworkflow%2Easpx
If you add this link somewhere in your site, by replacing the Source query string value with the URL of a specific page, you can get the users to the workflow initiation form. Then, when they start the workflow, they will be redirected back to that page. A very simple tip, but it makes a lot of people scratch their heads for a while.
As always, no application is complete without debugging, audit trails, logging, and testing. At a high level, workflow exceptions can be categorized in the following two distinctive groups:
Failed on start (retrying): This usually means that the workflow assembly cannot be loaded or the assembly in the global assembly cache (GAC) does not match the information specified in the
<workflow>element of the workflow manifest file.Error Occurred: This means that the workflow has started, but there was an error in one of the activities.
Debugging a workflow live is very similar to other types of debugging done with SharePoint projects created in Visual Studio 2010. You can set a few breakpoints in the code behind or on each activity in the Designer canvas and press F5. Behind the scenes, Visual Studio attaches to the right W3WP.exe process.
The SharePoint Unified Logging Service (ULS) also logs a large amount of information about each instance. Some of the core workflow exceptions are only caught by the ULS, which makes it a good place to refer to when debugging your workflows.
ULS logs and live debugging aside, there are three more options available when debugging workflows:
Fault handlers: A developer uses the
FaultHandleractivity to capture a specific exception type and execute one or more activities in response to that exception when workflows fail.Try-catch block: As with any other application, a developer captures exceptions in the code using a
try-catchblock. This enables the developer to handle exceptions and take actions accordingly.Workflow events: A developer creates an event handler that listens to various workflow events and provides logging and error notifications to the site administrator. This will be covered later in this chapter.
Now that you have some idea of how you go about fault handling in your workflows, let's build a fault handler.
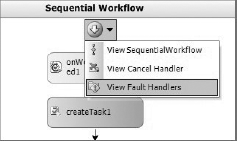
A FaultHandler activity can be associated with most of the activities in the workflow or the workflow itself. Obviously, when it's associated with the workflow, the handler acts at a global level as opposed to when it's local to a specific activity. Figure 12-46 shows how to associate a FaultHandler activity with the workflow.
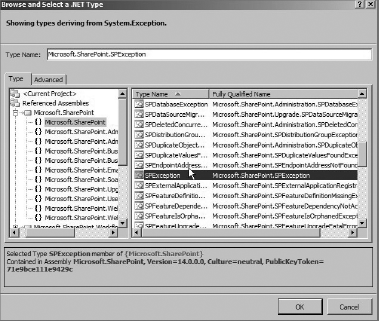
After selecting the View Fault Handlers option, the Designer canvas changes to the Workflow Exceptions mode. There is already a FaultHandlersActivity activity on the surface. This activity is a composite activity that can contain one or more FaultHandler activities. Drag a FaultHandler activity from the toolbox into the rectangular area directly below the icon that shows a folder with an exclamation mark next to it. Next, right-click the FaultHandler activity that you just added and select Properties from the context menu.
Find the FaultType property and then click the ellipsis button. From the list of available exceptions, select the Microsoft.SharePoint.SPException, as shown in Figure 12-47.
The SPException represents an exception in SharePoint. This exception is typically used when a violation of some kind happens. For example, attempting to delete one of the out-of-the-box galleries, such as Workflows, creates an SPException exception. Because attempting to create a site with the same name as an existing site is considered a violation, this exception suits the logic of your workflow very well.
Drag a logToHistoryListActivity activity from the toolbox and drop it directly above the termination step, where it says Drop Activities here. In the event of an exception of type SPException, this activity adds a log entry to the workflow history list associated with the workflow.
Note
Remember, the capability to copy and paste activities from one workflow Designer canvas to another Designer canvas is a great convenience. Let it help you.
For the logToHistoryListActivity2 activity, there are two properties that you need to set: HistoryOutcome and OtherData. Both properties are set the same way that the properties of the logToHistoryListActivity2 activity were set. The OtherData property is used to write additional information in the log entry written to the workflow history list. Unlike HistoryOutcome and HistrotyDescription properties, the OtherData property is not restricted to 255 characters in length.
Right-click the logToHistoryListActivity2 activity, and then select the Generate Handlers option from the context menu. Add the code shown in Listing 12-22.
Example 12-22. Coding the logToHistoryListActivity2 Activity
public String logToHistoryListActivity2HistoryOutcome =
 default(System.String);
public String logToHistoryListActivity2OtherData = default(System.String);

private void logToHistoryListActivity2_MethodInvoking
 (object sender, EventArgs e)
  {
    logToHistoryListActivity2HistoryOutcome =
     faultHandlerActivity1.Fault.ToString();
    logToHistoryListActivity2OtherData =
     faultHandlerActivity1.Fault.ToString();
  }

The logToHistoryListActivity activity writes the log entries to the workflow history list. The workflow history list is a hidden list and is not listed under View All Site Content link. You can find this list by clicking on the In Progress link in the workflow status page or by typing the following URL in the browser. Each workflow instance is uniquely identified by an ID of type GUID, which needs to be specified in the WorkflowInstanceID query string parameter. This ID is used to communicate with the instance.
http://wfe1/layouts/WrkStat.aspx?WorkflowInstanceID={00000000-0000-0000-
0000-000000000000}
The log entries are only kept for 60 days, by default. There is a timer job named Workflow Auto Cleanup that runs on a daily basis and removes log entries older than 60 days after the workflow is completed or canceled, as shown in Figure 12-48.
With the fault handler in place and the logToHistoryListActivity properties bound to fields and its event handler code, you can cause an intentional error to test the fault handler.
Start a workflow with "SWF01" as the training code. Once you verify that the training site is created, start the workflow one more time and use the same code. Because the CreateTrainingSite activity uses the training code as the title for the Web site, you should get the error message shown in Figure 12-49, in the workflow history list.

Previously, SharePoint-hosted workflows could only subscribe to a limited number of SharePoint core events such as ISharePointService, ITaskService, IListItemService, and IModificationService. However, many scenarios required workflow developers to interact with other internal or external events. Another issue was that workflow activities were intrinsically synchronous. So, running operations that take a long time to complete within the main workflow thread could potentially block other activities in the workflow from execution.
Imagine that you have created a workflow that interacts with a CRM web service and the service takes three seconds to respond to an action. There are 1000 instances of the workflow spawning every day. You certainly don't want to keep all those instances in the web frontend servers' memory for 3 seconds each just to complete a service call. Instead, you want to run the service call outside the workflow activity, so whenever the workflow gets the result back from the CRM service, the workflow wakes up and continues on, as shown in Figure 12-50.
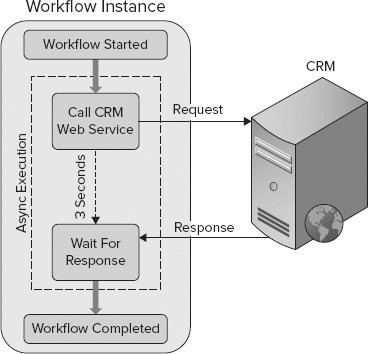
In WSS 3.0, one solution to overcome this shortcoming was to use the combination of an event handler attached to the Tasks list and workflow tasks to send a request to CRM (using its native web services) and have CRM update the task with the result. Once the result is written to the task, you can always access it in the workflow channel by using the OnTaskChanged activity. Microsoft also had a pattern called business event, which was conceptually very similar to this solution.
But, what if you want to get data into a workflow while it's running without getting tasks involved?
Thankfully, SharePoint 2010 now supports Pluggable Workflow Services via External Data Exchange (EDS). A Pluggable Workflow Service allows workflow instances to communicate with events outside the workflow channel. This is not something new and has been part of Windows Workflow Foundation for a while. When you think about it, all the dehydration and rehydration behaviors of workflows in SharePoint are based on the EDS communication system. So, Windows SharePoint Services 3.0 used it for modeling its own workflow communication system, but Microsoft just decided to lock it down and not allow SharePoint developers to directly benefit from it in their custom SharePoint-hosted workflows.
There are three primary uses for Pluggable Workflow Services:
Subscribing to internal and external events. Any event that dehydrates the workflow and rehydrates it when it's raised.
Handling long-running operations in an asynchronous manner, so the workflow can dehydrate and rehydrate the workflow while the operation is running.
Getting resource-intensive operations off the workflow thread so that it can switch back to other workflow activities; for example, if there are activities that have no dependency on the result of the operation or there are parallel activities that need to complete before the result is returned to the workflow.
There is nothing special about a Pluggable Workflow Service. Think of it as being like an event handler, feature receiver, or any other code that runs within the SharePoint. It's just some code that is registered with workflow runtime that runs in SharePoint and runs on the workflow host thread. This service can be implemented in such a way that it can interact with running instances of a workflow.
At a high level, creating a Pluggable Workflow Service involves several steps. To get started, add a C# class to your workflow project and name it TrainingSiteCreationLocalService.cs. Next, add the following using statements to the class:
using System.Workflow.Activities;
using System;
using Microsoft.SharePoint;
using System.Threading;
using System.Workflow.Runtime;
using Microsoft.SharePoint.Workflow;
Now, the class needs the logic required for the plumbing to work.
The first thing you need to create is the contract of the service. Listing 12-23 shows a service interface that's decorated with an ExternalDataExchange attribute. The interface definition contains an event and a method. The former provides the communication into the workflow, and the latter provides the communication into the service.
Note
From now on, the term "the service" refers to the Pluggable Workflow Service that you are implementing in this chapter.
An event called MessageIn is raised when the service needs to send a message into the workflow instance. When you insert this line, you get an error on the CommunicationObjArgs class. It's normal; you have defined an event handler, but you didn't specify the method that actually handles the event. Don't worry, you'll add this next. Keep in mind that you can have multiple events raised and more than one message pushed back into the workflow.
The interface also contains a method for the data that the workflow sends out to the service. Again, you can have the workflow communicate with the service to send more than one message.
Example 12-23. The Service Contract
[ExternalDataExchange]
public interface ITrainingSiteCreationService
  {
    event EventHandler<CommunicationObjArgs> MessageIn;
    void CreateTrainingSite(string sitename, string url);
  }

With the service contact in place, the next step is to add the event class that inherits the ExternalDataEventArgs class, as shown in Listing 12-24. This class is the handler for the event you added to the interface definition. It represents a serializable message that needs to go into the workflow.
Two things must be implemented in this class. First, a constructor that uses the :base(Id) constructor. This ID uniquely identifies a workflow instance. As previously mentioned, without this ID, it's impossible to know which instance to correlate the message to. Second, the class must be marked as Serializable, so the message is serialized on the way into the workflow instance.
Example 12-24. Event Handler Implementation
[Serializable]
public class CommunicationObjArgs : ExternalDataEventArgs
  {
    public CommunicationObjArgs(Guid id) : base(id) { }
    public string webID;
  }

The last piece of code you need to add is the actual service implementation, as shown in Listing 12-25. This class must derive from SPWorkflowExternalDataExchangeService and implement the service interface (the contract). At minimum, this class must implement two members:
The method that's defined in the interface definition. In this example, it's called
CreateTrainingSite().An inherited abstract member called
SPWorkflowExternalDataExchangeService.CallEventHandler. This method will handle the callback to the workflow instance.
In addition to the member implementations, the service must declare a public event of type CommunicationObjArgs, so it can be used in the plumbing to route the event handler (see CallEventHandler method).
Example 12-25. Service Implementation
class StateObject
  {
    public SPWeb web;
    public Guid instanceId;
    public StateObject(Guid instanceId, SPWeb web)
      {
        this.instanceId = instanceId;
        this.web = web;
      }
  }

class TrainingSiteCreationService : SPWorkflowExternalDataExchangeService,
 ITrainingSiteCreationService
  {
    public event EventHandler<CommunicationObjArgs> MessageIn;
    public void CreateTrainingSite(string sitename, string url)
      {
        ThreadPool.QueueUserWorkItem(delegate(object state)
{
StateObject sObject = state as StateObject;string webID = string.Empty; using (SPSite siteCollection = new SPSite(url)) { using (SPWeb web = siteCollection.OpenWeb()) { using (SPWeb trainingWeb = web.Webs.Add(sitename)) { trainingWeb.Description = "This site is created by a pluggable workflow service."; trainingWeb.Title = sitename; trainingWeb.Update(); webID = trainingWeb.ID.ToString(); } } }RaiseEvent(sObject.web, sObject.instanceId,typeof(ITrainingSiteCreationService),"MessageIn", new object[] { webID });}, new StateObject(WorkflowEnvironment.WorkflowInstanceId,this.CurrentWorkflow.ParentWeb));} public override void CallEventHandler(Type eventType, string eventName,object[] eventData, SPWorkflow workflow, string identity,System.Workflow.Runtime.IPendingWork workHandler, object workItem) { var msg = new CommunicationObjArgs(workflow.InstanceId); msg.webID = eventData[0].ToString(); msg.WorkHandler = workHandler; msg.WorkItem = workItem; msg.Identity = identity; this.MessageIn(null, msg); } // Code omitted for brevity }
Note a few things about Listing 12-25:
ThreadPool.QueueUserWorkItemqueues an anonymous method delegate for execution on a separate thread. This method will execute as soon as a thread pool thread becomes available.The
QueueUserWorkItemmethod only takes two parameters. The first parameter is the code that the thread executes. Using an anonymous method delegate means that you do not need to create an additional method to execute the long-running code. The second parameter, which starts after the delegate (new StateObject()), is for an object containing data to be used inside the anonymous method delegate.StateObjectis a class used to hold data to be used by the anonymous method delegate. This class contains two pieces of information: the workflow instance ID and theSPWebobject where the workflow is running.RaiseEvent()call raises a workflow event and sends an event back throughCallEventHandler().The
CallEventHandler()method is the plumbing code that gets the returned message (webID) from the long-running code into the workflow instance. This is done by passing an instance of theCommunicationObjArgsto the workflow instance.
With the service implementation complete, the service needs to be registered with the SharePoint workflow runtime host. Open the web.config file and insert the following line into <WorkflowServices> element. As always, replace the public token key with your own.
<WorkflowService Assembly="TrainingApprovalSiteWorkflow,
Version=1.0.0.0, Culture=neutral, PublicKeyToken=b3dec5fc56831cdf"
Class="TrainingApprovalSiteWorkflow.TrainingSiteCreationService">
</WorkflowService>
While you are in the web.config file, notice how some EDS implementations that SharePoint Workflow communication systems uses are already registered.
Switch back to the workflow Designer canvas; you are done with the TrainingSiteCreationLocalService.cs file. Delete the CreateTrainingSite1 activity in the right branch of the ifElseActivity1 activity. Instead, drag and drop the following three activities into the workflow:
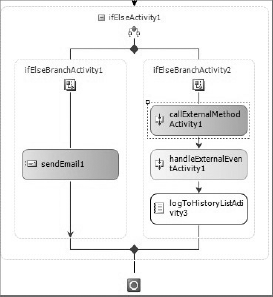
These activities will be used for in and out communications with the service. Notice how one activity is blue and the other one is green. Blue in workflow activities denotes that the activity sends something out or does something. Green activities are those waiting for something to happen. The Designer canvas now should look like Figure 12-51.
The CallExternalMethodActivity1 activity will call the CreateTrainingSite method in the service, and the HandleExternalEvent1 activity will dehydrate the workflow and wait for the event MessageIn to be raised. After the event is raised (or if it was raised before the activity executes), the data that is passed into the workflow (webId) will be written to the workflow history list, using the LogToHistoryListActivity3 activity.
Note
To provide a better designer experience, a command-line utility called wca.exe can be executed against a compiled ExternalDataExchange interface to create strongly typed activities. These activities can be then dragged from toolbox just like any other activity and placed in workflow. If you opt to use this tool, I highly recommend that you run it only when the interface definition has been finalized and is no longer being actively developed. For more information about this tool, refer to the official documentation at www.devhorizon.com/go/26.
The next step is to configure new activities to point to the service. For the CallExternalMethodActivity1 activity, there are four properties that must be set. Use the following combination as an example:
InterfaceType:
ITrainingSiteCreationService(see Figure 12-52)MethodName:
CreateTrainingSitesitename: Bind it to a new field named
callExternalMethodActivitysitename.url: Bind it to a new field named
callExternalMethodActivityurl.
Just as with the CreateTrainingSite1 activity, the workflow must set the sitename and url properties of the CallExternalMethodActivity1 activity before the activity will execute. Insert the code shown in Listing 12-26 into the onWorkflowActivated1_Invoked method.
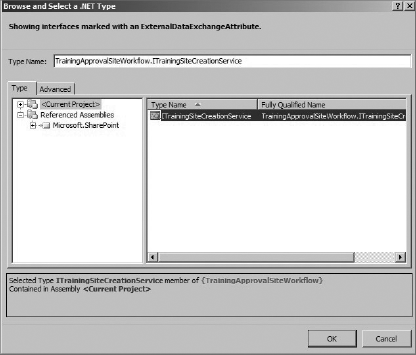
Example 12-26. Modifying the onWorkflowActivated1_Invoked Method
private void onWorkflowActivated1_Invoked(object sender,
 ExternalDataEventArgs e)
  {
    //Code Omitted for brevity
    callExternalMethodActivitysitename = twInfo.Code;
    callExternalMethodActivityurl = workflowProperties.WebUrl;
  }

To configure the HandleExternalEvent activity, you essentially have three properties to set. Use the following combination as an example:
InterfaceType:
ITrainingSiteCreationService(same as theCallExternalMethodActivityactivity)EventName:
MessageIne: Bind it to a property (not a field) called
handleExternalEventActivity1_e1.
The last activity that you need to configure is the LogToHistoryListActivity3 activity. Setting up this activity is a piece of cake, because you have done this twice already. Bind the HistoryOutcome property to a field called logToHistoryListActivity3HistoryOutcome. Right-click the activity and, from the context menu, click Generate Handler. Set the value of the HistoryOutcome property, as shown in Listing 12-27. Notice how webID is used as a property of the handleExternalEventActivity1_e1 property.
Example 12-27. Coding the logToHistoryListActivity3 Activity
private void logToHistoryListActivity3_MethodInvoking(object sender,
 EventArgs e)
  {
    logToHistoryListActivity3HistoryOutcome =
     string.Format("The ID of the training site created is {0}",
     handleExternalEventActivity1_e1.webID);
  }

That's it. The service is completed and everything's ready. Go ahead and deploy the new workflow. Run the workflow the same way as before and create a sample training. Ensure that you mark the task as 100% complete and type the word "Approved." The workflow should create the site using the Pluggable Workflow Service you created. Figure 12-53 illustrates the workflow history. Note how the WebID of the new training site is returned from the service and is written to the workflow history list. Basically, you got a message into the service (sitename and url) and a message out (WebID ).
Congratulations on a job well done!
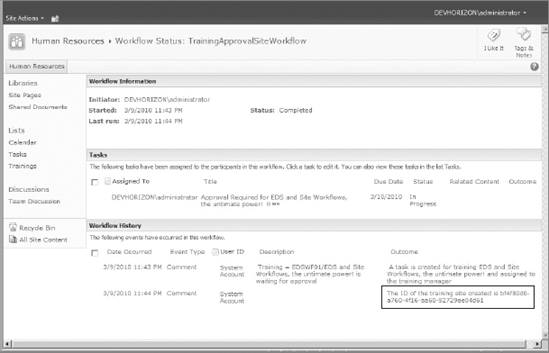
As indicated in the previous section, workflows in SharePoint 2010 have the ability to respond to events. SharePoint 2010 adds another new feature: workflow events. Essentially, workflows in SharePoint 2010 are structured to emit events that other event receivers can intercept and monitor. If workflows can listen to events and they can emit events, what does this tell you? The answer is that workflows can interact with each other. For example, imagine a series of chained workflows operating on the same list, with each starting after the previous one completes.
This new feature provides a number of key benefits for developers. The most obvious one is that it lends modularity to their workflow design, allowing them to break their workflows into smaller workflows and chain them together. This results in more reusable workflows. Consequently, this means that developers can create code to capture the events emitted by running instances of a workflow. For example, they can monitor and intercept out-of-the-box workflows for errors and handle them in an appropriate way, including custom error notification.
The event receivers have been dramatically improved in SharePoint 2010. The workflow events that ship with SharePoint 2010 are divided into the following four types:
WorkflowStartingWorkflowStartedWorkflowCompletedWorkflowPostponed
Note
It's important to understand that new workflow event receivers only fire on list workflows. They don't work for site workflows.
Consequently, Visual Studio 2010 has a new template and a new SPI for event receivers. When you create a new workflow event receiver, you can select the list and the desired workflow events to trap, as shown in Figure 12-54.
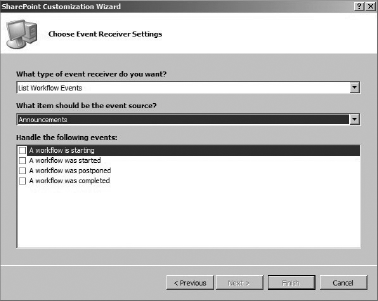
Once the project is created, the workflow event receiver is implemented in a class that inherits from the SPWorkflowEventReceiver class. Add the code shown in Listing 12-28 to the WorkflowCompleted method.
The code checks the workflow completion type and sends two types of notifications based on that. If the workflow completes successfully, a helper method is called and the email address of the person who started the workflow is passed into it. However, if the workflow errors out, the exception is retrieved and a notification error is sent to the administrator with the exception information included through another helper method.
Example 12-28. The WorkflowCompleted Method
public override void WorkflowCompleted(SPWorkflowEventProperties properties)
  {
    switch (properties.CompletionType )
      {
        case SPWorkflowEventCompletionType.Completed:
          string orginUserEmail =
           properties.ActivationProperties.OriginatorEmail;
          SendSuccessNotification(orginUserEmail);
        break;
        case SPWorkflowEventCompletionType.Errored:
          Exception ex = properties.ErrorException;
          SendErrorNotification(ex);
        break;
        default:
        break;
      }
    base.WorkflowCompleted(properties);
..}

This chapter introduced a whole new landscape of workflow features in SharePoint 2010.
Visio 2010 has two impacts on workflow development. It can be used to prototype a workflow as well as to visualize a running instance of a workflow.
You can import that prototype into SharePoint Designer 2010. You can further customize the workflow by using the SharePoint Designer Workflow Designer.
Reusable workflows are like templates. They can be used as a starting point for creating other workflows. If they are converted to globally reusable workflows, they can be shared across all sites within the same site collection.
SharePoint Designer 2010 can create declarative workflows and associate them with content types, a functionality that was missing in the last version of the product.
SharePoint Designer workflows come with all three types of workflow forms (association, initiation, and task). They all can be customized by InfoPath and published back to SharePoint.
Developers can create workflow actions in Visual Studio 2010 for use in SharePoint Designer workflows. They can be sandboxed, too. In multi-tenant or hosting environments, this would be beneficial. Custom actions must be registered in the
web.configfile as anauthorizedTypeelement.A SharePoint Designer reusable workflow can be imported into Visual Studio, but it's just a template. It needs some touch-ups before it's a fully functional WSP package, ready for deployment to other site collections or web applications.
Site workflows are a new type of workflow in SharePoint 2010. They can run on any SharePoint object, not only list items. Remember, site workflows cannot be saved as templates; neither can they be copied and modified. They are just not reusable.
There are two SPIs in Visual Studio 2010 for creating ASPX association and initiation forms. These forms already have the code required to start and cancel a workflow programmatically.
Starting with SharePoint 2010, workflows can listen to internal and external events through the implementation of a Pluggable Workflow Service. SharePoint workflow communication is accomplished through External Data Exchange.
The
CallExternalMethodActivityandHandleExternalEventactivities can be used to send and receive messages to and from a Pluggable Workflow Service asynchronously.Workflows in SharePoint 2010 can emit events that other event receivers can intercept and monitor.