
WHAT'S IN THIS CHAPTER?
An Introduction to IT Professional Features that affect developers
Best practices for working with the SharePoint 2010 Infrastructure Enhancements
When it comes to developing with SharePoint, it's very helpful if developers are able to be good friends with the IT pro who set up the SharePoint infrastructure, because often developers do not control the final server configuration that the code they write runs on. For example, unless an administrator allows a full-trusted solution to run in his or her environment, a developer will have a smaller set of SharePoint platform technologies to choose from when writing code. With SharePoint 2010, the choices for both IT and developers have grown, and developers need to understand what IT improvements have been made in SharePoint that could affect their applications. These improvements fall into the categories of performance, high availability, security, and management. Each of these areas is covered in this chapter.
The performance improvements in SharePoint 2010 are important for developers. These improvements will make your code run faster, but there are also some performance lockdowns that may affect your code, as SharePoint will protect the system from being overrun with bad queries or large amounts of data entering the system. In your code, you must be aware that you may run into certain limits and make sure that you have good error checking to fail gracefully if the error is hit. You will learn how to do this later in this chapter.
One of the main sources of performance problems in SharePoint is either users or developers writing too many items to a list and then requesting a view or a query that tries to return a large number of items. This causes locking on the database, and in a multiuser environment like SharePoint, this causes issues for other users who may be working in other SharePoint sites. To stop this, SharePoint 2010 has implemented list and library throttling so that the result sets are trimmed down regardless of the number of results requested. For example, SharePoint can store up to 50 million items in a list. Let's imagine you didn't have a list that large but had a list with a million items. A user creates a view that tries to return 50,000 items on a page. SharePoint 2010 will throttle that query and return either an error or the first set of results up to the number put in the throttle. Be aware that by default, SharePoint sets list throttles to 5,000 items.
One thing to realize is that, as a developer, you can trigger this throttle even when performing operations that seem as if they would not cause issues. For example, let's imagine that you have a list with 10,000 items in it and your throttle is 8,000. You're returning only 2,000 items in your views, and you try to sort on a nonindexed column to display those items. You will get an exception, because SharePoint will need to return all 10,000 items to sort and display your 2,000 items, which would exceed the throttle. Thankfully, SharePoint will throw a special exception if you hit the throttle in your operations, so you can catch this. This exception is SPQueryThrottledException.
The throttle can also be set on lookups in a list. You can limit the number of lookup columns in a list. If there are too many lookup columns, performance will suffer, so SharePoint can limit this for the administrator. As a developer, you must be aware of this limitation so that you do not hit it in your code, or if you do, you're able to fail gracefully. Figure 3-1 shows the different options you have when setting the throttle.
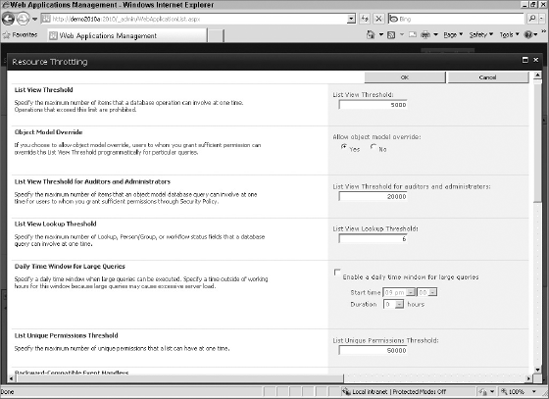
One of the settings you can configure for the throttle is the maximum number of items to be retrieved in a single request. You can also set an object model (OM) override that will be combined with the maximum number of items an auditor or administrator can retrieve via the object model. The administrator or auditor cannot see more items in the list view — only via the object model. To be an administrator or auditor, the farm administrator needs to grant you the correct permissions level to be a Site Collection Administrator or a Site Collection Auditor. When you look at the code to set the object model override, you will also see a Windows PowerShell override of the API override. In the end, administrators get the final say on whether an override can occur.
There is also a setting for something affectionately referred to as happy hours. This setting allows you to create a block of time, typically when usage is low, when you will allow large queries to run and not enforce the throttles.
One thing to note about the settings: they are not used if you are a SharePoint administrator and you execute a query. In that case, all of the results will be returned to you. This means that when you are testing your code, make sure that you use multiple different authentication methods so that you are not running as a super user all the time; otherwise, you will not catch throttling errors.
Through the SharePoint API, you can change or remove the throttle as long as the object model override was checked in the settings for the throttle. Before changing or removing the throttle, you need to check if the throttle is enabled. The following section demonstrates different ways to work with the throttle programmatically.
First, to check if the throttle is enabled, you will use a number of properties and methods of the SPWebApplication object that represents your web application. Table 3-1 shows the different properties and methods to detect the settings for the throttle with the SPWebApplication object; Table 3-2 shows the same thing for the SPList object.
Table 3.1. Detecting Throttle Properties and Methods on SPWebApplication
NAME | DESCRIPTION |
|---|---|
| This method returns a Boolean that tells you whether the throttle is ignored because the user has sufficient privileges, such as being an administrator, or if the throttle is not enforced at this particular time. |
| This method returns a Boolean that specifies whether unthrottled operations are allowed. |
| This Integer property gets or sets the maximum number of items in your throttled operations. |
| This Integer property gets or sets the maximum number of items to return when the throttle is overridden. Default is 20,000. |
| This integer gets or sets the maximum items allowed in the list before a warning is displayed in the UI and the farm admin receives email. |
| This integer property gets and sets the maximum lookup fields you can have in the list. The default is 6. |
| This Boolean specifies whether the happy hour feature is enabled. |
| This gets or sets the hour to start allowing unthrottled operations. |
| This gets or sets the minute to start allowing unthrottled operations. |
| This gets or sets the number of hours to allow unthrottled operations to run. Note that if an operation goes beyond the duration, SharePoint will allow it to continue to run as long as it was started in the allowed time window. |
Table 3.2. Detecting Throttle Properties and Methods on SPList
NAME | DESCRIPTION |
|---|---|
| This method returns a Boolean that tells you whether the throttle is ignored because the user has sufficient privileges, such as being an administrator, or if the throttle is not enforced at this particular time. |
Second, once you know whether the throttle is enabled, you can change your queries based on that knowledge to avoid hitting the throttle. However, there may be times when you fail to change your query and hit the throttle. This is where using the SPQueryThrottledException class in your code is helpful. The example that follows shows how to catch this exception, which tells you that you have exceeded the throttle on the list. Notice how even using the Count method on the Items object for a document library can trigger the throttle.
try
                {
                    int ItemCount = doclib.Items.Count;

                }
                catch (SPQueryThrottledException)
                {
                    //Retrieving all items can trigger the throttle
                }
Finally, once you know the throttle is there and can catch exceptions, you may want to override the throttle, using the object model. There are a couple of ways to do this. First, you can do it on an individual query, using the SPQuery or SPSiteDataQuery object's QueryThrottleMode property. Second, if you are a farm admin, you can use the SPList's EnableThrottling property to turn throttling off. Last, you can use the OM to set the time when the throttle is off. The most common approach is the SPQuery or SPSiteDataQuery object. The code that follows demonstrates how to use the SPQuery object and override the throttle. Please note that there is also a SPQueryThrottleOption, called Strict, if you want to apply the throttle regardless of permissions, even if an administrator is the logged in user.
using (SPSite site = new SPSite("http://intranet.contoso.com"))
            {
                using (SPWeb web = site.RootWeb)
                {
                    try
                    {

                        SPList list = web.Lists["Shared Documents"];

                        SPQuery qry = new SPQuery();
                        qry.QueryThrottleMode = SPQueryThrottleOption.Override;

                        //create your query
                        SPListItemCollection coll = list.GetItems(qry);
                    }

                    catch (SPQueryThrottledException)
                    {
                        //
                    }
                }
            }
}
}Beyond standard list throttling, SharePoint also supports External List throttling. External Lists are lists that are connected to other systems using Business Connectivity Services (BCS) and External Content Types. Sometimes when connecting to these backend systems, the backend can take a long time to respond, or you might try to retrieve too many items, overloading the backend. To solve this problem, BCS implements a throttle per connection type whether that is a database or web service that you are connecting to.
There are four types of throttles in BCS. One is a rows per fetch against a database, which limits the number of rows BCS will retrieve from the database. The second is the typical timeout for your operations against the backend. The third is size of fetch, as it's hard to use rows against a web service because a web service may return XML, text, or binary data, which may not translate easily into a rows metaphor. Each of these throttles is per instance, so you can have multiple instances of a BCS application against a single backend, each with different throttles. The fourth type is a global, meaning that regardless of the type of connection throttle, you can throttle the number of connections to the backend system, so you don't overload the backend with a lot of connections. Table 3-3 describes the default throttles for BCS.
Table 3.3. External List Throttles
CONNECTION TYPE | TYPE OF THROTTLE | LIMIT |
|---|---|---|
Database | Rows per fetch | 2000 |
Database | Timeout | 3 Minutes |
Web Service/WCF | Size of fetch | 30MB |
Web Service/WCF | Timeout | 3 Minutes |
Global | Connections | 100 |
The following PowerShell script demonstrates how to get and set the External List throttles:
$snapin = Get-PSSnapin | where-object { $_.Name -eq
'Microsoft.SharePoint.PowerShell' }
if ($snapin -eq $null){
 write-host "Loading SharePoint PowerShell Snapin..." -foregroundcolor Blue
 add-pssnapin "Microsoft.SharePoint.PowerShell"
 write-host "SharePoint PowerShell Snapin loaded." -foregroundcolor Green
}

$bdcAppProxy = Get-SPServiceApplicationProxy | where {$_ -match "Business
Data Connectivity"}

Get-SPBusinessDataCatalogThrottleConfig -Scope Database -ThrottleType Items -
ServiceApplicationProxy $bdcAppProxy

$throttleDb = Get-SPBusinessDataCatalogThrottleConfig -Scope Database -
ThrottleType Items -ServiceApplicationProxy $bdcAppProxy

#Alternative way to write out settings write-host $throttleDb.Default

#Uncomment to set your throttle limits
#Set-SPBusinessDataCatalogThrottleConfig -Identity $throttleDb -maximum 12000 -default 10000 $throttleWCF = Get-SPBusinessDataCatalogThrottleConfig -Scope WCF - ThrottleType Size -ServiceApplicationProxy $bdcAppProxy #Set-SPBusinessDataCatalogThrottleConfig -Identity $throttleWCF -maximum 100000000 -default 50000000 $throttleConn = Get-SPBusinessDataCatalogThrottleConfig -Scope Global - ThrottleType Connections -ServiceApplicationProxy $bdcAppProxy #Set-SPBusinessDataCatalogThrottleConfig -Identity $throttleConn -maximum 200 -default 150 write-host "Completed Run" -foregroundcolor Blue
One other throttle to be aware of is the new HTTP request throttle. Previously, SharePoint would not throttle requests. Therefore, all requests coming in would have the same priority, so the server could be overloaded by many people trying to write to the server at the same time. As far as user activities, SharePoint is very similar to email in that users perform a lot of reads and deletes but not as many writes. For this reason, SharePoint 2010 optimizes for the read scenarios when it comes to HTTP throttling, rather than write scenarios.
HTTP throttling works by comparing the server resources to the levels configured every 5 seconds. By default, the Server CPU, Memory, Request in Queue, and Request wait times are monitored, and after three failed checks against acceptable parameters, the server will enter a throttling period. This throttling period will continue until a successful check is completed and the levels are below the configured levels. Requests generated prior to the server entering into the throttling mode will be completed, so that users do not lose their work. Any new HTTP GET and Search Robot request will generate a 503 error message and will be logged in the Event Viewer. For the user, they will see a Server Too Busy error and can refresh their browser to try again. Any new timer jobs will also not be started while in the throttling period. However, HTTP PUT operations will be allowed so that submitting forms and saving documents will work.
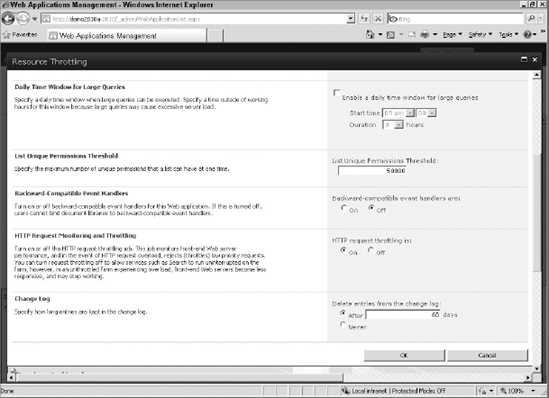
You can enable or disable throttling through Central Administration. You manage the throttle on a per web application basis, so some web applications can be throttled and others can be unthrottled. To enable throttling, look under the Application Management section and then Manage Web Applications. Click on a web application to select it, then click on the General Settings drop-down, and select the Resource Throttling menu. Find the section titled HTTP Request Monitoring and Throttling, where you will find a radio button option to turn it off or on. HTTP resource throttling is on by default. Figure 3-2 shows how to set HTTP resource throttling.
To get and set the parameters and see the values, you can use either PowerShell or the API. This is one instance in which using PowerShell as a developer might be easier than trying to use the API, because PowerShell has two commandlets that make viewing and editing the throttles easy. The first one is the Get-SPWebApplicationHttpThrottlingMonitor commandlet. This commandlet allows you to pass the URL to the web application you want to check using the Identity parameter. When you run this commandlet, you will get an output that looks similar to that here:
Category: Memory
Counter: Available Mbytes
Instance:
AssociatedHealthScoreCalculator : [1000.0,500.0,400.0,300.0,200.0,100.0,80.0,60
.0,40.0,20.0]

Category: ASP.NET
Counter: Requests Queued
Instance:
AssociatedHealthScoreCalculator : [0.0,1.0,2.0,4.0,8.0,16.0,32.0,64.0,82.0,100.
0]

Category: ASP.NET
Counter: Request Wait Time
Instance:
AssociatedHealthScoreCalculator : [10.0,50.0,100.0,200.0,400.0,800.0,1000.0,200
0.0,4000.0,15000.0]
To set the different throttles, use Set-SPWebApplicationHttpThrottlingMonitor and pass in the parameters for the category, counter, instance, minimum, and maximum. You can pull these from the Windows Performance Monitor if you don't know the categories or counters.
If you are familiar with the external blob storage (EBS) capabilities in SharePoint 2007, then remote blob storage (RBS) won't seem that different to you in SharePoint 2010. The main difference is that RBS takes advantage of the APIs from SQL Server 2008 and can use the new FILESTREAM capabilities in the SQL Server 2008 product. EBS was built on its own API, and the move to RBS moves the blob storage capabilities from SharePoint into the more mainstream API for blobs.
You may be wondering when you use blob storage. As a developer, the blob storage is pretty transparent to you, except if you're writing your own blob storage provider. IT pros are the ones who will make the decision and enable external blob storage in their environment. The main reason you will use external blob storage is if you want to move your blobs to more commodity-related hardware storage devices. You may be able to lower your cost a bit, because you don't have to store, manage, or maintain the blobs in SQL. Again, as a developer, it's transparent to you whether the blob is in SQL or another system.
There are a couple of things you need to remember about RBS. It does not get around the 2GB limit for file sizes in SharePoint. This is a hard limit. So as a developer, don't ask your IT administrator to implement RBS to get around this limit. Plus, RBS could lower your performance, especially if you write a poor provider. Therefore, as a developer, make sure that the benefits of using RBS and writing your own provider outweigh the cost, because if you write poor code, possibly every read or write operation on documents could call your code in SharePoint. SharePoint must block the user until it receives the blob back from your provider, because it wants to keep the metadata, which is still stored in SQL, and the blob consistent. Writing a storage provider is beyond the scope of this book. The SDK has some good documentation, but again, before you write one, make sure that you really need one and that, if you want RBS, the SQL Server FILESTREAM provider is not sufficient to meet your needs.
One of the other areas of enhancement that you can take advantage of in your applications is streaming and bit throttling. Given the explosion of digital media and its integration into applications, this is important. You do not want unhappy end users if the speed and performance of your sites that use video are such that it takes a long time to start playing or it plays inconsistently. SharePoint 2010 has many new digital asset management capabilities. When it comes to digital media, you have features such as the media player web part, support for video in the Content by Query web part, out-of-the-box (OOB) support for RSS/podcasting, and bit rate throttling support. If you are doing a lot of development with digital media, you need to understand the infrastructure that SharePoint provides for this asset type. Take a look at the Media Player web part API. It has a client-side API that allows you to customize the player to tell it to start, stop, pause, and set the source. Also, you can get the embed tag from the API so that others can embed a link right to the video. Finally, you can skin the player using Expression Blend, because it is just an XAML application.
When it comes to high availability (HA), most developers don't concern themselves with what IT folks have implemented. This is a mistake because your application needs to be resilient if there is a failure. In addition, with SharePoint you may actually be running against a different database server than the one that you originally connected to in your application. For this reason, understanding the High Availability (HA) enhancements that affect developers is important. This chapter covers two primary HA enhancements. The first is database mirroring and clustering, which allow SQL Server to fail over to a backup server if the primary server fails. The second is read-only databases, which enable administrators to turn on read-only content databases to allow for scenarios where data can be shipped globally, but make it read-only to avoid write conflicts, or for upgrade and migration scenarios.
No one wants their SharePoint deployments to experience downtime. To minimize this, IT administrators implement database mirroring, log shipping, or failover clustering in SQL Server so that when the primary SQL Server in the farm experiences issues, SQL Server will fail over to the secondary server and continue processing requests. As with any sort of interruption of service, transactions may have to be retried, depending on where they were when the failure occurred. You should always check the error codes returned in your applications to see if your transaction failed and then retry the transaction.
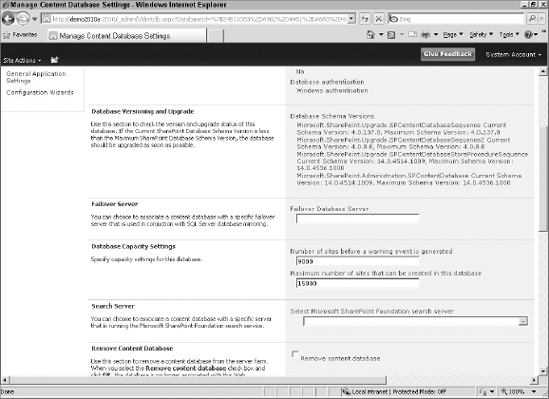
SharePoint 2010 supports the ability to specify a failover partner both through the Central Administration user interface and programmatically. Figure 3-3 shows the Central Administration interface for configuring database mirroring.
To work with this programmatically, use the SPDatabase class and the properties on this class, including FailoverServer, which will return the SPServer object that is the mirror, and FailoverServiceInstance, which returns an SPDatabaseServiceInstance that is the mirror. You can also use the method AddFailoverServiceInstance to specify a connection string to the failover partner SQL Server that you want the primary to work with. The code that follows shows these methods and properties in use.
SPDatabaseServiceInstance databaseServiceInstance = new
SPDatabaseServiceInstance();


            SPService service =
SPFarm.Local.Services.GetValue<SPDatabaseService>();
            foreach (SPDatabaseServiceInstance si in service.Instances)
            {
                if (si.TypeName == "Microsoft SharePoint Foundation Database"
                    || si.TypeName.Contains("Microsoft SharePoint Foundation"))
                {
                    databaseServiceInstance = si;
                    break;
                }
            }

            SPDatabase database = databaseServiceInstance.Databases["WSS_Content"];

            SPDatabaseServiceInstance siFail = database.FailoverServiceInstance;

            database.AddFailoverServiceInstance("Connection String");
database.Update();One new edition to 2007, late in its product lifecycle, was the support for read-only databases. With 2010, this support continues and is improved. Read-only databases are useful when you want to perform maintenance or provide copies of your database globally but you don't want to allow users to write to the database. Having a read-only database can work with high-availability technologies, such as log shipping or database snapshots.
Note that the user interface will understand when the database is in a read-only state. The UI will attempt to disable any functionality that would trigger a write, such as changing properties or saving content, rather than give users error messages.
As a developer, you should follow good error-handling etiquette to catch an error if the database is in a read-only state. You can also use the object model to detect whether the site and database are in a read-only state, so that you can either continue to try to write to the database or wait for the read-only state to be removed. The Boolean ReadOnly properties on the SPSite and the SPDatabase objects make it easy to check the read-only state of your site collection and your database. There is also a Boolean ReadLocked property you can use to see if the site collection is also read-locked so that you can't retrieve data from it. The code that follows shows how to use these properties.
SPDatabaseServiceInstance databaseServiceInstance = new
SPDatabaseServiceInstance();

            SPService service =
SPFarm.Local.Services.GetValue<SPDatabaseService>();
            foreach (SPDatabaseServiceInstance si in service.Instances)
            {
                if (si.TypeName == "Microsoft SharePoint Foundation Database"
                    || si.TypeName.Contains("Microsoft SharePoint Foundation"))
                {
                    databaseServiceInstance = si;
                    break;
                }
            }

            SPDatabase database = databaseServiceInstance.Databases["WSS_Content"];

            //Check to see if the database is read only
            bool isReadOnly = database.IsReadOnly;

            //Check to see if the site is read only
            SPSite site = new SPSite("http://intranet.contoso.com");

            bool readLocked = site.ReadLocked;

            bool readOnly = site.ReadOnly;

site.Dispose();Security is a major topic for developers. It often trips up developers because their code may be running in the wrong security context in order to perform operations, may not have the right identity, may be trying to perform multiple authentication hops, or may be attempting to perform cross-domain calls. All of these things can lead to errors or code that doesn't perform the way you expect it to. Security issues are also sometimes hard to track down. For this reason, understanding the security improvements in SharePoint 2010 will make you a better developer. There are a lot of improvements, and some will add more complexity rather than less, but they will give you the power to make your applications work in more environments than previously possible.
Understanding claims-based authentication is a book unto itself. For this reason, this section will give just a quick primer on claims-based authentication and what it means to you as a developer. Claims-based authentication is based on identity and trust. Some systems may identify you as being 20 years old, and some may identify you as being 30 years old. With claims-based authentication, you decide which claim you want to trust, the 20-year-old or the 30-year-old claim. Claims-based authentication, in a way, is more complex that using Windows-based authentication from an IT standpoint but provides better functionality from an identity protection and platform standpoint.
To understand the value of claims, you need to forget for a moment all the other authentication methods that you are used to. If you box yourself into thinking about or comparing claims to those other methods, it will be hard to break out of the constraints of those authentication methods. For example, if you use Windows integrated authentication, you probably think of identity in terms of Windows user accounts and groups. For ASP.NET, membership and roles provider are your context, and for forms-based authentication, usernames, passwords, and roles are your context. If you abstract out from these authentication methods to the high-level concepts, you have a claim of some type of information, and you have an issuer or authority that verifies that claim. Because you have a trust relationship with the issuer, you trust the claim that comes from that issuer. Trust is explicit, which is different from the other authentication methods you may be used to.
The value of claims is flexibility. Because claims are extensible and standards-based, you can create different attributes on your identity, pass that around to different applications, create roles and even use standards-based tokens, such as Security Assertion Markup Language (SAML) tokens, to identify and make a claim against access to a resource or application. The other value of claims is that you can use almost any authentication method you want on the backend, but in your application, you do not have to recode if you want to switch from NTLM to Kerberos or to forms-based authentication. This gives you ultimate flexibility in the security and authorization part of your application.
Not every application needs claims. For example, if you can get by with Windows authentication, and you are reasonably confident that your identity needs won't change, stick with Windows authentication. Claims-based authentication is a good choice when you need flexibility and functionality and are willing to pay the price for those capabilities. If you are working in a hybrid identity and authentication environment, look at claims as a solution, so that you can practice writing all your applications as claims-aware applications, whether they are internal, external, or somewhere in-between. Having the flexibility of claims will make your application lifecycle management easier.
Almost every application has code that supports identity and authentication. It may not be explicit sometimes, but it is in the layers that make up your application, even if you did not write it yourself. If you are used to writing using Windows authentication, you probably haven't had to worry about authentication code as much as a web developer who uses forms-based authentication and must write the code to check the username and password and perform password resets and account lockouts has. Windows authentication developers have the power of the domain and domain controllers to help them with all the services surrounding identity and user management.
Even with Windows authentication, while authentication may be provided for you, there are limitations. Once you go beyond the domain limit to try to authenticate against other domains that you may not trust, the developer becomes responsible for making sure that the complexities of trusts and relationships are set up by IT. In addition, if you want more information than username and password for your application, then you must move away from your authentication code to write to directory services. This means that you will be maintaining two code paths, one for authentication and one to get additional identity attributes.
Claims can solve these issues because they can be more than just usernames and passwords, and can contain things like groups, manager, email, and other user profile attributes that you may need for your application. Again, you factor out the authentication provider in claims from your claims-aware application, so you do not care how the authentication was performed on the backend.
This is the simplified version of how claims work. The easiest way to think about how claims work is to take a real-world example. Let's imagine that you need to board an airplane. First, you need to check in. That could be at the ticket counter or that could be online. Both require you to authenticate yourself but in different ways. The ticket counter requires you to show some form of ID and that ID comes from a trusted source. Online, you're forced to log in and that login must be trusted in order for you to print your boarding pass.
Your boarding pass contains a lot of extra information rather than just your name. It contains your destination, the gate you're leaving from, your flight number, and also your seat information. When you reach the gate, the gate agent checks your boarding pass. This agent doesn't really care whether your claim came from the ticketing agent or from your printer at home. The boarding pass is a trusted claim and you're allowed to get on your flight. If we translate this to software, that boarding pass is a signed security token from a trusted issuer. Your application would validate it and allow the user or application presenting that token to have access to the resource that was requested.
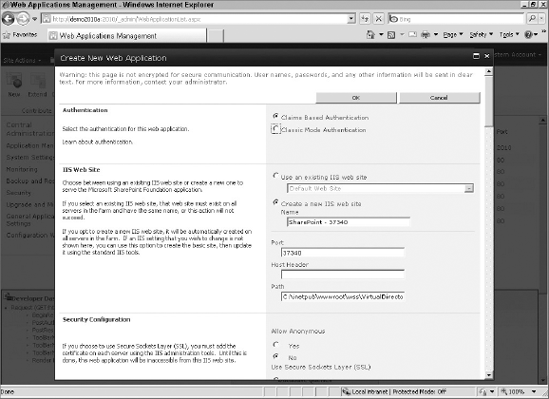
How SharePoint implements claims is seamless to you as the developer. The IT administrator selects claims-based authentication when creating a web application, as shown in Figure 3-4.
As a developer, you are shielded from the complexity of claims. You continue to use classes such as SPUser without caring whether the authentication was done by Windows, forms, or a SAML token. The only time you must get into the weeds on the claims classes that are in the Microsoft.SharePoint.Administration namespace is if you want to write your own claims provider, which is rare for the common developer.
SharePoint continues to support code access security, in which you can specify your own code access security (CAS) policy for your web parts so that you can perform operations that are not normally allowed inside of your SharePoint application. SharePoint provides minimal permissions out of the box for your web parts, which usually meet your needs, so use custom CAS policies with caution. Instead, take a look at Sandbox Solutions, which we will discuss next, as a possible alternative to using CAS. Sandbox Solutions do not require changes to the configuration in SharePoint. They have resource throttling, and they can be deployed both on-premise or in the cloud in SharePoint Online. In addition, Sandbox Solutions leverage CAS under the covers, so you do not have to configure CAS policies yourself.
Sandbox Solutions are a new feature in SharePoint 2010. Frequently, developers have difficulty deploying solutions to SharePoint in their environments because IT does not allow them access to the server. For example, you need to be an administrator on the machine to add DLLs to the GAC. Most developers are not administrators on centrally managed SharePoint servers. This causes problems for IT and also for the developer.
Plus, IT may worry that custom code running on their servers, if written poorly, will severely affect performance. For example, if you write a web part that does an infinite loop or calls out to an external system and it maxes out the server resources, then every site running on that server will be slow, even if they aren't using your custom web part.
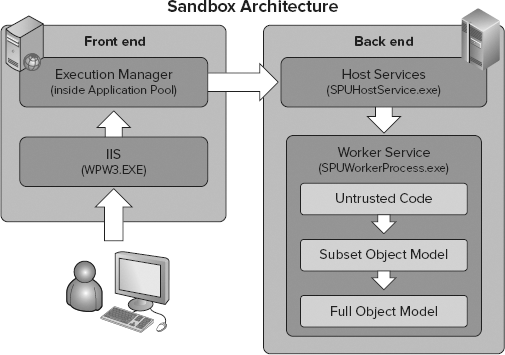
Out of these concerns, Sandbox Solutions were born. Sandbox Solutions are derivatives of your standard solution package that, when deployed to the server, SharePoint runs in a special process that has limited permissions. In your SharePoint Server, you will see three new processes running on the server for Sandbox Solutions. One is called SPUCHostService.exe, which decides whether the WFE on which this service is running will participate in the Sandbox Solutions. Because you can isolate or load balance your servers running Sandbox Solutions, not all the WFEs in your farm have to be running this service. You decide which servers are execution hosts for Sandbox Solutions.
Another process is called SPUCWorkerProcess.exe. This is the process where your code will run. As you can see, your code does not run in w3wp.exe but in this special process. Therefore, when you connect your debugger to a process, be sure to select the right process based on the type of solution you built for SharePoint.
Finally, there is SPUCWorkerProcessProxy.exe, which is part of the services application architecture for SharePoint. There are now proxies between web applications and service applications so that, when you call services from your Sandbox code, the proxy will make sure that you are calling the right services based on the permissions of your sandbox.
A picture is worth a thousand words, so Figure 3-5 shows the architecture for Sandbox Solutions.
Sandbox Solutions are covered more in the following chapters, so view this as a primer in context of other IT changes of which you should be aware.
To help secure SharePoint and the users who use SharePoint from malicious code, some changes were made in 2010 to prevent Cross-Site Scripting (XSS) attacks. Some of this will affect the way your applications may work. Part of these changes had to be made because of the new Client Object Model in SharePoint, where malicious users could possibly cut and paste code into properties in SharePoint and attempt to perform bad operations.
One example of a change relates to web parts. By default, contributors now are not allowed to view/edit custom web part properties. As a developer, you can override this default behavior either through an object model attribute — RequiresDesignerPermissionAttribute — or through a SafeControl attribute — SafeAgainstScript. The object model attribute wins over the SafeControl attribute, so if you set the OM attribute to false, then contributors would not be able to view/edit custom web part properties even if SafeAgainstScript were set to true. Note that this is true only for general web parts. If the user has personalized the web part either by making personal settings or by adding it as a personal web part, then these changes won't be implemented for those web parts. You will have to implement custom code to allow this customization.
Another change relates to how files are handled. SharePoint 2010 does not allow HTML files to be rendered in document libraries. Therefore, if your application has been posting HTML files to document libraries and your end users have been viewing them in the browser, this won't work in 2010. Instead, SharePoint will force the users to save the HTML files locally before viewing them. This is implemented using HTTP headers and is configurable at the List or Web Application level, or you can change the Safe List by Mime Type to allow this operation.
Another change is that the functionality that enabled contributors to upload ASPX files in 2007 is blocked in 2010. This is an important change to be aware of, because it may break the way your 2007 application works.
As a developer, the management improvements in 2010 will help both you and your IT counterparts maintain and track SharePoint and your custom code that runs on top of SharePoint. IT will be able to see slow-running pages where your code may not be performing properly. You can help IT by writing additional health rules, helping surface your applications in their reports, and extending PowerShell with new commandlets for them to use. This section will cover some of the new enhancements for IT that developers will care about and want to understand to make their applications better.
Your application is only as reliable and can perform as well as the infrastructure you run the application on. If your SharePoint infrastructure is undersized, unreliable, or does not perform well, your application will be affected no matter how well written your code is. For this reason, understanding how the health monitoring and reporting in SharePoint works and how you can plug into this infrastructure is important.
In 2010, there is a new health analyzer that runs health rules to help IT uncover issues in their environment. IT can then have SharePoint attempt to automatically repair those problems. Figure 3-6 shows the new health analyzer in SharePoint 2010.
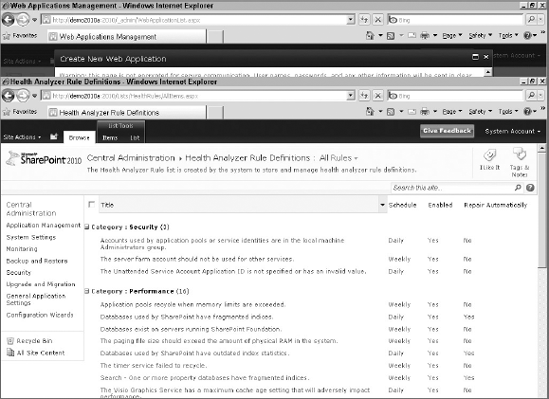
As a developer, the namespace that you will use to implement your health rules is the Microsoft.SharePoint.Administration.Health namespace. In particular, the class for your rules will inherit from the SPHealthAnalysisRule class. You implement the required members in your derived class, and you have a new health rule that IT can implement.
The SDK is a good resource for details on writing and deploying health rules. Note that you may want to write rules that monitor your applications for preventive maintenance. For example, if your application uses a custom SQL database or a timer job, you may want to proactively monitor the database and the timer job to make sure both are operational and configured correctly. If they are not, you can write code in your rule so that your application self-heals and repairs the issues.
SharePoint 2010 moves to a new architecture when it comes to application services. If you are used to the Shared Services Provider (SSP) in 2007, the SSP architecture is replaced with the new Service Applications. The best way to think about a Service Application is that it is a configured logical instance of a service that provides data or computing, such as user profiles or search. The Service Application provides an administrative interface and user resources, including an instance of a database in SQL Server and an Application Pool in IIS.
When it comes to usage, features such as web parts that run on a web application use the Service Application. This connection is made through a Service Application Proxy. The associations between web application and Service Application are set by the administrator and can be changed at any time. These associations can be managed individually or through a group called a Service Application Proxy Group.
So, why the change in architecture? With SSPs, everything was lumped together, even though some services offered very different capabilities. This made SSPs difficult to deploy and manage over the lifetime of your SharePoint deployment. Plus, because SSPs were effectively grouped together into a single database, scalability became difficult. In addition, allowing administration of a single service in the SSP, so that every administrator could administer any service, was next to impossible. Finally, you couldn't really share services across farms. There were many restrictions and the administrative and management overhead made administration difficult.
As a developer, you can write your own Service Applications that provide services to your features that run on the SharePoint WFEs. There are certain scenarios in which this makes sense. For example, if you need specialized computing and analytics; if you want to share data across sites, site collections, and farms; if you need to execute long-running operations; or if you want to scale out your application by taking advantage of the services infrastructure. You should not use Service Applications if your data or features are specific to a site, a site collection, or a site template. Instead, you should write code that runs within the boundaries of your site or site collection, such as an event receiver or web part.
Writing a complete Service Application is beyond the scope of this book, but to get you started, here are some steps to be aware of and also the APIs associated with Service Applications. To write a good Service Application, you should have a working knowledge of Windows Communication Foundation (WCF), because Service Applications use WCF extensively to communicate between the Service Application Proxy and the consumer.
The steps to write a Service Application at the high level are:
Create Service Application
Create Service Application endpoint using WCF
Create Service Application installers
Install and provision Service Application
Create Service Application Proxy
Create Service Application Proxy installers
Install and Provision the Service Application Proxy
Create Service Application consumers
Install, deploy, and test consumers
The APIs that you will use to create your service application are described in Table 3-4.
Table 3.4. Service Application APIs
API | DESCRIPTION |
|---|---|
SPService | A service that provides the core business logic of the service. It usually has no UI. You can have multiple instances of your service running across multiple servers but only a single instance of your service on any one server. The |
SPServiceInstance |
|
SPServiceApplication | A service application is usually created by an administrator by configuring and running your service. That service is then hosted by a service instance. |
SPServiceProxy | An |
SPServiceApplicationProxy | Service application proxies are the public interface for your service application. Through the proxy, other services or programs can interface with your service application. |
Recall the earlier section on read-only databases, and you will see SPService in use in the sample code.
The last area we will look at is PowerShell support. SharePoint 2010 ships a lot of PowerShell commandlets, so you will need to become familiar with the different cmdlets available to help you deploy your solutions or browse your service applications. STSADM is still functional, but over time may be deprecated, so it is important to start learning PowerShell now. There are times, though, when you will find STSADM to be faster from a productivity standpoint, because it requires only one command line command to perform certain operations versus PowerShell, which might require a more comprehensive script. If you remember that STSADM is not a long-term solution, but that you can use it tactically to achieve your goals faster and more easily, then definitely take advantage of it for the short term.
PowerShell is too large of a topic to fully cover all of the functionality it provides in this book. Instead, we will offer grounding in the basics of PowerShell here. Please look to other books by Wrox to learn more about the depths of PowerShell and what you can do with it.
Before you write your first PowerShell script, you need to know the tool options. There are a ton of PowerShell tools on the Internet, so we will focus here on the OOB ones, as you can evaluate the ones on the Internet on your own.
The first tool is the PowerShell command line. If you are a hardcore scripter, this may be your tool of choice. It has no fancy UI, it has no overhead, it is just bare-metal DOS-style scripting through a text UI. If you are going to use the PowerShell command line, you will want to launch the SharePoint 2010 Management Shell to get to the command line, because this will register the SharePoint 2010 cmdlets so that you do not have to do that step yourself.
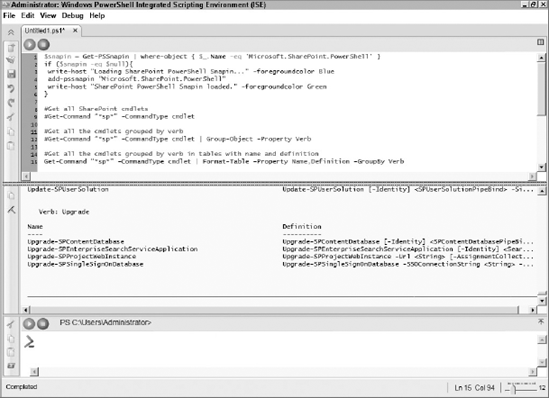
For the more GUI-style person, there is the Windows PowerShell Integrated Scripting Environment, as shown in Figure 3-7. This GUI provides the ability to write, execute, and debug your scripts. If you are a Visual Studio person, it will take some time to get used to the user interface, but once you learn it, you will be more productive with PowerShell.
Again, SharePoint ships with hundreds of cmdlets, and covering them all is beyond the scope of this book. Instead, understanding the basic commands will help you navigate around. Plus, PowerShell works directly with the API, so if you learn a SharePoint API, the cmdlet that works with that section of SharePoint most likely will use the same methods and properties you learned in the API. Therefore, learning the SharePoint API is the first step to becoming a SharePoint PowerShell pro.
First, you may want to get a list of all the SharePoint cmdlets. To do this, use Get-Command "*sp*" -CommandType cmdlet.
Second, to get a count of all the SharePoint cmdlets grouped by verb, use Get-Command "*sp*" -CommandType cmdlet | Group-Object -Property Verb or, to get a nicely formatted set of tables, use Get-Command "*sp*" -CommandType cmdlet | Format-Table -Property Name,Definition -GroupBy Verb. Finally, to get help for any cmdlet, use Get-Help <cmdlet> -Full.
One trap that many new PowerShell programmers fall into is not referencing the SharePoint PowerShell snap-in. To do that, use the following code:
$snapin = Get-PSSnapin | where-object { $_.Name -eq
'Microsoft.SharePoint.PowerShell' }
if ($snapin -eq $null){
 write-host "Loading SharePoint PowerShell Snapin..." -foregroundcolor Blue
 add-pssnapin "Microsoft.SharePoint.PowerShell"
 write-host "SharePoint PowerShell Snapin loaded." -foregroundcolor Green
}In this chapter, you saw how the new IT improvements in SharePoint 2010 affect you as a developer. Some of these improvements affect your applications immediately, such as throttling, while others you need work with your IT counterparts to understand what the right settings are for IT and your applications. With SharePoint 2010, having a good relationship with IT and understanding the SharePoint deployment your application is running on in a deeper way will make you a better SharePoint developer.