Throughout the first few chapters of this book, you have discovered several ways to move data between Access and Excel. Although many of those techniques will suit your needs just fine, each one retains an aspect of manual involvement. That is to say, each one involves manual setup, management, and maintenance. In this chapter, you explore how to leverage VBA (along with some data connection technologies) to make your life even easier by making your data transfer processes virtually hands free.
Note the phrase, "along with some data connection technologies." The reality is that VBA, in and of itself, does not have the capability to connect and manipulate external data. You need to combine VBA with a helper technology to work with external data sources. Although many technologies allow you to automate your data processes, you will focus on using ADO (ActiveX Data Objects) and SQL (Structured Query Language)—commonly pronounced "sequel."
Why bother using VBA when the manual processes work just fine? First, VBA allows you to process data without the need to create and maintain multiple queries and macros. Also with VBA, you can perform complex, multi-layered procedures that involve looping, record-level testing, and If...Then...Else checks without the need to inundate your processes with many queries and temporary tables. Finally, the one-two-three combination of VBA, ADO, and SQL is extremely powerful and relatively easy to understand and implement. In fact, as you go through this chapter, you will immediately start to think about the ways the techniques found here will help you optimize your Excel and Access integration projects.
Note
True to its purpose, all the techniques in this chapter involve writing some basic code. In order to keep this chapter focused on the data analysis aspect of these techniques, this chapter does not spending much time explaining the VBA behind them. If you are new to VBA, you may want to visit Appendix A, which gives you a basic understanding of the concepts used in this chapter.
When trying to grasp the basics of ADO, it helps to think of ADO as a tool that will help you accomplish two tasks: Connecting to a data source and specifying the dataset with which to work. In the following section, you will explore the fundamental syntax you will need to know in order to do just that.
The first thing you must do is connect to a data source. In order to do this, you must give VBA a few pieces of information. This information is passed to VBA in the form of a connection string. A connection string is fundamentally nothing more than a text string that holds a series of variables (also called arguments), which VBA uses to identify and open a connection to a data source. Although connection strings can get pretty fancy with a myriad of arguments and options, there are a handful of arguments that are commonly used when connecting to either Access or Excel. If you're new to ADO, it helps to focus on these commonly used arguments:
Provider: TheProviderargument tells VBA what type of data source with which you are working. When using Office 2007 or Office 2010 as the data source, theProvidersyntax will read:Provider=Microsoft.ACE.OLEDB.12.0
If your data process needs to run on a machine that does not have Office 2007 or Office 2010 on it, you need to use the
Providerfor earlier versions of Access and Excel:Provider=Microsoft.Jet.OLEDB.4.0
Data Source: TheData Sourceargument tells VBA where to find the database or workbook that contains the data needed. With theData Sourceargument, you pass the full path of the database or workbook. For example:Data Source=C:MydirectoryNorthwind 2007.accdb
Extended Properties: TheExtended Propertiesargument is typically used when connecting to an Excel workbook. This argument tells VBA that the data source is something other than a database. When working with an Excel 2007 or 2010 workbook, this argument would read:Extended Properties=Excel 12.0
If your data process needs to run on a machine that does not have Office 2007 or Office 2010 on it, you must use the
Extended Propertiesfor the earlier versions of Excel:Extended Properties=Excel 8.0
User ID: TheUser IDargument is optional and only used if a user ID is required to connect to the data source:User Id=MyUserId
Password: ThePasswordargument is optional and only used if a password is required to connect to the data source:Password=MyPassword
Take a moment now to see a few examples of how these arguments are put together to build a connection string:
Connecting to an Access database:
"Provider=Microsoft.ACE.OLEDB.12.0;" & _
"Data Source= C:MyDatabase.accdb"
Tip
You will notice that each argument is surrounded by quotes and we are using the ampersand (
&) along with an underscore (_). This is a simple technique used to break up the text string into readable parts. The code above is the same as writing:"Provider=Microsoft.ACE.OLEDB.12.0;Data Source= C: MyDatabase.accdb"
The purpose of breaking up the text string into parts is to make the code easy to read and manage within the Visual Basic Editor. The first line starts the string, and each subsequent line is concatenated to the previous line with the ampersand (
&). The underscore (_), preceded by a space, is used as a continuation marker, indicating that the code on the next line is part of the code on the current line. This is similar to the way a hyphen is used in writing to continue a word broken into two lines.Connecting to an Access database with password and user ID:
"Provider=Microsoft.ACE.OLEDB.12.0;" & _
"Data Source= C:MyDatabase.accdb;" & _
"User ID=Administrator;" & _
"Password=AdminPassword"
Connecting to an Excel workbook:
"Provider=Microsoft.ACE.OLEDB.12.0;" & _
"Data Source=C:MyExcelWorkbook.xlsx;" & _
"Extended Properties=Excel 12.0"
Access connection string that will run on systems without Office 2007 installed:
"Provider=Microsoft.Jet.OLEDB.4.0;" & _
"Data Source= C:MyDatabase.mdb"
Excel connection string that will run on systems without Office 2007 installed:
"Provider=Microsoft.Jet.OLEDB.4.0;" & _
"Data Source=C:MyExcelWorkbook.xls;" & _
"Extended Properties=Excel 8.0"
In addition to building a connection to your data source, you must define the data set with which you need to work. In ADO, this dataset is referred to as the Recordset. A Recordset object is essentially a container for the records and fields returned from the data source. The most common way to define a Recordset is to open an existing table or query using the following arguments (see Table 15-1):
Recordset.Open Source, ConnectString, CursorType, LockType
Table 15.1. Recordset Arguments
ARGUMENT | DEFINITION |
|---|---|
Represents the data to be extracted. This is typically a table, query or SQL statement that retrieves records. Initially, you use tables and queries to select records from a data source. Later in this chapter, you learn how to build SQL statements to fine tune data extracts on the fly. | |
Represent the connection string used to connect to your chosen data source. | |
Represents how a | |
The argument to specify whether the data returned by the |
The CursorTypes commonly used are shown in Table 15-2.
The following sections provide a few examples of how to declare a Recordset using the arguments you just covered.
Any of these Recordset declarations would return a Recordset that is read only. Note that you can use a table name or a SQL statement in each one of these examples:
MyRecordset.Open "MyTable", ConnectString
MyRecordset.Open "SQL", ConnectString, adOpenForwardOnly,adLockReadOnly
Table 15.2. Common Cursor Types
Table 15.3. Common Lock Types
| This is the default setting; if you don't specify a |
This |
Now it's time to put together the ADO fundamentals you have explored thus far to create your first ADO procedure. In this section, you build a procedure that transfers an Access table into an Excel spreadsheet.
Before you do anything with ADO, you must first set a reference to the ADO Object Library. Just as each Microsoft Office application has its own set of objects, properties and methods, so does ADO. Since Excel does not inherently know the ADO Object Model, you need to point Excel to the ADO reference library, as shown in the following steps:
Open a new Excel workbook and the Visual Basic Editor.
Tip
Remember that in both Excel and Access you can access the VBE with the shortcut Alt + F11. Alternatively, you can access the VBE in Excel by selecting the Developer tab from the ribbon, and then selecting the Visual Basic icon.
Depending on how Excel is set up, the Developer tab may not show up in your Ribbon by default. If it is not there, simply go to the top-left corner of the Ribbon and click the File tab in Excel 2010 (the Office icon in Excel 2007) and select Excel Options In the Personalize menu, you will see a check box entitled "Show Developer tab in ribbon." Make sure this box is checked.
Once you are in the Visual Basic Editor, go up to the application menu and select Tools

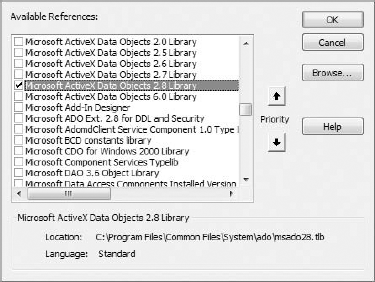
Scroll down until you locate latest version of the Microsoft ActiveX Data Objects Library. Place a checkmark beside this entry and click OK.
Note
It is normal to have several versions of the same library displayed in the References dialog box. It's generally best to select the latest version available. You will notice that in Figure 15-1, Microsoft ActiveX Data Objects Library 2.8 is used. Don't be too concerned if you only have earlier versions available; the examples in this chapter will run fine with those earlier versions.
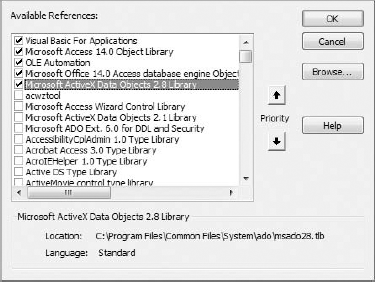
After you click the OK button, you can open the Reference dialog box again to ensure that your reference is set. You will know that your selection took effect, when the Microsoft ActiveX Data Objects Library is displayed at the top of the Reference dialog box with a check next to it (Figure 15-2).
Note
You have just walked through setting a reference to the Microsoft ActiveX Data Objects Library using Excel. Keep in mind that these are the steps you take when you perform the same task in Access.
Also keep in mind that the references you set in any given workbook or database are not applied at the application level. This means that you need to repeat these steps with each new workbook or database you create.
Once you have a reference set to the ADO Object Library, start a new module in the Visual Basic Editor by selecting Insert
Sub GetAccessData()

'Step 1: Declare your Variables
  Dim MyConnect As String
  Dim MyRecordset As ADODB.Recordset

'Step 2: Declare your Connection String
  MyConnect = "Provider=Microsoft.ACE.OLEDB.12.0;" & _
               "Data Source=
C:OffTheGridalexCorp Restaurant Equipment and Supply.accdb"

'Step 3: Instantiate and Specify your Recordset
  Set MyRecordset = New ADODB.Recordset
  MyRecordset.Open "Query_Products", MyConnect, adOpenStatic,
adLockReadOnly

'Step 4: Copy the Recordset to Excel
   Sheets("Your First ADO Procedure").Select
   ActiveSheet.Range("A2").CopyFromRecordset MyRecordset

'Step 5: Add Column Labels
 With ActiveSheet.Range("A1:C1")
      .Value = Array("Product", "Description", "Segment")
      .EntireColumn.AutoFit
 End With

End Sub
Tip
Installing the sample files for this book ensures that you have the Access database referenced in the previous code. You will also find a workbook called Chapter15_SampleFiles.xls containing this procedure along with the others found in this chapter.
When writing your own procedures, you will alter the connection string to reference the path for your data source.
Take a moment to think about what you are doing in each step:
Declaring the necessary variables: Declare two variables: a string variable to hold the connection string, and a
Recordsetobject to hold the results of the data pull. In this example, the variable calledMyConnectholds the connection string identifying the data source. Meanwhile, the variable calledMyRecordsetholds the data returned by the procedure.Declaring the connection string: Define the connection string for the ADO procedure. In this scenario, you are connecting to the ZalexCorp Restaurant Equipment and Supply.accdb found on the C drive.
Assigning data to your Recordset: Once you've defined your data source, you can fill your
Recordsetwith some data. Specify that your Recordset is read-only and filled with data from the Query_Products query found in the ZalexCorp Restaurant Equipment and Supply Access database. When writing your own procedures, you can replace the Query_Products query name with that of your own tables.Also notice that you must set the
MyRecordsetvariable to a newADODB.Recordset(Set MyRecordset = New ADODB.Recordset). VBA requires that you instantiate theRecordsetobject before it can be used.Copying the Recordset into Excel: By the time you reach this step, the
MyRecordsetobject is filled with data from the Query_Products query. Now, you use Excel'sCopyFromRecordsetmethod to get it out and into your spreadsheet. This method requires two pieces of information: The location of the data output and theRecordsetobject that holds the data you need. In this example, you are copying the data in theMyRecordsetobject onto the sheet called "Your First ADO Procedure" starting at cell A2.Adding column labels: Interestingly enough, the
CopyFromRecordsetmethod does not return column headers or field names. Step 5 is where you add the column headers yourself. You are telling Excel to fill cells A1 through C1 with the respective values in the array. Then you tell Excel to AutoFit those columns so that all the data can be seen.
Be sure to save your changes, and then close the Visual Basic Editor. At this point, you can run your procedure simply by running the GetAccessData macro.
Better still, you can get fancy and assign the macro to a button. This gives you and other users an easy way to call the ADO procedure whenever you need to refresh the data extract from Access. Follow these steps:
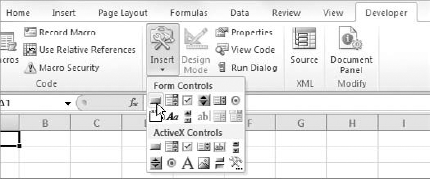
Select the Insert icon from the Developer tab on the Excel ribbon.
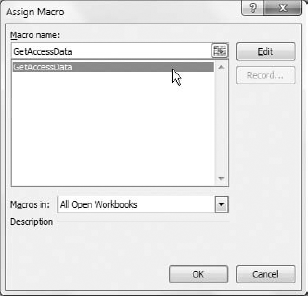
Click the Form button as demonstrated in Figure 15-3; then click anywhere on your spreadsheet to drop the button on the sheet. You will immediately see the Assign Macro dialog box shown here in Figure 15-4.
Click the macro name to assign the macro to the button.
Click OK.
The reward for all your efforts will be a worksheet that pulls data directly from Access at the click of a button! Remember, this is all without the use of third party applications (MS Query) or manual manipulation. With ADO and VBA, you can build all the necessary components at one time in a nicely packaged macro, and then simply forget about it. As long as the defined variables in your code (that is, the data source path, the Recordset, the output path) do not change, then your ADO-based procedures will require virtually zero maintenance.
Writing a data extract procedure with ADO and SQL is very similar to writing an ADO procedure to extract data directly from an Access table. The difference is that instead of specifying a table name as the data source, you pass a SQL statement that defines the data you need. Start a new module and enter the following code.
Sub GetAccessData_With_SQL()

'Step 1: Declare your variables
   Dim MyConnect As String
   Dim MyRecordset As ADODB.Recordset
   Dim MySQL As String

'Step 2: Declare your connection string
   MyConnect = "Provider=Microsoft.ACE.OLEDB.12.0;" & _
                "Data Source= C:OffTheGridalexCorp Restaurant
Equipment and Supply.accdb"

'Step 3: Build your SQL statement
 MySQL ="SELECT Region, Market, Product_Description," & _
        " Sum(Revenue) AS Rev, Sum(TransactionCount) AS Units" & _
        " FROM PvTblFeed" & _
        " GROUP BY Region, Market, Product_Description"

'Step 4: Instantiate and specify your recordset
   Set MyRecordset = New ADODB.Recordset
   MyRecordset.Open MySQL, MyConnect, adOpenStatic, adLockReadOnly

'Step 5: Copy the recordset to Excel
   Sheets("ADO and SQL").Select
   ActiveSheet.Range("A2").CopyFromRecordset MyRecordset

'Step 6: Add column labels
   With ActiveSheet.Range("A1:E1")
       .Value = Array("Region", "Market", "Product_Description", _
       "Revenue", "Transactions")
       .EntireColumn.AutoFit
   End With

End Sub
Tip
Be sure that you have set a reference to the ADO Object Library as outlined in "Referencing the ADO Object Library" earlier in this chapter.
Feel free to check out Appendix B if you need a refresher on SQL syntax fundamentals.
Running this code queries the Access database and aggregates records on the fly to return data to an Excel sheet. Let's take a moment to talk about what you are doing in each step.
Declaring the necessary variables: Declare three variables: a string variable to hold the connection string, a
Recordsetobject to hold the results of the data pull, and a second string variable to hold your SQL statement. In this example, the variable called MyConnect holds the connection string identifying the data source. Meanwhile, the variable called MyRecordset holds the data returned by the procedure and the variable called MySQL holds the SQL statement.Declaring the connection string: Define the connection string for the ADO procedure. In this scenario, you are connecting to the ZalexCorp Restaurant Equipment and Supply.accdb database found on the C drive.
Building the SQL statement: Assign a SQL statement in the form of a text string to the MySQL variable. You'll notice that the SQL statement is broken up into separate strings, each string followed by the ampersand (
&) along with an underscore (_). This technique breaks up the complete SQL string into readable parts, making the code easier to read and manage. The first line starts the string, and each subsequent line is concatenated to the previous line with the ampersand (&). The underscore (_), preceded by a space, is used as a continuation marker, indicating that the code on the next line is part of the code on the current line.Assigning data to your Recordset: Specify that your
Recordsetis read-only and is filled with data returned from your SQL statement.Copying the
Recordsetinto Excel: Use Excel'sCopyFromRecordsetmethod to get the returned dataset into your spreadsheet. In this example, you copy the data in theMyRecordsetobject onto the sheet called "ADO and SQL" starting at cell A2.Adding column labels: Add header columns by telling Excel to fill cells A1 through E1 with the respective values in the array. Then you tell Excel to AutoFit those columns so that all the data can be seen.
Passing criteria through your SQL statements allows you to evaluate each record in your dataset and selectively filter only the ones you need. This affords you tremendous flexibility that you can only achieve through SQL. Take a moment to review a few example SQL statements that use criteria to filter records.
Tip
To get a sense of the impact of using criteria, try replacing the SQL statement in the example you just walked through with any one of the statements listed in the following sections.
Setting numeric criteria is quite simple; just select the operator you want and you're done. In this example, you are selecting only those records that show revenues greater than $2,000.
"SELECT * FROM PvTblFeed" & _
"WHERE Revenue > 2000"When setting criteria that is textual or text type, you need to wrap your text in single quotes. In this example, you are selecting only records that belong to the Denver market.
"SELECT * FROM PvTblFeed" & _
"WHERE Market = 'Denver'"When setting criteria for a date type field, you need to wrap your criteria in pound (#) signs. The pound signs tags the criteria string as a date. In this example, you are selecting only those records that have an effective date after June 30, 2004.
"SELECT * FROM PvTblFeed" & _
"WHERE Effective_Date > #30/Jun/2004#"It's important to mention that you are not limited to one criterion. You can evaluate multiple criteria with your SQL statements by simply using the AND operator. In the example shown here, you are selecting only those records that have an effective date after June 30, 2004 and belong to the Denver market.
"SELECT * FROM PvTblFeed" & _
          "WHERE (Effective_Date > #6/30/2004#) AND (Market = 'Denver')"
You can evaluate multiple criteria using the OR operator as demonstrated in the next example. Here, you are selecting only records that belong to either the Denver market or the Charlotte market.
"SELECT * FROM PvTblFeed" & _
          "WHERE (Market = 'Denver') OR (Market = 'Charlotte'")
Tip
You will note that in the multiple criteria examples each criterion is wrapped in parentheses. The parentheses are not actually necessary; the SQL statement is valid without the parentheses. However, the parentheses are useful in visually separating the criteria, allowing for easy reading.
Access users will note that the wildcard character used in the WHERE clause is not the asterisk (*) that is typically used in Access. Instead, the percent sign (%) is used. This is because the SQL statement will be passed through ADO, which only validates the percent sign as a wildcard character.
"SELECT * FROM PvTblFeed" & _
"WHERE (Market Like 'C%')"There are literally countless ways you can use the fundamentals you have learned in this chapter. Of course, it would be impossible to go through each example here. However, there are some common scenarios where VBA can greatly enhance integration between Excel and Access.
Up until now, you have used Access as the data source for your data pulls. However, use can also use an Excel workbook as a data source. To do so, you would simply build a SQL statement that references the data within the Excel workbook. The idea is to pinpoint the dataset in Excel to query by passing a sheet name, a range of cells, or a named range to the SQL statement.
Query the Entire Worksheet: To query all of the data on a specific worksheet, you would pass the name of that worksheet followed by the dollar sign (
$) as the table name in your SQL statement. Be sure to encapsulate the worksheet name with square brackets. For example:"SELECT * FROM [MySheet$]"
Note
If the worksheet name contains spaces or characters that are not alphanumeric, you will need to wrap the worksheet name in single quotes. For instance:
Select * from ['January; Forecast vs. Budget$']Query a Range of Cells: To query a range of cells within a given worksheet, you would first identify the sheet as described above, and then add the target range. For example:
"SELECT * FROM [MySheet$A1:G17]"
Query a Named Range: To query a named range, simply use the name of the range as the table name in your SQL statement. For example:
"SELECT * FROM MyNamedRange"
The code shown here demonstrates how to query data from an Excel worksheet. In this example, the entire used range in the SampleData worksheet is queried to return only those records that belong to the North Region.
Sub GetData_From_Excel_Sheet()

'Step 1: Declare your variables
   Dim MyConnect As String
   Dim MyRecordset As ADODB.Recordset
   Dim MySQL As String
'Step 2: Declare your connection string
   MyConnect ="Provider=Microsoft.ACE.OLEDB.12.0;" & _
              "Data Source=
C:OffTheGridChapter15_SampleFile.xlsm;" & _
              "Extended Properties=Excel 12.0"

'Step 3: Build your SQL Statement
   MySQL = " SELECT * FROM [SampleData$]" & _
           " WHERE Region ='NORTH'"

'Step 4: Instantiate and specify your recordset
   Set MyRecordset = New ADODB.Recordset
   MyRecordset.Open MySQL, MyConnect, adOpenStatic, adLockReadOnly

'Step 5: Clear previous contents
   Sheets("Excel Data Pull").Select
   ActiveSheet.Cells.Clear

'Step 6: Copy the recordset to Excel
   ActiveSheet.Range("A2").CopyFromRecordset MyRecordset

'Step 7: Add column labels
  With ActiveSheet.Range("A1:F1")
      .Value = Array("Region", "Market", "Product_Description", _
      "Revenue", "Transactions", "Dollar per Transaction")
      .EntireColumn.AutoFit
  End With

End Sub
To query an Excel workbook, follow these steps:
Declaring the necessary variables: Declare three variables: a string variable to hold the connection string, a
Recordsetobject to hold the results of the data pull, and a second string variable to hold your SQL statement. In this example, the variable calledMyConnectwill hold the connection string identifying the data source. Meanwhile, the variable calledMyRecordsetholds the data that is returned by the procedure and the variable called MySQL holds the SQL statement.Declaring the connection string: Define the connection string for the ADO procedure. In this scenario, you are connecting to an Excel workbook, thus the reason for the Extended Properties argument.
Building the SQL statement: Assign a SQL statement in the form of a text string to the MySQL variable. Here, you build the SQL statement just as though you were working with a database, only you pass the worksheet name as the table. Note that NORTH is encased in single quotes. In SQL statements, you can use single and double quotes interchangeably.
Assigning data to your RecordSet: You specify that your
Recordsetis read-only and is filled with data returned from your SQL statement.Clearing cell contents: Clear the Excel Data Pull worksheet before copying the
Recordset. This ensures that all data from the previous pull are removed before bringing in fresh data.Copying the Recordset into Excel: Use Excel's
CopyFromRecordsetmethod to get the returned dataset into your spreadsheet. In this example, you copy the data in theMyRecordsetobject onto the sheet called Excel Data Pull starting at cell A2.Adding column labels: Add header columns by telling Excel to fill cells A1 through F1 with the respective values in the array. Then tell Excel to AutoFit those columns so that all the data can be seen.
There are often times when you don't necessarily want to overwrite the data in your Excel worksheet when you bring in fresh data. Instead, you may want to simply add or append data to the existing table.
In a typical scenario, you would hard-code the location or range where you want a given Recordset to be copied. In these situations, this location must dynamically change to reflect the first empty cell in your worksheet. The code that follows demonstrates this technique.
Sub Append_Results()

'Step 1: Declare your variables
   Dim MyConnect As String
   Dim MyRecordset As ADODB.Recordset
   Dim MyRange As String

'Step 2: Declare your connection string
   MyConnect = "Provider=Microsoft.ACE.OLEDB.12.0;" & _
                "Data Source= C:OffTheGridalexCorp Restaurant
 Equipment and Supply.accdb"

'Step 3: Instantiate and specify your recordset
   Set MyRecordset = New ADODB.Recordset
   MyRecordset.Open "Query_Products", MyConnect, adOpenStatic,
adLockReadOnly

'Step 4: Find first empty row and use that to build a dynamic range
   Sheets("AppendData").Select
   MyRange = "A" & _
   ActiveSheet.Cells.SpecialCells(xlCellTypeLastCell).Row + 1
'Step 5: Copy the Recordset to First Empty Row ActiveSheet.Range(MyRange).CopyFromRecordset MyRecordset End Sub
The following steps show how to append records to an existing Excel table:
Declaring the necessary variables: In Step 1, you declare three variables: a string variable to hold the connection string, a
Recordsetobject to hold the results of the data pull, and a second string variable to hold text that represent a cell reference. In this example, the variable calledMyConnectholds the connection string identifying the data source. Meanwhile, the variable calledMyRecordsetholds the data that is returned by the procedure and the variable calledMyRangeholds a text string that represent a cell reference.Declaring the connection string: Define the connection string for the ADO procedure. In this scenario, you are connecting to the ZalexCorp Restaurant Equipment and Supply.accdb database found on the C drive.
Assigning data to your Recordset: Specify that your
Recordsetis read-only and is filled with data from the Query_Products query found in the ZalexCorp Restaurant Equipment and Supply Access database.Finding the first empty cell: Dynamically determine the first available empty cell that can be used as the output location for the data pull. First, find the first empty row. This is relatively easy to do thanks to Excel's SpecialCells method, which helps you find the last used cell in the worksheet, and then extracts the row number of that cell. This gives you the last used row. To get the row number of the first empty row you simply add 1; the next row down from the last used row will inherently be empty.
The idea is to concatenate the
SpecialCellsroutine with a column letter (in this case"A") to create a string that represents a range. For example, if the first empty row turns out to be 10, then the code shown below would return"A10"."A" & ActiveSheet.Cells.SpecialCells(xlCellTypeLastCell).Row + 1
Trapping this answer in the
MyRangestring variable allows you to pass the answer to theCopyFromRecordsetmethod in Step 5.Copying the Recordset into Excel: Use Excel's
CopyFromRecordsetmethod to get the returned dataset into your spreadsheet. In this example, you are copying the data in theMyRecordsetobject onto the sheet called "AppendData" starting at the cell that has been dynamically defined by theMyRangestring.
You will undoubtedly find a time when you need to pull data from an Excel file into an Access table. Again, there are several ways to get Excel data in Access, but using the one-two-three combination of VBA, ADO and SQL can provide some flexibility that is not easily attained using other methods.
The code that follows demonstrates how to query data from an Excel worksheet and append the results to an existing Access table. In this example, the SampleData worksheet is queried to return only those records that belong to the North Region.
Note that this code is designed to be run from Access. That is to say, you add this code to your Access database to pull data from Excel.
Sub GetData_From_Excel_Sheet()

'Step 1: Declare your variables
   Dim MyConnect As String
   Dim MyRecordset As ADODB.Recordset
   Dim MyTable As ADODB.Recordset
   Dim MySQL As String

'Step 2: Declare your connection string
   MyConnect = "Provider=Microsoft.ACE.OLEDB.12.0;" & _
               "Data Source=C:OffTheGridChapter15_SampleFile.xlsm;"& _
"Extended Properties=Excel 12.0"

'Step 3: Build your SQL statement
   MySQL = " SELECT * FROM [SampleData$]" & _
           " WHERE Region ='NORTH'"

'Step 4: Instantiate and specify your recordset
   Set MyRecordset = New ADODB.Recordset
   MyRecordset.Open MySQL, MyConnect, adOpenStatic, adLockReadOnly

'Step 5: Instantiate and specify your Access table
   Set MyTable = New ADODB.Recordset
   MyTable.Open "ExcelFeed", CurrentProject.Connection,
adOpenDynamic, adLockOptimistic

'Step 6: Loop through each record and add to the table
   Do Until MyRecordset.EOF
   MyTable.AddNew
        MyTable!ActiveRegion = MyRecordset!Region
        MyTable!ActiveMarket = MyRecordset!Market
        MyTable!Product = MyRecordset!Product_Description
        MyTable!Revenue = MyRecordset!Revenue
        MyTable!Units = MyRecordset!Transactions
        MyTable![Dollar Per Unit] = MyRecordset![Dollar Per Transaction]
   MyTable.Update
MyRecordset.MoveNext Loop End Sub
Use the following steps to append Excel records to an existing Access table:
Declaring the necessary variables: Declare four variables:
MyConnectis aStringvariable that holds the connection string identifying the data source.MyRecordsetis aRecordsetobject that holds the results of the data pull.MyTableis aRecordsetobject that provides the structure of the existing table.MySQLis aStringvariable that holds your SQL statement.
Declaring the connection string: Define the connection string for the ADO procedure. In this scenario, you are connecting to an Excel workbook, thus the reason for the Extended Properties argument.
Building the SQL statement: Assign a SQL statement in the form of a text string to the MySQL variable. Here, you build the SQL statement just as though you were working with a database, only you pass the worksheet name as the table.
Assigning data to your Recordset: Specify that your
Recordsetis read-only and is filled with data returned from your SQL statement.Open the target Access table into a Recordset: Open the pre-existing local ExcelFeed table into a
Recordset. Two things to note about the Recordset declaration in Step 5:Notice that the connection argument is referencing the internal connection
CurrentProject.Connection. You use this standard connection to assign a local table to a Recordset.The
CursorTypeandLockTypearguments areadOpenDynamicandadLockOptimistic, respectively. This ensures that the local table can be updated to append the new records.
Loop through the Query Results and add each record to the table: Use a loop through the records in the results Recordset and add each record to the local ExcelFeed table. Start the loop by declaring what the procedure will do until MyRecordset hits the end of the file. This tells VBA to keep looping through the MyRecordset Recordset until it hits the EOF (end of file). Next, you use the
AddNewmethod of theRecordsetto add a new empty record to the local ExcelFeed table represented by the MyTable Recordset.
From here, you simply fill the fields in the empty record you just created with the values that were returned from your SQL statement.
Note
Note that each field in the ExcelFeed table (represented by the MyTable Recordset) has its counterpart in the MyRecordset Recordset.
For many, text files are not only a source of data but also very much part of daily data operations. Given this fact, it's worth looking into how to pull data from text files using ADO and SQL. The connection string used to source a text file is as follows:
MyConnect = "Provider=Microsoft.ACE.OLEDB.12.0;" & _
            "Data Source= C:Integration;" & _
            "Extended Properties=Text"
A closer look at the Data Source argument reveals that only the file's directory is specified as the source for the data; not the actual file itself. The Extended Properties argument is set to Text.
Outside the difference in the construct of the connection string, querying a text file is very much similar to querying an Excel workbook.
Sub GetData_From_Text_File()
'Step 1: Declare your variables
    Dim MyConnect As String
    Dim MyRecordset As ADODB.Recordset
    Dim MySQL As String

'Step 2: Declare your connnection string
   MyConnect = "Provider=Microsoft.ACE.OLEDB.12.0;" & _
               "Data Source=C:OffTheGrid;" & _
               "Extended Properties=Text"

'Step 3: Build your SQL statement
   MySQL = " SELECT * FROM SalesData.csv"

'Step 4: Instantiate and specify your recordset
   Set MyRecordset = New ADODB.Recordset
   MyRecordset.Open MySQL, MyConnect, adOpenStatic, adLockReadOnly

'Step 5: Clear previous contents
   Sheets("Query Text").Select
   ActiveSheet.Cells.Clear

'Step 6: Copy the recordset to Excel
ActiveSheet.Range("A2").CopyFromRecordset MyRecordset
'Step 7: Add column labels
With ActiveSheet.Range("A1:F1")
.Value = Array("Region", "Market", "Product_Description", _
"Revenue", "Transactions", "Dollar per Transaction")
.EntireColumn.AutoFit
End With
End SubAlthough there are many methods for moving data between Access and Excel using the interfaces of those two programs, many of them retains an aspect of manual involvement. VBA can help make your data transfer processes virtually hands free.
VBA, in and of itself, does not have the capability to connect and manipulate external data. You need to combine VBA with helper technologies such as ADO (ActiveX Data Objects) and SQL (Structured Query Language). ADO is a tool that helps you accomplish two tasks: connect to a data source and specify the dataset with which to work. SQL allows you to customize your data processes, giving you the flexibility to filter, group and sort your results.
The one-two-three combination of VBA, ADO and SQL is extremely powerful and relatively easy to understand and implement. Using these three tools together, you can process data without the need to create and maintain multiple queries and macros. You can also perform complex, multi-layered procedures that involve looping, record-level testing, and If...Then...Else checks without the need to inundate your processes with many queries and temporary tables.

