
When I first started with print and design layout (back in the pre-computer dinosaur age), I would drive all over the city to finish a job. After receiving the client's go-ahead, I had to pick up my type from a phototypesetter and my images from a stat house. Then, back at my studio, I'd cut and paste — and I mean literally, with scissors and glue — the text and images into place, hoping against hope that I had specified the type and image sizes correctly. If not, it was back in the car for another trip or two around town. Ah, the good old days.
Now designers (especially those who design for the Web) have the luxury of developing their creations right in their own studio. Until Dreamweaver, however, the development of a Web application often undertook a faster, albeit parallel, course to my inner-city travels. After a basic page was designed, complete with server-side code, the document had to be uploaded to a testing server and then viewed in a browser over the Internet. If — make that when — changes were needed, the pages were revamped back in the studio. Because the designer was not able to lay out the page with the actual data in place, modifications were a trial-and-error process that often required many, many trips to the server and back.
Dreamweaver's Live View eliminates the tedium and the lengthy time required for the upload-preview-modify-upload cycle. It enables developers to work with the layout while the actual data is live on the page. If a table width needs to be adjusted because one of the records is too long, you can make the change immediately with no guesswork.
Live View processes the page in the chosen server model. If the page requires variables, such as search criteria, to run properly, the Live View feature enables you to set such values as needed. Although a preliminary discussion of Live View was presented in Chapter 20, this chapter covers all the necessary details for using both basic and advanced Live View capabilities.
Live View is a terrific timesaving feature, but you can't rely on it totally for testing your Web application. You still need to preview the page in various browsers to ensure cross-browser compatibility. The final section of this chapter is dedicated to Dreamweaver's Preview In Browser feature and its relationship to your testing server.
After your site is properly set up, entering Live View is just a click away. Click the Live View button on the toolbar to refresh Dreamweaver's Document window and to replace all the dynamic data placeholders with information from the declared data source.
To get the most out of Live View — and to avoid problems — you need a firm grasp of how Dreamweaver is able to present your data, live. The following sections can help you understand this timesaving feature.
Once you enter Live View, there's a lot going on under the hood:
The developer inserts dynamic data elements into a standard HTML page. The dynamic data is represented by placeholders that combine the recordset and field names in a set of curly braces, such as
{rsEmployees.FirstName}.When the Live View is enabled, Dreamweaver creates a hidden, temporary copy of the current page.
The temporary page is stored in the folder designated in the Testing Server category of the Site Definition dialog box.
Dreamweaver instructs the defined testing server to execute the server-side code within the page and passes along any variables that have been specified. The URL prefix designated in the Site Definition Testing Server category is used to invoke the page.
When the code is executed, Dreamweaver reads the resulting HTML code.
Finally, Dreamweaver displays the page with its built-in rendering engine.
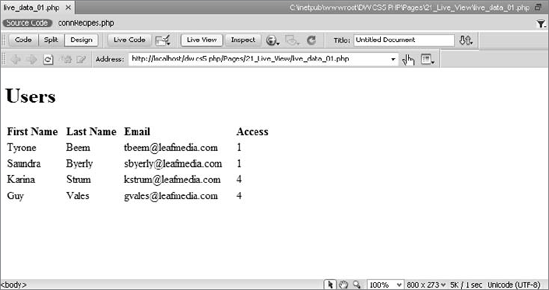
If all goes well, a page with dynamic data placeholders (shown in Figure 21-1) is replaced with the actual data integrated into Live View (shown in Figure 21-2).
If Dreamweaver encounters an error, it displays a message that explains where the process failed and suggests some possible remedies.

As noted in the summary of how Live View works, several values found in the Testing Server category of the Site Definition dialog are key to this feature's operation. Live View must know the location of the site root for the temporary page and how that location may be reached with an HTTP request. If either of these values is not found, the attempt to switch to Live View is aborted and an error message appears.
Two different methods exist for accessing the testing server: locally through a network, or remotely via FTP. If the testing server is to be accessed locally, the location of the folder storing the pages is entered in the Testing Server Folder field, shown in Figure 21-3. Although it is referred to as the Testing Server folder, if you're using a local Web server such as Internet Information Services (IIS) on your local testing machine, this entry is likely to be the same as your Local Root Folder, as defined in the Local Info category of the Site Definition dialog box. The other field essential to proper Live View operation is the URL Prefix field. When Live View sends the HTTP request to the testing server, the address contained in this field prefaces the name of the temporary page. For example, if my temporary page is named TMPGX123455.asp and the URL prefix is http://localhost/dba, the URL used is http://localhost/dba/TMPGX123455.asp.
Tip
Localhost is common shorthand for addressing a local Web server; generally, you can also use the Internet Protocol (IP) address 127.0.0.1.
Initially, Dreamweaver inserts only the http://localhost/ address into the URL Prefix field. This works if your local site root corresponds to the local Web server root. If your site root is in a different directory, you have to fill in the path of that directory. Most Web servers permit the creation of virtual directories, which are aliases recognized by the Web server. If you're using Windows XP Professional, Windows Vista Business, Windows Vista Ultimate, Windows 7 Professional, or Windows 7 Ultimate, you may already have Internet Information Services (IIS) available, and you can set up your own virtual directories.
To create a virtual directory, follow these steps:
First, check to see if you have IIS by right-clicking YourComputerName (My Computer on Windows XP) on your desktop and choosing Manage. In the Computer Management console, expand Services and Applications. If you see Internet Information Services listed, you've got everything you need installed and you can skip to Step 2. If you don't see IIS listed, choose Start

For Vista or Windows 7, select Internet Information Services (IIS) Manager. In the Connections column, expand the Web Sites entry.
Right-click the Default Web Site and choose Add Virtual Directory (New
In the Alias field (Virtual Directory Alias screen in Windows XP), enter the alias for the folder. This will be appended to the end of the
http://localhost/address. (If you name your virtual directory dba, for example, the URL would behttp://localhost/dba.) In Windows XP, click Next to continue.In the Physical path field (the Web Site Content Directory screen in Windows XP), browse to the folder that contains your site and click OK or Next in Windows XP.
The final step is for Windows XP users only.
Click Next on the Access Properties screen to continue, and click Finish on the next screen to add the virtual directory.
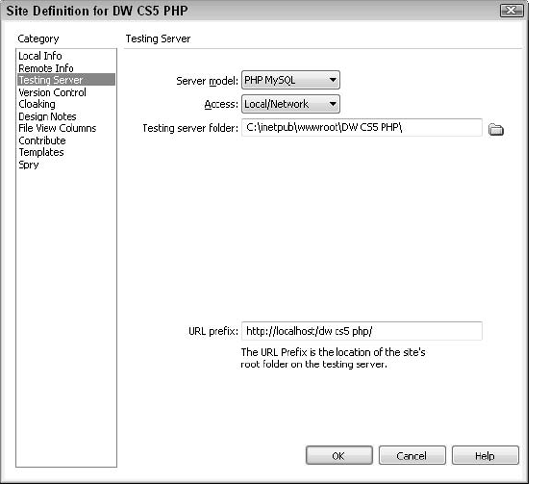

Figure 21-4. Right-click the Default Web Site in IIS and choose New
If you're connecting to a remote testing server, choose FTP from the Access list on the Testing Server category of the Site Definition dialog box. When FTP is selected, Dreamweaver displays the same information entered under the FTP heading in the Remote Info category. Additionally, Dreamweaver combines the entries under FTP Host and Host Directory in the URL prefix with an initial http://. For example, if your entry under FTP Host is www.drinkgoodstuff.com and Host Directory is blank, the URL prefix reads http://www.drinkgoodstuff.com/.
Warning
You may have to edit your URL prefix if your FTP host uses an ftp prefix. If my host directory were ftp.drinkgoodstuff.com, Dreamweaver would create the URL prefix entry http://ftp.drinkgoodstuff.com, an unworkable URL. Here, the ftp must be changed to www.
Dreamweaver provides several different methods for invoking Live View. Use the one that best suits your work style:
Click Live View in the Document toolbar.
Choose View
Use the keyboard shortcut Alt+F11 (Option+F11).
Regardless of the method used, Dreamweaver initially displays an alert that asks if you'd like to update the copy on the testing server. To preview the most recent changes, click Yes.
Once you're in Live View, executing either of these actions returns you to Standard mode, where you see dynamic data placeholders.
If a feature in a software program can be said to have a raison d'etre, then modifying the layout must surely be the raison d'etre of Live View. When in Live View, new elements — dynamic or static — can be formatted or styled using HTML or CSS.
Live View solves the thorny challenge of laying out a table without resorting to a time-consuming trial-and-error approach. For instance, varying lengths of data in the same column often complicate designing table layout with dynamic data. If, for example, the sample data includes a last name field that is 12 characters long and the real data contains a hyphenated name that is 25 characters long, you have a problem. When working in Live View, you can see the entire page as it would be generated on the server, including dynamic elements and repeating table rows (see Figure 21-5), with all the styling applied.
The Live View toolbar includes a Refresh button that, when clicked, resends your application to the server for processing and then redisplays the page in the Document window. The Refresh option is valuable in the following circumstances:
Information from the data source is reassessed. This feature enables you to make changes in the database and then see those changes incorporated into your page.
Server formatting changes are applied to dynamic data.
CSS formatting applied to dynamic data is also applied to Live View displayed through a Repeat Region server behavior.
Note
Repeat Region server behaviors enable multiple records from the same recordset to be incorporated into a page. For details on how to insert and manage a Repeat Region, see Chapter 20.

Although the capability to work with data from the current recordset is impressive, it's really only half the story of Live View. Many Web applications depend on variables used when the page is processed by the testing server. Users may intentionally submit these variables when they fill out a form or they may submit variables unintentionally when they navigate from a particular page. Session or application variables, from authentication routines or simple counters, may also be integrated into a page. Dreamweaver permits developers to interactively alter all such variables and preview the resulting Web page. This facility not only enables the designer to work with a wide range of real-life conditions, but it also facilitates testing of the application under a variety of circumstances. Dreamweaver offers two avenues of approach to variable handling: through the Address field and through the Settings dialog box.
Remember the first time you noticed that the link you clicked was carrying quite a bit of additional baggage? Where you might have selected a link that took you to a specific product page with a URL such as http://www.idest.com/products/widgets.htm, the link in the Location field of your browser looked more like the following:
http://www.idest.com/products/products.asp?prod=
widget&sessionID=2343215&login=no&visited=gadgets%20%r%20us
The text following the question mark is called a query string, or the URL parameters. Query strings are a tool used by Web applications to pass information from one page to the next. Frequently, you see a query string after submitting a form. Forms using the Get method pass their variables by appending a question mark and the form information to the URL of the requested page. The form information is in a series of name/value pairs; and each name/value pair is linked by an equal sign, as follows:
Firstname=Joseph
Query strings may include any number of name/value pairs, separated by an ampersand. Thus, for a form that passes the data entered into a first name field and a last name field, the query string may look like this:
?firstname=Joseph&lastname=Lowery
Neither single nor double quotation marks are used because they are in HTML attributes. Quotation marks and other characters — including spaces, apostrophes, and tildes — are represented by hexadecimal values so that they are properly understood by servers. Such strings are said to be URL encoded, and they are designated by an initial percent sign, followed by the ASCII value of the character in hexadecimal. The following table offers some commonly used encoding values:
Character | ASCII Value | |
|---|---|---|
Space |
| |
Apostrophe or single quotation mark |
|
|
Double quotation mark |
|
|
Tilde |
|
|
Less than |
|
|
Greater than |
|
|
The query string field appears in the Live View toolbar by default, prefaced by the URL path used by Live View plus a question mark. The URL path, question mark, and the text entered into the field constitute the complete URL submitted to the testing server when you invoke or refresh Live View.
Note
Depending on the length of the pathname, some elements, such as folders, may be represented by an ellipsis (three dots) so that Dreamweaver can display the filename and question mark.
Consider an example that uses the query string. Suppose that you've developed a page for an organization that displays employees and whether they're under contract. The contract status shown depends on the link selected by the user; the links are identical except for the query string portion. For uncontracted employees, the link reads employees.cfm?contract=no, whereas for contracted employees, the link reads employees.cfm?contract=yes. The recordset on the employees.cfm page uses a filter that sets the Contract field equal to the URL parameter called contract.
Note
Although the query string field is present by default, you can disable it by switching the Method option in the HTTP Request Settings dialog box from Get to Post. To re-enable the query string field, choose View
After entering Live View by any of the methods described previously, you can switch back and forth between the two sets of returned data by changing the value in the query string name=value pair. In this instance, the two accepted values — as defined in the data source — are no for employees not under contract and yes for employees under contract. After changing the value and pressing Enter (Return), Live View is refreshed, as shown in Figure 21-6.

Figure 21-6. You can use the query string field of the Live View toolbar to test different scenarios for your Web application.
Warning
If you encounter a Live View error indicating that the page cannot be displayed because the current record could not be found, you're probably including values in the query string that do not match any records in a recordset on the page. You have a couple of options for proceeding. Press the Esc key to dismiss the error dialog box and enter a new value in the query string field. (Don't click the Close button on the dialog box, or you'll close the Live View and the Live View toolbar.) Alternatively, you can enter a name/value pair through the HTTP Request Settings dialog box as outlined in the following section.
Although the query string is handy for changing one or two simple variables, the more complex the variables, the less convenient it becomes. Dreamweaver offers another route to controlling Live View variables: Live View settings. The HTTP Request Settings dialog box, shown in Figure 21-7, offers several important advantages over the query string:
The name/value pairs are easier to enter and maintain in a straightforward two-column table.
URL encoding is handled automatically by Dreamweaver; with query strings. You have to enter any necessary URL encoding manually.
Variables may be sent to the application by either the
GetorPostmethod. The query string uses only theGetmethod.Variable settings may be optionally stored. If you select this option, Dreamweaver uses its Design Notes facility to maintain the variables.
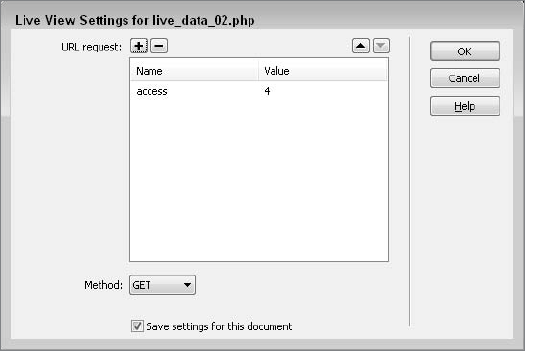
Figure 21-7. Invoke the HTTP Request Settings command to simulate forms using either the GET or POST method.
To establish variables using the HTTP Request Settings feature, follow these steps:
Choose View
To create a new variable, click the Add (+) button.
In the Name column, enter the name of the variable.
In the corresponding field under the Value column, enter a value for the variable.
Repeat Steps 2 through 4 to add additional variables.
To delete a name/value pair, select it and click the Remove (–) button.
You can adjust the sequence in which the variables are presented to the page by using the Up and Down buttons to move name/value pairs higher or lower in the list.
By default, Dreamweaver sends variables to a page using the
GETmethod, which appends URL-encoded name/value pairs in a query string. To simulate a form passing variables in an encapsulated, hidden manner, choosePOSTfrom the Method list.To store your variable settings, select the Save Settings For This Document option. Dreamweaver requires that Design Notes be enabled in order to save the Live View settings. If Design Notes is disabled when you select this option, you get an opportunity to enable it.
Changing HTTP Request Settings
In this Technique, you practice working with Live View settings, both in the dialog box and in the Live View query string field.
From the Techniques - Dynamic site (established in Chapter 17), expand the 21_Live_Data folder and open the
live_data_startfile for your server model.Before you can use the Live View settings to alter the preview, you need to know how the recordset is being filtered.
In the Bindings panel, double-click the Recordset (rsProperties) entry to reopen the associated dialog box.
Take note of the Filter section and you'll see that the recordset is filtered by the URL parameter
type.Click Cancel to close the recordset dialog box.
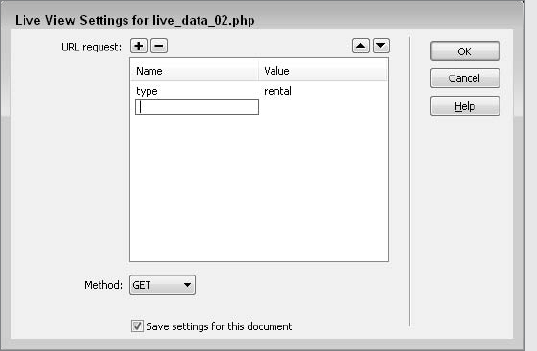
Now that you know what variable the recordset is filtered on, you can specify it in the Live View settings. Choose View
When the HTTP Request Settings dialog box opens, click Add (+) and in the Name column enter type and press Tab.
In the Value column, enter rental and click OK.
Choose View
Only the rental type records are displayed. Now, switch to a different set of records.
In the Live View Query String field, change the type value from rental to purchase so that the entire query string reads
type=purchase, and press Enter (Return).
Choose View
Although you can discover which parameters are used to filter the recordset, you can't uncover the expected values from within Dreamweaver. If they weren't provided for you as in this Technique, you'd need to examine the data source to see what values were expected and stored.
Live View saves a tremendous amount of time in the early design phase, yet when it comes time to test your application in various browsers — a necessary step for virtually all Web developers — there is no substitute for previewing in the browser. Dreamweaver does a decent job of approximating a browser's-eye view of your page. However, with so many variations between the major browsers — not to mention the versions within each major browser — you must test your page in as many browsers as possible. Dreamweaver's Preview In Browser feature enables you to specify up to 13 different browsers in Preferences. After this feature is defined, you can test your page by choosing File
To view Web applications properly, Dreamweaver must process the pages with a testing server. To use this facility, you must satisfy two requirements:
Specify the route to the testing server, either via a local (or networked) folder or through FTP in the Servers category of the Site Definition dialog box.
Transfer any dependent or related files to the testing server. Although you don't have to include dependent files such as graphics on the current page, you must transfer server-side includes, such as the connection script. Related files are other pages referenced in the Web application; Dreamweaver only uploads a copy of the current page during the Preview In Browser operation.
After the testing server is properly set up (as described in Chapter 5), you can transfer any necessary files quickly in the Site window. On the Site window toolbar, click the Testing Server button. The files on the testing server are displayed in the Testing Server pane of the Site window, as shown in Figure 21-8. Transfer files from the local site by dragging them from the local pane to the Testing Server pane or by selecting the files and then clicking the Put or Check In button.

Figure 21-8. The Dreamweaver Site window enables you to connect to the testing server or the remote server.
Tip
When you begin to test a new page, let Dreamweaver transfer the dependent files for you. Simply transfer a saved copy of the current page to the testing server and okay the request to transfer the dependent files as well. To take advantage of this feature, make sure that you select the Dependent Files: Prompt On Put/Check In option found in the Site category of Preferences.
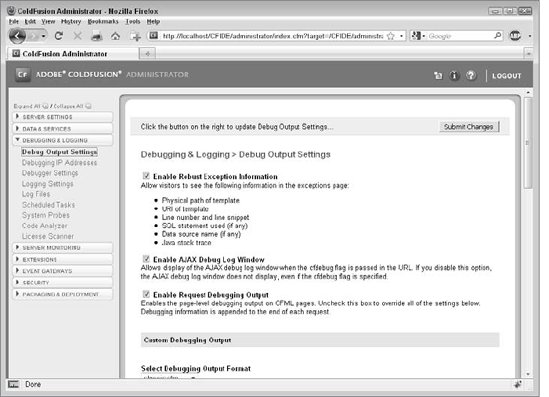
The Server Debug panel offers you an integrated view of all errors and server variables on your ColdFusion pages. The Server Debug view also gives you the capability to browse your site inside the Dreamweaver interface, testing values as you go.
To enable debugging directly inside Dreamweaver, follow these simple steps:
Enable server debugging by choosing Debugging & Logging
In Dreamweaver, choose View
Backward: Emulates the browser Back button and takes you to the previous page in your history.
Forward: Emulates the browser Forward button and takes you to the next page in your history.
Stop: Emulates the browser Stop button and stops the current page from processing.
Refresh: Emulates the browser Refresh button and reloads the current page.
It also includes an Address bar for passing query string values to your page and enabling you to see where you are in your site.
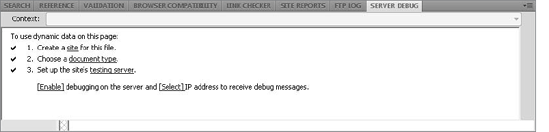
When you preview Live View, you can see all the Server Debug output (see Figure 21-10), and you can browse through your pages just as you would in a regular Web browser.
Open the Server Debug panel (see Figure 21-11) by choosing Window
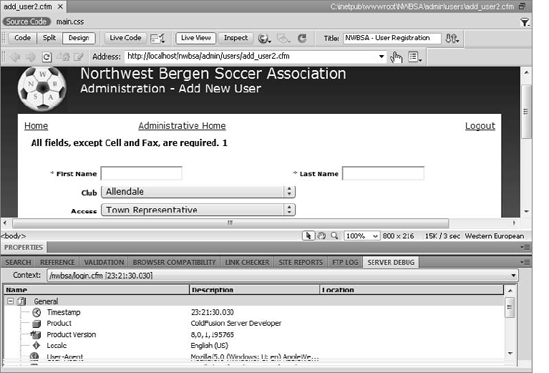
After you open the Server Debug panel, you can see all your variables, as well as any errors. Any exceptions provide a link to the page that is throwing the error. If that error was contained inside a <CFINCLUDE>, the URL for the page is a clickable link next to the error.
Tip
If you right-click inside the Server Debug panel, you can choose Select All and copy the contents of the panel by choosing Copy from the context menu. You can then paste it inside a new document — in Dreamweaver or another text editor — for future reference or to send to another ColdFusion developer for further debugging.
Sometimes, when an unusual idea appears in a software program, it's hard to separate the merely glitzy from the truly grand. As implemented in Dreamweaver, Live View proves to be very functional and, thus, more than a flash in the pan — although I have to admit, it's pretty darn cool as well. To make the most of Live View, remember the following points:
Live View depends on proper setup of the testing server to run dynamic pages smoothly. If any of the information entered into the Servers category of the Site Definition dialog box is incomplete or incorrect, Dreamweaver won't be able to process your Web application and display the results successfully.
The query string field and the Settings button in the Live View toolbar both offer developers a way to test their Web application with different variables. Use the query string field to emulate the passing of URL parameters and the Settings dialog box for
Post-enabled forms.To try different server environments, enter the appropriate code in the Initialization Script field of the Settings dialog box. This facility enables you to test different application variables, session variables, and other variables easily.
Be sure to use Dreamweaver's Preview In Browser feature to give your Web application a real-world tryout before going live. To test your page, transfer dependent and related files using the Site window from the local site to the testing server pane.
Use Dreamweaver's tight ColdFusion integration and the Server Debug panel to quickly debug your ColdFusion applications.
In the next chapter, you learn how to create multiple page applications.