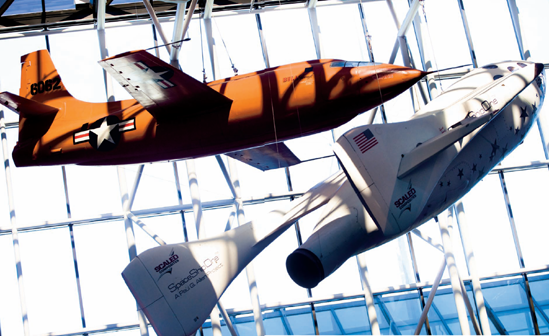
In the National Air and Space Museum, the Bell X-1, the first airplane to fly at the speed of sound, and SpaceShipOne, the first privately funded human-piloted aircraft to reach space. Visit www.chuckyeager.com and www.scaled.com for more information about these aircraft. Taken at ISO 800, f/4, 1/125 second.
The National Air and Space Museum is the world's most visited museum, according to the Smithsonian Institution. Its annual visitation regularly tops out around six million people, and with good reason: The museum is packed wall-to-wall with the largest collection of artifacts from air and space flight ever assembled in one place. If you're fascinated by flight, it's an absolute must-see.
Located on the south side of the National Mall between 7th St. SW and 4th St. SW, the Air and Space Museum at the National Mall has 22 exhibition galleries that cover over 160,000 square feet. You can see and learn a lot.
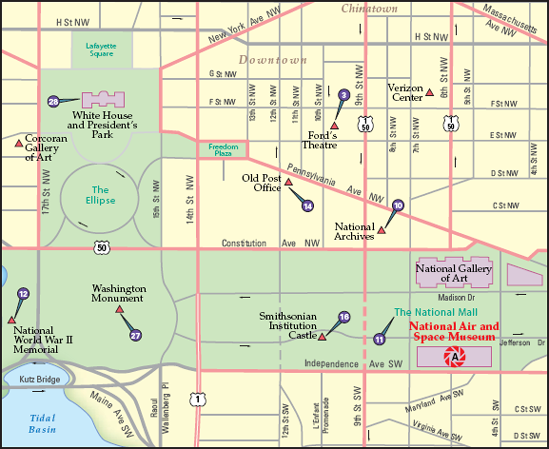
Figure 9.1. The best locations from which to photograph the National Air and Space Museum: (A) The museum's interior. Nearby photo ops: (3) Ford's Theatre, (10) National Archives, (11) National Mall, (12) National World War II Memorial, (14) Old Post Office, (16) Smithsonian Institution Castle, (27) Washington Monument, and (28) White House and President's Park.
Exhibits change at the Air and Space Museum, so the focus of this chapter is about techniques you can use to get better photos, rather than specific locations.
One of the main concepts of making good photos inside a museum is to minimize distractions in the photo by careful framing of your composition. A good technique is to use the concept of breaking the frame; this simply means you get close enough to the subject to let some of it go beyond the frame of the photograph. Showing a complete subject in the picture can look very static and, for lack of a better word, boring. By getting up close and letting some of the Lunar Module break the frame in Figure 9.1, I've enabled the viewer to feel more as if she were part of the subject, rather than a spectator.
The 1903 Wright Flyer is an example of an amazing sight to see that is rather hard to capture nicely in a photograph. Its svelte airframe is easy to lose in a photo because of its narrow and thin appearance; it's very easy to end up with a photo where you see straight through the main subject to the background.

Figure 9.2. The Apollo Lunar Module number two at the National Air and Space Museum at the National Mall. Taken at ISO 1600, f/4.5, 1/60 second with a 35mm lens.
Instead of trying to avoid background elements that are distracting, try to use the surroundings of such a challenging subject to your advantage with careful composition. Don't immediately start taking a photo when you first walk up to it. Take a walk around the object and see what lines up where. Look for a background that is complementary to the subject as well as a camera angle that enhances its shape and form. You want to see everything first — background, foreground, the subject's form, and lighting. In the case of Figure 9.2, the historic buildings and darker background help to create a scene as well as offset the brightly lit flyer from its background.
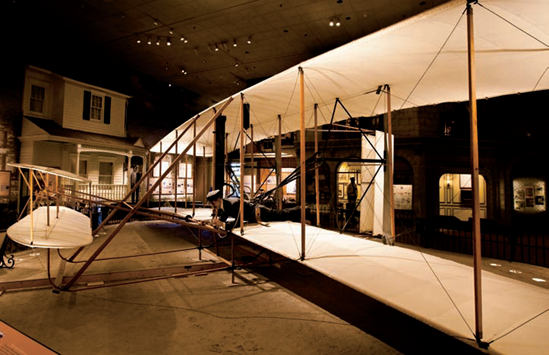
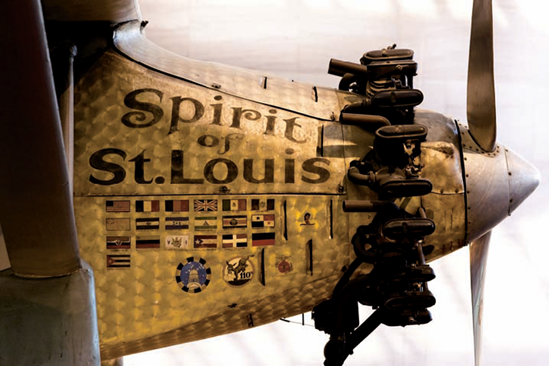
Figure 9.3. Orville and Wilbur Wright's 1903 Wright Flyer, taken at its temporary location inside The Wright Brothers and The Invention of the Aerial Age exhibit. Taken at ISO 3200, f/4, 1/30 second with a 20mm lens.
Although it may be possible to get a photo of the entire subject, focusing on unique details of the subject can often be a much more powerful way to understand it in a photograph.
Getting in close by either walking up next to the object or using a zoom lens can help you get detail shots that tell a great story. In Figure 9.3, Charles Lindbergh's Spirit of St. Louis is represented with an image of its hand-painted text and flags on its engine cowling.
The plane is on view under the Air and Space Museum's glass roof, which lets in a lot of light. The glass roof helps with getting good photos since you can use lower ISO values and the light is more even than artificial lighting. There are also simpler backgrounds in these areas, which make for cleaner photos.
The common hallmark of a good photo is a strong emphasis on a main subject. Unfortunately, emphasizing the main subject is not always possible to do in the crowded confines of a museum. When presented with a busy, complicated scene, you often have two choices: Find detail shots that can represent the space, or walk around and try to find a composition that captures the entirety of the space in a graceful way.
At the America by Air exhibit shown in Figure 9.4, you can see the enormity of just one room of the Air and Space Museum, and all the objects within the frame are composed in such a way that they grace each other's presence. Finding a visual rhythm and some harmony within disparate elements is your goal. It's not always possible, but when it is, you'll get a much more pleasing photo to show off.
Lighting in museums is specialized for your human eye, not for cameras. Although the exhibits will look stunning to your eye, the results are often far from spectacular when you try to record them with a photo. Artificial spotlights create light that is very high in contrast, meaning some areas go very dark while other areas become very bright on the subject. Mixed types of light bulbs produce a variety of different colors of light, which is rarely appealing photographically. Finally, the light levels are so low that you're often forced to use very high ISO values, slow shutter speeds, and low aperture values.
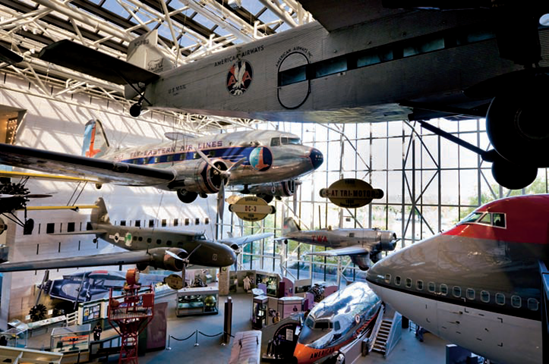
Figure 9.5. The America by Air exhibit at the Air and Space Museum. Taken at ISO 2000, f/6.3, 1/40 second with a 20mm lens.
So, what do you do? Instead of taking photos in areas where the light is problematic, keep an eye out for where you can use the light to your advantage. Compose your images to take advantage of the light that you think may work well for a photo. Pools of natural light coming from a window are always good.
If you're in a room that is lit entirely by artificial spotlights, work on finding a spot where the light works with the subject rather than against it. The lights are often set in such a way that when you stand in the normal viewing area, you can see the subject illuminated in a standard way: from the top down. But what happens if you stand somewhere else, such as down low or off to the side? Try to find a vantage point where the subject is lit in an interesting way, as in figures 9.5 and 9.6 — it will help make your photos captivating.
Don't assume that you have to always keep your camera perfectly straight while photographing something. Lines that crisscross the frame, rather than go straight through it, add interest to what would be a very static looking picture in Figure 9.7.
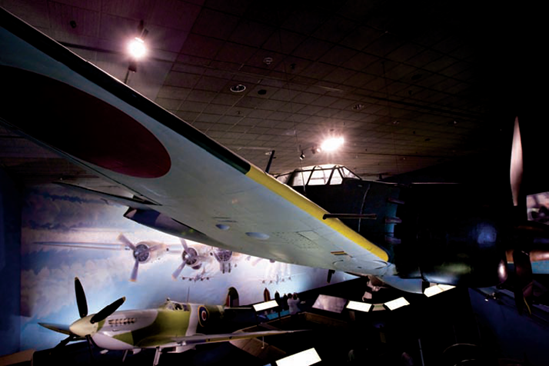
Figure 9.6. Using light behind the subject for a more dramatic effect: A Mitsubishi A6M5 Zero (above) and a Supermarine Spitfire F.Mk.VII in the World War II Gallery at the National Air and Space Museum. Taken at ISO 3200, f/4, 1/40 second with a 20mm lens.
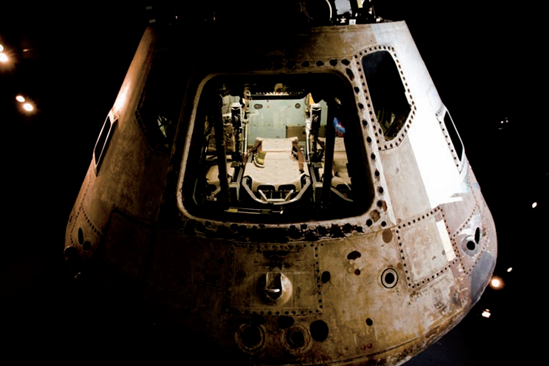
Figure 9.7. Using an area of natural light with artificial light creates a dramatic scene: The Skylab 4 Command Module in the Apollo to the Moon exhibit at the National Air and Space Museum. Taken at ISO 2000, f/4.5, 1/50 second with a 20mm lens
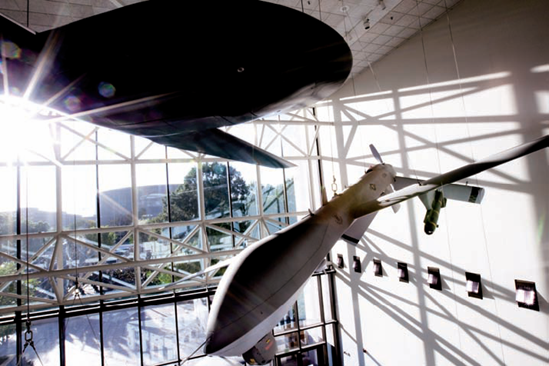
Figure 9.8. A Lockheed Martin/Boeing RQ-3A DarkStar (left) and a General Atomics Aeronautical Systems, Inc. MQ-1L Predator A in the Military Unmanned Aerial Vehicles exhibit at the National Air and Space Museum. Taken at ISO 800, f/20, 1/30 second with a 20mm lens.
Rotating your camera can often work well to help the composition of your photo be more dynamic, as shown in Figure 9.8.
Taking good photographs inside of any museum, however, is often rather difficult for several reasons. Light levels are usually very low. Objects are often behind transparent plastic walls, which usually reflect either the photographer's image, the light from your flash, or both. It's usually tough to get a clean shot of something without extraneous things in the frame. You are often limited in the locations you can shoot from. And there are usually lots of people surrounding the objects. All told, good museum photography is tough.
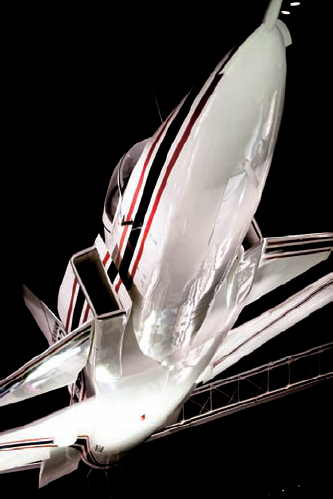
Figure 9.9. A mockup Grumman X-29 in the Beyond the Limits exhibit at the National Air and Space Museum. Taken at ISO 1600, f/2.8, 1/100 second with a 120mm lens.
Forgo the tripod and bring a few extra lenses to the Air and Space Museum.
Lens choices at the Air and Space Museum often run the entire range from very wide to long focal lengths, and most everything in between. Keep in mind that with longer focal length lenses, you need to be careful not to shake your camera — select a shutter speed that is somewhat close to the rule of one over your lens' focal length to minimize camera movement. If you are using a dSLR, hold the very end of the lens to stabilize it. If the lens has a hood, be sure to use it; it will lengthen the lens and, therefore, let you hold the lens even more steadily.
When going over your images using image-editing software, using a software-based graduated filter (which both darkens areas like a graduated neutral density filter as well as lightens them in a similar manner) in addition to traditional dodging and burning techniques can help eliminate distractions in the images from high-contrast artificial lighting and other less-than-ideal lighting situations.
Because museums are often lit with a variety of lighting methods, getting a good exposure can be a little more difficult. Your camera's meter may miss the bright spots of an image and overexpose them, or it may read the abundant natural light in one of the sunlit exhibits and underexpose the subject you're actually trying to photograph. This is a good time to use your camera's exposure compensation feature. Often you have to over or underexpose scenes by one to two stops to get the right exposure on your subject.
Your camera's on-board flash is typically not very powerful, so if you are in a dark room photographing a large subject, it will only illuminate a part of it — which is not very flattering. Also, you are often too far away from things for your flash to really make a difference. And, if there's any transparent plastic surrounding the object, the flash will reflect on the plastic. All in all, you want to keep your flash off for the vast majority of pictures in a museum. If you do want to use a flash, using an accessory flash with a cord that lets you shoot with it off-camera is a good move, although this step gets into somewhat advanced territory of balancing existing light with flash.
When you use wide lenses, keep in mind that you don't need as high an aperture value to keep everything in focus as you do with longer focal-length lenses. For example, whereas you may need to use f/8 to ensure you get most of a subject in focus with a 200mm lens, when using a 24mm lens you can often get away with a lower aperture value of f/4 and still maintain a good depth of field. Using a smaller aperture value is helpful when shooting in low-light areas of a museum so that your camera lets in more light. Also, you want to err your focusing towards the front of the subject, because you get more depth beyond the focus point than you do in the front of it.
Using your camera's Auto white balance function can be a savior here, because there are mixed kinds of lighting. Shooting in RAW mode lets you adjust color balance after the fact as well.
Because all the exhibits are indoors here, there are photography opportunities year-round. Just try to visit in the morning or in the off-season to avoid large crowds.
Because the Air and Space Museum is the most visited museum in the world, getting here early is a wise move to avoid the crowds. (Averaged out among the 364 days the museum is open, there are roughly 16,500 people visiting per day.) Although less light may be coming from the glass roofs, the brightness inside will still be adequate and it's much easier to photograph things here with fewer people around.
Overcast days are actually pretty good times to photograph the big exhibits under the glass roof areas here because the light is more even throughout the space.
The Air and Space Museum is open from 10 a.m. to 5:30 p.m., so night photographs are not options here.
Beyond the techniques I outline earlier, blurring out distracting background elements can help your museum photos. You can do this by using image-editing software, although too much of the effect can cause a very unnatural (and therefore distracting) look to a photograph.
Finally, don't limit yourself to getting photographs of the entire exhibits as they look to the eye. There have been artistic renditions of the airplanes by photographers using slow shutter speeds and moving the camera, which makes the planes look as if they are in motion. Or, in addition to the photos you take of the exhibits, you can concentrate on details of the many different things on display, such as geometric shapes or color.