
As in life, so in VBA: At times, you may want to repeat an action to achieve a certain effect. Sometimes, you'll want to repeat an action a predetermined number of times: break six eggs to make an omelet, or create six new documents based on a certain template.
More often, you'll want to repeat an action until a certain condition is met: buy two lottery tickets a week until you hit it big, or repeat an action for every instance of a value that appears in an Excel spreadsheet. In these cases, you won't know when you'll triumph against the wretched odds of the lottery, and you won't know how many instances of the value will appear in the spreadsheet—you'll just carry on until the condition is met.
In VBA, you use loops to repeat actions. By using loops, you can transform a simple recorded macro into one that repeats itself as appropriate for the material it's working on. VBA provides a number of expressions for creating loops in your code. In this chapter, you'll learn about the different types of loops and typical uses for each.
In this chapter you will learn to do the following:
Understand when to use loops
Use
For... loops for fixed repetitionsUse
Do... loops for variable numbers of repetitionsNest one loop within another loop
Avoid infinite loops
To repeat an action or a series of actions in VBA, you could record the repetition itself into a macro by using the Macro Recorder (if the application you're using supports the Macro Recorder—only Word and Excel do). Or you could copy some code and paste it multiple times to repeat the behavior. For example, you could record a macro containing the code for creating a new Word document based on the default template, open the macro in the Visual Basic Editor, and then copy the new-document code and paste it five times to create a procedure that makes six new documents.
It's almost always much better, however, to just write a loop structure to repeat the commands as necessary.
Loops have several straightforward advantages over simple repetition of code:
Your procedures are shorter—they contain less code and fewer instructions—and are easier to maintain.
Your procedures are more flexible: instead of hard-coding the number of repetitions, you can vary the number as necessary. (Hard-coding means writing fixed code as opposed to variable code, such as Create 6 new documents versus Create x number of new documents, thereby allowing the user or the code to supply the value of x.)
Your procedures are easier to test, debug, and modify, particularly for people other than you.
That said, if you just need to repeat one or more actions two or three times in a procedure and that procedure will always need to repeat the action the same number of times, there's nothing wrong with hard-coding the procedure by repeating the code. It'll work fine, it's easy to do, and you won't have to spend time with the logic of loops. The code will likely be longer and a tad harder to maintain, but that's no big deal as long as it works.
In VBA, a loop is a structure that repeats a number of statements, looping back to the beginning of the structure once it has finished executing them. Each cycle of execution of a loop is called an iteration.
There are two basic categories of loops:
Fixed-iteration loops repeat a set number of times.
Indefinite loops repeat a flexible number of times.
The execution of either type of loop is controlled by the loop invariant, also called the loop determinant. This can be either a numeric expression or a logical expression. Fixed-iteration loops typically use numeric expressions, whereas indefinite loops typically use logical expressions. For example, a fixed-iteration loop might specify that the loop will iterate five times, while an indefinite loop might continue iterating until the end of a document is reached.
Table 12.1 explains the types of loops that VBA provides.
Table 12.1. VBA's loop types
Loop | Type | Explanation |
|---|---|---|
| Fixed | Repeats an action or a sequence of actions a given number of times. |
| Fixed | Repeats an action or a sequence of actions once for each object in a VBA collection. |
| Indefinite | Performs an action or a sequence of actions if a condition is |
| Indefinite | Performs an action or a sequence of actions if a condition is |
| Indefinite | Performs an action or sequence of actions while a condition is |
| Indefinite | Performs an action or a sequence of actions once and then repeats it while a condition is |
| Indefinite | Performs an action or a sequence of actions once and repeats it while a condition is |
For... loops execute for a fixed number of times. For... Next loops repeat for a number of times of your choosing, while For Each... Next loops execute once for each element in the specified VBA collection.
For... Next loops repeat an action or a sequence of actions a given number of times, specified by a counter variable. The counter variable can be hard-coded into the procedure, passed from an input box or dialog box, or passed from a value generated either by a different part of the procedure or by a different procedure.
The syntax for For... Next loops is as follows:
Forcounter=start To end[Stepstepsize] [statements] [Exit For] [statements] Next [counter]
Table 12.2 explains the components of the syntax. As usual, brackets enclose optional items and italicized words are placeholders, elements in the code that are to be replaced by the programmer.
Table 12.2. Components of the syntax for a For... Next loop
Component | Description |
|---|---|
| A numeric variable or an expression that produces a number. By default, VBA increases the |
| A numeric variable or numeric expression giving the starting value for |
| A numeric variable or numeric expression giving the ending value for |
| A numeric variable or numeric expression specifying how much to increase or decrease the value of |
| A statement for exiting a |
| The keyword indicating the end of the loop. Again, you can specify the optional |
Here's what happens in a For... Next loop:
When VBA enters the loop at the
Forstatement, it assigns thestartvalue tocounter. It then executes the statements in the loop. When it reaches theNextstatement, it incrementscounterby 1 or by the specifiedstepsizeand loops back to theForstatement.VBA then checks the
countervariable against theendvariable. Whenstepsizeis positive, ifcounteris greater thanend, VBA terminates the loop and continues execution of the procedure with the statement immediately after theNextstatement (which could be any action or the end of the procedure). Ifcounteris less than or equal toend, VBA repeats the statements in the loop, increasescounterby 1 or bystepsize, and loops back to theForstatement again. (For a loop in whichstepsizeis negative, the loop continues whilecounteris greater than or equal toendand ends whencounteris equal to or less thanend. In other words, when thestepsizeis negative, the loop counts down rather than up.)The
Exit Forstatement exits theForloop early. You'll look at how to use theExit Forstatement, and examples of the different uses ofFor... Nextloops, later in this chapter.
In a straightforward For... Next loop, you first specify a counter variable and the starting and ending values for it:
Dim i As Integer
For i = 1 to 200
Here, i is the counter variable, 1 is the starting value, and 200 is the ending value. Because VBA by default increases the counter variable by 1 with each iteration of the loop, the counter variable in this example will count 1, 2, 3, and so on up to 200. Once the loop iterates enough times so the value in counter is 201, the looping ends and execution continues in the line below the loop's End statement.
You can also use the Step keyword to specify a different increment, either positive or negative; more on this in the next section.
After the previous two statements (Dim and For), you specify whatever actions you want carried out within the loop, followed by the Next keyword to end the loop:
Application.StatusBar = _
    "Please wait while Excel checks for nonuniform prices: " & i & "..."
Next i
This code displays (on the status bar) Excel's progress in checking your spreadsheet for improbable values.
As another example, say you need to check every paragraph in Word documents you receive from contributors to make sure there's no unsuitable formatting. By using a loop that runs from 1 to the number of paragraphs in the active document, you can check each paragraph in turn and let the user view the progress in the status bar. The number of paragraphs in a document is stored in the Count property of the Paragraphs collection in the ActiveDocument object:
Dim i As Integer
For i = 1 To ActiveDocument.Paragraphs.Count

    'CheckParagraphForIllegalFormatting
DoEvents
Application.StatusBar = _
"Please wait while Word checks the formatting in " _
& " this document: Paragraph " & i & " out of " _
& ActiveDocument.Paragraphs.Count & "..."
Selection.MoveDown Unit:=wdParagraph, _
Count:=1, Extend:=wdMove
Next iThis code snippet executes a CheckParagraphForIllegalFormatting procedure. We've not yet written this procedure, so we just insert a comment indicating that it needs to be called from inside this loop.
Next we use the DoEvents command. This allows multitasking. It interrupts the loop to see if something else is going on in the computer (the user typing something, the status bar in Word being updated, or whatever). This prevents your loop from hogging the computer's microprocessor.
Then the loop continues executing. The message is displayed in the status bar, indicating which paragraph out of the total number it's working on, and then the loop moves down a paragraph. When VBA reaches the Next statement, it increases the i counter by the default value, 1 (because no stepsize variable is specified in the For statement) and loops back to the For statement, where it compares the value of i to the value of ActiveDocument.Paragraphs.Count. The procedure continues to loop until i has reached the value of ActiveDocument.Paragraphs.Count, which is the final iteration of the loop. Notice here how the counter variable is used twice: first to keep track of the loop's iterations, but it's also used within the loop to display the current paragraph number: Paragraph " & i &
In a similar way you could use a simple For... Next loop to quickly build the structure of a timesheet or work log in Excel. The following statements use a For... Next loop to insert the labels 1.00 through 24:00 in the current column in the active sheet of the active workbook:
Dim i As Integer
For i = 1 To 24
    ActiveCell.FormulaR1C1 = i & ":00"
    ActiveCell.Offset(RowOffset:=1, ColumnOffset:=0).Select
Next i
Here, the ActiveCell.FormulaR1Ci statement inserts the automatically increased string for the counter—i—together with a colon and two zeroes (to create a time format). The ActiveCell.Offset(RowOffset:=1, ColumnOffset:=0).Select statement selects the cell in the next row and the same column. The loop runs from i = 1 to i = 24 and stops when the automatic increase takes i to 25. Again, the counter variable is used within the loop. This is quite common.
If increasing the counter variable by the default 1 doesn't suit your purpose, you can use the Step keyword to specify a different increment or decrement. For example, the following statement increases the counter variable by 20, so the sequence is 0, 20, 40, 60, 80, 100:
For i = 0 to 100 Step 20
You can also decrement by specifying a negative Step value:
For i = 1000 to 0 Step -100
This statement produces the sequence 1000, 900, 800, and so on, down to 0.
Instead of the "x out of y" countdown given in the example in the previous section, you could produce a countdown running from ActiveDocument.Paragraphs.Count to zero:
Dim i As Integer
For i = ActiveDocument.Paragraphs.Count To 0 Step -1
    CheckParagraphForIllegalFormatting
    Application.StatusBar = _
        "Please wait while Word checks the formatting in this document: " & i
    Selection.MoveDown Unit:=wdParagraph, Count:=1, Extend:=wdMove
Next iSometimes you'll be able to hard-code the number of iterations into a For... Next loop. You'll know the number of iterations when writing your code, so you can just type in the End number, like the 100 here:
For i = 0 to 100
Other times though, you can't know in advance how many loop iterations are needed. This information only becomes available during program execution (called runtime) rather than when you're writing the code (called design time).
Often you'll take a number from another operation during execution, such as the ActiveDocument.Paragraphs.Count property in the previous example. To be useful, that example must work with documents of various sizes, so during design time you can't specify the number of paragraphs to loop through.
Or frequently you'll ask for user input to specify the number of loop repetitions. The easiest way of doing this is to have the user enter the value into an input box.
For example, Listing 12.1 contains a simple procedure named CreatePresentations that displays an input box prompting users to enter the number of presentations they want to create. It then uses a For... Next loop to create the documents in PowerPoint.
Example 12.1. Letting the user specify the number of iterations
1.  Sub CreatePresentations()
2.      Dim intPresentations As Integer
3.      Dim i As Integer
4.      intPresentations = InputBox _
            ("Enter the number of presentations to create:", _
            "Create Presentations")
5.      For i = 1 To intPresentations
6.          Presentations.Add
7.      Next i
8.  End Sub
Here's what happens in the CreatePresentations procedure in Listing 12.1:
Line 2 declares the Integer variable
intPresentations, and line 3 declares the Integer variablei.Line 4 displays an input box prompting users to enter the number of presentations they want to create.
Lines 5 through 7 contain a
For... Nextloop that runs fromi = 1toi = intPresentationswith the default increment of1per iteration. Each iteration of the loop executes thePresentations.Addstatement in line 6, creating a new presentation based on the default template.
Control a For...Next Loop with User Input via a Dialog Box
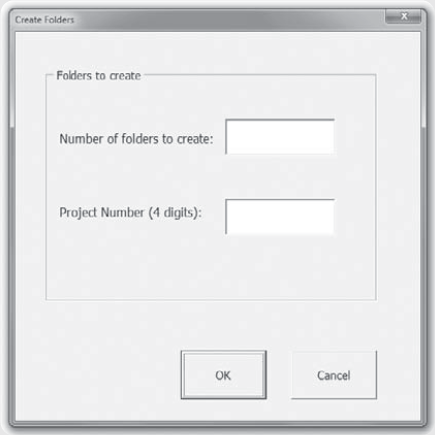
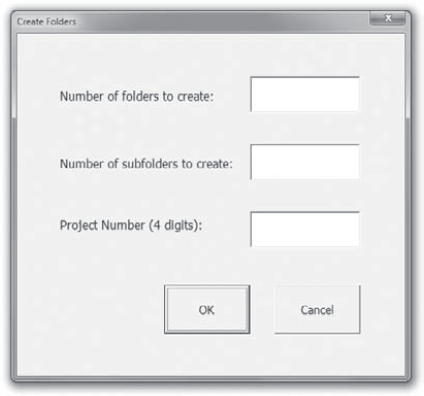
An input box returns only a single value. Sometimes you need multiple values from the user, so for those occasions when an input box won't suffice, you can easily get input from a dialog box to drive a For... Next loop. This book hasn't yet shown you how to create dialog boxes, but in this section you'll get a sneak preview by looking at a procedure named Create_Folders. You aren't expected to build and test this example; just read the code to get an idea of how it accepts user input and then employs that information in the loop.
This procedure reduces the tedium of creating multiple folders with predictable names, such as when I had to create 31 folders, a folder for each chapter in this book.
Say that you're using a four-digit number to identify the project, the letter s for section, and a two-digit number to identify the section. So you'd end up with folders named 1234s01, 1234s02, 1234s03, and so on—simple enough to create manually, but very boring if you need more than a dozen or so.
In its simplest form, this dialog box would provide a text box for the number of folders to be created (though you could also use a drop-down list for this, or even a spinner control) and a text box for the project number. The following illustration is an example of how this dialog box might look.
You display a dialog box by using the Show method in separate macro, perhaps using a Load statement first, like this:
Sub makefolders()

      Dialogs(wdDialogFileSaveAs).Show

      Load frmCreateFolders

      frmCreateFolders.Show

End Sub
You might have noticed the Dialogs command in this code. It's quite useful, but we'll discuss it at the end of this section. For now, our focus is on looping techniques.
I named the example dialog box frmCreateFolders. However, any valid VBA name will work. The first text box—identified with the Number Of Folders To Create label—is named txtFolders; the second text box is named txtProjectNumber.
The Cancel button here has an End statement attached to its Click event so that if the user clicks it, VBA ends the procedure:
Private Sub cmdCancel_Click()
    End
End Sub
The OK button in the dialog box has the following code attached to its Click event:
1.  Private Sub cmdOK_Click()
 2.
 3.      Dim strMsg As String
 4.      Dim strFolder As String
 5.      Dim i As Integer
 6.
 7.      frmCreateFolders.Hide
 8.      Unload frmCreateFolders
 9.      strMsg = "The Create_Folders procedure has created " _
             & "the following folders: " & vbCr & vbCr
10.
11.      For i = 1 To txtFolders.Value
12.          strFolder = txtProjectNumber.Value & "p" & Format(i, "0#")
13.          MkDir strFolder
14.          strMsg = strMsg & "    " & strFolder & vbCr
15.      Next i
16.
17.      MsgBox strMsg, vbOKOnly + vbInformation, _
             "Create Folders"
18.
19.  End Sub
Note that the Value properties of the two textboxes are used in this loop. The value in txtFolders specifies the loop's number of iterations. The txtProjectNumber specifies the first part of the name for each newly created folder.
The cmdOK_Click procedure runs when the user clicks the OK button in the dialog box:
Line 1 declares the
cmdOK_Clicksubroutine, and line 19 ends it. Line 2 is a spacer.Line 3 declares the String variable
strMsg, which is used to contain a string to display in a message box at the end of the procedure.Line 4 declares the String variable
strFolder, which will contain the name of the current folder to create in each iteration of the loop.Line 5 declares the Integer variable
i, which will be thecountervariable for theFor... Nextloop.Line 6 is a spacer.
Line 7 hides
frmCreateFolders.Line 8 unloads
frmCreateFoldersfrom memory.Line 9 assigns some introductory text to
strMsg, ending it with a colon and twovbCrcarriage-return characters to make the start of a list.Line 10 is a spacer.
Lines 11 through 15 contain the
For... Nextloop that creates the folders. Line 11 causes the loop to run fromi = 1toi = txtFolders.Value, the value supplied by the user in the Number Of Folders To Create text box. Line 12 assigns to thestrFolderString variable theValueproperty of thetxtProjectNumbertext box, the letter p, and the value ofiformatted via theFormatfunction to include a leading zero if it's a single digit (so that 1 will appear as 01, and so on). Line 13 uses theMkDircommand withstrFolderto create a folder (that is, make a directory—the old DOS commandmkdirlives on in VBA) of that name. Line 14 adds some spaces (for an indent), the contents ofstrFolder, and avbCrcharacter tostrMsg. Line 15 then loops back to theForstatement, incrementing theicounter. VBA then compares theicounter totxtFolders.Valueand repeats the loop as necessary.
This procedure creates a set of new subfolders within whatever is the current folder, without giving the user a choice of location. Chances are you won't want to do this in real-life situations. You might want to change a folder to a set location (so as to keep all the project files together), but more likely you'll want to let the user choose a suitable location—for example, by displaying a common dialog box, such as the Save As dialog box used by most Windows applications. These built-in dialog boxes can be very useful because everyone who uses Windows is familiar with them and because they contain quite a bit of functionality. You display, for example, the classic Windows SaveAs dialog box like this:
Dialogs(wdDialogFileSaveAs).Show
When the user closes this dialog box, whatever folder the user specifies becomes the current folder and the document is automatically saved. You can find out more about how to use common dialog boxes in Chapter 14 and also at this Microsoft web page:
http://msdn.microsoft.com/en-us/library/bb208857.aspx
I wanted you to be aware that common dialog boxes exist, but in this example, perhaps a more direct way of allowing the user to specify the path for the new directories would be to use the ChDir (change directory) command, like this:
Dim strDir As String

strDir = InputBox("Type the full path where you want new folders to be stored")

ChDir (strDir)The For Each... Next loop, which is unique to Visual Basic, is similar to the For... Next loop. With For Each, however, the iterations are based on the number of objects in a collection, such as the Slides collection in a presentation or the Documents collection of Word documents. So, using For Each means that you, the programmer, don't necessarily know the number of loop iterations in advance, but VBA will know during execution because it can query an object's Count property.
For example, you can choose to take an action for each Slide object in a presentation. During design time you don't need to know how many slides are in the collection, provided there is at least one. (If there are none, nothing happens.)
The syntax for the For Each... Next statement is straightforward:
For EachobjectIncollection[statements] [Exit For] [statements] Next [object]
VBA starts by evaluating the number of objects in the specified collection. It then executes the statements in the loop for the first of those objects. When it reaches the Next keyword, it loops back to the For Each line, reevaluates the number of objects, and performs further iterations as appropriate.
Here's an example: The Documents collection contains the open documents in Word. So you could create a straightforward procedure to close all the open documents by using a For Each... Next loop like this:
Dim Doc As DocumentFor EachDoc in Documents Doc.Close SaveChanges:=wdSaveChangesNext
VBA closes each open document in turn by using the Close method. The statement uses the wdSaveChanges constant for the SaveChanges argument to specify that any unsaved changes in the document be saved when the document is closed. As long as there are open documents in the Documents collection, VBA repeats the loop, so it closes all open documents and then terminates the procedure.
This example provides a straightforward illustration of how a For Each... Next loop works, but you probably wouldn't want to use the example in practice. Instead, you'd probably use the Close method with the Documents collection (which contains all the open documents) to close all the open documents more simply. However, you might use a For Each... Next loop to check each document for certain characteristics before closing it.
As you saw earlier in this chapter when looking at the syntax for For statements, you can use one or more Exit For statements to exit a For loop if a certain condition is met. Exit For statements are optional and are seldom necessary. If you find yourself needing to use Exit For statements in all your procedures, there's probably something wrong with the way you're constructing your loops. That said, you may sometimes find Exit For statements useful—for example, to respond to an error that happens within a loop or if the user chooses to cancel a procedure.
On those occasions when you do need Exit For statements to exit a loop early, you'll typically use them with straightforward conditions. For example, in Word, if you wanted to close open windows until you reached a certain document that you knew to be open, you could use an Exit For statement like this:
Dim Doc As Document
For Each Doc in Documents
    If Doc.Name = "Document1" Then Exit For
    Doc.Close
Next Doc
This For Each... Next statement checks the Name property of the document to see if it's Document1; if it is, the Exit For statement causes VBA to exit the loop. Otherwise, VBA closes the document and returns to the start of the loop.
Do loops give you more flexibility than For loops in that you can test for conditions in them and direct the flow of the procedure accordingly. VBA includes several types of Do loops:
Do While... LoopDo... Loop WhileDo Until... LoopDo... Loop Until
These loops break down into two categories:
Loops that test a condition at the start of the loop, before executing any of the statements contained inside the loop.
Do While... LoopandDo Until... Looploops fall into this category. In other words, if the test fails, the loop's contained statements will not execute even once.Loops that test a condition at the end of the loop. This type of loop executes its contained statements before testing a condition.
Do... Loop WhileandDo... Loop Untilfall into this category. This type of loop will execute at least one time.
The difference between the two types of loop in each category is that each While loop repeats itself while a condition is True (until the condition becomes False), whereas each Until loop repeats itself until a condition becomes True (while the condition remains False). This means that you can get by to some extent using only the While loops or only the Until loops—you'll just need to set up some of your conditions the other way around. For example, you could use a Do While... Loop loop with a condition of x < 100 or a Do Until... Loop loop with a condition of x = 100 to achieve the same effect.
The following sections describe all the different kinds of Do loops so that you can know when to use each.
In a Do While... Loop loop, you specify a condition that has to remain True for the actions in the loop to be executed. If the condition isn't True, the actions aren't executed and the loop ends. For example, you might want to search a document for an instance of a particular word or phrase and take action after you find it. Figure 12.1 shows a Do While... Loop loop.
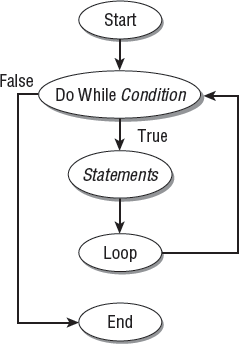
Figure 12.1. A Do While... Loop loop tests for a condition before performing the actions contained in the loop.
The syntax for the Do While... Loop loop is straightforward:
Do Whilecondition[statements] [Exit Do] [statements] Loop
While the condition is met (Do While), the statements in the loop are executed. The Loop keyword returns execution to the Do While line, which is then reevaluated. If the condition remains True, the loop continues. If the condition is False, execution continues below the loop structure, with the statement on the line after the Loop keyword. You can use one or more Exit Do statements to break out of the loop as necessary.
Say you wanted to construct a glossary from a long Word document that used italic to highlight the main terms. These terms are located both in the body text as well as within bulleted or numbered lists. However, you want to avoid picking up italic used in other elements (such as headings or captions). You could command Word to search for Times New Roman text with the italic attribute. If Word found instances of the text, it would take the appropriate actions, such as selecting the sentence containing the term, together with the next sentence (or the rest of the paragraph), and copying it to the end of another document. Then it would continue the search, performing the loop until it no longer found instances of italic Times New Roman text.
Listing 12.2 shows an example of how such a procedure might be constructed with a Do While... Loop structure. This listing includes a number of commands that you haven't met yet, but you should easily be able to see how the loop works.
Example 12.2. Understanding how Do While works
1.  Sub GenerateGlossary()
 2.
 3.      Dim strSource As String
 4.      Dim strDestination As String
 5.      Dim strGlossaryName As String
 6.
 7.      strSource = ActiveWindow.Caption
 8.      strGlossaryName = InputBox _
             ("Enter the name for the glossary document.", _
             "Create Glossary")
 9.      If strGlossaryName = "" Then End
10.
11.      Documents.Add
12.      ActiveDocument.SaveAs FileName:=strGlossaryName, _
             FileFormat:=wdFormatDocument
13.      strDestination = ActiveWindow.Caption
14.      Windows(strSource).Activate
15.
16.      Selection.HomeKey Unit:=wdStory
17.      Selection.Find.ClearFormatting
18.      Selection.Find.Font.Italic = True
19.      Selection.Find.Font.Name = "Times New Roman"
20.      Selection.Find.Text = ""
21.      Selection.Find.Execute
22.
23.      Do While Selection.Find.Found
24.          Selection.Copy
25.          Selection.MoveRight Unit:=wdCharacter, _
                 Count:=1, Extend:=wdMove
26.          Windows(strDestination).Activate
27.          Selection.EndKey Unit:=wdStory
28.          Selection.Paste
29.          Selection.TypeParagraph
30.          Windows(strSource).Activate
31.          Selection.Find.Execute
32. Loop
33.
34. Windows(strDestination).Activate
35. ActiveDocument.Save
36. ActiveDocument.Close
37.
38. End SubThe GenerateGlossary procedure in Listing 12.2 pulls italic items in the Times New Roman font from the current document and inserts them in a new document that it creates and saves. Here's what happens:
Line 1 begins the procedure, and line 2 is a spacer.
Lines 3, 4, and 5 declare the String variables
strSource, strDestination, andstrGlossaryName, respectively. Line 6 is a spacer.Line 7 assigns the
Captionproperty of the active window to the String variablestrSource. The procedure uses this variable to activate the document when it needs to work with it.Line 8 displays an input box asking the user to enter a name for the document that will contain the glossary entries pulled from the current document. It stores the string the user enters in the String variable
strGlossaryName.Line 9 then compares
strGlossaryNameto an empty string ("") to make sure the user hasn't clicked the Cancel button to cancel the procedure or clicked the OK button in the input box without entering a name in the text box. IfGlossaryNameis an empty string, line 9 uses anEndstatement to terminate execution of the procedure.Provided line 9 hasn't stopped the procedure in its tracks, the procedure rolls on. Line 10 is a spacer. Line 11 then creates a new blank document. (This document is based on the
Normal.dotmglobal template because noTemplateargument is used to specify a different template.) This document will become the glossary document.Line 12 saves the document with the name the user specified in the input box.
Line 13 stores the
Captionproperty of this document in thestrDestinationvariable, again making it available to activate this document as necessary throughout the procedure. You now have the source document identified by thestrSourcevariable and the destination document identified by thestrDestinationvariable.Line 14 uses the
Activatemethod to activate thestrSourcewindow. Line 15 is a spacer.Line 16 uses the
HomeKeymethod of theSelectionobject with thewdStoryunit to move the insertion point to the beginning of the document, which is where the procedure needs to start working to catch all the italicized words in Times New Roman.Lines 17 through 20 detail the Find operation the procedure needs to perform: Line 17 removes any formatting applied to the current
Finditem, line 18 sets theFindfeature to find italic formatting, line 19 sets Find to find Times New Roman text, and line 20 specifies the search string, which is an empty string ("") that causes Find to search only for the specified formatting.Line 21 then performs the Find operation by using the
Executemethod. Line 22 is a spacer.Lines 23 through 32 implement the
Do While... Looploop. Line 23 expresses the condition for the loop:While Selection.Find.Found(while the Find operation is able to find an instance of the italic Times New Roman text specified in the previous lines). While this condition is met (isTrue), the commands contained in the loop will execute.Line 24 copies the selection (the item found with italic Times New Roman formatting).
Line 25 moves the insertion point one character to the right, effectively deselecting the selection and getting the procedure ready to search for the next instance in the document. You need to move the insertion point off the selection to the right so that the next Find operation doesn't find the same instance. (If the procedure were searching up through the document instead of down, you'd need to move the insertion point off the selection to the left instead by using a
Selection.MoveLeftstatement.)Line 26 activates the
strDestinationwindow, putting Word's focus on it.Line 27 then moves the insertion point to the end of the glossary document, and line 28 pastes the copied item in at the position of the insertion point. Moving to the end of the document isn't strictly necessary here, provided that the
Normal.dotmglobal template doesn't contain any text—ifNormal.dotmis empty, the new document created in line 11 will be empty too, and the start and end of the document will be in the same position. And after each paste operation, Word positions the insertion point after the pasted item. However, ifNormal.dotmcontains text, this step is necessary.Line 29 uses the
TypeParagraphmethod of theSelectionobject to enter a paragraph after the text inserted by the paste operation.Line 30 activates the
strSourcedocument once more, and line 31 repeats the Find operation.The
Loopstatement in line 32 then loops execution of the procedure back to line 23, where theDo While Selection.Find.Foundcondition evaluates whether this latest Find operation was successful (True).If it was successful, the loop continues; if it wasn't, execution of the procedure continues at line 34, which activates the glossary document again. Line 35 saves the active document (the glossary document, because it was just activated), and line 36 closes it.
Line 37 is a spacer, and line 38 ends the procedure.
A Do... Loop While structure is similar to a Do While... Loop, except that in the Do... Loop While loop, the statements contained within the loop are executed at least once. This happens whether the condition is True or False because the condition isn't tested until the end of the loop structure. If the condition is True, the loop continues to run until the condition becomes False. Figure 12.2 shows a Do... Loop While loop.

Figure 12.2. In a Do... Loop While loop, the actions in the loop run once before the condition is tested.
The Do While... Loop structure probably makes immediate sense to you, but the Do... Loop While structure may seem odd. You're going to execute the contained statements before checking the condition?
But you'll find that Do... Loop While loops can be very useful, although they lend themselves to different situations than Do While... Loop loops.
Consider the lottery example from the beginning of the chapter. In that situation, you execute the action before you check the condition that controls the loop. First, you buy a lottery ticket, and then you check to see if you've won. If you haven't won, or you've won only a small sum, you loop back and buy more tickets for the next lottery. (Actually, this is logically a Do... Loop Until loop rather than a Do... Loop While loop because you continue the loop while the condition is False; when you win a suitably large amount, the condition becomes True.)
Likewise, in programming it's not uncommon to take an action and then check whether you need to repeat it. For example, you might want to apply special formatting to a paragraph and then check to see if other paragraphs need the same treatment.
The syntax for a Do... Loop While loop is as follows:
Do
    [statements]
    [Exit Do]
    [statements]
Loop While condition
VBA performs the statements included in the loop, after which the Loop While line evaluates the condition. If it's True, VBA returns execution to the Do line and the loop continues to execute; if it's False, execution continues at the line after the Loop While line.
As an example of a Do... Loop While loop, consider this crude password checker that you could use to prevent someone from executing a macro without supplying the correct password:
Dim varPassword As Variant VarPassword = "corinth"DovarPassword = InputBox _ ("Enter the password to start the procedure:", _ "Check Password 1.0")Loop WhilevarPassword <> "CorrectPassword"
Here the Do... Loop While loop displays an input box for the user to enter the password. The Loop While line compares the value from the input box, stored in varPassword, against the correct password (here, CorrectPassword). If the two aren't equal (varPassword <> "CorrectPassword"), the loop continues, displaying the input box again.
This loop is just an example—you wouldn't want to use it as it is in real life. Here's why: Choosing the Cancel button in an input box causes it to return a blank string, which also doesn't match the correct password, causing the loop to run again. The security is perfect; the problem is that the only way to end the loop is for users to supply the correct password. If they're unable to do so, they will see the input box again and again. There's no way out of the loop.
If you wanted to build a more friendly password-checking procedure, you might specify a number of incorrect passwords that the user could enter (perhaps three) before the procedure terminated itself, or you could simply use an End statement to terminate the procedure if the user entered a blank string, like this:
Do
    varPassword = InputBox _
        ("Enter the password to start the procedure:", _
         "Check Password 1.0")
    If varPassword = "" Then End
Loop While varPassword <> "CorrectPassword"A Do Until... Loop loop is similar to a Do While... Loop loop except that in a Do Until... Loop loop, the loop runs while the condition is False and stops running when it's True. Figure 12.3 shows a Do Until... Loop loop.
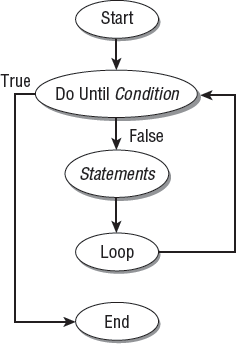
Figure 12.3. A Do Until... Loop loop runs while the condition is False and stops running when the condition becomes True.
The syntax for Do Until... Loop loops is as follows:
Do Untilconditionstatements[Exit Do] [statements] Loop
When VBA enters the loop, it checks the condition. If the condition is False, VBA executes the statements in the loop, encounters the Loop keyword, and loops back to the beginning of the loop, reevaluating the condition as it goes. If the condition is True, VBA terminates the loop and continues execution at the statement after the Loop line.
For example, consider the lottery example, redefined as a procedure in Listing 12.3.
Example 12.3. Using Do...Until loops
1. Sub Lottery_1() 2. Dim sngWin As Single 3.Do UntilsngWin > 2000 4. sngWin = Rnd * 2100 5. MsgBox sngWin, , "Lottery" 6.Loop7. End Sub
Here's how Listing 12.3 works:
Line 2 declares the Single variable
sngWin. Line 3 then starts aDo Until... Looploop with the condition thatsngWin > 2000—the value ofsngWinvariable must be larger than 2000 for the loop to end. Until then, the loop will continue to run.Line 4 assigns to
sngWinthe result of 2100 multiplied by a random number produced by theRndfunction, which generates random numbers between 0 and 1. (This means that the loop needs to receive a random number of a little more than .95 to end—a chance of a little less than 1 in 20, or considerably better than most lotteries.)Line 5 displays a simple message box containing the current value of the
Winvariable so that you can see how lucky you are.Line 6 contains the
Loopkeyword that completes the loop.Line 7 ends the procedure.
Listing 12.4 shows a more useful example of a Do Until... Loop loop in Word.
Example 12.4. A practical example showing how to employ Do Until in Word
1. Sub FindNextHeading() 2.Do UntilLeft(Selection.Paragraphs(1).Style, 7) = "Heading" 3. Selection.MoveDown Unit:=wdParagraph, _ Count:=1, Extend:=wdMove 4.Loop5. End Sub
Listing 12.4 contains a short procedure that moves the insertion point to the next heading in the active document in Word. Here's how it works:
Line 2 starts a
Do Until... Looploop that ends with theLoopkeyword in line 4. The condition for the loop is that the seven leftmost characters in the name of the style for the first paragraph in the current selection—Left(Selection.Paragraphs(1).Style, 7)—match the stringHeading. This will match any of the Heading styles (the built-in styles Heading 1 through Heading 9, or any style the user has defined whose name starts with Heading).Until the condition is met, VBA executes the statement in line 3, which moves the selection down by one paragraph.
The Do... Loop Until loop is similar to the Do Until... Loop structure except that in the Do... Loop Until loop, the statements contained within the loop structure are executed at least once, whether the condition is True or False. If the condition is False, the loop continues to run until the condition becomes True. Figure 12.4 shows a Do... Loop Until loop.
The syntax for Do... Loop Until loops is as follows:
Do
    [statements]
    [Exit Do]
    [statements]
Loop Until condition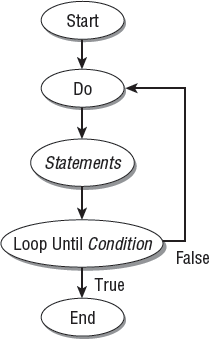
Figure 12.4. In a Do... Loop Until loop, the actions in the loop are run once before the condition is tested.
VBA enters the loop at the Do line and executes the statements in the loop. When it encounters the Loop Until line, it checks the condition. If the condition is False, VBA loops back to the Do line and again executes the statements. If the condition is True, VBA terminates the loop and continues execution at the line after the Loop Until line.
As an example, say you want to repeatedly display an input box that adds new worksheets to a workbook until the user clicks the Cancel button or enters an empty string in the text box. You could use code such as that shown in Listing 12.5.
Example 12.5. Use Do Loop to execute the code at least once
1. Sub Create_Worksheets() 2. Dim strNewSheet As String 3.Do4. strNewSheet = InputBox _ ("Enter the name for the new worksheet " _ & "(31 characters max.):", "Add Worksheets") 5. If strNewSheet <> "" Then 6. ActiveWorkbook.Worksheets.Add 7. ActiveSheet.Name = strNewSheet 8. End If 9.Loop UntilstrNewSheet = "" 10. End Sub
Here's what happens in the Create_Worksheets procedure:
Line 2 declares the String variable
strNewSheet.Line 3 begins a
Do... Loop Untilloop.Line 4 displays an input box asking the user to enter the name for the new worksheet.
Line 5 uses an
Ifstatement to make sure thatstrNewSheetis not an empty string. If it's not, line 6 adds a new worksheet to the active workbook, and line 7 assigns the value ofstrNewSheetto the active sheet (the new sheet). Line 8 ends theIfstatement.Line 9 contains a
Loop Until strNewSheet=""statement that causes the procedure to loop back to theDoline until the user enters an empty string in the input box. The user can enter an empty string either by leaving the text box in the input box blank and clicking the OK button or by clicking the Cancel button.Line 10 ends the procedure.
As with an Exit For statement in a For loop, you can use an Exit Do statement to exit a Do loop without executing the statements below the Exit line. The Exit Do statement is optional, and you'll probably seldom want to use Exit Do statements in your loops—at least if the loops are properly designed.
When you do need an Exit Do statement, you'll generally use it with a condition. The example shown in Listing 12.6 makes the lottery a little more interesting by adding an If condition with an Exit Do statement to take effect if the win is less than $500.
Example 12.6. How to use the Exit Do command
1.  Sub Lottery_2()
 2.      Dim sngWin As Single
 3.      Do Until sngWin > 2000
 4.          sngWin = Rnd * 2100
 5.          If sngWin < 500 Then
 6.              MsgBox "Tough luck. You have been disqualified.", _
                     vbOKOnly + vbCritical, "Lottery"
 7.              Exit Do
 8.          End If
 9.          MsgBox sngWin, , "Lottery"
10.      Loop
11.  End Sub
The procedure in Listing 12.6 works in the same way as the example in Listing 12.3 except that line 5 introduces a new If condition. If the variable sngWin is less than 500, the statements in lines 6 and 7 run. Line 6 displays a message box announcing that the player has been disqualified from the lottery, and line 7 exits the Do loop.
In addition to the For... Next loop, the For Each... Next loop, and the four flavors of Do loops examined so far in this chapter, VBA supports the While... Wend loop. While... Wend is VBA's version of the While... Wend looping structure used by earlier programming languages, such as the WordBasic programming language used with versions of Word up to and including Word 95. VBA includes While... Wend more for compatibility with those earlier versions than as a recommended approach in its own right. But you can use it if you choose to. To some extent, the Do loops supersede While... Wend, but While... Wend still works fine.
The syntax of a While... Wend loop is as follows:
Whilecondition[statements] Wend
While the condition is True, VBA executes the statements in the loop. When it reaches the Wend keyword (which is a contraction of While End), it returns to the While statement and evaluates the condition again. When the condition evaluates as False, the statements in the loop are no longer executed and execution moves to the statement after the Wend statement.
The following statements create a simple While... Wend loop for Word:
While Documents.Count < 10
    Documents.Add
Wend
While the number of documents in the Documents collection (measured here by the Count property of the Documents collection) is smaller than 10, the loop runs. Each time through, the Documents.Add statement in the second line creates a new document based on the Normal template (because no other template is specified). After the new document is created, the Wend statement in the third line returns execution to the first line, where the While condition is evaluated again.
You can nest one or more loops within another loop to create the pattern of repetition you need: You can nest one For loop inside another For loop, a For loop inside a Do loop, a Do loop inside a For loop, or a Do loop inside a Do loop.
For example, if you need to create a number of folders, each of which contains a number of subfolders, you could use a variation of the Create_Folders procedure you looked at earlier in the chapter. But such a task calls out for nesting.
The dialog box for the procedure will need another text box to contain the number of subfolders to create within each folder. The new dialog box is named frmCreateFoldersAndSubFolders and the text box for the number of subfolders is named txtHowManySubFolders. Figure 12.5 shows the dialog box.
Listing 12.7 shows the code triggered by the Click event on the cmdOK button of the form.
Example 12.7. Employing a nested loop
1. Private Sub cmdOK_Click() 2. 3. Dim strStartingFolder As String 4. Dim strFolderName As String 5. Dim strSubfolderName As String 6. Dim intSubfolder As Integer 7. Dim intLoopCounter As Integer 8. 9. frmCreateFoldersAndSubfolders.Hide 10. Unload frmCreateFoldersAndSubfolders 11. 12. strStartingFolder = CurDir 13. 14.For intLoopCounter= 1 To txtHowManyFolders.Value 15. strFolderName = txtProjectNumber.Value & "s" & _ Format(intLoopCounter, "0#") 16. MkDir strFolderName 17. ChDir strFolderName 18.For intSubfolder= 1 To txtHowManySubfolders.Value 19. strSubfolderName = "Subsection" & intSubfolder 20. MkDir strSubfolderName 21.Next intSubfolder22. ChDir strStartingFolder 23.Next intLoopCounter24. 25. End Sub
Here's what the code in Listing 12.7 does:
Line 1 begins the procedure, and line 25 ends it. Line 2 is a spacer.
Lines 3 through 5 declare three String variables,
strStartingFolder, strFolderName, andstrSubfolderName, respectively.Line 6 declares the Integer variable
intSubfolder, and line 7 declares the Integer variablei. Line 8 is a spacer.Line 9 hides the user form, and line 10 unloads it. Line 11 is a spacer.
Line 12 stores the name of the current folder in the String variable
strStartingFolder. You'll need this variable to make sure everything happens in the appropriate folder later in the procedure. Line 13 is another spacer.Lines 14 through 16 and line 23 are essentially the same as in the previous procedure. They build the folder name out of the
Valueproperty of thetxtProjectNumbertext box, the letter s, a two-digit number, and theivariable and then use theMkDirstatement to create the folder.Line 17 uses a
ChDirstatement to change folders to the folder that was just created,strFolderName.In line 18, the nested
For... Nextloop starts. This loop is controlled by the loop counterintSubfolderand will run fromintSubfolder = 1tointSubfolder = txtHowManySubFolders.Value, which is the value entered by the user in the Number Of Subfolders To Create text box in the dialog box.Line 19 builds the String variable
strSubfolderNameout of the word Subsection and the value of theintSubfoldercountervariable. For this procedure, you can assume that there will be fewer than 10 subsections for each of the sections, so single-digit numbering is adequate.Line 20 creates the subfolder by using a
MkDirstatement with thestrSubfolderNameString variable.Line 21 uses the
Next Subfolderstatement to loop back to the beginning of the nestedFor... Nextloop. VBA reevaluates the condition and repeats the loop as necessary.Line 22 changes folders back to
strStartingFolderfor the next iteration of the outside loop. (Otherwise, the next folder would be created within the current folder,strFolderName.)Line 23 then loops back to the beginning of the outer loop.
If you create an infinite (aka endless) loop in a procedure, it will happily run forever, unless the user presses Ctrl+Break, presses Ctrl+Alt+Del to use the Task Manager to shut down the frozen application, or restarts the computer. For example, one type of loop you haven't yet met is the Do... Loop. As you can see in the example in Listing 12.8, without a condition attached to it, this structure is an infinite loop. There's no condition that can stop the looping.
Example 12.8. An example of an endless loop
1.  Sub InfiniteLoop()
2.      Dim x
3.      x = 1
4.      Do
5.          Application.StatusBar = _
               "Your computer is stuck in an endless loop: " & x
6.          x = x + 1
7.      Loop
8.  End Sub
In Listing 12.8, Line 2 declares the variable x, and line 3 assigns it the value 1. Line 4 begins the Do loop, which displays a status-bar message and increases the value of x by 1. The effect of this loop is to display a message and an ever-increasing number on the status bar until you press Ctrl+Break to stop the procedure or until the value overflows the variable. This is all thoroughly pointless (except perhaps as part of a procedure for burning in a new computer) and is perhaps a good reason not to use the Do... Loop structure—at least not without a condition attached to one end of it.
No matter what type of loop you use, to avoid creating an infinite loop, you need to make sure the condition that will terminate the loop will be met at some point. For example, for an editing or cleanup procedure, you'll often want to perform an action until the end of the document is reached and then stop. Or you'll want to include some form of counting mechanism to make sure a Do loop doesn't exceed a certain number of iterations.
- Understand when to use loops
Loops come in very handy when you need to perform a repetitive task, such as searching through a document for a particular word.
- Master It
What is the alternative to looping if you are carrying out repetitive tasks in a macro?
- Use For... loops for fixed repetitions
For... loopsare the most common loop structures in programming. You specify the number of iterations the loop must make, and the loop is exited when that number is reached.- Master It
Write a
For...Nextloop that counts up to 100, but use theStepcommand to increment by twos.
- Use Do... loops for variable numbers of repetitions
A
Do... loop iterates until or while a condition exists, then exits from the loop when the condition no longer exists.- Master It
There are two types of
Do... loops.Do While... LoopandDo Until... Looploops test a condition before performing any action. What is the other type?
- Nest one loop within another loop
You can put loops inside other loops.
- Master It
Think of a programming task where nested loops would be useful.
- Avoid infinite loops
An infinite (or endless) loop causes your macro to continue execution indefinitely—as if the macro had stopped responding and was "frozen."
- Master It
How do you avoid creating an infinite loop?