
Chapter 5
Breaking Down the Project Activities
- Constructing the work breakdown structure
- Defining tasks and activities
- Setting milestones
- Constructing the Responsibility Assignment Matrix
- Making activity estimates
- Constructing network diagrams
This chapter continues our journey deeper into the planning recesses of project management. Along the way, we'll define tasks and activities, construct a work breakdown structure (WBS), and discuss how to estimate activity durations.
Creating the overall project plan involves many preliminary and incremental steps. This chapter will get us a little closer to the creation of a project schedule, which is one of the most important Planning process documents you'll create. Paying close attention to creating the work breakdown structure, defining milestones, and activity sequencing will make the job of creating the project schedule much easier.
At the end of this chapter, we'll take a look at some diagramming methods for project activities. As they say, a picture is worth a thousand words, and network diagrams help the stakeholders and project team visualize the workflow of the project.
Constructing the Work Breakdown Structure
work breakdown structure (WBS)
A deliverables-oriented hierarchy that defines all the work of the project. Each succeeding level has more detail than the level above it.
A work breakdown structure (WBS) is a tool used to graphically display the deliverables of the project in a hierarchical fashion. It organizes the work of the project into logical groupings and displays the information in a tree form or an outline form.
NOTE Only the work of the project (including the project management work) is included in the WBS. If the work is not included in the WBS, it's not part of the project. All the work at the lowest levels of the WBS should roll up to the higher levels so that nothing is left out and so that no extra work is included. This is known as the 100 percent rule.
scope creep
A phenomenon where the scope of the project changes over time because of lack of agreement on the original scope statement, not sticking to the original scope statement, or not having a scope statement.
Only the work of the project is included in the WBS. This may seem obvious, but if the work isn't shown in the WBS, it's outside the scope of the project and should be noted as such. (In Chapters 4, “Defining the Project Goals,” we included a section in the scope statement to note deliverables that are out of scope for the project.) This is an important distinction to make. Many projects suffer from scope creep, whereby the project seems to grow and grow the further you get into it. You no sooner have a list of deliverables and begin working on completing them when more deliverables are “discovered.” To top it off, the deliverables you previously defined have been modified or altered from their original description. Thus, the scope of the project grows to a point where the original project estimates are no longer valid because the new requirements have added additional tasks to the project.
If you've done a good job writing your project scope statement and then depicting that work accurately in the WBS, you'll go a long way toward eliminating scope creep on the project. This also implies that you've kept the project team and stakeholders focused on the original scope statement and have not allowed changes that would alter the scope. Legitimate changes that must be made in order to ensure project success are another matter, but we'll take that up in Chapters 11, “Controlling the Project Outcome.”
Organizing the WBS Levels
A WBS is similar to a company organization chart or a family tree. It can also be shown in outline form, which we'll get to shortly. It starts out with the big picture, and each successive level gets more and more detailed. Like an org chart, it's a hierarchically oriented view that shows which tasks “report” to which dependencies. There is no set number of levels in a WBS, but I recommend not going more than five or six levels deep, because the WBS will get bogged down in too much detail. If you're working on a large project, you will have subproject managers working with you who will be responsible for developing their own WBS from the project-level WBS. We'll cover this in more detail at the end of this section.
Whether you choose the tree form or the outline form, the levels and organization of the WBS remain the same. The top box of the WBS, level 1, contains the name of the project. The next level of the WBS shows the deliverables or major milestones of the project. (I'll talk more about milestones in the section “Determining Milestones” later in this chapter.) Level 2 may also be depicted as project phases or subprojects. The succeeding levels are further breakdowns of the deliverables that may include tasks or groupings of tasks. All deliverables don't necessarily require the same level of breakdown. What's important is that you get the WBS to a point where the components in the lowest level of the hierarchy are easily estimated, scheduled, and assigned.
TIP When defining your WBS levels, remember that deliverables are typically described as nouns such as PCs, brochures, and so on. Tasks, which are developed from the deliverables, are usually described as action words: create, develop, establish, set up, mail, and so on. (I'll talk more about task identification in the section “Defining Tasks and Activities” later in this chapter.)
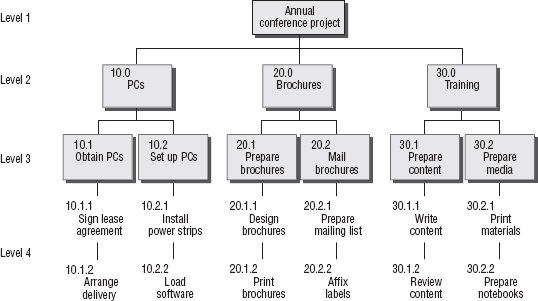
Let's look at some examples. The next graphic shows the level-1 and level-2 details for our conference project. Keep in mind that the deliverables in this figure are only a sample. Your project would have many more deliverables than this.

Level 1 shows the project name. This is usually the first level in any WBS. Level 2 for this WBS shows some of the deliverables or milestones for this project.
Now let's take a look at the next two levels:
Level 3 in this WBS shows a grouping of tasks, sometimes called summary tasks. For example, “Obtain PCs” is a summary task under the “PCs” deliverable found at level 2. The “Obtain PCs” summary task at level 3 has tasks under it that must be completed in order to consider the “Obtain PCs” summary task complete. To complete the deliverable called “PCs,” the two level-3 summary tasks shown on the WBS, “Obtain PCs” and “Set up PCs,” must have all of their tasks completed. The same is true for the other deliverables.
The idea is to start the WBS with the project and then continue to break down the deliverables into smaller, more manageable units in each subsequent level. These levels could include milestones, a grouping of tasks, or individual tasks. The idea is to keep adding levels to the WBS until you've broken the work out to the point where responsibility for each unit of work can be assigned to a specific person or to a team. This is also the level that allows you to easily determine estimates and the skills needed to complete these tasks.
Work Packages
work package
The lowest level in a WBS. Resource assignments and time and cost estimates are established at this level.
A work package is the lowest level of a WBS. This is the level where assignments, estimates, and resources are easily determined. It doesn't matter whether the WBS has three levels or five levels; the lowest level in either case is considered the work package level.
In the WBS shown earlier, level 4 is the work package level. In that example, the individual tasks like 10.1.1 (“Sign lease agreement”) and 10.1.2 (“Arrange delivery”) are the work packages and are assigned to individuals or teams to complete. If we broke off the WBS at level 3 — in other words, if we didn't include level-4 tasks — then level 3 would be the work package level.
NOTE The lowest level in any WBS is called a work package. Work packages can be subprojects, milestones, deliverables, or tasks, depending on how the WBS is structured.
Work packages may include individual tasks, milestones, or subprojects within the project. If you're working on a very large project, the project should be broken down into smaller subprojects rather than individual deliverables. Level 1 still remains the overall project, level 2 becomes subprojects within the project, and level 3 may also be subprojects within the subprojects, or this level might start the breakout of deliverables. In this case, level 3 is the work package level. Here is an example WBS with projects and subprojects:
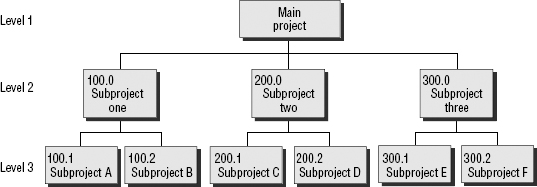
In a structure like this, subproject managers may be assigned to the level-2 subprojects. All subproject managers (also called assistant project managers) report to a single project manager who has responsibility for the overall project. Level-2 subproject managers assign the level-3 subprojects to teams or individual project assistants. At this point, the project assistants create their own WBS for the level-3 subproject they've been assigned.
For large projects, you can see that this could get rather complicated. However, the effort is well worth it in the end, because you have a logical, graphical depiction of the project breakdowns in one place.
NOTE Projects that are broken into subprojects, or multiple levels of subprojects, are often called programs. Programs are collections of projects that are managed collectively because of their similarities. The manager of this group of projects is often called a program manager, and the subproject managers are simply called project managers.
Once the WBS has been reviewed and approved by the project manager and project sponsor, it's a good idea to hang a copy of it in the project team meeting room. And don't forget, a copy of the WBS should be filed in your project notebook for future reference.
Identification Codes
You may have noticed numbers next to each of the WBS elements. These identifiers, or WBS codes, allow you to uniquely identify each element of the WBS. They're used to track the cost of the work or the cost of each element in the WBS. They also serve as reference numbers to other planning information.
A document that contains information about the activities or tasks listed on the WBS. It may include elements such as WBS number, WBS codes, descriptions, and resource names.
As you begin assigning tasks and defining resource needs and such, you'll want to document some of this information (the act of documenting will become contagious over time), and the codes provide you a handy way to tie the information to the WBS. For example, you might want to note that WBS item 10.2 was assigned to the IT department. Maybe there are several costs involved with this summary task that you need to break out. That information can be recorded in the WBS reference document or WBS dictionary. The dictionary is created as a simple Word document or spreadsheet document that lists each WBS reference number down the left side, with comments regarding that WBS element to the right. This document should be filed in the same section of your project notebook as the WBS.
Your budget officer will need these numbers as well to track the cost of the project. Depending on the WBS you've constructed, level-2 and level-1 elements are simply a roll-up of the costs from all the levels beneath them. These codes come in handy when using the outline view for the WBS. We'll look at that next.
Outline View
There's one more version of the WBS that you can use if you don't like the tree form. The outline form works well for small projects or projects that have multiple levels with lots of tasks.
The following list shows a snapshot of the same information we saw in the first WBS graphic but in outline form. The WBS identifiers are especially important in an outline form because they help you easily determine which task goes with which deliverable:
- 10.0 PCs -
- 10.1 Obtain PCs.
- 10.1.1 Sign lease agreement.
- 10.1.2 Arrange delivery.
- 10.2 Set up PCs.
- 10.2.1 Install power strips.
- 10.2.2 Load software.
- 10.1 Obtain PCs.
- 20.0 Brochures
- 20.1 Prepare brochures.
- 20.1.1 Design brochures.
- 20.1.2 Print brochures.
- 20.1 Prepare brochures.
I think you can see that if you've done a fabulous job of documenting the deliverables in the project scope statement and identifying your tasks, the WBS almost can't miss. If the project scope statement is inadequate or the deliverables were poorly developed, the WBS may also be poorly developed. This will cost you in the end in the form of rework. Rework means you have to go back and redo things you've already done or add tasks that you missed. And remember way back from Chapters 1, “Building the Foundation,” that time equals money, so if you're involved in rework or you're adding new deliverables to the WBS after it's been approved, project costs are going to escalate. Take the time to construct your WBS correctly and review it several times with the project team.
TIP Don't be alarmed if you uncover new deliverables as a result of creating the WBS. Updates to the project scope statement may occur two or three times throughout the Planning process.
Don't forget that as you create the WBS, changes to the project scope statement may result. That's to be expected at this point in the project, so when the WBS is completed, go back through your project scope statement to make sure all the deliverables are reflected there. If not, follow the procedures outlined in the scope management plan, and update the project scope statement to reflect the additions. (Don't forget to get sign-off on the changes.)
Defining Tasks and Activities
Now that you've constructed a working version of the WBS and have your deliverables outlined, your next job involves identifying the tasks or activities for those deliverables. First, you need to decide whether you like the term tasks or activities to describe the work of the project. Most project managers use these terms interchangeably. This isn't the only controversy you'll run across in project management circles, but it's one of the lighter ones. For the purposes of this book, I'm going to stick with the term activity most of the time, but if you see task in some places, know that I'm talking about the same thing. We will talk later about activity estimates and network diagramming, which both use the term activity, but keep in mind when we get there that activity and task mean the same thing. Now that we have that out of the way, let's look at what tasks are and explore the purpose of the task definition process.
Activities or tasks are a single piece of work, or units of related work, that must be completed in order to satisfy a project deliverable or the requirement of a deliverable. When you've completed all the tasks of the project, the product or service of the project is complete. And there you have it — define all your tasks, complete them, and your project is complete. Hold on, it's not quite that simple; there's more.
Activities are derived from the project deliverables and from the requirements of the deliverables. You defined those in the project scope statement and then again on the WBS. You'll see as we progress that almost everything we do in the Planning process builds on itself, so it's important to take each process seriously and do the best job you can because you're going to be relying on that information later.
NOTE When working on small projects, you could skip the activity identification process and perform it at the same time you're defining the WBS.
Managing the Work
The purpose of activity definition is to allow you to break down the work of the project into manageable components so that you can easily determine time, resource, and cost estimates. Each activity should be broken down to the point where these estimates are easily derived. Breaking down the deliverables into activities makes the project manager's job easier, because the work is subdivided into small units that are easily assigned to one team member or a group of team members. You can communicate the details of the work to the right team members, manage and track project progress, and provide a way to logically group similar activities together.
NOTE An easy way to differentiate between deliverables and activities is to describe deliverables as nouns (people, places, or things) and use verbs, or action words, for your activities or tasks — words like define, prepare, program, design, build, and research.
Let's look at an example. You've been assigned as the project manager for your company's upcoming annual conference. Customers from all over the world fly to your city to attend this conference and learn about your company's products, take some training classes, and meet with vendors. One of the deliverables of this project includes connecting and setting up 200 PCs for use at the training seminars held during and after the conference. One of the activities associated with this deliverable might be loading software on each PC. Another activity might be to run two power strips for each table in the ballrooms of the hotel where the training is being held.
At this point, you don't need to worry about in which order the activities appear; just start a list of activities for your project and give yourself room in between each major heading to come back and add to them. You'll find as you start breaking down tasks and activities that you'll think of new activities for some of the deliverables you've already broken down, so if you leave yourself some space, you can add these activities as you think of them.
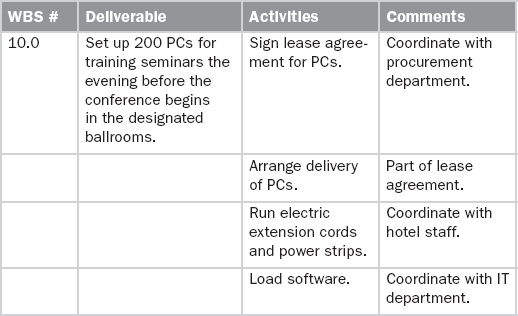
I recommend using a simple format that lists the deliverables as the main heading with activity breakdowns and comments under the deliverables. If your project is good sized, you might list each deliverable on a separate page (or pages). A small project may have only a few pages of combined deliverables with their activities. Table 5.1 shows an example activity list for some of the activities needed for the “Set up PCs” deliverable. If you're going to use this as a template, add the General Information section to the very top of this form like we had on the project scope statement and charter documents to help identify basic information about the project (project name, project number, date, and so on). You could also consider adding another column that lists the requirements (between the Deliverable and Activities columns) and then define the activities from the requirements. I've kept Table 5.1 simple, but complex deliverables may need further definition than what's shown here before you can start identifying tasks and activities.
Table 5.1 Activity list
Activity Sequencing
After you define the activities, you'll want to sequence them in a logical order. This will help you when you're ready to create the project schedule later. For example, you can't load software onto the PCs until they've been delivered and they have a source of electricity, so it makes sense to list the “Load software” activity last in this list. When you're working on small projects, you can easily combine the activity definition with the activity sequencing process. As you list the tasks, group them into a logical order at the same time. Larger projects require a two-step process: First identify the activities and then sequence them.
Activity sequencing also provides a way for you to keep similar types of work together. In our example project, the IT department is in charge of hooking up the PCs and loading the software. They also have the responsibility for setting up the PC connections from the speaker's podium to the overhead projection system. A logical place to include these activities would be in the activity list in Table 5.1. In other words, we've grouped activities that are similar in nature in the same place.
Activity identification and sequencing allows the project manager to define estimates and costs and to determine the skills needed for the work of the project. For instance, the activity called “Load software” tells us what type of skills are needed to complete this activity. Obviously, we need folks who have some understanding of how PCs work and how to troubleshoot problems if the software doesn't load correctly. This means that we're going to have to work with the functional manager of the IT group to assign some resources to these tasks or contract with a vendor to perform these tasks for us.
Your project budget, the project schedule, and resource assignments are determined primarily from the activity identification process and sequencing exercises. As you can see, these are important steps in the project's Planning process, so you want to take the time here to do a thorough job. But don't feel that you're out there all on your own. Hold a team meeting or two and do some brainstorming to come up with all the activities necessary to complete the deliverables. Then, after you've compiled your final list, review the list with the team before moving on to the network diagramming or project schedule process to be sure you haven't missed anything.
Determining Milestones
If you're older than 15, you've experienced some milestones in your life: reaching age 16 (driving!), then 18 (graduation from high school), then 21, and, well, you get the idea. Milestones in projects work the same way. Milestones are markers along the way that let you know that a significant accomplishment has been reached. Milestones are not activities, but they can consist of a grouping of activities. You don't perform actions to complete a milestone; in other words, they aren't work. Instead, they signify that a grouping of work has been completed or a significant accomplishment has been reached.
Milestones might be based on deliverables, a grouping of deliverables, or a grouping of activities. For example, one milestone for our conference project might be “Ballrooms prepped and PCs set up for training.”
Some project managers like to use milestone charts as one way to report on project progress. A milestone chart should include a listing of the milestones with their expected completion dates and their actual completion dates. Table 5.2 shows a sample portion of a milestone chart for the annual conference project.
Milestones are a way to help monitor the progress of the project. They are a great tool to use for reporting to executive management because they show at a glance where the project stands and what remains to be completed. Milestone charts work particularly well for smaller projects.
Another way to display milestone charts is in a Gantt chart format (we'll discuss Gantt charts in Chapters 8, “Developing the Project Plan”). You can display the start date of the milestone and its duration. Milestones should be listed in the order in which they'll be accomplished in the project.
Table 5.2 Milestone chart

Constructing the Responsibility Assignment Matrix
responsibility assignment matrix (RAM)
A chart that ties roles and responsibilities with the WBS elements.
We've seen a couple of examples of roles and responsibilities charts in the preceding chapters. The responsibility assignment matrix (RAM) is the same idea. After you've constructed your WBS, you're ready to determine the types of skills and resources needed for the project. The RAM will help you do that.
A RAM is usually depicted as a chart, with the types of resources needed listed in each row and the WBS elements as the columns. The intersection of a row and column contains an indicator that shows what level of activity is needed by the resource. This could consist of a simple word like Approve or Review, or it could contain a code that ties to a legend if you need to be more specific than a one- or two-word description.
Table 5.3 shows an example RAM for the “Set up PCs” summary task.
Table 5.3 Example RAM
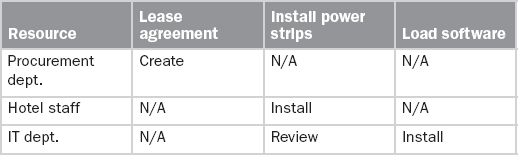
This example uses three words to indicate the level of involvement of each resource: Create, Install, and Review. Alternatively, you could use the RACI format with the terms Responsible, Accountable, Consult, and Inform. Whatever you choose for the key, I recommend limiting the choices to six or fewer to prevent confusion.
You could put actual names in the Resource column if they're known at this time. If you don't yet know the names of the folks responsible for these activities, listing the department name as we did in Table 5.3 will work for the early stages of planning. Later in the Planning process, you will want to associate someone's name with each of these activities so that responsibility for the completion of this activity is assigned to a person. We'll discuss assigning activities in Chapters 6, “Planning and Acquiring Resources.”
RAMs can be developed for the project as a whole or for any level in the WBS. When you're working with subprojects within a major project, you might develop RAMs for the level-3 elements in the overall WBS, and your subproject managers can develop RAMs for the elements in the individual work breakdown structures constructed for the subprojects.
Estimating Activity Durations
Estimating activity durations is the next activity you'll undertake after constructing the WBS and RAM. The reasons why you constructed the WBS and the RAM first are so that you know which activities you need estimates for and you know which resources you can ask to help you determine those estimates.
Activity duration estimates determine the number of work periods needed to complete the activities defined in the WBS. Work periods are expressed in hours, days, weeks, or months. Hours and days are the most common work periods used, but you may need to use weeks or months if your project is large or is expected to take a long time to complete.
There are several techniques for determining activity duration estimates. A few of them are interchangeable with the budget estimating techniques we'll discuss in Chapters 9, “Budgeting 101.” We'll look at two examples here that are used most often for activity durations, but keep in mind that there are other techniques, described in Chapters 9, that you could use as well.
Expert Judgment
expert judgment
Using individuals or groups of people who have training, specialized knowledge, or skills to help assess information and determine estimates.
Expert judgment is just what it sounds like. When you've determined the type of resource needed to perform the activity, you can ask staff members who are experienced at these types of activities to give you an estimate for those activities. Because of their experience with similar activities in the past, they'll be able to give you a fairly decent estimate. However, this is not a scientific method, and the person giving you the estimate may historically overestimate or underestimate durations based on their biases. To help even out these biases, you could ask more than one expert for an estimate and then combine their results. If possible, combine their expert judgment with historical information from past projects (remember those project notebooks filed away with all that juicy project information waiting for you to use as a reference?) to determine an estimate.
Parametric Estimating
Parametric estimating works with known quantities and calculates estimates based on the quantity of elements needed to complete the activity. For example, you know that it takes six minutes to print the address and postage on 50,000 brochures. If you're going to mail 50,000 brochures, you calculate the duration for this activity by multiplying 6 minutes times 10 to come up with a total duration of 60 minutes to print and seal 50,000 brochures.
These duration estimates are initial estimates right now. You will have a chance to refine these, and you should refine them again when you create the project schedule. At that time, you'll have more information about the activities, and your project team will be in place, so you'll have what you need to fine-tune these estimates.
Establishing Dependencies
When activities are dependent on one another, it means that one activity cannot start or finish until the previous activity has finished or started. To determine dependencies, you have to put the tasks in logical order. We talked about that earlier in this chapter in the section called “Activity Sequencing.” Now you'll determine whether the activities are independent activities or activities with dependencies.
Activities with dependencies must be sequenced in the correct order, or you'll end up doing a lot of rework. As an example, the “Load software” activity is dependent on the “Install power strips” activity because if you don't have power, you can't power up the PC and load the software. This is an example of a mandatory dependency because of the nature of the work. One action can be performed only after another action has taken place.
Not all activities have dependencies; some activities may be independent. The “Load software” and “Install power strips” example is what's called a Finish to Start dependency relationship. That is, the “Install power strips” activity must finish before the “Load software” activity can start.
There are four types of dependency relationships. Let's take a quick look at each.
Finish to Start The independent activity (the “Install power strips” activity from the earlier example) must finish before the dependent activity (the “Load software” activity) can start. This type of relationship is the most frequently used dependency. Most of the activities in our annual conference project that have dependencies have Finish to Start dependencies.
Finish to Finish The independent activity must finish before the dependent activity finishes. There isn't an example of this type of relationship in our annual conference project. But an example from the kitchen will help explain this relationship. When you're making a roast beef with gravy (assuming you're making gravy from the pan drippings), the roast beef must finish cooking before the gravy can finish. You can start the gravy any time by mixing the flour and water together, but you can't add it to the pan drippings until the beef has finished cooking. Therefore, these activities have a Finish to Finish relationship.
Start to Start The independent activity must start before the dependent activity starts. For example, when preparing the training materials for our annual conference, we might want to review materials as they are written rather than waiting for all the materials to be written and then reviewing them all in one step. Therefore, the “Write content” activity and “Review content” activity have a Start to Start relationship. You cannot start the “Review content” activity until the “Write content” activity has started.
Start to Finish The independent activity must start before the dependent activity can finish. This logical dependency is a little different from the others we've talked about and is seldom used. This situation exists when the dependent activity drives the completion time of the independent activity. Here is an example. In most states, the Department of Transportation requires trucks hauling hazardous materials to obtain a permit before traveling through the state. The trucking company must notify the department 30 days prior to driving the truck on the state highways. So, the dependent task, entering a new state with the truck, determines when the notice needs to be provided to the Department of Transportation (the finish of the independent activity). Let's say my truck needs to enter the state of Colorado on December 1; therefore, the notice and permit application must be delivered to the Colorado Department of Transportation no later than November 1.
You need to understand the dependency relationship between the activities in order to diagram them, as you'll see in the next section.
Constructing a Network Diagram
A network diagram allows you to show the activities of the project in the order they'll be performed — in other words, in sequential order. A network diagram is a graphical view of the project, starting with initiation as the left-most element followed by all the project activities or deliverables in the order they should be worked. Some activities have dependencies like those discussed in the previous section, and some are independent. The independent activities are often worked at the same time as other independent activities unless, of course, you're the only resource working on the project. Then you have no choice but to work one activity after the other in sequential order. Most projects have more than one resource, though, and that means those independent activities can be worked at the same time by different resources.
The network diagram allows you to visually construct and link the activities the way they should be worked. It's also a great graphic to hang in the project team meeting room to show your progress.
You may be thinking that we did all this with the WBS. Not really. The WBS is in a hierarchical layout, not a sequential layout. For example, if you refer to our WBS example, you'll see that “Prepare content” and “Prepare media” are two different deliverables displayed in a hierarchy. However, based on our previous discussion of dependencies, you can see that the “Print materials” activity cannot (or should not) be done before the “Review content” task is completed. Because these activities are listed under separate deliverables, there isn't a good way on the WBS to show their dependencies. Although all the activities under each of these deliverables are ordered logically, they aren't shown in dependency order. A network diagram allows us to show the flow, or sequence, of activities.
NOTE A WBS does a much better job of displaying milestones and deliverables than a network diagram does. A network diagram is better at showing the sequence of activities, so both of these tools have their place in the project's Planning process.
A network diagram, like the WBS, can consist of subprojects, deliverables, milestones, or activities. If you're working a large project, the network diagram will likely display the sequential order of all the subprojects. (Each subproject manager is then responsible for developing a network diagram for their individual subprojects.) Small projects will likely show the activities in sequential order. As you've probably guessed, there is more than one way to construct a network diagram, so we'll look at each of them next.
Precedence Diagramming
precedence diagramming
A diagramming method that links project activities according to their dependency, using boxes or nodes to depict project activities and arrows to show dependencies.
Precedence diagramming is the method of placing activities in the correct sequential order, taking their dependencies into account. Precedence occurs when one task cannot be started until a previous activity finishes, such as the “Load software” activity we talked about earlier. The “Install power strips” activity has precedence over this activity because it must be finished before the next activity can start.
Precedence diagramming can also take into account activities that can be worked at the same time and activities with multiple dependencies. Most project management software programs use precedence diagrams. Here is a sample precedence diagram for the activities in our annual conference project:

The numbers in the diagram are a way to identify the activities. The numbers are not in sequential order; they're just a way to identify each activity. Here, I've added two new activities: number 10, “Test,” and number 11, “Sign-off.” For the sake of this example, we'll assume that the “Review” activity, number 7, means a grammatical review of the text, while the “Test” activity, number 10, means that testers must work through each exercise in the manual to make certain they can understand them. The “Print media” activity now has two activities that must be completed before it can begin. Activity number 7, “Review,” and activity number 11, “Sign-off,” must both be completed before “Print media” can begin. Remember that “Sign-off” also has a dependency. The “Test” activity must be completed before “Sign-off” can be obtained.
You can see how a network diagram is a terrific tool to visualize the progress of the project. You can view the project in one graph (maybe two or three or more if the project is complex), determine how the work of the project must be performed, and see what dependencies exist between the activities. As you progress, you can indicate on the network diagram which activities have been completed by checking them off or coloring them, and so on.
In Chapters 8, “Developing the Project Plan,” we'll discuss establishing starting and ending dates for each activity. These can be added to the top corners of the box for a more complete picture.
Activity on Node
Activity on node (AON) is a type of precedence diagramming method that uses circles, called nodes, to depict the tasks and uses arrows to show the dependencies between the activities. AON diagrams can be constructed with boxes as nodes, like we saw in the previous section. In the following example, a sample portion of the activities, or tasks from our annual conference project, are placed on the nodes, and the arrows show the dependency between the tasks:
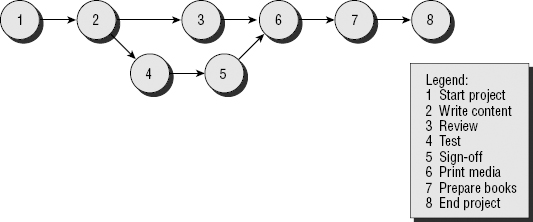
This example shows the “Print media” task dependent on the completion of the “Sign-off” and “Review” tasks. You could add more detail to this diagram by showing the duration estimates on the arrows for a clearer picture of how long each task should take. We'll discuss this technique further in Chapters 8. You should be aware that precedence diagrams are also known as activity-on-node. Both of these methods use nodes to depict the activities and arrows to depict the dependencies between them. Precedence diagrams, or AON, may use boxes as nodes or circles as nodes. You can use either method to construct a precedence diagram.
Arrow Diagramming Method — Activity on Arrow
Activity on arrow (AOA) is the opposite of the AON diagram. It also uses nodes and arrows like the AON, but in this case the arrows depict the activities or tasks, and the nodes indicate milestones or deliverables or simply events between the activities. Here is an example of an AOA:

Diagramming Method of Choice
Precedence diagrams are the easiest type to construct and the most often used. If you can draw boxes and straight lines or you can draw circles and straight lines, you can assemble a precedence diagram. I encourage you to draw a network diagram for your project and display it, along with the WBS, in the project team meeting room. And as you've heard consistently about other project documentation, put a copy of this diagram in your project notebook. (While I've talked about drawing out these diagrams by hand, keep in mind that most project managers use a tool such as Microsoft Project to do this for them.)
Terms to Know
| expert judgment | WBS dictionary |
| precedence diagramming | work breakdown structure (WBS) |
| responsibility assignment matrix (RAM) | work package |
| scope creep |
Review Questions
- What is the purpose of activity definition?
- Name some of the purposes of activity sequencing.
- What are milestones, and what significance do they have to the project?
- Describe a work breakdown structure.
- What is a work package?
- Why are codes used to identify elements in the WBS?
- Define a RAM and explain how it's used.
- Name two methods of determining activity duration estimates.
- Describe the four types of dependency relationships, and indicate which one is used most often.
- Name two ways to display network diagrams and briefly describe each.