Chapter 11. Radio Gadget and YouTube Video Gadget—Fun Gadgets
"People rarely succeed unless they have fun in what they are doing."
—Dale Carnegie
IN THIS CHAPTER
Media Gadgets
In this chapter, we create two gadgets that use the Windows Media Player and the Flash Player. These two technologies are used in the gadget in the form of embedded plug-ins. The Windows Media Player plug-in uses online streaming technologies to play audio in the Radio Gadget, whereas the Flash Player plug-in is used to download and play online videos, using the feed provided by YouTube.com.
The purpose of these gadgets is to implement our framework in the typical scenario of embedding media player controls inside a gadget, and of course to have some fun. The Radio Gadget embeds a Windows Media Player control and reads directly from an online streaming server. The YouTube Video Gadget opens an online feed provided by YouTube and plays the item in an embedded Flash player.
The Radio Gadget
The Radio Gadget plays a streaming radio from the Internet. In its most basic form, the Radio Gadget has Windows Media Player embedded to do most of the task of streaming audio from the server, playing the audio, and providing basic features such as volume controls, play, pause, and so on. The Radio Gadget has the following goals:
- Provide a simple implementation of Windows Media Player
- Play audio from online streaming servers
- Provide an option to increase or decrease the volume of the media player
- Support multiple streaming servers
Background—Internet Radio
Internet radio provides audio broadcasts over the Internet. Audio content from Internet radio uses streaming media technology: The audio is played and the data is received in real-time. The most popular audio streaming format is MP3.
Some of the popular Internet stations that provide streaming audio are
- Live365— http://www.live365.com
- SHOUTcast— http://www.shoutcast.com/
- AOL Radio— http://music.aol.com
This example focuses on SHOUTcast, which provides audio streaming in the form of playlist files that can be played directly in the Winamp player or Real Player.
If you go to Shoutcast.com and select a radio station, it asks you to save the shoutcast-playlist.pls file in your computer. If you open the PLS file in Microsoft WordPad, you will see the URLs of the streaming server and the station title. Here is how a file looks for a popular station, .977 The 80s Channel:
[playlist]
numberofentries=17
File1=http://scfire-dll-aa03.stream.aol.com:80/stream/1040
Title1=(#1 - 220/500) .977 The 80s Channel
Length1=-1
File2=http://another streaming server URL
Title2=(#2 - 221/500) Another channel
Length2=-1
...
Version=2
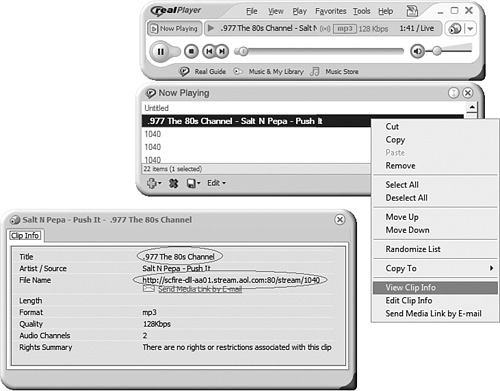
You can also open the playlist file in RealPlayer and view the clip information in the Properties window (see Figure 11.1). This information is important because the Radio Gadget needs the title and the radio station's URL:
Title: .977 The 80s Channel
Station URL: http://scfire-dll-aa03.stream.aol.com:80/stream/1040
To download the free version of Real Player, go to http://www.real.com/player.
FIGURE 11.1 The playlist file can also be read in the Clip Info window of Real Player.
Features and Technology
To create a Radio Gadget based on Internet radio you need to have a media player in the gadget that can play the streaming audio directly from a URL. A number of ActiveX plug-ins, such as Windows Media Player, Divx Player, Real Player, and QuickTime, are available and can be embedded in an HTML page.
The only requirement is that the plug-in needs to have been previously installed in the user's computer. This example uses the Windows Media Player object because it is, by default, installed on Windows machines and also because it provides rich scripting support.
After you have the title and the URL of the online audio, you need to send it to the media player and execute the play command. To embed a Windows Media Player object in the gadget's main window, you need to add the following code:
<OBJECT id="mediaPlayer" width="0" height="0"
style="position:absolute; left:0;top:0"
CLASSID="CLSID:6BF52A52-394A-11d3-B153-00C04F79FAA6"
type="application/x-oleobject">
<PARAM NAME="SendPlayStateChangeEvents" VALUE="True">
<PARAM NAME="AutoStart" VALUE="False">
<PARAM name="uiMode" value="invisible">
</OBJECT>
The name mediaPlayer is the identifier this example will use to work with the object in JavaScript. The CLASSID tag distinguishes different ActiveX plugins. The parameter SendPlayStateChangeEvents is called whenever the media player's state changes and is captured in the gadget code.
To set the URL to the media player, all you need is a single line:
mediaPlayer.url = stationURL;
To play the streaming audio and to stop the stream, you need just two lines:
mediaPlayer.controls.play();
mediaPlayer.controls.stop();
Finally, there's one more line required to change the volume of the media player:
mediaPlayer.settings.volume = currentVolume;
Design Considerations
The Radio Gadget is a fun gadget, so the design needs to be intuitive and simple. Design considerations involve giving the gadget a unique identity as well as an attractive look and feel. As with most gadgets, your design considerations revolve around the following:
- Themes and images used in the gadget
- Layout of the gadget
- Usability of the gadget
The following sections look into each of these in more detail with respect to the radio theme.
Theme, and Look and Feel of the Gadget
The theme of the gadget is a radio player. The image chosen is common and is used for classic physical radio. The image uniquely identifies the gadget (see Figure 11.2).
FIGURE 11.2 A classic radio image used for the gadget's icon makes the gadget's core purpose immediately recognizable.
The gadget's icon was chosen to match the theme. The next thing is the gadget window (see Figure 11.3). The gadget's background image looks like a radio with three knobs.
FIGURE 11.3 A Radio Gadget with an interface similar to a radio.
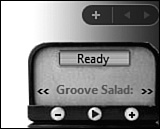
The Radio Gadget design has a simple interface: a Play button that changes to Stop when the audio is playing and Volume Up and Down buttons. There is also a Previous and Next link to move to the previous and next radio stations.
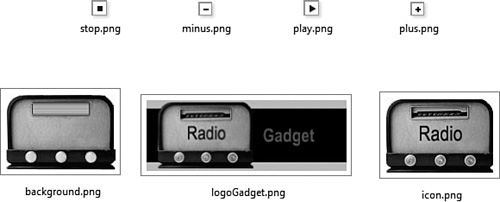
Figure 11.4 shows some of the images used in the gadget to match the radio theme.
FIGURE 11.4 The images used in the Radio Gadget all follow the same classic radio theme.
Layout of the Gadget
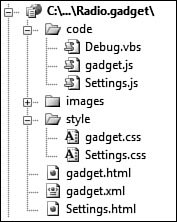
The layout of the gadget is similar to the framework created in Part II of this book (see Figure 11.5). Note, however, that in this case there's no need for a flyout window.
FIGURE 11.5 The Radio Gadget has a simple layout and does not have a flyout window
The gadget manifest shown here has changed to accommodate information specific to the Radio Gadget. Note the name and description have changed, but the names of the icon and the drag image remain the same. They now point to the images specific to the gadget.
<?xml version="1.0" encoding="utf-8" ?>
<gadget>
<name>- Radio Player -</name>
<namespace>Innovate.Gadgets</namespace>
<version>1.0</version>
<author name="Rajesh Lal">
<logo src="images/logo.png" />
<info url="www.innovatewithgadgets.com" />
</author>
<copyright>Copyright© 2008</copyright>
<description>Radio Gadget powered by SHOUTcast</description>
<icons>
<icon width="70" height="80" src="images/icon.png" />
</icons>
<hosts>
<host name="sidebar">
<base type="HTML" apiVersion="1.0.0" src="gadget.html" />
<permissions>Full</permissions>
<platform minPlatformVersion="1.0" />
<defaultImage src="images/drag.png"/>
</host>
</hosts>
</gadget>
Usability of the Gadget
A marquee effect is added to the gadget when the radio is playing, so as to scroll the station name from right to left. This is a special Internet Explorer–specific effect, but because gadgets are based on Internet Explorer browser objects, you can use any of the Dynamic HTML (DHTML) effects supported by Internet Explorer.
The Play button changes to a Stop icon when the gadget is playing the audio (see Figure 11.6).
FIGURE 11.6 The Radio Gadget displays the media player's status to the user.
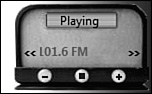
Notice the marquee effect in action in this figure: The status of the gadget is "Playing" and that the Play button has changed to display the Stop icon.
Developing the Gadget
Development of this gadget starts with the framework already created, but customized according to the Radio Gadget's requirements. The development can be divided into two parts:
- Integrating the existing framework
- Media Player functionality
Integrating the Existing Framework
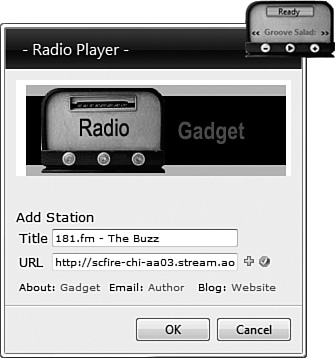
From the existing framework, we keep the settings for adding an item and customize it to accommodate the title and URL in the Settings page. The height of the Radio Gadget is just 88 pixels, so the Mini Me option is not required. The station title and station URLs are stored in memory in an array (see Figure 11.7).
FIGURE 11.7 The Settings page for the Radio Gadget has an option to add a new radio station.
Media Player Functionality
The second part is integrating the Media Player within the gadget. To embed the Media Player in the gadget, you need to add the plug-in code to the gadget.html file, as shown here. Next is a call to the different methods of the Media Player object mediaPlayer (ID in the OBJECT code). Note that SendPlayStateChangeEvents is added as a parameter to the Media Player and the parameter uimode. Notice also that uimode's value is set to invisible to hide the media player's interface.
<html>
<head>
<title>Radio Player</title>
<link href="style/gadget.css" rel="stylesheet" type="text/css" />
<script language="javascript" src="code/gadget.js" type="text/javascript"></script>
<script for="mediaPlayer" event="playstatechange(newstate)">
playStateChange(newstate);</script>
</head>
<body onload="loadMain()" scroll="no">
<g:background id="bkgImage"/>
<div id="gadgetText" >
<center><div id="playbackStatus">Ready</div></center>
<div id="nowPlaying" >Radio</div>
<div id="playbackControls">
<img id="PlayImage" onclick="PlayRadio()" src="images/play.png"/></div>
<div id="plus" >
<img id="plusImage" onclick="VolumeInc()" src="images/plus.png"/></div>
<div id="minus" >
<img id="minusImage" onclick="VolumeDec()" src="images/minus.png"/></div>
</div>
<OBJECT id="mediaPlayer" width="0" height="0"
style="position:absolute; left:0;top:0"
CLASSID="CLSID:6BF52A52-394A-11d3-B153-00C04F79FAA6"
type="application/x-oleobject">
<PARAM NAME="SendPlayStateChangeEvents" VALUE="True">
<PARAM NAME="AutoStart" VALUE="False">
<PARAM name="uiMode" value="invisible">
</OBJECT>
</body>
</html>
Table 11.1 lists all the parameters that can be used to customize Windows Media Player, along with their default values and descriptions. You can also add custom parameters, such as SendPlayStateChangeEvents, in the preceding code.
TABLE 11.1 Advanced Optional Parameter List for Windows Media Player
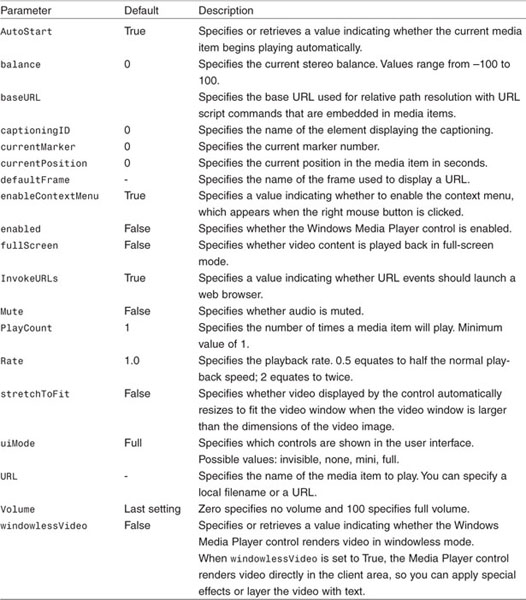
We need functions that make it possible to interact with the Media Player object from the gadget window. First of all we need to know when the state of the media player changes, such as for updating the status when the player state changes from ready to playing. Also needed is functionality to play and stop the Media Player object. We need functions for the following:
- State change of the Media Player object
- Radio play and stop functions
- Functions for volume control
State Change of the Media Player Object The SendPlayStateChangeEvents event, which was added as a parameter, updates the status to the user. If you add a custom event parameter, you need to tie it up with an actual JavaScript function. You can do this by using the following script tag in the head section of the gadget.html file:
<script for="mediaPlayer" event="playstatechange(newstate)">
playStateChange(newstate);</script>
A corresponding function in the gadget code (gadget.js) is needed to handle different status events and to change the Play button's icon between Play and Stop states. The following code shows the corresponding function in the code file:
function playStateChange(newstate)
{
switch (newstate){
case 1: // Stopped
playbackStatus.innerHTML = "Stopped";
PlayImage.src = PlayImage.src.replace(/stop/, "play");
break;
case 2: // Paused
playbackStatus.innerHTML = "Paused";
PlayImage.src = PlayImage.src.replace(/stop/, "play");
break;
case 3: // Playing
playbackStatus.innerHTML = "Playing";
PlayImage.src = PlayImage.src.replace(/play/, "stop");
break;
case 6: // Buffering
playbackStatus.innerHTML = "Buffering";
break;
case 7: // Waiting
playbackStatus.innerHTML = "Waiting";
break;
case 8: // Media Ended
playbackStatus.innerHTML = "Media Ended";
PlayImage.src = PlayImage.src.replace(/stop/, "play");
break;
case 9: // Transitioning
playbackStatus.innerHTML = "Connecting";
break;
case 10: // Ready
playbackStatus.innerHTML = "Ready";
PlayImage.src = PlayImage.src.replace(/stop/, "play");
break;
}
}
The playStateChange parameter updates the status text in the gadget as well as the image in the gadget window to reflect the current state of the Media Player object to the user. For example, if the gadget is trying to connect to a remote radio station, the status in the gadget says "Connecting."
The PlayRadio Function The next thing is to add the functionality that actually allows the Media Player object to play and stop, which is achieved by the PlayRadio function. The PlayRadio function also updates the station name and the station URL parameter in the Media Player object.
An element called NowPlaying is in the Gadget Main window:
<div id="nowPlaying" style="position:absolute">Radio</div>
This DIV is updated in the PlayRadio function:
function PlayRadio()
{
var nowPlayingText =""
if (PlayImage.src.indexOf("stop") > 0)
{
mediaPlayer.controls.stop();
// code update the title of the radio station
nowPlaying.innerHTML = nowPlayingText;
}
else
{
mediaPlayer.controls.play();
nowPlayingText =
// code to update the title of the radio station
nowPlaying.innerHTML = nowPlayingText;
}
}
NOTE
mediaPlayer (the ID given in the gadget.html file) is used to call the Media Player object's method directly.
Volume Functions
The last thing to add is functionality to control volume. Windows Media Player maintains the volume as a percentage from 0 (mute) to 100 (max volume). So, we set the default volume to 50% and increase and decrease the volume in 5% increments. Two knob images with plus and minus symbols call the VolumeInc() and VolumeDec() functions, respectively.
var currentVolume = "50";
function VolumeDec() // Decrease volume by 5
{
intVolume = parseInt(currentVolume);
if (intVolume > 9)
{
intVolume = (intVolume - 5)
changeVolume("" + intVolume);
currentVolume = "" + intVolume;
minus.title = "Volume down: " + intVolume
plus.title = "Volume up: " + intVolume
}
}
function VolumeInc()// increase volume by 5
{
intVolume = parseInt(currentVolume);
if (intVolume < 91)
{
intVolume = (intVolume + 5)
changeVolume("" + intVolume);
currentVolume = "" + intVolume;
minus.title = "Volume down: " + intVolume
plus.title = "Volume up: " + intVolume
}
}
function changeVolume(value)
{
currentVolume = "" + value + "";
mediaPlayer.settings.volume = currentVolume;
intVolume = parseInt(currentVolume);
}
The code updates the mediaPlayer.settings.volume property and also sets the tooltip text to show the user the current volume.
As you can see, the Windows Media Player object has very rich scripting support. It exposes a set of properties and methods that can be invoked directly from the script code.
NOTE
More information on Windows Media Player's scripting support can be found at MSDN under the title "Object Model Reference for Scripting." Here is the link: http://msdn2.microsoft.com/en-us/library/bb249259(VS.85).aspx.
The YouTube Video Gadget
This section deals with a YouTube Video Gadget. The gadget downloads RSS feeds from YouTube and plays the video links from the feed in the flyout window. The video is displayed by an embedded Flash Media Player. The YouTube Video Gadget provides the following functionality:
- Provide a simple implementation of a Flash Media Player
- Play YouTube videos, using a RSS feed provided by the website
- Display videos in the flyout window when in the docked state and in the gadget window when undocked
- Support search by keywords, using RSS feeds
Background—YouTube Video Feeds
YouTube is a popular video-sharing website that provides a number of RSS feeds for the media content. More information about the feeds can be found at http://www.youtube.com/rssls.
Some of the popular feeds provided by YouTube include
- Recently added videos at http://youtube.com/rss/global/recently_added.rss.
- Recently featured videos at http://youtube.com/rss/global/recently_featured.rss.
- Top favorites videos at http://youtube.com/rss/global/top_favorites.rss.
- Top rated videos at http://youtube.com/rss/global/top_rated.rss.
- YouTube RSS feeds also support feeds by tags. For example, use of the following URL dynamically creates a latest feed criteria for videos tagged with the keyword "Vista": http://www.youtube.com/rss/tag/vista.rss.
Let's see what an RSS feed looks like for a single item. The following shows the first item of the feed YouTube: Recently Added Videos:
<rss version="2.0" xmlns:media="http://search.yahoo.com/mrss/">
<channel>
<title>YouTube :: Recently Added Videos</title>
<link>http://youtube.com/rss/global/recently_added.rss</link>
<image>
<url>http://youtube.com/img/pic_youtubelogo_123x63.gif</url>
<link>http://youtube.com</link>
<title>YouTube</title>
<height>63</height>
<width>123</width>
</image>
<description>Recently Added Videos</description>
<item>
<author>[email protected] (3awnii)</author>
<title>Retoure El jadida - Azmmour</title>
<link>http://youtube.com/?v=oZf2K82eWRM</link>
<description><![CDATA[// ... ]]></description>
<guid isPermaLink="true">http://youtube.com/?v=oZf2K82eWRM</guid>
<pubDate>Wed, 21 Nov 2007 04:25:01 -0800</pubDate>
<media:player url="http://youtube.com/?v=oZf2K82eWRM" />
<media:thumbnail url="http://img.youtube.com/vi/oZf2K82eWRM/default.jpg" />
<media:title>Retoure El jadida - Azmmour</media:title>
<media:category label="Tags"> lmzanzen</media:category>
<media:credit>3awnii</media:credit>
<enclosure url="http://youtube.com/v/oZf2K82eWRM.swf" duration="45" type="applica
tion/x-shockwave-flash"/>
</item>
<item>
Second item details comes here
</item>
...~
</channel>
</rss>
A typical feed first describes the type of the feed (in the example it's "Recently Added Videos") and then has a list of up to 20 items in a sequence. Note the details in the "item" tag, which contains the information about that single video, title, media:player url, media: thumbnail, link and description tags, which will be used in the gadget.
Features and Technology
To create a gadget to play a video, you need to embed a media player in your gadget. YouTube uses a Flash Media Player for video streaming. The advantage of the Flash Media Player is that you don't need to add any supporting code for playback functions. The Flash Media Player used by YouTube has built-in functionality for playback, so after you embed the player and take care of the URL parameter, you are finished.
The following HTML is used to embed the Flash Media Player in an HTML page:
<object width="425" height="355">
<param name="movie" value="http://www.youtube.com/v/_S3LR6Tu7PE&rel=1"></param>
<param name="wmode" value="transparent"></param>
<embed src="http://www.youtube.com/v/_S3LR6Tu7PE&rel=1"
type="application/x-shockwave-flash"
wmode="transparent"
width="425"
height="355">
</embed>
</object>
The value of the video URL is the parameter that needs to be changed for each video. In the preceding example it was set to http://www.youtube.com/v/_S3LR6Tu7PE. This HTML is used to embed the player in the flyout window when the gadget is docked and inside the gadget window when the gadget is undocked.
The following portion of code illustrates how to create the Flash Media Player in the flyout window dynamically with the URL parameter:
function BuildVideoObject()
{
Video_HtmlString = "<object width="425" height="355">
<param name="movie" value="" + System.Gadget.Settings.read("sLink") + "
![]() &rel=1"></param>
&rel=1"></param>
<param name="wmode" value="transparent"></param>
<embed src=""+ System.Gadget.Settings.read("sLink") +"&rel=1" type=
![]() "application/x-shockwave-flash" wmode="transparent" width="425" height=
"application/x-shockwave-flash" wmode="transparent" width="425" height=
![]() "355"></embed>
"355"></embed>
</object>";
document.write(Video_HtmlString);
}
The BuildVideoObject function creates the HTML code to embed a Flash Media Player dynamically with the parameter System.Gadget.Settings.read ("sLink"). This parameter is updated every time the user clicks on a video to play.
Design Considerations
Because a YouTube Media Player gadget's look needs to be high tech and media related, I have used a TV theme for this gadget. I made the background of the gadget window a TV showing the thumbnail of the video, and I have used the flyout window to play the video.
Design considerations for this gadget involve
- Theme and images used in the gadget
- Layout of the gadget
- Usability of the gadget
Theme and Look and Feel
The theme of the gadget shown here is an LCD TV to reflect the video player functionality (see Figure 11.8). You can use any theme you want, but the idea is to have some relationship between the gadget's function and its look and feel.
FIGURE 11.8 The icon of the YouTube Video Gadget resembles a TV.
The next thing to do is create is the gadget window (see Figure 11.9).
The YouTube Video Gadget enables the user to navigate to the next video and includes an option to change the feed. This is implemented with the standard multiple page management functionality, which is already a part of the existing gadget framework.
FIGURE 11.9 The thumbnail of the video appears in the TV screen image.
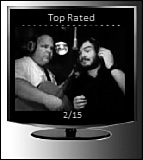
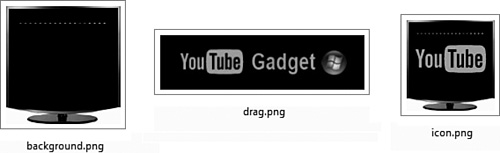
Figure 11.10 shows some of the images used in the gadget to match the TV theme.
FIGURE 11.10 All the images used in the gadget follow the same LCD TV theme.
Layout of the Gadget
The layout of the gadget is similar to the framework (see Figure 11.11) created for the MyBlog Gadget in Part II of this book. In this case, a flyout is used for playing the video and the Settings page is used to add feeds.
FIGURE 11.11 The standard layout from the existing framework is used for the gadget.
The gadget manifest must be modified to accommodate information specific to the media gadget. Note the change in name and description.
<?xml version="1.0" encoding="utf-8" ?>
<gadget>
<name>- Video Gadget -</name>
<namespace>Innovate.Gadgets</namespace>
<version>1.0</version>
<author name="Rajesh Lal">
<logo src="images/logo.png" />
<info url="www.innovatewithgadgets.com" />
</author>
<copyright>Copyright© 2008</copyright>
<description>YouTube Video Gadget</description>
<icons>
<icon width="70" height="80" src="images/icon.png" />
</icons>
<hosts>
<host name="sidebar">
<base type="HTML" apiVersion="1.0.0" src="gadget.html" />
<permissions>Full</permissions>
<platform minPlatformVersion="1.0" />
<defaultImage src="images/drag.png"/>
</host>
</hosts>
</gadget>
Most of the key value pairs are similar in the gadget manifest, as they are with all the gadgets. The image names icon.png and dragicon.png remain the same, but they now refer to images specific to the gadget, as shown previously in Figure 11.10.
Usability of the Gadget
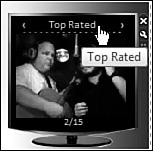
The design of the gadget also needs to ensure the gadget's usability. There are multiple video feeds, and each feed contains multiple videos. Users should be able to navigate through all the items of a single feed and also should be able to change the feed from the page level. For example, Figure 11.12 shows the second item (2/15) from the Top Rated video feed. The item number is displayed in the center bottom of the TV screen image and the feed title is displayed in the center top of the TV screen image.
FIGURE 11.12 The feed title is displayed to identify the feed, and the item number (2/15) shows the current item of that particular feed.
A feature that makes the YouTube Video Gadget more useful and fun is its undocked behavior. When the gadget is docked the flyout window displays the video (see Figure 11.13).
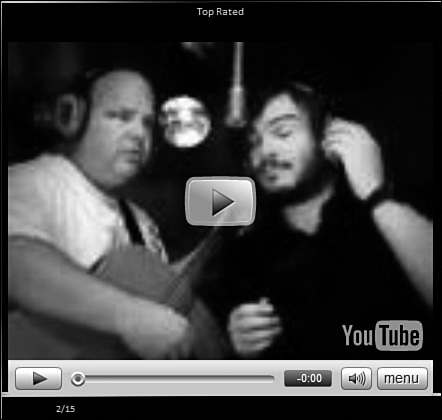
The flyout window disappears as soon as the focus is out of the window; this prevents the user from playing videos when the focus is on some other window. So, we added video play functionality for the gadget when it is undocked (see Figure 11.14) to remove the restriction and make it more usable.
FIGURE 11.13 The YouTube Video Gadget, when docked, shows the video in the flyout window.
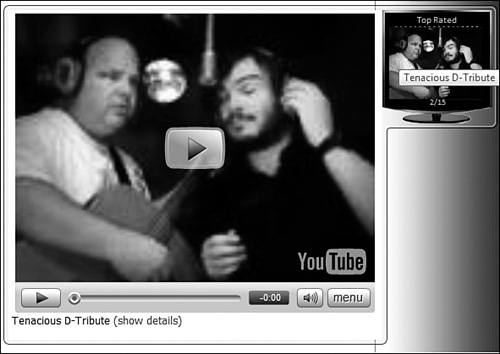
FIGURE 11.14 The YouTube Video Gadget, when undocked, shows the video in the gadget window and plays the video even if the focus is on some other window.
Developing the Gadget
It's possible to use the gadget framework created in Chapter 8, "Debugging and Deploying a Gadget," and customize it according to this gadget's requirements. The gadget's development can be divided into two parts:
- Integrating the existing framework
- Adding additional features
Integrating the Existing Framework
A "Search" item, which is used to create an RSS feed by a keyword, is added to the existing framework. This is added to the array in the memory, which has all the popular RSS feeds (see Figure 11.15).
FIGURE 11.15 The Settings page enables the user to add keyword-based feeds.
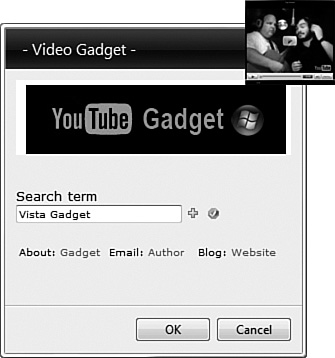
This is done in two parts: the HTML code in the Settings page and the JavaScript code in the code of the Settings page.
The Code Here is the HTML code that is added to include the search term functionality:
<font face = "verdana" size="2">Search term<br />
<input id="txtSearchTag" type="text" value="Vista Gadget"/>
<img alt = "add item" id = 'additem'style="cursor:hand" onclick="addItem()"
src ="../images/itemadd.gif" />
<img alt = "reset items to default set" id = 'resetitem' style="cursor:hand"
onclick="resetItem()" src ="../images/reset.gif" />
Note that the addItem() and resetItem() functions are called by the on-click event of both the Add Item image and Reset Item image.
The corresponding JavaScript code for Add Item functionality is as follows:
function addItem()
{
var Itemrepeat = false
for (i=0;i<System.Gadget.document.parentWindow.VideoURLs.length;i++)
{
var searchURL = "http://www.youtube.com/rss/tag/" +
document.getElementById("txtSearchTag").value + ".rss";
if (System.Gadget.document.parentWindow.VideoURLs[i] == searchURL)
{
document.getElementById("errorid").innerText = "Item already exists!";
Itemrepeat = true;
break;
}
}
if (Itemrepeat == false)
{
System.Gadget.document.parentWindow.VideoURLs.push(searchURL);
System.Gadget.document.parentWindow.VideoURLTitles.push("Search: "
![]() + document.getElementById("txtSearchTag").value );
+ document.getElementById("txtSearchTag").value );
document.getElementById("errorid").innerText = "Item added!";
System.Gadget.Settings.write("VideoURL",System.Gadget.document.
parentWindow.VideoURLs[System.Gadget.document.parentWindow.VideoURLs.
length-1]);
System.Gadget.Settings.write("VideoURLTitle",System.Gadget.document.
parentWindow.VideoURLTitles[System.Gadget.document.parentWindow.
VideoURLTitles.length-1]);
System.Gadget.document.parentWindow.CodeCurrentId = System.Gadget.
document.parentWindow.VideoURLTitles.length-1;
}
}
This code first checks whether the RSS feed already exists. If it does, it updates the innerText of the errorid element to the Item already exists! message; otherwise it adds the following RSS feed in the array of feeds:
http://www.youtube.com/rss/tag/" + txtSearchTag.value + ".rss";
The resetItem() function in the Settings page calls the DefaultCodes function in the gadget window code page, which clears all the user-added feeds and resets the feed array to the default set of feeds.
function resetItem()
{
System.Gadget.document.parentWindow.DefaultCodes();
}
Here is what the DefaultCodes function looks like:
function DefaultCodes()
{
VideoURLs.length = 0;
VideoURLTitles.length = 0;
VideoURLs[0] = "http://youtube.com/rss/global/top_rated.rss";
VideoURLTitles[0] = "Top Rated";
VideoURLs[1] = "http://youtube.com/rss/global/recently_added.rss";
VideoURLTitles[1] = "Recently Added";
VideoURLs[2] = "http://youtube.com/rss/global/recently_featured.rss";
VideoURLTitles[2] = "Recently Featured";
VideoURLs[3] = "http://youtube.com/rss/global/top_favorites.rss";
VideoURLTitles[3] = "Top Favorites";
// TOP VIEWED
VideoURLs[4] = "http://youtube.com/rss/global/top_viewed_today.rss";
VideoURLTitles[4] = "Today - Top Viewed";
VideoURLs[5] = "http://youtube.com/rss/global/top_viewed_week.rss";
VideoURLTitles[5] = "Week - Top Viewed";
VideoURLs[6] = "http://youtube.com/rss/global/top_viewed_month.rss";
VideoURLTitles[6] = "Month - Top Viewed";
VideoURLs[7] = "http://youtube.com/rss/global/top_viewed.rss";
VideoURLTitles[7] = "All Times - Top Viewed";
}
Additional Features
Apart from the standard framework function, the only function we need for making the YouTube Video Gadget is the undocked functionality. The undocked functionality is relevant for this gadget because you might need to have the gadget play video even when you are, for example, browsing a web page.
If the video play functionality is in only the Flyout window, and a new Internet Explorer session is opened while a video is playing, the flyout window collapses, instantly stopping the media. This is the basic nature of the flyout window. So, playing the video in the gadget itself makes sense. This requires additional coding to work in an undocked state.
Docked Versus Undocked To accomodate docked and undocked modes, you first have to set the dock and undock properties of the gadget object to functions. These functions will be called whenever the gadget state changes from docked state to undocked state and vice versa.
You have to create two methods that modify the gadget's appearance, the background image, and the dimensions of the gadget in the two different states.
System.Gadget.onUndock = undocked;
System.Gadget.onDock = docked;
function docked()
{
System.Gadget.background = "url('../images/docked.png')";
with (document.body.style)
{
width = 130;
height = 134;
}
ReSetup();
}
function undocked()
{
System.Gadget.background = "url('../images/undocked.png')";
with (document.body.style)
{
width = 442;
height = 420;
}
ReSetup();
}
These two functions change the gadget's size and its background image and call the ReSetup function. The ReSetup function then calls the systemSetup functions, the resize function, and the getRSS function to repopulate the feeds.
Another function related to the docked versus undocked mode is the Resize function:
function Resize()
{
if (System.Gadget.docked)
{
System.Gadget.background = "url(../images/background.png)";
document.getElementById("contenttable").height = "90%";
document.getElementById("content").style.top ="20px";
document.getElementById("content").style.width = "110px";
document.getElementById("content").style.left = "8px";
document.getElementById("content").style.height = "100px";
document.getElementById("content").style.fontsize ="11px";
document.getElementById("mylogo").style.left ="2px";
document.getElementById("mylogo").style.top ="70px";
document.getElementById("mylogo").style.height="70px";
document.getElementById("pagingbar").style.top = "100px";
}
else
{
System.Gadget.background = "url(../images/undocked.png)";
document.getElementById("contenttable").height = "384px";
document.getElementById("content").style.top ="30px";
document.getElementById("content").style.width = "430px";
document.getElementById("content").style.left = "8px";
document.getElementById("content").style.height = "384px";
document.getElementById("content").style.fontsize ="11px";
document.getElementById("mylogo").style.left ="2px";
document.getElementById("mylogo").style.top ="70px";
document.getElementById("mylogo").style.height="70px";
document.getElementById("pagingbar").style.top = "400px";
}
}
The style of the gadget window elements is changed based on the property System.Gadget.docked.
The Gadget Code The gadget window holds the thumbnail of the video in the flyout window when the gadget is docked. When the gadget is undocked, the video player is embedded into the gadget window itself:
if (System.Gadget.docked)
{
document.getElementById("cell" + (cell)).innerHTML = '<div onclick=
![]() "showFlyout('' + i + '')" ><div class="sub" title=''+ myTitle +''>'+
"showFlyout('' + i + '')" ><div class="sub" title=''+ myTitle +''>'+
![]() showimage +'</div></div>';
showimage +'</div></div>';
}
else
{
myVideo_HtmlString = "<object width="425" height="355"><param name=
![]() "movie" value="" + rssLink + "&rel=1"></param><param name="wmode"
"movie" value="" + rssLink + "&rel=1"></param><param name="wmode"
![]() value="transparent"></param><embed src=""+ rssLink +"&rel=1" type=
value="transparent"></param><embed src=""+ rssLink +"&rel=1" type=
![]() "application/x-shockwave-flash" wmode="transparent" width="425" height=
"application/x-shockwave-flash" wmode="transparent" width="425" height=
![]() "355"></embed></object>";
"355"></embed></object>";
document.getElementById("cell" + (cell)).innerHTML = myVideo_HtmlString;
}
The source code that comes with this chapter contains both the gadgets discussed here. Most of the functionality of the YouTube Video Gadget is similar to that of the RSS Feed gadget discussed in Part II of this book.
Ajax methodology is used to download the feed, which is then parsed and displayed to the user in the gadget window. The link to the video is dynamically populated to the flyout window when a particular video item is clicked. The flyout also contains a description of the video. All the common functionalities are not detailed here and users are encouraged to open the source of the corresponding gadget in Visual Studio 2005 or Visual Studio Express, as a website, and go through the gadget's layout and source code.