
Chapter 12. Silverlight World Clock—Utility Gadget
"Technology is just a tool. In terms of getting the kids working together and motivating them, the teacher is the most important."
—Bill Gates
IN THIS CHAPTER
- The Silverlight Gadget
- Design Considerations
- Developing the Gadget
- Creating a Sidebar Gadget Using Microsoft Popfly
- Where to Go from Here
The Silverlight Gadget
The goal of this chapter is to leverage Microsoft Silverlight technology in a Sidebar gadget in the form of a world clock. A World Clock Gadget displays a clock for multiple cities. It's a simple task that enables us to concentrate more on the technology and implementation part of the job. Microsoft Silverlight is a cross-browser, cross-platform plug-in for delivering the next generation of media experiences and rich interactive applications. It supports scripting languages such as JavaScript as well as high-level programming languages such as .NET. The gadget model demonstrated in this chapter uses JavaScript to implement Silverlight.
The Silverlight World Clock uses Microsoft Silverlight 1.1 technology to create a clock gadget that not only has compelling graphics but is also feature rich. This is also a good tutorial for creating a gadget with Extensible Application Markup Language (XAML) and a Silverlight plug-in with JavaScript.
The gadget is developed with the following goals:
- Implement Microsoft Silverlight technology in the Sidebar
- Create a gadget with compelling graphics and animation
- Make a feature-rich World Clock Gadget with multiple locations
- Provide the ability to extend the gadget with new locations over time
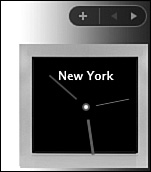
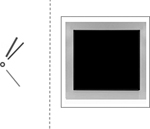
Figure 12.1 shows how the gadget looks. The clock hand pointing down is the hour hand, the hand pointing to the left top is the minute hand, and the one pointing to the right is the second hand. Although you can't see it here, the hands are each color-coded: green, blue and red, respectively. The location, which controls the time zone, is also displayed in the top of the gadget. In this case it is New York. When you click on the location, the gadget time changes to the next stored locale based on its time zone.
FIGURE 12.1 A Silverlight World Clock gadget hosted in the Sidebar displays time and location.
Background—Microsoft Silverlight
Microsoft Silverlight helps create a rich interactive application (RIA). An RIA is an application that is hosted in a web browser but behaves like a desktop application.
Here are some of the popular features of Silverlight applications with respect to Sidebar gadget development:
- Includes compelling 2D vector graphics and animation
- Supports Ajax for responsive Internet applications
- Streams video/audio and scales video quality from mobile device to 720 progressive HDTV video modes
NOTE
To run a Silverlight application you need to install a browser plug-in of approximately 4MB. The example in this chapter uses Silverlight 1.0, which can be downloaded from http://www.microsoft.com/silverlight/downloads.aspx.
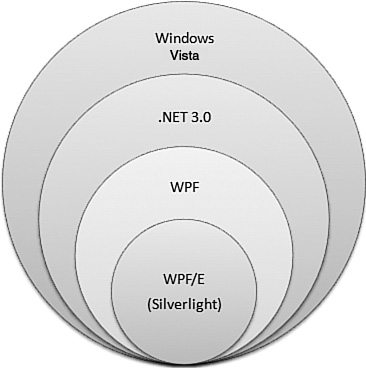
Origin of Silverlight
Silverlight, also known as WPF/E (Windows Presentation Foundation/Everywhere), is a subset of the Windows Presentation Foundation (WPF). It's a plug-in meant for web browsers. WPF is a part of the .NET Framework 3.0 application programming interface (API), as illustrated in Figure 12.2. Note that although .NET 3.0 comes pre-installed with Windows Vista, it can also be installed in Windows XP.
FIGURE 12.2 Overview of Silverlight and related technologies.
WPF takes advantage of advanced 3D graphics capabilities in modern machines, which are not available in Silverlight. The Aero interface provides transparent, glass-like window borders.
Figure 12.3 shows a bird's eye view of the programming model of a Silverlight application in a web page.
FIGURE 12.3 The Microsoft Silverlight programming model is a plug-in-based object model and supports multiple programming languages.
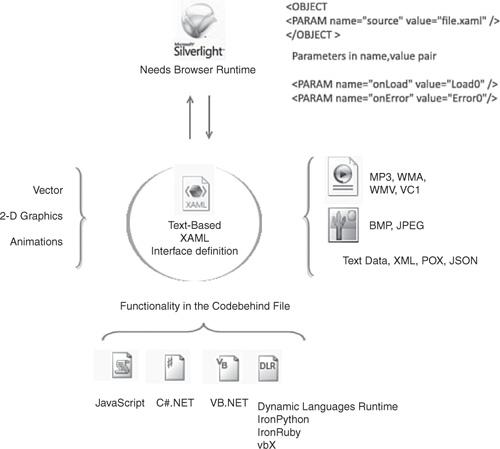
A Silverlight application is embedded in a web page. The embedded object takes input from an XAML file and dynamically creates the application's user interface. The XAML file contains all the information about the vector, graphics, animations, and links to audio, video, and image resources.
The core functionality of the interaction with the user and data comes from the code-behind file, which can be written in JavaScript, a .NET language such as C# or Visual Basic, or can come from an advanced programming language such as IronPython.
Features and Technology
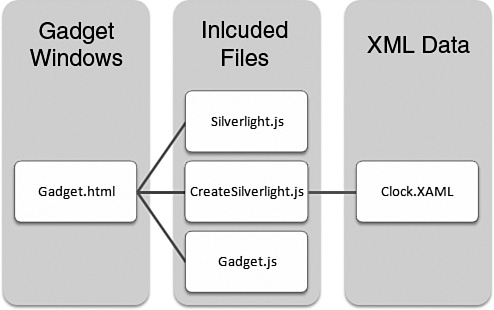
To implement Silverlight technology in the Sidebar, it's necessary to include a number of Silverlight-specific files in the gadget. Script code is also needed to interact with the Silverlight object and the XAML file that dynamically creates the Silverlight object's interface. The World Clock Gadget displays the time for multiple locales and is based on an XAML file (see Figure 12.4).
FIGURE 12.4 A Silverlight clock displaying the time for Frankfurt, Germany.

As illustrated in Figure 12.5, the following technology is used for the gadget:
- Script for creating the Silverlight object and interaction
- Microsoft Silverlight for the gadget
- XAML file for vector graphics and animation
FIGURE 12.5 Embedding a Silverlight object in an HTML page requires including a bunch of Silverlight-specific JavaScript files and a core XAML file.
Let's see how these technologies are implemented in the gadget, starting with the gadget window, which holds the Silverlight object.
JavaScript for Creating the Silverlight Object
The gadget's main window includes a DIV element that embeds the Silverlight object and the Silverlight.js CreateSilverlight.js, and code.js and script files. The following shows the HTML code of the gadget window, the gadget.html file that embeds the Silverlight object.
<html xmlns="http://www.w3.org/1999/xhtml">
<head>
<title>Silverlight World Clock</title>
<script type="text/javascript" src="Silverlight.js"></script>
<script type="text/javascript" src="CreateSilverlight.js">
</script>
<script type="text/javascript" src="code.js"></script>
<style type="text/css">
.silverlightHost {
height: 130px;
width: 126px;
}
</style>
</head>
<body>
<div id="SilverlightControlHost" class="silverlightHost">
<script type="text/javascript">
createSilverlight();
</script>
</div>
</body>
</html>
Note the DIV element with the ID SilverlightControlHost, which, as the name suggests, hosts the Silverlight object and the style class silverlightHost. The silverlightHost style class sets the height and width of the Silverlight object. The Silverlight element also includes a script function call to create createSilverlight(), which is defined in the included script file CreateSilverlight.js.
CreateSilverlight.js does what it says: It takes an XAML file (Clock.XAML) as a parameter and, based on the interface defined on the XAML file, creates a Silverlight object. Here is the createSilverlight() function to show the inner workings of the gadget:
function createSilverlight()
{
Silverlight.createObjectEx
(
{
source: "code/Silverlightclock.xaml",
parentElement: document.getElementById("SilverlightControlHost"),
id: "SilverlightControl",
properties: {
width: "130",
height: "126",
isWindowless: "true",
background:'#00000000',
version: "1.0"
},
events: { onLoad: handleLoad }
}
);
}
The code takes the element SilverlightControlHost from the parent document (gadget.html) and creates a SilverlightControl with the properties defined. Also note the event handleLoad, which is added to the Silverlight object that will be triggered when the Silverlight object is loaded.
Microsoft Silverlight
You have seen the Silverlight programming model for a web page. The programming model used for the gadget is slightly different in the way that a Sidebar gadget allows only scripting languages. Higher-level programming languages are not allowed in a Sidebar gadget.
Figure 12.6 shows a version of the Silverlight model that applies to gadget development.
FIGURE 12.6 Using the Silverlight programming model in a Sidebar gadget is similar to embedding Silverlight in a web page, but it does not allow high-level programming languages.
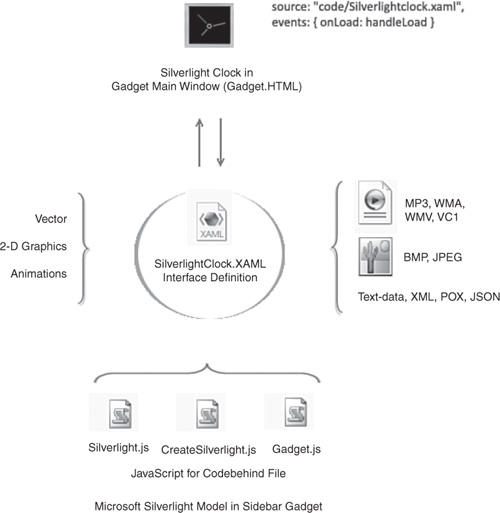
The plug-in is embedded in the gadget's main window file, gadget.html. Three script files are used for creating and interacting with the data.
The main logic resides in Gadget.js (as in the framework), which directly manipulates data. Silverlight.js is a Microsoft-supplied JavaScript file for creating an instance of the object. CreateSilverlight.js is where the Silverlight object is initialized with the XAML file and other required properties.
Extensible Application Markup Language
Extensible Application Markup Language is an-XML based language to describe an application's user interface. The core of Silverlight is an XAML file that is used to create compelling graphics, 2D vector images, and animations (see Figure 12.7).
FIGURE 12.7 The XAML file is XML and can be manipulated using any supported programming language.
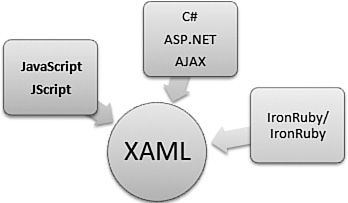
Programming languages that can be used with Microsoft Silverlight include JavaScript, .NET languages, and advanced dynamic languages. For the Sidebar gadget, only JavaScript is needed to create and interact with a Silverlight application. Let's see a sample XAML file.
Hello World XAML File To create the XAML file, open Windows Notepad and type the following:
<Page xmlns="http://schemas.microsoft.com/winfx/2006/xaml/presentation"
![]() xmlns:sys="clr-namespace:System;assembly=mscorlib" xmlns:x=
xmlns:sys="clr-namespace:System;assembly=mscorlib" xmlns:x=
![]() "http://schemas.microsoft.com/winfx/2006/xaml" >
"http://schemas.microsoft.com/winfx/2006/xaml" >
<Grid>
<TextBlock Text="Hello World" />
</Grid>
</Page>
When you are finished, save the file as HelloWorld.xaml. While saving the file, make sure you select All Files (*.*) in the Save as Type drop-down. To view the XAML file, open the file in Internet Explorer.
TIP
You can also use XAMLPAD.exe to create and edit XAML files. XAMLPad can be downloaded from http://msdn2.microsoft.com/en-us/library/ms742398.aspx.
Microsoft Expression Studio is one of the main tools you can use to create an XAML file. You can also create the Silverlight application itself by using Microsoft Visual Studio 2008. Other tools that can be useful for creating XAML are XAMLPad and Aurora XAML Editor.
Design Considerations
The focus of the chapter is to implement the Silverlight technology. And because the gadget is a utility gadget, the design should be simple and intuitive. The design considerations involve
- Theme and images used in the gadget
- Layout of the gadget
- Usability of the gadget
Theme and Images
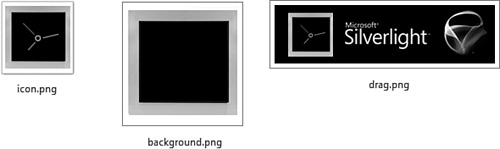
The theme of a World Clock Gadget needs to be simple and intuitive (see Figure 12.8). Because the animation of the clock is taken care by the XAML file, you have to create images for the background of the clock, the icon image, and the drag image.
FIGURE 12.8 The simple and intuitive clock icon for the Silverlight gadget.
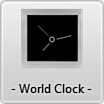
Figure 12.9 shows some of the images used in the gadget to simulate the Silverlight and Clock theme.
FIGURE 12.9 Different images used in the gadget with the clock theme.
Layout of the Gadget
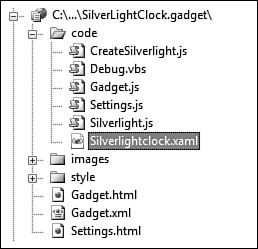
The gadget's framework is similar to our existing gadget framework. There are three new files: Silverlight.js, CreateSilverlight.js and SilverlightClock.XAML (see Figure 12.10). These files are specifically included for creating and embedding a Silverlight object. Other file structure and layout aspects of this gadget are similar to those of the existing framework.
FIGURE 12.10 The gadget's layout has additional files related to Silverlight.
The gadget manifest changes to accommodate information specific to the Silverlight World Clock Gadget. In particular, the name and description are among the changes that need to be implemented. The names of icons and the drag image, however, remain the same. The only other items that need to be changed are the actual images in the image folder.
<?xml version="1.0" encoding="utf-8" ?>
<gadget>
<name>Silverlight Clock</name>
<namespace>Innovate.Gadgets</namespace>
<version>1.0</version>
<author name="Rajesh Lal">
<logo src="images/logo.png" />
<info url="www.innovatewithgadgets.com" />
</author>
<copyright>Copyright© 2007</copyright>
<description>Shiny Silverlight Clock</description>
<icons>
<icon width="70" height="80" src="images/icon.png" />
</icons>
<hosts>
<host name="sidebar">
<base type="HTML" apiVersion="1.0.0" src="gadget.html" />
<permissions>Full</permissions>
<platform minPlatformVersion="1.0" />
<defaultImage src="images/drag.png"/>
</host>
</hosts>
</gadget>
Usability of the Gadget
The Silverlight World Clock is meant to keep time for multiple locales. The users can add different cities with their local time shown in the Settings page. By clicking on the name of the city in the gadget, the users can traverse from one time zone location to another.
For example, Figure 12.11 shows four instances of the Silverlight World Clock Gadget for the different time zones of Frankfurt, San Diego, New York, and Mumbai.
FIGURE 12.11 The World Clock Gadget shows multiple time zones with the name of the city.
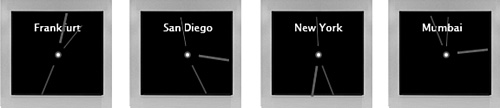
Clicking on the name of a city sets the clock to the that city, with its different time zone stored in the memory.
Developing the Gadget
So far you've seen the gadget's file structure and its layout. Its design element and usability have also been addressed. This section discusses the core functionality and the development of the gadget. It starts with the gadget framework and then customizes it according to its unique requirements.
The development of the gadget can be divided into three parts:
- Integrating the existing framework
- Creating the XAML file
- Integrating the Silverlight clock logic
Integrating the Existing Framework
In the existing framework, two options have been added: a text box for adding a new time and location and buttons to add a new city and reset to defaults (see Figure 12.12).
FIGURE 12.12 The Settings page of the gadget accommodates the addition of a new city and its time.
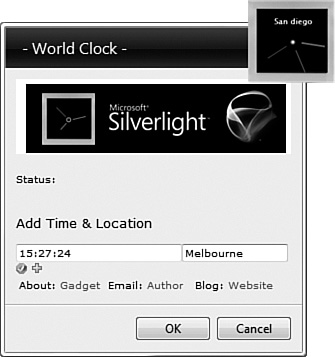
When a new location is added, the time difference of the new location is saved with respect to the current time of the computer. This difference is used to calculate the current time of that location in the future.
Four arrays store the values in the main gadget:
var ClockLocations= new Array();
var ClockValuesHourDiff= new Array();
var ClockValuesMinDiff= new Array();
var ClockValuesSecDiff= new Array();
When the user adds a new locale, the current time parameters are subtracted from the new time and stored in the array. Here is the code for adding a new locale with new time parameters:
var now = new Date();
var clockhours = now.getHours();
var clockminutes = now.getMinutes()
var clockseconds = now.getSeconds();
var hourPart= Mid(document.getElementById("txtTimeValue").value,0,2);
var minutePart= Mid(document.getElementById("txtTimeValue").value,3,2);
var secondPart= Mid(document.getElementById("txtTimeValue").value,6,2);
ClockLocations.push(timeLocation);
ClockValuesHourDiff.push(hourPart-clockhours);
ClockValuesMinDiff.push(minutePart-clockminutes);
ClockValuesSecDiff.push(secondPart-clockseconds);
When the user resets items in the Settings page, the DefaultTime function is called from the Settings page, and it resets the array to only one location, MyHome, -as illustrated here:
System.Gadget.document.parentWindow.DefaultTimes();
Function DefaultTimes() {
ClockLocations.length=0;
ClockValuesHourDiff.length=0;
ClockValuesMinDiff.length=0;
ClockValuesSecDiff.length=0;
var now = new Date();
ClockLocations[0] = "My Home";
ClockValuesHourDiff[0] = now.getHours();
ClockValuesMinDiff[0] = now.getMinutes() ;
ClockValuesSecDiff[0] = now.getSeconds();
}
As you can see in the code, the MyHome location will always have the current time from the computer. The next thing to tackle is the creation of the XAML file.
The XAML File
The XAML file, SilverlightClock.XAML, is the core of the user interface. It has a root element, Canvas, which hosts all the vector graphics and animation of the elements in the application. Figure 12.13 shows an overview of the XAML file that is used in the World Clock Gadget.
FIGURE 12.13 An XAML file is a formatted XML file.
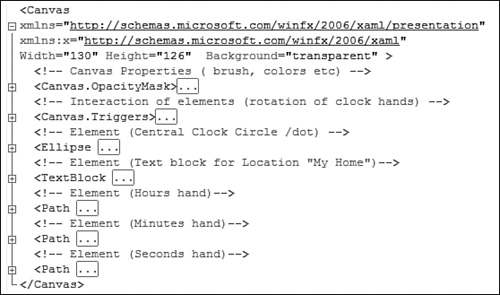
Elements of the SilverlightClock.XAML File
The XAML file for the World Clock Gadget includes some elements for the clock's hands and code for their animation. Note that there are no images in the XAML file. The complete clock animation is a vector image created dynamically based on the coordinates supplied in the XAML file.
Canvas.Triggers contains the elements that are animated. Ellipse, TextBlock, Path, and other items are elements of the user interface. The Path elements are used for the clock hands, which are animated. There are three clock hands with the names hourAnimation, minuteAnimation, and secondAnimation, as shown in the next section. The next section discusses the XAML code for the animation.
The Animation
The clock has animation for three hands. The rotation of the clock hands requires defining the element and setting up the environment for the animation. The following code shows the definition of the hours hand element:
<!-- Element (Hours hand)-->
<Path x:Name="HourHand" Stretch="Fill" Stroke="#FF008000"
StrokeThickness="3" Width="33.413" Height="21.259"
Canvas.Left="23.721"
Canvas.Top="70.121"
Data="M252,242 L298,183"
RenderTransformOrigin="1.287,-0.266" >
<Path.RenderTransform>
<RotateTransform Angle="180" x:Name="hourHandTransform"/>
</Path.RenderTransform>
</Path>
The hours hand element is defined as a <Path> with name HourHand. You will also notice the attributes such as width and height of the hour hand, stroke for color, and Canvas.Left and Canvas.Top for the location of the hand. Other attributes are used to render the hand on the Silverlight object. The tag Path.RenderTransform identifies the name of the actual animation hourHandTransform, which is defined in the Canvas.Triggers portion as shown next.
The animation of the elements in the XAML file is handled by the Canvas.Trigger element in the XAML file:
<Canvas.Triggers>
<EventTrigger RoutedEvent="Canvas.Loaded">
<BeginStoryboard>
<Storyboard>
<!-- This animation targets the hour hand transform -->
<DoubleAnimation x:Name="hourAnimation"
Storyboard.TargetName="hourHandTransform"
Storyboard.TargetProperty="Angle" From="180" To="540"
Duration="12:0:0" RepeatBehavior="Forever"/>
<!-- This animation targets the minute hand transform -->
<DoubleAnimation x:Name="minuteAnimation"
Storyboard.TargetName="minuteHandTransform"
Storyboard.TargetProperty="Angle" From="180" To="540"
Duration="1:0:0" RepeatBehavior="Forever"/>
<!-- This animation targets the second hand transform -->
<DoubleAnimation x:Name="secondAnimation"
Storyboard.TargetName="secondHandTransform"
Storyboard.TargetProperty="Angle" From="180" To="540"
Duration="0:1:0" RepeatBehavior="Forever"/>
</Storyboard>
</BeginStoryboard>
</EventTrigger>
</Canvas.Triggers>
The first part of the Triggers code defines the animation for the hour hand, which is defined as hourAnimation. It has the TargetName property set to hourHandTransform. The angle property has a value from 180 to 540, which signifies a full 360° rotation in a clockwise direction.
As you might have noticed, the animation code needs to be inside the storyboard element in a XAML file. This is by design.
The second part of the code is the duration of the animation for the hour hand, Duration="12:0:0", which signifies that in 12 hours the hour hand will make a complete rotation from 180° to 540°. Similarly, the minute hand duration is Duration="1:0:0", which means the minute hand will complete a rotation in one hour. And for the Seconds hand we have Duration="0:1:0", which means the rotation has to be completed every minute.
Silverlight Clock Logic
The clock logic of the gadget can be described in the following parts:
- The XAML file creates an animated clock.
- The gadget code sets the hour, minute, and second hands to specific angles based on the selected local time.
- Gadget settings enable the user to add multiple locations and times, which are stored in an array in memory.
- When the user clicks on the location, the next array item is displayed and the clock is adjusted to the time for that local region
XAML File Creates the Clock
In Figure 12.14, the left side shows the clock with animation that is created by the XAML file; the right side is a transparent image that becomes the background of the gadget and the host window of the clock.
FIGURE 12.14 The clock hands are created dynamically by the XAML file (left) and the background image (right) of the clock.
The XAML file contains the image in the vector file along with the animation information. Note that the XAML file does not contain any logic that allows it to interact with the outside world. Without the code file, the XAML file would have the three clock hands rotating forever, based on the values in the animation.
Next we implement the hour, minute, and second hands:
<!-- Element (Hours hand)-->
<Path x:Name="HourHand" Stretch="Fill" Stroke="#FF008000"
StrokeThickness="3" Width="33.413" Height="21.259"
Canvas.Left="23.721" Canvas.Top="70.121"
Data="M252,242 L298,183"
RenderTransformOrigin="1.287,-0.266" >
<Path.RenderTransform>
<RotateTransform Angle="180" x:Name="hourHandTransform"/>
</Path.RenderTransform>
</Path>
<!-- Element (Minutes hand)-->
<Path x:Name="MinuteHand" Stretch="Fill" Stroke="#FF1B4AEE"
StrokeThickness="2" Width="30.042" Height="25.321"
Canvas.Left="28.2" Canvas.Top="72.352"
Data="M252,242 L298,183"
RenderTransformOrigin="1.287,-0.266" >
<Path.RenderTransform>
<RotateTransform Angle="180" x:Name="minuteHandTransform"/>
</Path.RenderTransform>
</Path>
<!-- Element (Seconds hand)-->
<Path x:Name="SecondHand" Stretch="Fill" Stroke="#FFFF0000"
StrokeThickness="1" Width="27.339" Height="22.207"
Canvas.Left="31.445" Canvas.Top="71.415"
Data="M252,242 L298,183"
RenderTransformOrigin="1.287,-0.266">
<Path.RenderTransform>
<RotateTransform Angle="180" x:Name="secondHandTransform"/>
</Path.RenderTransform>
</Path>
The code generates the vector images for the hour, minute, and second hands. Note that each hand is related to a transformation that is defined in the Canvas.Triggers section. When the gadget is loaded, the XAML file reads the defining information (width, height, top, left, data, and so on) and creates the clock for the first time. Note that these attributes merely define the user interface and the animation of the clock. The XAML file does not include the logic to set the time for a particular region. This logic is added in the script that is called when the gadget is loaded for the first time.
Gadget Code Sets the Time
The gadget, when first loaded, calls the onload event (handleLoad) of the Silverlight object, which is defined in the CreateSilverlight code file:
function createSilverlight()
{
Silverlight.createObjectEx
(
{
source: "code/Silverlightclock.xaml",
parentElement: document.getElementById("SilverlightControlHost"),
id: "SilverlightControl",
properties: {
width: "130",
height: "126",
isWindowless: "true",
background:'#00000000',
version: "1.0"
},
events: { onLoad: handleLoad }
}
);
}
The HandleLoad Function When the Silverlight object is loaded, it calls the handleLoad function in the gadget code:
function handleLoad(control, userContext, rootElement)
{
SilverlightControl = control;
theTextBlock = SilverlightControl.content.findName("location");
theTextBlock.addEventListener("MouseLeftButtonDown", "txtLClicked");
setClock(0);
}
The handleLoad function does two things:
- Adds an event to capture mouse clicks in the location text area
- Sets the clock for the current system time
The SetClock Function Here is the part of the SetClock function to set the clock hands to the current time:
function setClock(clockValue) {
var now = new Date();
var hourAnimation = SilverlightControl.content.findName("hourAnimation");
var minuteAnimation = SilverlightControl.content.findName("minuteAnimation");
var secondAnimation = SilverlightControl.content.findName("secondAnimation");
// now is the current time in JavaScript
clockhours = now.getHours();
clockminutes = now.getMinutes();
clockseconds = now.getSeconds();
// Find the appropriate angle (in degrees) for the hour hand
// based on the current time.
if (hourAnimation)
{
angle = (clockhours/12)*360 + clockminutes/2
angle += 116.5;
hourAnimation.from = angle.toString();
hourAnimation.to = (angle + 360).toString();
}
if (minuteAnimation)
{
angle = (clockminutes / 60) * 360;
angle += 127;
minuteAnimation.from = angle.toString();
minuteAnimation.to = (angle + 360).toString();
}
if (secondAnimation)
{
angle = (clockseconds / 60) * 360;
angle += 127;
secondAnimation.from = angle.toString();
secondAnimation.to = (angle + 360).toString();
}
}
The function sets the time, based on the current time and the existing value of the hour, minute, and second hands. The values 116.5, 127, and 127 are added to the current hour, minute, and second settings to calculate the current time. This uses the JavaScript built-in Date function to get the current time.
var now = new Date();
// now is the current time in JavaScript
clockhours = now.getHours();
clockminutes = now.getMinutes();
clockseconds = now.getSeconds();
Based on the values, the angle is calculated and then the hour, minute, and second hands are set to the corresponding angles.
Multiple Locales
The gadget uses an array to save multiple locales along with the time difference of the locales with respect to the system time. Here is how it is managed in the background (using the sample data):
function DefaultTimesAdd()
{
ClockLocations.length=0;
ClockValuesHourDiff.length=0;
ClockValuesMinDiff.length=0;
ClockValuesSecDiff.length=0;
var now = new Date();
var GMTminus8 = 0;
// I have taken GMT - 8 as the current home
// If your location is GMT minus 6 initialze the value of
// GMTminus8 in the the above line as 2
// the new value will be "var GMTminus8 = 2";
ClockLocations[0] = "San Diego";
ClockValuesHourDiff[0] = GMTminus8;
ClockValuesMinDiff[0] = 0 ;
ClockValuesSecDiff[0] = 0;
ClockLocations[1] = "New York";
ClockValuesHourDiff[1] = GMTminus8 + 3 ;
ClockValuesMinDiff[1] = 0;
ClockValuesSecDiff[1] = 0;
ClockLocations[2] = "Mumbai";
ClockValuesHourDiff[2] = GMTminus8 -1;
ClockValuesMinDiff[2] = 30;
ClockValuesSecDiff[2] = 0;
ClockLocations[3] = "Frankfurt";
ClockValuesHourDiff[3] = GMTminus8-3;
ClockValuesMinDiff[3] = 2;
ClockValuesSecDiff[3] = 0;
}
This is based on sample data. If you want to add a time and location, add the hour, minute, and second difference from the current time in the array. If the current time is for San Diego, the time difference for New York will be hour 3, minutes 0, seconds 0.
User Clicks on the Next Locale
The mouse click event is added in the following text block:
theTextBlock.addEventListener("MouseLeftButtonDown", "txtLClicked");
The txtLClicked method changes the text to the next locale:
function txtLClicked(sender, args)
{
changeLocation(1);
theTextBlock.Text = ClockLocations[ClockCurrentId];
}
You can implement the changeLocation function as follows:
function changeLocation(val)
{
ClockCurrentId = ClockCurrentId + val;
if (ClockCurrentId == -1)
{
ClockCurrentId =ClockLocations.length -1;
}
if (ClockCurrentId == ClockLocations.length)
{
ClockCurrentId = 0;
}
setClock(1)
}
The setClock function updates the clock time, depending on whether the current system time can be used or the system time needs to be adjusted for the locale time.
if (clockValue==0) // 0 = take the value of the system clock
{ // now is the current time in JavaScript
clockhours = now.getHours();
clockminutes = now.getMinutes();
clockseconds = now.getSeconds();
}
else
{
clockhours = now.getHours() + ClockValuesHourDiff[ClockCurrentId];
clockminutes =now.getMinutes() +ClockValuesMinDiff[ClockCurrentId];
clockseconds = now.getSeconds() + ClockValuesSecDiff[ClockCurrentId];
}
Creating a Sidebar Gadget Using Microsoft Popfly
Microsoft Popfly is a website that allows users to create online mashups, web pages, widgets, and even Vista Sidebar gadgets using Microsoft Silverlight and the set of online tools provided.
NOTE
Mashups are web modules that combine the functionality of two or more websites or services.
It provides interactive tools to drag and drop services provided by multiple vendors and web applications, and creates innovative web modules. Popfly requires users to log in with their Windows Live ID.
Website Comparison Gadget
This section shows the step-by-step process of creating a gadget for website comparison using Microsoft Popfly. Imagine you want to know the popularity of three websites in Windows Live Search. The criteria is based on the number of search results in which each of the following websites appears in Live Search (www.Live.com):
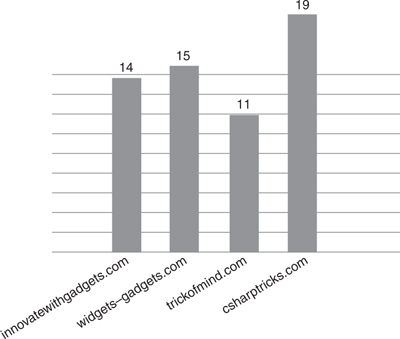
For example if you search for "www.innovatewithgadgets.com" and get 14 results for it, as well as 15 for www.widgets-gadgets.com, 11 for www.trickofmind.com, and 19 for , you will assume that csharptricks.com is the most popular of all. The second part is the display of the gadget in the form of a bar graph that appears after you get the values of the numbers of search results for each of the websites (see Figure 12.15).
FIGURE 12.15 The bar graph reflects the number of results in Live Search for each website.
Creating a Mashup Using Microsoft Popfly
This section looks at how you can use Microsoft Popfly to create a mashup. Microsoft Popfly has multiple modules, also called blocks, which can be used to create mashups and then convert them into Sidebar gadgets. In this case the mashup being built is one that uses Live.com and bar graph modules.
The process is twofold, first creating the mashup and then porting it to the Vista Sidebar. For this scenario the following are needed:
- Four Live.com search modules, one for each website
- One bar graph module, which takes the output of the search modules and displays it all in a graph
After you log in to Microsoft Popfly, follow the step-by-step process:
1. Find the item labeled Live Search in the list on the left under the Tools category.
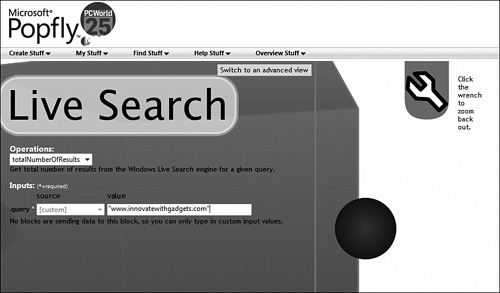
2. Drag the Live Search block into the middle of the screen, which is also called as the design surface. Click on the wrench beside the block to zoom in. Change the operations to totalNumberOfResults and the query value to the first website, www.innovatewithgadgets.com, as shown in Figure 12.16.
FIGURE 12.16 The Live Search module for the website www.innovatewithgadgets.com.
3. Click on the wrench to get back to the design surface.
4. Repeat step 1 through step 3 for each of the three remaining websites, www.widgets-gadgets.com, www.trickofmind.com, and www.csharptricks.com.
5. Find the item labeled Bar Graph in the list on the left, under the Display category.
6. Drag the Bar Graph block into the middle of the screen.
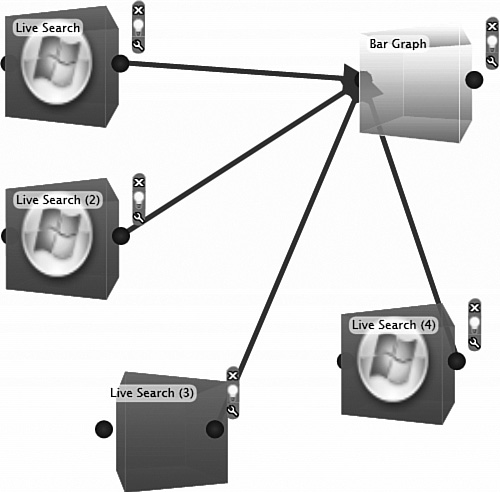
7. Click on one of the Search blocks and then click the Bar Graph block. This joins the Search block with the Bar Graph block. Do this for each of the Search blocks. The updated design surface should look like Figure 12.17.
FIGURE 12.17 Three Live Search blocks connected with the Bar Graph block.
8. Click on the wrench beside the Bar Graph block to zoom in and then click the Switch to an Advanced View button. Replace the JavaScript code in the editor with the following text:
barGraph.__reserved.pendingCalls = 1;
var result = barGraph.addBar(data["Live Search"], "blue", "http://www.
![]() innovatewithgadgets.com", "innovatewithgadgets.com");
innovatewithgadgets.com", "innovatewithgadgets.com");
var result2 = barGraph.addBar(data["Live Search (2)"], "Red", "http://www.
![]() widgets-gadgets.com", "widgets-gadgets.com");
widgets-gadgets.com", "widgets-gadgets.com");
var result3 = barGraph.addBar(data["Live Search (3)"], "Green", "http://www.
![]() trickofmind.com", "trickofmind.com");
trickofmind.com", "trickofmind.com");
var result4 = barGraph.addBar(data["Live Search (4)"], "Yellow", "http://www.
![]() csharptricks.com", "csharptricks.com");
csharptricks.com", "csharptricks.com");
The code tells the Bar Graph block to take the input from each of the Live Search blocks and create a bar for them.
9. Click on the wrench to zoom out.
10. Click on the Preview link to see the mashup in action. You will see an image similar to Figure 12.15, shown earlier in this chapter.
Porting a Mashup to Vista Sidebar as a Gadget
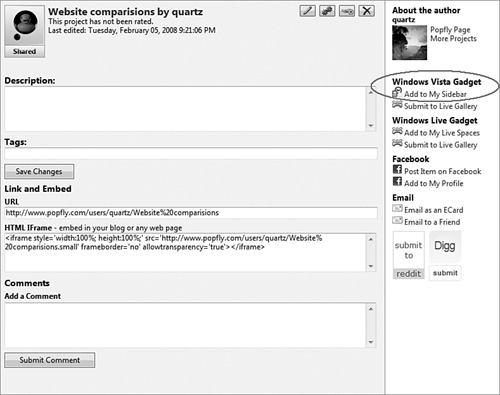
After you are satisfied with the mashup, click on the Save link at the top-right corner to save it to My Projects. In My Projects, you will see an option to share the mashup with others. A shared mashup has an option to be added as a Sidebar gadget (see Figure 12.18).
FIGURE 12.18 To port a mashup to the Vista Sidebar, first share the gadget.
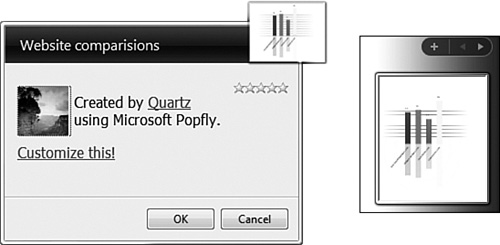
Feel free to experiment with different websites in this mashup, even creating mashups using different available blocks. Figure 12.19 shows the Sidebar gadget just created with Microsoft Popfly.
FIGURE 12.19 Microsoft Popfly can be used to create innovative Sidebar gadgets in minutes.
Where to Go from Here
This chapter showed you how to use Silverlight to create a gadget from scratch as well as how to use online tools such as Microsoft Popfly to create gadgets in minutes. The important point is not the tool, but the innovation platform that Sidebar gadgets provide. With a Website Comparison Sidebar Gadget I can track the popularity of four websites without even typing a word and see instant results.
Looking back to previous chapters, if I need to watch the top video in YouTube, the Media Gadget can make life much easier, and if you work on Visual Studio, the Recent Project Gadget is an indispensable tool. Finally, the MyBlog Gadget can consolidate all the feeds I subscribe to in a ready-to-read format.
As you go forward in creating your own gadgets, use the gadget examples found in this book as a base. These are not the only way to create gadgets, to be sure, but they do provide a starting point as useful tools for your future gadget development.