Chapter 4. Create and configure service applications
Service applications enable SharePoint to go beyond simply providing content in a browser-based format. They extend SharePoint and provide a framework where other applications can provide services while getting the benefits of SharePoint. With service applications, SharePoint can use the power of Microsoft Office applications such as Excel, Access, and Word right in the browser.
Service applications go even farther by allowing other SharePoint farms to consume certain services from other farms, so those farms can provide dedicated services such as Search or Word document conversions. This frees up the other farms to provide other services and allows for less duplication of services as well as a potentially more secure environment. Also, service applications such as the Business Connectivity Service enable SharePoint to extend its reach into external systems, allowing for a true enterprise experience within the SharePoint environment.
Objectives in this chapter:
Objective 4.1: Create and configure App Management
App Management is a new concept in SharePoint Server 2013. The concept of apps is pervasive throughout the environment. Rather than create a document library via a template, you now create a document library from a document library app. If you want to create a Contacts list, you do so from a Contacts app, and so on. Apps can come from your SharePoint farm as well as from external sources such as the Microsoft SharePoint and Office Store.
Farm administrators can also create and make App Catalogs available to users. Suppose that an internal user has created an app that he wants to make available to other users, or that an app has been purchased from a third party. Such apps can be made available to users through the App Catalog. As part of the exam, you will be expected to know the process of setting up and configuring the App Catalog as well as how to manage it.
Creating and configuring the App Store
The App Store allows users—either all or a subset—to acquire apps easily. This isn’t something that happens automatically, which is good because otherwise users could put apps on your farm that you as a farm administrator would know nothing about. You need to configure the store based on your organization’s needs, but before you can start the configuration process, you need to perform some steps.
First, you need to create at least one App Catalog site collection. Each web application can have its own App Catalog, so you can have as many as you have web applications; however, you need only one to start with. The App Catalog site has two special libraries that exist in the site—Apps for SharePoint and Apps for Office—so that the App Catalog can supply apps to both SharePoint and Office. The App Catalog can be created by a member of the Farm Administrator group by following these steps (assume that the App Management Service has been started):
Navigate to Central Administration with a farm administrator account.
Click Manage App Catalog in the Apps section.
Choose the web application where you want to create the App Catalog from the Web Application drop-down list.
Leave Create A New App Catalog Site selected, and then click OK on the Manage App Catalog page.
On the Create App Catalog page, enter a title in the Title text box and an optional description in the Description text box.
Choose the URL for the site (such as http://contoso/sites/apps) in the Web Site Address section.
Choose a site collection administrator in the Primary Site Collection Administrator section. Only one user login is allowed; security groups aren’t supported.
In the End User section, specify who can see the App Catalog (such as NT AUTHORITYauthenticated users).
Select a quota template, if you want one, and then click OK to start the site collection process.
As soon as an App Catalog site collection exists, you can specify the store settings for the web application on which the App Catalog exists. These settings determine how users will interact with the store and give you a place to view app requests. Following these steps to configure these settings:
Navigate to Central Administration with a Farm Administrator account.
Click Apps.
Click Configure Store Settings in the SharePoint And Office Store section.
Choose whether users can get free or purchased apps from the SharePoint Store in the App Purchases section.
Don’t touch the App Requests section. Items show up in the App Requests list if users aren’t allowed to get apps directly from the SharePoint Store or if they prefer to request them (rather than pay for the app themselves).
In the Apps For Office From The Store section, choose whether end users are allowed to start Apps for Office from the store from a document.
Click OK to save changes.
Important
If you create an App Catalog site collection, the SharePoint Store becomes available by default (although users can’t add apps until more configuration is done). If this availability isn’t intended, you might have users installing apps that you don’t want on your SharePoint farm.
The App Requests list in the App Catalog site collection can be accessed at the site or from Central Administration. It lists requests that users have put in because they want to install apps from the SharePoint Store. Users can request a single or multiple licenses as well as provide reasons for the app request. The relevant fields in the list and descriptions are as follows:
Title. The title of the app.
Publisher Name. The name of the app’s publisher.
Icon URL. The picture associated with the app.
Content Market. Text describing the content market.
Billing Market. Text describing the billing market.
Seats. The number of licenses requested.
Site License. A yes/no field indicating whether a site license is requested.
Status. A choice field that’s set to New for new requests. The reviewer can modify this to Approved, Closed as Approved, Closed as Declined, Declined, Pending, or Withdrawn.
Requested By. The person requesting the app.
Approved By. The person who approved the app.
Approver Comments. Any comments entered by the approver.
Administrators (members of the Owners or Designers groups) of the App Catalog site collection can also manually add apps to the catalog, making them available to all users who have permissions to the App Catalog. Follow these steps to add apps to the App Catalog:
Click the Apps for SharePoint link on the home page of the App Catalog site.
Click New on the on the Apps For SharePoint page.
Click Browse in the Choose A File section and select the app that you want to upload.
Click Open and then OK to upload the app.
Verify the details of the app (Name, Title, Short Description, and so forth) and make sure that the Enabled check box is selected.
If you want to make the app appear in the Featured section, select the Featured check box.
Click Save.
More Info: Managing the App Catalog
See http://technet.microsoft.com/en-us/library/fp161234(v=office.15) for more information on how to manage the App Catalog in SharePoint 2013.
You should have an App Catalog at this point, but you still might not be able to add apps from the SharePoint Store. You can go out to the SharePoint Store and look at the apps that are available but can’t add them to the catalog. Some steps and configurations still need to be verified, as described in the following sections.
Creating and configuring subscriptions
Apps rely on two services to run: the App Management service and the SharePoint Foundation Subscription Setting service. If you have an App Catalog site created, the App Management service should be running, but the SharePoint Foundation Subscription Setting service is off by default. You can turn it on by following these steps:
Navigate to Central Administration as a member of the Farm Administrators group and click Manage Services On Server in the System Settings section.
Choose the server on which you want the service to run from the Server drop-down list. This service needs to run on only one server for performance reasons; using two servers provides high availability.
Find the Microsoft SharePoint Foundation Subscription Settings Service service application in the Service list and click Start.
Because the Microsoft SharePoint Foundation Subscription Settings Service uses the multi-tenancy feature, even if you aren’t providing hosting, you still need to provide a default tenant. You do so by establishing a name for the default tenant, and then any SharePoint site not specifically associated with another tenant will be part of the default tenant.
Setting up the Subscription Services service application needs to be done with PowerShell commands. This is a little more complicated than setting up a typical service application, so the details of how to go about this are as follows:
Open the SharePoint 2013 Management Shell with an account that has the securityadmin fixed server role on the SQL Server instance, the db_owner fixed database role on all databases to be updated, and a membership in the Administrators group on the server where the PowerShell commands are run.
Run the following command, where <account> is a member of the Farm Administrators group to get an account for the application pool:
$account=Get-SPManagedAccount "<account>"
Run the following PowerShell command to create a new application pool (SettingsServiceAppPool is the name of the application pool):
$appPool=New-SPServiceApplicationPool -Name SettingsServiceAppPool -Account
$account
Create the service and proxy by using the following PowerShell commands, where <ServiceDB> is the name of the Subscription Service database that you want to create and <ServiceName> is the name you want to use for the service:
$appService=New-SPSubscriptionSettingsServiceApplication -ApplicationPool
$appPool -Name <ServiceName> -DatabaseName <ServiceDB>
$proxyService=New-SPSubscriptionSettingsServiceApplicationProxy -
ServiceApplication $appService
Important
The SettingsServiceAppPool application pool might already exist, in which case you can just use it by running Get-SPServiceApplicationPool SettingsServiceAppPool. Also, you might need to do an IISRESET after you create the proxy before you configure the app URLs.
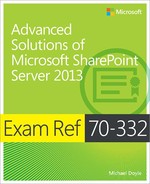
After you configure the Subscription Settings service, you can configure the app URLs. If you try to do this beforehand, you will get an error when you go to the Configure App URLs page. The two settings to configure on this page are App Domain and App Prefix. Specifying an app domain on this page defines a default tenant name. If you are hosting SharePoint instances and require multi-tenancy, you must use PowerShell to configure the app domains and the app prefixes. The app prefix is prepended to the subdomain of the app URLs. If you have a single tenant, you can use Central Administration to configure the app URLs:
Navigate to Central Administration with a Farm Administrator account and select Apps.
On the Apps page, click Configure App URLs in the App Management section.
On the Configure App URLs page, you need to set the app domain. The domain must already exist in your DNS servers. (The app domain is recommended to be just for apps, but that’s not a strict requirement.)
Configure the App Prefix, which is prepended to the subdomain of the app URL so that the pattern becomes <app prefix>-<app id>.<app domain>.
Figure 4-1 shows the configured settings, using contoso.com as the app domain and App as the app prefix.
At this time, you (and users with permissions to add Apps) should be able to go out to the SharePoint Store and start adding apps to the App Catalog. When you first set this up, you should go out to the SharePoint Store yourself and see the host of available apps. It also gives you a sense of who in your organization should have access to the SharePoint Store.
Configuring DNS entries
For security reasons, t is recommended that you use a different domain name for hosting apps from the domain name for the SharePoint farm or subdomain of the farm. This means that you need to configure a new name in Domain Name Services (DNS) before you start creating the App Catalog and configuring the service applications App Management and Microsoft SharePoint Foundation Subscription Settings. For the purposes of the exam, assume that you’ve purchased your domain name from a domain name provider.
Exam Tip
As a SharePoint administrator, you might not have access to the domain controller where DNS entries are created, so you might have limited experience with DNS. If so, spend a little extra time on this section so that you can become familiar with the terminology and steps involved.
Configuring DNS is done differently, depending on the operating system that your DNS server uses. For this objective, you need to be concerned only with Microsoft products. Assuming that you are using Microsoft Windows Server, you should configure a forward lookup zone with the domain name (if you are using Windows Internet Name Service (WINS) forward lookup). To configure a forward lookup zone on a Windows Server instance, follow these steps:
Log onto a domain controller with an account that is part of the local administrators group.
In Administrative Tools, click DNS to start the DNS Manager.
Right-click Forward Lookup Zones and choose New Zone.
Click Next to get past the first page of the New Zone Wizard.
Accept the default of Primary Zone on the Zone Type page and click Next.
On the Active Directory Zone Replication Scope page, leave the default (To All DNS Servers In This Domain) and click Next.
On the Zone Name page, enter the domain name that you want for the apps (for example, contoso.com or contosoapps.com) and click Next.
On the Dynamic Update page, leave the default (Do Not Allow Updates) and click Next.
On the Completing The New Zone Wizard page, click Finish.
More Info: Adding Zones
See http://technet.microsoft.com/en-us/library/cc754386.aspx for more information on adding zones.
When an app is added to the App Catalog, it receives a unique new domain name. For example, if the app prefix is App and the app domain name is contoso.com, an added app might be accessed by http://app-123ABC.contoso.com, where 123ABC is the application ID. To support these unique domain names, a wildcard Canonical Name (CNAME) entry for the DNS entry needs to be created. Like the forward lookup zone, this is done on the domain controller. To create a CNAME record on a Windows Server instance, follow these steps:
Log onto a domain controller with an account that’s a member of the local administrators group.
Open the DNS Manager in Administrative Tools.
Right-click the domain name you added in the Forward Lookup Zones in the DNS Manager and choose New Alias (CNAME).
On the New Resource Record dialog box, type * (an asterisk) in the Alias Name text box.
In the Fully Qualified Domain Name (FQDN) For Target Host section, enter a domain name that points to the SharePoint farm (such as home.contoso.com). You can optionally browse to the record by clicking Browse.
Leave the last setting cleared (Allow Any Authenticated User To Update All DNS Records With The Same Name) because it applies only to DNS records for a new name. Click OK.
After you configure the CNAME record, you can access the unique domain names that the app service creates whenever an app is added. If you’ve decided to use Secure Socket Layers (SSL), you still need to configure a wildcard certificate, as explained in the next section.
More Info: Adding an alias (CNAME) resource record to a zone
See http://technet.microsoft.com/en-us/library/cc816886 for more information on how to add an alias (CNAME) resource record to a zone.
Configuring wildcard certificates
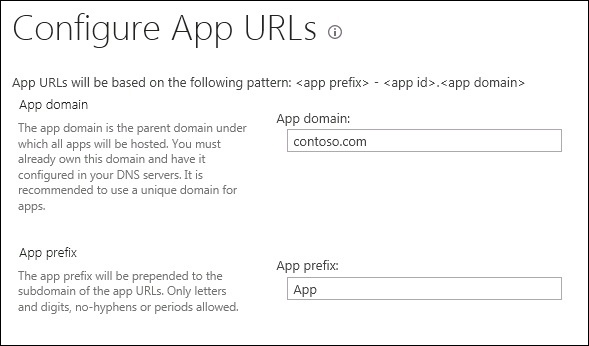
Each app that exists in the App Catalog has a unique name, which can present some problems when using Secure Socket Layers (SSL). Each unique domain name that uses SSL requires a certificate, but you don’t want to go around creating and installing certificates every time somebody puts an app in the App Catalog. To get around this, you need to obtain and install a wildcard certificate. To obtain a wildcard certificate, you can request one from your SSL certificate provider. To create a request for a wildcard certificate, follow these steps:
Log onto one of the WFEs in your SharePoint farm and open Microsoft Internet Information Server (IIS) 7.
Click the server name of the WFE and then click Server Certificates.
Click Create Certificate Request.
On the Request Certificate page, enter the information required. Make sure that the Common Name has the wildcard character at the beginning (for example, *.contoso.com) and that you don’t use abbreviations for the other items, as shown in Figure 4-2.
Click Next. In the Cryptographic Service Provider Properties dialog box, choose Microsoft RSA SChannel Cryptographic Provider as the cryptographic service provider (the default) and a bit length of 2048 (which can vary depending on the needs of your SSL provider and your security requirements).
Click Next to move to the page where you save the certificate. Give it a name and click Finish.
Send the certificate to your SSL certificate provider and wait for the provider to send you the SSL certificate.
More Info: Requesting an Internet server certificate
See http://technet.microsoft.com/en-us/library/cc732906(WS.10).aspx for more information on how to request an Internet server certificate in IIS 7.
When you have the SSL certificate in hand, you need to import it into IIS on each WFE. After the certificate is imported, it needs to be bound to the website where the App Catalog resides. To import an SSL certificate, follow these steps:
Log onto one of the WFEs in your SharePoint farm and open IIS 7.
Click the server name of the WFE and then click Server Certificates.
Click Complete Certificate Request.
On the Specify Certificate Authority Response page in the Complete Certificate Request dialog box, choose the filename containing the certification authority’s response by clicking the button with the ellipses (...) and selecting the SSL certificate.
In the Friendly Name text box, enter the domain name, starting with an asterisk (for example, *.contoso.com).
Click OK to finish the import of the SSL certificate.
Important
Make sure that the friendly name starts with an asterisk; otherwise, you can’t specify the host name when doing the site binding.
After the SSL certificate is installed on the WFE, you can bind the certificate to the web application where the App Catalog resides. This is also done in IIS by following these steps:
Log onto one of the WFEs in your SharePoint farm and open IIS 7.
Open up the Sites folder and click the site of the App Catalog.
In the Actions section, click Bindings.
In the Site Bindings dialog box, click Add.
Select https under Type, choose the IP address to bind to, and leave Port 443 in the Port text box.
Choose the SSL certificate that you imported for the App Catalog (the one that begins with an asterisk).
Enter the base host name (for example, contoso.com).
Objective summary
You can use the App Catalog to store apps from end users as well as those obtained from the SharePoint Store.
The app framework is designed to be used for multi-tenancy farms, so farms that are single tenancy need to define a single tenant.
The SharePoint Store offers many beneficial apps, for free and for sale, that can be accessed as soon as Apps are enabled.
Apps added to the App Catalog are accessed via a unique domain name.
Unique domain names require DNS configuration to make sure that the apps can be accessed without additional configuration each time an app is added.
Objective review
Answer the following questions to test your knowledge of the information in this objective. You can find the answers to these questions and explanations of why each answer choice is correct or incorrect in the “Answers” section at the end of this chapter.
What types of apps can you find the App Catalog?
Apps from the SharePoint Store
Apps for Office
End-user customized apps
All of the above
Before apps can be considered enabled, what step must you successfully perform?
You need to create an App Catalog.
You need to create the Subscription Settings service application and proxy.
You need to configure the app URLs.
You need to create the App Management service application.
What reason would you have for creating a wildcard Canonical Name (CNAME) entry?
Because each app in the App Catalog has a unique domain name
To make it easier to find apps within the app catalog
Because all web applications need a wildcard CNAME entry
No reason to create a wildcard CNAME entry for an App Catalog
Objective 4.2: Create and configure productivity services
SharePoint 2013 works with productivity services via the service application framework. Productivity Services cover the Microsoft Office products as well as a new service that performs translations of content from one language to another. Each productivity service requires separate setup and configuration. The settings depend on the makeup of the SharePoint farm and the needs of the organization. For example, an organization that uses Microsoft Excel heavily will configure the Microsoft Excel Services differently from one that limits usage.
SharePoint 2013 works closely with the productivity services to provide additional functionality to help users perform their functions more efficiently and with more integration. This objective covers how to create and configure the productivity services available in SharePoint Server 2013.
Creating and configuring Microsoft Excel Services
One of the most useful and powerful service applications available to SharePoint, the Microsoft Excel Services service application enables users to use Excel spreadsheets right within the browser and provides all document management benefits (versioning, security, collaboration, check in/out, and so forth) that other kinds of documents have within SharePoint. Excel Services also allows for the showing of just part of the Excel spreadsheet and the ability to display graphs and charts to users who don’t have access to the spreadsheet.
Before users can start using Excel Services, you must create the service application. And before you can create the service application, you need to make sure that the following items are set up:
A domain account needs to be set up for the application pool.
The account used to create and configure the services needs to be a member of the Farm Administrators group.
The domain account used for the application pool needs to have access to the content databases of the web applications that will use the service.
Access to the content databases that need Excel Services can be done at the web application level by using PowerShell, as follows:
$webApp=Get-SPWebApplication -identity <URL of web application>
$webApp.GrantAccessToProcessIdentity("<domain account>")
After the account has the proper permissions, you can begin the process of setting up Microsoft Excel Services. For the Excel Services application to be created, you need to start the Excel Calculation Services (ECS) service on at least one server (or on additional servers to provide additional resources, depending on the servers available and the resource demand expected). To start ECS, follow these steps:
Navigate to Central Administration with an account that’s part of the Farm Administrators group.
Click Manage Services On Server in the System Settings section.
Select the server on which you want to start the service from the Server drop-down list.
Locate the Excel Calculation Services from the Service list and click Start.
Repeat steps 3 and 4 for each server on which you want the service to run.
After the ECS service starts, you can create the Excel Services application. You need only one application per SharePoint farm. Follow these steps:
Navigate to Central Administration with an account that’s part of the Farm Administrators group.
Click Manage Service Application in the Application Management section.
Click the New button to access the drop-down list, and then select Excel Services Application.
Give the application a name (such as Excel Services Application) in the Name section.
Select the Create New Application Pool option and enter a name for the application pool (or choose one that has already been created for this application).
Select the Configurable option from the drop-down list (if you didn’t choose a pre-existing application pool) and select the account created for this application.
Click OK to start the creation process and wait until the process finishes.
More Info: Configuring Excel Services
See http://technet.microsoft.com/en-us/library/jj219698 for more details on how to configure the Microsoft Excel Services service application in SharePoint Server 2013.
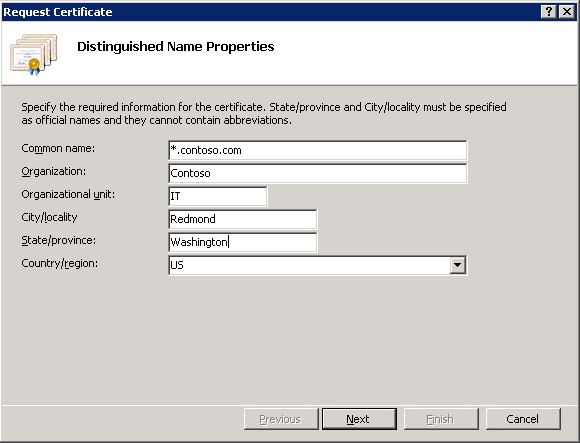
After you create the Excel Services application, you need to configure it. In fact, the Excel Services application has more options to configure than any other service application that comes with SharePoint 2013. Figure 4-3 shows the vast array of configurable options associated with this service.
Configuring global settings
The first group of settings to configure are the Global Settings, which need to be configured before users start using Excel Services. The Global Settings cover settings for the following items:
Security settings
You can configure three options in the Security section.
The first option, File Access Method, is used only for Excel spreadsheets that aren’t stored in a SharePoint database, such as those found on UNC shares or HTTP web sites. It has two settings to choose from:
Impersonation means that when a user accesses an Excel spreadsheet, the account of the user accessing the spreadsheet is used.
If the Process Account option is chosen, the user account isn’t impersonated; instead, the account that runs the Excel Service application is used.
The second option in the Security section is Connection Encryption. Selecting Required necessitates encryption between the client computer and the front-end component running Excel Services. You can use Internet Protocol Security (IPSec) or Secure Socket Layers (SSL) for authentication. The authentication requirement also applies to the Excel spreadsheet when accessing external data sources.
The third option in the Security section is the Allow Cross Domain Access option. By default, this is turned off so that only Excel files located in the same domain can be accessed. If you want to allow cross-domain access, you need to select this check box. Keep in mind that an element of security risk exists and that cross-domain access requires more resources, especially network bandwidth.
More Info: Configuring Excel Services global settings
See http://technet.microsoft.com/en-us/library/jj219683 for more information about how to plan Excel Services global settings in SharePoint Server 2013.
Load balancing settings
The next section under Global Settings is the Load Balancing section. If only one server is running Excel Calculation Services, these setting don’t apply. If more than one server are running ECS, you should choose the option that works best for your farm. The following settings are available:
Workbook URL. A URL in the workbook specifies which server running the ECS is used so that the specific workbook always uses the same ECS session.
Round Robin With Health Check. The ECS session is chosen in a round-robin fashion.
Local. If an ECS session is available on the server on which the workbook is opened, that session is used.
Session management settings
In the Session Management section of Global Settings, you can choose to limit the maximum number of session per user. The default is 25, which is fairly high if you plan to have lots of people using Excel Services. It’s also a high value in that it’s unlikely that a single user will have more than 25 sessions open at the same time. If you want to have unlimited sessions, set the value to –1. Monitoring performance is the best way to determine whether this limit needs to be changed.
Memory usage settings
The Memory Utilization section under Global Settings deserves some special attention. Unchecked, the Excel Services can consume a significant amount of memory resources. You should spend some time evaluating these settings because the default values can result in significant memory usage for organizations that use the Excel Services significantly. The following settings are available:
Maximum Private Bytes. The number of megabytes allocated by the ECS process. The default is –1, which means up to 50 percent of the physical memory on the server running the ECS can be used for Excel Services.
Memory Cache Threshold. The percentage of the memory allocated to the ECS process that can be allocated to inactive objects. When the threshold is reached, unused objects are released from memory. The default value is 90.
Maximum Unused Object Age. The amount of time, in minutes, that inactive objects can remain in memory (as long as the memory cache threshold hasn’t been reached). The default value is –1, which means no limit; otherwise, the limit is 34560 (24 days).
Workbook cache settings
Another section under Global Settings that’s related to memory management is the Workbook Cache section. These cache settings determine the amount of memory as well as the amount of disk space to be used on the servers running the ECS process. You need to make sure the resources specified by these settings are available on the servers running ECS. You need to review these settings to ensure that resources are allocated in the best way possible to provide optimal performance for ECS as well as typical SharePoint performance. The following settings are available:
Workbook Cache Location. The location of the workbook file cache. By default, this is empty, which means that the default temp location is used (usually on the C drive). Change this location to a non-system drive to help eliminate contention for hard drive resources.
Maximum Size Of Workbook Cache. The size (in megabytes) that can be allocated for workbooks now in use. The default value is 40960, or about 40 GB. You need to ensure that enough room is available on the drive where the workbook cache is located.
Caching Of Unused Files. A way to speed up spreadsheet loading for future users. This check box, selected by default, allows for the caching of unused files.
External data settings
The final section in Global Settings is for the important External Data settings. In particular, the unattended service account needs to be configured so that workbooks can use the account specified in this setting rather than have to authenticate against individual users.
The following settings are available in the External Data section:
Connection Lifetime. This setting specifies the amount of time, in seconds, for a connection to remain open. Connections past this value are closed. The value of –1 specifies that they never expire. The default is 1800 (30 minutes); the maximum is 2073600 (or 24 days).
Analysis Services EffectiveUserName. This setting applies only to external data connections based on Analysis Services with an authentication setting of Use The Authenticated User’s Account. This is an alternative to Windows delegation allowing secure access to Analysis Services.
Unattended Service Account. All workbooks can use this account to refresh data. All workbooks that specify Use The Unattended Service Account setting requires that this value be filled in.
Secure Store Service Association. This value is just for reference and can’t be changed. Under the value displaying which secure store application is being used, you can choose to create a new unattended service account or use an existing one.
When configuring the Global Settings, you need to either create a new unattended service account or choose a target application ID that has already been created. For either of these options to be filled in, the Secure Store Service needs to be created and configured. The unattended service account should be a low-permission account that Excel Calculation Services uses to connect to data connections that use non-Windows Single Sign-On (SSO) or no authentication method. The account used shouldn’t have access to any of the SharePoint Server databases.
Defining trusted file locations
Trusted File Locations productivity services is the second settings group on the Manage Excel Services Application settings page. This group defines the locations that SharePoint can use to open an Excel workbook.
By default, Excel Services is configured to allow workbooks (or parts of workbooks) to be opened within the SharePoint environment under http://. These default settings are designed to provide the Excel Services to the broadest set of users, but they can also present some security risks. Many different Trusted File Locations can enable a high degree of control over where and how Excel Services can use Excel files. The reasons for configuring these settings are for performance and security. In the Trusted File Locations section, you can edit existing file locations or you can add a new one. For the purposes of this section, either is a valid choice for viewing the available options.
Exam Tip
Creating a trusted file location is a prime target for questions that involve steps. It’s also one of the main tasks involved with setting up a SharePoint farm. You should familiarize yourself with creating a few before the exam.
Location settings
The first section, Location, is where you view or add a trusted file location:
Address. Enter the location, which can be a SharePoint location, a network file share, or a web folder.
Location Type. Choose the storage type: SharePoint, UNC, or HTTP UNC is for file shares, and HTTP is for locations accessed via the HTTP protocol.
Trust Children. If the check box is selected, all sublocations are also trusted. For example, if you want to trust an entire web application, you can put the top-level location in the Address field and then select Children Trusted.
Description. Use normal text to describe the location’s purpose.
Figure 4-4 shows an example of using the http://contoso web application and all subsites and libraries.

Session management settings
The next section on the Trusted File Location page is Session Management. Because each open session consumes memory resources, managing these options can help keep memory requests under control. If you are experiencing a heavy load on your servers running ECS, you probably want to determine if these properties need to be modified to provide a more responsive SharePoint experience:
Session Timeout. The amount of time, in seconds, that an ECS session remains open and inactive before it’s shut down. The default is 450 (7.5 minutes). A value of –1 can be specified for no timeout, and the max is 2073600 seconds (24 days).
Short Session Timeout. The amount of time, in seconds, that an Excel session can remain open and inactive. The default values and limits are the same as for Session Timeout. The Short Session Timeout is measured from the end of the initial open request.
New Workbook Session Timeout. The maximum amount of time, in seconds, that an ECS session for a new workbook can remain open and inactive before it’s shut down. The default value is 1800 (30 minutes). The maximum is 24 days, and a value of –1 indicates no timeout.
Maximum Request Duration. The maximum amount of time in seconds for a single request during an ECS session. Default is 300 (5 minutes). The maximum is 24 days, and a value of –1 indicates no timeout.
Maximum Chart Render Duration. The maximum amount of time in seconds to spend rendering any single chart. The default is 3 seconds. The maximum is 24 days, and a value of –1 indicates no timeout.
Workbook settings
The Workbook Properties section deals with the maximum size of the workbook as well as the objects contained within. Two settings are available:
Maximum Workbook Size specifies the maximum size, in megabytes, of a workbook that can be opened by ECS. The default value is 10 MB, which should be large enough for most workbooks unless they have a lot of graphics in them. The valid values are 1 through 2000.
Maximum Chart Or Image Size pertains to the maximum chart size or image size that can be opened by ECS. The default is 1 MB and the maximum is any positive integer (the maximum workbook size is still the limiting factor because the workbook must be open before a chart or image contained within can be opened).
Settings for calculation behavior
Next, you consider the Calculation Behavior settings:
Volatile Function Cache Lifetime specifies the amount of time, in seconds, that a volatile function is cached for automatic recalculations. The default value is 300 (five minutes). The value of –1 indicates that it’s calculated once on load. The value of 0 means that it’s always calculated, and the maximum value is 2073600 (24 days).
Workbook Calculation Mode specifies a workbook’s calculation mode. The default selection is File, which doesn’t override the workbook settings (unlike all the other options). This means that whatever the workbook specifies is what is used. The next option is Manual which means that the end user needs to specify that the calculations in the workbook need to be processed. The value of Automatic means that when data is changed within the workbook then all relevant cells that use that data as part of a calculation are updated. The final selection of Automatic except data tables means that the user has to request that calculations be updated for data that is from external data sources. Choosing either one of the Automatic options puts additional strain on the ECS but also provides the most up-to-date data.
External data settings
External data sources can consume memory and CPU resources as well as be a source of security risk. The settings for this section depend heavily on how your organization treats data and the reliability of the data sources that the Excel workbooks consume:
Allow External Data determines whether you should even allow external data sources. You can choose from the following values:
None prevents users from accessing external data sources.
Trusted Data Connection Libraries allows only connections available within SharePoint data connection libraries. This option allows for access to external data but provides a mechanism to control the data connections and the accounts used to access the external data.
Trusted Data Connection Libraries And Embedded is the most open and doesn’t allow for oversight of data connections. This option should be allowed only in organizations where the data connections are trusted.
Warn Of Refresh displays a warning before a user refreshes data from an external data source.
Display Granular External Data Errors displays granular error messages (rather than a general error message) from external data failures. This option is selected by default.
Stop When Refresh On Open Fails stops the open operation if the file contains a Refresh On Open operation that fails. This option is selected by default.
External Data Cache Lifetime contains two fields: one for automatic refresh and one for manual refresh. The values determine the maximum amount of time that the system can use external data query results. The default is 300 for both (5 minutes). A value of –1 means never refresh after the first query, and the maximum amount of time is 24 days.
Maximum Concurrent Queries Per Session determines the maximum number of external data queries per ECS session. The default is 5.
Allow External Data Using REST allows requests from REST APIs to refresh external data connections. This option is disabled by default.
Settings for user-defined functions
The default setting for the User Defined Functions section is cleared. You should allow user-defined functions only if you fully trust the users creating the functions. You should probably enable this setting only in specific cases—for example, where the library that contains the Excel workbook has very limited access such as for the Finance team. Allowing user-defined functions is a very big security risk and should be allowed only in organizations that fully trust all their members.
Defining trusted data providers
The Trusted Data Providers section of the Manage Excel Services Application settings page defines the sort of data providers that can be used to provide external data to Excel workbooks. Clicking the Trusted Data Providers link takes you to the Trusted Data Providers section. SharePoint has already created many providers covering SQL Server databases all the way back to SQL Server 2000, as well as providers created for OLE DB and ODBC connections.
You can delete any of the providers listed, as well as add providers that aren’t listed. To add a trusted data provider, click Add Trusted Data Provider in the Trusted Data Providers section. This opens a page where you can add providers. The following provider types are available:
OLE DB
ODBC
ODBC DSN
The other fields that need to be filled in are Provider ID and Description. The Provider ID is the main one that must be filled in; don’t add a provider unless it’s absolutely necessary. The providers that have already been created should account for most external data sources needed.
Setting up trusted data connection libraries
Data connection libraries are special document libraries that contain connection information so that users can access external data without having direct access to the data. The Trusted Data Connection Libraries section determines which data connection libraries Excel workbooks can use to connect to external data sources. By default, no trusted data connection libraries are included. To add any that you need, click Add Trusted Data Connection Library in the Trusted Data Connection Libraries section.
The only two values for a trusted data connection library are the Address field, which contains the URL of the data connection library, and the optional Description field. Both fields are located in the Location section. As a farm administrator, you need to make sure that the connections located with the data connection libraries use secure connections with accounts that have minimal rights.
Defining user-defined function assemblies
The User Defined Function Assemblies section of the Manage Excel Services Application settings page defines what assemblies are available for Excel workbooks. Assemblies have permissions that can harm the servers they run on as well as present potential security risks because they can operate at heightened levels of security, especially if they are located in the Global Assembly Cache (GAC). Therefore, you should allow only assemblies that have been tested and validated as being secure. Also be aware of the amount of memory that the assemblies use because they can affect the performance of your SharePoint farm.
If you decide that you want to add an assembly for use by Excel workbooks, click Add User-Defined Function Assembly on the User-Defined Function Assemblies section. The following options are available:
Assembly. This is the full path or the strong name of the assembly that contains functions that Excel Calculation Services can call.
Assembly Location. An assembly can either be in the GAC or have a file path.
Enable Assembly. This enables you to turn off an assembly without removing the assembly from the list—for example, when the assembly needs to be tested or functionality needs to be temporarily removed.
Description. This is an optional description of the assembly.
Configuring data model settings
In the Data Model Settings section, you can register SQL Server Analysis Services (SSAS) that the Excel Services application can use for advanced data analysis. SQL Server 2012 Analysis Services can be used in the processing of data models created in Excel 2013. You can add one or more SQL Server instances (version 2012 SP1 or later) for use by the data models. If you do add more than one SQL Server instance, the servers are accessed in a round-robin fashion. Adding a server is straightforward—simply click Add Server in the Data Model Settings section. After that, provide the name of the server in the Server Name field and an optional description in the Description field.
More Info: Configuring Data Model settings
See http://technet.microsoft.com/en-us/library/jj219780.aspx for more information on how to plan Data Model settings for Excel Services in SharePoint Server 2013.
Creating and configuring Microsoft Access Services
Microsoft Access has been increasingly integrated into SharePoint over the last few releases, and SharePoint 2013 is no exception. Microsoft Access Services in SharePoint 2013 allows users to do the following:
Create Access apps for use in SharePoint
Maintain Access web databases created in SharePoint Server 2010
New in SharePoint 2013 are Access apps, which are a new type of database built into Access Services that can be shared with other users as an app within SharePoint. This provides Access functionality within the browser. SharePoint 2013 also maintains backward compatibility with Access web databases that were previously created in SharePoint 2010. These two functions each have their own service and their own service application, and they are configured separately.
Access Services 2010
Access Services 2010 is set up separately from Access Services. If you plan to use web databases that were created in SharePoint 2010 on your SharePoint 2013 farm, you need to create this service application. Although Access Services 2010 doesn’t have as many options as Access Services 2013, creating this application is still a sizable task depending on your organization’s needs. First, you need to consider whether you want to use reports in the Access web database(s) that you will use on the SharePoint 2013 farm. If you do need reporting capabilities, you need to have SQL Server Reporting Services added to SharePoint Server 2013. The options here depend on the version of SQL Server instance on which SharePoint 2013 is installed:
For SharePoint farms installed on SQL Server 2008 R2, you need to install and configure SQL Server 2008 R2 Reporting Services (SSRS).
For SharePoint farms installed on SQL Server 2012, you need to install and configure Reporting Services SharePoint Mode for SharePoint 2013.
After you configure Reporting Services (if you need to), you need to start the Access Database Service 2010 on the server or servers that will provide this service. This service isn’t started by default. To start the service, follow these steps:
Navigate to Central Administration as a farm administrator and click Manage Services On The Server in the System Settings section.
Choose the server on which you want to start the service from the Server drop-down list.
On the Service list, find Access Database Service 2010 and click Start under the Action column.
After you start the service on the servers you choose (you can always add or remove servers as long as one server runs the service), you can create the Access Services 2010 service application. After the service application is created, you can start using the web databases. To create an Access Services 2010 service application, follow these steps:
Navigate to Central Administration as a farm administrator and click Manage Service Applications in the Application Management section.
Click the New icon on the Manage Service Applications page and choose Access Services 2010.
Give the application a name (such as Access Services 2010 Application) in the Access Services Application Name text box.
In the Application Pool section, choose whether to use an existing application pool or to create a new one.
Leave the Add To Default Proxy List option selected so that the application is available to all the web applications via the default proxy list.
Click OK to start the creation process.
Although the Access 2010 web databases are ready to use after the application is successfully created, you might want to change some of the default configuration settings, depending on your business needs. Access databases can grow quite large and use up a lot of memory and other resources on the servers in the SharePoint farm if left unchecked. To configure the settings, click the application service created in the preceding steps on the Manage Service Applications page in Central Administration (provided that you are using an account with permissions to the Access Services 2010 service application). You can configure the following settings:
The List And Queries section includes settings for queries of SharePoint lists:
Maximum Columns Per Query. The maximum number of columns that the query can reference, including columns automatically included. Default is 40 with a range of 1 to 255.
Maximum Rows Per Query. The maximum number of rows that a list can have and still be used in a query, as well as the maximum number of rows the output can have. Valid values are from 1 to 200,000 and a default of 25,000.
Maximum Sources Per Query. The maximum number of lists that a query can use. Range is from 1 to 20, with a default of 12.
Maximum Calculated Columns Per Query. The maximum number of inline calculated columns that a query or subquery can include. Values range from 0 to 32, with a default of 10.
Maximum Order By Clauses Per Query. The maximum number of Order By clauses allowed in a query. Range is from 0 to 8, with a default value of 4.
Allow Outer Joins. A check box allowing left and right outer joins. Inner joins are always allowed.
Allow Non-Remotable Queries. A check box indicating whether queries that can’t be sent to a remote database to run. Default is that remotable queries are allowed.
Maximum Records Per Table. The maximum number of records that an application table can contain. The default is 500,000. A value of –1 indicates no limit to the number of records.
The Application Objects section provides limits on the types of objects an Access Services 2010 application can contain:
Maximum Application Log Size. The maximum number of records allowed in the log list. The range is from 1 to any valid integer. The default is 3000.
The Session Management settings determine the behavior of Access Database Service 2010 sessions:
Maximum Request Duration. The maximum amount of time, in seconds, allowed for a request from an application. The default is 30 seconds. The value of –1 indicates no limit, and the maximum is 2007360 (24 days).
Maximum Sessions Per User. The maximum number of sessions allowed per user. If the value is exceeded, the sessions are deleted until the value is reached starting with the oldest first. Default is 10. A value of –1 indicates no limit, and the range is from 1 to any positive integer.
Maximum Sessions Per Anonymous User. Similar to Maximum Sessions Per User but for anonymous users. The default is 25.
Cache Timeout. The maximum amount of time, in seconds, that a data cache is available, as measured from the end of a request. The default value is 1500 (25 minutes). A value of –1 indicates no limit, and the range is from 1 to 2007360 (24 days).
Maximum Session Memory. The maximum amount of memory, in megabytes, that a single session can use. The default is 64 MB. The valid values are 0, which disables session memory, to 4095 (4 GB).
The Memory Utilization section determines the allocation of memory for the Access Database Service:
Memory Utilization. The allocation of memory on the servers running the Access Database Service process. The default of –1 allows up to half of the physical memory to be used on the server. The maximum value is any positive integer.
The Templates section provides template management settings:
Maximum Template Size. The maximum size, in megabytes, allowed for Access templates. The default is 30 MB. The default value of –1 allows any size, and the limit is any positive integer.
You should exercise caution when changing these values, especially if large and/or complicated web databases exist. Depending on the configuration, you could use up at least half of the memory on the SharePoint server(s) running the Access Database Service 2010 service. Allocating half of the physical memory to a single service isn’t advisable unless you have dedicated a server to running that single service.
More Info: Setting up and configuring Access Services 2010
See http://technet.microsoft.com/en-us/library/ee748653(office.15).aspx for more information on how to set up and configure Access Services 2010 for web databases in SharePoint Server 2013.
Access Services
Access Services is the service application in SharePoint 2013 that allows you to create Access apps that can be used and shared across the SharePoint farm. You can then create the Access apps in much the same way you would a document library or list. If you don’t have any legacy Access 2010 web databases, this will be the only Access Services service application that you need to provide database functionality.
Before you start using Access Services, be aware that the requirements for Access Services exceed those of the base installation of SharePoint Server 2013. The following items are required before users can start using Access Services:
A SQL Server 2012 instance needs to be configured for Access Services.
The SQL Server Feature Pack needs to be installed on SharePoint.
The Access Services service application needs to be installed and configured.
A SharePoint site collection for Access apps needs to be created.
Creators of Access apps need the Microsoft Access 2013 client to design Access apps.
Exam Tip
That Access Services requires the use of SQL Server 2012 might come up on the exam because this is beyond the usual requirements for SharePoint Server 2013.
Making SQL Server 2012 available
The first step in getting ready to use Access Services is to make sure that SQL Server 2012 is available. If your SharePoint 2013 farm is installed on SQL Server 2008 R2 and you can’t upgrade it to SQL Server 2012, you can still use an instance of SQL Server 2012 to run Access Services and attach it as a separate application database server. Assuming that you have a SQL Server 2012 instance available, you configure it for Access Services.
The account that runs Access Services must have certain built-in server roles on the SQL Server instance:
dbcreator
securityadmin
SQL Server 2012 must also have certain components installed before it can be used by Access Services. You might already have these services installed on SQL Server, but you still want to double-check to make sure. The required components—in addition to the database engine and SQL Server Management Studio—are as follows:
Full-Text and Semantic Extractions for Search
Client Tools Connectivity
The next step in configuring SQL Server 2012 is to ensure that the following properties and settings are configured:
Mixed Mode Authentication. In SQL Server Management Studio (SMSS), you can configure this setting through the server’s properties in the Security section.
Enable Contained Database. In SMSS, you can configure this setting through the server’s properties in the Advanced section. Under the Containment heading, set Enable Contained Databases to True.
Allow Triggers To Fire Others. In SMSS, you can configure this setting through the server’s properties in the Advanced section. Under the Miscellaneous heading, set Allow Triggers To Fire Others to True.
Named Pipes. This needs to be enabled through the SQL Server Configuration Manager. Under SQL Server Network Configuration, select Protocols For MSSQLSERVER and set Named Pipes to Enabled. This change requires a restart of MSSQLSERVER.
Firewall settings. You need to open TCP 1433, TCP 1434, and UDP in the Windows Firewall (or other firewall product) if they haven’t already been opened.
When the components are available and the settings are configured correctly, SQL Server 2012 should be ready for Access Services. Each Access app creates its own database, so you should keep an eye on the number of databases and the memory that they are using.
SharePoint 2013 servers running Access Services also need SQL Server components installed on them. The necessary components can be found in the Microsoft SQL Server 2012 Feature Pack:
Microsoft SQL Server 2012 Local DB
Microsoft SQL Server 2012 Data-Tier Application Framework
Microsoft SQL Server 2012 Native Client
Microsoft SQL Server 2012 Transact-SQL ScriptDom
Microsoft System CLR Types for Microsoft SQL Server 2012
More Info: Downloading the Microsoft SQL Server 2012 Feature Pack
You can download the Microsoft SQL Server 2012 Feature Pack at http://www.microsoft.com/en-us/download/details.aspx?id=29065.
Starting the Access Services service
The next step (although this step could have been done earlier as well) is to start the Access Services service. Follow these steps:
Navigate to Central Administration with a farm administrator account and click Manage Services On Server in the System Settings section.
Choose the server on which you want the Access Services service running by choosing it from the drop-down list next to the word Server.
Click Start under the Action column on the line that has Access Services under the Service Column.
Wait for the service to start, and then repeat steps 2 and 3 for any other servers that you want running the Access Services service.
Creating the Access Services service
As soon as the Access Services service is running, you can create the Access Services service application. This is set up similarly to other service applications:
Navigate to Central Administration with a farm administrator account and click Manage Service Applications in the App Management section.
Click New and choose Access Services from the list of service applications.
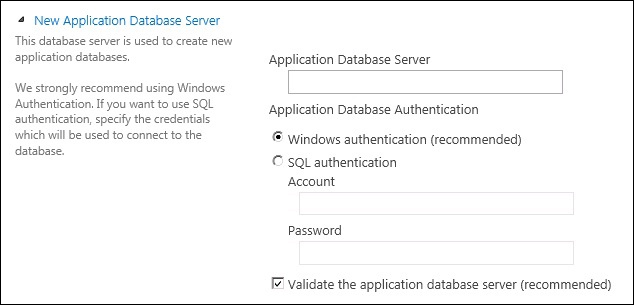
In the Name section, enter an appropriate name (for example, Access Service Application).
In the New Application Database Server section, enter the name of the SQL Server 2012 instance where Access app databases will be created.
Leave Windows Authentication selected under the Application Database Authentication heading (unless your organization has specified a strong reason not to).
Leave Validate The Application Database Server selected if you want to check the SQL Server instance to ensure that it has been configured correctly.
In the Application Pool section, choose to use an existing application pool or create a new one.
Leave the default proxy list settings as is, unless you don’t want the proxy to show up in the default list. Click OK.
If the SQL Server instance hasn’t been configured correctly, you should receive an error message describing what you need to fix. If the instance has been configured correctly, the service application is created.
Configuring the application pool
After creating the Access Services service application, you still need to configure the application pool that’s used with the service application. You can perform this step earlier if you plan to use an existing application pool. The application pool needs to be configured in Internet Information Services (IIS), and the Load User Profile setting needs to be set to True. Follow these steps to configure the application pool:
In the Start text box, type IIS or select it from Administrative Tools.
Open the server where the application pool exists and click Application Pools.
Right-click the application pool that starts with a GUID and has multiple applications (the Access Services pool application also starts with a GUID but has only a single application) and select Advanced Settings.
In the Process Model section, select True for the Load User Profile setting.
Click OK and perform an IISRESET.
Creating a site collection
Now you need to create a site collection where users can create Access apps. The site collection is just a typical site collection based on any template you want (such as Team Site). This is the location that you specify when you create an Access app.
Confirming the settings
At this point, you should look at the configuration of the Access Services service application and make sure that the settings are in line with your business needs. Also, if you set up a SQL Server 2012 instance because SharePoint Server 2013 is installed on SQL Server 2008 R2, you need to specify the SQL Server 2012 instance in the settings of the service application. You need to make fewer decisions than with the Access Services 2010 application, but they can still have a major effect on the resources of your SharePoint farm. The following configuration items are available:
Maximum Request Duration. The maximum amount of time, in seconds, allowed for a request. The default is 30 seconds. A value of –1 indicates no limit, and the maximum value is 2073600 (24 days).
Maximum Sessions Per User. The maximum number of sessions allowed per user, with the oldest ones being deleted as new requests come in. The default is 10. A value of –1 indicates no limit, and the maximum is any positive integer.
Maximum Sessions Per Anonymous User. The same as Maximum Sessions Per User, except it’s for anonymous users. The default is 25.
Cache Timeout. The maximum amount of time, in seconds, that data can remain cached as measured from the end of the last request. Default is 300 seconds (5 minutes). A value of –1 indicates no limit, and the maximum value is 2073600 (24 days).
Query Timeout. The maximum amount of time, in seconds, for a query to complete before it’s canceled. A value of 0 indicates no limit, and the maximum value is 2073600 (24 days).
Maximum Private Bytes. The maximum amount of server memory that can be allocated by the Access Services process. A value of –1 indicates that up to 50 percent of the memory can be allocated. The maximum value is any positive integer.
New Application Database Server. Where you can add a new database server (an additional server or the first one if you aren’t using the SQL Server instance on which SharePoint is installed). You enter the database information in the same way as when creating the service application (see Figure 4-5).
As with Access Services 2010, you should be thoughtful in how you modify the settings. Unchecked, Access Services can easily consume half of the resources available to the SharePoint farm just from a single user (depending on your farm’s configuration). If you expect heavy usage of Access Services, you should dedicate at least one SharePoint server to the Access Services service.
After you set up Access Services, users can start creating Access apps, as follows:
Open the Microsoft Access 2013 desktop application. (The Access Service service application doesn’t have an open API, so you can’t use code to create Access apps.)
Choose Custom Web App from the choice of templates.
In the Custom Web App dialog box, enter the App Name. For the Web Application, use the site collection you created earlier for the purpose of managing Access apps.
If an error occurs during app creation, you should go back and double-check all the steps to make sure that you didn’t miss anything. The Validate The Application Database Server option discussed earlier in the section Creating the Access Services service doesn’t catch all the required items.
More Info: What’s new in Access 2013?
See http://msdn.microsoft.com/en-us/library/fp179914(v=office.15).aspx to learn about the new features in Access 2013.
Creating and configuring Microsoft Visio Services
The Visio Services service application allows users to interact with Visio drawings. Users can load, display, interact programmatically with, and connect Visio drawings to the Business Connectivity Services. With SharePoint 2013, users can now save Visio files directly to SharePoint without having to export them to a Visio web drawing (.vdw). Users still need Microsoft Visio 2013 to save drawings this way, however.
Two different file types can be saved directly to SharePoint. The first file type has a .vsdx extension and is based on the Open Packing Conventions (OPC) standard. The second file type uses the XML-based file format with a .vsdm extension and is similar to the Visio 2010 file format. Both .vsdx and .vsdm files are displayed in raster format, whereas the .vdw files are displayed via Silverlight.
Important
Silverlight is going away. It’s not even supported in the Microsoft Windows 8 Modern UI. Although Silverlight probably isn’t on the test, you should plan on users possibly not being able to display Visio web drawings.
Be aware of several new features in Visio Services when configuring the service application. Diagrams can now be connected to external lists via the Business Connectivity Services. An additional related benefit is that the Visio diagrams can be refreshed as the data in the external lists is updated. Visio 2013 drawings can have comments attached to individual shapes and pages. This comment framework can be accessed through a JavaScript API allowing users to retrieve comments so they can be displayed on the web page.
More Info: Using Visio Services in SharePoint 2013
See http://msdn.microsoft.com/en-us/library/jj164027.aspx for more information on using Visio Services in SharePoint 2013.
Creating an unattended service account
The first step in creating and configuring Visio Services is to create an unattended service account for it to use. Although doing so isn’t required before the actual creation of the service application, it will save you time because it’s one of the configuration items.
Creating an unattended service account requires that the Secure Store service application already be created, configured, and started. Then you can create the account by following these steps:
Create or use an Active Directory account that has been given the SQL Server built-in server role of db_datareader.
Navigate to Central Administration with a farm administrator account and click Manage Service Application in the Application Management section.
Click the Secure Store Service service application.
Click New on the ribbon.
Enter a name (such as VisioAccount) in the Target Application ID text box.
In the Display Name text box, enter a user-friendly name.
In the Contact E-mail box, enter an email address of a monitored account.
In the Target Application Type drop-down list, select Group.
Click Next twice, leaving the default credential fields as they are.
Enter the administrator(s) of the account in the Target Application Administrators text box in the Specify The Membership Settings section.
In the Members text box, type Everyone (unless you want to limit Visio Services to a subgroup, but remember that each Visio Services service application can have only one unattended service account).
Click OK to save changes and return to the Secure Store Service Application page.
Set the credentials by hovering over the target application ID that was created in step 5 and click the down arrow that appears. Select Set Credentials.
Enter the Active Directory account that you created for the unattended service account in the Windows User Name text box.
Enter the password for the account and click OK.
Creating the Visio Graphics Service service application
Creating the Visio Graphics Service service application is straightforward:
Start it on the Services On Server page in Central Administration on all servers that will run the service.
On the Manage Service Applications page, create a new Visio Graphic Services service application. Give it a name and designate or create a new application pool for it to use. The account used to run the Visio Graphic Services service shouldn’t be the same account as the one used for the unattended service account.
Configuring Visio Graphics Service settings
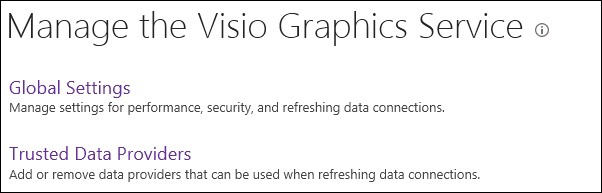
After you create the service application, you should configure its settings to meet your organization’s needs. To configure the settings, open the Manage Services Applications page and clicking the service application you created. This takes you to the Manage The Visio Graphics Service page. The two sections on the page are Global Settings and Trusted Data Providers, as shown in Figure 4-6.
Global settings
You should review the default global settings to ensure that they meet the needs of your organization. Like with most service applications, these settings can affect the performance of not just the Visio Graphics Service but also that of the entire SharePoint farm. The following global settings are available:
Maximum Web Drawing Size. The size, in megabytes (between 1 and 50), of the largest web drawing that can be rendered. The default is 25 MB.
Minimum Cache Age. The minimum number of minutes, between 0 and 34560 (24 days), that a web drawing remains in cached memory. The default value is 5.
Maximum Cache Age. The maximum number of minutes, between 0 and 34560 (24 days), that a web drawing remains in cached memory. After this value, the cache is purged of the web drawing. The default value is 60.
Maximum Recalc Duration. The amount of time, in seconds (between 10 and 120), before a data operation times out. The default is 60.
Maximum Cache Size. The maximum size, in megabytes (between 100 and 1024000), that can be used for the cache. The default is 5120 (5 GB).
External Data. Where the unattended service account is entered. Enter the application ID in the text box provided. It’s used whenever Visio connects to external data sources.
More Info: Configuring global settings for the Visio Graphics Service
See http://technet.microsoft.com/en-us/library/ee524061.aspx for more information on how to configure the global settings for the Visio Graphics Service in SharePoint Server 2013.
Trusted data providers
The second group of settings for the Visio Graphics Service service application is Trusted Data Providers. This list is similar to that in the Excel Services service application, but notice that several additional data providers aren’t part of the Microsoft suite of products. That this list of trusted providers is longer is probably because of Visio being more trusting of external data, due to the nature of what it can do (draw diagrams). One source is even for Excel Web Services, in case the values for some of the drawings exist in Excel workbooks. In fact, Visio Graphics Service allows for six different types of data providers for Excel, instead of just three.
If the data provider that you need isn’t available, you can add it by clicking Add A New Trusted Data Provider on the Visio Graphics Service Trusted Data Providers page and configure the following settings:
Trusted Data Provider ID. The name used by Visio to connect to external data
Trusted Data Provider Type. An integer between 1 and 6—1 for OLE DB, 2 for SQL, 3 for ODBC, 4 for ODBC with DSN, 5 for SharePoint Lists, and 6 for Visio Custom Data Providers—that specifies the type of data provider
Trusted Data Provider Description. A description that appears in the Trusted Data Provider list
Creating and configuring Microsoft Word Automation Services
Word Automation Services enables users to automate the conversion of Word documents into other sorts of documents. You can think of it as a way to automate the Save As command. For example, if you want to convert thousands of word documents into single file web pages (with the .mht or .mhtml extension), you can use Word Automation Services. Enabling Word Automation Services begins by starting the Word Automation Services service application:
Navigate to Central Administration with a farm administrator account.
Click Manage Services On Server in the System Settings section of the home page.
Choose the server on which you want to start the services from the Server drop-down.
Find Word Automation Services under the Service column and click Start in the action column.
Repeat steps 3 and 4 for each server on which you want Word Automation Services to run.
Creating the service application
As soon as Word Automation Services is running on all SharePoint servers that you want it to (you can always add or remove more at a later date), you can create the Word Automation Services service application. As with other service applications, this one can be created through the Central Administration interface as well as through PowerShell commands. The steps involved with using Central Administration are as follows:
Navigate to Central Administration with a farm administrator account.
Click Manage Service Applications in the Application Management section.
Click the New icon on the Manage Service Applications page to drop down the list of service applications and select Word Automation Services.
In the Create New Word Automation Services Application dialog box, enter a name (such as Word Automation Services Application) in the Name text box.
Choose an existing application pool or create a new one in the Application Pool section.
Choose the Partitioned Mode Only option if you are creating a multi-tenant SharePoint farm.
Select the Add To Default Proxy List option if you want to add the proxy to the default proxy list.
Click Next.
On the Database Page, enter the name of the database server as well as the name of the database to be created for the service application in the Database Name text box.
Click Finish to create the Word Automation Services Application service application.
Modifying properties
After you create the service application, you can modify its properties. Word Automation Services can open not only Microsoft Word documents but also the same kinds of documents that Microsoft Word can open, such as Rich Text Format files and single file web pages. The kinds of files that can be opened as well as settings that can affect the performance of the server(s) running the Word Automation Services service can be modified by clicking the Word Automation Services service application on the Manage Service Applications page in Central Administration. The following settings are available:
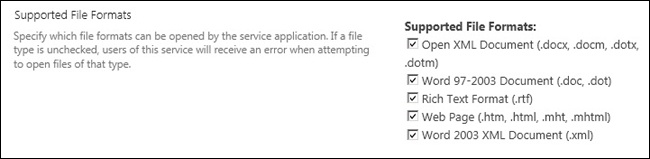
Supported File Formats. In this section, you specify which supported file formats will be allowed for use by Word Automation Services. Figure 4-7 shows the supported file types.
Embedded Font Support. This option enables you to choose whether to embed fonts (to help preserve consistency across different machines). It’s enabled by default.
Maximum Memory Usage. This is the percentage of system memory made available to the Word Automation Service service application. The default is the maximum, 100 percent.
Word 97-2003 Document Scanning. This option provides added security when loading Word 97-2003 documents. This process requires extra resources but should be disabled only if you fully trust all Word 97-2003 documents being loaded.
Conversion Processes. This is the number of concurrent documents that can be converted at the same time per server running Word Automation Services. The default is 1, and the maximum is 1000.
Conversion Throughput. This is the frequency at which groups of conversions are started and the number of conversions allowed per group. The default frequency is every 15 minutes (range is 1 to 59). The default number of conversions per group is 300 (range is 1 to 1000).
Job Monitoring. This is the length of time, in minutes, before the conversion status is monitored and, if necessary, restarted. Default is 5 minutes (range is 1 to 60).
Maximum Conversion Attempts. This is the maximum number of times Word Automation Services tries to convert a document before its status is set to failed. The default number of times is 2 (range is 1 to 10).
Maximum Synchronous Conversion Requests. This is the maximum number of conversion requests that can be processed at a time per server. Default is 25 (range is 1 to 1000).
As you can tell by the setting values (particularly the 100 percent for the Maximum Memory Usage setting), you need to plan resource allocation if you expect to convert a large number of documents. You can easily bring the SharePoint farm to a grinding halt if these settings aren’t properly set.
Configuring file conversions
SharePoint Server 2013 provides two options for how a conversion is started. In SharePoint 2010, conversions are placed into a queue that’s processed by a timer job that runs up to once a minute (or up to 59 minutes). In SharePoint 2013, conversions can be processed “on demand,” in which they are started right away and pushed ahead of the conversions in the queue. This allows for a much more responsive user experience. For example, you might have a web part that converts Word documents to web pages for end users. Users would much prefer to have the document converted right away rather than have to wait until the timer job starts.
The server that Word Automation Services uses doesn’t have to be the one that the SharePoint farm is installed on. You can use a different server to help take the load off the SharePoint farm database. You can also move the database, after you create it, to another SQL Server instance if you decide that the load is too much on the server where it is located. You need to edit the Word Automation Services service application properties if you do move the database. This can be done in Central Administration or via PowerShell.
More Info: Moving the Word Automation Services databases
See http://technet.microsoft.com/en-us/library/jj729799.aspx for more information on how to Move the Word Automation Services service application databases in SharePoint Server 2013.
Another new feature in SharePoint Server 2013 for Word Automation Services is the ability to perform file conversions on streams. This means that you can now convert files that aren’t stored in SharePoint. This feature has many uses, especially if you are converting the file before it goes into SharePoint. This would save you from having to put the file into SharePoint and then deleting it after it is converted (resource-expensive operations that also take a lot of transaction log space). The drawback to this new feature is that it can be used only with on-demand file conversion jobs, which means that only one stream can be converted at a time.
More Info: What’s new in Word Automation Services for developers?
See http://msdn.microsoft.com/en-us/library/office/jj163073.aspx for more details on the new developer features in Word Automation Services.
Creating and configuring Microsoft PowerPoint Conversion Services
Microsoft PowerPoint Conversion Services is a new feature in SharePoint 2013. In concept, it’s similar to Word Automation Services in that it provides the capability for automated conversions of PowerPoint documents to other types of documents. For example, if you wanted to convert a series of PowerPoint documents to a series of JPG files, you could use PowerPoint Conversion Services to automate this. The following files are supported for conversion by PowerPoint Conversion Services:
Open XML File Format (.pptx)
PowerPoint 97-2003 (.ppt)
PowerPoint Conversion Services can take these supported files and convert them into various formats, as follows:
Open XML File Format (.pptx)
Portable Document Format (.pdf)
Open XML Paper Specification (.xps)
Portable Network Graphics (.png)
Joint Photographic Experts Group (.jpg)
More Info: Using PowerPoint Automation Services
See http://msdn.microsoft.com/en-us/library/fp179894.aspx for more information on using PowerPoint Automation Services and PowerPoint Conversion Services in SharePoint 2013.
The PowerPoint Conversion Services service application relies on the PowerPoint Conversion Service. If you expect to convert many files, you should probably have this service running on more than one server. If you expect heavy and regular conversion usage, you should dedicate one or more servers to running this service. You can start the service on the required servers by following these steps:
Navigate to Central Administration as a farm administrator and click Manage Services On Server in the System Settings section.
Select the server on which you want the service running from the Server drop-down list.
Find the PowerPoint Conversion Service under the Service column and click Start under the Action column.
Repeat steps 2 and 3 for every server that you want running the PowerPoint Conversion Service.
After you start the services on the servers, you need to create the PowerPoint Conversion Service service application. This can be done by running the Farm Configuration Wizard and choosing the PowerPoint Conversion Service Application in the list of service applications. (If this is the only service application that you want configured, make sure that all the other options that can be changed are cleared.) The Farm Configuration Wizard uses the default settings; if you don’t want to use the default settings or just prefer to use PowerShell, you can use the following commands to create the service application and its proxy:
$account=Get-SPManagedAccount "<account>"
$appPool=New-SPServiceApplicationPool -Name PowerPowerAppPool -Account $account
$appService=New-SPPowerPointConversionServiceApplication -ApplicationPool $appPool -Name
<ServiceName>
$proxyService=New-SPPowerPointConversionServiceApplicationProxy -ServiceApplication
$appService
After you create the PowerPoint Conversion Service service application and proxy, it’s ready to be used by programmers. You don’t need to configure any user settings.
Creating and configuring Machine Translation Services
The Machine Translation Services service application is a powerful new tool in SharePoint 2013 that allows documents to be sent to Microsoft for translation from one language to another. This can be done for files and pages as well as for whole sites. This remarkable new service allows owners of SharePoint to deliver much of its content in wide variety of languages. Architecturally, the Machine Translation Service is similar to the Word Automation Service in that it has timer jobs and queues.
Note: Language packs aren’t applicable here
The Machine Translation Services service application isn’t connected to the language packs that enable the user interface elements to be displayed in the language of the browser.
Important
Information sent to Microsoft for translation can be used to help improve the translation process (and only for that reason). You should let users know that this is possible so that they can decide whether they want to use the service.
Creating and configuring the Machine Translation service is a little more complicated than most of the service applications, mainly because it has to connect to the Internet. The following prerequisites must exist before you can use the Machine Translation service:
The App Management Service is probably already running on your server, but if it isn’t, you need to create the App Management Service service application and start the App Management service as you did when creating and configuring the App Catalog in Objective 4.1: Create and configure App Management.
More Info: Configuring authentication
Configuring server-to-server authentication and app authentication isn’t covered in detail here for the Machine Translation service. For the exam, however, you should still know that they are required. See http://technet.microsoft.com/en-us/library/jj219532.aspx for information on how to configure server-to-server authentication in SharePoint 2013. For information on how to configure app authentication in SharePoint Server 2013, see http://technet.microsoft.com/en-us/library/jj655398.aspx.
Creating a Machine Translation Services service application
Any server that runs the Machine Translation service needs Internet access. This generally means opening up an Internet Explorer browser window on the server and going to Tools | Internet Options. On the Connections tab, click LAN Settings and then define a proxy server and port that will allow access out to the Internet. Your organization might already have this set up, or you might want to use a configuration script to make this happen. In any case, the server needs to send and receive files from the internet.
After you make sure that the perquisites are met and that the Machine Translation service is running on the appropriate servers, you can begin the process of creating a Machine Translation Services service application in Central Administration. Follow these steps:
Navigate to Central Administration as a member of the Farm Administrators group and click Manage Service Applications in the Application Management section.
Click the New icon on the Manage Service Applications page and then choose Machine Translation Service.
Enter a name (such as Machine Translation Service Application) in the Name text box.
In the Application Pool section, either select an existing application pool or create a new one.
In the Partitioned Mode section, select Run In Partitioned Mode only if you will be hosting.
Choose whether to add the service application to the default proxy list in the Add To Default Proxy List section.
In the Database section, choose the database server and the database name (use the SharePoint SQL Server instance unless you have a good reason to do so otherwise, such as heavy SQL Server loads and the need for load balancing). Leave Windows Authentication selected unless specified by your SQL Server administrator or for some other overriding business reason.
Click OK to finish.
Configuring the settings
After the Machine Translation Services service application is created, you should review the settings. Because the actual work of translation isn’t done on the SharePoint farm, the Machine Translation service doesn’t have the same resource requirements as Access Services or Word Automation Services. You should still make sure that the settings don’t overly burden the servers running the service, however, especially if you need to translate a large number of files into a multitude of languages. To access the settings, click the name of the Machine Translation service on the Manage Service Applications page. The following settings are available:
Enabled File Extensions. A list of file extensions that are allowed to be sent to the Machine Translation service, grouped into four sets: Microsoft Word Documents, HTML, Plain-Text, and XLIFF.
Maximum File Size For Binary Files In KB. In the Item Size Limits section, but specifies the maximum size for those files in the Microsoft Word Documents section. The default value is 51200 (range is 100 to 524288).
Maximum File Size For Text Files In KB. Limit in the Item Size Limits section for plain-text, HTM, and XLIFF files. The default is 5120 (range is 100 to 15360).
Maximum Character Count For Microsoft Word Documents. Limit in the Item Size Limits section for the maximum number of characters. The default is 500000 (range is 10,000 to 10,000,000).
Web Proxy Server. In the Online Translation Connection section, in case you want to specify a specific proxy server for the service to use.
Translation Processes. The number of translation processes per server, meaning the number of translations that can occur at the same time per server. The default is 1 (range is 1 to 5).
Frequency With Which To Start Translations. In the Translation Throughput section; determines the frequency at which groups of translations are started. The default is 15 (range is 1 to 59).
Number Of Translations To Start. In the Translation Throughput section; determines the number of translations that can be sent per group (per translation process). Default is 200 (range is 1 to 1000).
Maximum Translation Attempts. In the Maximum Translation Attempts section; specifies the attempts to translate before a translation status is set to Failed. Default is 2 (range is 1 to 10).
Maximum Number Of Synchronous Translation Requests. In the Maximum Synchronous Translations Requests section; specifies the maximum number of synchronous translations that can be processed per server. Default is 10 (range is 0 to 300).
Maximum Number Of Items Which Can Be Queued Within A 24-Hour Period. In the Translation Quota section; specifies the maximum number of items in a 24-hour period. Default is No Limit (range is 100 to 1,000,000).
Maximum Number Of Items Which Can Be Queued Within A 24-Hour Period Per Site Subscription. In the Translation Quota section; determines the limit per site description. Default is No Limit (range is 100 to 1,000,000).
Recycle Threshold. In the Recycle Threshold section; specifies the number of documents translated by a translation process before it’s restarted. Default is 100 (range is 1 to 1000).
Disable Office 97-2003 Document Scanning? In the Office 97-2003 section; determines whether extra checks are done on Office 97-2003 documents before the documents are opened. Disable this setting only if you fully trust all documents loaded by the Machine Translation service.
More Info: Creating and configuring Machine Translation Services
See http://technet.microsoft.com/en-us/library/jj553772(v=office.15).aspx for more information on how to create and configure Machine Translation Services in SharePoint Server 2013.
Running Machine Translation Services
The Machine Translation service can operate asynchronously, in which case the timer job values listed in the settings determine when the translations are processed. It can also operate synchronously. If you want to start translation processing immediately, you can do so by using the following PowerShell commands:
$timerjob = Get-SPTimerJob "Machine Translation Service - Machine Translation Service
Timer Job"
$timerjob.Runnow();
Several methods are available to make use of Machine Translation Services. The service application can be accessed through server-side code such as C#, through client-side code such as Jscript, or even through Representational State Transfer (REST) services. Within the SharePoint farm, Machine Translation Services has been integrated into variations. Translations can be requested by site owners manually, or they can be automated.
Objective summary
Excel Services is a powerful way to display Excel data wholly or partially in a controlled manner.
Access Services allows complex queries of SharePoint data as well as external data sources.
The Visio Graphics Service can provided raster-formatted data from Visio 2013 as well as display older Visio drawings using Silverlight.
Word Automation Services allows for unattended processing of document conversions via timer jobs as well as on-demand conversions.
PowerPoint Conversion Services can allow for the conversion of PowerPoint presentations into a wide variety of other types of documents, but configuration is limited.
Objective review
Answer the following questions to test your knowledge of the information in this objective. You can find the answers to these questions and explanations of why each answer choice is correct or incorrect in the “Answers” section at the end of this chapter.
The Excel Services application can use Excel files from which of the following locations?
SharePoint sites
Network file shares
Non-SharePoint websites
All of the above
Access Services requires SQL Server to store its data. Which version of SQL Server is required to use Access Services on SharePoint Server 2013?
SQL Server 2008 Express
SQL Server 2008 R2
SQL Server 2012
All of the above
What’s the maximum amount of physical memory that Access Services can use on an individual SharePoint server?
25 percent
50 percent
75 percent
All available up to 100 percent
Visio Services can display several types of drawing formats in the web browser. What types of drawings can’t be displayed in raster format?
Visio web drawings (.vdw)
Visio 2013 drawings saved with the .vsdx extension (files saved in Open Packing Convention)
Visio 2013 drawings saved in the XML format with the .vsdm extension
All of the above
Both Visio Graphics Services and Excel Services can access external data through trusted data providers. What type of provider type can neither of these service applications use?
ODBC
Access
OLE DB
DBC with DSN
Which of the following file types can’t be opened and converted by using the Word Automation Services?
Word 2003 documents
HTML pages
Excel workbooks
Rich Text Format files
Objective 4.3: Configure Service Application Federation
SharePoint Server 2013 farms can provide some of its services to other farms, otherwise known as a federation of services. If you are in an organization with more than one SharePoint farm, you can use federation of services to keep data consistent or use dedicated farms to provide services so that other SharePoint farms can use their resources for other tasks.
The first step in federating services is to determine which services should be federated. When this is determined, you need to set up a trust between the consuming farm and the publishing farm. After the trust is set up, one farm can publish the service and the other farm can consume it.
Planning services to federate
The first step in planning to federate services is to determine what services need to be federated. In SharePoint, a service on a farm can be published, and then one or more farms can consume this service. You might have various reasons to federate services. For example, if you want every farm to be able to search the same sets of data (thus providing consistent search results), you would want to set up a farm just for Search so that each farm won’t crawl the same set of data and store duplicate indexes, thereby saving storage space, memory, and CPU. The business needs of your organization should determine which services to federate; however, only certain services can be federated:
Business Data Connectivity
Machine Translation
Managed Metadata
Search
Secure Store
User Profile
SharePoint 2010 farms can also consume services from a SharePoint 2013 farm, but not the other way around. This allows for SharePoint 2010 farms to be migrated in stages but still maintain consistency and services. For example, the Managed Metadata service application could be migrated to the SharePoint 2013 farm, and SharePoint 2010 farms could still consume the migrated managed metadata. SharePoint 2010 farms can consume only the services available in SharePoint 2010. For example, because Machine Translation doesn’t exist in SharePoint 2010, the farm couldn’t consume that service.
Important
The User Profile service application and the content that it supports must reside in the same data center. This means that the My Site Host, the personal sites (SkyDrive Pro storage), team sites, and community sites must all be in the same data center.
To use federated services, the farms involved need to be set up to trust one another and then the services themselves need to be published and consumed. The order in which the process of federating service applications should occur is as follows:
Exchange trust certificates between the farms (consuming and publishing) involved in the federation process.
Publish the service application on the publishing farm.
Set appropriate permissions on the consuming farm for the federated service application.
Connect to the publishing farm service application from the consuming farm.
Add the shared service application to a Web Application proxy group (that is, default proxy group) on the consuming farm.
Exam Tip
The preceding steps are exactly the kind of ordering you might be asked to do on the exam. You can expect to see at least one question or case study (and perhaps more) about federating services.
Determining which services should be federated, which farms should be consumers, and which should be publishers is up to you and whoever else is architecting the farm. Switching to a federated service or switching back can take a considerable amount of time—hours or even days, depending on what data and/or settings need to be transferred to restore functionality. This would, of course, cause significant disruption in a production environment. To avoid these disruptions, try to test the scenarios that you might use before you implement them in production.
More Info: Sharing service applications across farms
See http://technet.microsoft.com/en-us/library/ff621100.aspx for more information on how to share service applications across farms in SharePoint 2013.
Performing a certificate exchange
Before two SharePoint farms can federate service applications, they must trust each other. For the SharePoint farms to trust each other, trust certificates must be exchanged between them. The consuming farm needs to provide two trust certificates to the publishing farm:
Root certificate
Security Token Service (STS) certificate
Whereas the consuming farm needs to provide two trust certificates to the publishing farm, the publishing farm needs to provide to the consuming farm just one certificate: the root certificate. These certificates must be created, copied over to the corresponding server, and then imported. The act of exporting the certificates varies somewhat, depending on the type of certificate being exported. To export the root certificate on the consuming farm, follow these steps:
Log onto a SharePoint server on the consuming farm with an account that is a member of the Administrators group. The account must also have the securityadmin and the db_owner fixed database roles on the consuming SharePoint farm’s SQL Server instance.
Open the SharePoint 2013 Management Shell.
Run the following PowerShell commands, where <Root Cert Path> is the path and filename where you want to create the root certificate (for example, c:ConsumingRootCert.cer):
$rootCert = (Get-SPCertificateAuthority).RootCertificate
$rootCert.Export("Cert")|Set-Content <Root Cert Path> -Encoding byte
While you are in the SharePoint 2013 Management Shell, you can export the security token (the STS certificate). Use the following PowerShell commands, in which <STS Cert Path> is the path and filename where you want to create the security token (STS) certificate:
$stsCert = (Get-SPSecurityTokenServiceConfig).LocalLoginProvider.SigningCertificate
$stsCert.Export("Cert")|Set-Content <STS Cert Path> -Encoding byte
After you export the certificates, you need to copy the consuming farm certificates to the publishing farm and the publishing farm certificate to the consuming farm.
More Info: Exchanging trust certificates between farms
See http://technet.microsoft.com/en-us/library/ee704552.aspx for more information on how to exchange trust certificates between farms in SharePoint 2013.
Managing trusts
After the certificates are created and exchanged, you can manage the trust between the consuming SharePoint farm and the publishing farm. Managing trusts requires that trust be established between the two farms. Establishing trust is done by importing certificates on the respective servers. On the publishing farm, you must import both the root and the STS certificates from the consuming farm. On the consuming farm, you need to import just the root certificate from the publishing farm. These tasks can be accomplished using Central Administration or through PowerShell commands. To import the certificates on the publishing farm, follow these steps:
Navigate to Central Administration with an account that’s part of the Farm Administrators group.
Click the Security link on the home page.
Click Manage Trust in the General Security section.
Click New on the Trust Relationship page.
On the Establish Trust Relationship page, enter a name for the trust relationship (such as Farm A trust) in the General Setting section.
Click Browse in the Root Certificate For The Trust Relationship section and select the exported consuming farm’s root certificate.
Select the Provide Trust Relationship check box in the Security Token Service (STS) Certificate For Providing Trust section.
Click the Browse button next to the Token Issuer Certificate box and select the exported consuming farm’s STS certificate.
Click OK to save changes.
On the consuming farm, you would follow steps 1 through 6, except that you would choose the exported publishing farm’s root certificate and then click OK. You don’t need to import an STS certificate on the consuming farm, so you would leave the Provide Trust Relationship box cleared. When the two farms have their certificates imported, trust is considered to be established.
You can also use PowerShell commands to establish trust. To import the consuming farm’s root certificate onto the publishing farm, follow these steps:
Open the SharePoint 2013 Management Shell on the publishing farm with an account that has the same level of permissions required for creating a certificate.
Run the following PowerShell commands, where <name of the consuming server> is the name of the consuming server (or another unique way to identify the consuming farm) and <root cert path> is the location of the consuming farm’s root certificate:
$rootCert=Get-PfxCertificate <root cert path>
New-SPTrustedRootAuthority <name of the consuming server> -Certificate $rootCert
That takes care of importing the root certificate. Now you need to import the exported STS certificate from the consuming farm. You can do this by staying in the SharePoint 2013 Management Shell and using the following PowerShell commands, where <sts cert path> is the location of the consuming farm’s STS certificate:
$stsCert=Get-PfxCertificate <sts cert path>
New-SPTrustedServiceTokenIssuer <name of consuming server> -Certificate $stsCert
The certificates on the publishing farm should be complete at this point. You can verify that they are set up correctly by looking at the Manage Trusts page in Central Administration. As with the Central Administration method, the consuming farm needs to import only the publishing farm’s root certificate, and you can use the same set of PowerShell commands as you did on the publishing farm (except that you would use the path to the publishing farm’s exported root certificate and use a unique name that represents the publishing farm).
Managing service application permissions
Before a consuming farm can actually consume any service applications from a publishing farm, the publishing farm has to give the consuming farm permissions to the Application Discovery and Load Balancing service application. After this is complete, the publishing farm can give permissions to the consuming farm for other service applications. Setting permissions on the publishing server can be done either in PowerShell or in Central Administration, but in either case you need the consuming farm ID, which you must obtain by using PowerShell commands. Follow these steps:
Log onto the consuming farm with an account that’s a member of the Administrators group and also has the securityadmin role on the SQL Server instance that the consuming farm is running on.
Start the SharePoint 2013 Management Shell.
Run the following PowerShell command and store the ID (for example, in a text file) that’s returned.
Get-SPFarm | Select Id
Now that you have the ID of the consuming farm, you can provide permissions to the Application Discovery and Load Balancing service application. This can be done on the publishing farm using PowerShell commands as follows:
Log onto the publishing farm with an account that’s a member of the Administrators group and also has the securityadmin and db_owner roles (on any database being updated) on the SQL Server instance that the publishing farm is running on.
Run the following PowerShell commands, where <consuming farm ID> is the ID of the consuming farm that you obtained earlier:
$security=Get-SPTopologyServiceApplication|Get-SPServiceApplicationSecurity
$claimprovider=(Get-SPClaimProvider System).ClaimProvider
$principal=New-SPClaimsPrincipal -ClaimType
http://schemas.microsoft.com/sharepoint/2009/08/claims/farmid -ClaimProvider
$claimprovider -ClaimValue <consuming farm ID>
Grant-SPObjectSecurity -Identity $security -Principal $principal -Rights "Full
Control"
Get-SPTopologyServiceApplication|Set-ServiceApplicationSecurity -ObjectSecurity
$security
Exam Tip
You might have noticed the Get-SPTopologyServiceApplication command in the preceding PowerShell code. This is because the Application Discovery and Load Balancing service application is also known as the Topology service. You might see the terms used interchangeably on the exam and in documentation.
If you want to use Central Administration (and save yourself a lot of typing) to set permissions on the Application Discovery and Load Balancing service application, you still need the consuming farm ID that you got from PowerShell earlier in this section. Assuming that you have the ID available, you can set permissions by following these steps:
Log onto a publishing server that’s running Central Administration with an account that’s a member of the Farm Administrators group.
Click Manage Service Applications in the Application Management section on the Central Administration home page.
Click the row that contains Application Discovery and Load Balancing Service Application.
On the ribbon, click the Permissions icon.
In the Connection Permissions dialog box, paste the consuming farm ID in the claims box, as shown in Figure 4-8.
Click the check names icon to resolve the farm ID, and then click the Add button.
Select the consuming farm ID in the box below where it was added and then select Full Control (the only option that can be selected).
Click OK.

After permissions are added to the Application Discovery and Load Balancing service application, you need to add permissions in the same way in Central Administration to any of the service applications that you want to publish to the consuming farm. If you want to use PowerShell commands to add these permissions, you would use similar commands as the earlier ones but instead use the service application’s GUID with Get-SPServiceApplication, not Get-SPTopologyServiceApplication.
More Info: Setting permissions to published service applications
See http://technet.microsoft.com/en-us/library/ff700211.aspx for more information on how to set permissions to published service applications in SharePoint 2013.
Publishing service applications
By now, you’ve exchanged certificates between the consuming and publishing farms, imported the certificates, and set permissions on the service applications. Now you need to actually publish the service applications so that they can be consumed by one or more farms.
The act of publishing a service application provides a Universal Resource Name (URN) that can be passed to consuming farm(s). This URN provides schema and authority information needed by the consuming farm.
You can use either Central Administration or PowerShell commands to publish service applications. The following steps use the Central Administration method:
Log onto Central Administration with a Farm Administrator account.
Click Manage Service Applications in the Application Management section.
Select the service application that you want to publish (do not to click the link but just select the line so that it’s highlighted) on the Manage Service Applications page.
Click the Publish button on the ribbon to open the Publish Service Application dialog box.
Select the type of connection (http or https) that you want to use from the Connection Type drop-down list.
Select the check box for Publish This Service Application To Other Farms.
Copy the published URN so that it can be used later. A published URN look something like this:
schemas-microsoft-com:sharepoint:service:196807c3bb0f4eea9b10afb70793a16
7#authority=urn:uuid:daf0ec20a27a44c7abe5104b5d516637&authority=https://
publishingserver:32844/Topology/topology.svc
Optionally, enter a Description and a link to an information page if you want to provide consuming farms with that information.
Click OK to start publishing.
The service application should be published at this point and you should have the published URN for use on the consuming farm. If you didn’t set up your trust with the consuming farm(s) earlier, you could have done it from the Publish Service Application dialog box by clicking the Click Here To Add A Trust Relationship With Another Farm link. You can also publish a service application by using PowerShell commands, as follows:
Log onto a server in the SharePoint publishing farm with an account that’s a member of the Administrators group and has the securityadmin fixed server role on the publishing farm’s SQL Server instance.
Open the SharePoint 2013 Management Shell.
Run the PowerShell command Get-SPServiceApplication to get a list of service applications and their associated GUIDs. Find the GUID associated with the service application that you want to publish and copy it for later.
Run the following PowerShell command, where <Service App GUID> is the GUID you copied from step 3.
Publish-SPServiceApplication -Identity <Service App GUID>
The service is published at this point if the command was successful. Use the PowerShell command Get-SPTopologyServiceApplication to get the load-balancing URN of the topology service that’s needed for consuming the service.
More Info: Publishing service applications
See http://technet.microsoft.com/en-us/library/ee704545.aspx for more information on how to publish service applications in SharePoint 2013.
Consuming service applications
Now you should be ready to start consuming service applications and using that functionality on the consuming SharePoint farm. To consume a service application, you need the published URN from the service application on the publishing farm. You can use Central Administration or PowerShell commands to consume the service application. If you want to consume the service application with Central Administration, follow these steps:
Open Central Administration with an account that’s a member of the Farm Administrators group.
Click Manage Service Applications in the Application Management section.
On the ribbon, click the Connect icon and then choose the type of service application to which you want to connect (such as Machine Translation Service Proxy).
On the Connect To A Remote Service Application page, enter the Farm or Service Application address (for example, the value from the Published URN field that starts with urn).
Click OK. If you can connect to the published service application, you should get a confirmation screen; otherwise, you should get an error.
On the next screen you should see the service application. Select whether you want to add the service to the consuming farm’s default proxy list.
Make sure that the service is highlighted and click OK to connect.
A confirmation screen appears. Click OK again.
The remote service application should be available for use now if everything is configured correctly.
If you want to use PowerShell commands to connect to the remote service application, follow these steps:
Log onto a server in the SharePoint publishing farm with an account that’s a member of the Administrators group and has the securityadmin fixed server role on the publishing farm’s SQL Server instance.
Open the SharePoint 2013 Management Shell.
Run the following PowerShell command, where <Published URL> is the publishing farm topology URL that you can get from Central Administration or from the PowerShell command Get-SPTopologyServiceApplication:
Receive-SPServiceApplicationConnectionInfo -FarmURL <Published URL>
You need to use a different command depending on the type of service application you are connecting to. Regardless of the command, you still need to supply a name and the Published URL (same one as in step 3). The different commands available are as follows:
New-SPBusinessDataCatalogServiceApplicationProxy
New-SPEnterpriseSearchServiceApplicationProxy
New-SPMetadataServiceApplicationProxy
New-SPProfileServiceApplicationProxy
New-SPSecureStoreServiceApplicationProxy
At this point, you should be able to consume the service application. If an error occurred in the configuration, you need to pinpoint it starting with the trust certificates, then going to permissions, and also verifying that you’re using the correct published URL. All these items have to be done without error for federation to work. Troubleshooting can be difficult, so it might be easiest to start over from the beginning if it’s not working.
More Info: Connecting to service applications on remote farms
See http://technet.microsoft.com/en-us/library/ee704558.aspx for more information on how to connect to service applications on remote farms in SharePoint 2013.
Objective summary
You can use federation to keep data consistent, reduce duplication of data, offload resource-intensive tasks to other farms, and increase security.
Two certificates from the consuming farm and one from the publishing farm are required to establish trust between two SharePoint farms.
Trust relationships can be viewed in Central Administration on the Manage Trust page, which can be found through the General Security section on the Security page.
The Application Discovery and Load Balancing service application—also know as the Topology service—must be published on the publishing farm.
The consuming farm must be given permissions to the publishing farm’s Application Discovery and Load Balancing service application as well as the service application that it’s consuming.
The published URL for a service application on the publishing farm is needed by the consuming farm to connect to the published service application.
Objective review
Answer the following questions to test your knowledge of the information in this objective. You can find the answers to these questions and explanations of why each answer choice is correct or incorrect in the “Answers” section at the end of this chapter.
Which of the following services can’t be consumed by a SharePoint 2010 farm from a SharePoint 2013 farm?
Search
Secure Store
Machine Translation
Managed Metadata
For a trust to be established between two SharePoint farms, certificates must be exchanged between the consuming farm and the publishing farm. Which certificate(s) must be created by the consuming farm and copied over to the publishing farm?
A root certificate and a security token certificate
Just a root certificate
Just a token certificate
A subordinate certificate
Which PowerShell commands should you use when importing a root certificate from another farm?
Get-SPCertificateAuthority
Get-PfxCertificate
Get-RootCertificate
Get-SPServiceApplicationSecurity
Which of the following steps must you perform before a consuming farm can consume a service application from a publishing farm?
The consuming farm must be given permissions to the Application Discovery and Load Balancing service application.
The consuming farm must be given permissions to the service application that’s to be consumed.
Both the root and the STS certificates from the consuming farm must be imported on the publishing farm.
All of the above.
Objective 4.4: Create and configure a Business Connectivity Service and Secure Store application
The Business Connectivity Service (BCS) is used to connect to external data so that it can be exposed as a SharePoint list or be used in SharePoint application. It works with the Secure Store service application to provide users secure access to the data. The Secure Store also works with other service applications, such as the Visio Graphics Services and Excel Services service applications, but it’s included in this objective because it is integral to the BCS service application.
Many kinds of data are better stored directly in databases such as SQL Server, but this data might also need to be exposed to users. The BCS can expose this data securely by exposing only the data that’s truly needed, as well as using the Secure Store to access the data with an account that has only limited rights so that end users never have direct access to the underlying data. With proper permissions, end users can even update the underlying data through SharePoint.
This objective assumes that the BCS and Secure Store service applications have already been created on the SharePoint farm. The BCS requires considerable configuration before you can start displaying and interacting with external data. Proper configuration will ensure secure exposure of data and provide optimal performance. This objective covers how to create and configure both the BCS and the Secure Store service applications.
Importing and configuring BCS models
BCS models—also known as Business Data Catalog (BDC) models—are XML files that describe an external data source. The XML file outlines the data available, the data type, and the data location for one or more external content types. The BCS model can be used with a wide variety of different types of data sources:
The ability to use OData data sources is new to SharePoint. SharePoint lists have been available as OData to other programs that can consume OData sources, but this is the first version of SharePoint that has built-in support for consuming OData. Data is accessed with OData by using a specially formed URL.
More Info: Using OData sources with BCS
See http://msdn.microsoft.com/en-us/library/sharepoint/jj163802(v=office.15) for more information on using OData sources with Business Connectivity Services in SharePoint 2013.
Exam Tip
Because using OData data sources is new to SharePoint 2013, you can expect to see it in some fashion on the exam. OData also requires that Visual Studio (2010 or later) be used to create BCD models that use it, whereas usually you can choose between Visual Studio and SharePoint Designer.
After a model is created and imported, the BCS can expose the data as a SharePoint list, use it in a SharePoint application, or even use it in Microsoft Office 2013. The BCS models can be created with SharePoint Designer or with Visual Studio. Depending on permissions and how the BCS model is designed, users can create, read, update, and delete data (known as CRUD operations). Users can also create queries that use the data. Regardless of how a model is created, it can be imported into the Business Data Connectivity Services (BDCS) service application using Central Administration or with PowerShell commands. To import a BCS model using Central Administration, follow these steps:
Open Central Administration with an account that has permissions to use the BDCS service application (a farm administrator or an administrator of the BDCS service) and has Edit permissions on the metadata store.
Click Manage Service Applications in the Application Management section.
Find the BDCS service application (Business Data Connectivity Service Application) and click it.
Click the Import icon, as shown in Figure 4-9.
On the Import BDC Model page, click Browse in the BDC Model section and choose the exported model file that you want to import.
Under File Type, choose whether it’s a Model (a definition file that contains the base metadata) or a Resource (a definition file that contains any combination of localized names, properties, and permissions).
In the Advanced Settings section, choose which resources to import (if you are importing a resource file) and configure any custom environment settings that you want to use.
Click Import to begin importing the file. The file is validated and, if it was successfully imported, you can click OK to finish.

Important
Use caution when importing permissions. The permissions imported are added to the security objects for the existing model. If an entry for a particular access control list (ACL) entry already exists, it will be overwritten.
After you import the model, it appears on the Business Data Connectivity page. Notice that three views can exist on the page: BDC Models, External Systems, and External Content Types. If you don’t see the data you are expecting, check to make sure that the view is correct.
You can also import models by using PowerShell commands in the SharePoint 2013 Management Shell, assuming that the account used has the proper permissions. You need to get a reference to the metadata store using the command Get-SPBusinessDataCatalogMetadataObject and then use the command Import-SPBusinessDataCatalogModel to import the model into the BDCS service application. In the following example, <context> is a web app that uses the metadata store you want to associate your model to (such as http://contoso) and <BDCM Path> is the file path to the exported model (for example, c:model.bdcm):
$meta=Get-SPBusinessDataCatalogMetadataObject -BdcObjectType "Catalog" -ServiceContext
<context>
Import-SPBusinessDataCatalogModel -Path <BDCM Path> -Identity $meta
More Info: Using Import-SPBusinessDataCatalogModel
See http://technet.microsoft.com/en-us/library/ff607757.aspx for more information on how to use the PowerShell command Import-SPBusinessDataCatalogModel.
As soon as a model is in the Business Data Catalog service application, it can be exported out. You might want to do this when you are moving from development to production or from one farm to another. If you created the model with SharePoint Designer 2013, you should use that to export the model. If you created the model with Visual Studio, you can import through Central Administration or through the SharePoint 2013 Management Shell by using the PowerShell command Export-SPBusinessDataCatalogModel.
More Info: Using Export-SPBusinessDataCatalogModel
See http://technet.microsoft.com/en-us/library/ff607696(v=office.15).aspx for more information on the PowerShell command Export-SPBusinessDataCatalogModel.
To use Central Administration to export a BDC model or resource file, follow these steps:
Open Central Administration with an account that has permissions to use the BDCS service application (a farm administrator or an administrator of the BDCS service) and has Edit permissions on the metadata store.
Click Manage Service Applications in the Application Management section.
Click the BDCS service application (Business Data Connectivity Service Application).
Make sure that the view is set to BDC Models.
From the list of models and resources, select the one you want to export.
Click the Export button that should now be enabled.
Select Model or Resource in the File Type section and then choose which resources you want to export (see Figure 4-10). You can also specify the name of any custom environment settings.
Click Export to begin the process of saving the model or resource to a file. You are prompted where to save the file.
Exam Tip
This exam won’t cover creating the models in any detail; the other exams go into deeper detail in that area. You just need to know how to make the models available securely to developers and end users.
The BCS uses profile pages to enable end users to see data related to a particular record. For example, a user could see all the details related to a catalog item such as price, quantity, weight, and so on. All the data related to the particular record appears on the profile page just by clicking the View Profile Action link that shows up on any SharePoint list where the business data is displayed. You can set the location of where the profile pages will reside, which can be any SharePoint site in the farm, but for maintenance and security reasons you are recommended to use one site for all the profile pages used by the BCS. You don’t have to enable profile page creation, but if you do, you need to specify a location. To configure profile pages for a BCD model, follow these steps:
Open Central Administration with an account that has permissions to use the BDCS service application (a farm administrator or an administrator of the BDCS service) and has Edit permissions on the metadata store.
Click Manage Service Applications in the Application Management section.
Click the Business Data Connectivity Services Application link.
Click the Configure icon in the Profile Pages section of the ribbon.
Leave the Enable Profile Page Creation check box selected and provide the location of the site to create the pages, as shown in Figure 4-11.
Click OK to save changes.
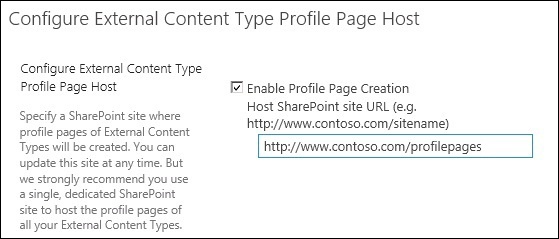
After you supply a Host SharePoint site URL and enabled profile page creation, you can create the profile pages by following these steps, assuming that you are already on the Business Data Connectivity Service Application properties page:
Change the view to External Content Types.
Select the External Content Types for which you want to create profile pages.
Click the Create/Upgrade icon in the Profile Pages section.
A page appears that has several warnings on it. If you still want to create the page, click OK.
Either a success page or an error page that indicates something is wrong with your model (such as a warning that SpecificFinder isn’t defined) appears. Click OK to continue.
Important
Creating a profile page overwrites any previous profile page (such as one that you might have customized). If the External Content Type has a Custom Action as its Default Action, creating a profile page changes that Default Action to View Profile.
In a situation where profile pages already exist, they are either upgraded or replaced. If they are replaced, you will lose any customizations. If they are being upgraded from SharePoint 2010 profile pages, they are simply upgraded; if they are being upgraded from SharePoint 2007 profile pages, a new action, called View Profile (SharePoint 2007), is added to point to the old profile page. View Profile points to the newly created profile page.
Profile pages are regular SharePoint pages that can be modified after they are created. You can provide additional information about the record, modify the look and feel of the page, and put links to more information on the page. You can add/remove web parts and customize the page to fit your organization’s needs. You can also modify the templates on which the profile pages are based, but remember that all future profile pages will use these modified templates.
Configuring BCS model security
Security in general should be kept to a least-privileged model. This means that only those users who need access to a BCS model (also known as a BDC model) and the components associated with it (External Systems and External Content Types) should have access to it.
Depending on the size and complexity of your organization, you probably don’t want the SharePoint farm administrators to manage the security on the BCS models. In fact, you might not want the farm administrators to have anything to do with the management of the BCS models. As a BCS administrator, you can apply permissions to each of the following items directly:
Metadata store
BDC models
External systems
External content types
The BDC models, external systems, and external content types are all stored in the metadata store. It not only provides a place for storage but also a mechanism for permissions inheritance. If a BDC model, external system, or external content type isn’t given explicit permissions, they inherit their permissions from the metadata store. An external content types can also inherit its permissions from the external system to which it’s connected.
Permissions inheritance can happen in one of two ways. Whenever an item is added, it automatically inherits the permissions of the metadata store. You can also forcibly overwrite any set of custom permissions by using the Propagate Permissions To All option when modifying the metadata store permissions. To modify the metadata store permissions, follow these steps:
Open Central Administration with an account that has permissions to use the BDCS service application (a farm administrator or an administrator of the BDCS service) and has Edit permissions on the metadata store.
Click Manage service Applications in the Application Management section.
Click the Business Data Connectivity Services Application link.
Click the Set Metadata Store Permissions icon in the Profile Pages section on the EDIT tab of the ribbon.
Add an account or accounts to the Permissions box and click Add.
Choose Edit and/or Set Permissions in the Permissions section, as shown in Figure 4-12. (Execute and Selectable In Clients have no meaning here.)
Select the Propagate Permissions To All BDC Models, External Systems And External Content Types In The BDC Metadata Store check box if you want to overwrite all existing permissions.
Click OK to save changes.
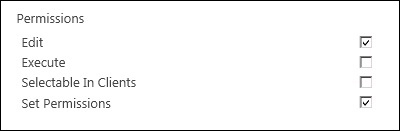
You can make changes to each of the three components (BDC Models, External Systems, and External Content Types) individually depending on your organization’s security needs. You would set the permissions similarly, but you would first select the view corresponding to the item that you want to change (such as BDC models) and then select the items to which you want to assign permissions. After selecting the items, click Set Object Permissions in the Permissions section of the EDIT tab on the ribbon. Then add users and permissions in the same way as you would with the metadata store. Any set of permissions that you set on the object will override the permissions set at the metadata store level unless the permissions are forcefully propagated down. The types of permissions and what they mean are as follows:
Execute. This is required for users of the external content type to perform CRUDQ (create, read, update, delete, and query) operations.
Selectable in Clients. This allows users or groups to expose external content types in external lists and apps within SharePoint by making them available in the external item picker.
Set Permissions. This allows users to set permissions on the object. At least one user or group must have this permission for each object.
Having a very limited set of users (or even just one user) at the metadata store level is generally advisable, and as is using the Propagate permissions to all early on and then not use it again. For the individual objects, give permissions explicitly to the users that are responsible for how the objects will be used. Periodically, you should review the permissions on all objects in BCS as you would with any secured area of your organization.
More Info: Overview of Business Connectivity Services security tasks
See http://technet.microsoft.com/en-us/library/jj683116.aspx for an overview of Business Connectivity Services security tasks in SharePoint 2013.
Generating a Secure Store master key
The Secure Store is a service application that provides an authorization service to other service applications. Credentials are stored securely in a database on the SQL Server instance that the SharePoint farm uses. The BCS uses the Secure Store to provide secure access to external systems that don’t use Active Directory or use Active Directory but want to impersonate as a different user. The security placed on BCS objects has no relation to the permissions that are set in Secure Store.
Before the BCS can start using the Secure Store, a master key needs to be generated. This master key is used to encrypt the credentials so that even if someone had access to the Secure Store database, they couldn’t retrieve the credentials. After the Secure Store service application is created, you need to create the master key:
Navigate to Central Administration with a farm administrator account.
Click Manage Service Applications in the Application Management section.
Click the Secure Store service application.
On the Secure Store Service Application page is a message indicating that you must first generate a new key. If you don’t see this message, a master key has already been created or something is wrong with the Secure Store service.
Click Generate New Key in the Key Management section of the EDIT tab, as shown in Figure 4-13.
In the Generate New Key dialog box, enter a passphrase in the Pass Phrase text box. A passphrase is a case-sensitive password that’s required to add new store service servers and needed for restoring a Secure Store database. It’s not stored, so record it somewhere safe. The passphrase must meet the following requirements:
It’s at least eight characters long.
It contains at least three of the following character groups: English uppercase characters (A through Z), English lowercase characters (a through z), numerals (0 through 9), and non-alphabetic characters (such as !, $, #, and %).
Reenter the passphrase in the Confirm Pass Phrase text box and click OK.
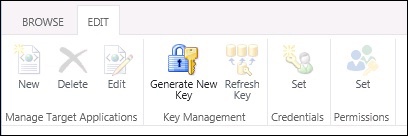
After you generate a new key, you should back up both the Secure Store database as well as the Secure service itself (which contains the key). These backups should be stored in separate locations for security reasons; the key is necessary to decrypt the database. If a new key is generated, you should repeat the backup process so that the backups of the key and the database are kept in sync.
Important
The Secure Store service application isn’t backed up as part of the usual database backup procedure. If the Secure Store service application is lost, you can’t decrypt the Secure Store database and all the data in there will be unusable.
You use Central Administration or PowerShell commands to back up the Secure Store service. To back up the service with Central Administration, follow these steps:
Navigate to Central Administration as a farm administrator.
Click Perform A Backup in the Backup and Restore section.
On the Select Component To Back Up page, expand the Shared Services section if it’s not already expanded.
Expand the Shared Services Applications section and select Secure Store Service Application.
Click Next to open the Select Backup Options page.
Enter a backup location in the Backup File Location and click Start Backup.
On the Backup And Restore Job Status page, monitor the progress until the procedure is complete.
Move the backup file to a secure location—not on the SharePoint farm and not with the backups of the Secure Store database.
You can back up the Secure Store service application with PowerShell also. As with the Central Administration backup method, the backup should be done locally for performance reasons but then it should be moved to a separate secure location. You can use the following PowerShell command in the SharePoint 2013 Management Shell to back up the Secure Store service application, where <path> is the network folder location and <service name> is the name of the Secure Store service application:
Backup-SPFarm -Directory <path> -BackupMethod Full -Item <service name>If for some reason the key is compromised, a new one should be created. If this is done, any backups of the old Secure Store database and any backups of the old Secure Store service application (which contains the key) should be deleted as well, assuming that new backups have been done.
More Info: Backing up the Secure Store service
See http://technet.microsoft.com/en-us/library/ee748648.aspx for more information on how to back up the Secure Store service in SharePoint 2013.
Managing the Secure Store master key
Managing the Secure Store master key means keeping the backed-up key (the backup of the Secure Store service application) and the passphrase in a secure location and, if necessary, restoring the master key. Keeping the master key and passphrase in a secure location depends on your organization and the options that you have available. Storing it on physical media such a thumb drive and putting it in a locked storage area is recommended.
You might need to restore the Secure Store service application (and therefore the master key) if the key is compromised or the service application becomes corrupted because of hardware or software failures. You can use Central Administration or PowerShell commands to restore the Secure Store service application, but in either case you need the passphrase. To perform the restore operation using Central Administration, follow these steps:
Navigate to Central Administration as a farm administrator.
Click Restore From A Backup in the Backup And Restore section.
On the Select Backup To Restore page, enter the path to the backup of the Secure Store service application and click Refresh.
Select the backup from the list of backups and click Next.
On the Select Component To Restore page, expand the Shared Services section if it’s not already expanded.
Expand the Shared Services Applications section and select Secure Store Service Application.
Click Next to open the Select Restore Options page. Check that the name of the Secure Store service application appears in the Restore Component section (preceded by FarmShared ServicesShared Services Applications).
In the Restore Options section, select Same Configuration under Type Of Restore. Click OK to confirm.
Click Start Restore and wait for the job to complete.
Go to the Service Applications page and click the Secure Store service application.
On the Secure Store Service page, click Refresh Key.
Enter the passphrase in the Pass Phrase text box when asked, and then click OK.
After you restore a Secure Store service application, you should probably generate a new key and do another backup.
If you want to use PowerShell commands to restore the Secure Store service application, you can do so by using the following commands in the SharePoint 2013 Management Shell, where <service name> is the Secure Store service application name, <path> is the folder where the backup is stored, and <passphrase> is the passphrase:
Restore-SPFarm -Directory <path> -Item <service name> -RecoveryMethod Overwrite
Update-SPSecureStoreApplicationServerKey -Passphrase <passphrase>
This method restores the most recent backup (if more than one exist). To retrieve a specific backup, use the PowerShell command Get-SPBackupHistory.
More Info: Restoring the Secure Store service
See http://technet.microsoft.com/en-us/library/ee748602.aspx for more information about how to restore the Secure Store service in SharePoint Server 2013.
Creating Secure Store target applications
A target application is defined as a collection of information used to map a user or group of users to a set of credentials that’s used to access data. The user name and password stored in the credentials is what’s used to access the external data, instead of the user’s credentials used to access SharePoint. The following information is stored as part of the target application:
Credentials (user name and password) used to connect to the external application
Any additional fields that might need to be sent to the external system
Whether it’s an individual or group mapping
User(s) that can administer the target application
Users or groups that can use the target application
One of the most import decisions when creating a target application is whether to use individual mappings or group mappings. Individual mapping is when each user has a unique set of credentials, whereas group mapping is where everyone has the same set of credentials. You can use individual mapping when you want to keep logging information about the user, but doing so requires more resources. Group mapping uses fewer resources and requires less work, but everyone is treated as the same person.
The second main decision to make is who will access the target application and therefore be able to use it and its account. After you open the target application to users, they can use it on multiple SharePoint solutions, potentially overloading the external system that it’s accessing.
Target applications can be created within the context of the Secure Store service application. Follow these steps:
Navigate to Central Administration as a farm administrator or with an account that has full control of the Secure Store service application.
Click Manage Service Applications in the Application Management section.
Click the Secure Store service application in the Name column of the Service Application list.
Click the New Icon in the Manage Target Application section of the EDIT tab.
On the Create New Secure Store Target Application page, enter a unique name for the target application in the Target Application ID text box. This is the name to be used in the application and can’t be changed.
Enter a user-friendly name in the Display Name text box.
Enter the email address of the primary contact for the target application in the Contact E-mail text box.
In the Target Application Type section, select one of the application types: Individual, Individual Ticket, Individual Restricted, Group, Group Ticket, or Group Restricted.
For the Target Application Page URL, choose the target application page where credentials can be set.
Click Next to open the field page.
Configure the Field Name and Field Type, as shown in Figure 4-14. The default field names and field types are Windows User Name and Windows Password.
Use the Add Field link to add more fields (and then enter a field name and choose the field type).
Because field names and types can’t be changed in the future, make sure they are correct. Then click Next to open the Target Application Administrators page.
Enter the users who can administer this target application in the Target Application Administrators text box. Users who have full control of the Secure Store service application or have All Target Applications permissions can also administer this target application.
If the target type is one of the group target types, enter the member(s) or group(s) in the Members text box.
Click OK to save.
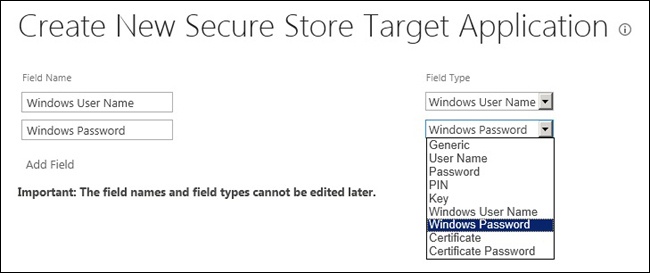
The target application is ready to have its credentials set at this point (and any of the other fields added). Unless you are working with customized solutions, you should stick with either Individual or Group for the Target Application type. The Ticketing options are used with systems that can use tickets and requires the IssueTicket and GetCredentialsUsingTicket methods to be used in the code accessing the external system. The Restricted options are used when the code calling the external system requires a restricted context.
More Info: Connecting to an external system via the Secure Store service
See http://msdn.microsoft.com/en-us/library/ee554863.aspx for more information on how to use the Secure Store service to connect to an external system.
Managing Secure Store target application permissions
Target applications have two different types of applicable permissions: permissions that determine who can administer the target application and credentials that are set for access to the external data. The permissions on who can administer a target application are entered when it is created. You can change these permissions at any time, though, by using Central Administration. Follow these steps:
Navigate to the Secure Store service application in the same manner as you did when you created a target application.
Either click in the space next to the Target Application ID to open the drop-down list and then choose Set Permissions, or select the check box next to the Target Application ID and click the Set icon in the Permissions section on the EDIT tab.
On the Edit Secure Store Target Application page, enter the user(s) or group(s) that you want to be able to administer the target application.
If the target type is one of the group types, modify the user(s) and/or groups(s) in the Members text box.
Click OK to save changes.
The next permissions-related item is setting the credentials. The default type of credentials is Windows (Active Directory), but several different types of credential types can be used, such as the following:
Generic
PIN
Certificate
Windows
Whatever type of credentials you choose, you need to set the values along with the values of any fields that have been added. These additional fields could be items such as default language or which database to use. You can set the values for these fields in the Secure Store service application. Follow these steps:
Navigate to the Secure Store service application in the same manner as you did when you created a target application.
Either click in the space next to the Target Application ID to open the drop-down list and then choose Set Credentials, or select the check box next to the Target Application ID and click the Set icon in the Credentials section on the EDIT tab.
On the Set Credentials For Secure Store Target Application page, fill in the values for the fields and confirm any masked fields, as shown in Figure 4-15.
Click OK to save changes.
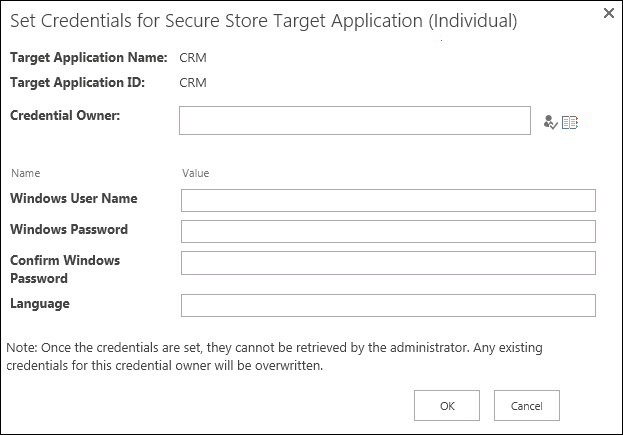
This example showed a target application type of Individual. This set of credentials would map to an individual, and each individual who wanted to use the target application would need her own set of credentials. If it had been a target application type of Group, the credential members would be shown but you couldn’t edit them here; you would have to edit the target application to change the members.
More Info: Planning the Secure Store service
See http://technet.microsoft.com/en-us/library/ee806889(v=office.15) for more information on how to plan the Secure Store service in SharePoint Server 2013.
Objective summary
The BCS uses models to define the metadata associated with a data source.
BDC models, external system information, and external content types are stored in the metadata store.
Permissions are inherited from the metadata store unless they are explicitly changed at the object level (BDC models, external systems, and external content types).
The Secure Store provides secure storage for credentials used to access external data in objects called target applications.
Individual target application types provide individual logging and the ability to provide differing security levels, but they also require more resources than the Group target applications.
Credential fields can contain additional information that might be needed by the external system.
Objective review
Answer the following questions to test your knowledge of the information in this objective. You can find the answers to these questions and explanations of why each answer choice is correct or incorrect in the “Answers” section at the end of this chapter.
You can use Business Data Catalog models for which kind of data type?
OData
WCF
.NET assemblies
All of the above
Which of the following BCS objects can’t have permissions directly given through Central Administration?
BDC model
Methods
External content types
External system
For somebody (not on the SharePoint farm) to decrypt the credentials stored in the Secure Store database, that person would need which of the following items, assuming that he didn’t have a huge supercomputer and tons of time in which to break the encryption?
The Secure Store database and the password of the account used to install SharePoint
The Secure Store database and the master key
The Secure Store database, the master key, and the passphrase
The Secure Store database and the passphrase
Which of the following is an invalid target application type?
Individual Group
Individual
Individual Ticket
Individual Restricted
Chapter summary
SharePoint apps are now the preferred model for developing custom solutions.
End users go to the App Catalog or the SharePoint Store to obtain SharePoint apps to be installed on their sites.
Service applications extend the base functionality of SharePoint but need to be installed and configured correctly to keep them from affecting overall performance.
The Secure Store provides a mechanism to store credentials that can be used by service applications such as Excel Services and Visio Services so that users don’t have to have direct access to external data sources.
A SharePoint farm can provide services to other farms, assuming that a trust has been set up between the farms and the publishing farm has published the service.
The Business Connectivity Services service application allows SharePoint to connect to and interact with data from external sources in a wide variety of formats such as OData, WCF, and cloud-based services.
The Secure Store service application should be backed up individually and stored in a different location than the master key and the password, all of which are needed for restoration.
Answers
This section contains the solutions to the thought experiments and answers to the lesson review questions in this chapter.
Objective 4.1: Thought experiment
In this thought experiment, you were asked what it would take for an App Catalog to remain available even though a SharePoint server was down for maintenance or because of hardware failure. The purpose behind this thought experiment was to reiterate the concept of high availability regarding apps.
First, you would probably want to take is to make sure that the App Management Services service application and the Microsoft SharePoint Foundation Subscription Settings Service service application are both running on more than one server. This ensures that the services needed by the App Catalog are available.
Second, you would want to make sure that more than one front end are available for and DNS entries that you created for use by the App Catalog. This should enable the App Catalog to be highly available so that users can get to the apps they need, even when a server is down.
Objective 4.1: Review
Correct answer: D
Incorrect: Apps from the SharePoint Store can be added to the App Catalog, but it’s just one of the right answers.
Incorrect: Apps for Office can be made available in the App Catalog, but it too is just one of the right answers.
Incorrect: End users can create their apps and ask that they be added to the App Catalog for other users to add to their SharePoint sites. However, this is only one of the right answers.
Correct: Answers A, B, and C are all valid answers.
Correct answer: C
Incorrect: An App Catalog needs to be created, but you can have an App Catalog and apps still be disabled.
Incorrect: The Subscription Settings service application needs to be created with PowerShell commands before you can configure the app URLs, so apps are still considered to be disabled.
Correct: After the app URLs are configured, apps should be enabled.
Incorrect: The App Management service application doesn’t enable apps by itself. It’s just one of the steps involved.
Correct answer: A
Correct: Each app in the App Catalog has a unique domain name that starts with an app prefix appended with the application ID. To keep from having to create an entry in DNS for each app, you can use a wildcard Canonical Name (CNAME) entry.
Incorrect: A CNAME entry has nothing to do with finding an app.
Incorrect: Most web applications don’t need wildcard CNAME entries, except only those that have multiple prefixes such as the App Catalog.
Incorrect: The reason is stated in answer A.
Objective 4.2: Thought experiment
In this thought experiment, you were told to figure out how to solve the slowness experienced by end users without compromising the Word conversion project. By default, the Word Automation Services service consumes 100 percent of the available memory on the servers that run the service. You could lower this percentage to give other applications more memory and ease up the load on the application servers, but this will probably slow down the Word conversion project. Another solution might be to delay the Word conversions until after hours or on the weekends. This might be a solution if you work with the developers to delay the requests and add only enough conversions so that they finish before the users come into work.
Perhaps the best solution is to use one of the WFEs as a dedicated Word Automation Services server and remove the service from the application servers. Because the WFEs aren’t even being used at 50 percent, removing one of them would still provide redundancy and the WFEs still wouldn’t be maxed out. Because the Word Automation Services server wouldn’t have to compete with other applications on the WFE server, it would most likely provide even better performance than if it was running on the both of the application servers. You wouldn’t have redundancy, but if the server should happen to fail, you could always start it up on one of the other SharePoint servers until it could be replaced or repaired.
Objective 4.2: Review
Correct answer: D
Incorrect: Although SharePoint sites are a valid option, this isn’t the best answer because other answers are also correct.
Incorrect: Although network file shares can be used, this isn’t the only right answer.
Incorrect: Non-SharePoint websites can be used as long as the account running the Excel Calculation Service can access them, but this isn’t the only right answer.
Correct: A, B, and C are all valid answers.
Correct answer: C
Incorrect: The Express version of SQL Server 2008 doesn’t support Access Services.
Incorrect: Although you can install SharePoint 2013 on SQL Server 2008 R2, you need SQL Server 2012 Standard or Enterprise editions to run Access Services.
Correct: Access Services requires SQL Server 2012, even if SharePoint 2013 is installed on SQL Server 2008 R2.
Incorrect: Because A and B are both incorrect, D is also incorrect.
Correct answer: B
Incorrect: The only way that 25 percent would be the limit is if that amount of physical memory was entered in the Maximum Physical Bytes setting, but it wouldn’t be the maximum allowed.
Correct: No matter what value is entered in the Maximum Physical Bytes setting, the limit is 50 percent of the physical memory available. A value of –1 sets it at 50 percent, no matter what the size of the memory on the server.
Incorrect: The limit is 50 percent, no matter what value is entered into the Maximum Physical Bytes setting.
Incorrect: The limit is 50 percent. A value of 100 percent wouldn’t allow the other programs necessary for the server to function correctly.
Correct answer: A
Correct: Visio web drawings are displayed using Silverlight.
Incorrect: Visio 2013 drawings saved with the .vsdx extension are displayed using the raster format.
Incorrect: Visio 2013 drawings saved with the .vsdm extension are displayed in the raster format.
Incorrect: Because B and C use the raster format, D can’t be correct.
Correct answer: B
Incorrect: Visio Graphics Service and Excel Services can both use ODBC data providers.
Correct: Neither application service can use Access data providers.
Incorrect: Both application services can use OLE DB data providers.
Incorrect: Both application services can use ODBC with DSN (although in Excel Services it’s referred to as ODBC DSN).
Correct answer: C
Incorrect: Word Automation Services can open Microsoft Word documents all the way back to Word 97.
Incorrect: HTML documents can be opened and converted to other types of documents.
Correct: Microsoft Excel documents can’t be converted to other documents using Word Automation Services.
Incorrect: Rich Text Format files can be converted to other types of documents.
Objective 4.3: Thought experiment
In this thought experiment, you were asked what steps would be required to be able to use the Search service of a SharePoint 2013 farm by an unspecified number of SharePoint 2010 farms. The steps required for connecting one consuming farm to one publishing farm were covered in the objective. The process for connecting more than one consuming farm is basically the same procedure repeated for each farm. You have to create the publishing farm root certificate only once. The same certificate can be used on all the consuming farms.
To use the Search service, follow these steps:
Create root and STS certificates on the consuming farms (one set per farm) and copy them to the publishing farm.
Import the certificates on the publishing farm.
Create the root certificate on the publishing farm and copy it to the consuming farms.
Import the publishing farm’s root certificate on each consuming farm.
Obtain the farm ID of each consuming farm.
Use the farm IDs to provide permissions to the Application Discovery and Load Balancing service application on the publishing farm.
Publish the Application Discovery and Load Balancing service application on the publishing farm.
Use the consuming farm IDs again to provide permissions to the Search service application on the publishing farm.
Publish the Search service application on the publishing farm and obtain the published URL.
Connect to the publishing farm’s Search service application by using the published URL on each consuming farm.
At this point, the consuming farms should be able to use the SharePoint 2013 farm’s Search service just as they would their own Search service. Management of any search settings needs to be done on the SharePoint 2013 farm, and any Search service crawling account needs permissions on the SharePoint 2010 farms to crawl them.
Objective 4.3: Review
Correct answer: C
Incorrect: The Search service application can be published by a SharePoint 2013 farm and consumed by a SharePoint 2010 farm.
Incorrect: The Secure Store service application can also be consumed by a SharePoint 2010 farm.
Correct: Because the Machine Translation service application doesn’t exist on a SharePoint 2010 farm, it can’t be consumed.
Incorrect: The Managed Metadata service application can also be consumed by a SharePoint 2010 farm.
Correct answer: A
Correct: Both certificates must be created on the consuming farm, but only the root certificate needs to be created on the publishing farm.
Incorrect: The security token (STS) certificate also needs to be created.
Incorrect: The root certificate also needs to be created.
Incorrect: A subordinate certificate doesn’t need to be created on either the consuming farm or the publishing farm.
Correct answer: B
Incorrect: The PowerShell command Get-SPCertificateAuthority is used for getting a certificate.
Correct: The PowerShell command Get-PfxCertificate is used when importing a root certificate and when importing the STS certificate.
Incorrect: The PowerShell command Get-RootCertificate doesn’t exist.
Incorrect: The PowerShell command Get-SPServiceApplicationSecurity is used when giving permissions to a service application.
Correct answer: D
Incorrect: The consuming farm needs permissions to the Application Discovery and Load Balancing service application, but this is just one of the right answers.
Incorrect: The consuming farm also needs permissions to the service application that it will consume, but this is just of the correct answers listed.
Incorrect: The publishing farm needs both the STS certificate and the root certificate from the consuming farm, but this is just one of the correct answers.
Correct: Because the items in A, B, and C are all needed before a consuming farm can consume a published service, this is the right answer.
Objective 4.4: Thought experiment
In this thought experiment, you were asked to provide a way to expose a user’s contacts from Windows Live in a SharePoint list. Because Windows Live is an OData provider, you can use OData as your data type when you create the BCD model. This most likely is the most straightforward way to reach this goal.
You need Visual Studio 2012 to create the OData model because SharePoint Designer can’t create OData models. You would create the model defining the Windows Live data source and then import it into the Business Data Connectivity service application. You would then provide permissions to the model and use Secure Store to provide pass through authentication. SharePoint Designers could then use an external content type to expose the contact information in a SharePoint list.
Using REST to expose the Windows Live data would also be possible because Windows Live exposes its endpoints via REST. Another option would be that a programmer could write a .NET assembly that pulls data from Windows Live and exposes it as SharePoint list data. However, OData is being embraced by SharePoint and, going forward, will likely be the most compatible with future releases. It’s also an open system that’s used by other organizations, so it is likely to become even more prevalent.
Objective 4.4: Review
Correct answer: D
Incorrect: Although OData is a supported data type as of SharePoint 2013, it’s just one of the right answers.
Incorrect: WCF is a supported data type just as it was in SharePoint 2010, but it too is just one of the correct answers.
Incorrect: .NET assemblies can be used as a data type, assuming that they have been created for that purpose. However, it’s just one of the right answers.
Correct: Because all three of the previous answers are correct, that makes “All of the above” the best answer.
Correct answer: B
Incorrect: The BDC model can be assigned permissions directly on the Business Data Catalog Service Application page by going to the BDC Models view, selecting a BDC model, and clicking the Set Object Permissions icon.
Correct: Methods inherit their permissions from the external content type and therefore can’t be given permissions directly in Central Administration.
Incorrect: External content types can be assigned permissions directly similarly to the BDC Model but under the External Content Types view.
Incorrect: External system objects can be assigned permissions just like BDC models by going to the External Systems view, selecting the external system(s), and clicking the Set Object Permissions icon.
Correct answer: C
Incorrect: The Secure Store database is where credentials are stored in an encrypted format and therefore is required if you want to retrieve those credentials. However, the account used to install the SharePoint farm has nothing to do with decrypting the data.
Incorrect: The master key is required, but you still need the passphrase to be able to use it with the Secure Store database.
Correct: If you have the Secure Store database, the master key, and the passphrase, you can decrypt the credentials. That’s why it’s important to keep the backups of these items in separate locations if you want to keep the credentials stored in them secure.
Incorrect: The master key would still be needed to decrypt the credentials. The master key is backed up as part of the Secure Store service application, which isn’t part of the usual database backups.
Correct answer: A
Correct: Target application types fall into two different categories, group or individual, but they can’t be both. Therefore, Individual Group is an invalid target application type.
Incorrect: The Individual target application type is valid.
Incorrect: The Individual Ticket target application type is valid and used for target applications that can assign tickets.
Incorrect: The Individual Restricted target application type is valid and used for target applications that require a restricted security context.