Chapter 2. Plan a SharePoint environment
Planning a SharePoint environment depends on which of the many roles the environment calls for. SharePoint is a broad platform that can be used for myriad applications or combinations of applications. This chapter covers some of the core functionality of the SharePoint platform and how to handle the workload involved with implementing these solutions. The core components of a SharePoint environment cover the areas of search, social, Web Content Management (WCM), and Enterprise Content Management (ECM). These core components of the SharePoint platform require careful planning and implementation. This chapter covers these aspects as well as how they relate to the exam.
Objectives in this chapter:
Objective 2.1: Plan a social workload
The social workload demands on a SharePoint 2013 farm vary widely from one organization to the next. The biggest factor is how emphatically the organization embraces the social aspects of SharePoint. The social components can increase demands on database storage, search resources, and bandwidth resources.
SharePoint 2013 has changed the architecture of how the social components are implemented. The changes represent several technical challenges that you need to plan for, but social components bring on additional political challenges that you need to account for in the successful implementation of any SharePoint farm.
This objective goes over how to plan for the various social components of the SharePoint 2013 farm. The non-technical parts of implementing social computing aren’t directly tested on the exam, but you will be tested on how to implement the changes brought on by these political decisions.
Planning communities
New in SharePoint 2013, Community Sites provide forums for people to ask and answer questions, post information, comment on posts, and be rewarded for their efforts in the form of points, earned badges, and gifted badges. Those familiar with the Microsoft forums should see many similarities. Much of the functionality in those forums has been built into the SharePoint Communities Sites. Additional components found in social networks, such as “liking” a post, are also included. This set of functionality can be extremely powerful in encouraging the sharing of knowledge and contributing of content. It’s also most effective when the forum aligns with real business goals; building a community site just for the sake of trying to encourage social computing doesn’t use communities effectively and will most likely fail.
You can add community features to an existing site, but a Community Site template is available. Discussion lists and the community features also have a bit of overlap. Therefore, SharePoint 2013 users have the following three options for community features:
Add a discussion list to an existing site.
Enable the community feature on an existing site.
Create a community site based on the template.
The choice depends on the business needs, but if your organization needs a center of knowledge sharing, a community site is typically the way to go. If an existing site needs the Community Sites features, you can turn them on by following these steps:
Navigate to the site that needs the community features enabled.
Go to the site settings of the site.
Select Site Features under Site Actions.
Click Activate in the Community Site Feature section, as shown in Figure 2-1.

Important: Enabling the Community Site feature
The SharePoint Server Standard Collection feature must be enabled before the Community Site template appears among the available site templates, even if the template has been made available through the Page Layouts And Site Templates options under Look And Feel in Site Settings. By default, this feature isn’t turned on.
Enabling the Community Sites feature creates lists, creates pages, and shows Web Parts that work with the community features:
Discussions list
Badges list, which contains the badges available for contributing members
Community Members list
Categories list
Administration settings page
Categories page
Members page
About page
Community Home page
What’s Happening Web Part, which displays the number of members, discussions, and replies
Top Contributors Web Part, which displays the members who contribute the most to the community site
My Membership Web Part, which displays an individual’s contributions to the community site
Manage Web Part, which allows moderators and site owners the ability to change settings to the community site, such as how many points posts are worth
These items are available if the feature is turned on at the site level of an existing site or if a new site is created with the Community Site template. A community site has all the functionality of a normal SharePoint 2013 site, such as document management, versioning, permissions, auditing, and so on. The preceding items allow for an interactive forum experience, but some dependencies exist for an even more enhanced experience. The optional service applications of the SharePoint 2013 farm that provide additional functionality are as follows:
User Profile service application. This allows for a tie-in to users’ newsfeeds and allows for mentions (an @ sign followed by a person’s name). A user following another user can see whenever that followed user goes up in reputation, posts a discussion item, gets a like, or gets a reply marked as a best reply. When implemented in the same environment as My Sites, a community site can be accessed on the Sites page.
Metadata service application. This allows for hash tags to be used (an # sign followed by a keyword) in posts and replies.
Search service application. This isn’t necessary but is required if searching of the community site is needed.
Exam Tip
The exam isn’t just a simple multiple-choice test that has been the hallmark of many past exams. It poses several questions that require placing steps in the correct order that they should occur. For example, enabling the Metadata service application is necessary before you can use hash tags.
The types of members for a site can be broken down into four different types: owner, moderator, contributor, and visitor. Typically, forums are open for contributions from all members, but in some situations only a certain group of users can contribute to a forum but a larger audience can view the contributions. A specialized help desk might be an example of this, where only members of the technology team can contribute.
Moderators are the key set of users in a community site. They serve as the site’s shepherds. They can create and delete categories, edit and delete posts, mark replies as “best replies,” and configure reputation settings. They are also responsible for monitoring content, if that is enabled. (Of course, they can manually monitor it, but allowing the community to report offensive content is much more effective.) To enable monitoring of offensive content, follow these steps:
On the home page of the community site, click Community Settings in the Community Tools section of the page (assuming that you are a moderator or owner).
Select Enable Reporting Of Offensive Content (see Figure 2-2).
Click OK to continue and save settings.
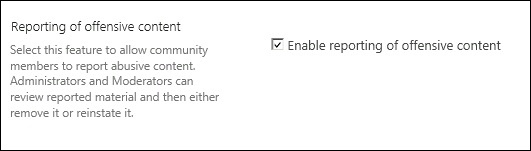
Now, all moderators receive email when a user identifies a post or reply as offensive. Having users report offensive content is considered a best practice because it minimizes the amount of time moderators have to keep an eye on the content.
Note: Outgoing email settings
Outgoing email settings must be enabled in Central Administration for the moderator to receive emails about offensive content.
On the same page as Enable Reporting Of Offensive Content is a setting called Established Date. This date is shown on the About Page and can be used for sites created before the Community Site template existed. With this setting, users can see how long content has been contributed.
Anyone who has created a blog site should be familiar with the categories, and the idea is the same with Community Sites. Part of the planning process should involve creating categories appropriate for the site. Correct categories help visitors find the information quickly and efficiently.
Reputation settings
Reputation settings are one of the most important parts of setting up a community site. With proper planning, you can determine the correct setting values so that you won’t have to change them in the future. Users prefer knowing what the settings are and that they don’t change frequently. This helps users know what the goals are and what is required to achieve them. Keeping settings consistent is considered a best practice, and unless you have an overwhelming reason to change them, leave the settings alone. If reputation settings need to be configured or changed, they can be by following these steps:
On the community site home page, click Reputation Settings in the Community Tools section.
In the Rating Settings section, choose whether you want contributors to be able to rate a post or reply. If you choose Yes, you will need to select the rating system of either Likes or Stars.
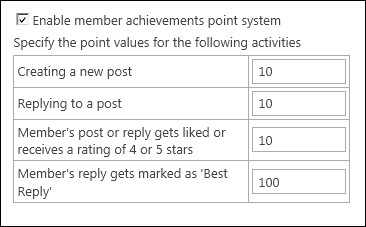
Choose whether to have member achievement points system enabled by selecting Enable Member Achievements Point System. If it’s selected, you must specify the points allocated for each activity (see Figure 2-3).
If the member achievement points system is enabled, you must configure the levels in the Achievement Level Points section. The five levels show defaults ranging from zero to ten thousand, but you can type any numeric value.
Again, if the member achievement points system is enabled, you can choose Achievement Level Representation, which displays either an image representing a contributor’s level or corresponding text of the level. To change the level text, choose Display Achievement Level As Text.
Click OK when done to change the reputation settings.
By default, the reputation settings are enabled, and users start receiving points as soon as they start contributing—unless you change the settings. Removing points from a site causes end-user confusion.
Badges
Users receive badges for their contributions to the community site. Badges are a symbolic award for a user’s efforts. They can be tied into actual recognition in the form of business goals being met and/or monetary rewards to make them even more effective.
Badges come in two different varieties:
They can be earned. These are the “levels” in the member achievement points system.
They can be gifted by community site moderators or site owners.
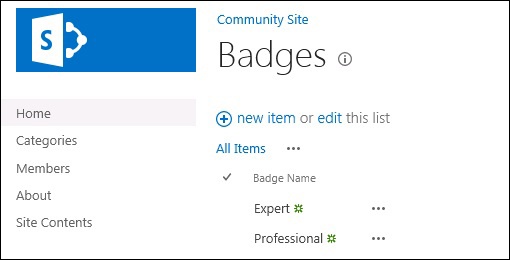
A badge is simple text displayed next to the user’s name on the community site. As a moderator of the site (or site owner), you can create or gift a badge. To create badges, follow these steps:
On the community site home page, click Create Badges in the Community Tools section of the page.
Click New Item. Figure 2-4 shows the two predefined badges, Expert and Professional.
Type the name of the badge in the Badge Name field.
Click Save.
Badges can be any sort of text but should reflect some sort of legitimate business goal. This depends on the organization, of course, but badges that truly reflect levels of effort mean more to the end user.
Now that you’ve created badges, you can gift them to individuals. Gifting is totally up to the site moderators and can be done at any time. To gift badges, follow these steps:
On the community site home page, click Assign Badges To Members in the Community Tools section of the page.
In the list, select who should be given badges by clicking to the left or right of the member name. (Clicking a member directly takes you to that member’s information.)
On the Moderation tab, click the Give Badge icon.
Choose the badge to gift from the Gifted Badge drop-down list.
Click Save.
The badge now appears with the member’s name so that when other people see the member in the top contributors’ area or the member’s page, they see the badge as well. The member’s page also shows when the user joined, how many discussions she has started, how many replies have been made, and how many have been marked as best replies. The photo of the member also appears if the User Profile service application is enabled and the user has uploaded a picture.
More Info: Communities
See http://technet.microsoft.com/en-us/library/jj219805(v=office.15).aspx for more information on communities in SharePoint Server 2013.
Planning My Sites
The My Sites feature has changed a lot between SharePoint 2010 and SharePoint 2013. The two most notable places of change are the look and feel as well as the addition of the SkyDrive, which has replaced the individual content area. The two main areas of My Sites are still the My Site host and the individual site collections. The interaction between Microsoft Office 2013 and the site collections (accessed by clicking SkyDrive from anywhere within SharePoint) will most likely lead to a much higher usage of the site collections and therefore require a greater degree of planning. Planning for the My Site host and for the SkyDrive locations should be done separately and is addressed that way in this section.
My Site host
The My Site host is a site collection based on the My Site Host site collection template. Although the My Site host doesn’t have to be created in its own web application, in all but the smallest of implementations it should have its own. This way, multiple content databases can be added as needed to accommodate for the growth of the individual site collections, as well as to allow for separate administration.
Creating the My Site host is done in the same way as in SharePoint 2010. Assuming that a web application has been created and that alternate access mapping has been configured, you can create the My Site host by following these steps:
On the home page of Central Administration, click Create Site Collections in the Application Management section.
Change the web application to the one created for the My Site host in the Web Application section.
Type a title in the Title section and a description in the Description field.
Leave the Web Site Address alone. It should be at the root of the web application.
In the Select Experience Version section, leave 2013 selected.
On the Enterprise tab, select My Site Host.
Enter a primary and secondary site collection administrator.
In the Quota Template section, choose an appropriate quota or create a new one.
Click OK.
The My Site host should be created shortly after you click OK.
User photos are stored in the content database of the My Site host like they were in SharePoint 2010. When a user uploads a profile picture, it’s converted into three thumbnails—small, medium, and large—in three different subfolders in the Profile Pictures folder. (The original isn’t saved.) These thumbnails don’t take up much space—less than 40 or 50 KB per person—so storage concerns should be minimal for photos unless the number of users is extremely high (10,000 users would still be less than 1 GB). However, in SharePoint 2013, attachments can be added to posts. These attachments are stored in the My Site host content database and, depending on how frequently people add attachments and the limit of upload size, the database could grow rather large. The default upload size for a web application is 250 MB. Be careful when adjusting this size because it affects all the site collections (SkyDrive locations) under it.
After a My Site host is created, you need to configure it in Central Administration so that the farm knows about it. You can configure it only after the User Profile service application is started, as discussed later in this objective. After the User Profile service is started and the My Site host is created, you can configure the host as follows:
Navigate to Central Administration.
Click Manage Service Applications in the Application Management section.
Click the User Profile Service Application link (this might be called something else if it was created with a different name).
On the Manage Profile Service page, click the Setup My Sites link in the My Site Settings section.
Type the preferred search center location for the My Site host in the Preferred Search Center text box. (If a search center hasn’t been created, this can be left blank until that task is completed.)
Choose a scope for finding people in the Search Scope For Finding People drop-down list. (The scope People is created by default when the Search service application is created.)
Choose a scope for finding documents in the Search Scope For Finding Documents drop-down list. The scope All Sites should be available.
In the My Site Host Location text box, enter the URL of the My Site host.
In the Personal Site Location section, enter where personal sites should be located. If the location hasn’t been created yet, a wildcard inclusion managed path needs to be created in the My Site host web application.
Choose a Site Naming Format option. If the My Site host has users from only one domain, leaving the default User Name option is adequate.
Select whether users can choose their language in the Language Options section. Options depend on which language packs are installed.
The Read Permissions Level section lists who has read permissions to the personal site collections when they are created. Changing this value affects only sites created going forward.
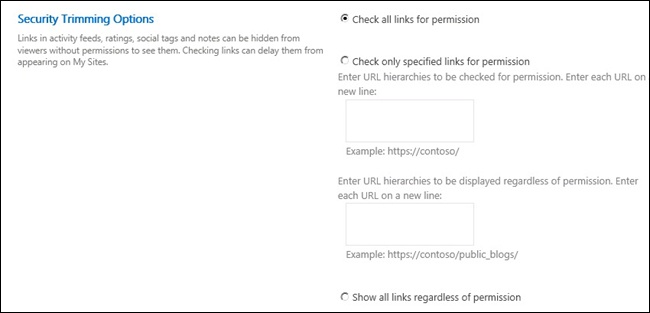
Choose the appropriate Security Trimming Option, as shown in Figure 2-5, to determine which links to show in notes, activity feeds, ratings, and social tags based on whether the user has permissions to the linked item. The options include showing all the links, trimming all the links that users don’t have permission to access, or trimming ones only in certain directories.
Choose whether to enable newsfeed activities in the Newsfeed section. You can also choose whether to include SharePoint 2010 activities.
In the Email Notifications section, choose whether users should get My Site-related emails (such as when a person posts on a site). If this setting is enabled, you need to provide a sent-from email address; it doesn’t need to be a real email address but should be one that isn’t blocked or sent to the junk folder.
In the My Site Cleanup section, choose whether to have delegation and who the secondary owner is. When a user profile is deleted, the corresponding site collection is deleted after 14 days. The person’s manager and/or secondary owner can access the site to retrieve data before the 14 days are up.
In the Privacy Settings section, choose whether to make My Sites public. This determines whether users’ social information—such as whom they follow and their newsfeed—is visible to other users.
Click OK to save settings.
Trusted My Site host locations
If more than one My Site host will be used, you need to configure Trusted My Site Host Locations. A trusted location can be on the same farm or a different farm. Audiences determine which user goes to which My Site host. The audiences used to configure the trusted locations need to be mutually exclusive; otherwise, confusion could result. To configure a trusted site location, follow these steps:
Navigate to Central Administration and click Manage Service Applications in the Application Management section.
Click the User Profile service application.
Click Configure Trusted Host Locations.
Click New Link.
Enter the URL of the trusted host in the URL text box.
Type a title in the Title text box.
Type the optional Description and Image URL.
In Target Audiences, choose the Audience (or audiences) that should use the trusted My Site host.
Click OK.
The reasons behind creating multiple My Site hosts are varied. One of the most common is because of distance. For example, an organization might have offices around the world and want users to access their SkyDrive sites from a local SharePoint farm for better performance (latency and bandwidth are still issues that must be planned for). That way, users could use a SharePoint site located in a geographically distant location but when they click SkyDrive or About Me, they are taken to their local SharePoint farm. Another reason could be that an organization wants different My Site variations based on what kind of employee uses it. You could have a My Site host for regular employees and a different one for contractors.
Personal site collections (SkyDrive)
After My Sites are configured on the My Site Settings page, you still need to enable self-site creation before users can create their own site collections. The content area of a user’s personal site collection is the SkyDrive location for the individual. Follow these steps:
Navigate to Central Administration and click Manage Web Applications under the Application Management section.
Click the web application in which the My Site host site collection resides.
Click Self-Service Site Creation in the Web Applications section of the ribbon.
In the Site Collections section, choose a quota to apply. If a quota other than the Personal Site quota is to be used, you need to create it before performing these steps.
In the Start A Site section, leave the Be Hidden From Users option selected. Users shouldn’t be able to create sites other than their SkyDrive sites.
The options Site Classification Settings and Require Secondary Contact should be dimmed. Click OK to finish.
Put thought into creating a quota for individuals. Changing which quota is used for self-service creation doesn’t affect sites that have already been created. Those must be changed manually (if so desired). The quota itself can be changed, though.
Exam Tip
Setting up self-service creation is an important step that could potentially be on the test. Even in the non-case study questions you might be asked a question similar to putting the steps of configuring a My Site Host in the correct order.
Personal site collection creation is handled differently in this version of SharePoint, which can affect the planning of My Site rollout. Personal sites are now created asynchronously in SharePoint 2013 as opposed to synchronously in SharePoint 2010. When a personal site (SkyDrive Pro location) is requested, it’s put into one of two queues:
Interactive queue. Filled by requests from a user clicking a link in the browser that would require a personal site to be created such as clicking SkyDrive or Newsfeed
Non-interactive queue. Filled if a user tries to access SkyDrive through Office 2013 or if code is used to prepopulate sites
The reason behind using a queue is that creating a personal site collection is a relatively resource-expensive operation. Requests are handled via a timer job that fires every minute and handles up to three requests at a time. This way, SharePoint 2013 won’t stop responding if it suddenly gets many personal site-creation requests at the same time. The interactive and non-interactive queues receive the same weight. So, if 100 are in the non-interactive queue and six are in the interactive queue, SharePoint processes three from the non-interactive queue, then three from the interactive queue, three more from the non-interactive queue, and so on until both queues are empty. This is so that if the sites are being created with code and someone clicks SkyDrive, they still get a fairly quick response rather than be stuck at the end of what could be hundreds or thousands of requests.
One important step is left in preparing to launch the My Site host. You need to determine the number of content databases needed. Moving site collections from one database to another is always possible, but by doing some proper planning, you can avoid this labor-intensive process involving downtime of the personal sites. Best practices still suggest a maximum of 200 GB per content database for backup, restore, and performance reasons. This might be extended through the use of certain hardware, but keeping content databases a manageable size is still a good idea. Because each personal site is a site collection, determining the number of content databases needed is fairly straightforward with the following math:
Number of databases = (Personal Site Quota × number of users) / 200 GB
Therefore, if you had a thousand users each with a 5 GB quota, you would need 25 content databases if users are expected to fully use their quotas. Personal site collection usage based on SharePoint 2010 will likely be erroneous based on how SkyDrive is integrated into Office 2013 and how pervasive it is in SharePoint 2013 sites (unless it is removed with branding). Usage will vary by organization and user, but the preceding formula should guarantee that content databases remain within suggested limits.
Important: Personal site quotas
By default, the Personal Site Quota is 100 MB, with a warning that occurs at 80 MB. This size is fairly small in today’s world of storage, so you probably want to adjust this to meet your organization’s business needs before users starting running out of storage and needing assistance from technical staff.
Planning social permissions
Social permissions are set in several places within the SharePoint environment. Proper planning helps enable those users who need the social components as well as keep those users who don’t (such as temporary employees or contractors, depending on the organization’s needs) from using the social components. Most social permissions are driven by political agendas instead of performance reasons, but you need to take some performance considerations into account.
Social data is stored and indexed for searching, which consumes resources. SkyDrive could also take up considerable resources and can be limited by allowing only the users that need it through permissions. Audiences also come under social permissions. Although they don’t prohibit users from accessing files, they can be used to change what is shown to users and to route them to their home My Site host.
Audiences
Audiences are a way to group people by an attribute in their profile. This can be by office, title, or any of the profile properties. In My Sites, audiences are generally sorted by region or by employee type. Creating an audience is fairly easy:
Navigate to Central Administration and click Manage Service Applications under Application Management.
Click the User Profile service application.
Click Manage Audiences under the People section.
Click New Audience on the View Audiences page.
Type a name in the Name field. (The Description and Owner fields are optional.)
Choose Satisfy All Of The Rules or Satisfy Any Of The Rules and then click OK.
Choose User or Property (this example uses Property).
Choose the Property (such as Office Location).
Enter a value in the Value text box.
Click OK to open the View Audience Properties sheet.
Click Compile Audience to compile the audience immediately; otherwise, it will be compiled during the next compile audience timer job.
After audiences are compiled, they can be used in the trusted My Site host locations to distribute users among various My Site hosts. Users can be in multiple audiences, but for My Site hosts the audiences should be mutually exclusive.
Social permissions
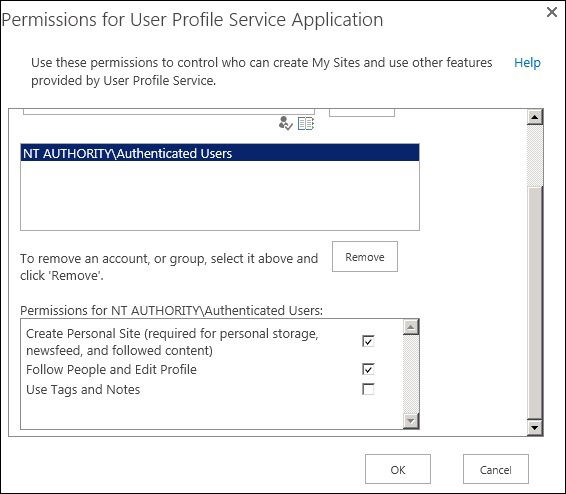
Social components require that users have specific permissions. Three distinct permissions are controlled in the User Profile Service Application area. The following permissions are accessed under the Manage User Permissions link of the People section:
Create Personal Site (required for personal storage, newsfeed, and followed content)
Follow People and Edit Profile
Use Tag and Notes
Users need all three permissions to be able to fully access all the social components of SharePoint 2013. Typically, the group of NT AuthorityAuthenticated Users is added by default. Permissions assigned in the Manage User Permissions dialog box are additive. For example, if a user doesn’t have the Use Tag and Notes permissions but Authenticated Users has the Use Tag and Notes permissions, they still have those rights. If you want to prohibit users from using the social features, the default user groups have to be removed, and the groups that need social permissions have to be added. In some situations, a social permission needs to be removed entirely; for example, if an organization decides that it doesn’t want users to be able to use tags and notes, it removes them in the Permissions For User Profile Service Application dialog box (see Figure 2-6).
By using these permission levels, you can limit social components to just the users that need them. You also can phase in social features as training and political concerns allow.
Some changes have been made in the permissions of user profile properties in SharePoint 2013. SharePoint 2010 had four levels of permissions for profile properties, but SharePoint 2013 has only two: Everyone and Just Me. The reduction in the number of options available was an effort to streamline the choices available to the end user. If a profile property has its permissions set to editable, users are limited to just two choices. With any social network, the easier something is for users to use, the more likely they are to use it. To modify the permissions for a user profile property, follow these steps:
Navigate to Central Administration and click Manage Service Applications under Application Management.
Click User Profile Service Application.
Click Manage User Properties under the People section.
Choose the property that needs to be modified and click it. From the drop-down list, select Edit.
In the Policy Setting section, set the Default Privacy Setting.
Click OK to save the changes.
Some properties, such as First Name, can’t be altered, but any added field can be changed. The choice of which properties are available to everyone is driven by the organization’s political concerns. For example, an employee ID might be brought in through Active Directory that should be visible only to the employee. This employee ID can then be used to populate fields and even be used for single sign-on (SSO) solutions based on such an ID.
Planning user profiles
User profiles are the crucial component for social components. Getting user profiles populated is one of the key components in setting up a SharePoint farm. Importing these user profiles from Active Directory (AD) is similar to the way SharePoint 2010 populated profiles. It’s still not a trivial task, however. For SharePoint to use profiles that it pulls from AD, the User Profile service needs to be started, a User Profile service application needs to be created, and then the User Profile Synchronization service needs to be started. When the User Profile service starts, you need to create a User Profile service application. Three databases associated with this service application are created when the User Profile service application is created:
Profile Database. Stores user profile and organization data
Synchronization Database. Used for configuration and staging of synchronization data from sources such as AD
Social Tagging Database. Stores social tags and notes
You can use the Configuration Wizard to create the User Profile service application, but creating it manually or via a script is the better way to go. This way, you can name the databases rather than let SharePoint name them with a GUID. It also allows for greater control over the options, such as specifying a My Site host location, selecting which application pool to use, and identifying a failover database server.
Before creating the User Profile service application, you should create the My Site host. Doing so isn’t essential, but it does save some time by creating the managed path for you. Follow these steps:
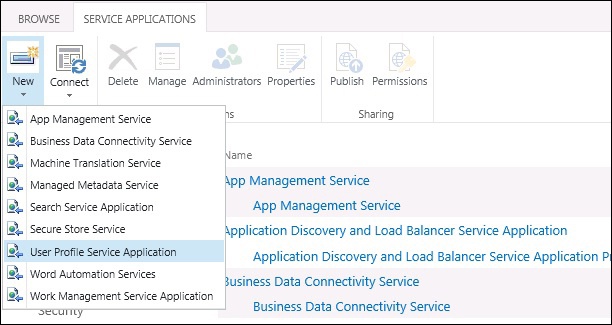
Navigate to Central Administration and click Manage Service Applications under the Application Management section.
Click New and then click User Profile Service Application (see Figure 2-7).
In the Name text box, type a name for the service application.
In the Application Pool section, choose an existing application pool or create a new one. Creating a new one is generally recommended but not required.
In the Profile Database section, type the name of the SQL Server node and the name you want to call the profile database (stay with Profile DB unless required by governance to use a different name). Also choose the Database Authentication Method (use Windows Authentication unless directed to do otherwise).
Still in the Profile Database section, enter a Failover Database Server if database mirroring is set up.
Repeat steps 5 and 6 for the synchronization database (preferably using Sync DB for the database name) and for the social tagging database (again, stay with the recommended database name if possible).
From the Profile Synchronization Instance drop-down list, choose the server that will run the profile synchronization. Only one server can run this process.
In the My Site Host URL text box, type the URL of the My Site host that you created earlier, click Create A New Site Collection if you want to create one at this time, or leave it blank if you want to create a My Site host later.
In the My Site Managed Path text box, type the location beneath the My Site host where personal sites for users (SkyDrive locations) will be created. This applies only if a My Site host has already been added.
In the Site Naming Format section, leave the User Name option selected unless you will have users from different domains.
For the Default Proxy Group, you probably want this to remain Yes unless you have a reason a web application shouldn’t use this User Profile service application.
Click Create to start the creation process. The User Profile service application takes a minute or so to create.
The second part of setting up user profiles involves importing profiles from a source such as Active Directory. You first need to start the User Profile Synchronization service, but before you do that, you need to make sure that the Forefront Identity Manager (FIM) services are correctly configured. Two FIM services are necessary for the User Profile service spplication to run:
Forefront Identity Manager Service
Forefront Identity Manager Synchronization Service
Both services are disabled by default when SharePoint is installed. SharePoint enables them and configures the account associated with them when the User Profile Synchronization service is started.
Exam Tip
Correctly configuring the FIM services is a key first step in setting up a User Profile imported from Active Directory. That they are changed from disabled to automatic is also a key component both in real life and potentially the exam.
Properly setting up the FIM service account is important. If the User Profile Synchronization service is started before the FIM services are configured, you might need to restart the computer before it can be provisioned correctly. The User Profile service also needs to be running. After the User Profile service and FIM services are configured, you can start the User Profile Synchronization service as follows:
Navigate to Central Administration and click Manage Services On Server under System Settings.
Click Start on the User Profile Synchronization Service line.
A service account name and password appears. This account will run the User Profile Synchronization service and will need local admin rights when it’s provisioned. Click OK.
On the Manage Services On Server page, the User Profile Synchronization Service line should say Starting. Startup can take up to 15 minutes or so. Wait until it has finished and says Started.
Return to the Central Administration home page, click Manage Service Applications under Application Management, and then click User Profile Service Application.
After the User Profile Synchronization service starts, you need to configure a connection to pull in profiles from AD. Before you can do so, however, you need to choose or create an account that will be used to communicate with between SharePoint and AD. This account needs special privileges in AD—specifically, it needs the Replicating Directory Changes permission. If the account doesn’t have this level of permissions, the synchronization still starts, but changes in AD aren’t reflected in the user profiles. This permission must be granted on a domain controller using the Active Directory User and Computers tool under the Administrative Tools section of the Start menu.
More Info: Granting AD DS permissions
See http://technet.microsoft.com/en-us/library/hh296982.aspx for more information on how to grant Active Directory Domain Services permissions for profile synchronization in SharePoint Server 2013.
Exam Tip
The Replicating Directory Changes permission is required for the account that’s synchronizing profiles from AD. This requirement will potentially be in a multiple-choice question or be a step in configuring user profile synchronization. The actual steps required to enable this permission most likely aren’t covered.
If you need to export changes in a user’s profile to AD, the synchronization account also needs Grant Create Child Objects and Write permissions to the organizational unit (OU) being synchronized with user profiles. One of the most common examples of when this would be needed is when My Site photos are used to populate Outlook and Lync via the thumbnailPhoto field in AD. That way, a single source of photos can be used for all three programs, plus any other program that can pull data from AD. Planning for the synchronization is discussed later in the Planning connections section.
More Info: Granting Create Child Objects and Write permissions
See http://technet.microsoft.com/en-us/library/hh296982.aspx#RDCchild for more information on how to grant Create Child Objects and Write permissions.
Planning activity feeds
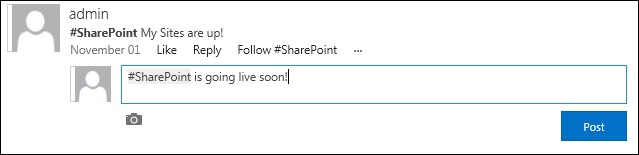
SharePoint 2013 has several items that can appear in the Activity Feed. Users can follow users, tags, sites, and conversations. Users can also post on a user’s site or mention them in posts, which causes an item to appear in their activity feed. Two significant changes reflect the influence of social networks on SharePoint. The first is the mention. You can put an “at” sign (@) in front of a person’s name to make the post appear in the person’s newsfeed. The second one is the hash tag (#), which a user can put in front of a word in a post. Putting the hash sign in front creates a tag that users can follow. If a user is following that word, the post appears in that person’s newsfeed. For example, if a user posts something about SharePoint and another user is following the keyword SharePoint, they see that on their newsfeed, as shown in Figure 2-8.
Following keywords is made even easier by a link that appears at the top of a conversation with the keyword associated with the word Follow. Because following keywords is so easy, you can expect a large increase in the number of tags followed. Tags are indexed and can be searched on. All this activity increases the load on the SharePoint server and needs to be taken into account when designing the farm.
The Outlook Social connector also shows the activity for individuals. These feeds are pulled from SharePoint periodically and stored in Outlook, requiring both memory and CPU resources. The number of people using the Outlook Social connector will vary depending on the organization, but this should factor into preparing for the load on the SharePoint server.
The number of profile properties that can be followed and therefore appear in the activity feed affect the resources required and need to be planned out. Also, some properties are excluded from the activity feed for political reasons. For example, in certain organizations, the title of a person can reflect their salary; as a result, an organization might decide that changes in a person’s title only promotes gossip and distracts people from their jobs. Users might also benefit from some profile properties that aren’t set up to be followed. To change whether a profile property appears in the SharePoint 2010-compatible newsfeed, follow these steps:
Navigate to Central Administration and click Manage Service Applications in the Application Management section.
Click the User Profile service application.
Click Manage User Properties in the People section on the Manage Profile Service page.
Click the property name of the user profile property to be changed (for example, Title) and select Edit from the drop-down menu.
Select or clear Show Updates To The Property In Newsfeed (Only Compatible With SharePoint 2010 Newsfeeds) and click OK to save.
The number of items that a user follows and the frequency of change in these items determine the load on the activity feed. Although the frequency of change is determined by usage and can’t be easily controlled, you can limit the number of items followed. Users can follow three main items and have their changes appear in their activity feeds:
You can limit each of these items. Changing the number of items that can be followed is a farm-level change and affects all users. Organizations with a large number of users and/or a large farm with many documents and sites might want to limit the number of items that can be followed, as follows:
On the Manage Profile Service page, click Manage Following in the My Site Settings section.
Type values for the Maximum Number Of Followed People, Maximum Number Of Followed Documents, and Maximum Number Of Followed Sites (see Figure 2-9).
Click OK to save your changes.
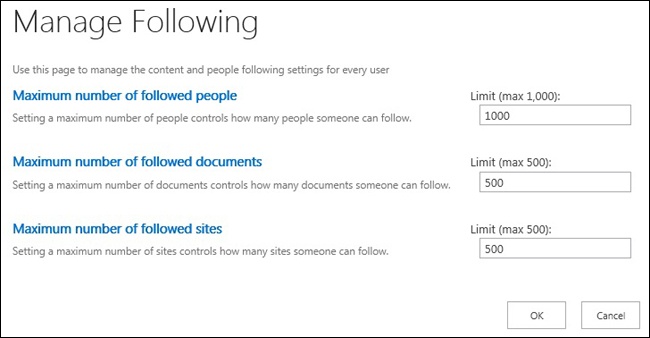
These limits are fairly high (and already at the maximum) for most people. You can’t increase them, but you might want to lower them to increase the performance of the SharePoint server.
You can access feed information on a user’s My Site. SharePoint 2013 offers several feeds, each with a different set of overall feed data that you can filter so that users can see the most appropriate data:
Newsfeed. The default view when visiting a user’s My Site profile, it shows the last 20 recent activities for entities that the user follows.
Everyone. This feed shows the last 20 posts or replies across all users.
Activities. This feed shows all activities associated with a user, including systemgenerated activities, and not just recent activities.
Likes. This feed lists posts or replies that the user has liked.
Mentions. Whenever a user is mentioned in a post or reply, the item appears in this feed.
More Info: Planning for feeds and Distributed Cache service
See http://technet.microsoft.com/en-us/library/jj219572.aspx#planfeeds for more information on how to plan for feeds and for the Distributed Cache service.
Distributed Cache allows for fast retrieval of activity-related items across all the components of SharePoint by caching recently accessed items. In fact, Distributed Cache has a dedicated cache referred to as the Feed Cache, whose sole purpose is to store activities and conversations for use by feeds on My Sites. Distributed Cache comes in two modes: Dedicated and Collocated.
Dedicated mode is recommended for the best performance, but it requires a server solely dedicated to being a Distributed Cache server. Collocated is when one or more SharePoint servers are running the Distributed Cache service as well as other services. A server running Distributed Cache in Collocated mode should stop all non-essential services to reduce the competition for memory resources.
Starting the Distributed Cache service on a SharePoint server is fairly straightforward:
Navigate to Central Administration.
Click Manage Services On Server under the System Settings section.
Find the Distributed Cache line and click Start.
Unlike SharePoint 2010, SharePoint Server 2013 can use Distributed Cache to cache the login token. This means that if Network Load Balancing (NLB) is being used, a user won’t lose his login information if he goes from one Web Front End (WFE) to another. In SharePoint 2010, the NLB servers had to be set up to have affinity (where a user would go back to the same WFE). Although this would work, it wasn’t true load balancing. With the login token cache, any WFE that receives a request for resources can access the security token, validate the user, and provide him with the resources requested (assuming that that user has permissions).
The Distributed Cache service is built on Windows Server AppFabric, which implements the AppFabric Caching service. This service must be installed on the Windows Server running SharePoint before it can be used. Luckily, Windows Server AppFabric is one of the prerequisites that must be installed before the SharePoint installation.
Exam Tip
A new feature in SharePoint, Distributed Cache will most likely be on the exam in some way. Important concepts to remember are the mode, the login token cache, and the feed cache. Knowing how to enable Distributed Cache is also important.
More Info: Microblog features, feeds, and the Distributed Cache service
See http://technet.microsoft.com/en-us/library/jj219700.aspx for more information on microblog features, feeds, and the Distributed Cache service in SharePoint Server 2013.
Planning connections
After the User Profile service application is created and the User Profile Synchronization service starts, you can use the selected account with sufficient permissions to create synchronization connection to a directory service. This connection needs to pull in just the users who are supposed to have profiles. This means that inactive users, test users, non-human users, and/or non-full-time employees might need to be filtered out.
More Info: Planning worksheets
Because creating a synchronization connection involves so many options, you should plan it out with worksheets. Luckily, worksheets have already been created to help you plan. See http://www.microsoft.com/en-us/download/details.aspx?id=35404 to download and use these planning worksheets.
Every user who needs a profile must have an identity in a directory service. A unique identifier needs to exist that identifies the user (such as the account name in AD) so that the user can be synchronized as a unique person. A directory service doesn’t have to be Active Directory, although this is the most common. Directory services come in three different types:
Windows-based authentication (such as AD)
Forms-based authentication
Claims-based authentication
Claims-based or forms-based authentication requires that a trusted provider be used; with Windows-based authentication, no trusted provider is needed. Several different types of connections can be made to directory services, including these built into SharePoint Server 2013:
Exam Tip
While knowing that a number of different types of connections can be used is important, you aren’t expected to have in-depth knowledge of non-Windows directory services for the exam.
Such a varied set of directory services exists in case SharePoint runs in a non-Windows environment or users come from a third-party source. SharePoint Server 2013 is an enterprise solution that needs to work in a wide variety of environments. For purposes of illustration, you need to see how to create a Synchronization Connection with AD as the directory service:
Navigate to Central Administration and click Manage Service Applications under the Application Management section.
Click the User Profile service application to open the Manage Profile Service page.
Click Configure Synchronization Connections in the Synchronization section.
On the Synchronization Connections page, click Create New Connection.
In the Connection Name text box, type a connection name that’s meaningful to SharePoint administrators (for example, active users).
Choose Active Directory in the Type section.
In the Connection Settings section, type a forest name in the Forest Name text box. This needs to be the complete forest name; remember that single-label domains aren’t supported.
In the same section, choose whether to autodiscover a domain controller. If you choose not to, type the domain controller’s name in the text box provided.
From the Authentication Provider Type drop-down list, choose Windows Authentication (Forms Authentication and Trusted Claims Provider Authentication are the other options). Because you’re using Windows authentication, you don’t need to provide an Authentication Provider Instance.
Type the account name with the additional AD permissions in the Account Name text box.
Type and confirm the password in the appropriate text boxes.
Choose the port and whether to use SSL. For most implementations, leave the port at 389.
Click Populate Containers and wait for the box below it to populate.
In the containers box, expand the tree and select the container(s) that contain the users to import. You might have to work with other groups in your organization to determine which containers have the users who need to be imported.
Click OK to save the changes.
More Info: Planning profile synchronization
See http://technet.microsoft.com/en-us/library/ff182925(office.15).aspx#connections for more information on how to plan profile synchronization for SharePoint 2013.
When a synchronization connection is created successfully, you can apply filters. You can use a filter to exclude certain users, such as contractors or temporary employees. Filters can also be used to narrowly define a set of users for a particular connection. For example, if only a subset of users from a specific office location needed profiles, a filter could limit the number of users imported. Most often filters are used to filter out inactive users. Not deleting users from AD in case they return is often a policy, so they can be given the same account that they previously had.
Filters are based on the attributes imported in the synchronization. The set of attributes will vary from organization to organization. To better understand how filters are used, follow these steps to create one:
Navigate to Synchronization Connections and choose the connection that needs to be modified. Clicking the name should show a drop-down menu; select the Edit Connection Filters option.
In the Exclusion Filter for Users section, choose the attribute to be filtered on. This determines the available Operators. Also choose whether the attribute is an AND or an OR operation.
Choose the desired operator, such as Equals or Contains.
Type in the value to filter on in the Filter text box.
Click Add to add the filter.
Continue adding filters until all applicable filters are applied.
Repeat steps 2-6 for groups in the Exclusion Filter for Groups section if you want to filter groups.
Click OK to finish and save the filters.
Now, the only thing left is to create a synchronization schedule. You first need to perform a full import and validate that the correct number of users are returned and that the mapped fields are populated correctly. Typically, a full synchronization isn’t required, but it’s necessary when the connection is first created. To synchronize a profile, follow these steps:
The process might not start immediately, but should start within a minute. The process could take a long time to complete, depending on the number of users and the performance of the server doing the profile synchronization. Full synchronization is a resource-intensive operation and should be done only when absolutely necessary.
After the process completes (check the Profile Synchronization Status on the Manage Profiles Service page to see whether it says Idle), look at the number of user profiles to ensure that they match the expected number.
You can determine a profile synchronization schedule based on business requirements and the capabilities of the SharePoint server running the profile synchronization service. An incremental profile synch isn’t overly taxing on the system and can be run quite often. You might want to consider an incremental synch if changes in Active Directory need to be reflected in SharePoint within a certain time frame.
Note: Profile properties change iteration
When a profile property changes in Active Directory, you need to perform two steps for the information to be fully iterated through the SharePoint environment:
Perform an incremental synchronization.
Have the Search service crawl the user profiles for the changes to appear in search.
To determine the maximum amount of delay, the time between incremental profile synchronizations needs to be added to the time between incremental crawls of user profiles by the Search service.
You can set up an incremental profile synchronization after the connection is verified. Changes can’t be made while the User Profile service is being synchronized; you must wait until the current synchronization process finishes. Incremental synchronization is handled with a timer job created in the SharePoint environment, which you can set up as follows:
Navigate to the Manage Profile Service page.
Click Configure Synchronization Timer Job in the Synchronization section.
In the Recurring Schedule section, choose how often the synchronization should run. Most organizations run it at least daily, but hourly or even every few minutes is a valid option because it’s a fairly low-resource operation except in the largest of organizations.
Click OK or Run Now.
Now the profiles should be synchronized with AD regularly. Periodically, you should check individual users to ensure that changes are being replicated.
Objective summary
Community sites are an effective way to encourage input in a forum-type environment but should be configured on creation.
You should thoroughly plan out the My Site host before users start creating personal sites.
The User Profile service application and User Profile Synchronization services require careful planning before they are implemented.
The AD account needs additional permissions to be able to import users.
Active Directory is just one of many directory services available for importing users.
Establishing connections to directory services and providing the correct filters are necessary to keep extraneous user profiles out of SharePoint.
Distributed Cache can greatly improve the performance of Activity Feeds and the end-user experience.
Objective review
Answer the following questions to test your knowledge of the information in this objective. You can find the answers to these questions and explanations of why each answer choice is correct or incorrect in the “Answers” section at the end of this chapter.
A community site has been created and a user has been given a badge. How many total badges is the person allowed to have?
As many as they receive
One
Three
Five
What is the default upload limit for an individual file in a My Site host?
10 MB
50 MB
250 MB
1 GB
On what server would an account be granted the Replicating Directory Changes permission (used in profile synchronization with AD)?
A domain controller
The SQL Server that SharePoint uses
Any SharePoint server
The SharePoint server that runs the profile synchronization
Which authentication method doesn’t require a trusted provider?
Forms-based authentication
Claims-based authentication
Windows-based authentication
All of the above
A user can follow many items in SharePoint 2013, and changes to these followed items appear in their activity feed. SharePoint allows the limiting of how many items users can follow for performance reasons. Which of the following items can be limited on a farm?
The number of people followed per user
The number of documents followed per user
The number of sites followed per user
All of the above
Objective 2.2: Plan and configure a search workload
Searches typically consume the most resources of any component in the SharePoint farm and often require one or more servers dedicated just to handle the demands. Because of the resources that searches consume and the end-user expectations, you need to know how to plan for them both for real-world implementations and for this exam.
Planning and configuring search result relevancy
Search is at the very core of SharePoint. Users type terms in the search box and expect relevant results to be returned. Although SharePoint does a great job at indexing and querying those results, it still needs some human interaction to help it determine the most relevant results.
Many factors can be used to help determine what results are the most relevant. SharePoint takes into consideration the item that’s searched on and what users click to refine the results that seem the most relevant, but many other factors can be configured so that certain results can be pushed to the top. The following items can be configured to help improve search relevancy:
Building a thesaurus
Defining a custom entity extraction
Adding query rules and suggestions
Designating authoritative pages
You can use each of these items to help end users find the results they need as quickly as possible so that they can spend more time doing their job and less time searching for the data. This section covers how to configure and plan for increasing search result relevance using the items in the preceding list.
Building a thesaurus
A thesaurus uses synonyms to help expand the results that SharePoint returns. For example, SharePoint 2013 could be a synonym for SharePoint Server 2103 and SP2013. After the synonyms are loaded into the SharePoint server, a search on any one of the three items would bring back results for all three items. The synonyms can be all in one language or expanded to other languages.
The thesaurus is created and maintained outside SharePoint, using a program such as Microsoft Excel to help generate comma-separated (CSV) files that are imported into the SharePoint system. When you create a thesaurus, remember that each SharePoint farm is limited to one thesaurus file.
Creating a thesaurus requires some manual effort, but the steps are pretty straightforward. When the SharePoint Search service application is up and running, you can create a file to be used to import the synonyms. A synonym consists of three key components:
Key. Single-word or multiple-word key that triggers the expansion of search components
Synonym. Word or phrase that’s included when the key word or phrase is searched on
Language. Optional component with an abbreviation for the language of the synonym
The simple CSV file that needs to be created has Key,Synonym,Language as the first line and the key, synonym, language combinations listed as individual lines below the first line. The following is an example:
Key,Synonym,Language
SharePoint 2013, SharePoint Server 2013, en
SharePoint 2013, SP2013, en
After you create and save the file as a CSV file with Windows Notepad, Microsoft Excel, or a third-party product, you can then import it into the SharePoint Search configuration as follows:
Verify that the account being used is an administrator for the Search service application.
Start the SharePoint Server 2013 Management shell (PowerShell for SharePoint) and type the following command, where <Path> is the location of the CSV file:
$searchApp = Get-SPEnterpriseSearchServiceApplication
Import-SPEnterpriseSearchThesaurus -SearchApplication $searchApp -Filename <Path>
When the thesaurus is imported and validated, whenever someone types the keyword, the synonyms are appended to the search so that all items in the group are returned. To help build a thesaurus, the words that people search on should be tracked so that a SharePoint administrator (or preferably a librarian) can look at the results and help to build a more accurate thesaurus.
More Info: Creating and deploying a thesaurus
See http://technet.microsoft.com/en-us/library/jj219579 for more information on how to create and deploy a thesaurus in SharePoint Server 2013.
Defining custom entity extractions
Custom entities are used to refine search results. For example, if the Contoso company had three levels of certification available to its users, it might want refiners to be displayed whenever the certification or part of the certification was typed into the search box. If the word expert was entered into the search engine, Contoso expert might appear as a refiner. This would help users find information on how to become a Contoso expert.
Defining custom entity extractions is similar to creating a thesaurus—you need to create a CSV file and then import it. The imported file is referred to as a custom entity extraction dictionary. As with the thesaurus, the file must follow a certain format, but with custom entity extractions, only two fields of data exist:
Key. A word or phrase that defines the custom entity
Display form. The refiner name (optional)
This is a little simpler than the thesaurus in that it doesn’t have a language component. An example of the CSV file is as follows:
Key, Display form
Expert, Contoso Expert
Contoso, Contoso Expert
After you create the CSV file with a program such as Notepad or Excel, you can import it into the SharePoint environment. The steps for importing the CSV file are similar to the method used in importing a thesaurus:
Create the CSV file based on the preceding example.
Open the SharePoint 2013 Management Shell.
In the Management Shell interface, type the following command, where <Path> is the path to the CSV file and <Dictionary name> is the name of the type of the custom extraction dictionary:
$searchApp = Get-SPEnterpriseSearchServiceApplication
Import-SPEnterpriseSearchCustomExtractionDictionary –SearchApplication $searchApp
–Filename <Path> –DictionaryName <Dictionary name>
The dictionary name depends on the type of custom extraction dictionary. You can use one of the following values:
Microsoft.UserDictionaries.EntityExtraction.Custom.Word.n, where n=1, 2, 3, 4, or 5
Microsoft.UserDictionaries.EntityExtraction.Custom.ExactWord.1
Microsoft.UserDictionaries.EntityExtraction.Custom.WordPart.n, where n=1, 2, 3, 4, or 5
Microsoft.UserDictionaries.EntityExtraction.Custom.ExactWordPart.1
More Info: Custom entity extractor types
See http://technet.microsoft.com/en-us/library/jj219480(v=office.15)#CustomDictionaryTypes for an overview on custom entity extractor types.
You can extract custom entities from managed metadata. Here, a managed property such as the Title or Body field can be used to create refiners of the custom entity. To make this happen, follow these steps:
Validate that the account being used is an administrator of the Search service application.
Navigate to Central Administration and click Manage Service Applications in the Application Management section.
Click the Search service application.
Click Search Schema in the Queries And Results section.
On the Managed Properties page, find the property to associate with the custom entity extraction.
Point to the managed property, click it, and then click Edit/Map Property.
On the Edit Managed Property page, edit the settings in the Custom Entity Extraction section. Select the dictionary for the custom entity extraction dictionary that you’ve imported, and then click OK.
The entity extraction requires a full crawl to implement. After the refiners are created, you can use Refinement Web Parts to include them on the search results page. Follow these steps:
On the page that the Refinement Web Part is to be configured, validate that the user making the changes is a member of the Designer group of higher.
Edit the page on which the refinement page resides.
Edit the Refinement Web Part.
Click Choose Refiners in the Properties For Search Refinement section.
Select one or more managed properties containing extracted entities that you want to use as a refiner from the list and click Add.
In the Configure section, configure how you want the refiner to appear and click OK.
When the refinement panel is configured, the custom entities should appear if the values match the entities in the custom extraction dictionary.
Adding query suggestions
Query suggestions (or search suggestions, as they are often referred to) help give users suggestions as they type text into the search box. This functionality is seen in almost all popular search engines used today.
SharePoint automatically generates query suggestions over time. The default is that when an item is searched on and then clicked six times, it then becomes a query suggestion. For example, if someone types Microsoft in the search engine, Microsoft SharePoint might appear as a query suggestion below the search box. A query suggestion appears only if at least one word that has been typed appears in the query suggestion.
As part of planning for search relevancy, you can add or prohibit query suggestions manually as part of the search configuration. Manually added query suggestions exist at the Search application level and appear in all search boxes across all site collections.
To add query suggestions, you must first create a text file that has one query suggestion per line. You can create this simple text file with Notepad or a similar product. After you create the file, you can add the query suggestions as follows, using an administrator account for the Search service application:
Navigate to the Search service application in Central Administration.
Click Query Suggestions in the Queries And Results section.
For the Language For Suggestion Phrases, select the language of the query suggestions to be imported. The list shows only the languages for which language packs have been added.
In the Always Suggest Phrases section, select the Import From Text File option.
Browse to the query suggestions file that you created and click OK.
Click Save Settings.
After the file is uploaded, the query suggestions in the provided list appear when a user types in the search box (if the query suggestions are turned on). If you want to remove all manually added query suggestions, you can upload an empty text file to erase all query suggestions for the language chosen.
Important: Overwriting a query suggestion file
Importing a query suggestion file overwrites any existing suggestions that exist in the search system (per language). Therefore, keeping a master query suggestion file is recommended.
Excluding query suggestions is also possible. The reasons behind excluding items are driven by business reasons, but SharePoint allows for these exclusions. When a phrase is added to the exclusion list, it never appears as a query suggestion. The text file to be used is similar to the file used for query suggestions in that one query phrase exists per line. The steps involved are as follows:
Navigate to Central Administration and click Manage Service Applications in the Application Management section.
Click the Search service application.
In the Queries and Results section, click Query Suggestions.
For the Languages For Suggestion Phrases, select the language of the query exclusions (one file per language).
In the Never Suggest Phrases section, click Import From Text File.
Browse to the file to be imported and click OK.
Click Save Settings.
Query suggestions (and the ability to exclude individual query suggestions) are turned on by default, but you can turn them on or off within SharePoint Server 2013. The process is fairly straightforward and can be accomplished with a few steps:
Navigate to the Search service application with an account that has administrative rights.
Open the Query Suggestions page in the Queries and Results section.
To enable query suggestions, select the Show Search Suggestions check box or leave it cleared to disable query suggestions
Click Save Settings to enable the changes.
The changes made are at the Search service application level and affect all search boxes in all site collections across the farm. Users expect query suggestions because they are familiar with popular search engines. Therefore, leave these on unless you have a specific business reason for them to be turned off.
After query suggestions are uploaded, you can export them to a text file. This is useful for maintaining query suggestions and for sharing them with other farms. This is done on the same page as importing the query suggestion text files.
More Info: Managing query suggestions
See http://technet.microsoft.com/en-us/library/jj721441 for more information on managing query suggestions in SharePoint Server 2013.
Designating authoritative pages
SharePoint uses authoritative pages to rank certain pages or sites above others. For example, an organization might decide that http://contonso/documents is a more important site than http://contoso/archive (because an archive site is probably less relevant than a working site). Defining authoritative pages is probably one of the most important steps that can be taken in making more relevant pages rise to the top of the search results. Rank is determined by how many times an item has been chosen from a search results query as well as how far it is away from an authoritative site or page. Closeness is determined by how many clicks it would take to get to the document from the authoritative page.
You can also enter non-authoritative sites into the SharePoint system. These pages or sites would then be pushed to the bottom of the search results list. This is useful for sites (such as archives) that need to be indexed, but the results shouldn’t be at the forefront of the search results. These sites are pushed to the bottom of the search results not matter how often they are chosen.
Determining which sites or pages are authoritative (or non-authoritative) is the role of someone who’s familiar with the SharePoint environment as well as the organization using SharePoint. Because finding a single individual for this task is difficult, it will probably require working with individuals who have in-depth knowledge of different areas of the SharePoint farm. One way to define authoritative pages is to create a page with links to sites deemed important and/or relevant. Sometimes this is simply the home page, but for more precise search results, creating a page for both authoritative results and non-authoritative results is beneficial.
Authoritative pages can be entered into the SharePoint system but require farm-level rights, whereas a page can be used so that a subject-matter expert or experts can update a SharePoint page without having access to Central Administration. Pages or sites can be deemed authoritative (or not) by following these steps:
In Central Administration, navigate to the Manage Service Applications page in the Applications Management section, using an account with administrative rights on the Search service application.
Click the Search service application.
Click Authoritative Pages to open the Authoritative Pages page.
Add the pages with the most authority in the Most Authoritative Pages text box under the Authoritative Web Pages section. Separate the sites and/or pages so that each line has only one URL.
In the Second-Level Authoritative Pages text box, type the URL of any pages seen as second-level. Repeat for the third-level authoritative pages.
In the Non-Authoritative Sites section, add the URLs of the sites to be demoted (all sites that start with this URL will also be demoted).
To adjust rankings immediately, click Refresh Now in the Relevance Rankings Analytics section. Otherwise, rankings will be refreshed later.
Click OK to save the changes.
After the changes are made and the rankings are calculated, users should start getting results ordered by the rankings in relation to the authoritative pages. These settings should be reviewed periodically so that the rankings can be adjusted based on how the SharePoint farm is used. This review is necessary to provide users the most relevant and up-to-date results possible and therefore saving them time and money.
Planning and configuring index freshness
Whenever a document is added, it doesn’t appear in the search results until it’s crawled and indexed. The same is true with document changes: They don’t appear until the content source is crawled. The more often a content source is crawled, the more up to date the results will be. SharePoint 2013 now includes an option to continuously crawl a content source. Of course, crawling continuously is a resource-intensive task, and the server or servers doing the crawling need to be up to the task.
Important: SharePoint 2013 Query Server changes
Changes made to SharePoint 2013 mean that the server responsible for handling search queries needs more resources. This was an effort to move some of the work away from the SQL Server. Therefore, moving the query functionality to its own server provides significant performance improvements.
Continuous crawling is started at 15 minute intervals by default. This interval can be changed using PowerShell. Before continuous crawling can be used, it must be enabled according to content-source level (applicable only to the SharePoint sites’ content-source type). To enable continuous crawling, follow these steps:
Navigate to Central Administration with an account that has administrative rights to the Search service application and click Manage Service Application in the Application Management section.
Click the Search service application.
Click Content Sources in the Crawling section.
Choose a content source to modify, or create a new one and click the content source.
In the Crawl Schedule section, select Enable Continuous Crawling.
On the Content Sources page, verify that the Status column shows Crawling Continuous.
Enabling continuous crawling means that search results can appear before a crawl is completed because adding a document starts a new crawl that might finish before the first crawl. A user can add a document and have it appear in the search results within seconds of it being added, which can greatly improve the end-user experience and help users find the most current information as soon as possible. The only thing to consider is the amount of resources consumed by the search server. For large content source and limited search server resources, enabling continuous crawling might not be an option. After continuous crawling is enabled, the server should be monitored to see how memory and CPU resources are affected.
More Info: Managing continuous crawls
See http://technet.microsoft.com/en-us/library/jj219802.aspx for more information on managing continuous crawls in SharePoint Server 2013.
Planning and configuring result sources
Result sources help limit crawls to subsets of the SharePoint farm. They have replaced the scopes used in previous SharePoint versions. Correctly configuring the result sources can help maximize the efficiency of the search servers.
SharePoint’s default result source is Local SharePoint Results, which is set up for you when you create the Search service application. Whenever a Search Driven Content Web Part is added to a page, it uses the default result source. If business rules specify that a specific result source is used, you can change the default at the Search service application level, the site collection level, and the site level. To change the default result source at the Search service application level, follow these steps, using an administrator account for the Search service application:
Navigate to Central Administration and click Manage Service Applications in the Application Management section.
Click the Search service application.
In the Queries and Results section, click Result Sources.
In the Manage Result Sources section, select the result source that will be the default. Click the arrow that appears and select Set as Default.
You can create result sources at the farm, site collection, and site levels, but this book focuses only on the farm level. To create or modify result sources at the site collection level, navigate to the site collection settings and click Result Sources in the Site Collection Settings section. To modify or create result sources at the site level, navigate to the site setting and click Result Sources under the Site Settings section.
To create a new result source at the farm level, follow these steps, using an administrator account for the Search service application:
Navigate to Central Administration and click Manage Service Applications in the Application Management section.
Click the Search service application.
In the Queries and Results section, click Result Sources.
On the Manage Result Source page, click New Result Source.
On the Add Result Source page, type the Name and Description in the General Information section.
In the Protocol section, select one of the following protocols for retrieving results:
Local SharePoint. The default; provides results from the Search service application
Remote SharePoint. Provides results from another farm
OpenSearch. Provides results from other sites that use the OpenSearch 1.0/1.1 protocol
Exchange. Provides results from Microsoft Exchange Server
In the Type section, choose SharePoint Search Results or People Search Results.
In the Query Transform field, you can choose to leave the default (searchTerms) as it is, or you can use a different transform method. You can also use QueryBuilder to help build queries using specific filters.
In the Credentials Information section, select the authentication type that you want to use to connect to the result source.
Important: Exchange Web Services
The Exchange Web Services Managed API must be installed on the computer that’s running the Search service if Exchange results are desired.
Result sources enable you to bring a variety of different search results into the SharePoint search experience, so that users can use SharePoint as a single source for all their search needs. However, you still need to plan out the result sources.
Exam Tip
SharePoint 2013 can no longer create scopes; result sources have replaced them. The scopes of All Results and People exist as part of the SharePoint installation. As part of the exam, knowing that creating a scope wouldn’t be a step for anything is important. You should also be aware that result sources can integrate different sources so that results appear in the same set of search results.
Gone is the ability to create scopes and have them appear in the drop-down list next to the search box (although migrated scopes will still be usable). Users now click the result scope they want to use. The result scopes shown on a search page are configured on the page from the result scopes that have been made available. For example, on the Enterprise Search results page, the default result sources of Everything, People, Conversations, and Videos are listed below the search box (see Figure 2-10).

The result sources are listed in a Search Navigation Web Part (the result types shown under the search box are actually just links to pages configured to display a particular result source by changing the query values of the Search Results Web Part). Clicking one of the result types changes what appears in the search results box connected to the Search Navigation Web Part. The displayed result sources are determined by the search settings, not by the Search Navigation Web Part. To modify the result sources, follow these steps:
Navigate to the search results page to be modified and click Site Settings under the Settings icon.
Click Search Settings in the Search section.
In the Configure Search Navigation section, you can add or remove links. The sort order also can be configured, as shown in Figure 2-11. Click OK to save any changes.
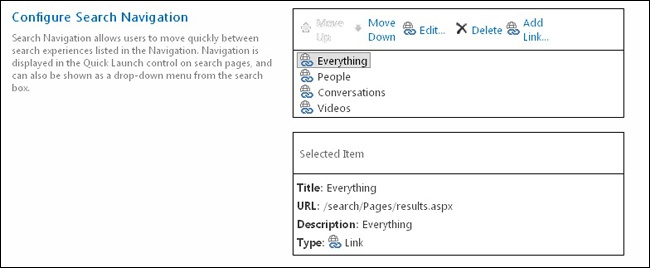
Before adding new links, you have to create the pages. The Search Results Web Part is where you choose the result source, but you can configure many other query options. You don’t need to know how to configure each of these options for the test, but you should have a general understanding of the options available. Some options that you can configure (by clicking Change Query in the Search Results Web Part settings) are as follows:
Select a result source
Add a keyword filter
Add a property filter
Query text to use and/or append
Choose refiners
Choose which property to search on
Choose a ranking model
Configure dynamic sorting
Whether to use query rules
Whether to use asynchronous or synchronous loading
Whether to rewrite URLs for product catalog items
As you can tell by the number of options, the ability to configure the search results has been greatly expanded. A high degree of customization can mean the results will take a while to be fully returned. In such cases, asynchronous loading would provide a more user-friendly experience.
Exam Tip
While most of the exam is concerned with configuring solutions in Central Administration, some items—such as result types—cross over because they can be configured at site, site collection, or farm level. To make these changes, you need to understand what kinds of permissions are required. For example, site collection administrators still can’t create a farm-level result source unless they also have farm-level permissions.
Planning and configuring the end-user experience
SharePoint 2013 has completely revamped the way search results appear. In SharePoint 2010, designers had to work with a huge XSLT file to modify the results. Now designers can target individual types of items and have them display differently, with specific metadata displayed and HTML that can be modified to show links and/or graphics in addition to the content. You can modify each item type in distinct files rather than modify the whole XSLT file. This way, multiple developers can work independently, potentially speeding up development as a result. SharePoint 2013 also uses query rules to alter the results being returned. This can be used to promote certain content or to change the result set based on the query entered.
You can use all these items together to provide a richer and better targeted search experience. They can even be used to provide a different result set for different individuals. For example, engineers could have different search result experiences than contractors.
This section covers how to use query rules, display templates, and result types to configure the search experience (result sources were covered in the previous section). Going through each of these, even if you aren’t the person having the search experience, will help you both on the exam and in understanding the architecture behind them.
Query rules
Query rules are used to change what’s returned in a search result set. You can use query rules to promote certain results, show additional results, and fine-tune rankings. A query rule is made up of conditions, actions, and publishing. These three components combine to make a rule that determines the content of the search results for a specified amount of time.
To get a better understanding of query results, you should start by creating one. You can set query results at the Search service application level, the site collection level, and the site level. At the Search service application level, you can add or modify query rules as follows:
In Central Administration, click Manage Service Applications in the Application Management section.
Click the Search service application to open the Search Administration page (or click the list of Search service applications).
In the Queries And Results section, click Query Rules to open the Manage Query Rules page (see Figure 2-12).
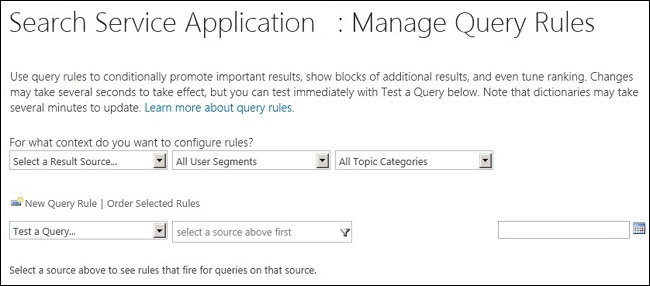
The first step in building a query rule is to determine what the conditions are. Not enough room is available to go over all of them, but here are some examples of possible conditions. First, look at some of the possible results sources:
All Sources
Wiki
Documents
Pages
Local People Results
After you choose a result source, you need to select a user segment and a topic category. Then you can create a query rule for the context by clicking New Query Rule. You can then configure the rule by following these steps:
Type a name for the rule in the Rule Name text box (the context will show under the box).
In the Context section, choose one of the following possible query conditions from the drop-down list:
Query Matches Keyword Exactly
Query Contains Action Term
Query Matches Dictionary Exactly
Query More Common in Source
Result Type Commonly Clicked
Advanced Query Text Match
Depending on which query condition is chosen, you can fill in options, such as providing the text for Query Matches Keyword Exactly.
Continue adding conditions by clicking Add Alternate Condition, if you want.
Add Promoted Result
Add Result Block
Change ranked results by changing the query
In the Publishing section, choose when to make the query rule active or inactive by selecting a Start Date and End Date. You also can choose to review the rule on a certain date by setting the Review Date and entering a Contact.
Click Save to save the changes.
Back on the Manage Query Rules page, you can test a query by typing some text in the Find Rules That Fire For A Query text box. You can also sort the queries by different types, such as inactive rules, thus simplifying the task of finding and modifying the query rules. Adding a query rule doesn’t make it take effect right away, but you can still test it immediately. You can use the same steps at the site collection and at the site level for targeted query results.
Display templates
Display templates enable particular search result items to be displayed differently. For example, if the item in question had the content type of Press Release, it could be displayed differently than a normal document (perhaps by having an icon associated with it and showing some additional metadata, such as Company). You can create display templates with straight HTML. This sort of control is a vast improvement over SharePoint 2010, where this sort of modification required modifying a huge XSLT file (more than 600 lines). Display templates are made up of the follow file types:
An HTML file
A JavaScript file that’s generated when the HTML file is uploaded
Everything needed for the display template is defined within the HTML file.
The easiest way to create a display template is to modify an existing one. A variety of templates are available in SharePoint 2013 in the Master Page Gallery of a site collection. To find the Display Template folder and save an example, follow these steps:
Navigate to the top level of a site collection and click Site Settings.
In the Web Designer Galleries section, click Master Pages And Page Layouts.
Click Display Templates on the Master Page Gallery page.
Because this discussion concerns search, click the Search folder.
Navigate to an item that closely matches the one you want to design a template for (for example, use Item_Person.html for a person-based template) and hover over it for the drop-down arrow.
Click the arrow and choose Download A Copy.
After you download the file, you can make changes to it and then upload it back to the display template in the Master Page Gallery. The file is fairly long but is much less complicated than the XSLT file that you had to modify for the people results page in SharePoint 2010.
After you create a display template, you need to create a result type so that SharePoint knows when to use it.
Result types
Result types work with display templates. A result type determines which display template is used based on a set of rules configured for the result type. Using content types, result sources, and managed properties to define rules for the result type provides some interesting options for displaying results. Each rule can have multiple values, and the result type can have multiple rules; you have an unlimited number of combinations. For example, you can combine a content type with a managed property. A possible option would be to show a map (or link to a map) if the item contained a Street, City, and State field.
To create a result type, follow these steps:
Navigate to the Site Settings page of the site collection where you need to create the result types.
Click Result Types in the Search section.
On the Manage Result Types page, click New Result.
Choose the appropriate Result Condition and Result Action—for example, if the content type is Sales Report, display the Sales Report display template.
Click OK to save the results.
Now that the result type is connected to a display template, whenever that item comes up in search, the display template for that item appears with all the extra content and/or graphics associated with it.
Planning and configuring a search schema
A search schema is composed of managed property mappings and managed property settings. Managed properties determine what’s indexed and therefore available in the search results and for refiners. The content and metadata of a document or a list item is referred to as crawled properties. For crawled properties to be included in the search index, you must map the crawled property to a managed property. Only managed properties are written to the index and therefore available to be searched on.
You can map multiple crawled properties to a managed property. For example, you can map both Office and Location to the managed property Office. Therefore, when a user types Office:Seattle, it returns results for documents or lists with either the Office or Location property populated with the word Seattle. If a document or list item contains the Office and Location properties, the first property that the Search service encounters is used to populate the Office managed property. A crawled property can also be mapped to more than one managed property.
More Info: Crawled and managed properties
See http://technet.microsoft.com/en-us/library/jj219630.aspx for an overview of crawled and managed properties in SharePoint Server 2013.
Some crawled property types generate a new managed property and mapping between the crawled and managed property. Whenever a site column is generated on a list or document library, a crawled property, a managed property, and the mapping between the two is automatically generated. Search application administrators can change the default mappings or create new ones. However, any changes to the default mappings require a full crawl of the content to take effect.
Multiple search schemas can exist. The main search schema is maintained in Central Administration in the Search service application. However, you can modify search schemas at the site collection and tenant levels. This means that site collection owners can manage the search experience at the site collection level by modifying the search schema. Site owners can view the search schema but can’t modify it.
The search index is composed of a set of files in a set of folders on the search servers that have the index component on them. The content processing component processes crawled properties and stores the mapping information in the index. A variety of indexes can be queried. Whenever an item is changed, it must be reindexed after it’s crawled. To reduce the reindexing load, SharePoint 2013 has introduced new index update groups:
Default. This group contains most of the managed properties. Everything that doesn’t fit into one of the other groups falls into this group.
Security. This group contains the document Access Control List managed property.
Link. This group contains managed properties related to link data.
Usage. This group contains managed properties related to usage data.
People. This group contains managed property information related to people searches.
The default full-text index contains the contents of the managed properties. All searchable text is saved into the index. The full-text index is divided into weight groups that determine the importance of a managed property. The relevance ranking model determines what content is the most important and therefore appears higher in the search results. Two main full-text indexes exist (other than the default full-text index): one for SharePoint content and one for people-related content.
Because all the data that exists in the indexes is based on managed properties and how a crawled property is mapped to a managed property, you should go over how these are added to the Search service application. To add a managed property, follow these steps, using an account with administrative rights to the Search service application:
Navigate to Central Administration and click Manage Service Applications in the Application Management section.
Click the Search service application to open the Farm Search Administration page.
In the Queries and Results section, click Search Schema.
Click New Managed Property.
Type a Property Name and an optional Description in the Name And Description section.
In the Type section, choose the type of data for the property (such as Text, Integer, Decimal, or Date and Time).
In the Main Characteristics section, select all applicable items (Searchable, Queryable, Retrievable, Refinable, and so on).
In the Mappings To Crawled Properties section, click Add A Mapping.
Select a crawled property in order to map a property to the managed property and then click OK. Repeat this step to map additional crawled properties.
On the New Managed Property page, specify whether you want to include all content from all crawled properties mapped to this managed property and/or content from the first crawled property in the Mappings to crawled properties section.
In the Company Name Extraction section, optionally select the check box to enable custom entity extraction.
Click OK to save changes.
Important: Creating refiners
When creating a managed property to be used as a refiner, it must be both Refinable and Queryable.
If you want to change the mappings, you can edit managed properties in the same area they are created. If you want to change the name, you can create a new one and, if necessary, delete the old one (if it’s not in use, it can be changed safely).
Use caution when deleting a managed property. Users can no longer run queries using the property, any query rules based on that property will no longer work, and it will break any custom search applications or Web Parts that use the property. If you’re not sure whether it’s used, don’t delete it until you can find out.
Now that you’ve created a managed property, you can attach crawled properties to it. Again, just because a property is crawled doesn’t mean it’s searchable. It must be mapped to a managed property and/or included in the full-text index. To map this property, follow these steps, using an account with administrative rights:
Navigate to and click the Search service application to open the Search Administration page, and then choose the particular Search service application to administer.
Click Search Schema in the Queries And Results section.
Click Crawled Properties to open the Crawled Properties page and find the property you are looking for by scrolling or using the filter (see Figure 2-13).
Hover over the Property Name to be edited and select Edit/Map Property from the drop-down menu.
In the Mappings To Managed Properties section, click Add A Mapping.
Choose a managed property from the Select A Managed Property list (you can narrow down the list by using the Find box) and click OK.
Repeat these steps for every managed property to be mapped to the crawled property.
Check to see whether the crawled property should be in the full-text index. If it’s in the full-text index, it’s available for querying without using a managed property (overuse of this can result in poor performance of the search engine).
Click OK to save changes.
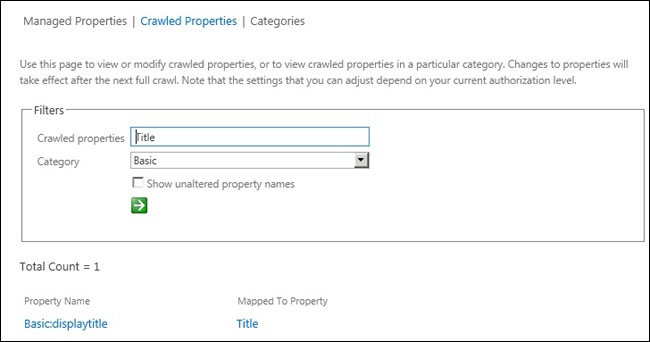
Each crawled property has a category. Categories help organize the crawled properties so that they’re easier to find and group, but they also provide a way to modify all the crawled properties in a category at the same time. For example, all the crawled properties in the Basic category could be set to Searchable. To view or edit property categories, follow these steps, using an account with administrative rights:
Navigate to and click the Search service application to open the Search Administration page, and then choose the particular Search service application to administer.
Click Search Schema in the Queries And Results section.
Click Categories to open the Categories page.
Hover over the category name to be viewed or edited and click the drop-down arrow so that you can select Edit Category (clicking a category takes you to the crawled properties page, with that category filled in for the filter).
View or change the Category Name in the Name And Information section.
Modify the four options available in the Bulk Crawled Property Settings as necessary:
Map all string properties in this category to the Content managed property
Searchable
Queryable
Retrievable
Optionally, you also can Delete All Unmapped Crawled Properties.
Click OK to save changes.
Changes made to a category affect all the crawled properties in that category. Therefore, choose these settings carefully because they can have unintended consequences on items in the search index.
More Info: Managing search schemas
See http://technet.microsoft.com/en-us/library/jj219667.aspx for more information on managing search schemas in SharePoint Server 2013.
Analyzing search analytics reports
Search analytics are important because they let users know how Search is being used and therefore how it can be modified to help users find what they want more efficiently. The analytics processing component analyzes crawled items and how users interact with Search. This is referred to as search analytics, which you can use to determine which items are searched on most often, how many times no results appear, and what users end up clicking. The analytics architecture consists of three main parts:
Analytics Processing Component runs the analytics jobs.
Analytics reporting database stores statistical information. Data from this database can be used to create Excel reports or to provide data to third-party products.
Link database stores information about searches and crawled documents.
The Analytic Processing Component runs two different types of analyses: search analytics, which analyzes how content is crawled and added to the search index, and usage analytics, which analyzes user actions such as clicked or viewed items.
Search analytics
Search analyses extracts information such as links and anchor text from the crawled content. This data is processed and stored in the search index. Extracted data is stored in the Link database with information on how users click search results. This information is then used to improve relevance and rank. It’s also used for reporting. Several types of analyses are done in search analytics:
Search Clicks. This type analyzes what a user clicks in the search results and is used to increase or decrease the relevancy of items in the search index. The click data is stored in the Link database.
Click Distance. This type analyzes the distance between an authoritative page and the item by the number of clicks between the two.
Social Tags. This type analyzes searches by social tags (words or phrases). By default, these aren’t used for refinement or rankings.
Anchor Text Processing. This type analyzes how items are interlinked. The text associated with the link is also included in the analyses. The results help determine rank and relevancy.
Social Distance. This type focuses only on users who follow people. The analysis calculates following to two levels: the people the user follows and then which users those people follow. Analyses are used to sort people by social distance.
Search Reports. Various search reports are created based on items such as top queries, no results queries, and number of queries.
Deep Links. These are based on what people actually click in the search results.
Usage analytics
Usage analytics are based on user actions such as clicking an item in search results or typing into a search box. Statistics are calculated on these actions and stored in the Analytics reporting database. Out of the box, SharePoint monitors and stores information about these events and provides some default reports. To get a better understanding of the analyses done in usage analytics, consider the different types of analysis performed:
Usage Counts. This type analyzes user events such as when a user clicks an item or views an item. The counts aren’t just for search results but can also include clicks from Microsoft Office programs (such as Word) or from a SharePoint library.
Recommendations. This type analyzes how users interact with an item. For example, it tracks users who clicked the same item and can recommend items that they also clicked.
Activity Ranking. This type uses the rate at which items are clicked to determine relevancy. For example, if an item is ranked on total number of clicks, older items rise to the top, but if more recent clicks are weighed more, recent items can rise to the top. This helps new documents get a higher rank.
The data collected with usage analytics is also used to generate reports so that search administrators can analyze usage trends and fine-tune how items are searched. Two types of reports are created based on usage:
Popularity Trends. This Excel report shows daily and monthly counts for a site collection, site, or even a specific item.
Most Popular Items. This report shows usage for all items within a list or library. The rankings are sorted by either Recent or Ever. This report can help you determine, for example, the most viewed item in a library.
Objective summary
Search relevancy can honed with several tools available in SharePoint, including synonyms, query suggestions, and authoritative pages.
Result sources have replaced scopes for defining search boundaries. They can be used to bring in search results from various different sources such as other farms, Exchange, and any source that uses OpenSearch 1.0/1.
You can pair display templates with result types to provide customized search results for individual items to provide additional details, graphics, and links related to the search item.
Managing crawled properties and managed properties is important in providing users queryable items as well as refiners.
Frequent review of search analytics is essential to fine-tune the search results and address issues such as no-results queries.
Objective review
Answer the following questions to test your knowledge of the information in this objective. You can find the answers to these questions and explanations of why each answer choice is correct or incorrect in the “Answers” section at the end of this chapter.
A decision has been made to push search results from an archive site in the SharePoint farm to the bottom of the search results page. What is the best way to achieve this result?
Make the site a third-level authoritative site.
Make the site a non-authoritative site.
Remove the site from the search results.
Remove the site from the list of authoritative results.
By using search results sources, users can search on results pulled from which of the following sources?
SharePoint sites
Exchange
OpenSearch 1.0/1.1
All of the above
You can use categories to do all but which of the following?
Make all crawled properties within the category searchable.
Delete all unmapped crawled properties.
Make all crawled properties refinable.
Map all string properties within the category to Content managed properties.
If you wanted the refiner Contoso Professional to appear whenever a user types the word Contoso or the word Professional in the search box, which of the following would you use?
Thesaurus
Entity extractor
Query suggestion
Search analytics
You’ve created a display template for items that have the content type of Expense Report, and you want items of that content type to use the display template in the search results. What else must you create to make that happen?
Query rule
Result source
A new content type
Result type
Objective 2.3: Plan and configure Web Content Management (WCM)
Web Content Management (WCM) is just one of the many roles that SharePoint 2013 can be configured to perform. This objective covers how to plan and configure the elements that make up the WCM environment.
WCM typically refers to a site that’s consumed by many people but for which only a few content authors are available. Users typically don’t collaborate on content (although that is possible) because they would do so on a team site or similar situation. Having a WCM site doesn’t preclude other types of content, but keeping internal and external content separated for security reasons is considered a best practice if the WCM content is to be consumed by external users.
When thinking about WCM, you need to consider a growing number of subjects, such as what types of devices are being used to view the content as well as what browsers to use. Also consider the publishing piece about how content is deployed and to where. Decisions about the preferred languages of the content consumers also need to be considered. All these items can’t be covered in great detail in this book, but understanding the different components in SharePoint 2013 related to WCM for the exam is still important.
Planning and configuring channels
Channels are part of the publishing infrastructure of SharePoint 2013 and are configured for particular device types. For example, you might have a channel for laptops, one for tablets, and one for mobile devices. SharePoint 2013 uses user agent strings that the browser provides to determine which channel to use. Depending on the channel, SharePoint can provide different master pages and CSS files designed specifically for the device being used. This allows web content providers to provide content that crosses a variety of different devices. (However, this doesn’t mean that content doesn’t have to be tested on the target devices.)
To create a channel within a site collection, click the Device Channels link in the Look And Feel section of the Site Settings page. Optionally, you can use the Design Manager. A default channel is already part of the site collection; if a browser doesn’t meet any specific channels, it will use the default one. A channel is defined by five properties:
Name. A required user-friendly name used to identify the channel
Alias. A required name used by code; must be 20 alphanumeric characters or fewer
Description. An optional description of the channel
Device Inclusion Rules. The required user agent string that determines which devices the channel is targeted for
Active. A check box to indicate whether the channel is active
Note: Making a channel active
When designing a channel, you are recommended to leave the channel inactive until it’s ready to use so that users don’t have a partially finished or non-functional user experience. To test a page using a specific channel, append ?DeviceChannel=alias (where alias is the alias property defined in the channel definition) to the page being tested.
Each site is limited to 10 channels (for on-premises installations). The order in which these channels occur can affect what channel is applied to what device. The more specific rules need to be above the general ones because the rules are processed in the order that they occur. For example, if a channel for a Windows 7.0 Phone operating system was below a channel for all Windows Phones, the Windows 7.0 Phone operating system channel would never be used. You can order device channels by following these steps:
Click the Site Settings icon to open Design Manager.
Click Manage Device Channels.
Click Edit Or Reorder Existing Channels.
On the Items tab, click Reorder Channels.
Use the Move Up and Move Down buttons to order selected channels (the default channel can’t be moved).
Click OK to exit.
After you create a channel, you need to associate a master page with it via the Site Master Page Settings. You can use the same master page for multiple channels. Channels can use a master page only if an approved version of the master page is available.
You can use device panels to display specific content on a particular device channel or set of channels. Doing so is particularly useful for trimming content for smaller devices such as mobile phones. Rather than use Cascading Style Sheets (CSS) to hide or alter content, you can use the device panels to prevent any rending of content, thus saving on resources, which can be of particular interest for users with limited bandwidth or bandwidth quotas. Typically, content that requires many resources—memory, CPU, bandwidth—is constrained to desktops and/or tablets.
More Info: Planning for device channels
See http://msdn.microsoft.com/en-us/library/jj862343.aspx for more information on how to plan for device channels in SharePoint Server 2013.
Planning and configuring product catalogs and topic pages
SharePoint 2013 allows for any library or list to be designated as a catalog. This way, the list or library can be reused among publishing sites. Creating a catalog is easier by first creating a product catalog site collection via the Product Catalog template, which is part of the Publishing group. The Product Catalog templates aids in the creation of catalog items and topic pages (pages automatically created for catalog items). This site collection is created just like any other site collection in Central Administration. After it’s created, you need to customize it for it to be a useful catalog. The Product Catalog template is part of SharePoint 2013 Enterprise Edition and isn’t available in the Standard edition.
Product catalogs
After you create the site collection, you can find several options that can help guide you through creating a product catalog. The welcome page shown in Figure 2-14 lists the steps basically in order.
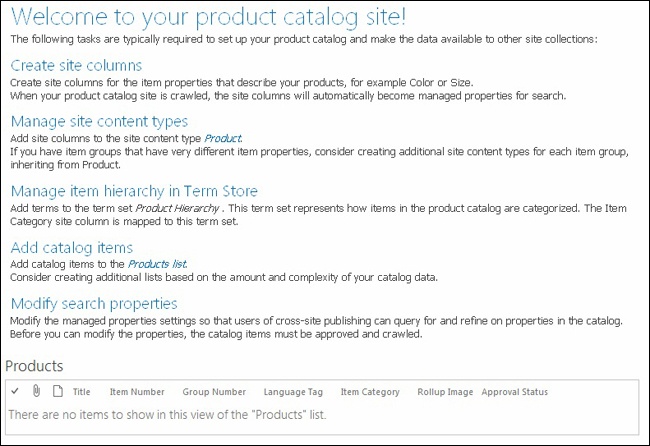
Creating site columns
You first create site columns. You can use existing site columns, but you probably want to create some additional that are specific to the products in the catalog (such as make and model columns, if the products are cars). After all the site columns that describe the product are created, you can add them to the Product content type. (You can always add or remove site columns, but getting the catalog as close to final as possible is best because additional site columns can affect how the product is displayed.)
Managing site content types
The second step is to modify the Product content type. Click Manage Site Content Types on the welcome page and scroll down to Product on the Site Content Types page. You can also make the changes directly by clicking the Product link in the Manage Site Content Types section. From here, you will add the product-specific site columns as follows:
Click the word Product under the Product Catalog Content Types heading.
Click Add From Existing Site Columns.
Choose the product-specific site columns from the Available Columns drop-down list and then click Add.
In the Update List And Site Content Types section, leave Yes selected so that the site columns are added to the product list and the Product with Image content type.
Click OK to save.
Important: Modifying the Product content type
The Products list on the product catalog site actually uses the Product with Image content type by default. The Product with Image content type inherits from the Product content type, so you always want to update all content types inheriting from the Product content type to see the changes in the Products list.
Managing Item Hierarchy in Term Store
The third step is to create the product hierarchy. Click the Manage Item Hierarchy In Term Store link (or by going through the site settings). The one you want to modify is under the Site Collection heading, followed by the site name and site catalog). This should have one term set called Product Hierarchy. Under the Product Hierarchy, you can enter an item that’s all inclusive of the products (for example, if the products are cars and trucks, the highest level would be vehicles). Then you enter term sets and subterm sets as applicable. Figure 2-15 shows an example.
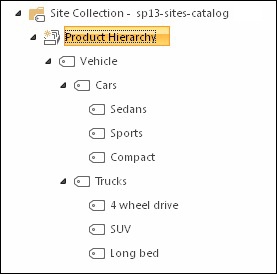
Note: Term Store Locations
Rather than use a term store located within the site collection, you should use a term store located at the farm level (one created by going to the Metadata service application in Central Administration rather than the Term Store link under Site Settings). This way, consumers of the product catalog (like with other site collections) don’t need rights to the term store within the product catalog site collection.
Adding Catalog Items
After the categories are entered, they can be chosen when a user adds an item. Items are added by clicking the Products link on the welcome page and then clicking the new item or the plus arrow. The list can also be reached by clicking Add Catalog Items or the Products List link. The Products list has Product with Image as its default content type, but you don’t have to insert an image if one isn’t available. To add an item category, you can click the metadata icon next to the Item Category, or just start typing into the Item Category text box and have SharePoint provide suggestions. By default, the categories term set is closed and it doesn’t allow unknown terms to be entered.
Modifying Search Properties
The final step listed on the welcome page is the Modify Search Properties section. This reminds the creator(s) of the product catalog that the newly created site columns need to be added to the managed properties within the search schema so that they can be searched on. After this step and a full crawl of the content are performed, the product catalog is ready to be used or consumed. It can be used in the site collection that it exists or it can be consumed by other sites or site collections.
The settings for how the product catalog is to be consumed don’t appear on the welcome page, but they can be found in the Library settings of the list itself. Several settings can be applied to a product catalog and should be planned out ahead of time, depending on how the product catalog will be used, how it will be searched on, and who can edit the items. To modify these settings, follow these steps:
Click Products on the welcome page.
Click List Settings on the List tab.
Click the Catalog Settings link.
Choose to enable or disable search indexing by clicking Advanced Settings Page in the Reindex list section (or trigger a full reindexing).
Choose whether to share the catalog among other sites and site collections by selecting the Enable This Library As A Catalog check box.
Select Enable Anonymous Access if you want users to have anonymous access to the product catalog.
Choose which fields will identify the catalog items (unique field or fields that identify unique items) and add them in the Catalog Item URL Fields section.
In the Navigation Hierarchy section, choose the column to use for navigation (typically, the Item Categories field).
Click OK to save changes.
Using the Catalog
Assuming that you chose to share the product catalog with other sites and site collections, the product catalog can be consumed and displayed. The site collection that contains the product catalog needs to be crawled fully before it can be consumed. This might take a bit of time depending on how the crawl was set up. When the crawl is finished, the product catalog can be consumed. This is done within the site that’s using the product catalog:
Navigate to the Site Settings page and click Manage Catalog Connections in the Site Administration section.
Click Connect To A Catalog on the Manage Catalog Connections page.
Choose or search for the product catalog. When you find it, click Connect.
Several options are on the next page, but the only ones that need to be filled in are in the Navigation Hierarchy section. Select the navigation field (for example, Item Category) and then choose the root term. You also want to choose the navigation level (Vehicles in this example), because you can’t choose the Product Hierarchy level.
Click OK to save changes.
After a connection is established, SharePoint creates pages on which the catalog can be displayed and the navigation hierarchy used to navigate the product catalog. Several options could have been configured during the connection. Of note is the Catalog Item URL Behavior option, which you can use to make the catalog seem as though it’s part of the consuming site. This is done by making the URLs relative to the consuming site. You also have the option of continuing to point to the source catalog. You even have the option to choose different master pages for the product catalog, but generally you want to use the master page of the consuming site so that it appears that it’s actually one site. Catalog items can be used with variants as well. The language tag is part of the Product content type and can be used to filter product catalog items so that only items that match the browsers language are shown.
Topic pages
You can use topic pages—category pages and catalog item pages—to display content from a metadata-driven term store (like the term store from the product catalog) without having to create a new page for each category or category item. This also allows for automatically created user-friendly URLs (unless that option is turned off). For example, if you used the example product catalog and had it consumed by a site called http://contoso, http://contoso/trucks and http://contoso/trucks/Long-bed would be category pages and http://contoso/trucks/long-bed/2 (a Dodge Ram truck is the second item in the catalog) would be a catalog item page. (Notice the absence of .aspx or .html extensions on the page names.) These pages are created automatically and are based on page layouts that are also created for you. To get to these newly created pages, use the navigation provided by the metadata, which replaces the structural navigation (see Figure 2-16).
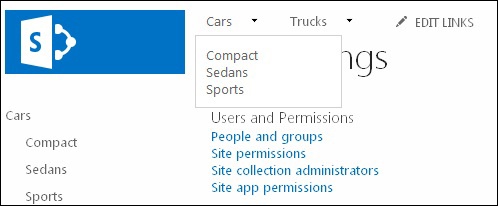
You can set up managed navigation without using a product catalog and use it with any term store.
More Info: Managed navigation
See http://msdn.microsoft.com/en-us/library/jj163978(v=office.15).aspx for more information about managed navigation in SharePoint 2013.
Before any data actually appears on the topic pages, the pages must be published. Open the Site Settings page and click Master Pages And Page Layouts in the Web Designer Galleries section. On the Master Page Gallery page, look for the following two pages and publish a major version of them:
CategoryItem-<Top level Term Store Name>.html
Category-<Top level Term Store Name>.html
For the example, the files would be CategoryItem-Vehicle.html and Category-Vehicle.html, respectively. If you plan to change these layouts, edit the HTML pages. They are meant to be customized for your product catalog branding needs. If for some reason you want to edit the .aspx page directly, delete the HTML page layouts.
The category page is meant to help users find the products they are looking for. It has a Content Search web part that limits the results to the category and displays links to the catalog items. The catalog item page is meant to display one item as well as display the picture at the top with properties below it. With the navigation and the topic pages created, you are well on your way to designing a complete product catalog suitable for public consumption.
More Info: Cross-site publishing
See http://technet.microsoft.com/en-us/library/jj635883.aspx for an overview on cross-site publishing in SharePoint Server 2013.
Planning and configuring content deployment
Content deployment is broadly defined, but in the context of WCM, this section focuses on cross-site publication, a new feature in SharePoint 2013, and Web Parts such as the Content Search Web Part that you can use to show content from the search index. Cross-site content deployment allows for publishing of site content across sites, site collections, and even farms. This varies from content deployment in SharePoint 2010 in which the entire site had to be deployed using the built-in SharePoint 2010 functionality.
The Content Search Web Part (CSWP) can show content from the search index, allowing content to be shown from other locations within the context of the site on which it’s located. This is much different than using the Content Query Web Part in SharePoint 2010 in that it was confined to the site collection in which it was contained. The CSWP is configured to use a result source, either built-in or created. It can also be used to show results from a published catalog. Some of the default result sources are as follows:
Documents
Pages
Pictures
Recently changed
Popular
Items related to current user
Wiki
After you choose the result source, you can restrict the returned items to the current site, the current site collection, or a URL, or you can leave it unrestricted, in which case it brings back everything from that result source. If no result source matches your needs, you can build a query from scratch. This is very similar to creating a result source. Considering this, you have a great amount of flexibility in the results that can be pulled back from the search results. An additional property of the CSWP allows for the search results to be further refined by tags. The following options are related to tags:
Don’t restrict by tag
Restrict by navigation term of current page
Restrict by current and sub-page navigation terms
Restrict on this tag
Restricting by tags can provide many options, such as putting on a page that shows a particular wiki item. The CSWP could show videos related to the tag across a number of site collections and even different farms.
The CSWP also uses display templates, allowing for customization of how the results are displayed. The display templates are configured similarly across the SharePoint environment. This is essentially modifying HTML and JavaScript.
More Info: Content Search Web Part
See http://msdn.microsoft.com/en-us/library/jj163789(v=office.15) for more information about the CSWP.
Traditional content deployment is still supported and is similar in function to the way it was in SharePoint 2010. The improvements in SharePoint 2013 involve a feature that determines whether a site collection can be deployed. Certain features must be removed before a site collection can be deployed via the built-in content deployment. If you try to deploy a site collection, you probably can’t see any site collections to deploy by default because a feature at the site collection level needs to be activated. To prepare a site collection for deployment, follow these steps:
Navigate to Site Settings as a site collection administrator.
Click Site Collection Features in the Site Collection Administration section.
Click the Activate button next to the Content Deployment Source Feature feature.
Exam Tip
The Content Deployment Source Feature is new in SharePoint 2013 and, like anything new, will receive special attention on the exam. Be aware of the feature and what it accomplishes as well how to disable features that prohibit content deployment.
When the Content Deployment Source Feature is activated, you can check whether the site collection is ready for content deployment. SharePoint 2013 lists items that prevent a site collection from being deployed. To find this list, follow these steps:
Navigate to Site Settings as a site collection administrator.
Click Content Deployment Source Status in the Site Collection Administration section. The Content Deployment Source Status page displays all features that you need to deactivate before content deployment is supported.
By default, a normal publishing site requires that quite a few features be deactivated before it can be deployed. Some of these can be deactivated by clicking the Deactivate link on the Content Deployment Source Status page. Some features are hidden and need to be deactivated by using PowerShell. The list might be very long and require that a lot of features be turned off. Some site templates, such as the Community Site, aren’t even supported. The PowerShell command for deactivating features is as follows:
Disable-SPFeature –Identity <name of feature> –url <URL of site collection or site>
When the unsupported features are disabled, the site is ready for deployment. However, the farm receiving the content must be configured to receive content. By default, a SharePoint 2013 farm is set up to reject any incoming content deployment jobs. To receive content deployment jobs, the SharePoint farm can be configured as follows:
On the destination server, navigate to Central Administration with an account that has administrator rights and click General Application Settings.
Click Configure Content Deployment in the Content Deployment section.
On the Content Deployment Settings page, select Accept Incoming Content Deployment Jobs.
Choose the import server to receive the incoming deployment jobs in the Import Server section. Make sure that the incoming server has enough disk space to handle the incoming jobs.
Optionally, specify the export server by selecting it in the Export Server section if it will be deploying content deployment jobs.
Choose whether https is required in the Connection Security section.
Choose whether to check for source status errors in the Source Status Check section.
Select a location for the temporary files involved in receiving content in the Temporary Files section. This drive location needs to have enough space to store the entire site collection being deployed.
In the Reporting section, choose how many reports to retain, and then click OK to save changes.
After the receiving SharePoint farm is configured to accept content deployment jobs from the deploying SharePoint farm, you can configure content deployment paths in Central Administration. The process involves creating a path for the content to be deployed and a job that determines how often the content will be deployed. To create a content deployment path, follow these steps:
Navigate to Central Administration and click Configure Content Deployment Paths And Jobs in the General Application Settings section.
On the Manage Content Deployment Paths And Jobs page, click New Path.
On the Create Content Deployment Path page, enter a name and description in the Name and Description settings.
Select the source web application and then the source site collection in the Source Web Application And Site Collection section.
Type the URL of the destination Central Administration server in the Destination Central Administration Web Application section.
Choose the authentication method, and then enter a user name and password that has Central Administration rights on the destination server in the Authentication Information section.
Choose the destination web application and the destination site collection in the Destination Web Application And Site Collection section.
Choose whether to deploy user names in the User Names section.
Choose what security information to deploy (All, Role Definitions Only, or None) in the Security Information section, and then click OK to save changes.
Important: Deploying content deployment using HTTP
Communications over the http protocol (instead of https) can be intercepted by malicious users. Use https if the content being deployed is sensitive in nature.
After the path is established, you can set up a job that runs on a specified schedule or on demand. The Manage Content Deployment Path And Jobs page shows the newly created path. Hovering over the name of the path and clicking it reveals options to Test Job, Run Now, and edit the Quick Deploy Settings. Follow these steps to configure the Quick Deploy Job settings after you choose the Quick Deploy Settings for the content deployment path:
In the Allow Quick Deploy Jobs section, choose whether to allow Quick Deploy Jobs.
Choose whether to use SQL Snapshots.
Select the content deployment schedule in the Quick Deploy Schedule section. The range is from 10 minutes up to 60 minutes.
Choose the users who can designate pages for Quick Deploy Jobs in the Users section.
In the Notification section, choose whether to send email when content deployment succeeds and/or fails and provide the email address to send the notifications to.
Click OK to save changes.
The content deployment job is now configured. To test the job to ensure that it works, choose Test Job in the content deployment path. The first time you deploy the job, choose Run Now. The first deployment can potentially take a while, depending on the size of the site collection. After the initial deployment, only changes are deployed, greatly increasing the speed of deployment.
Planning and configuring variations
Variations are used to target a person’s preferred language based on their browser settings. For example, with variations, SharePoint can target a page for English speakers, another one for French speakers, and a third one for Japanese speakers. SharePoint would automatically route a person to the preferred page based on the preferred language of the browser being used. SharePoint 2013 also can do machine translation, using an external service to automatically translate content. This is a powerful new feature but, as with any translation service, reviewing the finished product is necessary to ensure accuracy.
Setting up variations is done at the site collection level. After variations are configured and labels are created, content is copied selectively from the source site to the language-specific sites. For variations to be used, you should start by configuring the variation settings:
Navigate to the Site Settings page with a site collection administrator account.
Click Variations Settings in the Site Collection Administration section on the Site Settings page. (This link is also accessible from the Variations Labels page.)
In the Site, List, And Page Creation Behavior section, choose Create Everywhere or Create Selectively, depending on the desired result whenever a site, list, or page is created.
In the Recreate Deleted Target Page section, choose whether to re-create a new target page whenever a source page is republished.
Choose whether to update any Web Part changes when the variation source page is propagated (Web Part changes are treated independently of page content).
Choose whether to send email notifications when a new site or page is created or updated by the variation system.
Click OK to save changes.
After setting the variation settings, you can configure the labels. Labels represent individual variations (languages) that will be created. Labels typically represent individual languages, such as French, German, Chinese, Japanese, and so on. Language packs can be used with variations but aren’t required. Language packs provide translations for the SharePoint menu and ribbon items but don’t translate the user-provided content.
More Info: Downloading language packs
You can download language packs for SharePoint 2013 at http://www.microsoft.com/en-us/download/details.aspx?id=35492.
You can add language packs at any time, but because they require some downtime of the SharePoint server, installing them at the beginning is best. Adding language packs also gives users an interface in the language they prefer, encouraging use and contribution.
The next step in using variations is to create labels. Labels—also created at the site collection level—determine the sites created by SharePoint. Sites created based on label are created beneath the source site automatically. The first label to be created is the source variation label from which other variations receive published content based on the individual label settings selected. To create labels after the initial label, follow these steps, using an account that has site collection administrator permissions:
Click Variation Labels in the Site Collection Administration section of the Site Settings page.
Click New Label on the Variations Labels page.
Select the site template language from the drop-down list in the Language section. This doesn’t have to match the language of the variation.
Choose the locale from the drop-down list in the Locale section. This is the value used to redirect the browser based on the browser’s language settings.
Click Continue.
On the Target Label page, type the URL appended to the source site in the Label Name box and an optional description in the Description text box.
Type a user-friendly and locale-appropriate display name in the Display Name text box.
In the Hierarchy Creation section, choose what types of content should be copied from the source site and click Continue.
On the Translation Options page, choose whether to allow human translation in the Create Translation Package section. This allows users to export content to an XLIFF file for human translation.
In the Machine Translation section, choose whether to allow machine translation (which needs to be configured in Central Administration before it’s available on the page) and click Continue.
On the Target Label Behavior page, choose whether users manually sync updates from source variation pages or whether the operation is automatic. Also, in the Label Contact section, enter an email address to which notification is sent whenever variation content is created.
Click Continue to review the label settings on the Review Label Settings page, and then click Finish to save the changes.
Note: Creating a source variation
The first label created is the source variation. The process for creating this label is similar to creating other labels, except that a template (Publishing Site or Publishing Site with Workflows) needs to be chosen that won’t have the translation options or the target label behavior options. This varies from which content is copied from to other variations (and possibly translated).
You can continue to create labels for all the variations that you want. After you finish creating them, return to the Variation Labels page and click Create Hierarchies. The variations won’t be available right away; they are created with timer jobs and will be ready to use soon, depending on the resources available. You can check the status on the Variations Labels page. This page shows other information—such as locale, language, and whether it’s the source—about all the labels created and allows them to be edited.
One great new function of SharePoint 2013 is the ability to support the automatic translation of content. Referred to as Machine Translation, it’s configured in Central Administration similarly to other service applications. The Machine Translation service application requires a connection to the service providing the translation. After the Machine Translation service application is created, it needs to be configured, as follows:
Using an account that’s a member of the Farm Administrators group, navigate to Central Administration and click Manage Service Applications in the Application Management section.
On the Manage Service Applications page, click the Machine Translation Service link (or whatever the machine translation service was named).
Specify which file extensions are to be excluded by clearing the box next to the extension in the Enabled File Extensions section.
Set the file limit size in kilobytes for binary files (such as Microsoft Word documents) and text files (such as HTML, .txt, and .xlf files) in the Item Size Limits section. Then set the maximum number of characters in Word documents allowed for the Maximum Character Count For Microsoft Word Documents setting.
In the Translation Process section, set the number of simultaneous processes that can run at the same time. These processes consume resources, so be careful not to set the value too high; also, be sure to monitor resource usage.
In the Translation Throughput section, set the frequency (in minutes) at which translations start in the Frequency In Which To Start Translations text box. Also, set the number of translation to start per translation process in the Number Of Translations To Start text box.
Set the maximum number of translation attempts in the Maximum Translation Attempts section.
In the Maximum Synchronous Translation Requests section, set the number of maximum translation requests per server (that’s running the Machine Translation service) that can be run at one time.
In the Translation Quota section, indicate the maximum number of translation requests that can occur in a 24-hour period (or set it to unlimited). This can be done overall and per site subscription.
In the Recycle Threshold section, determine the number of documents to translate before the Machine Translation service restarts.
In the Office 97-2003 Document Scanning section, choose whether to disable Microsoft Office 97-2003 documents, and then click OK to save changes.
Note: Restarting the Machine Translation service
Many of the options in the Machine Translation service application require that the service be restarted manually to take effect. Doing this is recommended after you make any configuration changes and/or if site collections are having problems connecting to the Machine Translation service.
You need to consider many options when configuring machine translation. Depending on the amount of translation required, specifying a server (or two) as the designated translation server might be beneficial. Only those servers with the Machine Translation service started on them can process translation requests.
Translation services have come a long way in a short time, but that doesn’t preclude checking the translated data for accuracy. Another way to address this is to set up a link for end users to report errors in translation.
Exam Tip
Because machine translation is an important and powerful new feature in SharePoint 2013, you can expect it to be covered on the exam. Possible questions include using it as a step in setting up a WCM site as well as a possible short-answer question. Knowledge of how it fits in with variations is also to be expected.
Objective summary
You can configure channels to deliver specific branding to multiple devices.
You can use product catalogs to provide list information across sites and site collections as well as to filter products specific to individual languages.
The Content Search Web Part can be used to deliver targeted search results from across multiple sites, site collections, and even other farms.
Content deployment has been made easier using the feature Content Deployment Source Feature and the Content Deployment Source Status page.
Variations enable automatic publishing of content—and potentially automatic translation—for language-specific sites.
Using Machine Translation services to enable the automatic translation of content in variations greatly reduces the amount of manual effort.
Objective review
Answer the following questions to test your knowledge of the information in this objective. You can find the answers to these questions and explanations of why each answer choice is correct or incorrect in the “Answers” section at the end of this chapter.
As an administrator of a WCM site collection, you want to use different master pages for different devices. Channels can be used to target custom master pages to which of the following devices?
A particular operating system that runs on smartphones
Tablets
Desktop running a specific operating system
All of the above
A product catalog is consumed by another site collection. What does the product catalog use for navigation of the catalog items?
Term set
Views
List Filter
Quick Launch
You’ve created a community site by using the Community Site template. What must you do for the community site to be deployed to another SharePoint farm?
Activate the feature Content Deployment Source Feature on the community site.
Disable the features on the Content Deployment Source Status page.
Nothing. The Community Site template doesn’t support content deployment and therefore can’t be deployed using out-of-the-box OTB SharePoint.
Both A and B.
You’ve decided to create variations to support the publishing content in a worldwide deployment across many languages. What built-in SharePoint functionality would you implement to translate content with minimal human effort?
Machine Translation service application
Nothing, because variations are automatically translated in SharePoint 2013
Enable variation labels
Export XLIFF files for translation
Objective 2.4: Plan an Enterprise Content Management (ECM) workload
Enterprise Content Management covers a wide variety of topics, but basically this objective is concerned with functions at the farm level that affect sites and site collections across several site collections. These functions involve dealing with records, configuring routing, using eDiscovery, and archiving items into repositories.
Planning and configuring eDiscovery
eDiscovery is generally referred to how litigators and records managers discover content in an electronic format. This involves searching through documents, emails, and websites across a wide variety of sources so that the content can meet the criteria for a legal case. SharePoint 2010 introduced the concept of putting a hold on an item such as a document, list item, or page so that no further modifications could be placed on it (nor could the item be deleted). Exchange 2010 also introduced a way to put legal holds on mailboxes so that a thorough search could be made on them without any content being modified or deleted. SharePoint 2013 works with Microsoft Exchange to establish an eDiscovery solution. The tasks involved with setting up eDiscovery in SharePoint 2013 involve the following:
If content is to be discovered in Exchange using a SharePoint eDiscovery center, Exchange Server 2013 must be running. To discover content in the Exchange Server instance, make sure the following steps have been performed:
Ensure that the Exchange Web Service managed API is running on all the Web Front Ends (WFEs) that are running SharePoint 2013.
Configure a trust relationship between the SharePoint 2013 servers and the Exchange Server instance.
If content from Lync Server 2013 is to be discoverable, make sure that it’s set up to archive to Exchange Server.
Perform the eDiscovery configuration steps for Exchange Server.
More Info: Configuring Exchange Server for eDiscovery
See http://technet.microsoft.com/en-us/library/jj218665(v=exchg.150) for more information on how to configure Exchange Server for SharePoint eDiscovery Center.
Content can be discoverable only if it’s crawled and indexed by the Search service application associated with the eDiscovery center. If Exchange content is to be searched, it must be crawled as part of result source. Also, all sites and libraries within the sites must be made searchable for the eDiscovery center to be able to discover them.
Everything that needs to be searched must be accessible by the users involved in the eDiscovery. The recommended way to provide permissions is to create a security group of all concerned individuals and then grant permissions at the web application level. This is done by creating a user policy with full read (because you don’t want the records modified) for each web application involved in the discovery process. Changing or adding a policy at the web application level starts a recrawl of the content contained with the web application, precluding the need to manually start a new crawl. Finally, the security group needs permissions to view the search crawl log. This is done using PowerShell.
More Info: Setting permissions on the search crawl log
See http://technet.microsoft.com/en-us/library/jj219817.aspx for more information on how to use the PowerShell command Set-SPEnterpriseSearchCrawlLogReadPermission to set permissions on the search crawl log.
After permissions are established and any Exchange Server permissions and crawls are set up, an eDiscovery center needs to be created. This center is a site collection that allows user to create and manage eDiscovery cases. The eDiscovery template requires that claims be used in the web application in which the center resides. It’s created similarly to other site collections in Central Administration, using the eDiscovery template that resides in the Enterprise section.
Important: Permissions required for eDiscovery
If you’re not going to use policies, make sure the eDiscovery security group is made a site collection administrator on each site collection in which discovery is to be done. Also, if you are discovering content on Exchange, the security group needs access to the Exchange Server mailboxes.
After an eDiscovery site is created, you need to create a new case before you can start eDiscovery. Follow these steps:
On the home page of the eDiscovery site collection and with site collection administrator privileges, click Create A New Case.
Type a title and description in the Title And Description section.
In the Web Site Address section, enter a URL-friendly name for the site.
In the Template Selection section, choose the only template available—the eDiscovery Case template.
In the Permissions section, leave Use Same Permissions As Parent Site selected unless you have an overriding need to change it.
In the Navigation And Navigation Inheritance section, leave the defaults and click Create to start the creation process.
The site that’s created has two major sections: one for Identify and Hold and one for Search and Export. The exam doesn’t cover the end-user experience, so this book won’t cover how to use these functions in detail, but seeing how these functions work is a worthwhile exercise to get a better understanding of how to plan for an eDiscovery site.
The ability to do in-place holds is a new feature in SharePoint Server 2013 that deserves some attention. It allows for items in SharePoint and Exchange Server to stay in place so that users can continue to work with them, but a copy of the content at the time the hold is placed is kept. This is in contrast to SharePoint 2010, which wouldn’t allow content that had a hold on it to be modified or deleted. Now, an end user doesn’t even have to know that the content is being held. An in-place hold occurs at the site level, and a preservation hold library is created that stores copies of any content modified or deleted after the hold is placed. If multiple in-place holds are established, the content could appear more than once in the preservation library.
More Info: eDiscovery and in-place holds
See http://technet.microsoft.com/en-us/library/fp161516(office.15).aspx#in_place_holds for an overview of eDiscovery and in-place holds in SharePoint Server 2013.
Exam Tip
eDiscovery is a high-visibility feature that represents a very task-specific technology set. The ability to do in-place holds is an important concept. Expect at least one question about it on the exam. It’s not a highly used feature because it addresses a niche market, but understanding the general workings of it is still important.
Planning and configuring record management
SharePoint Server 2013 includes a powerful set of features for managing records. Because of the very nature of records, setting up a record-management solution requires a considerable amount of planning. A record is generally considered a piece of evidence that an organization performed an activity or transaction. In SharePoint, a record is considered active until it’s declared a record and can then be modified only if it meets certain policy requirements. You can make an item go from active to record in several ways:
Manually declare an item as a record.
Use a workflow to send a document to the record center.
Define a policy that either declares an item a record or routes it to the record center.
Use custom code based on the SharePoint object model to declare an item a record or route it to the record center.
Records generally have some sort of legal and/or archival nature to them, which means that as soon as an item becomes a record, it shouldn’t be altered (or if it is, the alteration is recorded) and should have a retention period as part of it. The retention period determines how long the record should remain with the record management system. When planning for a record-management system, you need to consider the following:
What should be considered a record
The process of declaring an item a record and how it should be treated at that point
How legal, regulatory, and business requirements affect records
Retention policies for different record types
What to do with expired records
What types of records are managed
Whether record declaration should be voluntary or mandatory
Record management typically isn’t a single solution for most organizations. Various types of records could exist, such as print, audio, video, and even physical items such as art. Although the exam focuses on SharePoint-specific solutions, including these other types in your overall plan is a beneficial exercise. You would first categorize the types of records that you need to manage and the details associated with them, such as kind of record, category, description, media, retention period, disposition, and a contact of the person(s) who oversees the records.
More Info: Planning for record management
See http://go.microsoft.com/fwlink/p/?LinkID=179987&clcid=0x409 for an Excel worksheet to help plan for record management.
SharePoint 2013 has all the record-management features that existed in SharePoint 2010, plus the following additional capabilities:
Site retention
Site mailbox
Record management in the cloud
Site retention is where the entire site is essentially treated as a record. In SharePoint 2013, a site can be “closed,” which means that it’s ignored by navigation and search crawls but can still be accessed via its URL. Closure of a site doesn’t prevent its use; closure just makes the site harder to get to. Closure of a site collection, however, can make the site collection and all subsites read-only depending on the policy chosen.
Site closure is enabled via Site Policy, a site collection feature that must be enabled before site collection policies can be implemented. After you activate this feature, you can implement a site collection closure policy by following these steps:
Navigate to Site Settings at the site collection level (even policies applied to just a site are created at the site collection level), with a site collection administrator account.
Click Site Policies in the Site Collection Administrator section.
On the Site Policies page, click Create.
Enter a name and description for the policy in the Name And Description section.
Choose how to handle site deletion and closure (automatic or manual) in the Site Closure And Deletion section. Choosing one of the automatic options requires entering times—in days, months, or years—in which the deletion and/or closure should happen.
In the Site Collection Closure section, choose whether to make the site collection and all subsites read-only.
Click OK to create the policy.
After the policy is created, you can apply it at the site or site collection level for deletion policies and at the site collection level for closure policies. To apply site policies, click Site Closure And Deletion in the Site Administration section on the Site Settings page. You also can choose to close the site immediately if manual closure is desired.
Site mailboxes are integrated between Exchange Server 2013 and SharePoint Server 2013. In the past, documents and emails were usually kept into two distinct repositories. Site mailboxes use shared storage in both the Exchange and SharePoint spaces to provide end users a single place to access emails and related documents. Now emails can be dragged directly from Microsoft Outlook into SharePoint and can be treated as records, just like regular documents residing in SharePoint. Configuration of site mailboxes is required on both the Exchange Server side as well as the SharePoint side. Knowing how to set up site mailboxes in detail isn’t required for the exam, but general knowledge of what is required might be. The following items are required in addition to SharePoint Server 2013:
Exchange Server 2013
Exchange Web Services API 2.0—and only version 2.0—installed on each WFE
A mutual trust between Exchange Server 2013 and SharePoint Server 2013
That the User Profile Synchronization service is configured on the SharePoint farm
That the App Management service application is configured on the SharePoint farm
That Secure Sockets Layer (SSL) is configured for the default zone on the SharePoint farm
More Info: Configuring site mailboxes
See http://technet.microsoft.com/en-us/library/jj552524(office.15).aspx for more information on configuring site mailboxes in SharePoint Server 2013.
Site mailboxes should be configured and maintained on the SharePoint side. The lifecycle application can be used to automatically close and delete site mailboxes, giving users the chance to keep them open if needed. When a site mailbox is closed by the lifecycle application, it’s retained for a period of time specified by the lifecycle policy. You should delete mailboxes only via the SharePoint interface, because deleting them on the Exchange Server instance causes orphans on the SharePoint server. On the Exchange Server side, only the mailbox size and the maximum size of an individual email can be set. These are set with PowerShell commands on the Exchange Server node.
Important: Disaster recovery considerations for site mailboxes
Emails that are part of a site mailbox aren’t backed up as part of the usual SharePoint backup. The emails need to be backed up on the Exchange Server side.
Exam Tip
Although SharePoint 2013 now supports record management in the cloud, it’s unlikely to be on the exam. Advanced solutions are geared toward on-premises solutions and often involve many connected servers. The 70-331 exam, “Core Solutions of SharePoint Server 2013,” covers the cloud in more detail.
A record center is a site that you can create anywhere inside a SharePoint environment by using the Records Center template. The key components of the record center are the Drop Off Library and the Record Library. Documents sent to the Drop Off Library (via routing or uploading or code) are processed and then sent to the proper record folder (such as the Record Library or similar library) depending on the document’s properties. This is known as document routing. Drop Off Libraries don’t just exist in record centers, but in other site templates as well, and they can be used to route documents. The Drop Off Library requires the site level feature Content Organizer to be activated (the default in a record center). This enables the two site settings pages located under the following Site Collection Administration settings, which need to be configured before document routing can occur:
Content Organizer Settings
Content Organizer Rules
You need to consider a number of settings when planning for a record center or for sites using the Content Organizer:
Redirect Users To The Drop Off Library. Indicates whether users who are trying to upload a document to a library in the site are redirected to the Drop Off Library. Enabling this setting allows for the Drop Off Library to be the sole source for determining which library receives the record and therefore centralizing the location for rules.
Sending to Another Site. Allows documents to be sent to another site or site collection if that location has the Content Organizer feature turned on. Using this setting is useful if you want to create a central record management hub.
Folder Partitioning. Enables records to be split into folders after a certain limit is reached. Lowering the number of items per folder increases the display speed of the items in the browser.
Duplicate Submissions. Allows records with the same name to either be appended or added with an additional unique character at the end.
Preserving Context. Allows the original audit log and properties of the submitted content to be saved in an audit entry.
Another available option enables you to email role managers if a submission doesn’t match a rule and/or when content has been left in the Drop Off Library. This allows for unattended monitoring of record activity. Also, a submission point enables other sites or email-messaging software to send content to this site (it’s always the site URL followed by /_vti_bin/OfficialFile.asmx).
Modifying the content organizer settings gets you ready to create rules. Content organizer rules route documents to the appropriate locations based on content types and property rules. To create a rule, follow these steps, using an account that has Full control:
Click Content Organizer Rules on the Site Settings page in the Site Administration section.
Click New Item on the Content Organizer Rules page.
Type a name that describes the rule in the Name text box.
In the Rule Status and Priority section, choose whether the rule is active and what priority it has. If an item matches several rules, the one with the highest priority is applied.
In the Submission’s Content Type section, choose the content type that the rule is to run on. You can also enter alternate names for the content type if it’s coming from other sites.
Note: Using wildcard characters
Adding a rule with the * makes the rule run for all items that don’t match another rule. Generally, you want to create as many record libraries as you think you will need before you start to create rules so that documents don’t get stuck in the Drop Off Library or in a document library specified by the * wildcard character.
In the Conditions section, add one or more property rules (for example, Department=Financial) to be used for rule matching.
In the Target Location section, choose the library or list to which the item will be routed. This section also includes an option to create folders based on unique properties—for example, for a Word document library that had a department property, folders would be created for each department that submitted records.
Click OK to create the rule.
Planning and configuring record disposition and retention
After an item is declared a record, you need to consider how long to retain it and how to dispose of it after it’s no longer required for business or legal reasons. (The term “dispose of” is used here because it might not actually be deleted.) Retention plans are typically centered on the business and legal requirements for keeping documents around. The two main factors involved are disk space requirements and disaster recovery concerns.
Disposition involves several options. The most efficient is automatic deletion. For example, if a record has been around for seven years, it’s deleted automatically. In this case, it would happen without user interaction and if, for some reason, a record was declared accidentally, it would be deleted without notice. Another method of disposition is to have automatic deletion with holds. In this case, a record would be deleted automatically unless a hold had been placed on it. The hold would be extended past the time for automatic deletion for a predefined period of time. Also, records might require human interaction and review before they are deleted. This disposition method is the safest (that is, least risky) but requires the most time and effort.
Site retention policies were discussed in the preceding section. A site itself can now have a deletion as well as a closure schedule. The policies associated with items within a site collection are defined at the site content level by default. To define a policy for site content, follow these steps:
Navigate to the Site Settings page of the site collection and click Site Content Types in the Web Designer Galleries section.
On the Site Content Types page, choose the site content type on which to apply a retention policy.
On the Site Content Type settings page, click Information Management Policy Settings in the Settings section.
Type a name and description in the Name And Administrative Description section.
Type a policy statement describing what policies to apply and why in the Policy Statement section.
In the Retention section, select the Enable Retention check box to display the retention options.
In the Non-Records section, click Add A Retention Stage.
In the Stage Properties sheet, specify what causes the stage to activate (amount of time or custom retention formula) and what action to take as soon as the stage is activated (move to recycle bin, permanently delete, declare a record, move to a new location, and so forth).
Choose whether to force the stage to recur after a certain period of time and then click OK to save the stage.
You can add more retention stages and choose whether you want to apply the same retention policy after it’s declared a record. If a different stage is required for records of this content type, the stage(s) must be defined at this time.
Optionally, define Auditing, Barcodes, and Labels on this page. Then click OK to save changes.
You can override content type retention policies at the document library and list level. Overriding requires that the site collection level’s Library and Folder–based retention is activated. After this is done, go to the library or list settings and then click Information Management Policy Settings. On the Information Management Policy Settings page, click the content type if more than one is associated with the list/library. On the Edit Policy page, enable retention as you would for a content type and then enter the appropriate retention schedule.
Planning large document repositories
With record management and eDiscovery, you need to plan for large document repositories. The definition of “large” is subject to debate, but you can take some steps to ensure that your SharePoint environment is responsive. The best way to determine the system’s capabilities is to do some load testing, which helps determine the number and type of servers necessary to achieve the capabilities demanded by your business needs. Some of the tests that you can perform are as follows:
Time required to upload a document
Time required to update a document’s properties
Time required to route a document based on a workflow or policy
Time required to download a document
Time required to display a view of a document library
Time required to return data with the Content Query Web Part such as highest rated, newest, or most recently modified
Time required to query the repository based on document properties
Time required to crawl the content
After you come up with a test that represents what the end user will experience and the load that will be placed on the servers, you can load the servers with test data to see whether the performance is what you expect. As with any test scenario, representing the load presented by real-life situations is difficult, but it can at least help you determine the hardware requirements.
One item that can decrease performance is the number of items in an individual document library or list. Although SharePoint can support lists/libraries containing tens of millions of items, performance degradation occurs, especially for the SQL Server node that contains the items. You need to test performance on the individual hardware and software that you expect to use, but CPU usage and memory are two items that need to be monitored.
The number of documents contained within a content database can also affect document uploading performance. A large part of this degradation can be mitigated with proper database maintenance. Most databases are set up to grow by a percentage so that when a 100 GB database, for example, needs to grow 10 percent, it must grow by 10 GB, but when it’s a terabyte in size, it must grow by 100 GB. Obviously, growing a database by 10 GB would require a lot less time than growing it by 100 GB. Other maintenance tasks, such as keeping the index up to date as well as keeping a fresh set of statistics, helps improve performance.
Because most of the work involved with large document repositories is placed on the SQL Server nodes, you can achieve only a certain amount of performance increase by adding more WFEs. Each situation is different, but generally after two WFEs, the performance gain is minimal. Even during bulk uploads, the SQL Server node becomes the bottleneck. Data being sent to the SQL Server instance needs to be written to disk, and the speed at which this occurs depends on the input/output speed of the disks more than any other factor.
SharePoint sites tend to continue to grow, and planning for space to contain all this growth comes under capacity planning. Although document libraries and lists can contain millions of items, you might not want all that data in a single content database. Extremely large databases require a long time to back up and even longer to restore if something happens to them. Most organizations strive to find an effective setup that minimizes the number of databases and maximizes performance. Such a setup depends on a multitude of variables, including hardware, software, number of servers, network performance, and the business needs. You need to take care of capacity planning early on to handle the growth of large repositories so that the budget, space, and technical expertise can be available to meet the demand.
More Info: Capacity planning
See http://technet.microsoft.com/en-us/library/ff758645.aspx for more information on capacity planning for SharePoint Server 2013.
Objective summary
eDiscovery centers can be used to manage eDiscovery as long as the proper permissions are configured.
Site closure enables site collections to be made read-only, and SharePoint treats the site as though it doesn’t exist.
Site mailboxes enable emails and documents to be stored together.
Record management can occur on documents, list items, emails, and even sites.
The full life cycle of records (creation, retention, and disposition) need to be taken into account when planning a record management system.
Planning for large document repositories requires load balancing to determine the correct number and types of servers as well as storage requirements.
Objective review
Answer the following questions to test your knowledge of the information in this objective. You can find the answers to these questions and explanations of why each answer choice is correct or incorrect in the “Answers” section at the end of this chapter.
Permissions are a very important part of setting up an eDiscovery center. What rights do the people doing discovery on a set of site collections and Exchange mailboxes need?
Site collection administrator rights on all site collection involved in the discovery
Rights on the Exchange Server mailboxes being discovered
Just being a site collection administrator on the eDiscovery site collection gives a user all the rights necessary
Both A and B
You need to implement site mailboxes in your SharePoint ECM solution. On which of the following servers does this requires configuration?
All SharePoint WFEs
All SharePoint servers
All SharePoint WFEs and Exchange Server 2013 nodes
No server configuration is required
Which of the following items wouldn’t be considered a record?
Item in a list
Document library
Word document
Email
When creating a retention schedule in SharePoint, you can choose to retain an item for a period of time. The amount of time specified can be in increments of all the following except which?
Hours
Days
Months
Years
Chapter summary
Community sites use points and badges to reward users for contributing content.
The User Profile service relies on the Forefront Identity Manager to synchronize user profile data.
On-premises SkyDrive storage (SkyDrive Pro) for individuals is kept in their personal site collections.
Users can now follow people, documents, and sites so they can keep track of related activity and be notified of suggested sites on their newsfeed.
Search can be configured to display search result differently, based on the type of content returned and the properties associated with the item.
Continuous crawling allows for recently added items to appear in search result within seconds of being added.
Channels allow SharePoint content to be displayed differently, depending on the target device.
eDiscovery allows in-place holds on content, allowing users to continue modifying content during the eDiscovery process.
Answers
This section contains the solutions to the thought experiments and answers to the lesson review questions in this chapter.
Objective 2.1: Thought experiment
In this thought experiment, you were presented with two main questions: How many content databases are required for My Sites? What is the best way to increase performance for the activity feeds?
You can answer the first question with some simple math, based on an assumption that no content database should be larger than 200 GB. Because each user is allowed 1 GB of space, you can assume 200 users per content database. This means 25 content databases for the My Sites, thus allowing for users to fully use their allotted space without moving site collections from one database to another.
The second question is concerned with activity feed performance. The best way to increase activity feed performance is to have a dedicated Distributed Cache server, a SharePoint 2013 server that runs only the Distributed Cache service. The other option is to have collated servers running the Distributed Cache service with every non-essential SharePoint service turned off. This gives the Distributed Cache service as much memory as possible, allowing for the fastest retrieval of activity feed data.
Objective 2.1: Review
Correct answer: B
Incorrect: The number of gifted badges is limited to one
Correct: Only one badge is allowed at a time.
Incorrect: Three is an erroneous number.
Incorrect: Five is the number of levels on earned badges but has no relation to gifted badges.
Correct answer: C
Incorrect: 10 MB isn’t the default in SharePoint 2013 for a web application.
Incorrect: 50 MB was the default in SharePoint 2010.
Correct: 250 MB is the default in SharePoint Server 2013.
Incorrect: 1 GB isn’t the default limit.
Correct answer: A
Correct: AD permission-level changes are made on domain controllers, using the Active Directory and Users tool.
Incorrect: Because SQL Server doesn’t communicate directly to Active Directory during the synchronization process, it doesn’t need enhanced permissions.
Incorrect: SharePoint servers shouldn’t be domain controllers and therefore don’t have the necessary tools.
Incorrect: The SharePoint server doesn’t matter. Because none of them should be domain controllers, the permissions can’t be given on those servers.
Correct answer: C
Incorrect: Forms-based authentication isn’t native to the Windows environment, so it needs a trusted provider.
Incorrect: Claims can come from a wide variety of different sources, so a trusted provider is needed.
Correct: Windows-based authentication is the only authentication method that doesn’t require a trusted provider.
Incorrect: Because C is the only correct answer, D isn’t a valid answer.
Correct answer: D
Incorrect: The number of users that can be followed can be limited. The default is 1,000, but it’s not the only correct answer.
Incorrect: The number of documents that can be followed can be limited. The default is 500, but it’s not the only correct answer.
Incorrect: The number of sites that can be followed can be limited. The default is 500, but it’s not the only correct answer.
Correct: The number of people followed, number of documents followed, and number of sites followed can all be limited at the farm level for users.
Objective 2.2: Thought experiment
In this scenario, you were asked how you would customize the search results for when a user entered the name of the CEO in the people results search box. This requires three steps:
You need to create a query rule with a context of local people results. This distinguishes when a user is looking for people results as opposed to a general search.
You need to create a display template, which enables you to customize how the results look for a particular item (in this case, the name of the CEO).
You need to create a result type so that the customized display template is displayed.
These three steps enable you to display the required results in the desired format.
Objective 2.2: Review
Correct answer: B
Incorrect: This is better than making it a first or second level authoritative site, but it’s not the best answer.
Correct: Making a site a non-authoritative site would push it down to the bottom of the search results.
Incorrect: This would completely remove the site from the search results, which isn’t the stated objective.
Incorrect: Although removing the site from the authoritative sites would lower them compared to other authoritative sites, the results wouldn’t be pushed to the bottom.
Correct answer: D
Incorrect: SharePoint sites are the default for a results source but serve as only one of many result sources available.
Incorrect: Exchange Server is an available results source when the Exchange Web Services Managed API is installed on the SharePoint Search server. However, it’s just one of several sources available.
Incorrect: Although OpenSearch 1.0/1.1 is an available source of search results, it’s just one of several options available.
Correct: All the previous options are valid result sources.
Correct answer: C
Incorrect: Making all the crawled properties within a category searchable is one of the options available on the Edit Category page.
Incorrect: Delete all unmapped crawled properties is a button on the Edit Category page.
Correct: Making all crawled properties refinable isn’t an option available on the Edit Category page.
Incorrect: Mapping all string properties in this category to Content managed properties is an option on the Edit Category page.
Correct answer: B
Incorrect: The thesaurus is used to expand the results returned but doesn’t have anything to do with refiners other than increasing the result set they can be pulled from.
Correct: Entity extractors are used to create refiners based on word or phrases that are typed in the search box.
Incorrect: Query suggestions appear as a user types in the search box, whereas refiners are shown after the results are returned and used to narrow the results.
Incorrect: Search analytics can be used to determine whether refiners would be useful, but they don’t create refiners.
Correct answer: D
Incorrect: A query rule could be used to promote an item and/or expand a result set, but in this case it’s not necessary.
Incorrect: A result source is used to define subsets of the crawled content.
Incorrect: The new content type isn’t required because the one being used in the question has already been created, and another one couldn’t be used to display the new template.
Correct: The result type helps determine when a certain display template should be used.
Objective 2.3: Thought experiment
In this scenario, you were presented with a single main question: What is the best solution for providing consistent list content across multiple sites and site collection, both internally and externally? The answer is a product catalog site collection that enables a product catalog to be published across sites, site collections, and even SharePoint farms.
Because the content is to be shared internally and externally (meaning the Internet), a product catalog makes the most sense. A product catalog enables the consuming of content from a wide variety of sites and site collections, enabling editing of content in one location and publishing that content to every source that consumes it. Product catalogs are new in SharePoint 2013 and represent a new way to distribute content across multiple sites, site collections, and even SharePoint farms.
Objective 2.3: Review
Correct answer: D
Incorrect: You can use channels to target specific operating systems on smartphones, but this is just one of the correct answers.
Incorrect: You can use channels to target tablet devices, but other answers are correct.
Incorrect: You can use channels to target operating systems that run on desktop computers, but this too is just one of the correct answers.
Correct: Channels can target specific master pages to devices and/or operating systems listed in A, B, and C.
Correct answer: A
Correct: A metadata term store set is used for navigation of the product catalog and is a required item when connecting.
Incorrect: Views can be used to limit items shown from a list but not for navigation of a product catalog.
Incorrect: List filters are used in addition to navigation and can be used to further filter a set of results.
Incorrect: Quick Launch is a manually maintained way to navigate a site. It can link to other SharePoint pages or even pages outside SharePoint, but not for the navigation of a product catalog.
Correct answer: C
Incorrect: Activating the Content Deployment Source Feature feature is the first step in preparing a site collection for deployment, but a community site isn’t supported for deployment.
Incorrect: The Content Deployment Source Status page shows the features that need to be disabled before a site collection can be deployed successfully, but the community site needs features unsupported by content deployment.
Correct: The Community Site template includes features unsupported for content deployment and therefore can’t be deployed using OTB SharePoint.
Incorrect: Although A and B are required for preparing a site collection for content deployment, they work only for site collections that support deployment.
Correct answer: A
Correct: Machine translation allows for the automatic translation of content into other languages with minimal human interaction based on the source site.
Incorrect: Variations aren’t translated automatically.
Incorrect: Labels are used to create new sites and content, but no automatic translation is done.
Incorrect: XLIFF files are exported for the purpose of human translation and therefore require a much higher degree of human interaction than machine translation.
Objective 2.4: Thought experiment
In this scenario, you were told to come up with a solution for an eDiscovery project that would cause minimal disruption to the end users allowing them to work undisturbed. You would start by creating a security group, an eDiscovery site collection, and a new case site:
Create a security group with everyone doing eDiscovery in it, and then create a user policy for the security group that had read rights to all sites involved in the eDiscovery.
Create an eDiscovery site collection, making the security group site collection administrators.
Create a case (which creates a site) by clicking Create New Case.
After the new case site is created, content can be identified and held. An in-place hold would cause the least amount of disruption to the end users enabling them to continue to work on their documents and lists without disruption. After items are identified and held, a search and export can make a copy of all identified items (including mailbox items, if that was configured during the identify process).
Objective 2.4: Review
Correct answer: D
Incorrect: Site collection administrator rights (or a web application–level user policy) are necessary to ensure that discovery can happen on all necessary site collections and subsites, but it doesn’t cover the Exchange Server requirement.
Incorrect: Read rights on Exchange Server mailboxes are also needed but don’t address the SharePoint permissions.
Incorrect: Rights given on the eDiscovery site collection have nothing to do with the permissions required on SharePoint site collections or Exchange Server mailboxes.
Correct: Both site collection administrator rights (or a user policy equivalent) and rights on Exchange mailboxes are needed for users to be able to use eDiscovery in this situation.
Correct answer: C
Incorrect: SharePoint WFEs require the Exchange Web Services API and a trust needs to be established, but the solution also requires Exchange Server to be configured.
Incorrect: Only the WFEs need to be configured, but this answer doesn’t include the Exchange Server side.
Correct: Site mailboxes need configuration on both the SharePoint WFEs and the Exchange Server 2013 node before they can be enabled.
Incorrect: Site mailboxes aren’t available without configuration on SharePoint and Exchange Server.
Correct answer: B
Incorrect: An item in a list can be considered a record, and SharePoint treats it as such.
Correct: Document libraries can contain records but are themselves not generally considered a record because their contents change similarly to a traditional file cabinet.
Incorrect: Word documents are one of the most common types of records.
Incorrect: Emails are considered records and can be treated as such in SharePoint by using site mailboxes.
Correct answer: A
Correct: Hours isn’t a valid option for a retention schedule in SharePoint. One day is the shortest amount of time that can be specified.
Incorrect: Days is a valid option, and the shortest amount of time that can be specified is one day.
Incorrect: Months is a valid option.
Incorrect: Years is the longest valid option.