Chapter 2. ASP.NET MVC views
Design is not just what it looks like and feels like. Design is how it works.
—Steve Jobs
In ASP.NET MVC, any request is resolved in terms of an action being executed on some controller. Even for a newcomer, this point is relatively easy to understand and figure out. But, there’s another aspect of the request that the newcomer often has difficulty grasping—the generation of the HTML for the browser.
In ASP.NET Web Forms, you don’t even think of an action—you think of a page, and a page incorporates both logic and view. In classic ASP.NET, you start with, say, a register.aspx page that the user reaches following a link. The page unfolds its user interface, which ends with a submit button. The button originates a POST to the same page that takes care of posted data, modifies the state of the application as appropriate, and prepares the expected thank-you screen. The entire process is rooted in the page resource.
However, in ASP.NET MVC, you set up a Register action on some controller class. When the action is invoked over a GET command, it results in the display of the user interface for the data entry. When invoked over a POST, the action performs the desired server-side tasks and then manages to serve back the thank-you screen. The entire workflow is similar to what you have in a nonweb scenario.
In ASP.NET MVC, you just deal with two main flavors of components. One is the controller, which is in charge of executing the request and producing raw results in return for raw input. The other is the view engine, which is in charge of generating any expected HTML response based on the results calculated by the controller. In this chapter, I’ll first briefly discuss the internal architecture of the view engine and then move to more practical considerations on how you feed an engine with view templates and data.
Note
As is demonstrated in Chapter 1, a controller action doesn’t necessarily produce some HTML. You can look upon an ASP.NET MVC application as a collection of components with the ability to serve various responses, including HTML, JavaScript, JavaScript Object Notation (JSON), and plain text. In this chapter, I’ll restrict the discussion to considering the subsystem responsible for the production of HTML. Later in the book, I discuss other types of responses in more detail.
The structure and behavior of a view engine
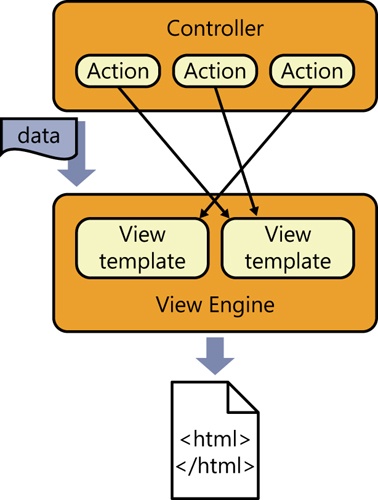
The view engine is the component that physically builds the HTML output for the browser. The view engine engages for each request that returns HTML, and it prepares its output by mixing together a template for the view and any data the controller passes in. The template is expressed in an engine-specific markup language; the data is passed packaged in dictionaries or in strongly typed objects. Figure 2-1 shows the overall picture of how a view engine and controller work together.
The mechanics of a view engine
In ASP.NET MVC, a view engine is merely a class that implements a fixed interface—the IViewEngine interface. Each application can have one or more view engines. In ASP.NET MVC 5, each application comes by default with two view engines. Let’s find out more.
Detecting registered view engines
Until ASP.NET MVC 4, when you first created an ASP.NET MVC application, the Microsoft Visual Studio project wizard asked you to pick your favorite view engine—whether ASPX or Razor. Figure 2-2 shows the specific dialog box as it appears when ASP.NET MVC 5 is installed in Visual Studio 2013.
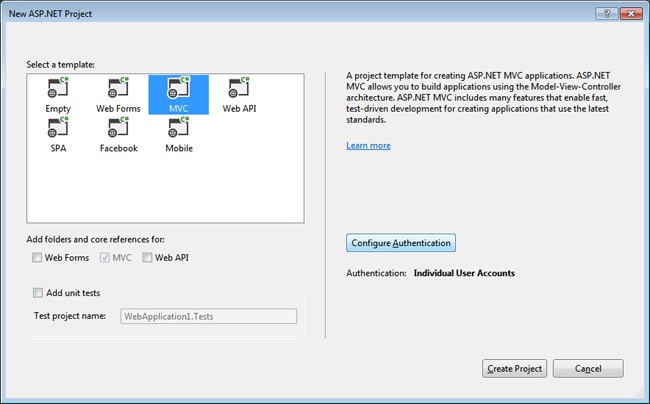
As you can see, there’s no choice between ASPX and Razor, and all view files are automatically created by using the Razor markup language. In spite of appearances, the choice you make here has a limited impact on the application. Your choice, in fact, influences only the content of the project files the wizard will create for you. By default, any ASP.NET MVC 5 application will always load two view engines: Razor and ASPX.
The ViewEngines class is the system repository that tracks the currently installed engines. The class is simple and exposes only a static collection member named Engines. The static member is initialized with the two default engines. Here’s an excerpt from the class:
public static class ViewEngines
{
   private static readonly ViewEngineCollection _engines =
           new ViewEngineCollection {
                  new WebFormViewEngine(),
                  new RazorViewEngine()
           };

   public static ViewEngineCollection Engines
   {
       get { return _engines; }
   }
   ...
}
In case you’re interested in using ViewEngines.Engines to detect the installed engines programmatically, here’s how to do it:
private static IList<String> GetRegisteredViewEngines()
{
   return ViewEngines
            .Engines
            .Select(engine => engine.ToString())
            .ToList();
}
The most likely scenario in which you might encounter ViewEngines.Engines is when you need to add a new view engine or unload an existing one. You do this in the application startup, more precisely, in the Application_Start event in global.asax.
Anatomy of a view engine
A view engine is a class that implements the IViewEngine interface. The contract of the interface says it’s all about the services the engine is expected to provide: the engine is responsible for retrieving a (partial) view object on behalf of the ASP.NET MVC infrastructure. A view object represents the container for any information that is needed to build a real HTML response in ASP.NET MVC. Here are the interface members:
public interface IViewEngine
{
    ViewEngineResult FindPartialView(
          ControllerContext controllerContext,
          String partialViewName,
          Boolean useCache);
    ViewEngineResult FindView(
          ControllerContext controllerContext,
          String viewName,
          String masterName,
          Boolean useCache);
    void ReleaseView(
          ControllerContext controllerContext,
          IView view);
}
Table 2-1 describes the behavior of the methods in the IViewEngine interface.
Method | Description |
FindPartialView | Creates and returns a view object that represents a fragment of HTML |
FindView | Creates and returns a view object that represents an HTML page |
ReleaseView | Releases the specified view object |
Both FindPartialView and FindView return a ViewEngineResult object, which represents the results of locating a template for the view around the server directory tree and instantiating it. Here’s the class signature:
public class ViewEngineResult
{
    ...

    // Members
    public IEnumerable<String> SearchedLocations { get; private set; }
    public IView View { get; private set; }
    public IViewEngine ViewEngine { get; private set; }
}
The ViewEngineResult type just aggregates three elements: the view object, the view engine object used to create it, and the list of locations searched to find the template of the view. The content of the SearchedLocations property depends on the structure and behavior of the selected view engine. The ReleaseView method is intended to dispose of any references that the view object has in use.
Who calls the view engine?
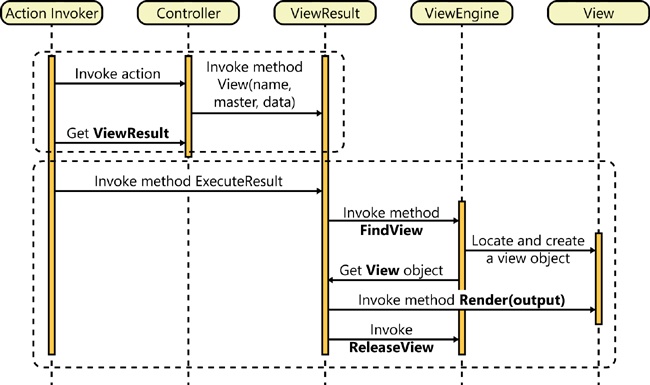
Although Figure 2-1 seems to show direct contact between controllers and view engines, the two components never communicate directly. Instead, the activity of both controllers and view engines is coordinated by an external manager object: the action invoker. The action invoker is triggered directly by the HTTP handler in charge of the request. The action invoker does two key things. First, it executes the controller’s method and saves the action result. Next, it processes the action result. Figure 2-3 presents a sequence diagram.
Let’s consider the typical code of a controller method as you saw it in Chapter 1.
public ActionResult Index()
{
    // Some significant code here
    ...

    // Order rendering of the next view
    return View();
}
The View method on the controller class packs a few pieces of data together in a single container: the ViewResult class. Information includes the name of the view template that the controller has selected as the next view to show to the user. An optional piece of data that goes into ViewResult is the name of the master view. Finally, the ViewResult container also incorporates the calculated data that will be displayed in the view. When the View method gets no parameters, as in the code snippet shown earlier, default values are provided. An instance of ViewResult object is delivered back to the action invoker.
Next, the action invoker invokes the ExecuteResult method on the ViewResult object. The method goes through the list of registered view engines to find one that can match the specified view and master view names. If no such view engine is found, an exception is thrown. Otherwise, the selected view engine is asked to create a view object based on the information provided.
Subsequently, the ViewResult object orders the view to render its content out to the provided stream—the actual response stream. Finally, the ViewResult object instructs the view engine to release the view.
The view object
The view object is an instance of a class that implements the IView interface. The only purpose of a view object is for writing some HTML response to a text writer. Each view is identified by name. The name of the view is also associated with some physical file that defines the HTML layout to render. Resolving the association between the view name and actual HTML layout is the responsibility of the view engine.
The name of the view is one of the parameters that the View method on the controller action is supposed to provide. If no such parameter is explicitly defined by the programmer, the system assumes by convention that the name of the view is the same as the action name. (As is demonstrated in Chapter 1, the action name doesn’t necessarily match the method name.)
The IView interface is shown here:
public interface IView
{
    void Render(ViewContext viewContext, TextWriter writer);
}
Under the hood, a view object is a wrapper around an object that describes a visual layout devoid of data. Rendering the view means populating the layout with data and rendering it as HTML to some stream. Of the two default view engines in ASP.NET MVC, one—the ASPX view engine—just uses a derivative of the ASP.NET Page class to represent the visual layout. The other view engine—the Razor engine—is based on a different class designed around the same core idea. The Razor engine uses the WebMatrix counterpart of an ASP.NET Page class.
Definition of the view template
In ASP.NET MVC, everything being displayed to the user results from a view and is described in terms of a template file. The graphical layout is then transformed into HTML and styled via one or more cascading style sheet (CSS) files. The way in which the template file is written, however, depends on the view engine. Each view engine has its own markup language to define the template, and its own set of rules to resolve a view name into a template file.
Resolving the template
At the end of its job, the controller figures out the name of the next view to render to the user. However, the name of the view must be translated into some good HTML markup. This takes a couple more steps. First, the system needs to identify which view engine (if any) can successfully process the request for the view. Second, the view name must be matched to an HTML layout and a view object must be successfully created from there.
Starting from the point that the name of the view is known, the ViewResult object (shown earlier in Figure 2-3) queries through all the installed view engines in the order in which they appear in the ViewEngines.Engines collection. Each view engine is asked whether it is capable of rendering a view with the given name.
By convention, each ASP.NET MVC view engine uses its own algorithm to translate the view name into a resource name that references the final HTML markup. For the two predefined view engines, the search algorithm attempts to match the view name to a physical file in one of a few fixed disk locations.
A custom view engine, however, can release both constraints and employ a different set of conventions. For example, it can load the view layout from, for example, a database, or it can use a customized set of folders.
Default conventions and folders
Both the ASPX and Razor view engines use the same core conventions to resolve view names. Both match view names to file names, and both expect to find those files in the same set of predefined folders. The only difference between ASPX and Razor is the extension of the files that contain the view layout.
Unless you install a custom view engine, an ASP.NET MVC application finds its view templates in the Views folder. Figure 2-4 demonstrates that the Views folder has a number of subfolders, each named after an existing controller name. Finally, the controller folder contains physical files whose name is expected to match the view name and whose extension must be .aspx for the ASPX view engine and .cshtml for the Razor view engine. (If you’re writing your ASP.NET MVC application in Microsoft Visual Basic, the extension will be .vbhtml.)
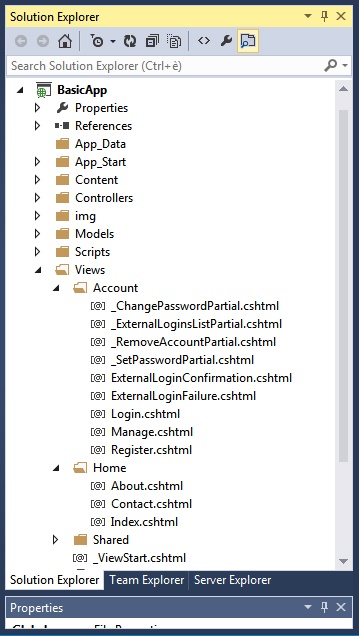
Although Figure 2-4 lists only .cshtml Razor view files, you are welcome to mix and match template files written according to different syntaxes.
Important
Having view templates written using different markup languages certainly doesn’t increase the consistency of your source code, but it can be a viable solution for cases in which you have different skills within a team or when you need to incorporate some legacy code. Also, consider that when you have view templates for different engines, resolving the names can produce some surprises. View engines are called to claim the view in the order in which they are registered and, by default, the ASPX engine takes precedence over the Razor engine. To modify the order, you should clear the Engines collection during application startup and add engines again, in the order you prefer.
In general, ASP.NET MVC requires that you place each view template in the folder of the controller that uses it. When multiple controllers are expected to invoke the same view (or partial view), you should move the template file to the Shared folder.
Finally, note that the same hierarchy of directories that exists at the project level in the Views folder must be replicated on the production server. However, folders such as Controllers, App_Start, and ViewModels are plain namespace containers used to better organize the source files, and they can be ignored in production.
The template for the view
As mentioned, a view is nothing more than a template for the resulting HTML content. The following is valid content for a view template file to find in some Views subfolder. The view template targets the ASPX view engine.
<%@ Page Language="C#"
         MasterPageFile="~/Views/Shared/Site.Master"
         Inherits="System.Web.Mvc.ViewPage" %>

<asp:Content ID="aboutTitle" ContentPlaceHolderID="TitleContent" runat="server">
    About the book
</asp:Content>

<asp:Content ID="aboutContent" ContentPlaceHolderID="MainContent" runat="server">
    <h2><%: ViewBag.Message %></h2>
    <p>
        Put content here.
    </p>
</asp:Content>
Without beating around the bush, this looks nearly the same as an old, faithful ASP.NET Web Forms page. So, what’s the point of ASP.NET MVC?
Admittedly, the syntax you see here is the same as in an ASP.NET Web Forms page; the role of this file, however, is radically different. In ASP.NET MVC, about.aspx is not a public resource you can request by following a link or typing it in the address bar of the browser. Rather, it’s an internal resource file used to provide the template for a view. In particular, the about.aspx template is picked up only when the user makes a request that the system maps to a controller method which, in turn, selects the About view for display, as shown here:
public ActionResult About()
{
    ViewBag.Message = "Thank you for choosing this book!";

    // By default, the view name is the same as the action name.
    return View();
}
Another huge difference is the data you display through the template. In Web Forms, each page is made of server controls and, as a developer, you set properties on server controls to display any data. In ASP.NET MVC, you group the data that you want to pass to the view in a container object and pass the container object as an argument in the controller’s call that selects the view.
ASP.NET MVC makes it possible for you to pass a container object directly in the call to the View method. In any case, two predefined dictionaries are available for the controller method to stuff data. They are the ViewData and ViewBag dictionaries.
A key point to remember is that ideally the view object doesn’t need to retrieve data on its own; the only data it must deal with is the data it receives from the controller.
Important
The purpose of the view template is to produce HTML, but the source of the template doesn’t need be HTML. The language used to write the template depends on the view engine. It can be nearly the same ASPX markup that you might know from ASP.NET Web Forms if you opt for the ASPX view engine; it will be something significantly different if you choose the Razor engine or another engine.
The master view
Just like in ASP.NET Web Forms, you need to decide whether you want to write the view template entirely from scratch or inherit some common markup from a master view. If you choose the latter option, you define the master template with respect to the syntax and constraints set by the view engine.
Specifying the master view is easy. You can use the conventions supported by the view engine, or you can just pass the name of the master view as an argument to the View method when you select the next view from the controller. Note that the master template might follow different conventions than plain views. For example, the ASPX view engine requires you to name it with a .master extension and place it in the Shared folder. The Razor view engine, instead, adds a .cshtml extension and requires you to specify the path in a special viewstart.cshtml file in the root of the Views folder.
I’ll have more to say about the two default view engines in just a moment.
HTML helpers
Admittedly, the ASPX view engine is quite similar to ASP.NET Web Forms but doesn’t support server controls in the same manner. This is not because of a partial implementation; there is a deeper explanation. Server controls are, in effect, too tightly coupled to the life cycle of a Web Forms page to be easily reworked in a request-processing model that breaks up action into neatly distinct phases, such as getting input data, processing the request, and selecting the next view.
On the other hand, server controls served a very important purpose in ASP.NET—favoring HTML-level code reuse. Even though ASP.NET MVC makes a point of letting developers gain control over every single HTML tag, a good deal of HTML can’t be hard-coded in the view. It needs be built programmatically, based on dynamically discovered data. What’s a technology equivalent to server controls in ASP.NET MVC? Enter HTML helpers.
Note
HTML helpers certainly are not the same as server controls, but they are the closest you can get to HTML-level code reuse with a view engine. An HTML helper method has no view state, no postbacks, and no page life cycle and events. HTML helpers are simple HTML factories. Technically speaking, an HTML helper is an extension method defined on a system class—the HtmlHelper class—that outputs an HTML string based on the provided input data. In fact, internally an HTML helper simply accumulates text into a StringBuilder object.
Basic helpers
The ASP.NET MVC framework supplies a few HTML helpers out of the box, including CheckBox, ActionLink, and RenderPartial. The stock set of HTML helpers is presented in Table 2-2.
Method | Type | Description |
BeginForm, BeginRouteForm | Form | Returns an internal object that represents an HTML form that the system uses to render the <form> tag |
EndForm | Form | A void method, closes the pending </form> tag |
CheckBox, CheckBoxFor | Input | Returns the HTML string for a check box input element |
Hidden, HiddenFor | Input | Returns the HTML string for a hidden input element |
Password, PasswordFor | Input | Returns the HTML string for a password input element |
RadioButton, RadioButtonFor | Input | Returns the HTML string for a radio button input element |
TextBox, TextBoxFor | Input | Returns the HTML string for a text input element |
Label, LabelFor | Label | Returns the HTML string for an HTML label element |
ActionLink, RouteLink | Link | Returns the HTML string for an HTML link |
DropDownList, DropDownListFor | List | Returns the HTML string for a drop-down list |
ListBox, ListBoxFor | List | Returns the HTML string for a list box |
TextArea, TextAreaFor | TextArea | Returns the HTML string for a text area |
Partial | Partial | Returns the HTML string incorporated in the specified user control |
RenderPartial | Partial | Writes the HTML string incorporated in the specified user control to the output stream |
ValidationMessage, ValidationMessageFor | Validation | Returns the HTML string for a validation message |
ValidationSummary | Validation | Returns the HTML string for a validation summary message |
As an example, let’s see how to use an HTML helper to create a text box with programmatically determined text. You place the call in a code block if you’re using the ASPX view engine:
<%: Html.TextBox("TextBox1", ViewBag.DefaultText) %>Or, you prefix the call with the @ symbol if you’re using Razor. (I’ll say more about Razor in a moment and throughout the rest of the book.)
@Html.TextBox("TextBox1", ViewBag.DefaultText)Note
The Html in the code snippets refers to a built-in property of the base classes used by both view engines to refer to a rendered view. The class is ViewPage for the ASPX view engine and WebPage for the Razor view engine. In both cases, the property Html is an instance of HtmlHelper.
Each HTML helper has a bunch of overloads to let you specify attribute values and other relevant information. For example, here’s how to style the text box by using the class attribute:
<%: Html.TextBox("TextBox1",
                 ViewBag.DefaultText,
                 new Dictionary<String, Object>{{"class", "coolTextBox"}}) %>
In Table 2-2, you see a lot of xxxFor helpers. In what way are they different from other helpers? An xxxFor helper differs from the base version because it accepts only a lambda expression, such as the one shown here:
<%: Html.TextBoxFor(model => model.FirstName,
                    new Dictionary<String, Object>{{"class", "coolTextBox"}}) %>
For a text box, the lambda expression indicates the text to display in the input field. The xxxFor variation is especially useful when the data to populate the view is grouped in a model object. In this case, your view results are clearer to read and strongly typed.
Let’s see a few other examples of basic HTML helpers.
Rendering HTML forms
The unpleasant work of rendering a form in ASP.NET MVC occurs when you have to specify the target URL. The BeginForm and BeginRouteForm helpers can do the ugliest work for you. The following code snippet shows how to write a simple input form that presents user and password text boxes:
<% using (Html.BeginForm()) { %>
   <div>
     <fieldset>
         <legend>Account Information</legend>
         <p>
             <label for="userName">User name:</label>
             <%= Html.TextBox("userName") %>
             <%= Html.ValidationMessage("userName") %>
         </p>
         <p>
              <label for="password">Password:</label>
              <%= Html.Password("password") %>
              <%= Html.ValidationMessage("password") %>
         </p>
         ...
         <p>
             <input type="submit" value="Change Password" />
         </p>
     </fieldset>
   </div>
<% } %>
The BeginForm helper takes care of the opening <form> tag. The BeginForm method, however, doesn’t directly emit any markup. It’s limited to creating an instance of the MvcForm class, which is then added to the control tree for the page and rendered later.
By default, BeginForm renders a form that posts back to the same URL and, subsequently, to the same controller action. Using other overloads on the BeginForm method, you can specify the target controller’s name and action, any route values for the action, HTML attributes, and even whether you want the form to perform a GET or a POST. BeginRouteForm behaves like BeginForm except that it can generate a URL starting from an arbitrary set of route parameters. In other words, BeginRouteForm is not limited to the default route based on the controller name and action.
I believe that discussing HTML forms is the best scenario to showcase the added value of Razor over ASPX. Here’s how you would rewrite the previous form with Razor syntax:
@using (Html.BeginForm())
{
   <div>
     <fieldset>
         <legend>Account Information</legend>
         <p>
             <label for="userName">User name:</label>
             @Html.TextBox("userName")
             @Html.ValidationMessage("userName")
         </p>
         <p>
              <label for="password">Password:</label>
              @Html.Password("password")
              @Html.ValidationMessage("password")
         </p>
         ...
         <p>
             <input type="submit" value="Change Password" />
         </p>
     </fieldset>
   </div>
}
In the rest of the book, I’ll always be using Razor for views.
Note
In HTML, when you use the form tag, you can’t use anything other than the GET and POST verbs to submit some content. In ASP.NET MVC, a native method on the HtmlHelper class—HttpMethodOverride—comes to the rescue. The method emits a hidden field whose name is hard-coded to X-HTTP-Method-Override and whose value is PUT, DELETE, or HEAD. The content of the hidden field overrides the method set for the form, thus making it possible for you to invoke a REST API also from within the browser. You can also specify the override value in an HTTP header with the same X-HTTP-Method-Override name or in a query string value as a name/value pair. The override is valid only for POST requests.
Rendering input elements
All HTML elements that you can use within a form have an HTML helper to speed up development. Again, there’s really no difference from a functional perspective between using helpers and using plain HTML. Here’s an example of a check box element, initially set to true, but disabled:
@Html.CheckBox("ProductDiscontinued",
               true,
               new Dictionary<String, Object>() {{"disabled", "disabled"}}))
You also have facilities to associate a validation message with an input field. You use the Html.ValidationMessage helper to display a validation message if the specified field contains an error. The message can be indicated explicitly through an additional parameter in the helper. All validation messages are then aggregated and displayed via the Html.ValidationSummary helper.
You can find an expanded discussion of input forms and validation in Chapter 4.
Action links
As previously mentioned, creating URLs programmatically is a boring and error-prone task in ASP.NET MVC. For this reason, helpers are more than welcome, especially in this context. In fact, the ActionLink helper is one of the most frequently used in ASP.NET MVC views. Here’s an example:
@Html.ActionLink("Home", "Index", "Home")Typically, an action link requires the link text, the action name, and optionally the controller name. The HTML that results from the example is the following:
<a href="/Home/Index">Home</a>
In addition, you can specify route values, HTML attributes for the anchor tag, and even a protocol (for example, HTTPS), host, and fragment.
The RouteLink helper works in much the same way, except that it doesn’t require you to specify an action. With RouteLink, you can use any registered route name to determine the pattern for the resulting URL.
The text emitted by ActionLink is automatically encoded. This means you can’t use any HTML tag in the link text that the browser will be led to consider as HTML. In particular, you can’t use ActionLink for image buttons and image links. However, to generate a link based on controller and action data, you can use the UrlHelper class.
An instance of the UrlHelper class is associated with the Url property on the ViewPage type. The code here shows the Url object in action:
<a href="@Url.Action("Edit")">
    <img src="editMemo.jpg" alt="Edit memo" />
</a>
The UrlHelper class has a couple of methods that behave nearly similar to ActionLink and Route Link. Their names are Action and RouteUrl.
Note
ASP.NET MVC routing is not aware of subdomains; it always assumes that you’re in the application path. This means that if you want to use subdomains within a single application instead of virtual paths (for example, dino.blogs.com instead of www.blogs.com/dino), the extra work of figuring out which subapplication you’re in is entirely up to you. You can address this in a number of ways. A simple approach consists in creating a custom route handler that would look at the host passed in the URL and decide which controller to set up. This solution, however, is limited to fixing incoming requests. It might not be enough for all of the helpers you have around to generate links to resources and actions. A more complete solution is creating a Route class that is aware of subdomains. You can find a good example at http://blog.maartenballiauw.be/post/2009/05/20/ASPNET-MVC-Domain-Routing.aspx.
Partial views
You use either the Partial or RenderPartial helper method to insert a partial view. Both methods take the name of the partial view as an argument. The only difference between the two is that Partial returns a string, whereas RenderPartial writes to the output stream and returns void. Because of this, the usage is slightly different, as demonstrated here:
@Html.Partial("login")
@Html.RenderPartial("login")
In ASP.NET MVC, a partial view is analogous to a user control in Web Forms. The typical location for a partial view is the Shared folder in Views. However, you can also store a partial view in the controller-specific folder. A partial view is contained in a view, but it will be treated as an entirely independent entity. In fact, it is legitimate to have a view written for one view engine and a child partial view that requires another view engine.
The HtmlHelper class
The HtmlHelper class owes most of its popularity to its numerous extension methods, but it also has a number of useful native methods. Some of them are listed in Table 2-3.
Method | Description |
AntiForgeryToken | Returns the HTML string for a hidden input field stored with the antiforgery token (see Chapter 4 for more details) |
AttributeEncode | Encodes the value of the specified attribute using the rules of HTML encoding |
EnableUnobtrusiveJavaScript | Sets the internal flag that enables helpers to generate JavaScript code in an unobtrusive way |
EnableClientValidation | Sets the internal flag that enables helpers to generate code for client-side validation |
Encode | Encodes the specified value using the rules of HTML encoding |
HttpMethodOverride | Returns the HTML string for a hidden input field used to override the effective HTTP verb to indicate that a PUT or DELETE operation was requested |
Raw | Returns the raw HTML string without encoding |
In addition, the HtmlHelper class provides a number of public methods that are of little use from within a view but offer great support to developers writing custom HTML helper methods. A good example is GenerateRouteLink, which returns an anchor tag containing the virtual path for the specified route values.
Templated helpers
Writing HTML templates over and over again leads to repetitive, boring, and therefore error-prone code. Templated helpers help because they are created to take an instance of a C# class, read properties, and decide how to best render those values. By decorating the view-model objects with special attributes, you provide the helper further guidance regarding user-interface hints and validation.
With templated helpers, you are not losing control over the user interface; more simply, attributes in the model establish a number of conventions and save you from a number of repetitive tasks.
Flavors of a templated helper
In ASP.NET MVC, you have two essential templated helpers: Editor and Display. They work together to make the code for labeling, displaying, and editing data objects easy to write and maintain. The optimal scenario for using these helpers is that you are writing your lists or input forms around annotated objects. However, templated helpers can work with both scalar values and composite objects.
Templated helpers actually come with three overloads. Using the Display helper as an example, you have the following more specific helpers: Display, DisplayFor, and DisplayForModel. There’s no functional difference between Display, DisplayFor, and DisplayForModel. They differ only in terms of the input parameters they can manage.
The Display helpers
The Display helper accepts a string indicating the name of the property in the ViewData dictionary, or on the view-model object, to be processed:
@Html.Display("FirstName")The DisplayFor helper accepts a lambda expression and requires that a view-model object be passed to the view:
@Html.DisplayFor(model => model.FirstName)
Finally, DisplayForModel is a shortcut for DisplayFor getting the expression model => model:
@Html.DisplayForModel()
All flavors of templated helpers have the special ability to process metadata (if any) and adjust their rendering accordingly; for example, showing labels and adding validation. You can customize the display and editing capabilities by using templates, as will be discussed in a moment. The ability of using custom templates applies to all flavors of a templated helper.
Important
ViewBag is a property defined on the ControllerBase class defined to be of type dynamic. In .NET, the type dynamic indicates the site for dynamically interpreted code. In other words, whenever the compiler meets a reference to a dynamic object, it emits a chunk of code that checks at run time whether the code can be resolved and executed. Functionally speaking, this is similar to what happens with JavaScript objects.
Lambda expressions don’t support dynamic members and therefore can’t be used with data passed into the ViewBag dictionary. Also note that to successfully use ViewBag content in HTML helpers, you must cast the expression to a valid type.
The Editor helpers
The purpose of the Editor helper is to let you edit the specified value or object. The editor recognizes the type of the value it gets and picks up a made-to-measure template for editing. Predefined templates exist for object, string, Boolean, and multiline text, whereas numbers, dates, and GUIDs fall back to the string editor. The Editor helper works great with complex types. It generically iterates over each public property and builds up a label and an editor for the child value. Here’s how to display in an editor the value of the FirstName property on some object being passed to the view:
@Html.EditorFor(person => person.FirstName)
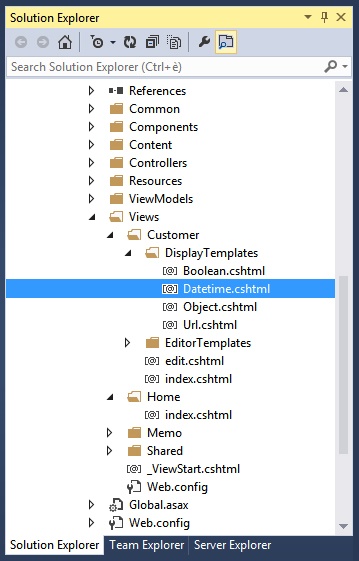
You can customize the editor (and the visualizer) by creating a few partial views in the EditorTemplates folder of the view. It can be in a controller-specific subfolder or in the ViewsShared folder, as well. The partial view is expressed as an .ascx template for the ASPX view engine and as a .cshtml template if you’re using the Razor view engine. You can provide a custom template for each type that you expect to support. For example, in Figure 2-5 you see a datetime.cshtml template that will be used to modify the way dates are rendered in both editing and display. Likewise, you can provide a partial view for each type of property in the view-model object.
If the name of the partial view matches the type name, the custom template is automatically picked up by the system.
You can also point the editor to your template by name and give the template the name you like. Here’s an example that uses the date.ascx view to edit a DateTime property:
@Html.EditorFor(person => person.Birthdate, "date")
In the same ASP.NET MVC application, you can have views requiring different view engines. Note that ASP.NET MVC resolves each view and partial view independently. This means that if you’re processing, for example, the about view, you end up with the Razor engine (as shown in Figure 2-5). However, if the about view requires an editor for dates and you have a matching .aspx template, it will be picked up anyway with no need for you to provide an analogous .cshtml template.
Finally, the Editor helper can recognize data annotation attributes on view-model objects and use that information to add special validation features, such as ensuring that a given value falls in the specified range or is not left empty.
Note
When you use DisplayForModel and EditorForModel, the system uses reflection to find all the properties on the specified object and then generates a label and visualizer or editor for each of those properties. The overall template of the resulting view is a vertical sequence of labels and visualizers/editors. Each emitted piece of HTML is bound to a CSS class and can be easily styled as you prefer. Furthermore, if you’d like to change the template of the view, you need to provide an object.aspx (or object.cshtml) template and use reflection, as well. I return to this topic with an example in Chapter 4.
Custom helpers
The native set of HTML helper methods is definitely a great benefit, but it’s probably insufficient for many real-world applications. Native helpers, in fact, cover only the markup of basic HTML elements. In this regard, HTML helpers are significantly different from server controls because they completely lack abstraction over HTML. Extending the set of HTML helpers is easy, however. All that is required is an extension method for the HtmlHelper class or for the AjaxHelper class if you’re interested in creating an HTML factory that does some Ajax work.
The structure of an HTML helper
An HTML helper is a plain method that is not tied to any forced prototype. You typically design the signature of an HTML helper method to make it receive just the data it needs. Having several overloads or optional parameters is common, too.
Internally, the helper processes input data and starts building the output HTML by accumulating text in a buffer. This is the most flexible approach, but it is also quite hard to manage when the logic to apply becomes complex. An alternate approach consists of generating the HTML by using the TagBuilder class, which offers an HTML-oriented, string-builder facility. The TagBuilder class generates for you the text for HTML tags, thus allowing you to build chunks of HTML by concatenating tags instead of plain strings.
An HTML helper is expected to return an encoded HTML string.
MvcHtmlString is better than just a string
What if you use the compact syntax on a piece of markup that is already encoded? Without countermeasures, the text inevitably will be double-encoded. For this reason, it is becoming a best practice to write HTML helpers that return an MvcHtmlString wrapper object instead of a plain string. In fact, all native HTML helpers have been refactored to return MvcHtmlString. The change is no big deal for developers. You can easily obtain an MvcHtmlString object from a string through the following code:
var html = GenerateHtmlAsString();
return MvcHtmlString.Create(html);
The MvcHtmlString type is a smart wrapper for a string that has HTML content, and it exposes the IHtmlString interface.
What’s the purpose of IHtmlString? In ASP.NET an attempt to HTML-encode an object that implements IHtmlString results in a no-operation.
A sample HTML helper
Suppose that your view receives some text that can be optionally empty. You don’t want to render the empty string; you’d rather display some default text such as N/A. How do you do that? You can brilliantly resolve everything with an if statement. However, nesting an if statement in ASPX markup doesn’t particularly help to make your code clean; doing the same in Razor is only a little better.
An ad hoc helper can smooth things out because it encapsulates the if statement and preserves the required logic while delivering more compact and readable code. The following code demonstrates an HTML helper that replaces a given string with some default text if it’s null or empty:
public static class OptionalTextHelpers
{
   public static MvcHtmlString OptionalText(this HtmlHelper helper,
        String text,
        String format="{0}",
        String alternateText="",
        String alternateFormat="{0}")
   {
        var actualText = text;
        var actualFormat = format;

        if (String.IsNullOrEmpty(actualText))
        {
            actualText = alternateText;
            actualFormat = alternateFormat;
        }

        return MvcHtmlString.Create(String.Format(actualFormat, actualText));
    }
}
The helper has up to four parameters, three of which are optional parameters. It takes the original text and its null replacement, plus a format string to embellish the text in both cases.
A sample Ajax helper
An Ajax helper differs from an HTML helper only because it is invoked in the context of an Ajax operation. For example, let’s suppose that you want to use an image as a button. Clicking the image should automatically trigger an Ajax call to some application URL.
How is this different from just attaching a bit of JavaScript to the click event of the image and then using jQuery to carry the call? If you know the URL to pass to jQuery, you don’t need this helper. If, however, you find it better to express the URL as a controller/action pair, you need this helper to generate a link that takes the user to wherever the pair controller/action pair points, as shown in the following:
public static class AjaxHelpers
{
    public static String ImgActionLink(this AjaxHelper ajaxHelper,
        String imageUrl,
        String imgAltText,
        String imgStyle,
        String actionName,
        String controllerName,
        Object routeValues,
        AjaxOptions ajaxOptions,
        Object htmlAttributes)
    {
        const String tag = "[xxx]";    // arbitrary string
        var markup = ajaxHelper.ActionLink(
             tag, actionName, controllerName, routeValues, ajaxOptions,
             htmlAttributes).ToString();

        // Replace text with IMG markup
        var urlHelper = new UrlHelper(ajaxHelper.ViewContext.RequestContext);
        var img = String.Format(
            "<img src='{0}' alt='{1}' title='{1}' style='{2}' />",
            urlHelper.Content(imageUrl),
            imgAltText,
            imgStyle);
        var modifiedMarkup = markup.Replace(tag, img);
        return modifiedMarkup;
    }
}
The helper first invokes the default ActionLink helper to get the URL as if it were to be a text-based hyperlink. In the first step, the hyperlink text is set to a known string acting as a placeholder. Next, when everything is ready to go, the helper strips off the placeholder string and replaces that with the URL of the image.
Why can’t you just provide the <img> tag as the text of the original action link? Being a good citizen, ActionLink HTML-encodes everything, so you won’t see any images, just the text of the URL.
The Razor view engine
The Web Forms view engine employs a syntax that on one hand is familiar to nearly all ASP.NET developers. On the other hand, the ASPX markup was devised as a way to support server controls, and it has severe limitations when used mostly with code blocks. Clearly, the major issue is lack of readability.
Introduced with ASP.NET MVC 3, the Razor view engine comes to the rescue, providing an alternate markup language to define the structure of view templates.
Inside the view engine
According to Razor, a view template is an HTML page with a few placeholders and code snippets. Overall, the readability of the view template is greatly improved, and by combining Razor code snippets with HTML helpers, you can arrange views to make them easier to read and maintain.
Search locations
The Razor view engine supports a bunch of interesting properties that are related to the locations of the view templates. Table 2-4 describes these properties.
Property | Description |
AreaMasterLocationFormats | Locations where master views are searched in the case of area-based applications |
AreaPartialViewLocationFormats | Locations where partial views are searched in the case of area-based applications |
AreaViewLocationFormats | Locations where views are searched in the case of area-based applications |
MasterLocationFormats | Locations where master views are searched |
PartialViewLocationFormats | Locations where partial views are searched |
ViewLocationFormats | Locations where views are searched |
FileExtensions | List of extensions supported for views, partial views, and master views |
Each property is implemented as an array of strings. Table 2-5 shows the default values for the properties.
Default location format | |
AreaMasterLocationFormats | ~/Areas/{2}/Views/{1}/{0}.cshtml ~/Areas/{2}/Views/Shared/{0}.cshtml ~/Areas/{2}/Views/{1}/{0}.vbhtml ~/Areas/{2}/Views/Shared/{0}.vbhtml |
AreaPartialViewLocationFormats | ~/Areas/{2}/Views/{1}/{0}.cshtml ~/Areas/{2}/Views/{1}/{0}.vbhtml ~/Areas/{2}/Views/Shared/{0}.cshtml ~/Areas/{2}/Views/Shared/{0}.vbhtml |
AreaViewLocationFormats | ~/Areas/{2}/Views/{1}/{0}.cshtml ~/Areas/{2}/Views/{1}/{0}.vbhtml ~/Areas/{2}/Views/Shared/{0}.cshtml ~/Areas/{2}/Views/Shared/{0}.vbhtml |
MasterLocationFormats | ~/Views/{1}/{0}.cshtml ~/Views/Shared/{0}.cshtml ~/Views/{1}/{0}.vbhtml ~/Views/Shared/{0}.vbhtml |
PartialViewLocationFormats | ~/Views/{1}/{0}.cshtml ~/Views/{1}/{0}.vbhtml ~/Views/Shared/{0}.cshtml ~/Views/Shared/{0}.vbhtml |
ViewLocationFormats | ~/Views/{1}/{0}.cshtml ~/Views/{1}/{0}.vbhtml ~/Views/Shared/{0}.cshtml ~/Views/Shared/{0}.vbhtml |
FileExtensions | .cshtml, .vbhtml |
Pretty much everything works in the same way with the Web Forms engine. As far as the view is concerned, the only variation is the different file extension and, of course, the different syntax. Let’s get familiar with it, then.
Code nuggets
A Razor view template is essentially an HTML page with a few code snippets, also known as code nuggets. Code nuggets are similar to ASP.NET code blocks, but they feature a simpler and terser syntax. You denote the start of a Razor code block by using the @ character. More important, you don’t need to close those blocks explicitly. The Razor parser uses Visual Basic or C# parsing logic to figure out where a line of code finishes. Here’s an example:
<html>
<head>
    <title>@ViewBag.Title</title>
    <link href="@Url.Content("~/Content/Site.css")" rel="stylesheet" type="text/css" />
    <script src="@Url.Content("~/Scripts/jquery.js")" type="text/javascript"></script>
</head>
...
</html>
You can mix any Razor code nugget with plain markup even when the code nugget contains control flow statements such as an if/else or for/foreach statement. The following code rewrites the page rendered in Figure 2-7 using code nuggets:
<body>
    <h2>@ViewBag.Header</h2>
    <hr />

    <table>
        <thead>
           <th>City</th>
           <th>Country</th>
           <th>Been there?</th>
        </thead>
    @foreach (var city in Model) {
       <tr>
          <td><%: city.Name %></td>
          <td><%: city.Country %></td>
          <td><%: city.Visited ?"Yes" :"No"%></td>
       </tr>
    }
    </table>
</body>
Note that the closing brace (}), which is placed in the middle of the source, is correctly recognized and interpreted by the parser.
Generally, you can use any C# (or Visual Basic) instructions in a Razor template as long as they are prefixed by @. Here’s an example of how you import a namespace and create a form block:
@using YourApp.Extensions;
...
<body>
   @using (Html.BeginForm()) {
      <fieldset>
          <div class="editor-field">
                @Html.TextBox("TextBox1")
          </div>
      </fieldset>
   }
</body>
In the end, a Razor template is a plain HTML markup file intertwined with @ expressions that wrap executable statements and HTML helpers. However, a few shortcuts exist.
Special expressions of code nuggets
You can insert a full segment of code made of multiple lines anywhere by wrapping it within an @{ code } block like the one shown here:
@{
   var user = "Dino";
}
...
<p>@user</p>
You can retrieve any variable you create and use it later as if the code belonged to a single block. The content of an @{...} block can mix code and markup. It is essential, however, that the parser can figure out exactly where code ends and markup begins, and vice versa. Look at the following nugget:
@{
    var number = GetRandomNumber();
    if(number.IsEven())
      <p>Number is even</p>
    else
      <text>Number is odd</text>
}
If the markup content you’re emitting is wrapped up by HTML tags, the parser will properly recognize it as markup. If it’s plain text (for example, just a text string), you must wrap it in a Razor-specific <text> for the parser to handle it correctly.
A single statement that results from an expression can be combined in the same expression by using parentheses:
<p> @("Welcome, " + user) </p>Parentheses also work when you intend to place a function call:
<p> @(YourMethod(1,2,3)) </p>
Any content being processed by Razor is automatically encoded, so you don’t need to take care of that. If your code returns HTML markup that you want to emit as-is without being automatically encoded, you should resort to using the Html.Raw helper method presented here:
@Html.Raw(Strings.HtmlMessage)
Finally, when inside multiline code nuggets @{ ... }, you use the C# or Visual Basic language syntax to place comments. You can comment out an entire block of Razor code by using the @* ... *@ syntax, as shown here:
@*
<div> Some Razor markup </div>
*@
The Visual Studio toolbar buttons for commenting blocks in and out support the Razor syntax nicely.
Note
Most of the time, the Razor parser is smart enough to determine from the context the reason why you’re using the @ symbol, whether it’s to denote a code nugget or perhaps a literal email address. If you hit a corner case that the parser can’t successfully solve, using @@ makes it clear that you want the symbol @ to be taken literally and not as the start of a code nugget.
Conditional nuggets
Razor also supports conditional attributes that should be emitted only if the Razor expression is true or not null. Let’s consider the following markup:
<div class="@yourCss">
   ...
</div>
The variable yourCss might be empty or null; in this case you ideally don’t want the class attribute to be emitted. Up until ASP.NET MVC 4, you were forced to write some conditional logic yourself. Now, the conditional logic is built in to the Razor engine.
Be aware that the same happens if the Razor expression is Boolean: If it returns false or is null, the attribute is not emitted.
The Razor view object
When the Razor view engine is used, the resulting view object is an instance of the WebViewPage class defined in the System.Web.Mvc assembly. This class incorporates the logic to parse markup and render HTML. Public properties on this class are available to any code nuggets you might write in actual templates.
Table 2-6 provides a quick list of a few properties in which you might be interested.
Property | Description |
Ajax | Gets an instance of the AjaxHelper class used to reference Ajax HTML helpers around the template. |
Culture | Gets and sets the ID of the culture associated with the current request. This setting influences culture-dependent aspects of a page, such as date, number, and currency formatting. The culture is expressed in xx-yy format, where xx indicates the language and yy the culture. |
Href | Converts paths that you create in server code (which can include the ~ operator) to paths that the browser understands. |
Html | Gets an instance of the HtmlHelper class used to reference HTML helpers in the template. |
Context | Gets the central repository to gain access to various ASP.NET intrinsic objects: Request, Response, Server, User, and the like. |
IsAjax | Returns true if the current request was initiated by the browser’s Ajax object. |
IsPost | Returns true if the current request was placed through an HTTP POST verb. |
Layout | Gets and sets the path to the file containing the master view template. |
Model | Gets a reference to the view model object (if any) containing data for the view. This property is of type dynamic. |
UICulture | Gets and sets the ID of the user-interface culture associated with the current request. This setting determines which resources are loaded in multilingual applications. The culture is expressed in xx-yy format, where xx indicates the language and yy the culture. |
ViewBag | Gets a reference to the ViewBag dictionary that might contain data the controller needs to pass to the view object. |
ViewData | Gets a reference to the ViewData dictionary that might contain data the controller needs to pass to the view object. |
Not all of these properties are effectively defined directly on the WebViewPage class. Many of them are actually defined on parent classes.
Designing a sample view
To create a Razor view of some reasonable complexity, you need to understand how to pass data to the view and how to define a master view.
Defining the model for the view
As previously mentioned, the controller can pass data down to the view in various ways. It can use global dictionaries such as ViewBag or ViewData. Better yet, the controller can use a strongly typed object tailor-made for the specific view. I’ll discuss the pros and cons of the various approaches in a moment.
To use ViewBag or ViewData from within a code nugget, you don’t need to take any special measures. You just write @ expressions that read or write into the dictionaries. To use a strongly typed view model, instead, you need to declare the actual type at the top of the template file, as shown here:
@model IList<GridDemo.Models.City>
The syntax you use to express the type is the same as the language you use throughout the template to write code nuggets. Next, you access properties in the view model object by using the Model property, as listed in Table 2-6. Here’s an example:
@model IList<GridDemo.Models.City>
@{
   ViewBag.Title = ViewBag.Header;
}

<h2>@ViewBag.Header</h2>
<hr />

<table>
    <thead> ... </thead>
@foreach (var city in Model)
{
    <tr> ...  </tr>
}
</table>
Of course, if Model references an object with child properties, you use Model.Xxx to reference each of them.
Defining a master view
In Razor, layout pages play the same role as master pages in Web Forms. A layout page is a standard Razor template that the view engine renders around any view you define, thus giving a uniform look and feel to sections of the site.
Each view can define its own layout page by simply setting the Layout property. The layout can be set to a hardcoded file or to any path that result from evaluating run-time conditions:
@{
    if (Request.Browser.IsMobileDevice) {
        Layout = "mobile.cshtml";
    }
}
You don’t need to incorporate the code that determines the layout in each view file. With Razor, you can define a special file in the Views folder, which is processed before each view is built and rendered. This file, called _ViewStart.cshtml, is the ideal container of any view-related startup code, including the code that determines the layout to use. Here’s a common implementation for the _ViewStart.cshtml file:
@{
    Layout = "~/Views/Shared/_Layout.cshtml";
}
According to the preceding code snippet, the file _Layout.cshtml defines the overall structure of each view in the site. (This is just the Razor counterpart to a master page.)
A layout page contains the usual mix of HTML and code nuggets and derives from WebViewPage. As such, it can access any properties on WebViewPage, including ViewBag and ViewData. The layout template must contain at least one placeholder for injecting the code of a specific view. The placeholder is expressed through a call to the RenderBody method (defined on WebViewPage), as demonstrated in the next example:
<html>
<head>
    <title>@ViewBag.Title</title>
    <link href="@Url.Content("~/Content/Site.css")" rel="stylesheet" type="text/css" />
    <script src="@Url.Content("~/Scripts/jquery-1.9.1.min.js")" type="text/javascript"></script>
</head>
<body>
    <div class="page">
    @RenderBody()
   </div>
</body>
</html>
Executing RenderBody causes any code in the actual view to flow into the layout template. The code within the actual view template is processed before the merging of the view and layout. This means that you can write view code that programmatically sets values in ViewBag which the layout can retrieve and consume. The typical example is the title of the page. Another good example is <meta> tags.
Important
In a view, it is recommended that you reference resources such as images, scripts, and stylesheets by using the tilde operator to refer to the root of the website. In earlier versions of ASP.NET MVC, you had to resort to the Url.Content method to ensure that the tilde was properly expanded in a URL. Starting with ASP.NET MVC 4, tilde is expanded automatically by the Razor engine, and using Url.Content is still supported but no longer necessary.
Defining sections
The RenderBody method defines a single point of injection within the layout. Although this is a common scenario, you might need to inject content into more than one location. In the layout template, you define an injection point by placing a call to RenderSection at the locations where you want those sections to appear:
<body>
    <div class="page">
    @RenderBody()
   </div>
   <div id="footer">
      @RenderSection("footer")
   </div>
</body>
Each section is identified by name and can be marked as optional. To declare a section optional, you do as follows:
<div id="footer">
   @RenderSection("footer", false)
</div>
The RenderSection method accepts an optional Boolean argument that denotes whether the section is required. The following code is functionally equivalent to the preceding code, but it’s much better from a readability standpoint:
<div id="footer">
   @RenderSection("footer", required:false)
</div>
Observe that required is not a keyword; more simply, it is the name of the formal parameter defined on the RenderSection method. (Its name shows up nicely thanks to IntelliSense.)
If the view template doesn’t include a required section, you get a run-time exception. Here’s how to define content for a section in a view template:
@section footer {
    <p>Written by Dino Esposito</p>
}
You can define the content for a section anywhere in a Razor view template.
You can also use the RenderPage method if you need to send an entire view straight to the output stream. The RenderPage method takes the URL of the view to render. The overall behavior is nearly identical to the RenderPartial extension method that you might have used plenty of times in ASPX views.
Default content for sections
Master pages in the Web Forms view engine make it possible for you to specify some default content for a placeholder to use in case the actual page doesn’t fill it in. This same feature is not natively supported in Razor, but you can arrange some quick workarounds. In particular, the WebViewPage class provides a handy IsSectionDefined method that you can use in a Razor template to determine whether a given section has been specified. Here’s some code that you can use in a layout page to indicate default content for an optional section:
@* This code belongs to a layout page *@
<div id="footer">
    @if(IsSectionDefined("Copyright"))
    {
       @RenderSection("copyright")
    }
    else
    {
       <hr /><span>Rights reserved for a better use.</span>
    }
</div>
Keep in mind that section names are case insensitive.
Nested layouts
You can nest Razor layouts to any level you want. Suppose that you want to transform the About view created by the standard ASP.NET MVC application into something more sophisticated. The About view is based on the general site layout—the _Layout.cshtml file. Suppose further that you want it to accept contact information from an external view template. Here’s the structure you expect:
@{
    ViewBag.Title = "About Us";
}
<h2>About</h2>
<p>
     @RenderBody()
</p>
You can’t request a layout template—that is, any Razor template that calls RenderBody—directly; you get an exception if you try to do that. This means that you should rename the about.cshtml file, modified as shown in the preceding code, to something like aboutLayout.cshtml. In addition, you must explicitly mention the parent layout on which it is based:
@{
    Layout = "~/Views/Shared/_Layout.cshtml";
    ViewBag.Title = "About Us";
}
<h2>About</h2>
<p>
     @RenderBody()
</p>
Finally, you create the actual about.cshtml view, which is the view directly requested by the application:
@{
    Layout = "~/Views/Home/AboutLayout.cshtml";
}
<fieldset>
    <legend>Contact</legend>
    <p>Follow me on Twitter: @@despos</p>
</fieldset>
Declarative HTML helpers
As you saw earlier in the chapter, HTML helpers are a powerful tool to build reusable and parametric pieces of HTML. Written as extension methods for the HtmlHelper (or AjaxHelper) class, you can easily reference helpers in a Razor template without requiring even a single code change. This rule applies, for example, to all built-in HTML helpers, such as those used to emit a form or an action link.
The downside of writing HTML helpers as extension methods is the limited flexibility they offer for expressing the graphical layout. For example, to build an HTML table, you need to compose markup into a string builder. You can do it, but it’s not really effective. In Razor, you have an alternate approach: declarative helpers.
You start by creating a .cshtml file in the App_Code folder of the project. The project wizard doesn’t create this folder automatically, so you need to do it yourself. (Curiously, the folder is not even listed as an ASP.NET folder.) The name you choose for the .cshtml file is important because you’ll be using it when making calls to the helpers. Think of this file as one of your helper repositories. A classic name for this file is something like MyHelpers.cshtml. Here’s some content:
@using RazorEngine.Models;

@helper CityGrid(IList<City> cities)
{
    <table>
        <thead> ... </thead>
        @foreach (var city in cities)
        {
            <tr>
                <td>@city.Name</td>
                <td>@city.Country</td>
                <td>@(city.Visited ? "Yes" : "No")</td>
            </tr>
        }
    </table>
}

@helper ShowHeader()
{
    <h2>I'm a Razor declarative helper!</h2>
}
The @helper keyword begins the HTML declaration. The keyword is followed by the signature and implementation of the method. The body of the helper is just an embedded fragment of a Razor template. You can have multiple helpers in a single file. (Keep in mind that the helper repository won’t be detected if it’s placed outside the App_Code folder.)
To invoke a declarative Razor helper, you do as follows:
@using RazorEngine.Models;
@model IList<City>

@MyHelpers.ShowHeader()
<p>
    @MyHelpers.CityGrid(Model)
</p>
The name of the helper is composed of two parts: the repository name and the helper name.
Coding the view
In this final section of the chapter, I’ll delve into a couple of important points that affect views and controllers: how to effectively pass data to a view, and how to add more flexibility to the view-rendering processing.
Modeling the view
Using Razor (or the ASPX engine), you define the graphical layout of a view. Sometimes, the view is just made of static content. More often, though, the view must incorporate real data resulting from some operation against the middle tier of the system or loaded from the application cache or session state. How would you make this data available to the view?
The golden rule of ASP.NET MVC design claims that the view receives but doesn’t compute any data it has to display. You can pass data in three nonexclusive ways: via the ViewData dictionary, the ViewBag dictionary, and a tailor-made container object, often referred to as the view model object.
The ViewData dictionary
Exposed directly by the Controller class, the ViewData property is a name-value dictionary object. Its programming model is analogous to using Session or other ASP.NET intrinsic objects:
public ActionResult Index()
{
    ViewData["PageTitle"] = "Programming ASP.NET MVC";
    return View();
}
Any data you store in a dictionary is treated as an object and requires casting, boxing, or both for it to be worked on in the view. You can create as many entries as you like in the dictionary. The lifetime of the dictionary is the same as the request.
The ViewData dictionary is packed into the view context—an internal structure through which the ASP.NET MVC infrastructure moves data from the controller level to the view level—and made available to the view engine. The view objects—ViewPage for the ASPX engine and WebViewPage for Razor—expose the ViewData dictionary to any code in the view templates. Here’s how you retrieve ViewData content from a view template:
<head>
   <title> @ViewData["PageTitle"] </title>
</head>
Keep in mind that you are not limited to storing strings in the ViewData dictionary.
Overall, the ViewData dictionary is straightforward to use and extremely flexible. In fact, it allows you to pass a new piece of data to the view by simply creating a new entry. At the same time, the name-based model forces you to use a lot of magic strings (plain-text strings such as PageTitle in the preceding example) and, more important, to match them between the controller and view code. By using constants, you can reduce some of the inherent brittleness of magic strings, but you still have no defense against the possibility of picking up the wrong name. If you happen to reference the wrong dictionary entry, you’ll find out only at run time. The ViewData dictionary is well suited for simple solutions and applications with a relatively short lifetime. As the number of dictionary entries and the number of views grow, maintenance becomes an issue, and you should move away from ViewData when looking for other options.
The ViewBag dictionary
Also defined on the Controller class, the ViewBag property offers an even more flexible facility to pass data to the view. The property is defined as a dynamic type, as illustrated here:
public dynamic ViewBag { get; }When a .NET compiler encounters a dynamic type, it emits a special chunk of code instead of simply evaluating the expression. Such a special chunk of code passes the expression to the Dynamic Language Runtime (DLR) for a run-time evaluation. In other words, any expression based on the dynamic type is compiled to be interpreted at run time. Any member set or read out of ViewBag is always accepted by compilers but not actually evaluated until execution. Here’s an example that compares the usage of ViewData and ViewBag:
public ActionResult Index()
{
    // Using ViewData
    ViewData["PageTitle"] = "Programming ASP.NET MVC";

    // Using ViewBag
    ViewBag.PageTitle = "Programming ASP.NET MVC";

    return View();
}
The compiler doesn’t care whether a property named PageTitle really exists on ViewBag. All it does is pack a call to the DLR interpreter, where it asks the DLR to try to assign a given string to a certain PageTitle property. Similarly, when PageTitle is read out of ViewBag, the compiler instructs the DLR to check whether such a property exists. If it doesn’t exist, the compiler throws an exception. Here’s how you consume content from ViewBag in a Razor view:
<head>
   <title> @ViewBag.PageTitle </title>
</head>
From a developer’s perspective, which is better, ViewBag or ViewData?
The ViewBag syntax is terser than the ViewData syntax, but as I see things, that’s the entire difference. Just as with ViewData, you won’t have compile-time checking on properties. The dependency of the dynamic type on the DLR doesn’t save you run-time exceptions if you mistype a property name. In the end, it’s purely a matter of preference. Also, for what it matters, ViewBag requires at least ASP.NET MVC 3 and .NET 4, whereas ViewData works with any version of ASP.NET MVC and with .NET 2.0.
Note
Because the dynamic type is resolved at run time, Visual Studio IntelliSense can’t indicate anything about its properties. IntelliSense treats a dynamic type like a plain Object type. Some tools—most noticeably JetBrains ReSharper—are a bit smarter. ReSharper tracks all the properties encountered along the way in the scope where the dynamic variable is used. For any properties used, an entry is added to the IntelliSense menu of members.
Strongly typed view models
When you have dozens of distinct values to pass to a view, the same flexibility that makes it possible for you to quickly add a new entry or rename an existing one becomes your worst enemy. You are left on your own to track item names and values; you get no help from IntelliSense and compilers.
The only proven way to deal with complexity in software is through appropriate design. So, defining an object model for each view helps you to track what that view really needs. I suggest that you define a view-model class for each view you add to the application:
public ActionResult Index()
{
...
// Pack data for the view using a view-specific container object.
var model = new YourViewModel();
// Populate the model.
...
// Trigger the view.
return View(model);
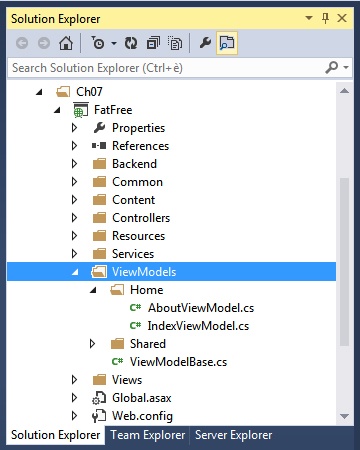
}Having a view-model class for each view also creates the problem of choosing an appropriate class name. You could use a combination of controller and view names. For example, the view-model object for a view named Index invoked from the Home controller might be named HomeIndexViewModel. Even better, you can create a subfolder named Home in the Models folder and host there an IndexViewModel class. In my applications, I often also rename Models to ViewModels. (This particular approach is just a suggestion, though; you should just feel free to choose meaningful names.)
How would you shape up a view-model class?
First and foremost, a view-model object is a plain data-transfer object with only data and (nearly) no behavior. Ideally, properties on a view-model object expose data exactly in the format the view expects it to be. For example, if the view is expected to display only the date and status of pending orders, you might not want to pass a plain collection of full-blown Order objects because they result from the middle tier. The following view-model class is a better choice for modeling data for the view. It helps keep the presentation layer and middle tier decoupled.
public class LatestOrderViewModel
{
    public DateTime OrderDate { get; set; }
    public String Status { get; set; }
}
The ASP.NET MVC infrastructure guarantees that ViewData and ViewBag collections are always made available to the view object without any developer intervention. The same is not true for custom view-model objects.
When you use a view model object, you must declare the view model type in the view template so that the actual view object can be created of type ViewPage<T> in the ASPX view engine and of type WebViewPage<T> if Razor is used. Here’s what you need to have in an .aspx template if you use the ASPX Web Forms view engine:
<%@ Page Language="C#" MasterPageFile="~/Views/Shared/Site.Master"
         Inherits="System.Web.Mvc.ViewPage<LatestOrderViewModel>" %>
In the preceding code snippet, the type assigned to the Inherits attribute is not fully qualified. This means that you probably need to add an @Import directive to specify the namespace to import to locate the view-model type. If the view engine is Razor, here’s what you need:
@model LatestOrderViewModel
To retrieve the view-model object in the view template, you use the Model property defined on both WebViewPage and ViewPage. Here’s a Razor example:
<h2>
    Latest order placed
    <span class="highlight">@Model.OrderDate.ToString("dddd, dd MMM yyyy")</span>
    <br />
    Status is: <span class="highlight">@Model.Status</span>
</h2>
In this example, the format of the date is established in the view. It is also acceptable that the controller prepares the date as a string and passes it down to the view, ready for display. There’s not a clear guideline on where this code belongs; it falls into a sort of gray area. My preference is to keep the view as simple as possible. If the format is fixed and not dependent on run-time conditions, it is acceptable for you to pass DateTime and let the view figure out the rest. When a bit of logic is required to format the date, in general I prefer to move it up to the controller.
Although each view should have its own model object, limiting the number of classes you deal with is always a good idea. To reuse model classes in multiple views, you typically build a hierarchy of classes. Here’s an example of a view-model base class:
public class ViewModelBase
{
    public String Title { get; set; }
    public String Header { get; set; }
}
public class LatestOrderViewModel : ViewModelBase
{
    ...
}
Finally, it is always a good approach to devise the structure of the view model class around the view rather than around the data. In other words, I always prefer to have a view-model class designed as a container.
Suppose that you need to pass a list of orders to the view. The first option that springs to mind is using the following view-model class (in a Razor template):
@model IList<PendingOrder>
Functionally speaking, the approach is sound. But is it extensible? In my experience, you always end up stuffing a variety of heterogeneous data in a view. This might be required because of refactoring efforts, as well as new requirements that pop up. A more maintainable approach (one that will let you refactor without changing controller/view interfaces) is the following:
@model YourViewModel
In this case, YourViewModel is defined as shown here:
public class YourViewModel
{
    public IList<PendingOrder> PendingOrders {get; set;}
}
A view-model class ultimately models the view, not the data.
Important
I’m not sure if I stated it clearly enough, so let me rephrase it. Strongly typed view models are the only safe and sound solution for any ASP.NET MVC application of at least moderate complexity and duration. I do believe that using view models is a state of mind more than a way to fight complexity. However, if you can make it work with a couple of ViewData or ViewBag entries per view, and you’ll be throwing the site away after a few months (for example, a site you set up for a specific event), by all means ignore view models.
Packaging the view-model classes
Where should you define the view-model classes? This mostly depends on the size of the project. In a large project with a good deal of reusability and an expected long lifetime, you probably should create a separate class library with all view-model classes you use.
In smaller projects, you might want to isolate all the classes in a specific folder. This can be the Models folder that the default Visual Studio project templates create for you. Personally, I tend to rename Models to ViewModels and group classes in controller-specific subfolders, as shown in Figure 2-6.
Advanced features
ASP.NET MVC is built around the Convention-over-Configuration pattern. As is typical of frameworks, the pattern saves developers a lot of programming details as long as they adhere to a number of fixed rules and conventions. This is particularly evident with views.
The view engine works by retrieving and processing view templates. How does it know about templates? In general, it can happen in either of two ways: you register known views with the engine (configuration), or you place views in specific locations so that the engine can retrieve them (convention). What if you want to organize your views according to a different set of conventions? Quite simply, you need your own view engine.
Note
The need for a custom view engine is more frequent than one might think at first. You might create a custom view engine for two main reasons: you want to express views in a new markup language, or you want to apply a set of personalized conventions. I’m not saying that every application should use a custom markup language, but most applications might benefit from views organized in a custom way.
Custom view engines
Most applications of mine employ their own view engine that just organize views in a slightly different way or need an extra layer of code to resolve view names to actual markup files. If you have reasons for using a different directory schema for some of your views, all you need to do is derive a simple class, as shown here:
public class MyViewEngine : RazorViewEngine
{
    public MyViewEngine()
    {
        this.MasterLocationFormats = base.MasterLocationFormats;
        this.ViewLocationFormats = new string[]
                                          {
                                             "~/Views/{1}/{0}.cshtml"
                                          };

        // Customize the location for partial views
        this.PartialViewLocationFormats = new string[]
                                          {
                                             "~/PartialViews/{1}/{0}.cshtml ",
                                             "~/PartialViews/{1}/{0}.vbhtml"
                                          };
    }
}
To use this class in lieu of the default view engine, you enter the following in global.asax:
protected void Application_Start()
{
    ...

    // Removes the default engines and adds the new one.
    ViewEngines.Engines.Clear();
    ViewEngines.Engines.Add(new MyViewEngine());
}
After you do this, your application will fail if any of the partial views is located outside a Partial Views subfolder.
Note
While setting custom locations is a good reason for considering custom view engines, you should keep in mind that if all you need to do is set location format properties on one of the default engines, you might not need to create a custom view engine at all. It might suffice that you retrieve the current instance in Application_Start and set location format properties directly.
Important
If you have a custom view engine that supports custom folders (for example, a PartialViews folder for grouping partial views) it is essential that you add a web.config file to it. You can copy the same web.config file you find in the Views folder by default. That file contains critical information for the ASP.NET MVC runtime to locate view classes correctly.
Render actions
Complex views result from the composition of a variety of child views. When a controller method triggers the rendering of a view, it must provide all data the view needs for the main structure and all of the parts. Sometimes, this requires the controller to know a lot of details about parts of the application with which the class itself is not directly involved. Want an example?
Suppose that you have a menu to render in many of your views. Whatever action you take in relation to your application, the menu must be rendered. Rendering the menu, therefore, is an action not directly related to the current ongoing request. How would you handle that? Render actions are a possible answer.
A render action is a controller method that is specifically designed to be called from within a view. A render action is therefore a regular method on the controller class that you invoke from the view by using one of the following HTML helpers: Action or RenderAction.
@Html.Action("action")Action and RenderAction behave mostly in the same way; the only difference is that Action returns the markup as a string, whereas RenderAction writes directly to the output stream. Both methods support a variety of overloads through which you can specify multiple parameters, including route values, HTML attributes, and, of course, the controller’s name. You define a render action as a regular method on a controller class and define it to be the renderer of some view-related action:
public ActionResult Menu()
{
    var options = new MenuOptionsViewModel();
    options.Items.Add(new MenuOption {Url="...", Image="..."});
    options.Items.Add(new MenuOption {Url="...", Image="..."});
    return PartialView(options);
}
The content of the menu’s partial view is not relevant here; all it does is get the model object and render an appropriate piece of markup. Let’s see the view source code for one of the pages you might have in the application:
<div>
    ...
    @Html.RenderAction("Menu")
    ...
</div>
The RenderAction helper method calls the Menu method on the specified controller (or on the controller that ordered the current view to be rendered) and directs any response to the output stream. In this way, the view incorporates some logic and calls back the controller. At the same time, your controller doesn’t need to worry about passing the view information that is not strictly relevant to the current request it is handling.
Child actions
The execution of a render action is not simply a call made to a method via reflection. A lot more happens under the hood. In particular, a render action is a child request that originates within the boundaries of the main user request. The RenderAction method builds a new request context that contains the same HTTP context of the parent request and a different set of route values. This child request is forwarded to a specific HTTP handler—the ChildActionMvcHandler class—and is executed as if it came from the browser. The overall operation is similar to what happens when you call Server.Execute in general ASP.NET programming. There’s no redirect and no roundtrip, but the child request goes through the usual pipeline of a regular ASP.NET MVC request and honors any action filters that it might encounter with just a few exceptions. The most illustrious examples of filters that won’t work across child actions are AuthorizeRequest and OutputCache. (I’ll say more about action filters later in the book.)
By default, any action method can be invoked from a URL and via a render action. However, any action methods marked with the ChildActionOnly attribute won’t be available to public callers, and their usage is limited to rendering actions and child requests.
Summary
ASP.NET MVC doesn’t match URLs to disk files; instead, it parses the URL to figure out the next requested action to take. Each action terminates with an action result. The most common type of action result is the view result, which consists of a chunk of HTML markup.
Generated by the controller method, a view result is made of a template and model. The view engine takes care of parsing the view template and filling it in with model data. ASP.NET MVC comes with two default view engines supporting different markup languages for expressing the template and different disk locations to discover templates. Today, Razor is the most commonly used view engine, and it superseded the old-fashioned ASPX syntax that reminds too much of classic ASP.NET but doesn’t allow (reasonably) the use of server controls.
In this chapter, we first examined what it takes to process a view and then focused on development aspects, including using HTML helpers and templated helpers for the two default engines, ASPX and Razor. We also discussed best practices for modeling data and contrasted dictionaries with strongly typed view models.
I suggest that you take a look at the BasicApp examples that are in the companion source code to better understand what’s been discussed in this chapter. In ASP.NET MVC 5, the default app built by the Visual Studio wizard is based on Twitter Bootstrap and offers a graphical template that is responsive to different screen sizes.