Chapter 4. Input forms
Whatever you can do or dream, begin it.
—Wolfgang Goethe
Classic ASP.NET bases its programming model on the assumption that state is maintained across postbacks. This is not true at all at the HTTP-protocol level, but it is brilliantly simulated by using the page view-state feature and a bit of work in the Web Forms page life cycle. The view state, which is so often kicked around as a bad thing, is a great contribution to establishing a stateful programming model in ASP.NET, and that programming model was one of the keys to ASP.NET’s success and rapid adoption. Data entry is a scenario in which server controls really shine and in which their postback and view-state overhead save you from doing a lot of work. Server controls also give you a powerful infrastructure for input validation.
If you’ve grown up with Web Forms and its server controls, you might be shocked when you’re transported into the ASP.NET MVC model. In ASP.NET MVC, you have the same functional capabilities as in Web Forms, but they’re delivered through a different set of tools. The ASP.NET MVC framework uses a different pattern, one that is not page based and relies on a much thinner abstraction layer than Web Forms. As a result, you don’t have rich native components such as server controls to quickly arrange a nice user interface in which elements can retain their content across postbacks. This fact seems to cause a loss of productivity, at least for certain types of applications, such as those heavily based on data entry.
Is this really true, though?
For sure, in ASP.NET MVC you write code that is conceptually and physically closer to the metal; therefore, it takes more lines, but it gives you a lot more control over the generated HTML and actual behavior of the run-time environment. You don’t have to write everything from scratch, however. You have HTML helpers to automatically create (quite) simple but functional viewers and editors for any primitive or complex type. You have data annotations to declaratively set your expectations about the content of a field and its display behavior. You have model binders to serialize posted values into more comfortable objects for server-side processing. And, you have tools for both server and client validation.
This chapter aims to show you how to grab input data through forms in ASP.NET MVC and then validate and process it against a persistence layer.
Note
Growing attention is being garnered these days by Ajax-based solutions for input forms. For example, it’s becoming common to display a modal dialog box to the user in which to enter input data. Displaying a modal dialog box is as easy as creating a separate <div> and have client frameworks such as Twitter Bootstrap or jQuery UI to manage the presentation. As far as posting data is concerned, however, using a plain FORM post and full or partial page refresh under the control of the ASP.NET MVC API being discussed in this chapter is still a common and widely used option. The other option that would make the content of this chapter less interesting is managing the HTTP POST yourself by using plain JavaScript code.
General patterns of data entry
Input forms revolve around two main patterns: Edit-and-Post and Select-Edit-Post. The former displays an HTML form and expects users to fill the fields and post data when they’re done. The latter pattern just extends the former by adding an extra preliminary step. The users select an item of data, place it into edit mode, play with the content, and then save changes back to the storage layer.
I’m not explicitly covering the Edit-and-Post pattern because it is merely a simpler version of the Select-Edit-Post pattern. The sections Editing data and Saving data later in the chapter, which provide a description of the Select-Edit-Post pattern, also provide one of the Edit-and-Post pattern. Let’s proceed with an example.
A classic Select-Edit-Post scenario
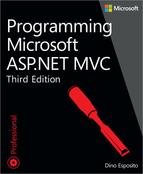
I’ll illustrate the Select-Edit-Post pattern through an example that starts by letting users pick a customer from a drop-down list. Next, the record that contains information about the selected customer is rendered into an edit form, where you can enter updates and eventually validate and save them.
In this example, the domain model consists of an Entity Framework model inferred from the canonical Northwind database. Figure 4-1 shows the initial user interface of the sample application.
Note
Examples discussed in this chapter don’t actually use any database linked or embedded in some way in the project. All examples end up placing simple query calls to a web service, available at my personal site http://www.expoware.org. You can find the details of this in the file northwind.cs in the BookSamples.Components library project.
Presenting data and handling the selection
The listing that follows shows the controller action that is used to populate the drop-down list to offer the initial screen to the user. Observe that I’m designing controllers according to the Coordinator stereotype defined in the Responsibility Driven Design (RDD) methodology. (I talk more about RDD and MVC controllers as coordinators in Chapter 7. For now, suffice it to say that a coordinator is a component that reacts to events and delegates any further action to an external component.) A coordinator is limited to passing input and capturing output. Having controllers implemented as coordinators in ASP.NET MVC is beneficial because it decouples the layer that receives requests from the layer (or layers) that processes requests. For the sake of simplicity, at this time the code doesn’t make use of dependency injection. The next obvious step would be injecting the instance of the coordinator class—HomeService—via Inversion of Control (IoC).
public class HomeController : Controller
{
    private readonly HomeService _service = new HomeService();
    public ActionResult Index()
    {
        var model = _service.GetModelForIndex();
        return View(model);
    }
}
The method Index obtains a view-model object that contains the list of customers to display.
public class IndexViewModel : ViewModelBase
{
    public IndexViewModel()
    {
        Customers = new List<SimpleCustomer>();
    }
    public IEnumerable<SimpleCustomer> Customers { get; set; }
}
Here’s the implementation of the GetModelForIndex method in the coordinator component:
public class HomeService
{
    public IndexViewModel GetModelForIndex()
    {
        var model = new IndexViewModel {Customers = NorthwindCustomers.GetAll()};
        return model;
    }
}
The view that produces the interface in Figure 4-1 is shown here:
@model Sep.ViewModels.Home.IndexViewModel

<div class="floating">
    <p class="legend">Customers</p>
    @using(Html.BeginForm("edit", "home"))
    {
        @Html.DropDownList("customerList", new SelectList(Model.Customers, "Id", "Company"))
        <input type="submit" name="btnEdit" value="Edit" />
    }
</div>
After the user has selected a customer from the list (by clicking a submit button), he submits a POST request for an Edit action on the HomeController class.
Editing data
The request for the Edit action moves the application into edit mode, and an editor for the selected customer is displayed. As you can see in Figure 4-2, you should also expect the successive view to retain the current drop-down list status. The following code shows a possible implementation for the Edit method on the Home controller:
public ActionResult Edit([Bind(Prefix = "customerList")] String customerId)
{
    var model = _service.GetModelForEdit(customerId);
    return View(model);
}
Chapter 3, points out that the Bind attribute instructs the default model binder to assign the value of the posted field named customerList to the specified parameter. In this case, the GetModelForEdit method retrieves information about the specified customer and passes that to the view engine so that an input form can be arranged and displayed to the user:
public EditViewModel GetModelForEdit(String id)
{
    var model = new EditViewModel
                    {
                        Title = "Edit customer",
                        Customer = NorthwindCustomers.Get(id),
                        Customers = NorthwindCustomers.GetAll()
                    };
    return model;
}
Why does the GetModelForEdit method also need to retrieve the list of customers?
This is a direct consequence of not having the view state around. Every aspect of the view must be recreated and repopulated each time. This is a key part of the HTTP contract and relates to the inherent HTTP stateless-ness. In ASP.NET Web Forms, most of the refilling work is done automatically by the abstraction layer of the framework through information stored in the view state. In ASP.NET MVC, it’s just up to you.
In the preceding code snippet, I just place another call to the service layer; a more serious application would probably cache data and reload from there. The caching layer, however, could also be incorporated in the repository itself.
Here’s the code for the view:
@model Sep.ViewModels.Home.EditViewModel

<div class="container">
    <div class="floating">
        <p class="legend">Customers</p>
        @using(Html.BeginForm("edit", "home"))
        {
            @Html.DropDownList("customerList",
                new SelectList(Model.Customers, "Id", "Company", Model.Customer.Id))
            <input type="submit" name="btnEdit" value="Edit" />
        }
    </div>
    <div class="floating-spacer">
        @Html.Partial("uc_customerEditor", Model.Customer)
    </div>
</div>
The structure of the view is nearly the same as in Figure 4-1, the only difference being the table-based editor on the right of the view. The editor (uc_customerEditor.cshtml) is created through the Partial HTML helper. If you look into the list of native HTML helpers, you find two apparently similar helpers: Partial and RenderPartial. What’s the difference? As is hinted in Chapter 2, Partial just returns a string, whereas RenderPartial performs the action of rendering a string. If the goal is only that of creating a view, they are nearly identical but still require a slightly different programming syntax. To call RenderPartial, you need the following in Razor:
@{ Html.RenderPartial(view) }Figure 4-2 shows the editor in action.

Saving data
After the input form is displayed, the user enters any data she reckons to be valid and then presses the button that posts the content of the form to the server. Here’s the markup for a typical form that posts changes. (The markup is the content of the uc_customerEditor.cshtml file.)
@model BookSamples.Components.Data.SimpleCustomer

<div class="container">
@using(Html.BeginForm("update", "customer", new { customerId = Model.Id }))
{
    <table id="__tableCustomerEditAscx" rules="rows" frame="hsides">
        <tr>
            <td width="100px"><b>ID</b></td>
            <td width="350px">@Model.Id</td>
        </tr>
        <tr>
            <td><b>Company</b></td>
            <td><span>@Model.Company</span></td>
        </tr>
        <tr>
            <td><b>Contact</b></td>
            <td>@Html.DisplayTextFor(c => c.Contact)</td>
        </tr>
            ...
        <tr>
            <td><b>Country</b></td>
            <td>@Html.TextBoxFor(c => c.Country,
                        new Dictionary<String, Object>() { { "class", "textBox" } })
                <br />
                @Html.ValidationMessage("country")
            </td>
        </tr>
    </table>
    <br/>
    <input id="btnSave" type="submit" value="Save" />
}
</div>
Typically, you group any editable field (for example, a text box) with a ValidationMessage helper. The validation helper displays any message that originates as a result of invalid values being entered in the field. Furthermore, you ensure that the resulting URL includes a key value that uniquely identifies the record to be updated. Here’s an example:
Html.BeginForm("update", "home", new { customerId = Model.CustomerID })Internally, BeginForm matches the data it has received to the parameters of registered URL routes in an attempt to create the proper URL to post the form. The preceding code generates the following URL:
http://yourserver/customer/update?customerId=alfki
Thanks to the default model binder, the method Update receives the fields of the input form as members of the SimpleCustomer class:
public ActionResult Update(SimpleCustomer customer)
{
    var modelState = ViewData.ModelState
    var model = _service.TryUpdateCustomer(modelState, customer);
    return View("edit", model);
}
The method needs to do a couple of things: update the data layer, and display the edit view so that the user can continue making changes. Except perhaps for some unrealistically simple scenarios, the update operation requires validation. If validation of the data being stored is unsuccessful, detected errors must be reported to the end user through the user interface.
The ASP.NET MVC infrastructure offers built-in support for displaying error messages that result from validation. The ModelState dictionary—a part of the Controller class—is where methods add notifications of an error. Errors in the ModelState dictionary are then displayed through the Validation Message helper, as illustrated here:
public EditCustomerViewModel TryUpdateCustomer(ModelStateDictionary modelState, Customer customer)
{
if (Validate(modelState, customer))
Update(customer);
return EditCustomer(customer.CustomerID);
}
private static Boolean Validate(ModelStateDictionary modelState, Customer customer)
{
var result = true;
// Any sort of specific validation you need ...
if (!CountryIsValid(customer.Country)))
{
// For each detected error, add a message and set a new display value
modelState.AddModelError("Country", "Invalid country.");
result = false;
}
return result;
}
private static void Update(Customer customer)
{
NorthwindCustomers.Update(customer);
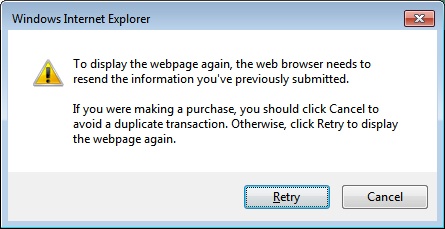
}As the name suggests, the ModelState dictionary is the key/value repository for any messages that relate to the state of the model behind the view. The value is the error message; the key is the unique name used to identify the entry (such as the string “Country” in the preceding example). The key of a model state entry will match the string parameter of the Html.ValidationMessage helper. Figure 4-3 shows the system’s reaction when the user attempts to enter an invalid value.

During the validation process, every time you detect an error in the posted data, you add a new entry to the ModelState dictionary, as demonstrated here:
modelState.AddModelError("Country", "Invalid country.");It is your responsibility to provide localized error messages.
Observe that the model binder always sets parameters to null if a corresponding match cannot be found through the various value providers (for example, the form, route parameters, or the query string). In particular, this means that string parameters or string members can be set to null. You should always check against nullness before you attempt to consume a value that came through model binding. The following code shows a possible way to deal with this condition when strings are involved:
// In the examples for this chapter, validation is really coding in this way. In the end,
// validation is a plain logical expression suggested by business. While this condition
// is not much realistic, it still makes perfectly sense in a demo. Anyway, note that in light
// of this code any "valid" country name you enter is denied except "USA".
if (String.IsNullOrEmpty(customer.Country) || !customer.Country.Equals("USA"))
{
   ...
}
With respect to the earlier code, you would place the test against nullness in the CountryIsValid method.
Applying the Post-Redirect-Get pattern
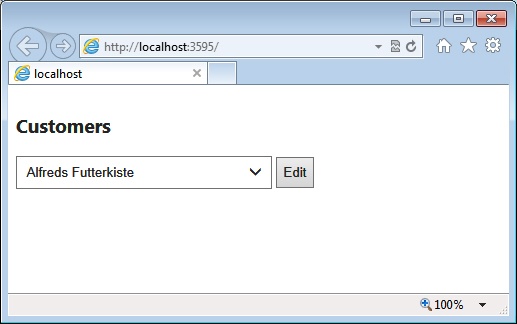
The previous approach to input forms is functional, but it’s not free of issues. First, the URL in the address bar might not reflect the data being displayed by the page. Second, repeating the last action (Refresh or an F5 keystroke) might not simply prompt the user with the annoying confirmation message shown in Figure 4-4. As the user goes ahead, she can easily get a run-time exception if the repeated operation is not implemented as idempotent (that is, if it doesn’t always produce the same result regardless of how many consecutive times it is called).
However, these aspects of ASP.NET applications are not specific to ASP.NET MVC. They exist in ASP.NET Web Forms, too, but this is not a good reason to avoid using a better implementation.
The lack of synchronization between the URL in the browser’s address bar and the content displayed might not be a problem in most cases. Your users might not even notice that. In fact, the confirmation dialog box that prompts the user when she refreshes the current page is an old (and not really pleasant) acquaintance of ASP.NET developers and the users of their applications. Let’s see how the Post-Redirect-Get (PRG) pattern can help fix both aspects.
Keeping the URL and content synchronized
In the previous example, the URL shown in the address bar after the user has selected, for instance, user ALFKI is the following:
// Action EDIT on CUSTOMER controller
http://yourserver/customer/edit
If the user repeats the last action (for example, by pressing F5), he gets the dialog box shown in Figure 4-4 and then the view updates as expected. Wouldn’t it be preferable for the URL to reflect the selected customer and have the page be refreshed without side effects?
The side effect represented by the dialog box in Figure 4-4 has a well-known origin. When F5 is pressed, the browser just blindly reiterates the last HTTP request. And, the selection of a customer from a drop-down list (shown in Figure 4-1) is an HTTP POST request for the action Edit on the Customer controller.
The PRG pattern recommends that each POST request, after having been processed, terminates with a redirect to a resource accessed via GET. If you do so, the URL stays nicely synchronized with the customer displayed, and your users forget the annoying dialog box that you saw in Figure 4-4.
Splitting POST and GET actions
The first step on the way to applying PRG to ASP.NET MVC applications is neatly separating POST actions from GET actions. Here’s how to rewrite the Edit action:
[HttpPost]
[ActionName("edit")]
public ActionResult EditViaPost([Bind(Prefix = "customerList")] String customerId)
{
    // POST, now REDIRECT via GET to Edit
    return RedirectToAction("edit", new {id = customerId});
}

[HttpGet]
[ActionName("edit")]
public ActionResult EditViaGet(String id)
{
    var model = _service.GetModelForEdit(id);
    return View("edit", model);
}
Every time the user posts the Edit method to select a given customer, all that happens is a redirect (HTTP 302) to the same action via GET. The GET method for the action Edit receives the ID of the customer to edit and does its job as usual.
The beautiful effect is that you can change the selection in either of two ways: by typing the URL in the address bar (as a command) or just by clicking the drop-down list. Moreover, when the user interface is updated, the last action tracked by the browser is a GET—and you can repeat the GET as many times as you like without incurring any boring warnings or annoying exceptions.
Updating only via POST
Take a look back at Figure 4-3, which represents the next page after an update. In particular, the figure shows a failed update, but that is not relevant here. What’s relevant instead is the URL.
http://yourserver/customer/update?customerId=ALFKI
This is the URL that will be repeated by pressing F5. I can hardly believe that any regular user will ever attempt to manually edit this URL and try to push updates to another customer. But, as unlikely as that is, it’s definitely a possibility.
The URL of an update operation should never be visible to users. The user performs the update, but the operation remains hidden between two displays of the same page. This is exactly what you get with the PRG pattern. Here’s how to rewrite the Update action:
[HttpPost]
public ActionResult Update(SimpleCustomer customer)
{
      var modelState = ViewData.ModelState;
      _service.TryUpdateCustomer(modelState, TempData, customer);
      return RedirectToAction("edit", new { id = customer.Id });
}
As you can see, you need only the HttpPost leg. A user orders the update from a page created via a GET that displays the customer being edited. The update takes place, and the next view is obtained by redirecting again to the Edit action for the same customer. It’s simple, clean, and effective.
Saving temporary data across redirects
There’s one final issue to take into account. The PRG pattern makes the overall code look cleaner but requires two requests to update the view. This might or might not be a problem with regard to performance—I don’t think it is. Anyway, this is primarily a functional problem: if the update fails, how do you pass feedback to the view? In fact, the view is being rendered in the GET action subsequent to the redirect; it’s quite another blank request.
Overall, the best option you have is saving feedback messages to the Session object. ASP.NET MVC provides a slightly better option that still uses session state, but which does so through a smart wrapper—the TempData dictionary. Here’s how to modify the code that validates before updating:
private static Boolean Validate(ModelStateDictionary modelState,
                                TempDataDictionary tempData,
                                SimpleCustomer customer)
{
    var result = true;

    if (String.IsNullOrEmpty(customer.Country) || !customer.Country.Equals("USA"))
    {
        modelState.AddModelError("Country", "Invalid country.");

        // Save model-state to TempData
        tempData["ModelState"] = modelState;
        result = false;
    }

    return result;
}
You first add feedback messages to the ModelState dictionary as usual. Then, you save a reference to the ModelState in the TempData dictionary. The TempData dictionary stores any data you provide in the session state for as long as two requests. After the second request past the storage has been processed, the container clears the entry.
You do the same for any other message or data that you need to pass to the view object. For example, Figure 4-5 depicts the message that is added by the following code if the update operation completes successfully:
private Boolean Update(TempDataDictionary tempData, SimpleCustomer customer)
{
    // Perform physical update
    var result = _repository.Update(customer);

    // Add a message for the user
    var msg = result
                    ? "Successfully updated."
                    : "Update failed. Check your input data!";
    tempData["OutputMessage"] = msg;
    return result;
}
You still might want to give some clear feedback to users about what has happened before redisplaying the same edit form for them to keep on working. If your update operation takes the user to a completely different page, you might not need the previous trick.
Saving data to the TempData dictionary is only half the effort. You also need to add code that retrieves the dictionary from the session state and merges that with the current model state. This logic belongs to the code that actually renders the view.
[HttpGet]
[ActionName("edit")]
public ActionResult EditViaGet(String id)
{
   // Merge current ModelState with any being recovered from TempData
   LoadStateFromTempData();

    ...
}
private void LoadStateFromTempData()
{
    var modelState = TempData["ModelState"] as ModelStateDictionary;
    if (modelState != null)
        ModelState.Merge(modelState);
}
With these few changes, you can arrange input forms that are clean to write and read and that work effectively. The only wrinkle in an input form built in accordance with the PRG pattern is that you need a second request the redirect for each operation. Furthermore, you still need to pack the view model with any data required to render the view, including data calculated by the ongoing operation and any other data around the page, such as menus, breadcrumbs, and lists.
To go beyond this level, however, you need to embrace the Ajax approach.
Automating the writing of input forms
Input forms play a central part in the organization of views. Often input forms contain images, require the specific placement of fields, and are enriched with client-side goodies. In all of these cases, you probably need to write the template of the input form from scratch.
Generally speaking, however, there are a number of other situations in which you can automate the building of the input form. This is often the case, for example, when you write the back office of a website. A back-office system typically consists of a bunch of forms for editing records; however, as a developer, you don’t care much about the graphics. You focus on effectiveness rather than style. In a nutshell, a back-office system is the perfect case for which you don’t mind using an automatic generator of form input templates.
Predefined display and editor templates
Chapter 2 presents templated HTML helpers such as DisplayXxx and EditorXxx. These helpers can take an object (even the entire model passed to the view) and build a read-only or editable form. You use the following expression to specify the object to display or edit:
Html.DisplayFor(model => model.Customer)
Html.EditorFor(model => model.Customer)
The model argument is always the model being passed to the view. You can use your own lambda expression to select a subset of the entire model. To select the entire model (say, for editing), you can choose either of the following functionally equivalent expressions:
Html.EditorFor(model => model)
Html.EditorForModel()
Attributes placed on public members of the model class provide guidance on how to display individual values. Let’s find out how it works in practice.
Annotating data members for display
In ASP.NET MVC, templated helpers use metadata associated with class members to decide how to display or edit your data. Metadata is read through a metadata provider object; the default metadata provider grabs information from data annotations attributes. The most commonly used attributes are listed in Table 4-1.
Description | |
DataType | Indicates the presumed data type you’ll be editing through the member. It accepts values from the DataType enumeration. Supported data types include Decimal, Date, DateTime, EmailAddress, Password, Url, PhoneNumber, and MultilineText. |
DisplayFormat | Use this to indicate a format through which to display (and/or edit) the value. For example, you might use this annotation to indicate an alternate representation for null or empty values. In this case, you use the NullDisplayText property. |
DisplayName | Indicates the text to use for the label that presents the value. |
HiddenInput | Indicates whether a hidden input field should be displayed instead of a visible one. |
UIHint | Indicates the name of the custom HTML template to use when displaying or editing the value. |
Annotations are spread across a variety of namespaces, including System.ComponentModel and System.ComponentModel.DataAnnotations. If you explore these (and other) namespaces, you can find even more attributes, but some of them don’t seem to work with ASP.NET MVC, at least not in the way that you would expect.
Data annotations are attributes, and attributes don’t typically contain code. They just represent meta-information for other modules to consume. By using data annotations, you decorate your model objects with metadata. This isn’t really expected to produce any visible effect: It all depends on how other components consume metadata.
In ASP.NET MVC, default display and editor helpers simply consume only a few of the possible annotations. However, metadata information is there, and if you override default templates, you have available a lot more meta-information to consume at your leisure. The ReadOnly attribute is a good example of an annotation that default templates ignore but that ASP.NET MVC regularly understands and exposes to helpers.
Note
Data annotations include descriptive attributes that instruct listeners how to display or edit data as well as validation attributes that instruct listeners how to validate the content of a model class. I’ll discuss validation attributes later.
The following code shows a view-model class decorated with annotations:
public class CustomerViewModel : ViewModelBase
{
[DisplayName("Company ID")]
[ReadOnly(true)] // This will be blissfully ignored by default templates!
public Int32 Id { get; set; }
[DisplayName("Is a Company (or individual)?")]
public Boolean IsCompany { get; set; }
[DisplayFormat(NullDisplayText = "(empty)")]
public String Name { get; set; }
[DataType(DataType.MultilineText)]
public String Notes { get; set; }
[DataType(DataType.Url)]
public String Website { get; set; }
[DisplayName("Does this customer pay regularly?")]
public Boolean? IsReliable { get; set; }
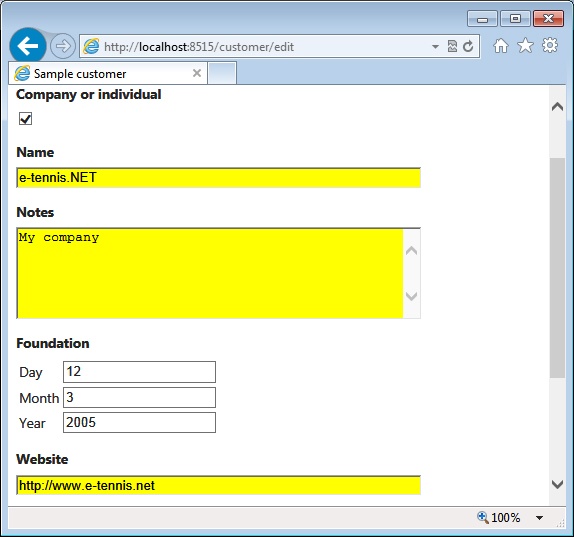
}Note that you don’t need data annotations if you are not using DisplayForModel or EditorForModel to generate input forms automatically. Like any other metadata, annotations are transparent to any code that is not specifically designed to consume them.
Figure 4-6 shows the input form that EditorForModel creates for the previous model object.

Meta-information instructs the Editor/Display helpers how to edit and display values. This results in ad hoc HTML templates being used, such as a TextArea element for multiline types and check boxes for Boolean values. For nullable Boolean values, helpers also automatically display a tri-state drop-down list. Not all data types show up in edit mode or display mode. For example, the EmailAddress and Url data types are reflected only in display mode.
To be precise, the form displayed in the figure also passed through a slight set of graphical changes due to the application of a style sheet. The Editor/Display helpers automatically read style information from a few cascading style sheet (CSS) classes with a conventional name, as shown here:
.display-label, .editor-label {
    margin: 1em 0 0 0;
    font-weight: bold;
}
.display-field, .editor-field {
    margin: 0.5em 0 0 0;
}
.text-box {
    width: 30em;
    background: yellow;
}
.text-box.multi-line {
    height: 6.5em;
}
.tri-state {
    width: 6em;
}
In particular, classes named display-label and editor-label refer to labels around input values. You can insert these styles either inline in views or inherit them from a globally shared CSS file.
Default templates for data types
Display/Editor helpers work by mapping the data type of each member to render to a predefined display or edit template. Next, for each of the template names, the system asks the view engines to return a proper partial view. Predefined display templates exist for the following data types: Boolean, Decimal, EmailAddress, HiddenInput, Html, Object, String, Text, and Url. Data types are resolved through the DataType annotation or the actual type of the value. If no match can be found, the default template is used, which consists of plain text for display and a text box for editing. Let’s see what a template looks like. The following listing shows a sample implementation of the Razor template for displaying the Url data type:
@inherits System.Web.Mvc.WebViewPage<String>
<a href="@Model">
   @ViewData.TemplateInfo.FormattedModelValue
</a>
The Url data type is rendered through a hyperlink in which the Model object references the data being displayed—most likely, a string representing a website. As you can see, the real value is used to set the URL but not the text of the hyperlink. The FormattedModelValue property on the TemplateInfo object is either the original raw model value or a properly formatted string, if a format string is specified through annotations.
Note
The TemplateInfo property is defined on the ViewData object, but it is always null, except when you’re inside of a template.
The Url template is a fairly simple one. The template for Boolean values is a more interesting example to consider:
@model bool?

@if (Model == null)
{
    <text>Not Set</text>
}
else
{
    if (Model.Value)
    {
        <text>True</text>
    }
    else
    {
        <text>False</text>
    }
}
The example contains a mix of logic and markup as the template applies to Boolean and Nullable<Boolean> values.
Editor templates are not that different from display templates, at least in terms of structure; however, the code might be a bit more complex. ASP.NET MVC provides a few predefined editors for Boolean, Decimal, HiddenInput, Object, String, Password, and MultilineText. Here’s a sample editor for a password:
@Html.Password("",
        ViewData.TemplateInfo.FormattedModelValue,
        new { @class = "text-box single-line password" })
As you can see, conventions regarding styles descend from the implementation of default templates. By changing the default template for a given data type, you can choose to style it according to different rules.
Object.cshtml is the template used to recursively loop through the public members of a type. It builds an entire form by using type-specific editors. The default implementation of Object.cshtml vertically stacks labels and editors. Although it’s valuable for quick prototyping, it is not usually something you want to seriously consider for a realistic application. Let’s move ahead and see how to customize editor templates.
Custom templates for data types
Display/editor helpers are customizable to a great extent. Any custom template consists of a custom view located in the Views[controller]DisplayTemplates folder for display helpers and in the Views[controller]EditorTemplates folder for editor helpers. If you want templates shared by all controllers, you place them in ViewsShared. If the name of the view matches the data type, the view becomes the new default template for that data type. If it doesn’t, the view won’t be used until it’s explicitly called through the UIHint annotation, as shown here:
public CustomerViewModel
{
    ...
    [UIHint("CustomerViewModel_Url")]
    public String Url {get; set;}
}
The Url property is now displayed or edited by using the CustomerViewModel_Url template. Properties whose data type is Url will continue to be served by the default template, instead.
Let’s see how to create a custom display and editor template for a type that doesn’t even have predefined templates—the DateTime type. Here’s the content for a Razor display template:
@model DateTime
@Model.ToString("ddd, dd MMM yyyy")
In this example, you just display the date in a fixed format (but one controlled by you) that includes day of the week, name of the month, and year. Here’s a sample editor template for a date:
@model DateTime
<div>
<table>
<tr>
    <td>@Html.Label("Day")</td>
    <td>@Html.TextBox("Day", Model.Day)</td>
</tr>
<tr>
    <td>@Html.Label("Month")</td>
    <td>@Html.TextBox("Month", Model.Month)</td>
</tr>
<tr>
    <td>@Html.Label("Year")%></td>
    <td>@Html.TextBox("Year", Model.Year)</td>
</tr>
</table>
</div>
You can style elements in the template by using any class names you like; as long as those classes are defined in some style sheets in the application, they will be automatically used. Observe that IDs you set in your templates are always automatically prefixed in the emitted markup by the name of the member. For example, if the preceding date template is applied to a property named BirthDate, the actual IDs emitted will be BirthDate_Day, BirthDate_Month, and BirthDate_Year.
Note
It’s probably not a very realistic scenario, but if you happen to have two editors for the same model in the same page, well, in this case you’re going to have ID conflicts that the model binder might not be able to resolve without a bit of effort on your own. If you are in this position, you might want to consider the tricks we discussed in Chapter 3 for binding a collection of custom types to a controller method.
How do you name these templates? If the UIHint attribute is specified, its value determines the template name. If it’s not specified, the DataType attribute takes precedence over the actual type name of the member. Given the following class definition, the expected template name is date. If none of the view engines can provide such a view, the default template is used, instead. Figure 4-7 shows the table-based date editor defined earlier.
Read-only members
If you decorate a member of the view model with the ReadOnly attribute, you probably expect it not to be editable in the editor. You probably expect that the display template is used within the editor for the model. You’ll be surprised to see that this is not the case. The ReadOnly attribute is properly recognized by the metadata provider, and related information is stored in the metadata available for the model. For some reason, though, this is not transformed into a template hint.
As weird as it might sound, you have data annotations to indicate a given member is read-only, but this is not reflected by default templates. There are a few workarounds to this problem. First and foremost, you can use the UIHint annotation to specify a read-only template like the one shown here, named readonly.cshtml:
<span>@Model</span>
You need to place the readonly.cshtml template in the editor folder.
Although it’s effective, this solution bypasses the use of the ReadOnly attribute. Not that this is a big problem, but you might wonder if there’s a way to solve the issue by forcing the metadata provider to process the ReadOnly attribute differently. You need a different metadata provider, such as the one shown here:
public class ExtendedAnnotationsMetadataProvider : DataAnnotationsModelMetadataProvider
{
    protected override ModelMetadata CreateMetadata(IEnumerable<Attribute> attributes,
        Type containerType,
        Func<Object> modelAccessor,
        Type modelType,
        String propertyName)
    {
        var metadata = base.CreateMetadata(
            attributes,
            containerType,
            modelAccessor,
            modelType,
            propertyName);

        if (metadata.IsReadOnly)
            metadata.TemplateHint = "readonly";   // Template name is arbitrary
        return metadata;
    }
}
You create a new class that inherits the DataAnnotationsModelMetadataProvider class and overrides the CreateMetadata method. The override is simple—you call the base method and then check what the IsReadOnly property returns. If the member is declared read-only, you can programmatically set the TemplateHint property to your custom read-only template. (It is then your responsibility to ensure that such a template is available in the Views folder.)
You must register a custom metadata provider with the system. You can do that in either of two ways. You can just store an instance of the new provider in the Current property of the Model MetadataProviders class, as shown next (this needs be done in Application_Start in global.asax):
ModelMetadataProviders.Current = new ExtendedAnnotationsMetadataProvider();
In ASP.NET MVC, you have another equally effective option: using dependency resolvers. I discuss the topic of dependency resolvers in Chapter 7. For now, it suffices to say that all internal components of ASP.NET MVC that were pluggable in earlier versions, and a bunch of new ones, are in ASP.NET MVC and are discovered by the system by using a centralized service (the dependency resolver) that acts like a service locator. A service locator is a general-purpose component that gets a type (for example, an interface) and returns another (for example, a concrete type that implements that interface).
In ASP.NET MVC, the ModelMetadataProvider type is discoverable through the dependency resolver. So, all you have to do is register your custom provider with a made-to-measure dependency resolver. A dependency resolver is a type that knows how to get an object of a requested type. A simple dependency resolver tailor-made for this scenario is shown in the code that follows:
public class SampleDependencyResolver : IDependencyResolver
{
    public object GetService(Type serviceType)
    {
        try
        {
            return serviceType == typeof(ModelMetadataProvider)
                ? new ExtendedAnnotationsMetadataProvider()
                : Activator.CreateInstance(serviceType);
        }
        catch
        {
            return null;
        }
    }

    public IEnumerable<object> GetServices(Type serviceType)
    {
        return Enumerable.Empty<Object>();
    }
}
You register the resolver in global.asax like so:
DependencyResolver.SetResolver(new SampleDependencyResolver());
Be aware that ASP.NET MVC attempts to find a valid implementation of ModelMetadataProvider, first by looking into registered resolvers and then by looking into the ModelMetadataProviders.Current property. Double registration for the ModelMetadataProvider type is not allowed, and an exception will be thrown if that occurs.
Custom templates for model data types
So far, we’ve exposed a lot of details about display and editor templates that work on primitive types of values. The internal architecture of helpers such as EditorForModel and DisplayForModel, however, provides for some inherent ability to reflect through the public interface of the model type and build a hierarchical view. This behavior is hardcoded, but it’s too simple to be useful in real-world scenarios. In this section, I’ll show you how to rewrite the display and editor template for a generic type to make it look tabular. In other words, instead of getting a vertically stacked panel of label and value <div>s, you get a two-column table with labels on the left and values on the right. The template to overwrite is named object.
Tabular templates
Writing a table-based layout is a relatively simple exercise that consists of looping over the properties of the model object. Here is the Razor code:
@inherits System.Web.Mvc.WebViewPage
@if (Model == null)
<span>@ViewData.ModelMetadata.NullDisplayText</span>
else
{
<table cellpadding="0" cellspacing="0" class="display-table">
@foreach (var prop in ViewData
.ModelMetadata
.Properties
.Where(pm => pm.ShowForDisplay && !ViewData.TemplateInfo.Visited(pm)))
{
<tr>
<td>
<div class="display-label">
@prop.GetDisplayName()
</div>
</td>
<td>
<div class="display-field">
<span>@Html.Display(prop.PropertyName)</span>
</div>
</td>
</tr>
}
</table>
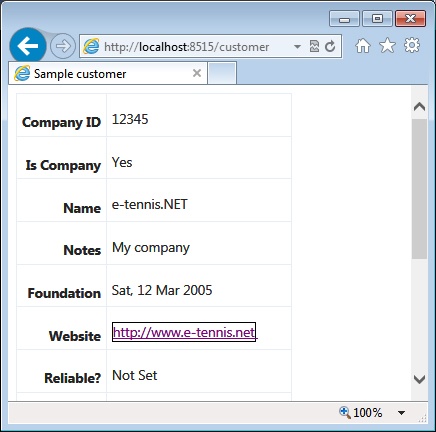
}If the model is null, you just emit the default null text for the model class. If it’s not, you proceed to looping all the properties and creating a table row for each property that has not been previously visited and that is set up for display. For each property, you then recursively call the Display HTML helper. You can style every little piece of markup at will. In this example, I’m introducing a new table-level style called display-table. Figure 4-8 shows the results.
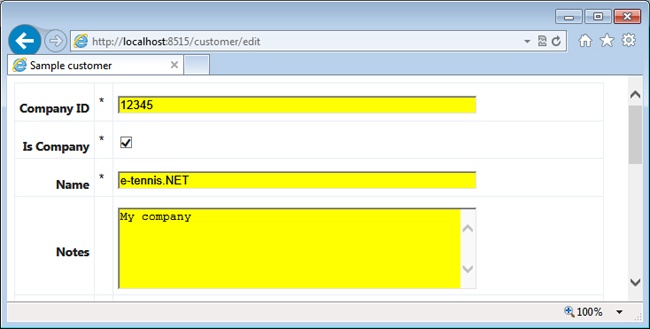
The editor template is a bit more sophisticated because it takes care of validation errors and required fields. The template has an extra column to indicate which fields are required (based on the Required annotation), and each editor is topped with a label for validation messages. Here is the source code:
@inherits System.Web.Mvc.WebViewPage
@if (Model == null)
    <span>@ViewData.ModelMetadata.NullDisplayText</span>
else {
    <table cellpadding="0" cellspacing="0" class="editor-table">
    @foreach (var prop in ViewData
                        .ModelMetadata
                        .Properties
                        .Where(pm => pm.ShowForDisplay && !ViewData.TemplateInfo.Visited(pm)))
    {
        <tr>
            <td>
                <div class="editor-label">
                    @prop.GetDisplayName()
                </div>
            </td>
            <td width="10px"> @(prop.IsRequired ? "*" : "") </td>
            <td>
                <div class="editor-field">
                    @if(prop.IsReadOnly)
                    {
                        <span>@Html.Display(prop.PropertyName)</span>
                    }
else
{
<span>@Html.Editor(prop.PropertyName)</span>
<span>@Html.ValidationMessage(prop.PropertyName, "*")</span>
}
</div>
</td>
</tr>
}
</table>
}Figure 4-9 shows the editor in action.
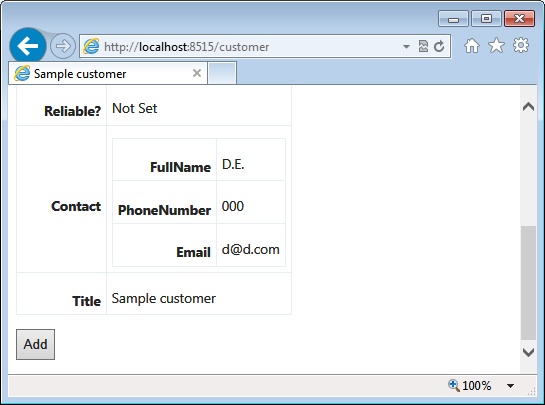
Dealing with nested models
One final point to cover is the expected behavior of the templates when the model type has nested models. The code shown so far recursively digs out properties of nested models and renders them as usual. Imagine that you have the following model:
public class CustomerViewModel
{
   ...
   public ContactInfo Contact {get; set;}
}

public class ContactInfo
{
   public String FullName {get; set;}
   public String PhoneNumber {get; set;}
   public String Email {get; set;}
}
Figure 4-10 shows the results.
As a developer, you can control this behavior to some extent. By adding an extra if branch to the code of the template, you can limit the nesting level to what you like (1 in this example).
@if (Model == null)
    <span>@ViewData.ModelMetadata.NullDisplayText</span>
else
if (ViewData.TemplateInfo.TemplateDepth > 1)
{
    <span>@ViewData.ModelMetadata.SimpleDisplayText</span>
}
else
{ ... }
The property TemplateDepth measures the allowed nesting level. With this code enabled, if the nesting level is higher than 1, you resort to a simplified representation of the child model. You can control this representation by overriding ToString on the child model type.
public class ContactInfo
{
    ...
    public override string ToString()
    {
        return "[ContactInfo description here]";
    }
}
Alternatively, you can select one column and use that for rendering. You select the column by using the DisplayColumn attribute on the child model type.
[DisplayColumn("FullName")]
public class ContactInfo
{
   ...
}
The attribute DisplayColumn takes precedence over the override of ToString.
Input validation
Programming books are full of statements such as “Input is evil,” and of course, a chapter mostly dedicated to input forms can’t leave out a section on input validation. If you want to discuss it in terms of what’s really a necessity, you should focus on server-side validation and think about the best technology available that facilitates validation in the most effective way for your application and business domain.
However, having said that, there’s really no reason for skipping a client-side validation step that would simply prevent patently invalid data from making it to the server, consuming valuable CPU cycles. So, you’re likely interested in both client-side and server-side validation. But, even in moderately complex web applications, validation applies at least at two levels: to validate the input received from the browser, and to validate the data the back end of your system is going to store.
These two levels might sometimes be just one, but this is not what typically happens in the real world and outside of books and tutorials about some cool pieces of technology. Unless your domain model is essentially aligned one-to-one with the storage and the user interface is mostly Create/Read/Update/Delete (CRUD), you have to consider (and make plans for) two levels of validation: presentation and business.
In the rest of this chapter, I’ll review a bunch of other data annotations attributes that are well integrated with the ASP.NET MVC plumbing.
Using data annotations
As mentioned, data annotations are a set of attributes which you can use to annotate public properties of any .NET class in a way that any interested client code can read and consume. Attributes fall into two main categories: display and validation. We’ve just discussed the role that display attributes play with metadata providers in ASP.NET MVC. But, before we dig out validation attributes, let’s learn a bit more about data validation in ASP.NET MVC.
Validation provider infrastructure
Chapter 3 explains how controllers receive their input data through the model-binding subsystem. The model binder maps request data to model classes and, in doing so, it validates input values against validation attributes set on the model class.
Validation occurs through a provider. The default validation provider is based on data annotations. The default validation provider is the DataAnnotationsModelValidatorProvider class. Let’s see which attributes you can use that the default validation provider understands.
Table 4-2 lists the most commonly used data annotation attributes that express a condition to verify on a model class.
Attribute | Description |
Compare | Checks whether two specified properties in the model have the same value. |
CustomValidation | Checks the value against the specified custom function. |
EnumDataType | Checks whether the value can be matched to any of the values in the specified enumerated type. |
Range | Checks whether the value falls in the specified range. It defaults to numbers, but you can configure it to consider a range of dates, too. |
RegularExpression | Checks whether the value matches the specified expression. |
Remote | Makes an Ajax call to the server and checks whether the value is acceptable. |
Required | Checks whether a non-null value is assigned to the property. You can configure it to fail if an empty string is assigned. |
StringLength | Checks whether the string is longer than the specified value. |
All of these attributes derive from the same base class: ValidationAttribute. As you’ll see in a moment, you can also use this base class to create your own custom validation attributes.
You use these attributes to decorate members of classes being used in input forms. For the entire mechanism to work, you need to have controller methods that receive data in complex data types, as shown here for the Memo controller:
public ActionResult Edit()
{
    var memo = new Memo();
    return View(memo);
}

[HttpPost]
public ActionResult Edit(Memo memo)
{
    // ModelState dictionary contains error messages
    // for any invalid value detected according to the annotations
    // you might have in the Memo model class.

    return View(memo);
}
The model-binder object edits the ModelState dictionary while binding posted values to the Memo model class. For any invalid posted value being mapped to an instance of the Memo class, the binder automatically creates an entry in the ModelState dictionary. Whether the posted value is valid depends on the outcome returned by the currently registered validation provider. The default validation provider bases its response on the annotations you might have set on the Memo model class. Finally, if the next view makes use of ValidationMessage helpers, error messages show up automatically. This is exactly the case if you use EditorForModel to create the input form.
Decorating a model class
The following listing shows a sample class—the aforementioned MemoDocument class—that makes extensive use of data annotations for validation purposes:
public class MemoDocument : ViewModelBase
{
public MemoDocument()
{
Created = DateTime.Now;
Category = Categories.Work;
}
[Required]
[StringLength(100)]
public String Text { get; set; }
[Required]
[Range(1, 5]
public Int32 Priority { get; set; }
[Required]
public DateTime Created { get; set; }
[EnumDataType(typeof(Categories))]
[Required]
public Categories Category { get; set; }
[StringLength(50, MinimumLength=4)]
[RegularExpression(@"[A-Z0-9._%+-]+@[A-Z0-9.-]+.[A-Z]{2,4}")]
public String RelatedEmail { get; set; }
}
public enum Categories
{
Work,
Personal,
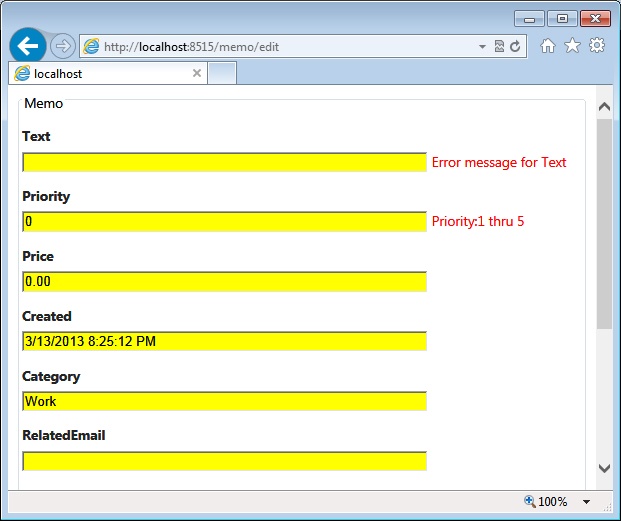
Social
}Given the class, you should expect to receive error messages if the Text property is longer than 100 characters or if it is left empty. Likewise, the Priority members must be an integer between 1 and 5 (extremes included) and the Created date cannot be omitted. The RelatedEmail member can be empty; however, if given any text, the text must be between 4 and 50 characters long and matching the regular expression. Finally, the Category member must contain a string that evaluates to one of the constants in the Categories enumerated type. Figure 4-11 shows the validation of a sample memo.
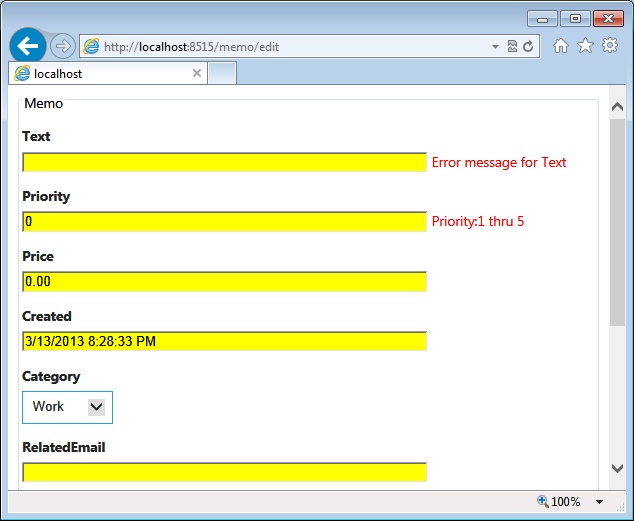
Dealing with enumerated types
You might wonder why the Category field is being edited as a plain string. It would be smarter if a drop-down list could be provided. That won’t just happen for free. The EnumDataType is recognized by the validation provider, which ensures that the value belongs to the enumeration; it is ignored by editors. If you want a drop-down list with enumerated values, you need to write a String.cshtml custom template and place it in an EditorTemplates folder. Because enumerated types are paired to strings, you overwrite String.cshtml (or .aspx) to change the way in which an enumeration is edited. In the code, you determine the markup based on the actual type of the Model property. Here’s the simple code you need:
@model Object
@if (Model is Enum)
{
   <div class="editor-field">
      @Html.DropDownList("", new SelectList(Enum.GetValues(Model.GetType())))
      @Html.ValidationMessage("")
   </div>
}
else
{
    @Html.TextBox("", ViewData.TemplateInfo.FormattedModelValue,
          new { @class = "text-box single-line" })
}
Figure 4-12 shows the same form when the just-created editor template is used.
Controlling error messages
In Figure 4-12, you see some messages that attempt to explain what went wrong. You have total control over those messages. Each attribute has an ErrorMessage property for you to set the text. Note, though, that attribute properties can accept only constant strings.
[Required(ErrorMessage = "A description is required.")]
public String Text { get; set; }
You might not like the idea of having plain strings interspersed with class definition. A way to decouple the class definition from error messages is by using resources. Using resources makes it possible for you to make offline changes to the text without touching classes. It also facilitates localization, but it still doesn’t give you programmatic control over the text being displayed. For programmatic control, the only option you have is editing the ModelState dictionary in the controller method, as shown here:
[HttpPost]
public ActionResult Edit(MemoDocument memo)
{
    if (!ModelState.IsValid)
    {
        var newModelState = new ModelStateDictionary();

        // Create a new model-state dictionary with values you want to overwrite
        newModelState.AddModelError("Text", "...");
        newModelState.AddModelError("Priority", "...");
        ...

        // Merge your changes with the existing ModelState
        ModelState.Merge(newModelState);
    }
    return View(memo);
}
Basically, you create a new model-state dictionary and then merge it with one calculated during the model-binding stage. When you merge the dictionaries, the values in the new dictionary are copied into the ModelState dictionary, overwriting any existing value.
If having constant messages works for you and all you need to do is avoid magic strings in software, you can use a resource file which, incidentally, also sets the stage for easy localization. Each validation attribute accepts an error message expressed as a resource index:
[Required(ErrorMessageResourceName="MustSetPriority",
      ErrorMessageResourceType = typeof(Strings))]
[Range(1, 5, ErrorMessageResourceName="InvalidPriority",
      ErrorMessageResourceType=typeof(Strings))]
public Int32 Priority { get; set; }
You indicate the resource through a pair of arguments: the resource container data type, and the name of the resource. The former is expressed through the ErrorMessageResourceType property; the latter is expressed by ErrorMessageResourceName. When you add a resource file to an ASP.NET MVC project, the Microsoft Visual Studio designer creates a container type that exposes strings as public members. This is the type to assign to the ErrorMessageResourceType property. By default, the name of this auto-generated type matches the name of the resource (.resx) file.
Advanced data annotations
The beauty of data annotations is that after you have defined attributes for a model type, you’re pretty much done. Most of what follows happens automatically, thanks to the deep understanding of data annotations that the ASP.NET MVC infrastructure has. However, in this imperfect world, none of the things you really need are completely free. So it is for data annotations, which cover a lot of relatively simple situations very well, but leave some extra work for you to do on your own in many realistic applications. Let’s explore a few more advanced features that you can build on top of data annotations.
Cross-property validation
The data annotations we’ve considered so far are attributes you use to validate the content of a single field. This is definitely useful, but it doesn’t help that much in a real-world scenario in which you likely need to validate the content of a property in light of the value stored in another. Cross-property validation requires a bit of context-specific code. The problem is this: how and where do you write it?
The solution that springs to mind is probably not too far from the following outline:
public ActionResult Edit(MemoDocument memo)
{
    if (ModelState.IsValid)
    {
        // If here, then properties have been individually validated.
        // Proceed with cross-property validation, and merge model-state dictionary
        // to reflect feedback to the UI.
        ...
    }
}
If the model state you receive from the binder is valid, all of the decorated properties passed the validation stage. So, taken individually, each property is OK. You proceed with context-specific, cross-property validation, add errors to a new state dictionary, and merge it to the existing ModelState.
You might be pleased to know that the CustomValidation attribute serves exactly this purpose and, overall, you can consider it a shortcut for the approach I just suggested. Consider the following code:
[Required]
[EnumDataType(typeof(Categories))]
[CustomValidation(typeof(MemoDocument), "ValidateCategoryAndPriority")]
public Categories Category { get; set; }
The CustomValidation attribute takes two parameters: a type and a method name. The type can also be the same model you’re decorating. The method must be public and static with any of the following signatures:
public static ValidationResult MethodName(Categories category)
public static ValidationResult MethodName(Categories category, ValidationContext context)
Using the first overload is the same as defining custom validation logic for an individual value. It is sort of equivalent to creating a custom data annotations attribute—it’s quicker to write but more rigid as far as the signature is concerned. Much more interesting is the second overload. In fact, through the ValidationContext parameter, you can get a reference to the model object and check as many properties as you like.
public static ValidationResult ValidateCategoryAndPriority(
                 Categories category, ValidationContext context)
{
    // Grab the model instance
    var memo = context.ObjectInstance as MemoDocument;
    if (memo == null)
        throw new NullReferenceException();

    // Cross-property validation
    if (memo.Category == Categories.Personal && memo.Priority > 3)
        return new ValidationResult("Category and priority are not consistent.");
    return ValidationResult.Success;
}
You can attach the CustomValidation attribute to an individual property as well as to the class. In the preceding example, the attribute is attached to Category, but it ensures that if the value is Personal, the property Priority must be set to a value not higher than 3. If the validation fails, the entry in the model-state dictionary uses Category as the key. If you attach CustomValidation to the class, be aware that the validation is performed only if everything went fine for all individual properties. This is exactly the declarative counterpart of the pattern outlined earlier:
[CustomValidation(typeof(MemoDocument), "ValidateMemo")]
public class MemoDocument
{
   ...
}
Here’s the signature of the method if the CustomValidation attribute is attached to the class:
public static ValidationResult ValidateMemo(MemoDocument memo)
{
   ...
}
When you use CustomValidation at the class level, you have the problem of capturing error messages, because error messages are usually associated with properties. You can easily solve the issue by using the helper Html.ValidationSummary, which brings up all error messages regardless of the originating properties. I’ll return to the topic of class-level validation later in the chapter.
Finally, the Compare attribute is available to serve far more quickly a specific cross-property scenario; for example, when you need to ensure that the value of a property matches the value of another. The canonical example is retyping a new password:
[Required]
[DataType(DataType.Password)]
public String NewPassword {get; set;}

[Required]
[DataType(DataType.Password)]
[Compare("NewPassword"])
public String RetypePassword {get; set;}
The comparison is made by using the Equals method as implemented on the specific type.
Creating custom validation attributes
The CustomValidation attribute forces you to validate the value stored in the property without the possibility of adding any extra parameters. The problem here is not so much gaining access to other properties on the model object—which you can do through ValidationContext—but enriching the signature of the attribute that defines additional attribute-level parameters. For example, suppose that you want to validate a number to ensure that it is an even number. Optionally, however, you want to turn on the attribute to check whether the number is also a multiple of 4. You want an attribute such as the one shown here:
[EvenNumber(MultipleOf4=true)]
public Int32 MagicNumber {get; set;}
There’s no way to pass an optional Boolean value in the signature recognized by CustomValidation. In the end, the difference between the CustomValidation attribute and a custom validation attribute is that the latter is designed to be (easily) reusable. Here’s how to write a custom data annotation attribute:
[AttributeUsage(AttributeTargets.Property)]
public class EvenNumberAttribute : ValidationAttribute
{
    // Whether the number has to be checked also for being a multiple of 4
    public Boolean MultipleOf4 { get; set; }

    public override Boolean IsValid(Object value)
    {
        if (value == null)
            return false;

        var x = -1;
        try
        {
            x = (Int32) value;
        }
        catch
        {
            return false;
        }

        if (x % 2 > 0)
            return false;
        if (!MultipleOf4)
            return true;

        // Is multiple of 4?
        return (x % 4 == 0);
    }
}
You create a class that inherits from ValidationAttribute and override the method IsValid. If you need extra parameters such as MultipleOf4, you just define public properties.
In ASP.NET MVC, you can create custom attributes that perform cross-property validation. All you do is override a slightly different overload of the IsValid method:
protected override ValidationResult IsValid(Object value, ValidationContext context)
Using the properties on the ValidationContext object, you can gain access to the entire model object and perform a full validation.
Enabling client-side validation
All of the examples considered work across a postback or through an Ajax form. To use them with Ajax, you need to make just a small change to the view that displays the editor so that it uses Ajax.BeginForm instead of Html.BeginForm. In addition, the controller method should return a partial view instead of a full view, as shown here:
[HttpPost]
public ActionResult Edit(MemoDocument memo)
{
    if (Request.IsAjaxRequest())
        return PartialView("edit_ajax", memo);
    return View(memo);
}
Here’s how to convert the original view to an edit_ajax partial view:
@model DataAnnotations.ViewModels.Memo.MemoDocument
@{
    Layout = "";  // Drop the master page
}

@using (Ajax.BeginForm("edit", "memo",
     new AjaxOptions() { UpdateTargetId="memoEditor" }))
{
    <div id="memoEditor">
    <fieldset>
        <legend>Memo</legend>
        @Html.EditorForModel()
        <p>
        <input type="submit" value="Create" />
        </p>
    </fieldset>
    </div>
}
In this way, your form is validated on the server but doesn’t refresh the full page. However, at least for a few basic annotations, it can be helpful in turning on client-side validation so that if the data is patently invalid (for example, a required field is empty), no HTTP request is ever started.
To turn on client-side validation, you need to perform a couple of easy steps. First, ensure that your web.config file contains the following:
<appSettings>
   <add key="ClientValidationEnabled" value="true" />
   <add key="UnobtrusiveJavaScriptEnabled" value="true" />
</appSettings>
Observe that both settings are set by default. In addition, you need to link a couple of JavaScript files: jquery.validate.js (the jQuery validation plugin) and jquery.validate.unobtrusive.js, or their minified versions. The simplest way to find and add these files is via NuGet. Needless to say, you need to link the jQuery library on top of everything.
Important
When you turn on client-side validation, all built-in data annotation attributes gain a client-side behavior and, to the extent that it is possible, perform their validation in JavaScript within the browser. If the validation fails, no request is made to the web server. However, custom validation attributes such as EvenNumber don’t automatically work in this way. To add client-side validation for custom attributes also, you need to implement an additional interface, IClientValidatable, which I’ll cover in a moment.
Culture-based, client-side validation
When it comes to data-type validation, you likely have the additional problem of globalization. For example, consider the following:
public Decimal Price {get; set;}The editor correctly handles the type and displays a default format of “0.00”. However, if you enter “0,8” where the decimal separator is the comma, your input is rejected and the form won’t post. As you can see, it is a problem of setting the correct culture on the client-side validation. The jQuery Validation plugin defaults to the United States culture on the client; on the server-side, instead, it depends on the value of the Culture property on the thread. (See Chapter 5, for more details on localization and globalization.)
To support a specific culture on the client, you must first link the official jQuery globalization plugin as well as the script file for the specific culture in which you’re interested. Both files must be included after regular validation scripts. In addition, you must instruct the globalization plugin as to which culture you intend to use. Finally, the validator plugin must be informed that it needs to use globalization information when parsing a number.
<script type="text/javascript">
    $.validator.methods.number = function (value, element) {
        if (Globalization.parseFloat(value)) {
            return true;
        }
        return false;
    }
    $(document).ready(function () {
        $.culture = jQuery.cultures['it-IT'];
        $.preferCulture($.culture.name);
        Globalization.preferCulture($.culture.name);
    });
</script>
With this code in place, you can enter decimals using the culture-specific settings. Taking this approach further, you can customize on a culture basis most of the client-side validation work.
Validating properties remotely
Validation might happen on the client, but you should see it as a way to save a few HTTP-heavy requests for pages. To be on the safe side, you should always validate any data on the server. However, to give users a nicer experience, you might want to perform a server-side validation without leaving the browser. The typical example is when users are registering to some service and enter a nickname. That name must be unique, and uniqueness can be verified only on the server. Wouldn’t it be cool if you could inform the user in real time whether the nickname is already taken? In this way, she could change it and avoid annoying surprises when finally posting the registration request.
Data annotations offer an attribute that helps code this feature: the Remote attribute. Attached to a property, the attribute invokes a method on some controller and expects a Boolean response. The controller method receives the value to validate plus an additional list of related fields. Here’s an example:
[Remote("CheckCustomer", "Memo",
        AdditionalFields="Country",
        ErrorMessage="Not an existing customer")]
public String RelatedCustomer { get; set; }
When validating RelatedCustomer on the client, the code silently places a jQuery call to the method CheckCustomer on the Memo controller. If the response is negative, the specified error message is displayed.
public ActionResult CheckCustomer(String relatedCustomer)
{
    if (CustomerRepository.Exists(relatedCustomer))
        return Json(true, JsonRequestBehavior.AllowGet);
    return Json(false, JsonRequestBehavior.AllowGet);
}
The controller must return true/false wrapped up in a JSON payload. If additional fields have been specified, they are added to the query string of the URL and are subject to the classic model-binding rules of ASP.NET MVC. Multiple fields are separated by a comma. Here’s a sample URL:
http://yourserver/memo/checkcustomer?relatedCustomer=dino&Country=...
The Ajax call is placed every time the input field loses the focus after having been modified. The property decorated with the Remote attribute honors the client-side validation contract and doesn’t allow the form to post back until a valid value is entered.
Important
Data annotations can be specified only statically at compile time. Currently, there’s no way to read attributes from an external data source and bind them to model properties on the fly. To turn this feature on, you probably need to consider replacing the default validation provider with a custom one that reads metadata for validation from a different source.
I’ve found this to be a real issue more in business-layer validation than in presentation. In business-layer validation, you likely need to inject business rules as requirements change, and more flexibility is therefore welcome. In business-layer validation, I often use the Enterprise Library Validation Application Block, which can read validation attributes from the configuration file. (I’ll return to the Enterprise Library in a moment.)
Self-validation
Data annotations attempt to automate the validation process around data being posted from forms. Most of the time, you use only stock attributes and get error messages for free. In other cases, you create your own attributes at a bit higher development cost, but still what you do is create components that fit nicely in an existing infrastructure. In addition, data annotations are designed to work mostly at the property level. In ASP.NET MVC, you can always access the entire model via the validation context; however, ultimately, when the validation is complex, many developers prefer to opt for a handcrafted validation layer.
In other words, you stop fragmenting validation in myriad combinations of data annotations and move everything into a single place—a method that you call on the server from within the controller:
public ActionResult Edit(MemoDocument memo)
{
   if (!Validate(memo))
      ModelState.AddModelError(...);
   ...
}
The MemoDocument class might or might not have property annotations. As I see things, if you opt for self-validation, for reasons of clarity you should just stop using data annotations. In any case, self-validation doesn’t prevent you from using data annotations, as well.
The IValidatableObject interface
When it comes to building a layer of self-validation, you can unleash your creativity and choose the application model that best suits you. ASP.NET MVC attempts to suggest an approach. Basically, ASP.NET MVC guarantees that any model class that implements the IValidatableObject interface is automatically validated, with no need for the developer to call out validation explicitly. The interface is shown here:
public interface IValidatableObject
{
    IEnumerable<ValidationResult> Validate(ValidationContext validationContext);
}
If the interface is detected, the Validate method is invoked by the validation provider during the model-binding step. The parameter of type ValidationContext makes available the entire model for any sort of cross-property validation.
Important
If the model is also decorated with data annotations, the Validate method is not invoked if some of the properties are not in a valid state. (To avoid pitfalls, I suggest that you drop annotations entirely if you opt for IValidatableObject.)
Using IValidatableObject is functionally equivalent to using the CustomValidation attribute at the class level. The only difference is that with IValidatableObject you can implement a validation layer with a single method, using your own architecture and remaining independent of data annotations.
Benefits of centralized validation
When you have really complex validation logic in which cross-property validation is predominant, mixing per-property validation and class-level validation might result in an unpleasant experience for the end user. As mentioned, class-level validation won’t fire until properties are individually validated. This means that users initially see a few error messages related to properties and are led to think that they are safe as soon as these errors are fixed. Instead, they might get an entirely new group of errors because of cross-property validation. Users won’t have any clue about these other possible errors until they show up. To avoid this, if class-level validation is predominant, just focus on that and drop per-property validation.
To implement class-level validation, choosing between IValidatableObject or CustomValidation at the class level is entirely your call. For years, I used my own interface, which looked nearly identical to today’s IValidatableObject.
The IClientValidatable interface
Custom validation attributes won’t produce any visible effect when client-side validation is active. In other words, a custom attribute is not able per se to run any client-side code to attempt to validate values in the browser. It doesn’t mean, however, that you can’t add this ability. It just takes more code. Here’s how to extend a custom attribute to turn it on for the client:
[AttributeUsage(AttributeTargets.Property)]
public class ClientEvenNumberAttribute : ValidationAttribute, IClientValidatable
{
    ...

    // IClientValidatable interface members
    public IEnumerable<ModelClientValidationRule> GetClientValidationRules(
            ModelMetadata metadata, ControllerContext context)
    {
       var errorMessage = ErrorMessage;
       if (String.IsNullOrEmpty(errorMessage))
            errorMessage = (MultipleOf4 ? MultipleOf4ErrorMessage : EvenErrorMessage);

       var rule = new ModelClientValidationRule
                      {
                         ValidationType = "iseven",
                         ErrorMessage = errorMessage
                      };
       rule.ValidationParameters.Add("multipleof4", MultipleOf4);
       yield return rule;
   }
}
You simply make it implement a new interface: the IClientValidatable interface. The method returns a collection of validation rules. Each rule is characterized by an error message, a JavaScript function name used for validation, and a collection of parameters for the JavaScript code. Names of parameters and functions should be lowercase.
Next, you need to write some JavaScript code that performs the validation on the client. Preferably, you should do so by using jQuery and the jQuery validation plugin. Here’s the JavaScript you need to turn on the previous EvenNumber attribute to work on the client, too:
$.validator.addMethod('iseven', function (value, element, params) {
    var mustBeMultipleOf4 = params.multipleof4;
    if (mustBeMultipleOf4)
        return (value % 4 === 0);
    return (value % 2 === 0);
});

$.validator.unobtrusive.adapters.add('iseven', ['multipleof4', 'more_parameters'],
    function (options) {
        options.rules['iseven'] = options.params;
        options.messages['iseven'] = options.message;
    });
The addMethod function registers the validation callback for the iseven rule. The validation callback receives the value to validate and all parameters previously added to the rule in the implementation of IClientValidatable.
In addition, you need to specify adapters to generate JavaScript-free markup for the validation scenario. To add an adapter, you indicate the name of the function, its parameters, and error message.
You don’t need anything else; if it doesn’t work, first check that all required scripts are available and then check function and parameter names in JavaScript code and in the C# implementation of IClientValidatable. Be aware that you won’t be receiving any JavaScript error if something goes wrong.
Dynamic server-side validation
Validation is about conditional code, so in the end, it is a matter of combining together a few if statements and returning Booleans. Writing a validation layer with plain code and without any ad hoc framework or technology might work in practice, but it might not be a great idea in design. Your resulting code would be hardly readable and hard to evolve even though some recently released fluent-code libraries are making it easier.
Subject to real business rules, validation is a highly volatile matter, and your implementation must necessarily account for that. In the end, it is not simply about writing code that validates, but code that is open to validating the same data against different rules. Data annotations are a possible choice; another valid choice is the Validation Application Block (VAB) in Microsoft’s Enterprise Library.
Data annotations and VAB have a lot in common. Both frameworks are attribute-based and you can extend both frameworks with custom classes representing custom rules. In both cases, you can define cross-property validation. Finally, both frameworks have a validator API that evaluates an instance and returns the list of errors. So, where’s the difference?
Data annotations are part of the .NET Framework and don’t need any separate download. Enterprise Library is a separate NuGet package. It might not be a big deal in a large project, but it is still an issue because it might require additional approval in some corporate scenarios.
In my opinion, VAB is superior to data annotations in one aspect: It can be fully configured via XML rulesets. An XML ruleset is an entry in the configuration file in which you describe the validation you want. Needless to say, you can change things declaratively without even touching your code. Here’s a sample ruleset:
<validation>
  <type assemblyName="..." name="Samples.DomainModel.Customer">
    <ruleset name="IsValidForRegistration">
      <properties>
        <property name="CompanyName">
          <validator type="NotNullValidator" />
          <validator lowerBound="6" lowerBoundType="Ignore"
                     upperBound="40" upperBoundType="Inclusive"
                     messageTemplate="Company name cannot be longer ..."
                     type="StringLengthValidator" />
        </property>
        <property name="Id">
          <validator type="NotNullValidator" />
        </property>
        <property name="PhoneNumber">
          <validator negated="false"
                     type="NotNullValidator" />
          <validator lowerBound="0" lowerBoundType="Ignore"
                     upperBound="24" upperBoundType="Inclusive"
                     negated="false"
                     type="StringLengthValidator" />
        </property>
        ...
      </properties>
    </ruleset>
  </type>
</validation>
A ruleset lists the attributes that you want to apply to a given property on a given type. In code, you validate a ruleset as follows:
public virtual ValidationResults ValidateForRegistration()
{
    var validator = ValidationFactory
            .CreateValidator<Customer>("IsValidForRegistration");
    var results = validator.Validate(this);
    return results;
}
The method above applies the validators listed in the IsValidForRegistration ruleset to the specified instance of the class. (The ValidateForRegistration method is expected to be a method on an entity class of yours.)
Note
There are two approaches to validation: sometimes, you want to yell out if invalid data is passed; sometimes, you want to collect errors and report that to other layers of code. In .NET, Code Contracts is another technology that you probably want to take into account for validation. Unlike annotations and VAB, however, Code Contracts just check conditions and then throw at first failure. You need to use a centralized error handler to recover from exceptions and degrade gracefully. In general, I would recommend using Code Contracts in a domain entity only to catch potentially severe errors that can lead to inconsistent states. For example, it makes sense to use Code Contracts in a factory method. In this case, if the method is passed patently invalid data, you want it to throw an exception. Whether you use Code Contracts also in the setter methods of properties is your call. I prefer to take a softer route and validate via attributes.
Summary
Input forms are common in any web application, and ASP.NET MVC applications are no exception. For a while, there was a sentiment in the industry that ASP.NET MVC was not well suited to support data-driven applications because they required a lot of data entry and validation. Ultimately, ASP.NET MVC measures up nicely to the task. It does use a different set of tools than Web Forms, but it is still effective and to the point.
ASP.NET MVC offers templated helpers for autogenerated, repetitive forms and server-side and client-side forms of input validation. Input validation can be largely streamlined if you build your user interface around view-model objects annotated with display and validation attributes. These attributes—known as data annotations—are recognized by the ASP.NET MVC infrastructure (model metadata and validation providers), and they’re processed to produce templated helpers and feedback messages for the user.
With this chapter, we’ve nearly covered all the fundamentals of ASP.NET MVC programming. Chapter 5 covers what remains to be dealt with, including localization, security, and integration with intrinsic objects, primarily Session and Cache.