Until now, we have focused on explaining the operation and features of SignalR both on the client and the server side, but only in web environments. On the server side, all the examples that we have seen and developed throughout the book worked on IIS and ASP.NET, although thanks to the independence that the Open Web Interface for .NET (OWIN) provides and the abstractions offered by SignalR, we were not using any of the features specifically belonging to either of these components.
And we have used only the JavaScript client too, due to the ubiquity of the web, the facility with which solutions can be implemented in this environment, and the spectacular results that we can produce in this type of scenario, where the traditional pull model of HTTP used to greatly hamper the creation of real-time multiuser systems.
But, as we know, SignalR again goes far beyond this. Hubs or persistent connections can be hosted in practically any type of solution, from console applications to Windows services, not forgetting web-based applications. It is even possible to execute them in environments other than Windows, thanks to independent implementations of the framework, such as the one provided by the Mono project.
Likewise, its services can be consumed from virtually any type of client platform, such as the familiar JavaScript-based web clients, Windows Phone, Silverlight, or WinRT native applications, or any type of system operating on .NET 4.0 or above, and even native platforms not based on Windows.
In this chapter, we will focus on the multiplatform capabilities of SignalR. First we will show how to host services in different types of systems. When finished with the server side, we will jump to the other end and study the different choices that we have for implementing SignalR clients.
On the server side, we’ll look at SignalR hosting in console applications, in a Windows service, and in some platforms other than Windows.
Although it might look as if IIS and ASP.NET made up the only environment from which we would want to host SignalR services, this is actually not the case. There are multiple scenarios where it can be a good idea to publish services created with this framework without having to rely on these two elements, including the following:
Server infrastructures where IIS is not an option due to system policies or other reasons.
Scenarios where we want to fully control the life cycle of the host processes on which our applications operate.
Distributed scenarios where we want to simplify and reduce the requirements for the deployment of certain applications.
Scenarios in which we want to provide highly controlled responses, where because IIS/ASP.NET will not be used, the server will not perform any other processes than those strictly necessary.
Scenarios where we want to include SignalR in servers of existing applications that already have independent host processes, such as Windows services or Azure worker roles, where it is better to publish the services from that point, to avoid complicating the architecture.
In any case, the decoupling offered by OWIN means that we can host these services in practically any type of system without having to change a single code line of our application on either the server or the client side. We will simply have to enter small modifications regarding the startup of the services so that everything works properly.
SignalR is executed in web applications simply because there is a package called Microsoft.Owin.Host.SystemWeb, provided by the Katana project, which acts as a go-between for the middleware and the hosting based on ASP.NET/IIS. In fact, it is the host that is automatically included in our projects when we install the generic package Microsoft.AspNet.SignalR.
If we want to publish services from another type of application, we must simply change this component, which acts as Server, substituting it for another one capable of being executed independently.
As we also know, the Katana project provides us with one, Microsoft.Owin.Host.HttpListener, on which the possibilities for self-hosting (that is, hosting the services in the OWIN-based systems’ own processes) are based.
As you can guess by its name, this component is based on the HttpListener class of the .NET Framework, and it can open a port and remain waiting for HTTP requests, passing them to the frameworks, modules, or applications that are found at a higher level in the technology stack.
We will now describe in detail how to perform the installation and startup of hubs or persistent connections on a console application, although these same techniques can be used in any other type of system detached from ASP.NET.
We will now show in detail the necessary process to implement a SignalR service based on hubs on an existing console application.
The first step is to install the Microsoft.AspNet.SignalR.SelfHost package, using, as usual, the indispensable NuGet:
PM> install-package Microsoft.AspNet.SignalR.SelfHost
When this package is installed, all its dependencies will also be entered into the project, thus making the server components of SignalR, OWIN, and the server based on HttpListener readily available.
When this process is concluded, a readme.txt file will open automatically; see Figure 7-1. In it, the creators of the package have entered some brief instructions to help us start the services. These instructions highlight the need to map the services to their corresponding access URLs, as well as explaining how to start the web server that will receive the requests.

Hubs and persistent connections are created inside the console application just as always, because the package installed also includes references to the SignalR core:
public class PingConnection: PersistentConnection
{
    protected override Task OnReceived(
        IRequest request, string connectionId, string data)
    {
        if (data == "Ping")
        {
            Console.WriteLine("[Connection] Ping received");
            return Connection.Send(
                connectionId,
                "Ping received at " + DateTime.Now.ToLongTimeString()
                );
        }
        return base.OnReceived(request, connectionId, data);
    }
}
public class PingHub: Hub
{
    public Task Ping()
    {
        Console.WriteLine("[Hub] Ping received");
        return Clients.Caller.Message(
            "Ping received at " + DateTime.Now.ToLongTimeString());
    }
}
The way to map the URLs to these services is exactly the same as we have seen throughout this book, and it simply consists in specifying the address through which it will be possible to access the different endpoints of SignalR. Remember that this address will be a single one for hubs, whereas in the case of persistent connections, each one must be associated to a different URL.
Therefore, as on other occasions, paths are defined in a startup class, using the extensions offered by SignalR on the IAppBuilder object that receives the Configuration() method of the class as a parameter.
The following code shows a startup class with the mapping definition of a hub and a persistent connection. In the first case, the default route is used, whereas in the second case, it is set explicitly. Note that the code requires you to additionally install the Microsoft.Owin.Cors package:
public class Startup
{
    public void Configuration(IAppBuilder app)
    {
        app.UseCors(CorsOptions.AllowAll)
           .MapSignalR<PingConnection>("/ping-connection")
           .MapSignalR("/hub", new HubConfiguration());
    }
}
As you can see, the code would be exactly the same as we would use if we created the definition in an ASP.NET/IIS environment instead of self-hosting: we activate CORS to provide support for browsers connecting to the service from other domains, and we create the mappings for the hubs and persistent connections of our system.
After this startup class has been created and the routes to the endpoints have been defined, we still need to do something else: start the web server and tell it where it can find the startup class that we have previously created. We can achieve this with a method such as the following, which we could enter into the Main() static method, which works as the starting point of a console application or wherever suits our needs best:
using (WebApp.Start("http://localhost:5000"))
{
    Console.WriteLine("Server running at http://localhost:5000/");
    Console.ReadLine();
}
The WebApp static class, part of the Katana set of components, offers us the Start() method, whose purpose is to start a web server on which to execute the different frameworks, modules, and applications based on OWIN. For example, the preceding call starts the server on port 5000 of localhost, and by convention, it executes the configuration in the Configuration() method of the Startup class.
Note
If we want to respond to requests that are performed on port 5000 with any host name, we could use http://*:5000, although run-time errors might occur if the process is executed for a user without elevated permissions.
However, there are other variants of Start() that allow us to customize the way in which this server will be started. In the following code, an overload is used, which allows us to specify via a generic parameter the startup class of our system (Startup). Note that we do not need to specify the method to be executed because, by convention, the server will already know that it is Configuration().
using (WebApp.Start<Startup>("http://localhost:44444/"))
{
    Console.WriteLine("Server running at http://localhost:44444/");
    Console.ReadLine();
}
It is also possible to specify the configuration method and class, as well as some other additional options, using the StartOptions class:
var options =
   new StartOptions("http://*:44444")
   {
       AppStartup = "Namespace.StartupClass.ConfigurationMethod"
   };
using (WebApp.Start(options))
{
    ...
}
In the preceding examples, we have assumed that all the startup, mapping, and server start code is found in the console application itself. However, this is not necessarily the case—we could also have said code in a class library referenced from the console application.
In these scenarios, it is important to take into account that, in the host (in our example, the console application), we must add the following NuGet package to ensure that the host based on HTTP listeners is available:
PM> Install-Package Microsoft.Owin.Host.HttpListener
SignalR hosting inside an operating system service is another case where it is necessary to use self-hosting and where SignalR must be independent from the infrastructure on which it is executed.
Windows services are just executables, as console applications are, but due to their special nature they have to be programmed in a different way to respond to the different events related to the life cycle of this type of component. The implementation of SignalR in a system of this type will therefore be similar to the one we have seen previously, so we’ll now show only a quick example.
When a Windows Service project is created in Visual Studio, the basic structure of the service will be generated. As always, we must add the Microsoft.AspNet.Signalr.SelfHost package with NuGet and implement the startup class Startup to perform mapping and, of course, the hubs or persistent connections that we want to publish from the service.
// File: Broadcaster.cs
public class Broadcaster: Hub
{
    public Task Broadcast(string message)
    {
        return Clients.All.Message(message);
    }
    public override Task OnConnected()
    {
        return Clients.All.Message(">> New client arrived");
    }
    public override Task OnDisconnected()
    {
        return Clients.All.Message(">> Client disconnected");
    }
}
// File:Startup.cs.
// Note that you will need to install the NuGet package Microsot.Owin.Cors
public class Startup
{
    public void Configuration(IAppBuilder app)
    {
        app.UseCors(CorsOptions.AllowAll)
           .MapSignalR();
    }
}
Again, the only thing that we are doing is enabling CORS, to allow external browser connections, and mapping the hubs to the default address.
Starting the web server is a different process in this case. In the console application, we would simply launch it when execution began and we would keep it active until exiting the application. However, operating system services have a different life cycle: they can be launched, stopped, restarted, and even paused for a time, if we have so allowed in the definition of the service. We should thus take into account these aspects when managing the lifetime of the web server.
Fortunately, the classes in which the services are implemented inherit from System.ServiceProcess.ServiceBase and include virtual methods that are executed when these events occur and which can be overridden by the descendant classes. Thus when we host SignalR persistent connections or hubs inside a service, we want to take control at the right moments to start or stop the web server that processes the requests.
We can achieve this in a simple way, as shown here:
public partial class BroadcasterService : ServiceBase
{
    private IDisposable _webApp;
    public BroadcasterService()
    {
        InitializeComponent();
    }
    protected override void OnStart(string[] args)
    {
        var address = (args != null && args.Length > 0)
                         ? args[0]
                         : "http://localhost:54321";
        _webApp = WebApp.Start<Startup>(address);
    }
    protected override void OnStop()
    {
        _webApp.Dispose();
    }
}
In this code, we are making use of the OnStart() method, invoked when the service is started, to start the web server, the process that listens to requests using an HttpListener. The arguments received, which we can use to introduce some variations in the behavior of the service, can be sent when the service is started manually.
We also take control at the point in which the service stops to stop our server too.
Finally, in the entry point of the application, it is necessary to specify the service that is to be launched:
static class Program
{
    /// <summary>
    /// The main entry point for the application.
    /// </summary>
    static void Main()
    {
        ServiceBase[] ServicesToRun;
        ServicesToRun = new ServiceBase[]
        {
            new BroadcasterService()
        };
        ServiceBase.Run(ServicesToRun);
    }
}
In contrast to other types of projects, Windows Services cannot be started from Visual Studio; it is necessary to install them in the system. To do this, we have to perform the following steps:
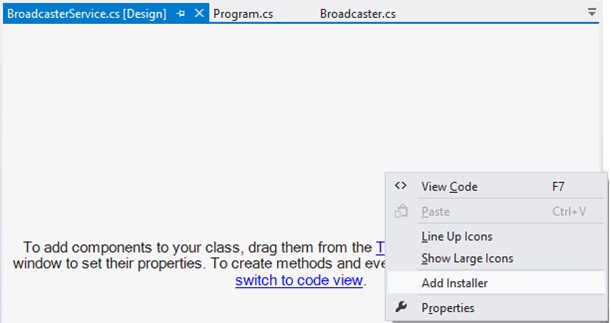
We have to add an installer to our project. This is a special class that stores information about the server and allows us to enter logic to be executed in this installation. We can create it easily by opening the context menu on the design surface of the service class and selecting the Add Installer action, as shown in Figure 7-2.
After we have compiled the project, we open the developer command prompt for Visual Studio 2013. It is essential that we do this as an administrator, because we will need permissions to change the configuration of the system. From this window, we go to the binaries folder of the project and we find the executable file for the project.
We now execute the following command, which will install the service on Windows:
installutil [exeName]
where
[exeName]is the full name of the executable that we have generated, including its extension. Each time we compile, we will have to repeat this operation, and therefore we could include this task inside the build process of the project.Depending on the user that we have defined in the properties of the service—or rather, in the properties of the service installer—it might be necessary to specify at this point the credentials of the user to be employed. This is achieved by adding the parameters
/usernameand/passwordto the preceding command:installutil SignalrService.exe /username=jmaguilar /password=1234
However, to uninstall the service from the system, it will suffice to do this:
installutil SignalRService.exe /u
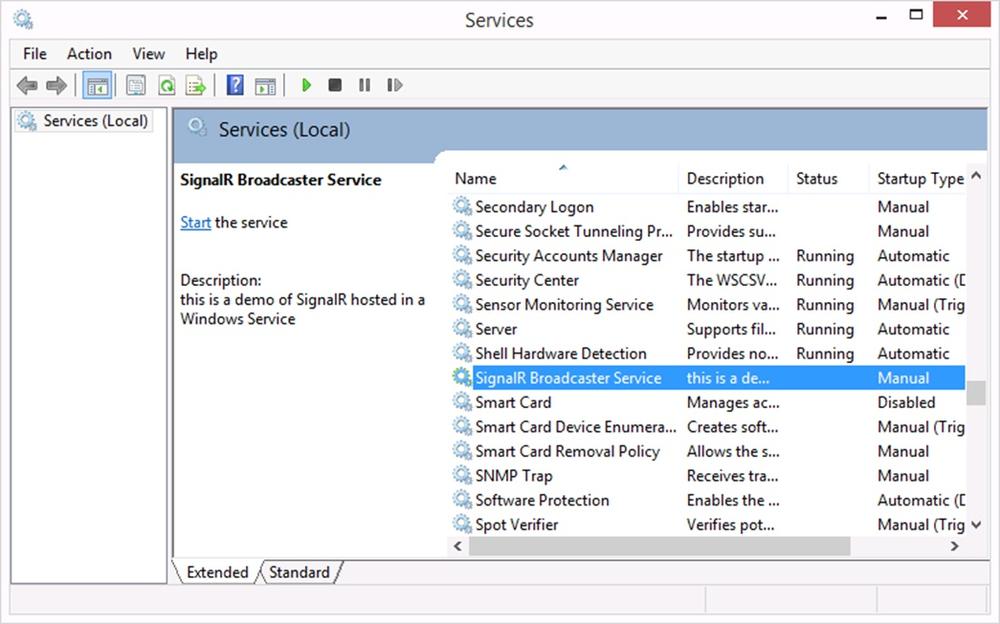
After we have installed it, the server will be available in our system and we will be able to start it by using the Windows Services management console (see Figure 7-3) or from the command line with the familiar
net start.
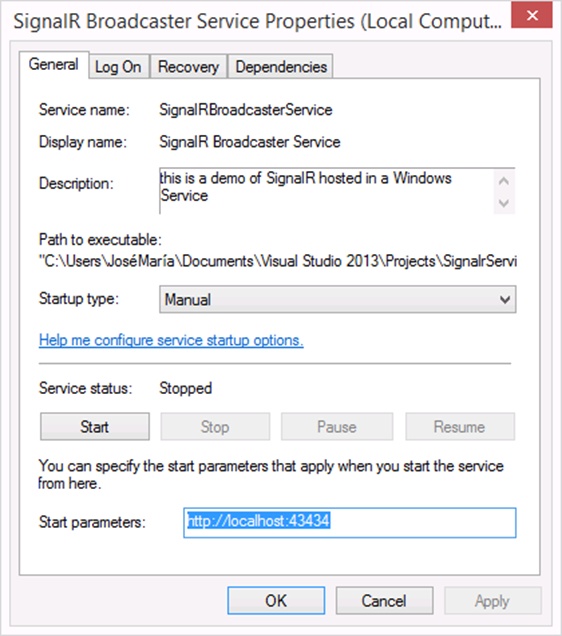
We could use the parameters that we previously received in the OnStart() method of the service, sending them to the service when we start it manually, as shown in Figure 7-4.
It is a good idea to note that all the infrastructure on which we are building our services is based on open standards, in many cases with implementations distributed under very permissive licenses, which opens the door to the possibility of executing the applications on platforms other than Windows.
If we add this to the availability of multiplatform implementations of the .NET platform, it is possible to take SignalR applications to other popular operating systems where it would a priori seem impossible, such as Linux, BSD, or Mac OS X.
The Mono[27] project was begun in 2001 by Ximian, a company started by Miguel de Icaza for the purpose of creating a multiplatform and open source implementation of Microsoft’s .NET Framework, based on the ECMA standard of C# and Common Language Runtime (CLR). Currently, Mono provides support, even at binary level, for a large number of features offered by version 4.5 of the .NET Framework, although there is obviously a slight delay in their implementation when it comes to the new features that continue to appear in the new versions of the .NET Framework. In fact, to access the most recent features, it is recommended that you download the source code from its repository at GitHub[28] and that you generate the specific binaries for the local computer by following the instructions provided.
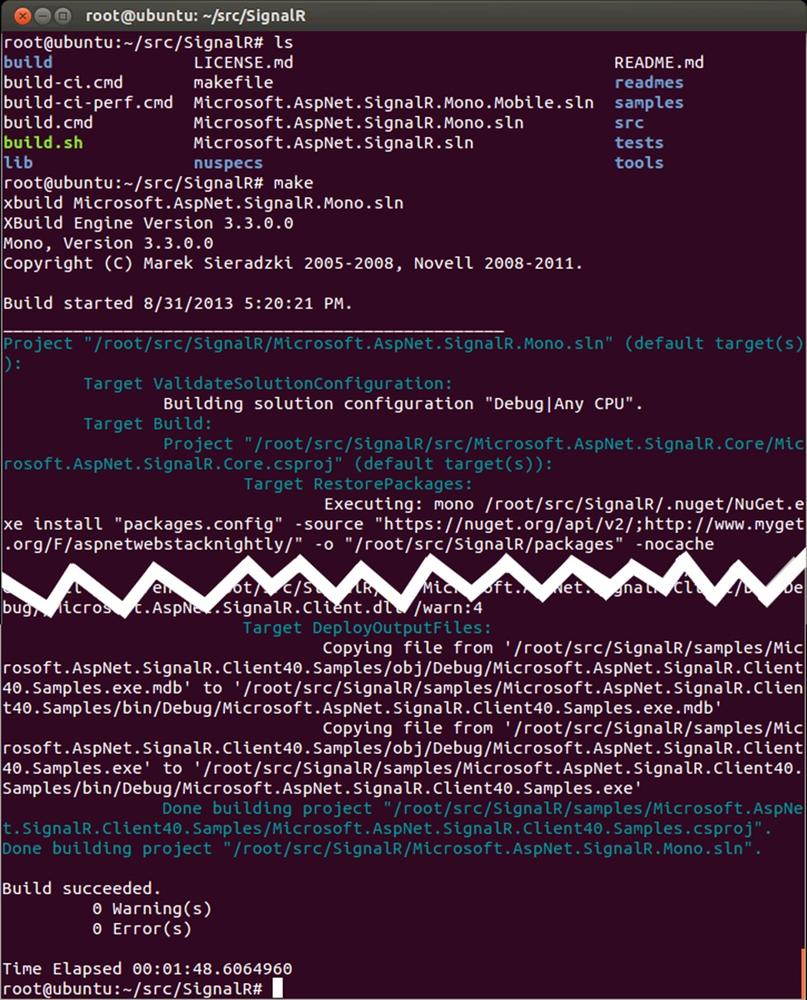
At the time of writing, even the SignalR framework itself can be completely compiled on Mono. The Readme.md file that we find on the main page of the repository in GitHub provides instructions to obtain a copy of the source code and compile it using the command line as shown in Figure 7-5.
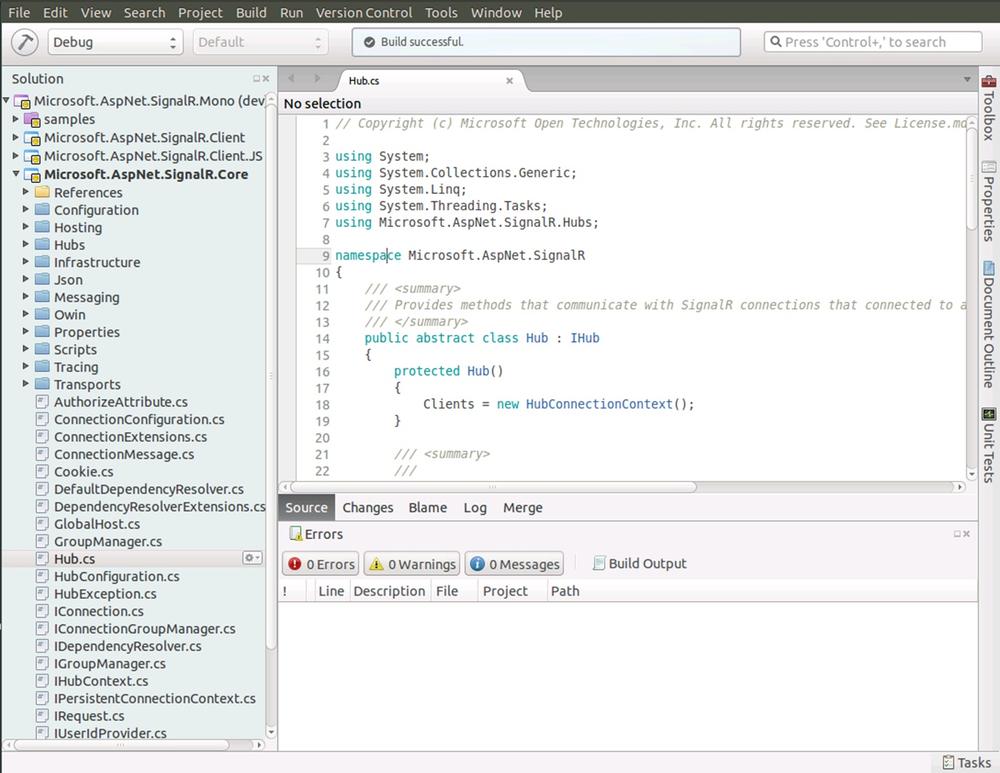
It is also possible to debug or make modifications to SignalR by using MonoDevelop[29], a multiplatform integrated development environment also created and distributed under the same open source premises as the Mono ecosystem. For this, in the SignalR source code, a solution file is included (Microsoft.AspNet.Signalr.Mono.Sln), which we can open from this IDE to modify or compile the project, as shown in Figure 7-6. Obviously, projects that are very specific to the Microsoft platform, such as scalability adapters for SQL Server or Windows Azure, are not found in this solution.
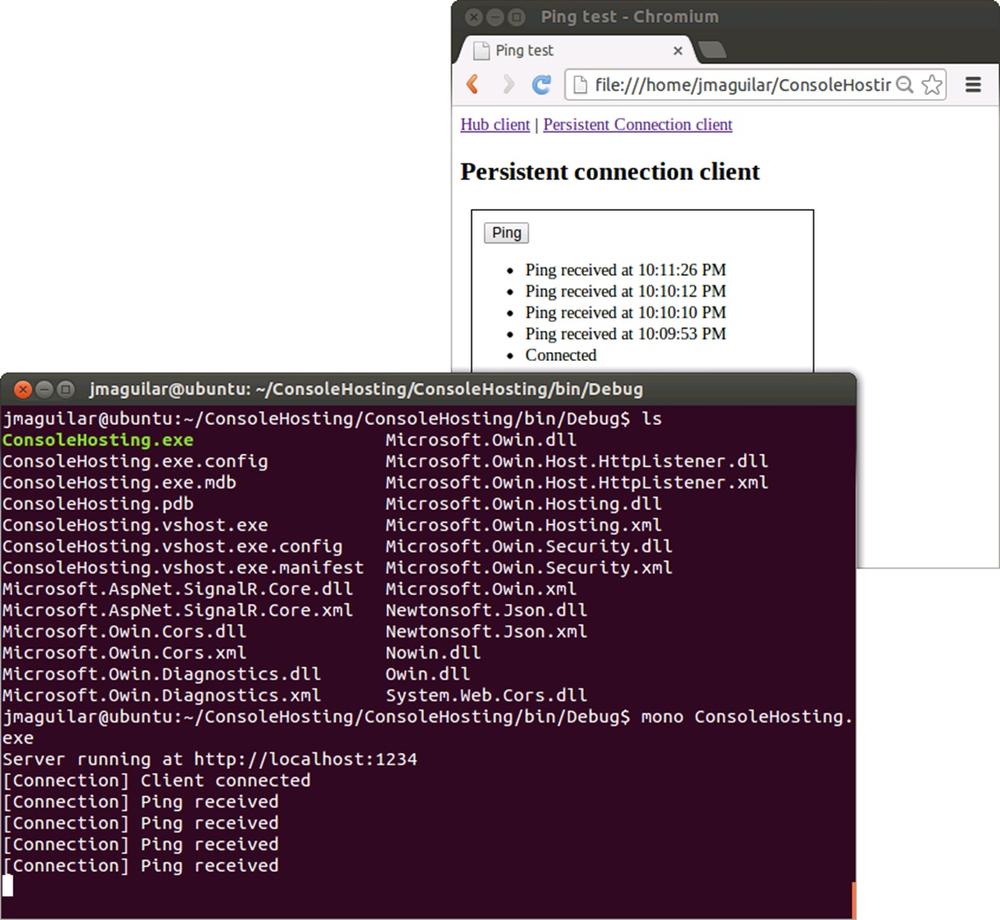
The SignalR self-hosting server components can be successfully executed on Mono (see Figure 7-7), but the same does not happen with the server based on ASP.NET/IIS, because the implementation of the latest version of the platform is not yet fully supported. Hopefully, this will change in the near future.
Until now, on the client side, we have focused only on studying the specific JavaScript component. However, this library—whose scope is circumscribed to web environments—is but one among those available.
It is possible to find client components for Windows Phone, Silverlight, WinRT, or .NET generic clients, which broadens the range of SignalR’s possibilities as a real-time application development framework in any type of scenario. Table 7-1 lists the client component packages currently available.
Table 7-1. SignalR clients
Client technology | Package to be installed |
JavaScript | Microsoft.AspNet.SignalR.JS |
.NET 4 .NET 4.5 Silverlight 5 WinRT Windows Phone 8 | Microsoft.AspNet.SignalR.Client |
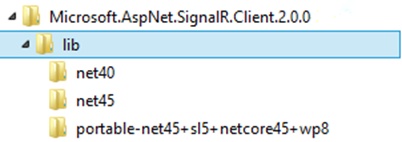
Note that, with the exception of the client libraries for JavaScript, the rest are found in the same NuGet package. The variety of platforms becomes evident if we observe the folder structure generated in the “packages” directory of the solution after downloading the package from the repository; see Figure 7-8.
Thus, if we wanted to access a SignalR service as a client from a console application, a Windows forms application, or an operating system service, the specific libraries for .NET 4 or .NET 4.5 would be used, depending on the platform version with which we are working. In the case of a WinRT, Windows Phone, or Silverlight application, the .NET client version designed as a portable class library would be used.
Regardless of the platform on which we work, the libraries included in the Microsoft.AspNet.SignalR.Client package share a common API, which is in fact similar to the one we saw when we studied JavaScript clients for persistent connections and hubs, when they did not use the self-generated proxy. Therefore, the concepts and principles that we will deal with are generally common to all platforms.
From the client side, a persistent connection is created through the instantiation of a Connection type object, available in the Microsoft.AspNet.SignalR.Client namespace. At this point, we must mandatorily supply the URL where the SignalR server is awaiting connections. The URL provided must include the protocol, host, port (if different to the default port), and the part of the route that has been included in the mapping of the server.
// Server side (mapping)
app.MapConnection<EchoConnection>("/echo");
// Client side (connection)
var connection = new Connection("http://localhost:2713/echo");
Optionally, we can use this moment to specify key-value pairs that will travel in the query string of requests. We have two ways to do this. Each will use one overload for the constructor. This is the first way:
var connection = new Connection(
                        "http://localhost:2713/echo",
                        "username=johnsmith&color=red"
                 );
And this is the other way:
var values = new Dictionary<string, string>()
                {
                    { "username", "johnsmith"},
                    { "color", "red"},
                };
var conn = new Connection("http://localhost:2713/echo", values);
The Connection object created offers additional methods and properties to customize in detail the information that will travel in the requests made against the server. See Figure 7-9.
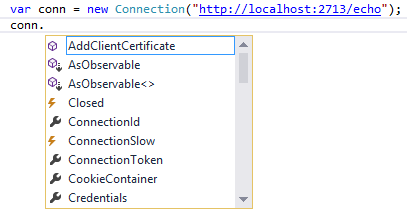
The most useful members that we can find in the Connection class are the following:
AddClientCertificate(certificate), which allows adding an X509 certificate to a connection made under SSL. The following code shows how it is possible to obtain the certificate from a file and include it in the connection:var connection = new Connection("https://secureserver.com/signalr"); connection.AddClientCertificate( X509Certificate.CreateFromCertFile("User.cer") );ConnectionId, which allows obtaining or setting the identifier of the connection.CookieContainer, which provides access to a container of theSystem.Net.CookieContainertype, which can be useful to enter cookies that will travel to the server side. By default, this property contains a null value, so to use the property, we first need to enter an instance of this type in it:var cookie = new Cookie("username", "johnsmith"); connection.CookieContainer = new CookieContainer(); connection.CookieContainer.Add(cookie);Credentials, which allows obtaining or setting the authentication information for the connection. The following example shows how it could be used to include the credentials of the security context where the application is executed:connection.Credentials = CredentialCache.DefaultNetworkCredentials;
Headers, of theIDictionary<string,string>type, which allows adding custom headers to the requests made in the context of a connection:connection.Headers["CustomToken"] = "12345";
Proxy, which allows defining the proxy that is going to be used to make the connections to the server:connection.Proxy = new WebProxy("http://192.168.1.2:8080") { Credentials = new NetworkCredential( "proxyuser", "1234" ) };State, a value of theConnectionStateenumeration that gives the state of the connection at all times.
After we have configured and adapted the connection to our needs, we can begin communication with the server invoking the Start() method. As you can surely guess, this method starts the connection procedure asynchronously. Therefore, it returns a Task object representing this task. We can use this object in different ways to take control upon success or failure of the operation.
Thus it is possible to use the Wait()method. If problems occur in the connection, an exception will be thrown, which can be easily caught:
try
{
    connection.Start().Wait();
}
catch (Exception ex)
{
    Console.WriteLine("Error connecting to the server...");
}
Or we can also employ the the async/await construct of C# 5 to invoke the asynchronous method in a very clean way:
try
{
    await connection.Start();
}
catch (Exception ex)
{
    Console.WriteLine("Error connecting to the server...");
}
The Start() method also allows specifying a precise transport to be used for the connection, which can be useful if we want to force one of them due to environment needs or simply to perform tests. However, transport objects cannot be reused across multiple connection instances:
var connection = new Connection("http://localhost:2713/echo");
connection.Start(new LongPollingTransport());
When we do not need a connection anymore, we can close it explicitly by using its Stop() method.
Clients of persistent connections can work directly on the Connection object to send and receive data to and from the server, as well as to subscribe to the main events relating to the connection.
We will send data as we did with the JavaScript client: using the Send() method of the connection. As is usual in asynchronous environments, the Send() method returns the Task object in charge of sending data in the background.
await connection.Send("Hello, world!");
// The message has been sent
We can send objects of any type directly. They will be serialized automatically by the framework before sending them to the server side:
var message = new ChatMessage()
              {
                 Message = "Hello, world!",
                 From = "Joe"
              };
connection.Send(message);
However, the server side will receive the message as a text string and will have to deserialize it in the form of a CLR object if it wants to work with it in a typed and secure way.
To obtain the data sent from the server to the client, as well as to take control during the main events that take place during the lifetime of the connection, the Connection class offers a set of events to which it is possible to subscribe, to take control when they occur using delegates to functions, anonymous functions, or lambda functions. The following example shows how to implement the code to handle message reception by using a lambda function:
connection.Received += data =>
                        {
                            Console.WriteLine("Received: " + data);
                        };
The main events available are the following:
Closed, which is executed when the connection has been closed by one of the ends. In case of a disconnection made by the server end, the client library will try to reconnect to retrieve the connection, and only if it does not succeed will it launch this event.ConnectionSlow, which occurs when it is detected that the connection is slow or unstable. We can use this event to notify the user too:connection.ConnectionSlow += () => Console.WriteLine("Please be patient!");Error, launched when there has been any exception on the connection. The handling code will receive as an argument anExceptionobject with specific information about the error.Received, which occurs when data is received from the server. The handling code will receive a character string with the information received.Reconnecting,Reconnected, which are events launched when the client side detects that connection to the server has been lost and it begins the recovery sequence. The first event is launched when the reconnecting process begins, and the second one is launched when it has been successful.StateChangedoccurs when the connection changes state. In the handling code, we will receive an object of theStateChangetype as an argument, with which we will be able to know both the previous and the current state of the connection.connection.StateChanged += info => Console.WriteLine( "Going from " + info.OldState + " to " + info.NewState );
Consuming hubs as clients by using .NET libraries is quite similar to what we have seen when handling JavaScript libraries without using a self-generated proxy. To access the services provided by a hub, it is necessary to first start a connection with the server. For this, instead of the Connection class that we used with clients of persistent connections, we will now use one of its descendants, the HubConnection class.
var hubConn = new HubConnection("http://localhost:9638");The URL supplied can include the part of the route where the hubs were mapped at the server or not. There is an optional parameter in the constructor, called useDefaultUrl, which specifies whether or not we want to use the default value (automatically adding the string “/SignalR” to the URL provided). By default, the value of this parameter is true, and for this reason, we can use a URL such as the one in the preceding example; the framework will add “/SignalR” to it. If we set it to false, this suffix will not be added to the URL supplied, and we will have to state the URL specified in the server side exactly.
The following code shows the use of this parameter to open a connection to the system of hubs published at the root of the host stated in the URL:
// Server mapping.
// The Hubs will be published directly at http://host/
app.MapSignalR("", new HubConfiguration());
// Client connection
var hubConn = new HubConnection("http://localhost:9638",
                                 useDefaultUrl: false);
The HubConnection class provides features specifically designed to facilitate work with hubs, apart from all the ones inherited from its ancestor, Connection, which we have already used: control over the query string, cookies, credentials, headers, proxy configuration, the methods Start() and Stop(), events such as Closed or StateChanged, and so on. Because they are inherited, all these aspects are identical to those already described, so we will not go over them again.
To work with a hub, we will need to have a class to represent it at the client and on which we can implement the code for treating the methods invoked from the server, as well as to call it when needed. We can create this proxy by calling the CreateHubProxy() method, to which we will send the name of the hub to be used as an argument:
var hubConn = new HubConnection("http://localhost:9638/");
var hubProxy = hubConn.CreateHubProxy("Calculator");
... // Other initialization code
hubConn.Start();
Finally, after we finish configuring the proxy, we must open the connection by using the Start() method of HubConnection to start working with the hub. It is important to remember that this method is asynchronous, so the proxy cannot be used right after the call to it. We will have to wait for it to finish or use the promise pattern to continue execution when the connection has been made successfully.
To invoke server methods, after the connection is opened, we just need to use the Invoke() method of the proxy that we have created for the hub, specifying the name of the server action or method to execute, and the parameters that it needs:
... // Initialization code
await hubConn.Start();
hubProxy.Invoke("Broadcast", "john", "Hi, all!");
For example, the preceding statement would invoke the following method of the hub referenced by hubProxy:
public void Broadcast(string from, string message)
{
    // Code
}
The arguments that we send to the remote method are defined as object type parameters, which indicates that we can pass any object type. The SignalR client will automatically take care of serializing it before sending it to the other end of the communication.
Invoke() returns a Task object, which we can use again to take control when its execution completes by using the promise pattern or wait for its completion using Wait() or the async/await construct of the language.
When the server method returns a data type, we can use a generic Invoke<T>() overload, as shown in the following example, and get the result returned by accessing the Result property of the task:
// Client code
var result = hubProxy.Invoke<int>("Sum", 2, 3).Result;
// or using an async flavour:
// var result = await hubProxy.Invoke<int>("Sum", 2, 3);
Console.WriteLine("Result: " + result);
// Server code (Hub)
public int Sum(int a, int b)
{
    return a+b;
}
We can also receive any object type as a return value, deserialization being fully automatic.
var customer = _customerServices.GetById(3);
var provider = _providerServices.GetById(34);
var result = await hubProxy.Invoke<IEnumerable<Invoice>>(
                     "GetInvoices",
                     customer,
                     provider
             );
foreach(var invoice in result)
{
    Console.WriteLine("Invoice: " + invoice.Id);
}
Let’s see what happens with the opposite direction of the communication—that is, when the server is the one who invokes an action from a client connected to the service. From the point of view of the client, it is a mere subscription to an event. Using its internal protocol, the server sends a command specification that includes the name of the method to be executed and the arguments that need to be supplied to it. For this to occur, on the client side, we will have to previously subscribe to each of the events, or actions, where we want to include handling logic.
To associate an action invoked by the server to a handler, we must use the On() method, an extender defined in the SignalR client library on the IHubProxy interface, which allows us to do this in a very quick and expressive manner:
hubProxy.On(
    "message",
    (string msg) => {
                       Console.WriteLine(msg);
                    }
);
The first parameter is the name of the method or action, case-insensitive, and the second parameter is a delegate of the Action type, a method with zero or more parameters and no return value, which is where we will enter the handling code. Again, the parameters that the server sends can be of any type, and they are deserialized automatically.
hubProxy.On(
    "InvoiceAdded", (Invoice invoice) => {
                       // TODO
                    }
);
The handling code will depend to some extent on the platform on which we are executing our application. For example, in WinRT, Windows Phone, WPF, or Silverlight environments, to update the user interface from this code, we will normally use the mechanisms provided by each one of them to securely access the user interface from the thread on which the call to the event is being executed:
// WinRT code:
hubProxy.On<Invoice>("InvoiceAdded", invoice =>
       Dispatcher.RunAsync(CoreDispatcherPriority.Normal,
       () => {
             // TODO
          }
));
Finally, the client library also allows access to the features of state maintenance between the client and the server, which we studied when we looked at the JavaScript client in Chapter 5. As a very brief reminder, this capability allowed us to define “variables” at the client, which traveled to the server accompanying each message sent to the hub. From the server, their values could be read and even changed, and in this case, the new value traveled back automatically to the client so as to always maintain full and consistent state between both ends.
To add state variables, we will use the hub proxy directly as if it were a dictionary allowing us to set key-value pairs:
// Client side
hubProxy["color"] = "red";
hubProxy["username"] = "scott";
hubProxy["refreshCount"] = 1;
hubProxy.Invoke("refresh").Wait();
Console.WriteLine(hubProxy.GetValue<int>("refreshCount")); // 2
// Server side (Hub)
public Task Refresh()
{
    var userColor = Clients.Caller.color;
    var userName = Clients.Caller.username;
    Clients.Caller.refreshCount++;
    ... // More code
}
In this case, the naming of state variables at the client and the server is case-sensitive. Thus we must write them in exactly the same way on both ends.
As we can see in this code, state variables will be accessible from the server directly via Clients.Caller. From the client, we will be able to query their value using the hubProxy.GetValue<T>("varName") extender, which will return it converted to the type that we want.
The SignalR client includes infrastructure to perform a complete tracing of what is happening in the backstage during and after the connection process. We can also use it to register the application’s own events.
First, it offers a Trace() method directly on the Connection or HubConnection object, which is used internally by the client libraries to register events or messages. However, we client application developers can also use it to add our own information, as in the following example:
connection.Trace(
    TraceLevels.None,                    // Event type
    "Hello, world! Today is {0}",        // Message
    DateTime.Now.ToLongDateString()      // Message params
);
The first argument specifies the event type that will be associated to the message that we are registering, to be chosen among those available in the TraceLevels enumeration provided by SignalR. The value chosen is important because there is another property in the connection that allows restricting the messages that we want to see in the trace: TraceLevel.
We can set the TraceLevel property of the Connection object to one or several of the following values (it is an enumeration of flags):
TraceLevels.Messages. In the trace, we will see only information on the messages received.
TraceLevels.Events. We will see the main events and errors that are occurring during the life of the connection.
TraceLevels.StateChanges. We will see the changes of state of the connection.
TraceLevels.None. The trace will contain information not associated to any of the previous elements, such as the code example that we have previously shown.
TraceLevels.All. All the messages sent to the trace will be shown, as shown in Figure 7-10.
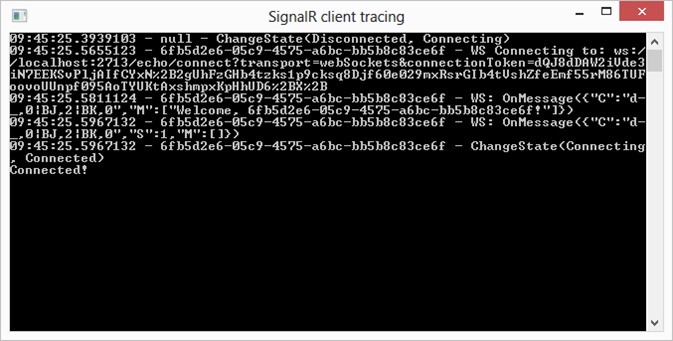
These messages are dumped in a TextWriter object, present in the TraceWriter property of the connection. For example, the console output shown in Figure 7-10 has been made with the following code:
connection.TraceWriter = Console.Out;
Likewise, it would be quite easy to create our own TextWriter and implement any other output or persistence mechanism for traces. The following example implements a basic writer that shows the trace messages through the debugging console, in a similar way to the implementation that comes out of the box with SignalR:
// Custom text writer
class DebugTextWriter: TextWriter
{
    public override void WriteLine(string value)
    {
        Debug.WriteLine(value);
    }
    public override Encoding Encoding
    {
        get { return Encoding.UTF8; }
    }
}
// Set as trace writer
var connection = new Connection("http://localhost:2713/echo");
connection.TraceWriter = new DebugTextWriter();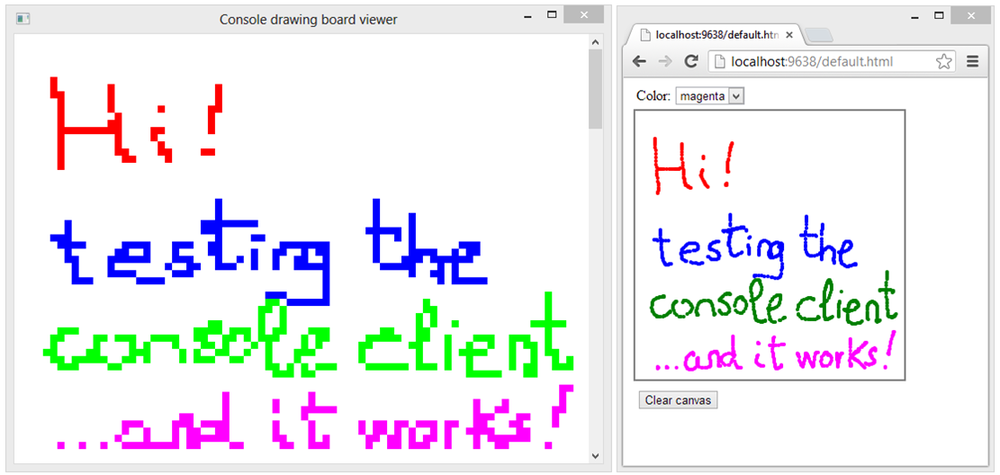
connection.Start();We have previously seen the implementation of a shared drawing board using the SignalR JavaScript client. Now we will use the generic .NET client to implement a simplified client of the drawing board that will be executed in a console application.
Our goal is shown in Figure 7-11. The console application is connected to the hub and reproduces the points drawn from the web client on screen.
After we have created the console type project, it is necessary to download the Microsoft.AspNet.SignalR.Client package via NuGet and then create the client as shown in the following code. Because it is a console application, we will simply edit the Program.cs file:
using System;
using Microsoft.AspNet.SignalR.Client;
class Program
{
    private static ConsoleColor[]
        _colors = new[]
                  {
                      ConsoleColor.Black, ConsoleColor.Red,
                      ConsoleColor.Green, ConsoleColor.Blue,
                      ConsoleColor.Yellow, ConsoleColor.Magenta,
                      ConsoleColor.White
                  };
    static void Main(string[] args)
    {
        Console.Title = "Console drawing board viewer";
        Console.SetWindowSize(80, 60);
        Console.BackgroundColor = ConsoleColor.White;
        Console.ForegroundColor = ConsoleColor.Black;
        Console.Clear();
        var server = "http://localhost:1497/signalr"; // Change to your server's port number
        var hubConn = new HubConnection(server);
        var hubProxy = hubConn.CreateHubProxy("drawingBoard");
        hubProxy.On("clear", () =>
                    {
                        Console.BackgroundColor = ConsoleColor.White;
                        Console.Clear();
                    }
        );
        hubProxy.On("drawPoint", (int x, int y, int color) =>
                    {
                        DrawPoint(x, y, color);
                    }
        );
        hubProxy.On("update", (int[,] buffer) =>
            {
                for (int x = 0; x < buffer.GetLength(0); x++)
                {
                    for (int y = 0; y < buffer.GetLength(1); y++)
                    {
                        if (buffer[x, y] != 0)
                            DrawPoint(x, y, buffer[x, y]);
                    }
                }
            }
        );
        hubConn.Start().ContinueWith(t =>
             {
                 if (t.IsFaulted)
                 {
                     Console.WriteLine("Error connecting to "
                       + server + ". Are you using the right URL?");
                 }
             }
        );
        Console.ReadLine();
        hubConn.Stop();
    }
    private static void DrawPoint(int x, int y, int color)
    {
        int translatedx = Console.WindowWidth*x/300;
        int translatedy = Console.WindowHeight*y/300;
        Console.SetCursorPosition(translatedx, translatedy);
        Console.BackgroundColor = _colors[color - 1];
        Console.Write(" ");
    }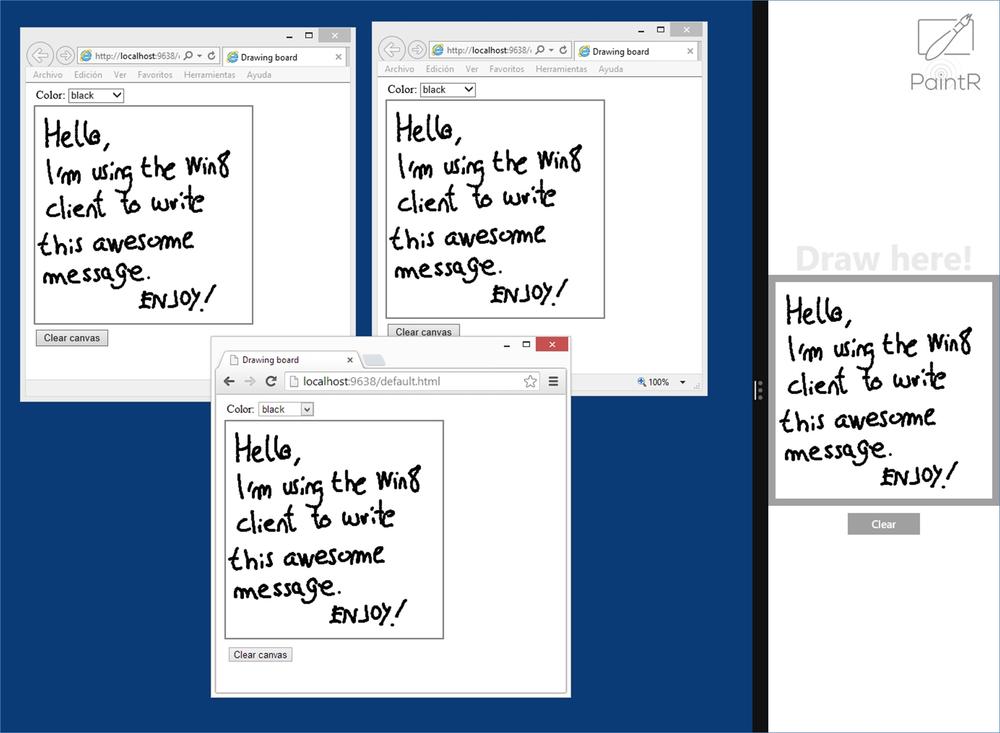
}When creating SignalR clients, there is really very little difference between platforms, because the concepts, the philosophy, and even the objects that we will handle are identical. To illustrate this, we are going to implement PaintR, a client for Windows 8 and Windows 8.1 of our well-known shared drawing board, using C# and XAML; see Figure 7-12.
For the purpose of creating the application that we will develop over the following pages, it is necessary to first create a project of the “Blank App (XAML)” type from Visual Studio. After we have created it, we must install the following package using NuGet:
PM> install-package Microsoft.AspNet.SignalR.Client
<Page
    x:Class="PaintR.MainPage"
    xmlns="http://schemas.microsoft.com/winfx/2006/xaml/presentation"
    xmlns:x="http://schemas.microsoft.com/winfx/2006/xaml"
    xmlns:local="using:PaintR"
    xmlns:d="http://schemas.microsoft.com/expression/blend/2008"
    xmlns:mc="http://schemas.openxmlformats.org/markup-compatibility/2006"
    mc:Ignorable="d">
    <Grid Background="White">
        <StackPanel VerticalAlignment="Center" Orientation="Vertical">
            <TextBlock MaxWidth="320" Margin="0,0,0,0"
                       Text="Draw here!" VerticalAlignment="Bottom"
                       FontFamily="Global User Interface" FontSize="48"
                       Foreground="#FFEAEAEA" FontWeight="Bold"
                       TextAlignment="Center" Width="320" Height="49"/>
            <Border Margin="0,0,0,0" BorderThickness="10"  Width="320"
                    Height="320" BorderBrush="#a0a0a0"  >
                <Canvas Name="InkCanvas" Background="white"
                        Margin="0,0,0,0" Width="300" Height="300"
                        MaxWidth="300" MaxHeight="300"
                        HorizontalAlignment="Center"  />
            </Border>
            <Button Content="Clear" Name="ClearButton" Width="100"
                    HorizontalAlignment="Stretch"
                    VerticalAlignment="Stretch"
                    Style="{StaticResource TextButtonStyle}" />
        </StackPanel>
        <Image HorizontalAlignment="Right" VerticalAlignment="Top"
               Source="Assets/Logo.png" Stretch="None"
               Opacity="0.5"></Image>
    </Grid>
    <Page.BottomAppBar>
        <AppBar Padding="10,0,10,0">
            <Grid>
                <StackPanel Orientation="Horizontal"
                            HorizontalAlignment="Left">
                    <Button AutomationProperties.Name="Color"
                            Click="SelectColor"
                            Style="{StaticResource
                                    AppBarButtonStyle}"/>
                </StackPanel>
            </Grid>
        </AppBar>
    </Page.BottomAppBar>
</Page>using System;
using Windows.Foundation;
using Windows.UI;
using Windows.UI.Core;
using Windows.UI.Input;
using Windows.UI.Input.Inking;
using Windows.UI.Popups;
using Windows.UI.Xaml;
using Windows.UI.Xaml.Controls;
using Windows.UI.Xaml.Input;
using Windows.UI.Xaml.Media;
using Windows.UI.Xaml.Navigation;
using Windows.UI.Xaml.Shapes;
using Microsoft.AspNet.SignalR.Client;
namespace PaintR
{
public sealed partial class MainPage : Page
{
private bool _pressed = false;
private readonly InkManager _mInkManager = new InkManager();
IHubProxy _drawingBoard;
HubConnection _hub;
public MainPage()
{
InitializeComponent();
InkCanvas.PointerPressed += OnCanvasPointerPressed;
InkCanvas.PointerMoved += OnCanvasPointerMoved;
InkCanvas.PointerReleased += OnCanvasPointerReleased;
InkCanvas.PointerExited += OnCanvasPointerReleased;
ClearButton.Click += OnClearButtonClick;
}
///////////////////////////
// Startup code
///////////////////////////
protected async override
void OnNavigatedTo(NavigationEventArgs e)
{
base.OnNavigatedTo(e);
if(_hub != null) // If the client has already been initialized
return; // do not initialize again
_hub = new HubConnection("http://localhost:9638/");
_drawingBoard = _hub.CreateHubProxy("DrawingBoard");
// Define state vars
_drawingBoard["color"] = 1; // Black by default;
// Subscribe to Hub events
_drawingBoard.On<int, int, int>(
"DrawPoint", (x, y, c) =>
Dispatcher.RunAsync(CoreDispatcherPriority.Normal,
() =>
{
DrawPoint(x, y, c);
}
));
_drawingBoard.On(
"Clear", () =>
Dispatcher.RunAsync(CoreDispatcherPriority.Normal,
() =>
{
ClearDrawingBoard();
}
));
_drawingBoard.On<int[,]>(
"Update", (int[,] buffer) =>
Dispatcher.RunAsync(CoreDispatcherPriority.Normal,
() =>
{
UpdateDrawingBoard(buffer);
}
));
// Go!
await _hub.Start();
}
////////////////////////
// Flyout Context Menu
///////////////////////
private Rect GetElementRect(FrameworkElement element)
{
GeneralTransform buttonTransform =
element.TransformToVisual(null);
Point point = buttonTransform.TransformPoint(new Point());
return new Rect(point,
new Size(
element.ActualWidth,
element.ActualHeight));
}
private async void SelectColor(object sender, RoutedEventArgs e)
{
var menu = new PopupMenu();
menu.Commands.Add(new UICommand("Black", null, 1));
menu.Commands.Add(new UICommand("Red", null, 2));
menu.Commands.Add(new UICommand("Green", null, 3));
menu.Commands.Add(new UICommand("Blue", null, 4));
menu.Commands.Add(new UICommand("Yellow", null, 5));
menu.Commands.Add(new UICommand("Magenta", null, 6));
IUICommand chosenCommand =
await menu.ShowForSelectionAsync(
GetElementRect((FrameworkElement)sender)
);
if (chosenCommand != null)
{
_drawingBoard["color"] = (int)chosenCommand.Id;
}
}
//////////////////////
// Event handlers
//////////////////////
public void OnCanvasPointerReleased(
object sender, PointerRoutedEventArgs e)
{
_pressed = false;
}
public void OnCanvasPointerPressed(
object sender, PointerRoutedEventArgs e)
{
_pressed = true;
}
private async void OnCanvasPointerMoved(
object sender, PointerRoutedEventArgs e)
{
if (!_pressed)
return;
PointerPoint pt = e.GetCurrentPoint(InkCanvas);
var x = Convert.ToInt32(pt.Position.X);
var y = Convert.ToInt32(pt.Position.Y);
if (x >= 0 && x < InkCanvas.Width
&& y >= 0 && y < InkCanvas.Height)
{
DrawPoint(x, y, (int) (_drawingBoard["color"]));
await _drawingBoard.Invoke("BroadcastPoint", x, y);
}
}
async void OnClearButtonClick(object sender, RoutedEventArgs e)
{
ClearDrawingBoard();
await _drawingBoard.Invoke("BroadcastClear");
}
///////////////////////////
// Drawing board Helpers
///////////////////////////
private Color[] _colors = new[]
{
Colors.Black,
Colors.Red,
Colors.Green,
Colors.Blue,
Colors.Yellow,
Colors.Magenta,
Colors.White
};
private Color GetColorFromInt(int color)
{
return (color >0 && color <= _colors.Length)?
_colors[color-1]
: Colors.Black;
}
private void DrawPoint(int x, int y, int color)
{
if (color == 0) return;
var brush = new SolidColorBrush(GetColorFromInt(color));
var circle = new Ellipse()
{
Width = 4,
Height = 4,
Fill = brush,
StrokeThickness = 1,
Stroke = brush
};
InkCanvas.Children.Add(circle);
Canvas.SetLeft(circle, x);
Canvas.SetTop(circle, y);
}
private void ClearDrawingBoard()
{
InkCanvas.Children.Clear();
}
private void UpdateDrawingBoard(int[,] buffer)
{
for (int x = 0; x < buffer.GetLength(0); x++)
{
for (int y = 0; y < buffer.GetLength(1); y++)
{
DrawPoint(x, y, buffer[x,y]);
}
}
}
}
}Aside from the obvious differences at platform level, there is nothing in relation to SignalR to differentiate these developments from any other type of client. We can open connections, create proxies, send data, subscribe to the reception of information or invocations made from hubs, and so on, and all this in the same way as we have seen so far.
The only aspect worth noting is a problem that we will often encounter while developing Windows Phone solutions: connectivity with the local host from the device emulator. Keep in mind that it is running on a virtual machine that, for all purposes, is a different computer on the network, so by default it will not have access to SignalR services provided from the local system.
In fact, this problem is not unique to SignalR. The exact same thing happens when trying to connect to REST APIs or to any other service available at “localhost”, due to the following reasons:
The emulator uses a different IP addressing space.
The server that we use (typically, IIS Express) is usually not configured to receive requests from computers other than the local one.
There might be security elements (for example, the Windows firewall) that block the requests.
For successful testing, we first have to ensure access to the server that we are using, for which it is important that it is associated to an address that is accessible from the emulator. Normally, we can use the one assigned to the virtual network adapter used by the emulator, which is usually of the 169.254.80.80 type.
Therefore, we must ensure that the server that we are using is capable of responding to requests made to this address, at the port that we are using.
When using IIS Express, as is the usual case, we must perform the following steps:
Close IIS Express.
Employing a user with elevated privileges, access its configuration file, called applicationhost.config, usually found at “%userprofile%DocumentsIISExpressconfig”.
Look for the specific configuration section of the website that we are using to debug. Such sections look like this:
<site name="MySignalrApp" id="304">
      ...
</site>
Add a binding to make IIS Express respond to requests directed to a new IP address accessible from the emulator. In the following example, we have added the second
<binding>with the address and port through which the server will be accessed from the emulator:<site name="MySignalrApp" id="304"> ... <bindings> <binding protocol="http" bindingInformation="*:7890:localhost" /> <binding protocol="http" bindingInformation="169.254.80.80:54321:" /> </bindings> </site>
Next we just need to start Visual Studio with elevated privileges so that IIS Express can use the specified address, and the service will be available from outside as long as the firewall does not intercept the calls—in which case the ideal thing to do is to add a rule that allows them. (A much worse solution would be to temporarily disable this security feature.)
Finally, it is important to remember that instead of using “localhost” to access the local computer from the client, we must specify the IP address that we have configured.
Both the SignalR team and the user community are developing client implementations that allow consumption of hub or persistent connection services environments other than Windows, and even from those not based on the .NET Framework.
For developers of native applications for Windows, the SignalR team is working on a pure C++ client so that these systems can also benefit from the consumption of real-time services.
The following example shows how to access a persistent connection from a C++ client:
auto connection =
        make_shared<MicrosoftAspNetSignalRClientCpp::Connection>(
            U("http://localhost:40476/raw-connection")
        );
connection->SetReceivedCallback([](string_t message)
{
    wcout << message << endl;
});
connection->SetStateChangedCallback([](StateChange stateChange)
{
    wcout <<
        ConnectionStateString::ToString(stateChange.GetOldState())
        << " => "
        << ConnectionStateString::ToString(stateChange.GetNewState())
        << endl;
});
connection->SetErrorCallback([](exception& ex)
{
    wcerr << U("========ERROR==========") << endl;
    wcerr << ex.what() << endl;
    wcerr << U("=======================") << endl;
});
connection->Start().wait();
connection->Send("Hi!").wait();
For .NET developers, the easiest option to implement native clients on platforms such as Linux or Mac OS is via the use of Mono and tools such as MonoDevelop, Xamarin Studio[30], or Visual Studio extensions created by the same company. The SignalR .NET client libraries are valid on these platforms.
It is also possible to create native applications for iOS or Android using the languages to which we are accustomed with the set of multiplatform solutions provided by Xamarin. To access SignalR services from them, we will simply need to use the same client libraries as usual.
There are also unofficial libraries that are being created by the community, for Android and iOS native environments, Java, C++ on QT (Windows and Linux), NodeJS, and others.
[27] Official website of the Mono project: http://www.mono-project.com
[28] Mono Project repository at GitHub: http://github.com/mono
[29] Official website of the MonoDevelop project: http://monodevelop.com
[30] Official Xamarin Studio website: http://xamarin.com/studio