
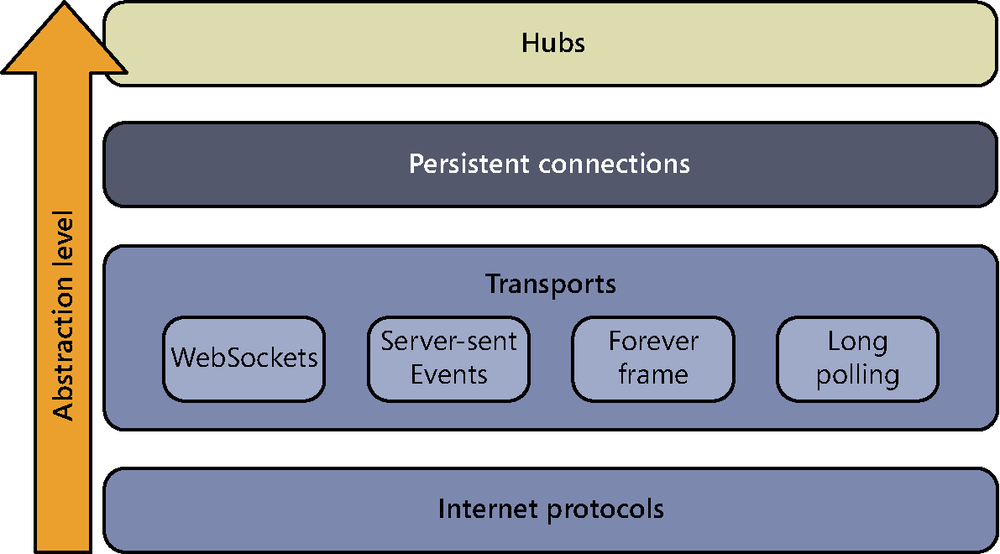
Indubitably, persistent connections provide all that we might need to create real-time multiuser applications through a really simple and intuitive API. Nevertheless, the creators of SignalR have taken it one step further, offering a much higher level of abstraction above Internet protocols, transports, and persistent connections: hubs. (See Figure 5-1.) Hubs use an imperative development model based on the flexibility of JavaScript and the dynamic features of C#, which creates an illusion of continuity between the client and the server, two physically separated environments.
Hubs are thus the higher-level API that we can use to access the persistent connection created by SignalR. We can create the same applications using persistent connections, but if we choose hubs, it will be simpler.
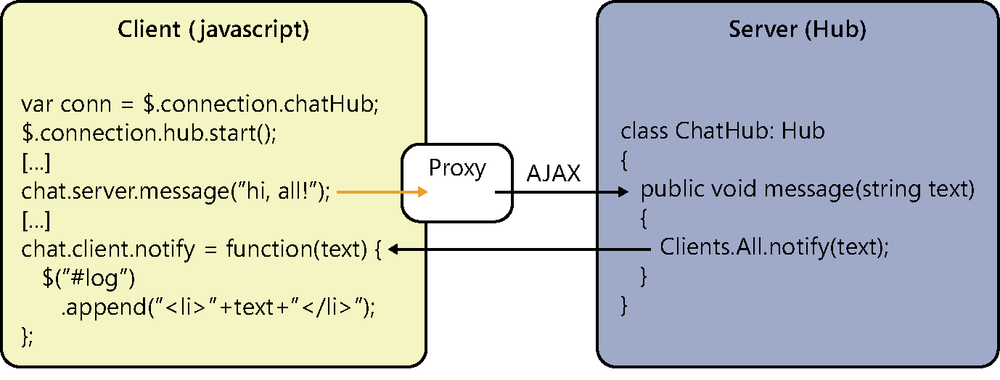
Although there are two different approaches to working with hubs in SignalR, the most common model used in web environments allows us to make direct calls between client-side and server-side methods transparently. This is two-way RPC; that is, from the client, we will directly invoke methods available at the server, and vice versa. See Figure 5-2.
Obviously, there is nothing magical about this. To make it possible, on the client side, SignalR automatically creates proxy objects with the façade of server Hub classes, and in their methods, it enters remote calls to their real methods. Conversely, when the server invokes a method of the client, it is resolved by using dynamic types and a special protocol that “packages” these calls at the server and sends them to the other end through push by using the underlying transport. They then arrive at the client, where they are interpreted and executed. Later in this chapter, in the section Sending messages to clients we’ll look at this process in greater detail.
The use of hubs is recommended when we need to send different types of messages with various structures between the client and the server. As you know, persistent connections operate mainly on text strings, which means that we have to perform the parsing of data manually, and this can sometimes be laborious. But if we use hubs, most of the work is done by the SignalR framework itself, in exchange for a very small additional load.
Creating a hub-based application usually involves the deployment of components both on the server and client sides. In this section, we will focus on the server side, and we will study how to configure, create, and use hubs to create real-time services.
Unlike persistent connections, services based on hubs do not require specific mapping for each one during startup to associate them with the URLs that access them, because they are all accessible through a single base URL that the framework sets by default with the value “/SignalR”.
For this reason, it will be necessary to perform only one mapping during startup, something that we can do in the OWIN startup class. As we have seen, by convention, this class in most cases will be called Startup, will be found in the root namespace of the project, and will contain a method called Configuration() where the configuration code will be found:
public class Startup
{
    public void Configuration(IAppBuilder app)
    {
        app.MapSignalR();
    }
}
MapSignalR() is an extension method of IAppBuilder provided by SignalR to facilitate mapping and configuration of the hub service. Notice, as opposed to its generic overload MapSignalR<TConnection>, which we use to map persistent connections, that we do not have to specify the classes that implement the services: this call suffices to map all the hubs of the system. Of course, if both hubs and persistent connections are used in the same applications, their mappings should appear separately in the configuration:
public void Configuration(IAppBuilder app)
{
    // Map persistent connections
    app.MapSignalR<MyPersistentConnection>("/myconnection");
    app.MapSignalR<OtherPersistentConnection>("/other");
    // Map hubs to "/signalr" by default
    app.MapSignalR();
}
We can modify the default path to access the services and adapt the path to our needs or preferences:
app.MapSignalR("/realtime", new HubConfiguration());In this case, the base URL for accessing the hubs will be /realtime. Also, in the second parameter, we can modify some configuration options of our hubs, such as the dependency resolution component to be used or whether the generation of dynamic proxies and JSONP are enabled. We’ll look at all these aspects as we delve deeper into the use of hubs in SignalR in this chapter.
Services are implemented in classes that inherit from the Hub class, available in the Microsoft.AspNet.SignalR namespace:
public class EchoHub: Hub
{
    // ...
}
Hubs are instantiated through calls. Each time a client sends a message to the server, an object of this type will be created to process it. Hubs will also be instantiated when new connections or disconnections are detected, so we can enter customized logic in these cases, as we shall see. It is important to bear this in mind so as not to use instance members on the hub to maintain the state: after the current request is processed, the object will be eliminated, so this information would be lost.
This short life cycle is similar to the one found in Web API or ASP.NET MVC controllers, but it is different from the one found in PersistentConnection objects, which could remain active for as long as the connection lasts, depending on the transport used.
The name selected for the hub class is an important detail because later, on the client side, it will be used to reference the service. Nevertheless, it’s possible to specify a different name for that by using the [HubName] attribute:
// This service will be referenced as "EchoService"
// instead of "EchoHub"
[HubName("EchoService")]
public class EchoHub: Hub
{
    // ...
}
Inside the class, we will implement the methods that will be exposed to the clients and that will allow us to take control upon the arrival of messages.
When a client needs to send data to a hub, it invokes one of its methods and supplies it the required parameters, in the same vein as RPC. That is, in this case, we do not have a single point for receiving information on the server side like the OnReceived() method of persistent connections; here we can implement as many methods as we need in the class, and each of them will act as a possible point of entry and implementation of processing logic.
The following code shows a hub with the signature of methods that could be useful for a simple chat service:
public class ChatHub: Hub
{
    public void Broadcast(string text) { ... }
    public void Message(string to, string text) { ... }
    public void SendToGroup(string group, string text) { ... }
    public void ChangeNick(string newNickname) { ... }
    public void Join(string group) { ... }
    public void Leave(string group) { ... }
    // ...
}
Note
Any public method within a hub can be invoked from outside, which could potentially become a security hole. Be careful with this.
In the following examples, you can see how one of these methods could be invoked from a JavaScript client using the automatically generated proxy (we will look at this in depth later on):
var newNick = prompt("Enter your new nickname");
hubProxy.server.changeNick(newNick); // Calls method ChangeNick()
                                     // on the server
Or from a generic .NET client:
hubProxy.Invoke("ChangeNick", "Joe"); // Calls method ChangeNick()
                                      // on the server
As you can see, the name of the method is used from the client to make the call, although it is possible to specify an alternative one using the [HubMethodName] attribute:
// This method will be referenced as "SendPrivate"
// instead of "Message"
[HubName("SendPrivate")]
public void Message(string to, string text) { ... }
SignalR allows us to overload the methods exposed to the client; but internally, when determining which method is to be executed, only the number of parameters supplied will be considered and not their type. Therefore, the following methods defined in a hub are valid and could be invoked from the client side without any problems:
public class ChatHub: Hub
{
    public Task Send(string message) {...}
    public Task Send(string message, string target) {...}
    ...
}
However, a definition like the following would generate ambiguity problems, and trying to execute either of these two actions would return an error:
public class ChatHub: Hub
{
    public Task Send(string message, string target) {...}
    public Task Send(string message, MessageType type) {...}
    ...
}
After the framework determines what method to execute, depending on the name of the method and the number of arguments supplied in the call from the client side, they are directly mapped to the parameters expected by the method on the server side, type conversion being automatically managed on both ends. Internally, a mechanism similar to the one we find in the binder of ASP.NET MVC or Web API is used; not only will it be capable of transforming values into native types used by the parameters, but it will also do the same thing with complex types like the one shown in the following example:
public class ChatHub: Hub
{
    // ...
    public void SendPrivate(PrivateMessage msg)
    {
        // ...
    }
}
public class PrivateMessage
{
    public string From { get; set; }
    public string To { get; set; }
    public string Message { get; set; }
    public int MsgId { get; set; }
}
Thus, from a JavaScript client, the call to the method might be like this:
hubProxy.server.sendPrivate({ from: "john",
                              to: "peter",
                              message: "Hi!",
                              msgId: "18"
});
In complex objects, binding will be performed without regard to uppercase or lowercase. That is, the preceding code would work exactly the same way if it was written like this:
hubProxy.server.sendPrivate({ From: "john",
                              TO: "peter",
                              MeSsAgE: "Hi!",
                              msgid: "18"
});
It is also possible to receive complete graphs, such as the following:
// Hub:
public class PeopleHub: Hub
{
    public bool SavePerson(Person person)
    {
        // TODO: Persist this person in db
    }
}
// Data structures
public class Person
{
    public string Name { get; set; }
    public int Age { get; set; }
    public Address Address { get; set; }
}
public class Address
{
    public string Street { get; set; }
    public string Zip { get; set; }
}
From a JavaScript client, it could be invoked as follows:
peopleHub.server.savePerson({
    name: "John",
    age: 32,
    address: {
        street: "Madison Avenue",
        zip: "1234"
    }
});
Another interesting feature of these methods is that they allow the direct return of any type of value; SignalR will be the one in charge of serializing them to make them available to the client that made the call. In the following example, we can see the implementation of a method with a return and its retrieval by a JavaScript client, where we can again observe the use of the promise pattern to obtain the result of this operation:
// ======================================================
// Server code
public class Calc: Hub
{
    // ...
    public int Sum(int a, int b)
    {
        return a + b;
    }
}
// ======================================================
// Client code (JavaScript)
hubProxy.server.sum(3, 4)
        .done(function(result) {
            alert(result);
        });
Asynchrony is also present in the implementation of the methods of the hub. If, inside a method, the process to be performed is too costly and it depends on external factors—for example, the connection to a web service or a complex query to a database—we can return a Task<T> object representing the process in the background that will return a T type object:
public Task<int> Sum(int a, int b)
{
    return Task.Factory.StartNew(() =>
              {
                  Thread.Sleep(5000); // Simulate an external call
                  return a + b;
              });
}
And, of course, we can also use the recommended async/await construct of C# in the implementation of asynchronous features:
public async Task<int> Sum(int a, int b, int c)
{
    var partialResult = await DoSum(a, b);
    var result = await DoSum(partialResult, c);
    return result;
}
// Private methods
private async Task<int> DoSum(int a, int b)
{
  await Task.Delay(1000);
  return a + b;
}The same concept applied to sending messages from the client to the server is also employed in the opposite direction. Through its Clients property, the Hub class offers a wide variety of tools to determine the recipients of the message and “invoke their methods” in a simple way thanks to the flexibility provided by .NET dynamic types.
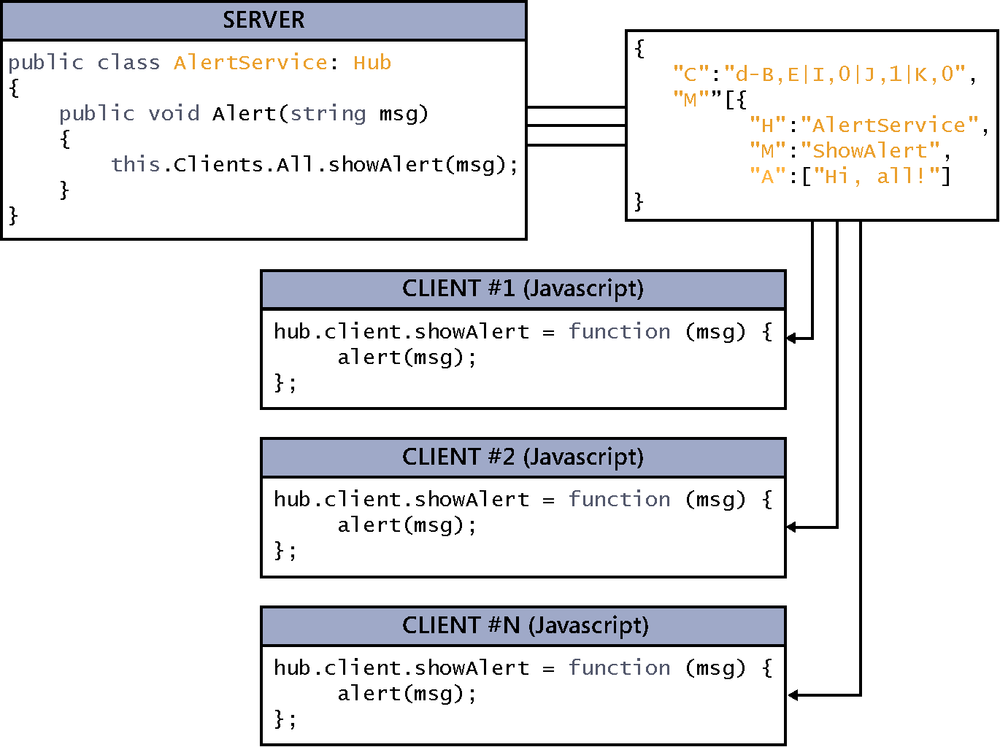
The following code shows an invocation of the showAlert() method in all the clients connected when one of them calls the Alert() method of the hub:
public class AlertService: Hub
{
    public void Alert(string msg)
    {
        this.Clients.All.showAlert(msg);
    }
}
Clients.All returns a reference to all connected clients in the form of a dynamic object that we can subsequently use to directly code the call to the method that we want to execute in all of them. Notice that the use of dynamic types is what makes the preceding code not fail in compilation despite the fact that there is no showAlert() method in the object on which we are making the call.
Internally, still at the server, all invocations to methods that are made on this dynamic object are captured and, following the command[21] pattern, their specifications are entered into a data packet, which is what is really sent to the clients. When the information reaches the other end, the data will be interpreted to execute whatever logic has been implemented.
The structure sent from the server to the clients looks more or less like this:
{
    "C": "d-B,2|F,2|G,3|H,0",
    "M": [
            {
                "H":"AlertService",
                "M":"showAlert",
                "A":["I felt a great disturbance in the force"]
            }
         ]
}
Although this data packet has a lot of control information, we can intuitively understand that when a client receives this information it will know that the message has been sent from the “AlertService” hub and that it must execute the “showAlert” local method, supplying it the text “I felt a great disturbance in the force” as an argument. Depending on the type of client (JavaScript, .NET, WP, and so on), it will be executed in one way or another. For example, with a JavaScript client, the packet will be translated into a call to the client.showAlert() method of the proxy created for the hub and its parameter will be supplied the specified text, as shown in Figure 5-3:
hubProxy.client.showAlert = function (msg) {
    alert(msg);
};
It is important to take into account that no checks are performed at the server on the name of the method or the coincidence of its signature, parameters, or types—there would be no way to do so, because they are physically separated. Therefore, the call specification will simply be “packaged”; if we make any mistake, no error will be generated: the packet will be sent to the recipients, but they will not know how to interpret it, and thus the effects will not be as expected.
If we go back to the server side, we find that besides Clients.All, we can use various constructions to select the recipients of the calls. All of them are used in the same way, because they return a dynamic object on which we must make the invocations of the functions on the client side. The delivery tools offered by SignalR hubs are as follows:
Clients.AllAllows us to “invoke” a method in all the clients connected to the hub, with no exceptions.public class ChatHub: Hub { public Task Broadcast(string text) { // Invokes the function "Message" in all connected clients return Clients.All.Message(text); } }Clients.AllExcept(connections)Indicates that the call must be sent to all the clients, except those whoseconnectionIds are passed as an argument in the form of an array or strings, or simply separated by commas, because the parameter received by this method is aparams string[]:Clients.AllExcept(darkSideUser1, darkSideUser2) .Message("May the force be with you"); // Or string[] darkSidePeople = _getDarkSidePeople(); Clients.AllExcept(darkSidePeople) .Message("May the force be with you");Clients.CallerIdentifies that the recipient of the invocation is the client that has made the call to the hub method currently being executed.public Task Broadcast(string message) { Task broadcast = Clients.All.Message("Broadcast: " + message); Task notification = Clients.Caller.Message( ">> Your message was sent!"); return broadcast.ContinueWith(_ => notification); }Clients.Client(connectionId)Sends the invocation of the method to the client with the specified connection identifier only.Clients.Client(lukeConnectionId).Message("Use the force");Clients.Clients(connectionIds)Sends the invocation of the method to the clients whose connection identifier is specified in the form of anIList<string>:var jedis = _rebelServices.GetJedisConnectionIds(); Clients.Clients(jedis).Message("Use the force");Clients.OthersRepresents all the clients connected except the one who has invoked the method being executed. It is equivalent to usingAllExcept()and supplying it the identifier of the current connection.public Task Broadcast(string message) { return Clients.Others.Message("Broadcast: " + message); }Clients.Group(groupName, excludeConnectionIds)Allows invoking functions only in clients belonging to the group specified as an argument. Although we will go into deeper details later in this chapter in the section Managing groups it should be remarked here that hubs, like persistent connections, allow creating arbitrary groups and linking clients to them.public Task MessageToGroup(string group, string text) { return Clients.Group(group).Message(text); }The second parameter is useful to enter the identifiers of the clients that, despite belonging to the specified group, must not receive the message.
Clients.Groups(groupNames, excludeConnectionIds)Similar to the preceding method, sends the invocation of the method to the clients belonging to the groups specified in the form of string lists.public Task MessageToAdmins(string text) { var groups = new[] { "admins", "superadmins", "ninjas" }; return Clients.Groups(groups).Message(text); }Clients.OthersInGroup(groupName)Allows us to select all the clients belonging to a group, except the one making the current call to the hub.public Task BroadcastToGroup(string group, string text) { return Clients.OthersInGroup(group).Message(text); }Clients.OthersInGroups(groupNames)Allows us to specify all the clients belonging to the groups entered as recipients of the message, except the client making the current call to the hub.public Task BroadcastToGroups(IList<string> groups, string text) { return Clients.OthersInGroups(groups).Message(text); }Clients.User(userName)Enables us to state the specific user on which the method will be invoked but, in contrast toClients.Client(), in this case we will use their name as the search criterion. In the next section, Sending messages to specific users we will come back to this, but for now it will suffice to know that this name will initially be the name of the user authenticated in the system:public Task ObiWanMessage() { return Clients.User("luke").Message("Use the force"); }
An important detail to keep in mind, which we have anticipated in some of the previous examples, is that the invocation of any method from the client side on a selection of recipients returns a Task type object, which allows employing it as a return of asynchronous methods or using the capabilities offered by this type to coordinate processes executed in parallel, as well as easy use of the async/await constructs of the language:
public async Task Alert(string msg)
{
await Clients.All.showAlert(msg);
await Clients.Caller.showAlert("Your alert has been sent");
}We previously saw that we can invoke a method on a specific client by using its connection identifier via a construct similar to Clients.Client(id).MethodToInvoke(params).
We also briefly commented on another option: using the User(userName) selector, thus adding an additional way of selecting the recipient or recipients of the message by their user names.
public Task ObiWanMessage()
{
    return Clients.User("luke").Message("Use the force");
}In the preceding example, the message will be sent to all the SignalR clients that are authenticated in the system as “luke”. Note that, as opposed to Clients.Client(), which locates the recipient uniquely, in this case it would be possible to send the message via several connections, as many as are associated to the authenticated user.
The small distinguishing nuance is the distinction between the terms “client” and “user.” A client is equivalent to a connection and has a unique identifier, whereas a user can have several active connections (for example, by having several tabs open in their browser), each one with a different identifier.
Nevertheless, the best thing about this feature is its flexibility. When SignalR needs to know the name of the user, it employs a class that implements the IUserIdProvider interface, whose single method will be in charge of returning the user name, using information from the current request, if necessary.
The default implementation is found in the PrincipalUserIdProvider class, defined in the Microsoft.AspNet.SignalR.Infrastructure namespace, and it returns the name of the authenticated user:
public class PrincipalUserIdProvider : IUserIdProvider
{
    public string GetUserId(IRequest request)
    {
        if (request == null)
            throw new ArgumentNullException("request");
        if (request.User != null && request.User.Identity != null)
            return request.User.Identity.Name;
        else
            return (string) null;
    }
}
Obviously, we can implement our own logic to obtain the name of the user associated to a connection. For example, the following code shows how we could use the content of a cookie for this:
public class CookiesUserIdProvider : IUserIdProvider
{
    public string GetUserId(IRequest request)
    {
        if (request == null)
            throw new ArgumentNullException("request");
        Cookie cookie;
        if (request.Cookies.TryGetValue("username", out cookie))
        {
            return cookie.Value;
        }
        else
        {
            return null;
        }
    }
}
SignalR will know that it must use this class instead of the one included out of the box because we are going to specifically indicate so by registering this class in a component called the dependency resolver. In Chapter 9 we will delve into the dependency resolver. For now, it will suffice to understand that the following code, entered in the application startup, tells SignalR that when it needs an object of the IUserIdProvider type it must use the delegate that we are providing it to obtain the instance. In this case, we will always provide it an instance of the CookiesUserIdProvider type:
GlobalHost.DependencyResolver.Register(
    typeof(IUserIdProvider),
       ()=> new CookiesUserIdProvider()
);Clients automatically include state information in the calls they make to the methods of a hub. This information consists of a key-value dictionary that contains data that might be of use to either end. From the point of view of the server, this gives us the possibility of accessing these data from the body of the methods, again thanks to .NET dynamic types.
Thus, on the client side, we can create and use arbitrary properties that could be directly accessed from the server method invoked. In the case of a JavaScript client, these properties are created inside the state property of the proxy, as you can see in the following code:

Obviously, we can access data relative only to the client that invoked the current method; for this reason, we use the familiar Clients.Caller property to access such data.
It is also possible to modify the values at the server. The new state will be transferred to the client in the response to the invocation. Notice that in this case we are directly applying an autoincrement operator on the MsgId property:
public Task Alert(string msg)
{
    var alert = string.Format("#{0} alert from {1}: {2}",
                               Clients.Caller.MsgId++,
                               Clients.Caller.UserName,
                               msg);
    return Clients.All.ShowAlert(alert);
}
The new value of the MsgId property will be returned to the client as part of the response to the call to the method. Upon arrival, the local value of the property will be updated.
This capability can be useful for the purpose of simplifying the signature of the methods of the hub, although we should bear in mind that the state information that we include at the client will travel in all requests, to maintain synchronization between both ends, so we must use it carefully.
Later, in “State maintenance” in the Client implementation section, we will look at the mechanisms behind this interesting feature.
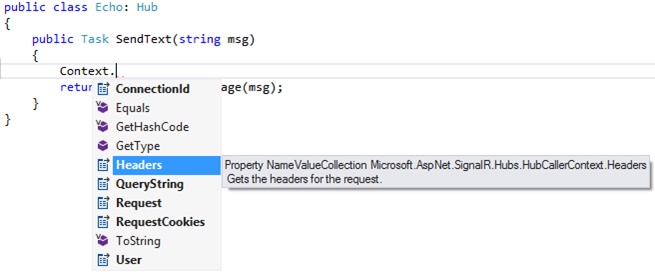
When using hubs, in method signatures we include only the parameters that the methods need to receive from the client to perform the task assigned to them. Consequently, obtaining information from the context of the request or even the identifier of the connection that makes the call is not as direct as when we used persistent connections, where we received these data as parameters of the methods provided by the PersistentConnection base class.
Nevertheless, it is just as easy. To access the context data, the Hub class offers the Context property—of the HubCallerContext type—through which it exposes properties, including ConnectionId, Headers, QueryString, or User. See Figure 5-4.
As its name implies, in Context.ConnectionId we will always have the identifier of the connection that the hub is currently instantiating and executing.
public Task NewUser()
{
    var message = "New user: " + Context.ConnectionId;
    return Clients.Others.ShowAlert(message);
}
Other properties of Context, such as Headers, QueryString, RequestCookies, and User, are just shortcuts to members of the Request property, which is the one that really contains the information about the request.
Although one might expect the type of this Request property to be the traditional System.Web.HttpRequest, this is not so. The property uses the IRequest type, which is a SignalR-specific abstraction and which allows accessing information on the context of the request in a decoupled way, without needing to know exactly what its implementation is. If we keep poring over the code of the framework, we will see that this interface is implemented in a class that, in turn, obtains all the data it needs using the OWIN standard. This constitutes a complete isolation from the host in which the application is executed.
Hubs also detect when new clients connect, as well as disconnections and reconnections, allowing us to enter logic at these points. In a similar way to persistent connections, we will achieve this by overriding three methods defined in the Hub class:
public abstract class Hub : IHub, IDisposable
{
    public virtual Task OnDisconnected() { ... }
    public virtual Task OnConnected()    { ... }
    public virtual Task OnReconnected()  { ... }
    ... // Other members of Hub
}
Because, as we have seen, the context information is available through the Context property of the Hub, none of these methods defines input parameters. Also, as with the PersistentConnection class, they all return a Task type object.
public class AlertService : Hub
{
    public override Task OnConnected()
    {
        return Clients.All.ShowAlert(
                "There is a new user ready to send alerts to!"
        );
    }
    ... // Other members of AlertsService
}
If inside one of these methods we perform an operation that is quick and direct and does not require using asynchrony or creating a Task, we can simply return the result of invoking the corresponding method of the base class:
public override Task OnConnected()
{
    // Do something sync here
    return base.OnConnected();
}We have already seen how to send messages to clients belonging to a group by using the Clients.Group() and Clients.OthersInGroup() methods, but first, we must obviously find some way both to associate clients to SignalR groups and to disassociate them.
Both operations can be performed very easily through the Groups property of the hubs, which gives us the Add() and Remove() properties for asynchronously adding a connection and removing it from a group:
public class Chat: Hub
{
    public Task Join(string groupName)
    {
        return Groups.Add(Context.ConnectionId, groupName);
    }
    public Task Leave(string groupName)
    {
        return Groups.Remove(Context.ConnectionId, groupName);
    }
    ... // Other members of the Chat
}
As with persistent connections, to avoid limiting the scale-out possibilities of SignalR applications, we are unable to ask what groups are available or what connections are included in each of them. If we were to need these functionalities for our applications, we would have to implement them outside the SignalR framework.
During the development of an application on SignalR, the need can frequently arise to save any type of state maintenance on the server side. We have already seen how to do it at the client side, but because the client is inherently fragile and because the information travels continually between both ends, this is not always a viable option and we have to search for other solutions. For example, if we are implementing an online game, the reasonable thing to do is store the state of the different players at the server, and not at the client, for the duration of the match. Or suppose that we need a list with the users connected to a chat service. SignalR does not offer any way to get it, so our only option would be to keep a list at the server with information about these users.
As a first approach that is valid in many scenarios, we could consider using data structures stored in the server memory. Depending on our needs, we could use variables, lists, dictionaries, or any other structure, but it is important to remember that they must be defined statically, because hubs have a very short life cycle, being created and destroyed in each call or event of the connection. Thus we might be tempted to write code like the following:
// Note: UserData is a custom class to store
// our user's current status.
public class ChatHub : Hub
{
    private static Dictionary<string, UserData> _users =
                           new Dictionary<string, UserData>();
    private static int _usersCount = 0;
    public override Task OnConnected()
    {
        _usersCount++;
        var user = new UserData()
                       {
                           Active = true,
                           Name = "user" + _usersCount,
                           Color = "blue",
                           ConnectedAt = DateTime.Now
                       };
        _users[Context.ConnectionId] = user;
        return base.OnConnected();
    }
    // ...More code
}
Although conceptually this would solve our problem—allowing us to have state information available to use in our application—if we were to test it, we would notice after a few minutes that it does not work properly in multiuser environments. Concurrent access of several users would cause the information kept in the dictionary and even the counter itself to begin to display corruption issues, generating inconsistencies and problems during execution.
This aspect is of vital importance in all SignalR applications because, by definition, we are building multiuser systems where we will likely have a high degree of concurrency, so it is necessary to take precautions to prevent simultaneous access of these members. In Chapter 4 we saw that we can perform increment atomic operations on integers by using the features offered by the static class System.Threading.Interlocked:
Interlocked.Increment(ref _usersCount);
And, with the dictionary, the problem is solved in an equally easy way. Data corruption happens because, by design, the Dictionary class of the .NET Framework is not thread safe for writing; that is, it does not guarantee its consistency in scenarios with multiple concurrencies where there might be execution threads adding elements and other execution threads eliminating them.
Fortunately, since version 4 of the .NET Framework, we have an option especially designed for this: ConcurrentDictionary. This class is available in the System.Collections.Concurrent[22] namespace, together with other concurrent versions of familiar structures such as lists, stacks, or queues, and it provides a key-value dictionary that can be used safely in multiprocess scenarios. Therefore, the only change that we would need to make to the previous code would be in the definition of the store used:
private static ConcurrentDictionary<string, UserData> _users =
    new ConcurrentDictionary<string, UserData>();
This way, we would now be storing the system state in the server memory safely while having concurrent accesses. We can use this state information from the actions or events of the hub, as in the following example:
public class ChatHub: Hub
{
    private static int _usersCount = 0;
    private static ConcurrentDictionary<string, UserData>
             _users = new ConcurrentDictionary<string, UserData>();
    public override Task OnConnected()
    {
        Interlocked.Increment(ref _usersCount);
        var user = new UserData()
                       {
                           Active = true,
                           Name = "user" + _usersCount,
                           Color = "blue",
                           ConnectedAt = DateTime.Now
                       };
        _users[Context.ConnectionId] = user;
        return base.OnConnected();
    }
    public Task ChangeNickname(string newName)
    {
        UserData user;
        if (_users.TryGetValue(Context.ConnectionId, out user))
        {
            var oldName = user.Name;
            user.Name = newName;
            return Clients.All.Message(
                     oldName + " now is " + newName, "system");
        }
        return null;
    }
    public Task Send(string message)
    {
        UserData user;
        if (_users.TryGetValue(Context.ConnectionId, out user))
        {
            var m = string.Format("[{0}]: {1}", user.Name, message);
            return Clients.All.Message(m);
        }
        return null;
    }
    ... // Other methods
}
The technique shown is absolutely valid, and it yields great performance because it is based on the store that is most efficient and closest to the server: its memory. However, it is not exempt from drawbacks.
The first obvious problem is that memory is a volatile resource. If the server is restarted, the application breaks down, or an update is installed, all the information stored would be lost immediately. In some services, this might not be a great issue, but in other systems, we will not be able to allow this behavior and we will therefore have to discard this solution.
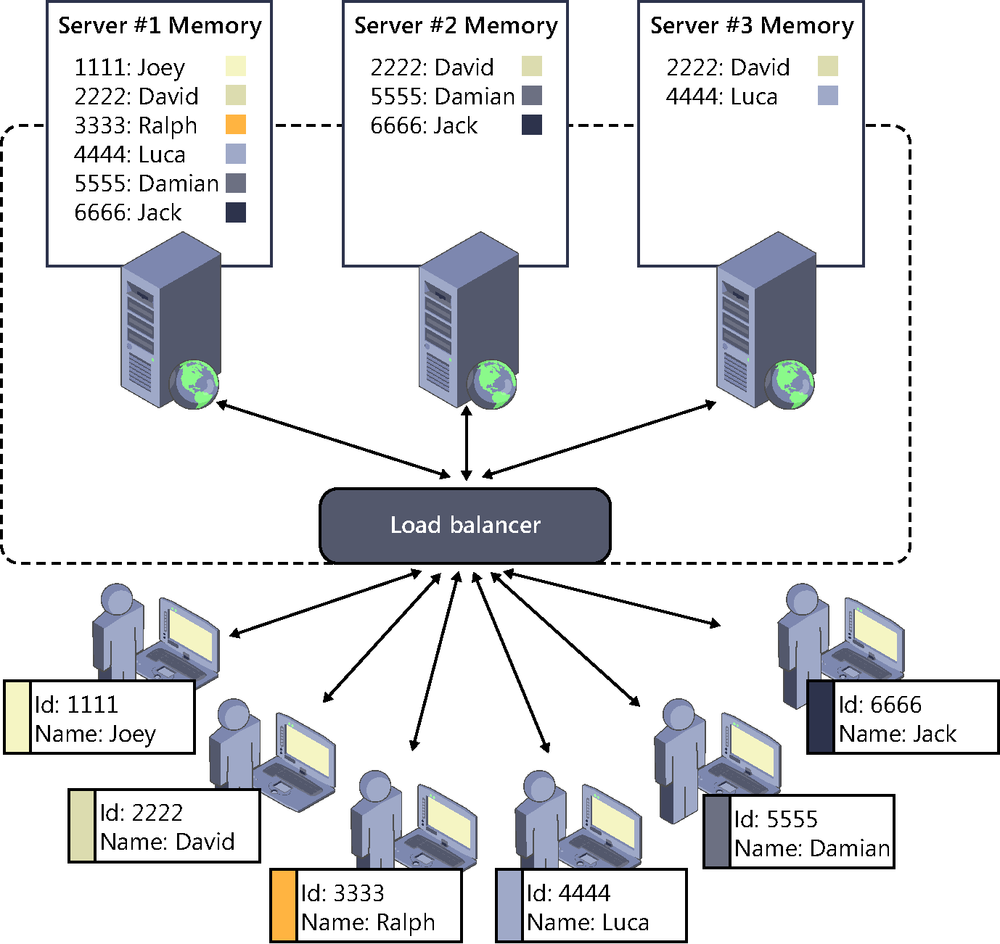
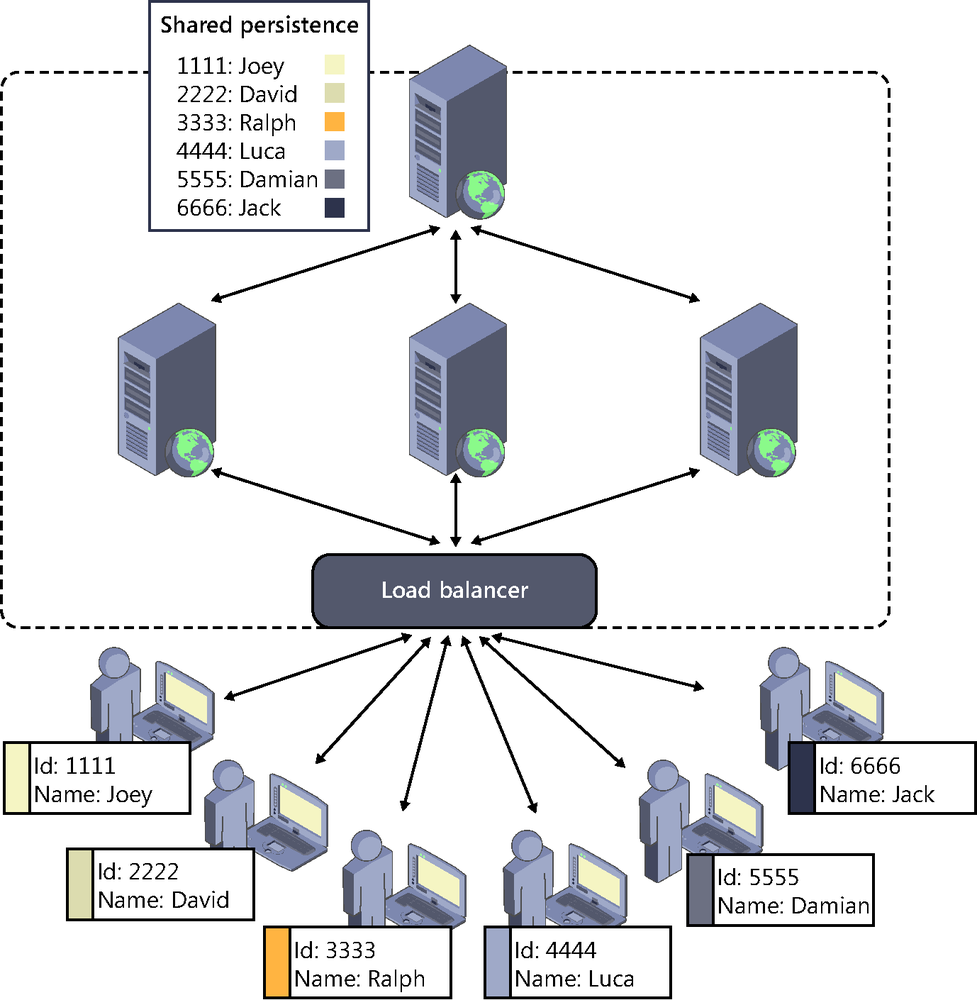
Another serious problem would emerge if we had to scale out the system horizontally—that is, adding new servers to balance the load, as shown in Figure 5-5. (Later, we’ll see that SignalR provides tools to do this.) In this scenario, each connection could be dealt with by a different server, so the state of the application would be distributed among all of them without any synchronization of the information stored. Thus, relying on server memory to store state information can prove unreliable in these situations.
This is neither a peculiar limitation nor exclusive to SignalR; it is quite logical and common to all application servers whose load we want to share among several nodes. For example, in standard ASP.NET applications, the use of in-memory session variables causes the same scalability problems, and this is why there are alternative options such as session state servers or providers in charge of storing the state in distributed stores, such as the cache system in Windows Azure.
SignalR does not offer any out-of-the-box solution for these situations, and it is the responsibility of the developer to have a centralized and non-volatile persistence system capable of storing this information and retrieving it quickly. The approach would therefore be to migrate to a structure such as the one shown in Figure 5-6, where a component or additional system is introduced whose responsibility will be exclusively focused on storing and managing the application state information and making it available to all its nodes.
We could implement this system on virtually any technology or platform, from a relational database such as SQL Server, solutions for structured storing in the cloud such as those provided by Azure, or systems specialized in offering high-efficiency distributed storage, such as Redis, Memcached, MongoDB, and many more. Among others, the following criteria can help us select the solution that matches our needs:
Efficiency. For real-time multiuser applications, remember that immediate response is a basic requirement. However, it is also important to bear in mind that the immediacy needs can be different depending on the type of application: a multiuser shooter does not have the same requirements as a chat room service.
Persistence and non-volatility. Normally, it is important for our software to ensure these aspects of the information.
Scalability. For state storage solution, if the number of users grows exponentially, it might be necessary to distribute this very component among several physical nodes. If we cannot scale out the persistence mechanism, the scalability of our system will be irredeemably limited to it.
Security. This component must offer features to protect the information proportional to the importance of the state data to be stored.
Operation environment. The solution selected must be technically compatible with this environment. Also, the availability of interfaces allowing its use with .NET applications must be considered.
Knowledge and experience. This is especially important for the development and maintenance team, who will have to use it to implement state persistence and keep it operating throughout the system’s life.
Along with the preceding criteria, of course, we must include other aspects of the product, such as its reliability, integrity, maintainability, community, support, licensing model, and so on.
Now that we have taken a first look at operation environments distributed across several nodes, this is a good time to anticipate a very important point that we delve into in Chapter 8.
In distributed scenarios such as the one described previously, SignalR creates a challenge with no precedent in more traditional web applications: how to get the messages to reach their recipients. Something so relatively simple as sending a broadcast message to all users connected to one same point stops being trivial when there are several nodes to which a balancer has been assigning the users. For now, we will just reflect upon this; in Chapter 8, we will describe the problem in depth and we will go over the solution that SignalR offers for these situations.
The SignalR framework offers specific client libraries for the different types of systems that can consume services in real time: JavaScript, generic .NET applications, Windows Phone, and so on. They are all similar, yet obviously adapted to the peculiarities of their respective execution environments.
In Chapter 7 we will see other examples of use, but for now, we will continue to focus on the JavaScript client because it is easy to implement and very useful for a natural environment for this type of system: the web.
There are two different ways of working with SignalR using JavaScript: with or without an automatic proxy. We have already anticipated many aspects of the first way in earlier sections, and it is really the most spectacular and easy to use because SignalR, on its own, takes care of a large portion of the work needed to achieve bidirectional communication with the server. Contrariwise, if we choose not to use an automatic proxy, we will have to make a little more effort to reach the same goals, because we will use a syntax that is more generic and aseptic, quite similar to the one used in other types of clients, as shown in the following example:
// With automatic/dynamic proxy:
proxy.server.alert("Here I am");
// Without automatic proxy:
proxy.invoke("alert", "Here I am");
We will continue studying the JavaScript client using the dynamic proxy, although later on we will also see some examples of direct use of the API without this aid.
To initiate the connection to the hub by using the JavaScript client with a dynamic proxy, we must reference the following script libraries from the page[23]:
<script src="/scripts/jquery-1.6.4.min.js"></script>
<script src="/scripts/jquery.signalR-2.0.0.min.js"></script>
<script src="/signalr/js"></script>
Note
It is important to take into account the root path where the application is published when passed during production. For this reason, unless we are implementing the client on a pure HTML page, it is a good idea to use the methods provided by the different technologies to generate the URL based on virtual addresses of the resources, relative to the root of the site:
// In ASP.NET MVC 4 or above
<script src="~/signalr/js"></script>
// In ASP.NET MVC 3
<script src="@Url.Content("~/signalr/js")"></script>
// WebForms
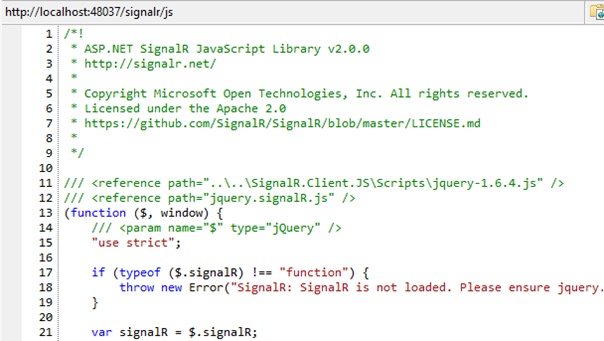
<script src="<%: ResolveClientUrl("~/signalr/hubs")%>"></script>The first two scripts included, already used in the implementation of clients using persistent connections, are basic. SignalR’s client library for JavaScript (jquery.signalR) is a plug-in for JQuery, and for this reason, both must be included in the page and in this order. Otherwise, a runtime script error will be generated, as shown in Figure 5-7, indicating the measures to be taken to solve it.

Next we find a new reference to a script located at /Signalr/js. The first part of this path (“/Signalr”) is the address where the framework is expecting connections from the clients wanting to consume the services provided by the hubs. This path is common to all hubs in the application, and as we have seen, it can be easily modified in the call to the MapSignalR() method that the server executes during application startup, although normally the one provided by default will be valid and we will not need to change it.
The second part (“/js”) indicates the resource to be downloaded, in this case the proxy components that will allow easy access to the methods exposed by the different hubs present at the server.
Note
In previous versions of SignalR, only the URL “/Signalr/Hubs” was used to download the proxies, but since version 2.0, “/Signalr/Js” is also allowed because this path is more appropriate for the type of resource that we want to obtain.
When the first request to this URL is received, SignalR will analyze the classes of the application inheriting from Hub and will create a script dynamically. Inside it, we will find a JavaScript object for every hub implemented at the server, which will act as a proxy of it on the client side. This process will take place only once, remaining stored in the memory for the following connections. The result generated—the JavaScript file that will be included in the page by the web client, as shown in Figure 5-8—is sent to the client as it is.
SignalR does not feature “out-of-the-box” implementation of the minimization of the JavaScript code—that is, the removal of all unnecessary characters from the file with the aim of optimizing its download. However, it has been taken into account internally, so we can use the marvelous extensibility features of the product to insert a minimization component in the middle of the process and achieve this goal. We will see how in due time.
Sometimes it can be useful to have the JavaScript proxies in the form of a static file included in the site instead of having to generate it on the fly. This could make things easier for us at design time, because we would be able to benefit from IntelliSense or optimize downloads sending it to a CDN, making a more efficient use of the cache, or compacting and packaging the resulting script in the bundles used by the application.
For this, SignalR comes with a command-line application downloadable via NuGet that we can execute either manually or as part of the build process of the solution. We can obtain the tool, called SignalR.exe, by installing the following package:
PM> Install-Package Microsoft.AspNet.SignalR.Utils
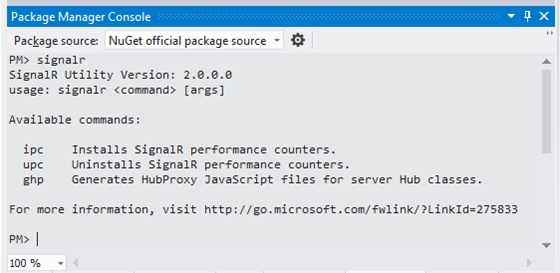
This command will download and install the executable file in our solution, leaving it ready to be used from the package manager console itself; see Figure 5-9.
To generate the JavaScript file of a project, we just enter the following command:
PM> signalr ghp /path:[your-hubs-dll-folder] /o:[output-file]
The path parameter indicates the path to the folder that contains the assembly in which the hubs for which we want to obtain the proxy are found. Normally, this will be the path to the /bin folder of the project. The o parameter indicates the full path and the name of the file to be generated.
In both cases, the path is relative to the current directory; the default NuGet console will be found in the root folder of the solution (we can query it with the command pwd), so we will be able to use relative paths to simplify the command, like this for example:
PM> signalr ghp /path:MyWebApp/bin /o:MyWebApp/scripts/hubs.js
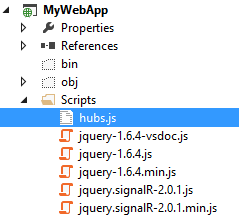
We must take into account that the first time we execute this command, the file will be generated but it will not be included in the project, as shown in Figure 5-10. This is something that we have to do manually afterwards from the Visual Studio solution explorer, adding the existing file.
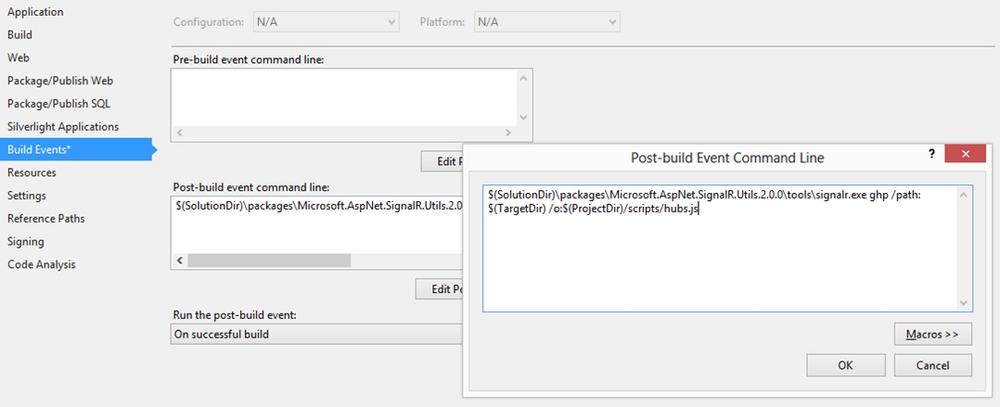
For better convenience, we can include this procedure as part of the building process of the application very easily. As shown in Figure 5-11, we just have to access the properties of the project and include the following command in the post-compilation command line:
$(SolutionDir)packagesMicrosoft.AspNet.SignalR.Utils.2.0.0	oolssignalr.exe ghp /
path:$(TargetDir) /o:$(ProjectDir)/scripts/hubs.js
Regardless of which way we generate the .js file, from now on it will obviously be the one that we reference from the pages where we use our hubs:
<script src="/scripts/hubs.js"></script>
Also, in this case, it would be a good idea to deactivate the automatic proxy generation capability, specifying it in the hub configuration that we can provide during system startup, in the Startup class or wherever we have decided to enter the SignalR startup code:
public void Configuration(IAppBuilder app)
{
...
app.MapSignalR(new HubConfiguration()
{
EnableJavaScriptProxies = false
});
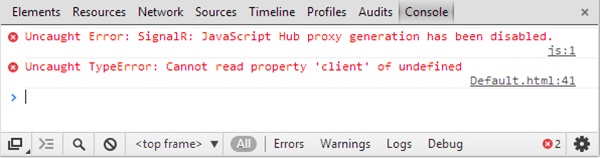
}When this is done, any attempt to access the automatic proxy generation path, such as /Signalr/Hubs or /Signalr/Js, will generate an error at the client; see Figure 5-12.
Expressly disabling automatic proxy generation can also be useful when the clients of our system are not JavaScript clients but applications of any other type (.NET, Windows Phone, Windows Store, and so on), because these will not need the proxy. We must take into account that the code of the proxies contains a lot of information about the hubs and their actions, and for security, it is a good idea to hide it if their use is not necessary.
After the script is at the client, we can initiate the connection to the server by using the following instruction:
$.connection.hub.start();
The start() method implements the promise pattern, so we can enter logic when the connection has been successfully completed or when an error has occurred:
$.connection.hub.start()
    .done(function () {
        alert("Connected");
    })
    .fail(function() {
        alert("Connection failed!");
    });
Note that the call to the start() method is independent of the hubs that we want to use from the client. Initiating the connection simply indicates that we are going to use hubs, but we do not necessarily have to specify which one or ones yet. This is important, because it means that communication with them will be carried out on a single persistent connection and performance will not be affected if we decide to divide up our hubs into several, to organize our code better and to avoid excessively long classes.
The client initiates the negotiation process when the start() method is executed. We can trace this process by using the development tools of any browser or external tools such as Fiddler (as shown in Figure 5-13).
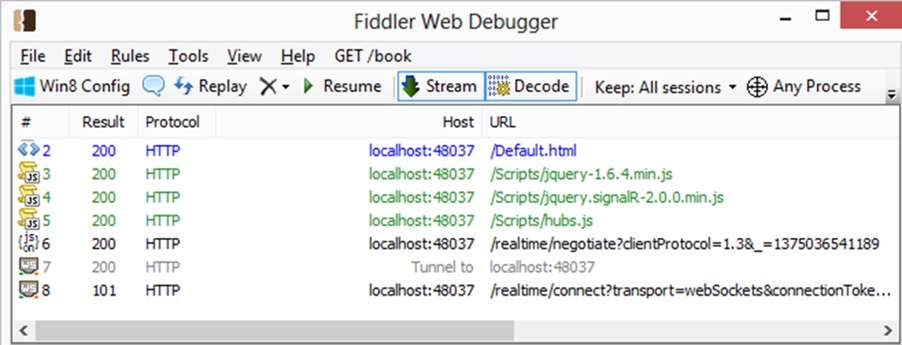
Note that one of the parameters that are sent to the server is the version of the SignalR protocol that the client expects to use, 1.3 in this case. This is important, because from version 2.0 of SignalR the server will be able to respond to different client protocols, which will allow client and server to understand each other even if they do not share the exact same version of the framework. Thus a SignalR 2.0 server can give service to connections made using version 1.0 of the client libraries. However, it will not work in the opposite way: a 1.0 server would not be able to give service to clients of a later version.
By default, the JavaScript client will try to communicate with the hub system available at the URL “/Signalr”, although if the URL has been modified at the server, we will also have to modify it here before initiating the connection:
// Server initialization code
public void Configuration(IAppBuilder app)
{
    var config = new HubConfiguration();
    app.MapSignalR("/realtime", config);
}
// Client code
$.connection.hub.url = "/realtime";
... // Other client initialization
$.connection.hub.start();
This feature also opens the possibility of connecting to services published in different servers to the one that has served the current page.
$.connection.hub.url = "http://myserver.com/myurl";
The SignalR client will detect cross-domain scenarios automatically and will use the appropriate technique for the connection to be successfully established. However, to serve this type of request, the hub will have to have been previously configured at the server. The configuration mechanism is identical to the one already described when we studied persistent connections:
If we want the server to respond to requests from external domains using CORS, we have to activate the appropriate OWIN middleware. For this, we first install the package from NuGet:
PM> Install-Package microsoft.owin.cors
Next, we enter it into the OWIN pipeline before SignalR. Note that, as we did with persistent connections, we use the
Map()extension to create a configuration section associated to a URL, to which we add the modules that we want. In practice, it is as if we created a bifurcation in the pipeline starting off from the specified path:// Server initialization code public void Configuration(IAppBuilder app) { app.Map("/chat", map => { map.UseCors(CorsOptions.AllowAll); map.RunSignalR(); }); }If we also need to activate JSONP to allow older browsers to access the services, we could indicate it in the hub configuration object that we can supply to
RunSignalR()orMapSignalR():app.Map("/chat", map => { map.UseCors(CorsOptions.AllowAll); var config = new HubConfiguration() { EnableJSONP = true }; map.RunSignalR(config); });
As you know, in the dynamically generated script, there will be a proxy object for every hub in the server. Each hub will have a representative on the client side, which we can access via the $.connection.[hubName] property. The following code shows how we can reference the proxy of a hub called “AlertService” at the server:
// Client code
var proxy = $.connection.alertService;
Note that to ensure coherence with the syntax and naming standards of JavaScript, during the generation of the proxy, the name of the class has been converted to camel casing style with the first character automatically in lowercase. This detail is very important, because if this naming convention is not respected, access to the hub will not be possible:
var proxy = $.connection.AlertService; // Error: "AlertService"
                                       // doesn't exist
This conversion is performed whenever we have not used the [HubName] attribute to explicitly specify a name for the hub. In this case, the name will be used exactly as stated in this annotation.
Now we shall pause for a moment to look at what has happened behind the scenes that enables us to access the proxy like this. Here is the code of a simple hub, followed by a portion of the code generated dynamically for it by SignalR:
// ======================================================
// Server code
public class AlertService : Hub
{
    public Task Alert(string msg)
    {
        // Code
    }
}
// ======================================================
// Portion of client code (generated script)
...
proxies.alertService = this.createHubProxy('alertService'),
proxies.alertService.client = { };
proxies.alertService.server = {
    alert: function (msg) {
              return proxies.alertService.invoke.apply(
                  proxies.alertService,
                  $.merge(["Alert"], $.makeArray(arguments))
              );
           }
};
In the proxies object that appears in the generated code is where the different objects are stored that will act as proxies of the hubs detected at the server. Later on, we will be able to access them using the expression $.connection.[hubName]. On this object, we see that in this case an alertService property is declared to store the proxy created. This is the one that we used earlier to obtain a reference to said proxy, when we used the following code:
var proxy = $.connection.alertService;
As you can see, inside this proxy a server property has been created, which is a faithful reproduction of its counterpart at the server; it includes a method for each method found in the hub. Obviously, in their implementation, we will find only the code needed to perform the invocation to the server asynchronously.
By default, the name of each method is also converted to adapt it to the customary naming conventions in JavaScript: the Alert() method of the server will be mapped to an alert() method at the client. However, the name will not be converted if we use the [HubMethodName] attribute to expressly state the name by which the method will be available.
Therefore, to call methods from the client that are available at the server, the only thing we have to do is use the server property of the proxy towards the hub and invoke it directly, supplying it the required parameters:
var proxy = $.connection.alertService;
... // Open connection
proxy.server.alert("Here I am!");
Note
In the case of methods overloaded at the server, only the signature of the one with the least number of parameters will appear in the proxy, but we will still be able to invoke them from the client without any problems.
The call to the server methods implements the promise pattern, so to take control when the call has been made successfully or when it has failed for any reason, we can use the constructions that we already know. In the first case, it is also possible to retrieve the value returned by the method executed.
// ======================================================
// Server code
public int Divide(int a, int b)
{
    return a / b;
}
// ======================================================
// Client code (JavaScript)
var a = prompt("a?");
var b = prompt("b?");
proxy.server.divide(a, b)
    .done(function (result) {
        alert("Result: " + result);
    })
    .fail(function (err) {
        alert("Error: " + err);
    });
In this example, the function defined in the done() method will receive the result of the operation performed by the server as an argument. In case of failure, the function specified in fail() will receive an object where we can find the description of the error that occurred (for example, “divide by zero attempt”), if this option has been expressly enabled at startup. Note the use of the #if DEBUG compilation directive to prevent detailed error messages from reaching production:
public class Startup
{
    public void Configuration(IAppBuilder app)
    {
        var config = new HubConfiguration();
        #if DEBUG
            config.EnableDetailedErrors = true;
        #endif
        app.MapSignalR(config);
    }
}
By default, when detailed errors are not enabled, a generic message will be sent, indicating that an error has occurred in the call to the method of the hub.
To handle errors in a more precise way, from the hub we can throw exceptions of the HubException type at any moment, supplying it a message describing the error and, if necessary, an arbitrary object with additional information:
// Server code
public Task ChangeNickname(string newNickname)
{
    if (!nameIsValid(newNickname))
    {
        throw new HubException(
                  "Nickname not valid",
                  new { user = Context.User.Identity.Name, attempted = newNickname }
        );
    }
    … // Change the nickname
}
The HubException exception thrown will be automatically serialized by SignalR, and we will receive it in the fail() function associated to the call to the server:
// Client code
proxy.server.changeNickname(newNickname)
     .fail(function(err) {
         if (err.source === 'HubException') {
            console.log(e.data.user+" -> "+ e.message);
         }
});Just as it happened in the world of persistent connections, the clients of a hub can send additional information in requests by using the mechanisms provided by web protocols. This information can be retrieved at the server with the Context property of the hub.
For example, a JavaScript client can enter information in a cookie, and its value will be available at the server side because it will travel with each request made to the server:
// Client (JavaScript) code
document.cookie = "Username=phil";
$.connection.hub.start();
…
// Server code (Hub)
public Task Send(string message)
{
    Cookie cookie;
    var username =
         Context.RequestCookies.TryGetValue("Username", out cookie)
         ? cookie.Value
         : Context.ConnectionId;
    return Clients.All.Message(username + " >> " + message);
}
Another option is to enter additional values into the query string of the different requests originated at the client. For this, we can set arbitrary values in the qs (“query string”) property of the hub at the client before opening the connection, and these values will be available later at the server:
// Client code
$.connection.hub.qs = "username=phil";
// Or, alternatively:
$.connection.hub.qs = { username: "phil" };
$.connection.hub.start();
// Server code (Hub)
public Task Send(string message)
{
    var username = Context.QueryString["Username"] ?? "Unknown";
    return Clients.All.Message(username + " dice " + message);
}
It should be again noted that this information will travel when requests are made to the server. In a transport such as WebSockets, there will normally be only one request that will remain open, while other transports such as long polling will open many more connections. Therefore, the value obtained at the server will be the one sent from the client at the time of the most recent request.
We have seen that when we make calls from the server to methods that exist in clients, what actually happens is that the specifications of that call are “packaged” into a data structure and sent to all its recipients using push. See Figure 5-14.
From the point of view of the client, what SignalR does is interpret the data packet received and invoke the relevant methods. That is, it processes the events received.
In the JavaScript client, methods that can be “executed” from the server must be defined in the client property of the proxy object:
var alertHub = $.connection.alertService;
alertHub.client.showAlert = function (msg) {
    alert(msg);
};
alertHub.client.newUser = function (userId) {
    alert("New user with id: " + userId);
};
It is necessary to make these specifications before the connection is opened; otherwise, they will not work. It is also important to highlight that the name of the method used at the server must match the name at the client exactly, except that the match is case-insensitive. The following commands at the server will execute the logic expected at the client:
public override Task OnConnected()
{
    return Clients.All.NewUser(Context.ConnectionId);
}
   // Is equivalent to
public override Task OnConnected()
{
    return Clients.All.newuser(Context.ConnectionId);
}
However, if a nonexistent method is invoked from the server, there will be no errors on either end. The server will send the clients the data packet with the command specification, and the clients will not execute any action upon its reception, because the name of the method received will not match any existing one.
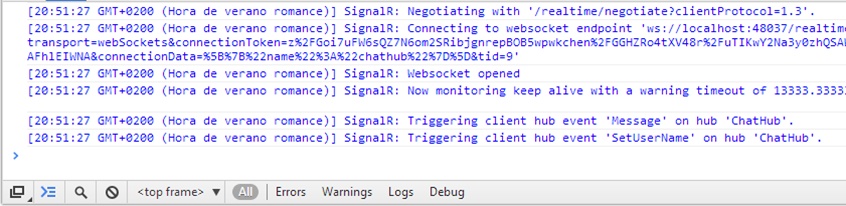
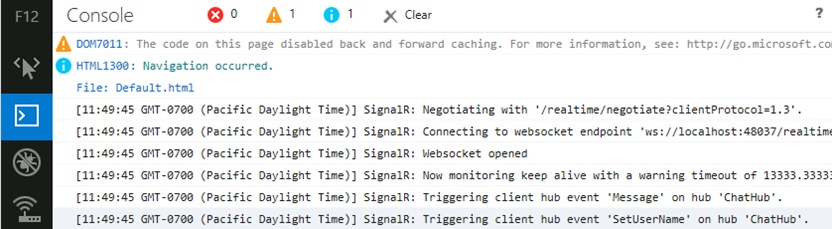
The client component of SignalR for JavaScript allows registering a trace with the most relevant events that occur during the lifetime of the connection, which can be very helpful when debugging the applications. To activate this trace, we just have to add the following line to the initialization code:
$.connection.hub.logging = true;
From that moment on, it will be possible to query the trace in the browser’s console, as shown in Figure 5-15 and Figure 5-16. Note that, as well as the negotiation process, we can view the events thrown from the server—that is, the methods invoked on the client side.
Actually, if we need to, we can even include custom information in this log easily (see Figure 5-17):
$.connection.hub.start()
    .done(function () {
        $.connection.hub.log("My id: " + $.connection.hub.id);
    });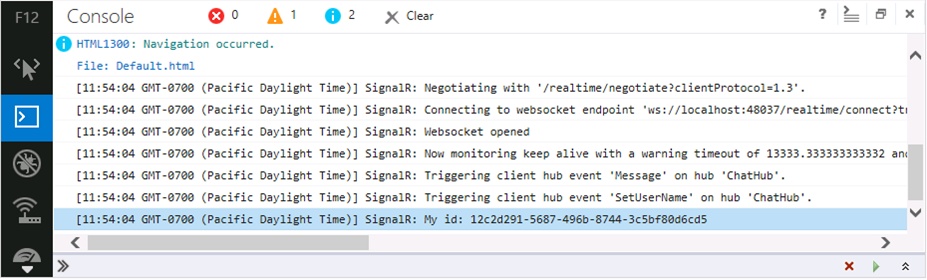
The information logged in this way will always have the prefix “SignalR:”, so it is easy to identify it in the trace.
We have previously seen that it is possible to define variables at the client that can be queried or modified directly from the server:
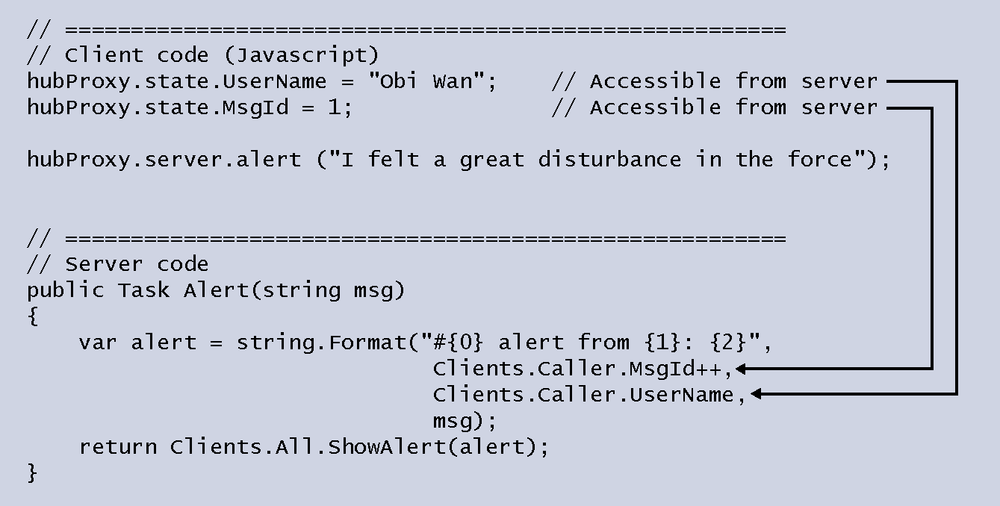
As we said earlier and as you can infer from the code, these variables must be defined in the hub’s proxy, inside the object stored in its state property. In this case, the name of the variable used at the server must match the one defined at the client exactly, including letter case.
The internal operation of this feature is based on the command pattern and is quite simple. Given the above code, where we saw the setting of two state properties and a call to a remote method at the client, the information sent in the client-server direction would be approximately as follows:
data = {
    "H":"alertservice",
    "M":"Alert",
    "A":["I felt a great disturbance in the force"],
    "I":6,
    "S":{
        "UserName":"Obi Wan",
        "MsgId":7
        }
}
As you can see, the message sent encapsulates both the specification of the invocation to be performed on the server side (“H”: hub, “M”: method, “A”: args) and all the state variables (“S”: state) that have been defined. It is therefore important to use them prudently to avoid excessive bandwidth consumption.
After processing the method at the server, the information returned to the client is more or less as follows:
{
    "S": {
        "MsgId":8
     },
    "I":"6"
}
In this case, we see that the client is returned a structure that contains information about several aspects, including the new value of the state variables modified during server processing (note the increase of the MsgId variable). Thus, when the data packet reaches the client, the latter can extract the property values and modify them on its local copy, maintaining a consistent application state between calls.
There might be scenarios where using a proxy is inconvenient, such as applications with a large number of hubs or applications that expose a large number of operations to their clients. In such—perhaps somewhat extreme—cases, using a proxy might be too costly in terms of the bandwidth and processing capacity needed on both ends. Also, a hacker could very easily obtain information about the hubs and their actions, which constitutes a perfect x-ray of the server’s attack surface.
However, we are not required to use proxies. Yes, they simplify development, but SignalR offers an additional alternative to directly communicate with hubs in scenarios where we do not want to use a proxy.
In this case, the API is in fact quite similar to the one we find in other clients such as the generic .NET client, where we do not have this type of syntactical sweetener. We will now very quickly study its main features, because the concepts are identical to those explained until now, this being just a different syntax to achieve the same purposes.
To initiate a connection to a hub without using proxies, it will not be necessary to reference the /SignalR/Hubs script or whichever one we have set as we were doing before. Here it will suffice to include jQuery and SignalR in the page:
<script src="Scripts/jquery-1.6.4.min.js"></script>
<script src="Scripts/jquery.signalR-2.0.0.min.js"></script>
Next we must obtain a reference to the connection to the hub server and open it, similar to what we have done in previous examples:
var connection = $.hubConnection();
connection.start()
    .done(function () {
        // Code
    });
The URL where it is assumed by default that SignalR will be available at the server is /Signalr, which is the one used in the default mapping. However, we can modify it by supplying it to the $.hubConnection() method as a parameter, as you can see in the following example:
// Client side
   var connection = $.hubConnection("/realtime");
// Server side configuration(startup.cs):
app.MapSignalR("/realtime", new HubConfiguration());
Finally, if we are not using proxies, the best thing to do is to disable them at the server, something that can be done by specifying it when the hub is configured:
public void Configuration(IAppBuilder app)
{
    app.MapSignalR(new HubConfiguration()
                {
                    EnableJavaScriptProxies = false
                });
}
Of course, if we have configured the generation of the proxy as a static file, we must not forget to eliminate it too.
Even if we are not using the automatically generated proxy, on the client side we will always need an object representing the hub on which we can work, allowing us to invoke the methods and receive the events of the server.
We can create one of these objects, which is but a proxy after all, based on the connection previously referenced, like this:
var connection = $.hubConnection();
var proxy = connection.createHubProxy("AlertService");
To perform an operation from the server side, we use the invoke() method directly on the proxy that we have created:
var connection = $.hubConnection();
var proxy = connection.createHubProxy("AlertService");
connection.start().done(function () {
    proxy.invoke("Alert", "I felt a great disturbance in the force");
});
As you can guess, the first argument is the name of the method or action to be invoked on the server side. In this case, the name is not case-sensitive: we will get the same result if we invoke the methods “alert” and “ALERT”.
The second argument and the following ones are values that are going to be supplied to the action for its execution. They can be any type; the server will be in charge of converting them to those specified in the method signature.
As usual, the invoke() method implements the promise pattern, so we can take control when execution has ended, whether in success—at which point we can obtain the return values—or in an error:
proxy.invoke("divide", 100, prompt("Divisor?"))
    .done(function(result) {
        alert(result);
    })
    .fail(function(err) {
        alert(err);
});This programming model also offers the ability to maintain state in client variables that are accessible from the server. In the same way as we saw when using dynamic proxies, we can use the state property for this:
... // Code
var proxy = connection.createHubProxy("AlertService");
proxy.state.MsgId = 1;             // Property accessible from server
proxy.state.UserName = "Obi Wan"; // Property accessible from serverWhen methods of the client side are invoked from the server, we can capture these calls using the On() method as follows:
proxy.on("ShowAlert", function(msg) {
    alert(msg);
});
The first parameter supplied to this method is the name of the event or action invoked from the server, specified as a case-insensitive character string. The second one is the code to be executed, in the form of an anonymous function, with the parameters that have been sent to it from the remote end.
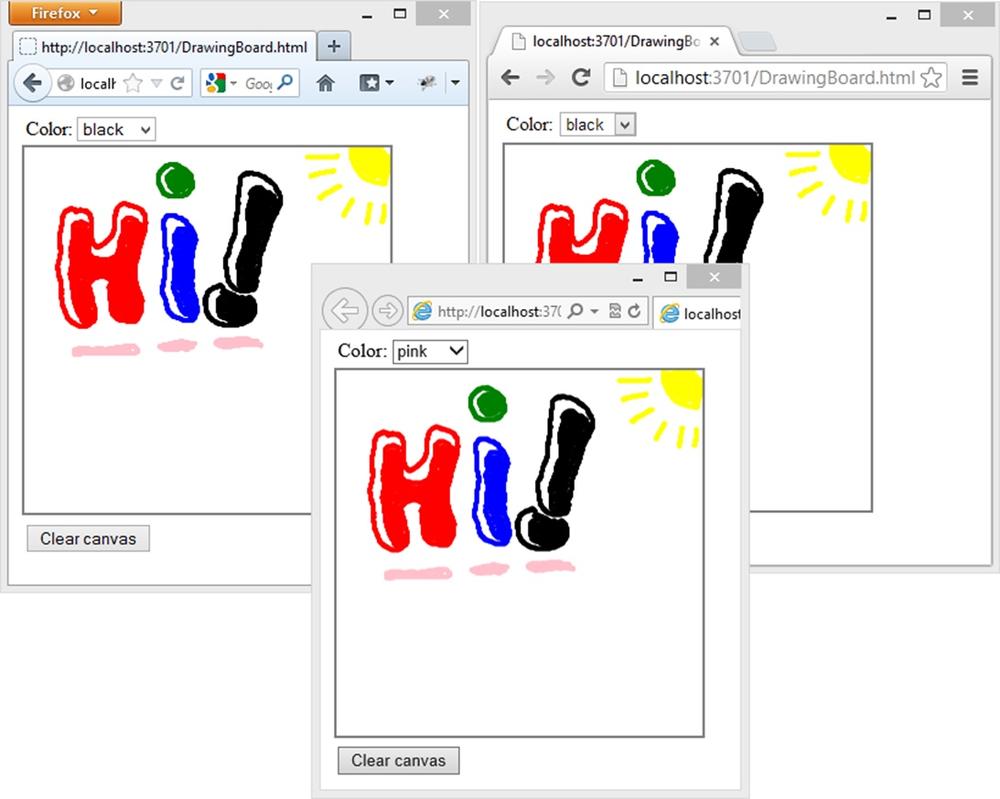
In this example, we will use hubs to implement a simplified version of a shared drawing board system, with the purpose of showing how some of the concepts presented in this chapter work in practice.
Users will be able to draw freely on the canvas, and their actions will be visible to the other connected clients in real time. Furthermore, we will allow selecting the stroke color and erasing the entire drawing board at any moment. Each point drawn is stored at the server in a buffer so that the first thing that new clients receive is a full copy of the content of the drawing board at the time of their connection.
The result we want to obtain is shown in Figure 5-18.
For the purpose of creating the application that we will develop over the following pages, it is necessary first to create a project of the “ASP.NET Web Application” type from Visual Studio 2013 and then to select the “Empty” template to create a completely empty project[24]. The version of .NET Framework used must be at least 4.5.
After we have created it, we must install the following package using NuGet:
PM> install-package Microsoft.AspNet.SignalR
<!DOCTYPE html>
<html xmlns="http://www.w3.org/1999/xhtml">
<head>
    <title>Drawing board</title>
    <script src="Scripts/jquery-1.6.4.min.js"></script>
    <script src="Scripts/jquery.signalR-2.0.0.min.js"></script>
    <script src="/signalr/js"></script>
    <script src="Scripts/DrawingBoard.js"></script>
    <style>
        div { margin: 3px; }
        canvas { border: 2px solid #808080; cursor: default; }
    </style>
</head>
<body>
    <div>
        <div>
            <label for="color">Color: </label>
            <select id="color"></select>
        </div>
        <canvas id="canvas" width="300" height="300"></canvas>
        <div>
            <button id="clear">Clear canvas</button>
        </div>
    </div>
</body>
</html>$(function () {
///////////////////////////////////////////////////////////////
// Standard drawing board functionalities
///////////////////////////////////////////////////////////////
var colors = ["black", "red", "green", "blue", "yellow", "magenta", "white"];
var canvas = $("#canvas");
var colorElement = $("#color");
for (var i = 0; i < colors.length; i++) {
colorElement.append(
"<option value='" + (i + 1) + "'>" + colors[i] + "</li>"
);
}
var buttonPressed = false;
canvas
.mousedown(function () {
buttonPressed = true;
})
.mouseup(function () {
buttonPressed = false;
})
.mousemove(function (e) {
if (buttonPressed) {
setPoint(e.offsetX, e.offsetY, colorElement.val());
}
});
var ctx = canvas[0].getContext("2d");
function setPoint(x, y, color) {
ctx.fillStyle = colors[color-1];
ctx.beginPath();
ctx.arc(x, y, 2, 0, Math.PI * 2);
ctx.fill();
}
function clearPoints() {
ctx.clearRect(0, 0, canvas.width(), canvas.height());
}
$("#clear").click(function () {
clearPoints();
});
///////////////////////////////////////////////////////////////
// SignalR specific code
///////////////////////////////////////////////////////////////
var hub = $.connection.drawingBoard;
hub.state.color = colorElement.val(); // Accessible from server
var connected = false;
// UI events
colorElement.change(function () {
hub.state.color = $(this).val();
});
canvas.mousemove(function (e) {
if (buttonPressed && connected) {
hub.server.broadcastPoint(
Math.round(e.offsetX), Math.round(e.offsetY)
);
}
});
$("#clear").click(function () {
if (connected) {
hub.server.broadcastClear();
}
});
// Event handlers
hub.client.clear = function () {
clearPoints();
};
hub.client.drawPoint = function (x, y, color) {
setPoint(x, y, color);
};
hub.client.update = function (points) {
if (!points) return;
for (var x = 0; x < 300; x++) {
for (var y = 0; y < 300; y++) {
if (points[x][y]) {
setPoint(x, y, points[x][y]);
}
}
}
};
// Voila!
$.connection.hub.start()
.done(function () {
connected = true;
});
});public class DrawingBoard : Hub
{
private const int BoardWidth = 300;
private const int BoardHeight = 300;
private static int[,] _buffer = GetEmptyBuffer();
public Task BroadcastPoint(int x, int y)
{
if (x < 0) x = 0;
if (x >= BoardWidth) x = BoardWidth-1;
if (y < 0) y = 0;
if (y >= BoardHeight) y = BoardHeight - 1;
int color = 0;
int.TryParse(Clients.Caller.color, out color);
_buffer[x, y] = color;
return Clients.Others.DrawPoint(x, y, Clients.Caller.color);
}
public Task BroadcastClear()
{
_buffer = GetEmptyBuffer();
return Clients.Others.Clear();
}
public override Task OnConnected()
{
return Clients.Caller.Update(_buffer);
}
private static int[,] GetEmptyBuffer()
{
var buffer = new int[BoardWidth, BoardHeight];
return buffer;
}
}[21] Command pattern: http://en.wikipedia.org/wiki/Command_pattern
[22] Documentation of the System.Collections.Concurrent namespace: http://msdn.microsoft.com/en-us//library/system.collections.concurrent.aspx
[23] Remember that the version numbers of the script files referenced from the code can vary depending on the updates that you have installed in your project.
[24] In Visual Studio 2012 we can achieve the same goal by creating a project from the template “ASP.NET Empty Web Application.”