This chapter introduces scripting for the desktop, or common user applications and the desktop environment. It describes how to script such tasks as playing music, controlling word processors, and the like. Special focus is given to Mac OS X and its unique Apple Open Scripting Architecture, or OSA, that enables the shell environment to interact with applications such as Photoshop or Microsoft Word. While you can do a lot with just the operating system, at some point you're going to want to start gluing various applications together. If you think about it, that's what shell scripting is: gluing applications together. However, it's not limited to things such as sed, awk, and other traditional Unix applications. You can even glue design applications and music applications together with scripting, shell and otherwise.
While part of this chapter focuses on Mac OS X and linking the shell to AppleScript, the basic concepts apply to any application. For example, OpenOffice contains an extensive scripting implementation that is syntactically very similar to Microsoft's Visual Basic for Applications (VBA). Microsoft Word on the Mac has a full VBA implementation that can be called from AppleScript, which can be called from the shell environment. In other words, regardless of which language an application uses, if it runs on some form of Unix, you can probably get to it from the shell.
This chapter covers scripting for the desktop, including the following:
Scripting office applications, such as the AbiWord word processors and the OpenOffice.org office suite
Scripting Mac OS X applications using AppleScript to drive OSA-enabled applications
Scripting audio players and video players
Tips on scripting other desktop applications
Office applications provide nice foundations upon which to create scripts. This includes both scripting within an application, such as using Visual Basic for Applications (VBA) inside Microsoft Office, and gluing applications together, such as creating documents for the OpenOffice.org suite.
The OpenOffice.org suite includes a word processor, spreadsheet, presentation program, database front end, and a whole lot more. Designed as a drop-in replacement for Microsoft Office, the applications in the OpenOffice.org suite can load and save most Microsoft Office files. In fact, the majority of this book was written using the OpenOffice.org suite.
Note that the name OpenOffice is owned by a company not associated with the free office suite—hence the awkward name OpenOffice.org, often shortened to OOo. You can download the suite from
www.openoffice.org. The suite runs on Unix, Linux, Windows, and Mac OS X. For Mac OS X, you can run OpenOffice.org from the X11 environment or download NeoOffice/J fromwww.neooffice.orgfor a Macintosh-native version of the OpenOffice.org suite. The suite comes with most Linux distributions.
The suite supports OpenOffice.org Basic, a built-in programming language similar to BASIC or Microsoft's Visual Basic for Applications (VBA). With OpenOffice.org Basic, you can create simple macros or complex programs that run within the OpenOffice.org environment. This is very useful for operations you need to perform repeatedly. OpenOffice.org even includes an integrated development environment (IDE), for creating, testing, and debugging OpenOffice.org Basic add-ons.
OpenOffice.org also supports a programming API, which enables access from Java, C++, Perl, Python, and other programming languages. You can program far more than you'd ever imagine possible using the OpenOffice.org API. Furthermore, all native file formats are textual XML files, which makes it a lot easier to modify these files from your scripts or programs.
OpenOffice.org can be run from a single command, ooffice. By using command-line arguments and options, you can tell the program to print files, run macros, or start in a particular mode. The most useful command-line arguments and options appear in the following table.
Command | Usage |
|---|---|
-invisible | Starts in invisible background mode. |
-writer | Starts the word processor with an empty document. |
-p filename | Prints the file filename. |
macro:///library.module.method | Runs the macro method in the given module in the given library. |
'macro:///library.module.method("Param1","Param2")' | Runs the macro method in the given module in the given library, passing the given parameters (two in this case). You likely need to quote the whole command-line argument. |
-calc | Starts the spreadsheet with an empty document. |
-draw | Starts the drawing program with an empty document. |
-math | Starts the math program with an empty document. |
-global | Starts with an empty global document. |
-web | Starts with an empty HTML document. |
-impress | Starts the presentation program with an empty document. |
You can use these command-line arguments in your scripts to launch ooffice. For example, the background -invisible option is especially useful when ooffice is called by a script.
With the macro argument, you can tell ooffice to run a given macro, written in OpenOffice.org Basic.
BASIC is one of the older programming languages. It was designed long ago for newcomers to programming. Since that time, BASIC has matured into a sophisticated programming environment. Microsoft's Visual Basic for Applications (VBA), provides a way to write BASIC programs that run within the Microsoft Office environment. OpenOffice.org Basic similarly provides a way to write BASIC programs that run within the OpenOffice.org environment. As such, you can write BASIC programs, or program snippets called macros, to manipulate documents, update spreadsheets, and so on. Furthermore, you can combine OpenOffice.org Basic with the OpenOffice.org database module to provide a simplified interface for writing programs that access databases.
All of this is rather neat, but best of all is the fact that you can call these OpenOffice.org Basic programs from shell scripts. The scripts can launch the OpenOffice.org suite and run your BASIC programs, all from convenient shell scripts. Note that this exercise isn't trivial. To do this, you need to combine the OpenOffice.org suite, programs written in OpenOffice.org Basic, and shell scripts that run from the shell's command line. This is really an attempt to marry two disparate environments.
OpenOffice.org Basic organizes macros into modules and modules into libraries. Libraries are stored inside objects, such as the OpenOffice.org suite itself, or within a document file.
To get started, the first step is to create a library and a module inside that library, as shown in the following Try It Out. Just consider these storage locations for your Basic program code.
Try It Out: Creating an OpenOffice.org Basic Module
Launch an OpenOffice.org application, such as the Writer word processor. Select Tools
Note that the look of each version of the OpenOffice.org suite varies. Therefore, you may see a slightly different window displayed. Luckily, OpenOffice.org comes with a very good set of on-line help.
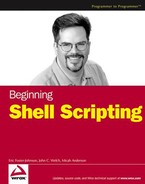
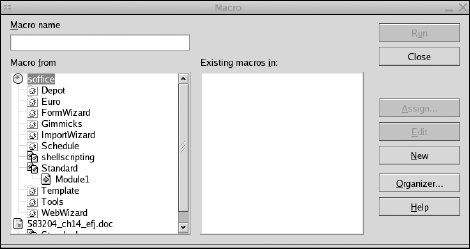
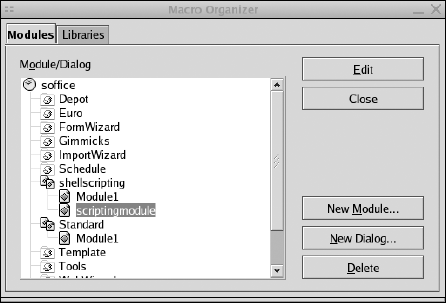
Click the Organizer button. This displays the Module and Library Organizer window, as shown in Figure 14-2.
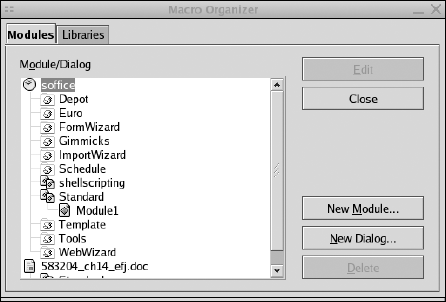
Click the Libraries tab, shown in Figure 14-3.
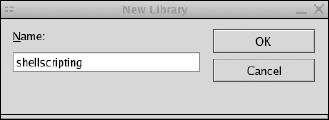
You need to start with a library. The Application/Document drop-down list shows soffice. This drop-down list may be hard to find because it is small and appears in a way that does not stand out. Leave the setting at soffice. Click the New button to create a new library. Name the library shellscripting, as shown in Figure 14-4.
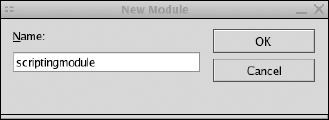
Next, you need to create a module within the library. Click the Modules tab in the Macro Organizer window and then click the New Module button. Enter a name of scriptingmodule in the dialog box, as shown in Figure 14-5.
You now have a container to hold your new macros.
You need to create a library and a module as a place to hang your OpenOffice.org Basic macros. You can use names of your choice. The names shown in this example are used in later examples in this chapter.
Starting with a library, you can place the library inside an application or a document. If you place the library inside the application, you can call on the library from anywhere in the OpenOffice.org suite. If you place the library within only a document, you can only access the macros when editing that document.
Sun Microsystems sells a commercialized version of the OpenOffice.org suite as StarOffice. With StarOffice, the name for the executable program is soffice. Thus, you'll sometimes see ooffice or soffice used interchangeably in the OpenOffice.org on-line help and libraries. For example, to create a library that is accessible anywhere within OpenOffice.org, you create the library with the Application/Document setting as soffice, not ooffice, even though you are running OpenOffice.org.
Once you have a module set up, you can start to create macros, another word for Basic subroutines and functions, as shown in the next example.
Try It Out: Creating an OpenOffice.org Basic Macro
Select Tools
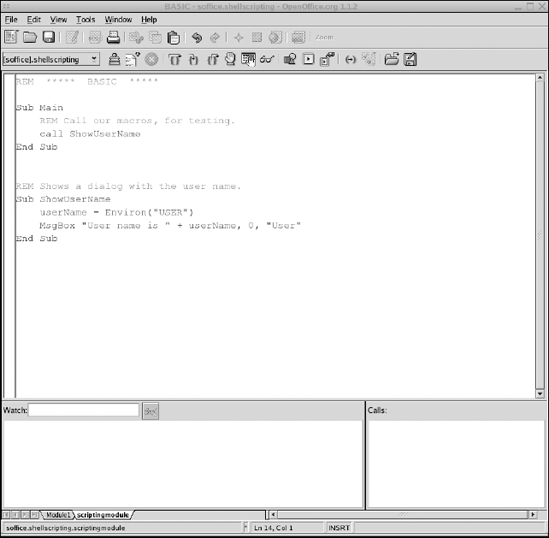
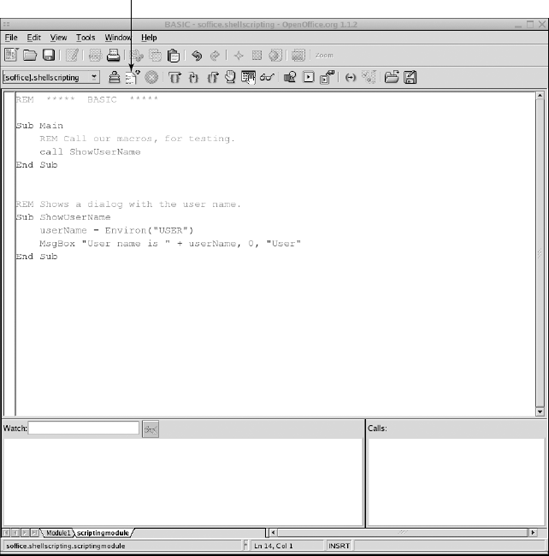
Next, click the Edit button. You'll see the OpenOffice.org Basic IDE, as shown in Figure 14-7.

Figure 14-7 shows the default empty module just created. The next step is to edit the module. Enter the following code and click the Save icon or menu option:
REM ***** BASIC *****
Sub Main
REM Call our macros, for testing
call ShowUserName
End Sub
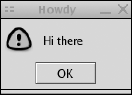
REM Shows a dialog with the user name.Sub ShowUserNameuserName = Environ("USER")MsgBox "User name is " + userName, 0, "User"End Sub
Figure 14-8 shows the final macro.
Click the Run icon, indicated in Figure 14-9, to run the macro.
When you click the Run button, you will see a window like the one shown in Figure 14-10 (with your username, of course).
You have now written and executed a Basic macro in OpenOffice.org.
You only need to enter the code marked in bold. OpenOffice.org created the rest for you when you defined a new module.
The BASIC language is not that hard to learn. You can probably grasp enough to get started just by looking at this short example. The REM command, short for remark, indicates a comment. The Sub command starts a subroutine. By default, when you run a module or program, the subroutine named Main is what is actually run. It is a good idea to split your work into separate subroutines and not clutter the Main subroutine, but to test, this example shows the call command calling the new subroutine ShowUserName.
The ShowUserName subroutine gets the name of the user from the USER environment variable. (Sound familiar?) In OpenOffice.org Basic, call the Environ function to get the value of this environment variable and return that value into the userName variable.
A function in BASIC is a subroutine that returns a value. By default, subroutines return no value.
The MsgBox command displays a dialog box with the given text. The first parameter, "User name is " + userName, holds the text that should appear within the dialog window. The second parameter, 0, is a special code that indicates what kind of dialog box to create. The third parameter, "User", holds the text for the dialog box's title bar.
The following table lists the numeric codes for the dialog box types supported by the MsgBox command.
Code | Meaning |
|---|---|
0 | Show the OK button |
1 | Show the OK and Cancel buttons |
2 | Show the Cancel and Retry buttons |
3 | Show the Yes, No, and Cancel buttons |
4 | Show the Yes and No buttons |
5 | Show the Retry and Cancel buttons, reversed from above |
16 | Place the Stop icon in the dialog box |
32 | Place the Question icon in the dialog box |
48 | Place the Exclamation icon in the dialog box |
64 | Place the Information icon in the dialog box |
128 | Make the first button the default button (if the user presses the Enter key) |
256 | Make the second button the default button |
512 | Make the third button the default button |
These codes control the buttons and icons shown in the dialog box. You can combine codes to see more than one option. You can find these values, and more, in the on-line help. Look for the document titled Help About OpenOffice.org Basic.
Note that the current version of the OpenOffice.org Basic IDE does not support using the Ctrl-S key combination to save your work. This is very, very frustrating. You need to click the Save icon on the toolbar, or select the Save option from the File menu, to save your work. Save often.
Instead of editing in the OpenOffice.org Basic IDE, you can also record your interactions with the OpenOffice.org suite and save the recording as a macro to be called again later.
You can also use the Shell function to run a shell script or program from within the OpenOffice.org environment. With this scenario, you might end up with a shell script calling an OpenOffice.org Basic module, which in turn calls a shell script.
The macro shown so far requires no parameters. It can get all the data it needs from within the OpenOffice.org environment. Often, however, you'll need to pass a parameter or two to the macro to give the macro the information it needs. The following example shows how to do that.
Try It Out: Passing Parameters from the Command Line to OpenOffice.org
Edit the previous macro definition to appear as follows:
REM ***** BASIC *****
Sub Main
REM Call our macros, for testing.
call ShowUserName
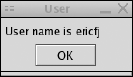
call ShowMsgBox "Hello from OpenOffice.org", "Hello"
End Sub
REM Shows a dialog with the user name.Sub ShowUserName
userName = Environ("USER")
MsgBox "User name is " + userName, 0, "User"
End Sub
REM Shows a handy message dialog.
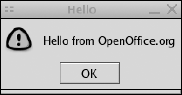
Sub ShowMsgBox(pMessage as String, pTitle as String)
MsgBox pMessage, 0 + 48 + 128, pTitle
End SubThe new text is indicated in bold. Click the Run icon, and you will see the dialog box shown in Figure 14-11. Note that you will first see the username message dialog. Click the OK button, and you should see the following window.
Run the subroutine from the command line. Enter the following command:
$ooffice -quickstart'macro:///shellscripting.scriptingmodule.ShowMsgBox("Hi there","Howdy")'
You should see the window shown in Figure 14-12. Note the different text.
How It Works
The ShowMsgBox subroutine expects two parameters: the text to display and the title for the message window. You can pass these parameters within OpenOffice.org Basic subroutines or, more important, from the command line or a shell script. This example shows how to pass parameters to the OpenOffice.org Basic subroutines from the command line. To do this, you use parentheses around the parameters, using the same library.module.method naming scheme used so far from the ooffice command line.
Because the first parameter has a space, you need to quote the Basic parameter value. In addition, to avoid any conflicts with the shell, it is a good idea to surround the entire macro:/// argument in quotes. The two different types of quotes, ' and ", enable you to clearly distinguish these purposes.
The ShowMsgBox subroutine also adds several numeric codes together to get a display that shows the exclamation icon (48), sets the first (and only) button to the default (128), and displays only one button, OK (0).
You can write OpenOffice.org Basic programs to create files, such as word processor documents. The following example shows how to create a TPS report reminder.
Try It Out: Creating Files from Scripts
Edit the previous macro definition to appear as follows:
REM ***** BASIC *****
Sub Main
REM Call our macros, for testing.
REM call ShowUserName
REM call ShowMsgBox "Hello from OpenOffice.org", "Hello"
call CreateTpsReport("tps1.doc", "This is my TPS Report")
End Sub
REM Shows a dialog with the user name.
Sub ShowUserName
    userName = Environ("USER")
    MsgBox "User name is " + userName, 0, "User"
End Sub
REM Shows a handy message dialog.
Sub ShowMsgBox(pMessage as String, pTitle as String)
MsgBox pMessage, 0 + 48 + 128, pTitle
End Sub
REM Create a TPS report from text passed in.
Sub CreateTpsReport(fileName, fileText)
fileNum = Freefile
Open fileName For Output As #fileNum
Print #fileNum, fileText
Close #fileNum
MsgBox "TPS Report " + fileName + " created.", 64, "Done"
End SubThe new text is indicated in bold.
Next, create the following shell script (remember those?) and name the file tps_create:
#!/bin/sh

# Launches OpenOffice.org to create a TPS report reminder.
# Pass the name of the report file and the date required
# on the command line, in order. Both arguments
# are optional.
#

dir=`pwd`

if [ $# -lt 1 ]
then
filename="$dir/tpsreport.doc"
else
    filename="$dir/$1"
fi

if [ $# -lt 2 ]
then
    date_required=today
else
    date_required=$2
fi

# Build the message as one long line.
msg=$(tr "
" " " <<EndOfText
"Please complete all TPS reports and have them
on my desk by EOB $date_required."
EndOfText
)


# Send the message
echo "[$msg]"

macro=macro:///shellscripting.scriptingmodule.CreateTpsReport
ooffice -quickstart "${macro}("$filename", $msg)"

echo "Message sent"
When you run this script, you should see output like the following:
$ ./tps_create
["Please complete all TPS reports and have them on my desk by EOB today." ]
Message sent
You should also see a message box like the one shown in Figure 14-13.
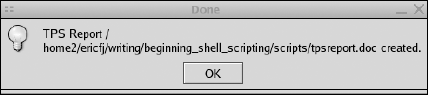
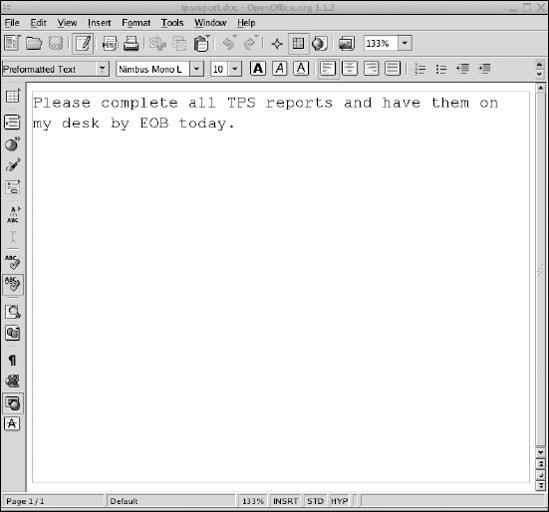
If no errors appear, you should see the document shown in Figure 14-14 in your current directory.
How It Works
This is a fairly complicated example because it contains so many parts.
In the OpenOffice.org Basic macro, the CreateTpsReport subroutine opens a file for writing, writes out the passed-in message, and then closes the file. The Freefile function returns a file number, much like the file descriptor introduced in Chapter 5. You need this number because the Open command requires it. (In other words, this is a quirk of OpenOffice.org Basic.)
The Open command opens a file for writing (Output), using the passed-in file name. The Print command prints text to a file number, and the Close command closes a file represented by a file number.
You can test the CreateTpsReport subroutine from within the OpenOffice.org Basic IDE by clicking the Run icon, as shown previously.
Next, the Bourne shell script tps_create invokes the OpenOffice.org Basic macro.
The tps_create script is similar to the tps_report1 and tps_report2 scripts from Chapter 5.
The tps_create script gets the current directory from the pwd command. This ensures that OpenOffice.org creates files in the current directory. Optionally, you can pass the file name to create (a document file) and the date the TPS reports are required.
The next command in the tps_create script creates a message. It is important that this message be only one line due to the way in which the script passes the message as a parameter to the OpenOffice.org Basic macro. The tr command acts on a here file to remove any new lines and replace them with spaces. In addition, the text should not contain any commas.
The tps_create script uses the echo command to output the created message. This helps diagnose problems in the script.
Next, the tps_create script calls the ooffice command. Because the command line is so long, the script uses a variable for the long name of the OpenOffice.org Basic macro, shellscripting.scriptingmodule.CreateTpsReport.
Note
The parameters passed to the OpenOffice.org Basic macro must be in quotes. Otherwise, you can crash the OpenOffice suite.
Together, all of this enables you to script OpenOffice.org applications. See the on-line help on OpenOffice.org Basic as well as the office applications for more information on writing macros.
In addition to OpenOffice.org, you can script other office applications, mentioned here briefly to spur ideas.
AbiWord provides another word processor. Unlike the OpenOffice.org suite, however, AbiWord is just a word processor, not a full suite. Nonetheless, AbiWord provides an extremely fast and small word processor, especially when compared to Microsoft Word. AbiWord starts faster than Microsoft Word or OpenOffice.org Write, but it does not support the Microsoft file formats or OpenOffice.org.
Find out more about AbiWord at
www.abisource.com. AbiWord runs on many platforms, including Unix, Linux, Windows, QNX, and Mac OS X.
AbiWord, like every other major application, supports the capability to plug in add-ons to the application. Two very useful add-ons for scripting are as follows:
The AbiCommand plug-in enables you to run the
abiwordcommand from shell scripts or the command line.The ScriptHappy plug-in works inside the AbiWord application. With the ScriptHappy plug-in, you can run a shell script or command from within AbiWord. The word processor will capture the output of the script or command and insert that text into the current document.
To do this, your script must be set up as an executable script. It must have execute permissions, as well as the magic first-line comment, such as the following:
#!/bin/sh
This first-line commend indicates that this script is a Bourne shell script. See Chapter 4 for more information on the magic first-line comment.
The NEdit text editor, which ships with most Linux distributions and can run on most Unix platforms, provides a server mode that you can access from scripts. To use this mode, launch the nedit command with the -server command-line argument, as shown in the following example:
$ nedit -server &
Once you do this, the nedit command will listen for requests—in most cases, requests to open text files for editing. The nc command then sends messages to the nedit command. Without any special options, pass the file name to the nc command to call up the file in the text editor.
Note
Due to an unfortunate coincidence, another command named nc may very well be on your system. Short for netcat, or network concatenate, this nc command does not work with the nedit command. Check which command you have. On Linux systems, for example, nedit and its nc command should be located in /usr/X11R6/bin/ by default, whereas the netcat nc command will be in /usr/bin.
You can also download the application from www.nedit.org. NEdit requires the X Window System to run.
Another text editor called jEdit also supports a server mode. See Chapter 2 for more information on text editors.
Let's assume that you're one of those hard-working people who needs to be reminded when it's time to go home. (You are a computer geek, right?) You could probably find a dozen tools that will act as an alarm clock for you in Mac OS X, or Linux, or anything else, but where's the fun in that? The following Try It Out combines the shell with AppleScript and iTunes in Mac OS X to accomplish this, because that's what being a geek is all about!
Obviously, this specific method is only going to work on Mac OS X systems, but the principles will apply to any Unix systems; just change the application you use to make noise at 4:55 p.m. However, Mac OS X is one of the few Unix-based operating systems that enable you to combine a shell script with major commercial apps such as Photoshop, or even Microsoft Word, so from a shell scripting point of view, it's interesting. Mac OS X also has a very well defined scripting architecture, which I touch on in the next section, and that's kind of neat too.
When I talk about linking the shell to "native" OS X applications, I'm referring to using the Open Scripting Architecture, or OSA, to connect different environments. OSA has been a part of the Mac OS since the System 7 days and is conceptually just a glue mechanism. It creates a set of interfaces, or APIs, to the Interapplication Communications mechanisms in Mac OS X.
When I talk about "native" Mac OS X applications, it's perhaps easier to define what I'm not talking about:
Command-line applications such as shell scripts
Applications that require the X11 environment to function
Older applications that require Mac OS 9 (or earlier) or the Classic Compatibility Environment to run
Everything else is native.
Interapplication Communication, or IAC, is simply the way that applications or, more correctly, processes share data. Each OS has several different methods for doing this, from shared memory to copy and paste.
If developers take advantage of OSA when they write their application, then you, the scripter, can use an OSA language, such as AppleScript, to control that application, which brings us to another major point about OSA.
It is an all-too-common myth that the only way to use OSA and OSA-enabled applications is with AppleScript. This has never been true, and with Mac OS X, it's especially not true. OSA is not a language. It's just a set of APIs that enable you to use an OSA-supported language to get work done. AppleScript is the most traditional language used, and with AppleScript Studio, you can do a lot of really nifty things with it, but it's not the only game in town. Late Night Software has a JavaScript OSA implementation that you can download for free from its web site (www.latenightsw.com), and OSA connectors for Perl, Python, and more are available.
In other words, if you don't want to use AppleScript but want the power that OSA gives you in Mac OS X, relax. You don't need to learn AppleScript if you don't want to (but it's really cool, albeit different from almost every other language).
Even though you can use all kinds of other languages with OSA, the examples in this section use AppleScript, mostly because it has explicit support for interaction with the shell, and Apple has supplied shell applications that enable you to interact with AppleScript.
As I mentioned earlier, AppleScript syntax can be different. One reason for this is to enhance accessibility by people who aren't going to ever be hardcore programmers. The syntax had to be more inviting than traditional programming languages. This is good in that it's somewhat easier to dope out AppleScript syntax when you're first getting into it, but it's bad in that AppleScript's verbosity can result in some very bizarre statements, such as the following:
set theiChatStatusMessageText to the contents of text field "iChatStatusMessage" of
window "iChatStatusSet"
That's AppleScript referring to something that in dot notation, à la Visual Basic, would look more like this (or something similar):
iChatStatusSet.iChatStatusMessage.contents
This book is not meant to be a tutorial on AppleScript, but this section does show you some neat tricks you can do with shell and AppleScript and Mac OS X applications, and explain what the script is doing on both sides.
You do need background on one aspect of AppleScript for the examples, and that's targeting applications, as this is critical to using AppleScript. Unlike a lot of languages, AppleScript has dynamic syntax that is application specific. In other words, depending on the application you're trying to target, doing the exact same thing can be syntactically different.
For example, suppose you want to create a new signature for an email application and set it to "Custom Sigs ROCK." If you use Microsoft Entourage, you would use this syntax:
tell application "Microsoft Entourage"
  make new signature with properties {name:"Shell Scripting Book Sig",
content:"—
Custom Sigs ROCK", include in random:false}
end tell
However, if you're targeting Apple's Mail application, you have to use this:
tell application "Mail"
  make new signature with properties {name:" Shell Scripting Book Sig ",
content:"Custom Sigs ROCK"}
end tell
While both operations are similar, there's a minor difference or two. For one thing, Entourage has a parameter or property in AppleScript for making this signature appear randomly. Because I didn't want this, I set it to false, as it's a boolean value. Because Mail doesn't support this, I don't use it for Mail. Entourage requires you to add the -Space, which is the standard signature precedent line for email signatures, as a part of the contents, whereas Mail doesn't. Therefore, with Entourage, the sig starts with --
, which inserts the <dash><dash><space><return> characters needed for the signature.
The thing to remember is that AppleScript terminology is dynamic and can change depending on what application you're talking to. However, it's not like you have to guess or go searching in obscure locations for documentation that may or may not be current. Every scriptable application carries within itself a guide to how you can script it: the AppleScript Dictionary.
The dictionary is just what it sounds like: a guide to the AppleScript terms and functions that exist for use with that application. Dictionaries can range in size from nonexistent (meaning the application is not scriptable) to hundreds of pages in size (Adobe InDesign, Microsoft Word).
Every scriptable application and OSAX (Open Scripting Architecture extension) has its own dictionary, and they all work the same, with one exception: If you are using an application's dictionary, you have to use a tell block of some kind, whereas with an OSAX you don't need the tell block—you just use the terms.
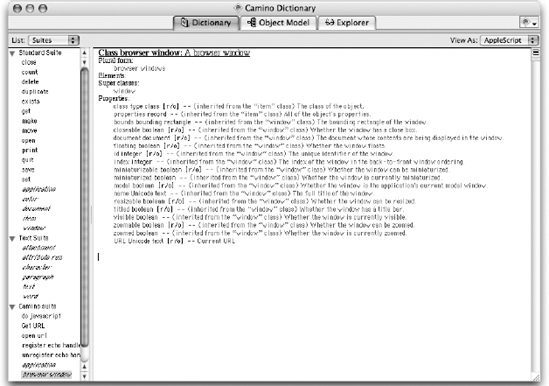
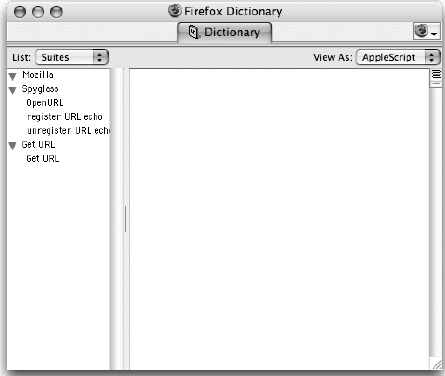
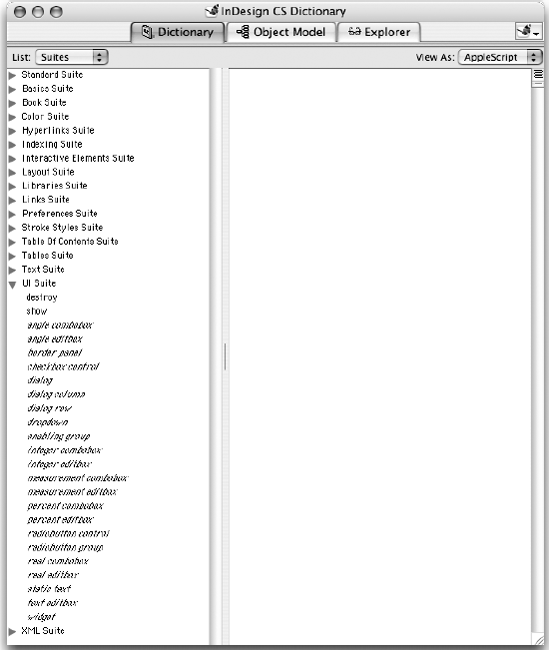
The following figures show some examples of dictionaries from three applications: Figure 14-15 shows Camino, a Mac OS X–only web browser based on the Mozilla project's Gecko rendering engine. Figure 14-16 shows Firefox, a cross-platform Web browser also based on Gecko, and Figure 14-17 shows Adobe InDesign CS. As you can see, even though Camino and Firefox are based on the same engine, Camino is more scriptable, and InDesign is more scriptable than both of the others combined. InDesign's UI suite (in AppleScript terms, a collection of similar scripting terms within a dictionary) is almost bigger than Camino's and Firefox's combined. You can do a lot with AppleScript in InDesign.
Opening a dictionary is simple. Start up Script Editor in /Applications/AppleScript/, and select Open Dictionary in the File menu. Navigate to the application for which you want to open the dictionary, and voila! Dictionary!
Now you can figure out what terms an application directly supports. However, that's not the entire syntax of AppleScript. AppleScript is a programming language with its own syntax, just like C, or Java, or COBOL. Apple has created a language guide for you: The AppleScript Language Guide, available as a PDF from Apple at http://developer.apple.com/documentation/AppleScript/Conceptual/AppleScriptLangGuide/AppleScriptLanguageGuide.pdf, is the best general guide available, and it's free. If you want to develop a good understanding of the building blocks of AppleScript, it's the best place to start.
How do you actually link AppleScript and shell script together? As you saw in the earlier example, you can use a shell script to start an AppleScript application. What if you can't prebuild the script ahead of time, or you need to talk to the shell environment from AppleScript? Worry not, Apple has taken care of that.
You can use three shell commands to connect a shell script to AppleScript:
osalangosacompileosascript
osalang is the command that enables you to see what OSA languages are installed on a given Mac. If I run osalang with the -L switch on the Mac on which I'm writing this chapter, which gives me all the available languages and their capabilities, I get the following:
[Aurora:∼] jwelch% osalang -L
Jscr LNS  cgxe-v-h  JavaScript (JavaScript Scripting System)
asDB asDB cgxe-v-h  AppleScript Debugger (Script Debugger's AppleScript debugger)
ascr appl cgxervdh  AppleScript (AppleScript.)
scpt appl cgxervdh  Generic Scripting System (Transparently supports all installed
OSA scripting systems.)
The output shows that I have a few different potential languages with different capabilities. The capabilities of the languages translate as follows:
c     compiling scripts.
g     getting source data.
x     coercing script values.
e     manipulating the event create and send functions.
r     recording scripts.
v     ``convenience'' APIs to execute scripts in one step.
d     manipulating dialects.
h     using scripts to handle Apple Events.
In other words, by using osalang and grep, you can test for a given language or set of capabilities. For example, to look for JavaScript and get its feature set, you use the following:
osalang -L|grep "JavaScript"
The preceding command would return the following:
Jscr LNS cgxe-v-h JavaScript (JavaScript Scripting System)
Therefore, if you need a specific OSA language, osalang is a handy way to test for that.
osacompile is the second part of the command line AppleScript trio, and a very powerful one. This command enables you to create a compiled script, or script application, from shell input or a text file. You can also specify the OSA language you wish to use; in fact, you can even use different languages depending on the capabilities of the system you're running. For example, you could test for Perl and JavaScript while using AppleScript as a fallback by taking the output of osalang and using that to test for the languages you want. osacompile has a nice set of switches that give you a lot of power (see the man osacompile page for full details), but the following list shows the major switches:
-lenables you to specify the language in which you want the script compiled. For example, if you want the script compiled as JavaScript, useosacompile -l JavaScript.-eenables you to enter the script commands as part of the statement. This can be tricky because AppleScript uses a lot of characters that need to be escaped or properly quoted to make it past the shell correctly. You can use multiple lines here by using the forward slash () character in the script command. For example, a single line script to display a dialog box would look likeosacompile -e 'display dialog "boo"'. Note how the full command is enclosed in single quotes and the text part of the command is in double quotes inside the single quotes. A multiline command would look likeosacompile -e 'display dialog "boo"< return>display dialog "who"'and would create a compiled script with two separate commands:display dialog "boo"anddisplay dialog "who". Obviously, this is not going to be the way you want to create a large script; the quoting and escaping alone will make you quite insane (not as insane as my former co-worker who composed personal letters in raw PostScript code, but close). To specify an input text file, simply place the path to the file after all the switches in theosacompilecommand, and it will use that as an input file. As long as the input file is valid code for the language you're using,osacompilewill use it the same way that Script Editor will.-oenables you to specify the name of the script file to be created. If you don't use a name, then the output file isa.scpt, and it's placed in whatever directory you happen to be in. If the name of the output file ends in.app, then a double-clickable application, or droplet (a special AppleScript that runs when files or folders are dropped on it), is created.You do not make a full GUI application just because you use an .app file. For that, you really need AppleScript Studio, which is a part of Apple's Developer tools, or FaceSpan from DTI. A whole host of tasks is involved in that process, which osacompile isn't doing alone, although it's involved heavily in the process.
-xenables you to create a run-only script or application. Normally, scripts and applications include the source code, but if you don't want people doing silly or evil things to your script, you can use the-xoption to strip the source code out of the compiled script or application. This is also handy for commercial applications for which you don't want people using your source code sans permission.-uenables you to have a startup screen if you're creating an application. This is not a splash screen à la Photoshop, but rather a little screen of text that pops up every time the application runs. They're usually annoying, so most folks don't bother with them.-screates a stay-open application. Normally, AppleScripts and AppleScript applications run and then stop at the end of the script. Creating a stay-open application enables the script to remain running constantly. AppleScripters use this for several reasons, and as you get more familiar with AppleScript, you'll find reasons to use it too.If it seems as though I'm avoiding AppleScript Studio, you're right. I am. Not because it's not a great way to create fully featured Mac OS X applications, because it is. Rather, AppleScript Studio is an umbrella name for a huge development environment that can take up entire books, and even a casual discussion of it would take up half of this book and be way off topic. If you're interested in AppleScript Studio, the best place to start is at the AppleScript site's Studio section, at
www.apple.com/applescript/studio.
The final part of the AppleScript shell command triumvirate is osascript, which is the complement to osacompile. osascript executes a given script file or input command but doesn't create a script. It has similar flags to osacompile; in fact, the -l and -e flags are identical. The -s flag is for setting options that specify how the script output and errors should be handled. Normally, the output of a script is in human-readable format, so the command osacompile -e 'set foo to {"listitem1","listitem2"}' followed by osascript a.scpt returns listitem1, listitem2. However, if you use the s option for the -s flag, osascript -s s a.scpt, on the same script, you get the results in the "real" form, which could be compiled into another script: {"listitem1", "listitem2"}. Normally, osascript passes errors to stderr, not the screen. If you want to see runtime errors (not compile errors; those always go to the screen), use -s o with osascript.
There are some limitations with osascript and osacompile. First, you can't play outside your sandbox. If you want to play with things that are above your authentication level, it's not going to work unless you use sudo or su to run the command. Second, you can't use osascript to run scripts that require user interaction. Therefore, while you can use osacompile to create scripts that require user interaction, you can't use osascript to run them. Considering that user interaction in AppleScripts happens outside of the command-line environment, this makes sense. However, you could use the open command, as in the alarm-clock example shown earlier, to run an AppleScript application that requires user interaction. Finally, you can't get too interactive with these commands. The only result you can directly get from an AppleScript is the last one. For anything else, you'll need to have the script write results to a text file.
While going from shell to AppleScript is really cool, it's only half the story. You can run shell scripts directly from AppleScript via the do shell script command. do shell script is a fairly self-explanatory command, with a limited set of parameters. From the Standard Additions dictionary:
do shell script string  -- the command or shell script to execute.  Examples are
'ls' or '/bin/ps -auxwww'
[as type class] -- the desired type of result; default is Unicode text (UTF-8)
[administrator privileges boolean] -- execute the command as the administrator
[password string] -- use this administrator password to avoid a password dialog
[altering line endings boolean] -- change all line endings to Mac-style and trim a
 trailing one (default true)
[Result: string]  -- the command output
There's not a lot to do here, parameterwise. You can specify how you want the result. You can run the shell script as root, but if you do, you have to provide a password. You can enter the password in more than one way: as part of a displayed dialog box (somewhat secure), embedded in the script (not secure at all, not even if it's run-only), or by fetching the password from the user's secure password storage, aka the Keychain or the Keychain Scripting application. (I'll leave the Keychain scripting up to you as an extra-credit trick, but it's really cool, and the only way to get the password is to have an event tap or read it directly from RAM. If someone has cracked your machine to that level, you have greater problems than a shell script.) Altering line endings enables you to have the script output results as a Mac-style string, not a Unix-style string. Change that setting to false for Unix line endings.
This feature is a huge hit among the AppleScript community, because it enables them to leverage the strengths of other languages without having to resort to bizarre workarounds. Therefore, if you need high-level text manipulation, instead of trying to do it in AppleScript (a tedious proposition), you can use do shell script, and connect to a Perl or shell routine that will manipulate text far faster and more efficiently. It's also handy for doing things when you don't feel like waiting for others. For example, until quite recently, Virex, an antivirus utility for the Mac, couldn't automatically scan items. You had to manually invoke the scan engine in the UI or use the shell command, vscanx, manually or via cron. Of course, that's not the same as autoscanning a file as soon as it's downloaded. Therefore, I used do shell script to create a routine for scanning files with vscanx.
First, I set a property that contained the command I needed with all the arguments that I wanted to use:
property theScan : "/usr/local/vscanx/vscanx --allole --dam --delete --one-file-
system --recursive --secure --summary "
This command scans every kind of file (--secure, --allole) inside of any folder it's presented with (--recursive), cleans all macros from a potentially infected file (--dam), deletes any infected file (--delete), resides on a single file system (--one-file-system), and prints a summary to the screen of what it found (--summary). (Note that because Unix can make remote file systems look like a part of the local file system, and because the AFS distributed file system can make entire global networks look like part of the local file system, the --one-file-system option is important.) This way, I could use theScan instead of the full command line and parameters.
Next, I created another property that would use grep to scan the results of the viral scan for an infected file result:
property theGrep : "|grep "Possibly Infected""
That was only part of it, however. AppleScript in OS X uses something it calls folder actions, commands that run as part of something that happens to a folder, such as adding a file to a folder—that is, downloading a file to the Desktop. Using that and some do shell script wizardry, I built an autoscan system for Virex that did not need to interact with OS X at the kernel level (as do most of these systems). It was fast, and I had it working a year before McAfee was able to get a stable version of Virex that had autoscan out the door. The full code, with explanations, follows:
property theScan : "/usr/local/vscanx/vscanx --allole --dam --delete --one-file-system --recursive --secure --summary "
The property statement uses a variable for the scan command with the full path to vscanx; that way, I didn't have to rely on user shell configurations.
property theGrep : "|grep "Possibly Infected"" --this will check for infected file result
The preceding line checks for the infected file indicated in the summary.
property theResult : ""theResult is a placeholder text variable.
property theMessage : ""theMessage is a placeholder text variable.
on adding folder items to this_folder after receiving added_items
This line is part of the folder action handler (AppleScript lingo for subroutine) that deals with adding items to a folder. this_folder and added_items are standard names in this statement, and almost every example of this kind of folder action uses them. I used an example from Apple's AppleScript web site to help me out on this.
tell application "Finder"
        set the folder_name to the name of this_folder
  end tell
Because the Finder is the standard file and folder manipulation application, I use its capabilities to get the name of this_folder and put that in folder_name.
-- find out how many new items have been placed in the folder
  set the item_count to the number of items in the added_items
The preceding step gets the number of items that have been added to the folder and puts that number in item_count.
repeat with x in added_items
repeat loops are AppleScript's version of for-next and while loops. In this case, I am using the number of items in added_items as the control for the loop; and for each iteration, I assign a new item to x.
set theFileInfo to info for x --get info for the downloading file(s)
info for is a record (a list where each item has a label) that is an array of properties for a file, so I put that record into theFileInfo.
set theBaseSize to size of theFileInfo --get initial size
I want to get the current size of the file and use it as a baseline (I'll explain why in a second).
delay 3 --wait 3 seconds
          set theFileInfo to info for x --get info again
This code refreshes the information in theFileInfo.
set theCompareSize to size of theFileInfo --get a newer size
This line gets the most current size of the file.
repeat while theCompareSize ≠ theBaseSize --if they don't equal, loop until they do
As of Panther, Mac OS X 10.3, it's hard to tell when a file is still downloading. While the Finder does have a busy flag, it's not used if you are transferring files, say, via ftp, sftp, or some other command-line option. (Well, it may or may not, but as of version 10.3, it's not reliable). Therefore, to work around that, I wrote a loop that compares the starting size with the current size every three seconds. Even on a slow link, the size should change by a byte or two in three seconds. If they aren't equal, theBaseSize is set to theCompareSize, the system waits three seconds, refreshes theFileInfo, gets a new theCompareSize, and checks again. Eventually, the two sizes will match, and as far as the script is concerned, the download is done. The next five lines handle this:
set theBaseSize to theCompareSize --new base size
delay 3 --wait three seconds
set theFileInfo to info for x --get info
set theCompareSize to size of theFileInfo --get a newer size
          end repeat --once the sizes match, the download is done

          set thePath to " "" & (POSIX path of x) & """ --this quotes the file
path so that odd characters are handled correctly
In Mac OS X, path delimiters aren't a / (slash) character but a : (colon). The shell environment only uses slashes, so to get around this, use the POSIX path command to get the shell-compatible path of the file from the Mac OS X path. Because it needs to have quotes in it, I insert those by escaping them with the " character:
set theCommand to theScan & thePath & theGrep as string --build the
entire command, but only caring if infected files are found
Now build the command. Take the theCommand variable, set its contents to the theScan variable concatenated with the thePath variable I just created, and then concatenate them with the theGrep variable. And make sure the entire thing is a string, as that's what's needed in the next step:
set theResult to do shell script theCommand --run the command
Run vscanx against the current item in added_items, and set that to text:
set theTextResult to theResult as text --text version of the result
Even though this is normally a string, I like to be sure, so I use the as text coercion:
set oldDelims to AppleScript's text item delimiters --temp store Applescript
current delimiters
Because the result is going to contain a lot of words and spaces (and I only care about one thing), I'm going to parse it. Normally, Apple uses the null character as a text delimiter. I want to use a space, so I first store the current delimiter in a variable for safekeeping. oldDelims is traditionally used for this.
set AppleScript's text item delimiters to " " --use spaces as the current delimiter
The preceding line sets the text item delimiters to a space.
set theNewResult to (every text item of theTextResult) --this turns the text into a
list, with the number at the end
Now turn the result from a single text line to a list of words. When vscanx returns a summary, the number of items found is always the last word/item in the line. Therefore, I turn this into a list, and the last item in the list is going to indicate how many infected items were found and deleted.
set theTest to the last item of theNewResult as number --since the last item is the
number of possibly infected files, let's treat it as one
Remember that in a string, a number character is just that: a character. It's not a number, but we need it to be one, as numerical tests are really easy and reliable compared to text tests. Set theTest to the last item of the newly created list from the summary to force, or coerce, that value to be a number.
if theTest ≠ 0 then --only display a dialog if possible infections are found
As long as it's not zero, it's a positive integer. (If it returns a negative, then vscanx is way buggy, and we can't possibly work around that here anyway. In any event, I've never seen that happen or heard of it happening.)
set theTest to theTest as text --display dialog only likes text
A nonzero return indicates a possible bad virus, and because the file's already been deleted, I should probably tell the user. To do that, I need a display dialog step, and that requires text, so I coerce theTest back to a text variable.
display dialog theTest & " possibly infected files were found in
" & thePath & ", and deleted!" --give the user the number of infected files and
location
The preceding code tells the user how many infected files were deleted and where they were. I put this in the repeat loop, so if users wanted to kill the scan on the spot, they could by hitting the Cancel button in the dialog box. It creates an error that kills the script. It's a bit abrupt, but it works well here, and it definitely stops the script from running, which is what I want.
end if
This is the close of the if statement, aka fi in shell. AppleScript closes things with an end whatever. More verbose, but in many cases clearer, and much nicer if you're a tad dyslexic.
set AppleScript's text item delimiters to oldDelims
Because I can't always count on the script's ending cleanly, I restore the delimiters to the state they were in before each iteration. I haven't seen that this creates a noticeable slowdown.
--display dialog theResult --add some grep routines to parse for actual infections
The preceding line is a reminder of stuff I should do one day.
end repeat
This line closes the repeat loop.
end adding folder items to
Finally, the preceding line ends the folder action.
This is a great, albeit not glamorous, use for do shell script, and it shows how it can be a force multiplier for AppleScript. I could use the GUI Virex application here, but if it's not running, the user has to deal with it popping up, eating CPU even in the background, taking up space in the Dock, and so on, even if there's no virus to be found. This way, everything is scanned (regardless of the folder to which you attach this action), and the only time the user is bothered is when a virus is found. Because this happens within three seconds of the file's completing a download, it's unlikely that the user will be able to open the file before the scan happens. True, you have to manually assign this script to every folder on which you want it to run, but it enabled me to enjoy autoscan in a safe, nonkernel patching manner a year before McAfee could offer it. Viruses don't pose the same worry on the Mac as they do on Windows, so this is a more than acceptable level of virus protection for the platform.
Like using osacompile and the others, do shell script has some limitations. First, it's a one-shot deal. You can't use it to create user or even script interactions between shell and AppleScript. The command runs, and you get a return. It's no more interactive than that. You can have the shell script write results to a text file and use AppleScript to read those, but that's it. Second, unless you use an ignoring application responses block, as in the iTunes alarm-clock example, AppleScript will pause script or application execution until the script ends. If you use ignoring application responses with do shell script, you can't get the result of the do shell script step with any reliability. Finally, do shell script uses sh for its environment, and you can't change it unless you include the specific shell in the do shell script statement or in the script you're running. For full details on do shell script, read Apple Technical Note TN 2065, available at http://developer.apple.com/technotes/tn2002/tn2065.html. It is the authoritative answer to almost every do shell script question you'll ever have.
There, in a nutshell, are the basics of AppleScript and shell interaction. You can do a lot more with these two very powerful languages, but I leave that for your own inventive/demented needs.
Although you can use xterm windows in Mac OS X, most folks use the Terminal application as their shell interface. It's there by default, and you don't have to fire up another windowing environment to get to it. Terminal has the standard features that you find in any terminal window application, plus some pretty spiffy uncommon ones.
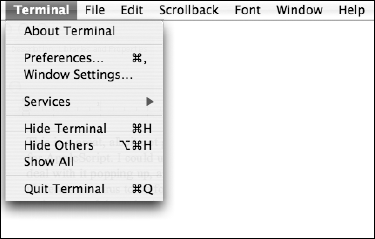
Terminal has two areas for settings, Preferences and Window Settings, both accessed from Terminal's application menu, as shown in Figure 14-18.
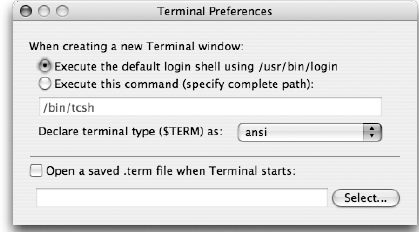
The Preferences for Terminal are fairly basic. You can set the initial shell and the initial terminal type, and you can specify a .term file to run when Terminal starts, as shown in Figure 14-19.
However, it's in the Window Settings that you find the juicy Terminal goodness. You'll notice quite a few settings here. One thing to note right away is that by default, these settings only apply to the active Terminal window. If you want them to apply to all future windows, click the Use Settings as Defaults button at the bottom of the window.
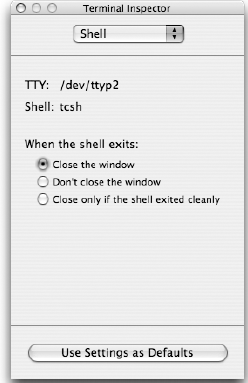
The first setting is the Shell setting, shown in Figure 14-20. This is where you set the window behavior when the shell exits. The options are self-explanatory. Just remember that the shell runs inside the window, so it is the window behavior when you quit the shell that you set here.
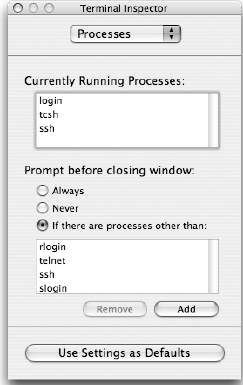
Next are the Processes settings. These settings, shown in Figure 14-21, have two major functions: to show you the current process in the frontmost Terminal window and to set the window (not shell or application) closing behavior. The main feature here is that you can insert processes that you should be reminded are running before the window closes, as opposed to always being prompted or never being prompted. This can be handy if you have a script that takes a long time to run and you don't want to accidentally close the window on it while it's running, but you don't want to be always prompted.
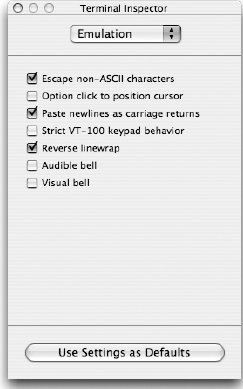
The Emulation settings, shown in Figure 14-22, contain the basic terminal emulation options, including non-ASCII character handling, newline pasting behavior, bell behavior, and cursor positioning.
Scrollback settings specifying the size of the scrollback buffer are handled via the Buffer settings. Also included here are settings for line-wrap behavior and scroll behavior on input, as shown in Figure 14-23.

Shown in Figure 14-24 are the Display settings. This could just as easily be called Type because this is where you set your type and cursor settings. Because Mac OS X is fully Unicode capable (indeed, all text strings are actually stored as Unicode and translated on the fly to your default encoding), you can specify how to handle Japanese/Chinese and other "larger" character sets. You can also set blinking text options, how dragging text into and around the window is handled, and what font you want to use.
It is worth mentioning here that Terminal in Mac OS X enables you to get the full path to a folder or file by dragging the folder or file into the Terminal window. This can be handy when you are looking inside frameworks, where the path is long and repetitive, or when a lot of special/nonstandard characters are contained in the path name.

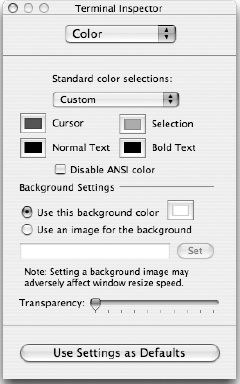
Next up are the Color settings, where you can set text colors, background colors, or even a background image in your window. The last setting, Transparency, however, is the coolest thing about Terminal. It enables you to set individual or default transparency for Terminal windows. This is where Mac OS X's imaging model and alpha channels support really shine. It's hard to describe, but Figure 14-25 shows a transparent Terminal window overlaying an opaque Terminal window and a Microsoft Word file, illustrating why this is a definite "ooooooooh" feature.
The Color settings dialog box is shown in Figure 14-26.
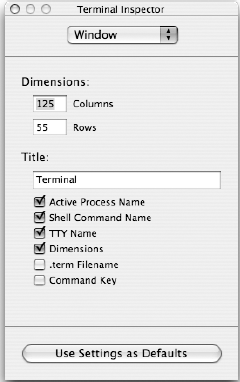
The penultimate Terminal dialog box, Window, is shown in Figure 14-27. This is where you set the default width of the window, the primary title for the window that shows in the title bar, and any other bits of information you want in the title bar, such as active process name, shell command name, TTY name, dimensions, .term filename, and the command key combo you need to enter to bring this window to the front.
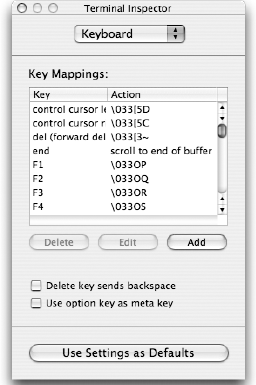
The final Terminal settings dialog box, Keyboard, is shown in Figure 14-28. This can be one of the most critical settings if you are dealing with custom Terminal environments, such as tn3270 or tn5250, where you need to be able to customize the actual codes sent by the forward delete key, the function keys, and so on. You can also set your Mac keyboard's option key to the Terminal meta key (critically important for EMACS users) and just map the forward key to backspace.
That covers all of the UI settings for Terminal. (There is at least one more hidden setting, but you can figure that out on your own for another extra-credit project. It's not that hard; Google should find it quite fast.) Mac OS X gives you a wide range of settings for the Terminal application itself, in addition to the nearly infinite number of ways you can customize your shell environment. Between that and the excellent shell-to-desktop-application connections provided by Apple, you can do a lot with shell at virtually every layer of Mac OS X.
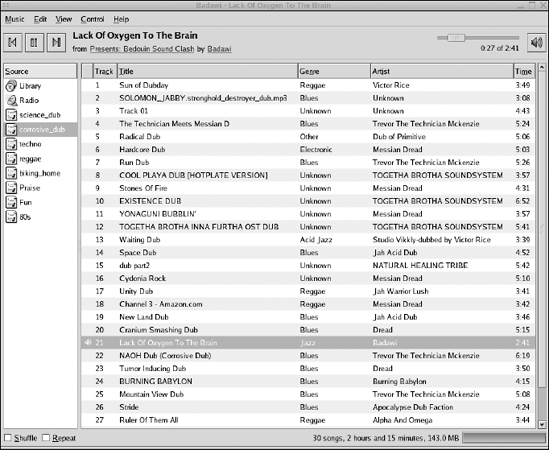
Two of the main Linux and Unix audio players include the X Multi-Media System (XMMS) and Rhythmbox. XMMS looks a lot like the Windows application Winamp. Rhythmbox looks a lot like the Macintosh application iTunes. Both applications can be controlled from the command line, which means, of course, that both applications can be controlled from scripts.
In addition, the Totem movie player can be controlled from the command line.
The following sections provide an overview of the command-line options available to control these applications.
The XMMS application, xmms, creates one or more windows to play music, visualize the music, and manage playlists, or lists of songs. Figure 14-29 shows xmms in action.
Once started, you can run the xmms command from the shell or a script to control the already-running xmms by passing command-line options that manipulate the current playlist. For example, to jump ahead to the next song on the playlist, use the following command:
$ xmms --fwdNotice the two dashes in front of fwd. When you run this command, xmms jumps to the next song in the playlist.

The following table shows the most useful xmms commands for scripting.
Command | Usage |
|---|---|
xmms --rew | Jump to the previous song in the playlist |
xmms --fwd | Jump to the next song in the playlist |
xmms --pause | Pause the music |
xmms --play | Play the music, resuming from pause mode |
The Rhythmbox player presents a larger user interface by default, as shown in Figure 14-30.
You can script the Rhythmbox music player in a similar fashion to XMMS. Launch the rhythmbox command normally and then run a second rhythmbox command with a special command-line option. For example, to jump to the next song in the playlist, use the following command:
$ rhythmbox --nextWhen you run this command, the display should change to show the next song.
The following table shows the most useful rhythmbox commands for scripting.
One odd aspect to Rhythmbox is the use of toggles. The --play-pause option switches the state of Rhythmbox, but it is highly dependent on the initial state. The --toggle-mute options works similarly. If you do not know the initial state, then toggling the state will leave the application in an unknown state as well.
The totem command-line arguments are very similar to those for the Rhythmbox music player. The main command-line options appear in the following table.
Command | Usage |
|---|---|
totem --previous | Jump to the previous movie or chapter |
totem --next | Jump to the next movie or chapter |
totem --volume-up | Raise the volume |
totem --volume-down | Lower the volume |
totem --play-pause | Toggle the play or pause mode—if playing, then pause; otherwise, play video |
totem --seek-fwd | Tells Totem to seek forward 15 seconds |
totem --seek-bwd | Tells Totem to seek backward 15 seconds |
totem --quit | Tells Totem to quit |
In addition to the desktop applications listed here, you can do a lot more with scripts. Any time you type in a complex command, think of scripting the command instead. Furthermore, any application, be it a server program or desktop suite, can be scripted, so long as you can launch the application from a command line. If you can do this, you can launch the application from a shell script.
Some applications, however, work better for scripting than others. For example, the Totem movie player works better with scripts than other movie-playing applications, such as Xine or mplayer. That's simply because the Totem application supports more useful command-line parameters.
Some tips when scripting desktop applications include the following:
Look for applications that support several command-line options and arguments. These applications typically work better for scripting than other applications.
Look for a listing of the command-line options and arguments. On Unix and Linux systems, you can view the on-line manuals with the
mancommand. Some applications, notably the OpenOffice.org suite, seem to go to great lengths not to describe the command-line options and arguments.If a desktop application has a server or background mode, chances are good that the application was meant to be controlled by other applications. Such applications work well in scripts. The terms server and background are used in a lot of desktop application documentation.
As always, test the commands you want to script from the command line. Work out all the needed parameters. Then add these commands to your scripts.
By now, you should feel comfortable writing scripts, as well as choosing what will script well and what will be more difficult. Even though this book is titled Beginning Shell Scripting, it has covered a lot of tough topics. After getting this far, you should be able to start scripting on your own.
Furthermore, you should be able to perform web searches to find additional information. The Internet is by far the best source for specific information on ever-changing environments and commands. For example, you can find an early paper by Steven Bourne, creator of the Bourne shell, at laku19.adsl.netsonic.fi/era/unix/shell.html, or the Advanced Bash-Scripting Guide at www.tldp.org/LDP/abs/html/.
Most users think of scripting and server-related systems as if these two were joined at the hip, but you can also do a lot with desktop applications and shell scripts:
Office applications such as the OpenOffice.org suite and the AbiWord word processor offer several ways to script their applications. The OpenOffice.org suite is especially interesting. You should be able to write scripts that run on multiple platforms that can update documents and fill out forms.
Despite a long history of hostility to the command line, modern Mac OS X systems are surprisingly ready for scripting. You can automate large portions of the desktop with AppleScript as well as traditional shell scripts.
Multimedia applications are also open to scripting, especially the XMMS, Rhythmbox, and Totem media-playing programs.
This chapter should spur a number of ideas as to what you can use scripts for in your environment.
What is the name of the OpenOffice suite? What is the command that launches the suite?
In OpenOffice.org Basic, what are methods, macros, modules, and libraries? What is the difference between subroutines and functions?
Can you pass parameters from a shell script to an OpenOffice.org Basic subroutine? If so, how?
What is the name of the architecture Apple created to enable scripting of applications in Mac OS X?
What is the AppleScript command used to run shell scripts from within an AppleScript?
What is the shell command used to compile AppleScript code from the shell environment?