
In this chapter, you’ll explore all the iPod functionality that iPhone has to offer. The topics include the following:
![]() Stocking iPhone with Audio and Video Using iTunes
Stocking iPhone with Audio and Video Using iTunes
![]() Stocking iPhone with Audio and Video from the iTunes Store Application
Stocking iPhone with Audio and Video from the iTunes Store Application
![]() Finding and Listening to Podcasts
Finding and Listening to Podcasts
3 Listening to Audio and Watching Video
One of the best things about iPhone is that it is a fully featured iPod that you can use to listen to music, podcasts, audiobooks, and other audio. You can also watch movies, TV shows, and other video on iPhone’s high-resolution screen. iPhone has an awesome iPod interface that makes working with audio and video easy and fun.
Using iTunes to Add Audio and Video Content to iPhone
Before you can listen to audio and watch video, you have to move content onto iPhone. One way to do this is to add content to your iTunes Library and then move that content from iTunes to iPhone.
The most common ways to add content to the iTunes Library are by importing audio CDs or purchasing content from, renting movies from, and subscribing to podcasts in the iTunes Store.
After you have stocked your iTunes Library, you can create playlists to organize content.
When your content is ready, sync iPhone with the iTunes Library so that the content you want to be available is moved from the Library onto iPhone.
>>>step-by-step
Importing Audio CDs to the iTunes Library
Importing audio CDs is one of the most useful ways to get music and other audio content into iTunes.
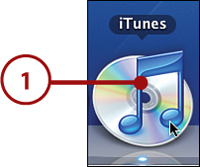
1. Launch iTunes by double-clicking its application icon, choosing it on the Windows Start menu, or clicking it on the Mac’s Dock.
Only the First Time
You need to only perform steps 2 through 10 before the first time you import CDs or when you want to change settings.
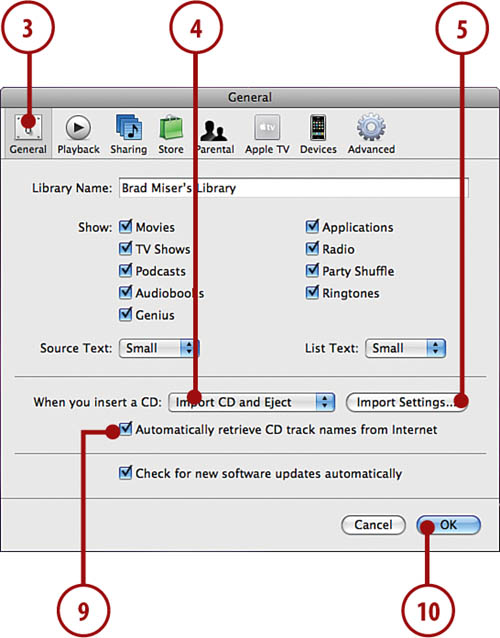
2. Choose Edit, Preferences (Windows) or iTunes, Preferences (Mac). The Preferences dialog appears.
4. On the When you insert a CD drop-down list, choose Import CD and Eject.
5. Click Import Settings.
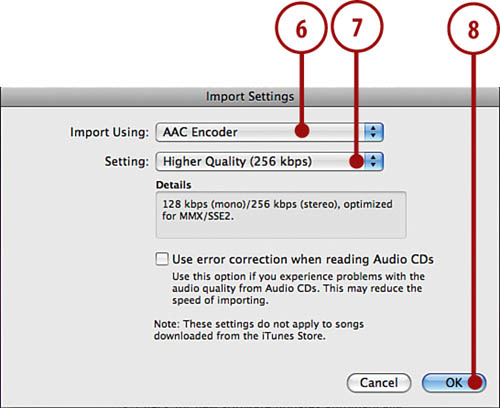
6. On the Import Using drop-down list, choose AAC Encoder.
7. On the Setting drop-down list, choose Higher Quality.
8. Click OK.
9. Check the Automatically retrieve CD track names from Internet check box.
10. Click OK.
11. Insert a CD into the computer. iTunes connects to the Internet and identifies the CD. When that’s done, the import process starts. You don’t have to do anything else because iTunes manages the import process for you. When the process finishes, iTunes plays an alert sound and ejects the disc.
12. Insert the next CD you want to import. After it has been ejected, insert the next CD and so on until you’ve added all the CDs you want to the iTunes Library.

>>>step-by-step
Purchasing Audio and Video from the iTunes Store
The iTunes Store has a very large selection of music, movies, TV shows, and other content that you can preview, purchase, and download. To do this, you must have an Apple Store account, also known as an Apple ID (you can preview content without an Apple ID). If you have an AIM/AOL screen name, you can use that as an Apple ID (you have to provide credit card information to be able to use that account to make purchases in the iTunes Store).
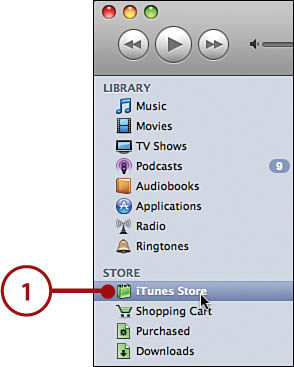
1. Click iTunes Store on the Source list. iTunes connects to the iTunes Store, and you see the Home page.
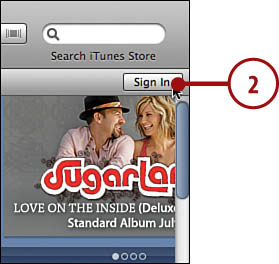
2. Click Sign In. The Sign In dialog appears.
Already Logged In?
If your Apple ID appears instead of the Sign In button, you are already signed in to your iTunes account and can skip to step 6.
3. Enter your Apple ID.
4. Enter your password.
5. Click Sign In. You return to the iTunes Store Home page; your Apple ID appears in place of the Sign In button to show that you are signed in to your account.

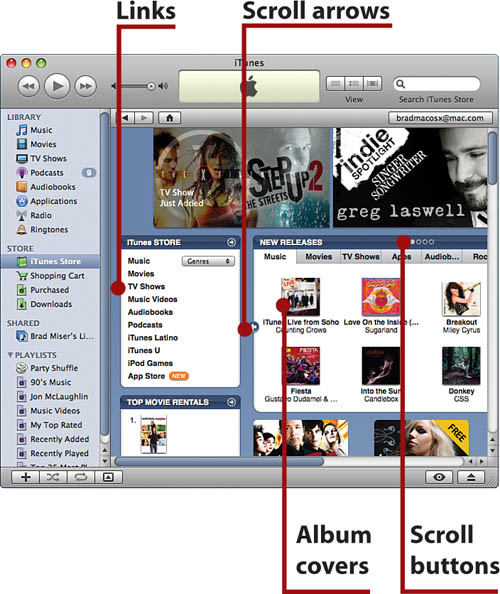
6. Browse the iTunes Home page using the various scroll arrows, scroll buttons, and links you see. As you move around, you see more details about content you are browsing, down to the individual album.
Sign Me Up!
If you don’t have an Apple ID or want to create a new one, click Create New Account and follow the onscreen instructions to obtain an Apple ID. Then use your new ID to log in to the iTunes Store.
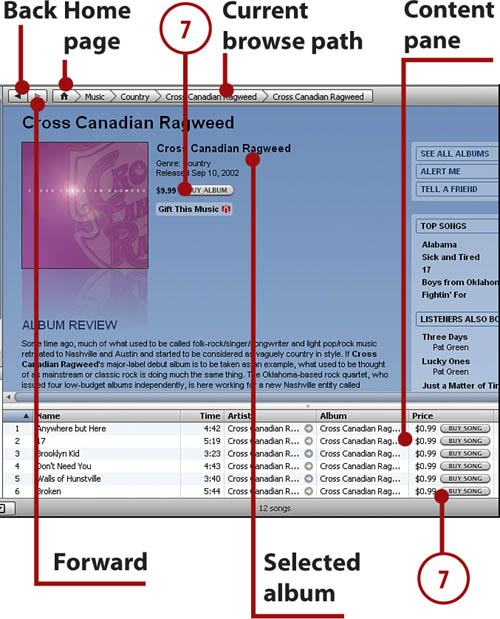
7. When you want to purchase and download content, click the Buy button. For example, when you are viewing music, this is the Buy Song or Buy Album button. When you are viewing TV shows, it is the Buy Episode or Buy Season button. The content you purchase is downloaded to your computer and added to your iTunes Library.
8. Click the Purchased playlist on the iTunes Source list to see content you’ve downloaded from the iTunes Store.
>>>step-by-step
Renting Movies from the iTunes Store
You can also rent movies from the iTunes Store. When you rent a movie, you can watch it as many times as you’d like within a 24-hour period (starting as soon as you play the rented content the first time) within a 30-day rental window. After either the 24-hour viewing or 30-day rental period expires (whichever comes first), the rented movie is removed from iTunes (or your iPhone) automatically. To rent a movie, follow these steps.
1. Move into the iTunes Store and click the Movies link.
2. Browse for movies in which you might be interested.
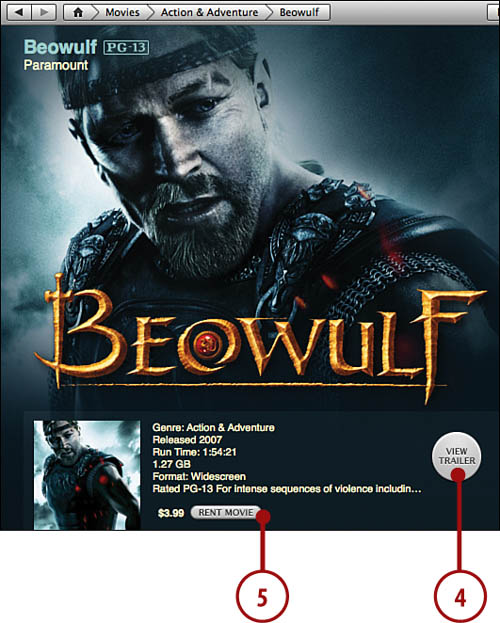
3. Click a movie’s link to see detailed information about it, including the cost to rent it.

4. To watch the movie’s trailer, click the View Trailer button.
5. To rent the movie, click the Rent Movie button. The Sign In dialog box appears.
6. Enter your Apple ID or AOL screen name and password and click Rent. The movie is downloaded to the iTunes Library.
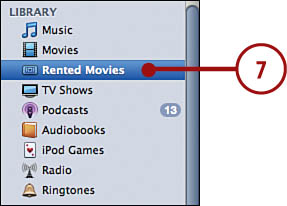
7. To access movies you’ve rented, click the Rented Movies source. (Be sure not to play a rented movie until you’re sure you will be able to watch all of it within 24 hours because the viewing period starts as soon as you play it.)
Unlike other content you get from the iTunes Store, rented movies can be on only one device at a time. So when you move a rented movie from the iTunes Library onto iPhone, it disappears from the iTunes Library (you can move it back if you choose).
>>>step-by-step
Subscribing to Podcasts in the iTunes Store
Podcasts are radio-like audio or video episodes that you can subscribe and listen to or watch. Even better, most podcasts are free.
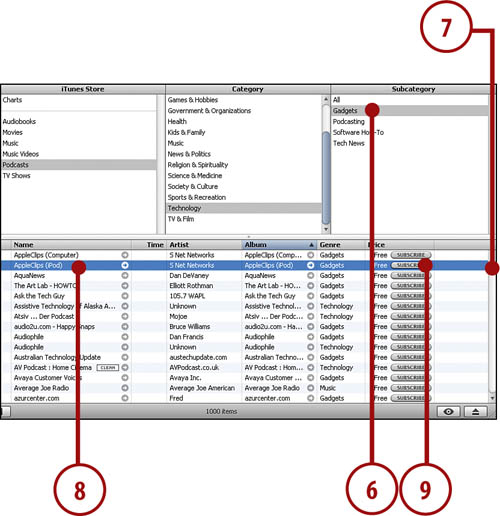
1. Click iTunes Store. The iTunes Store fills the Content pane.
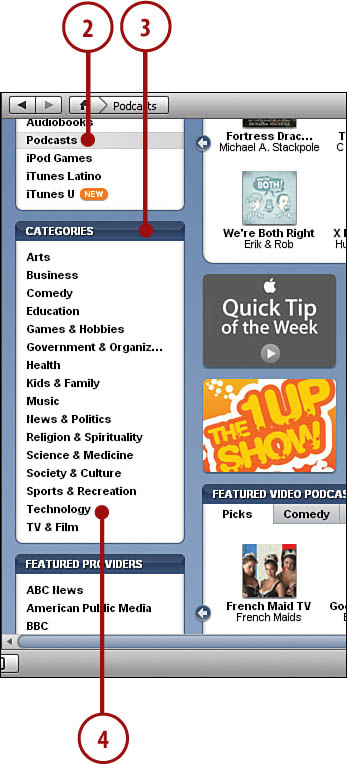
2. Click Podcasts. The Podcasts Home page appears.
3. Scroll down until you see the entire Categories section.
4. Click a category you are interested in, such as Technology.
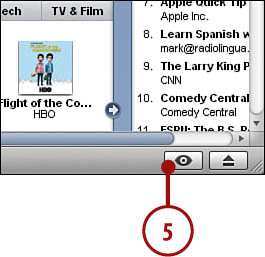
5. Click the Browser button. The browser opens.
6. Click a subcategory in which you are interested.
7. Use the scrollbar in the Content pane to browse all the podcasts available.
8. When you find a podcast you are interested in, select it and click the Play button or just double-click it.
9. When you find a podcast that you would like to try, click its Subscribe button.
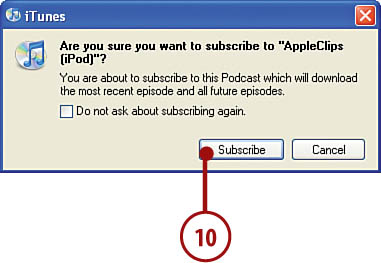
10. Click Subscribe. Under the iTunes Store source, you see the Downloads icon that displays the progress of file downloads, including the number of episodes being downloaded.
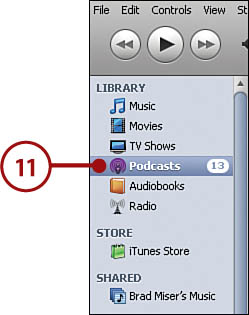
11. Click the Podcasts source in the Source list. You see all the podcasts to which you’ve subscribed. The number next to the Podcasts source indicates the number of episodes of the podcasts to which you have subscribed but not listened.
Building Audio and Video Playlists
One of the best ways to collect content that you want to place on iPhone is to create a playlist and manually place content onto it.
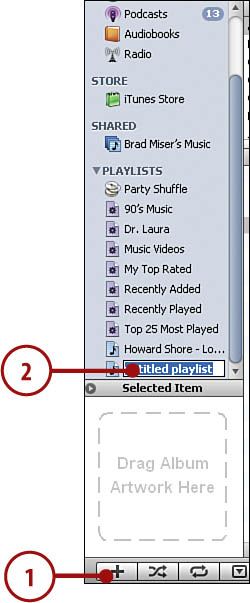
1. Click the New Playlist button. A new playlist is created with its default name selected for you to change.
2. Rename the new playlist and press Enter (Windows) or Return (Mac).
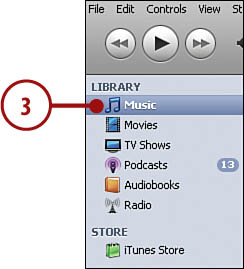
3. Select Music on the iTunes Source list.
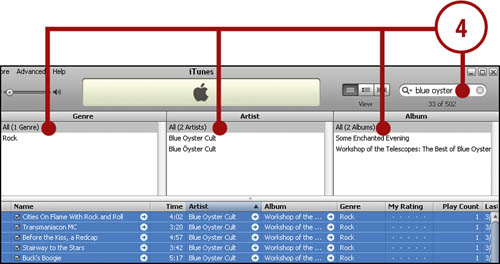
4. Browse or search for songs you want to add to the playlist.
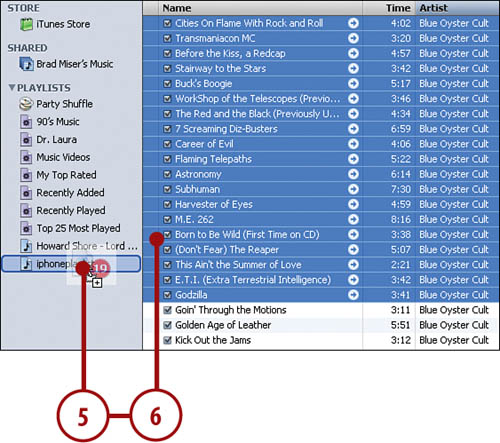
5. Drag songs from the Content pane onto the playlist you created.
6. Repeat steps 3–5 until you place in the playlist all the songs that you want it to contain. You can place any combination of songs in a single playlist.
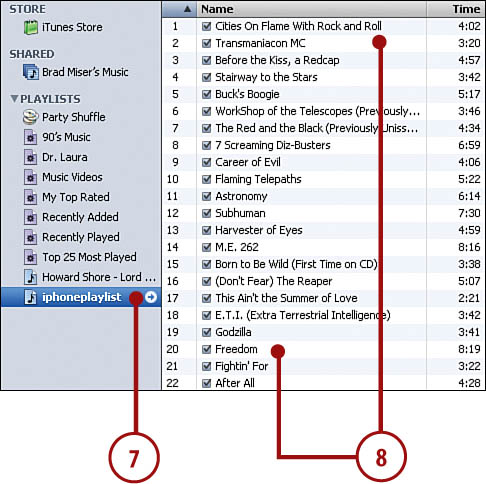
7. Select the playlist. Its contents appear in the Content pane.
8. Drag songs up and down the playlist until they are in the order in which you want them to play.
Building Audio and Video Smart Playlists
A smart playlist does the same basic thing as a playlist, which is to collect content that you want to listen to or watch and to move onto iPhone. Instead of placing content in a playlist manually, a smart playlist adds content automatically based on criteria you define.
1. Select File, New Smart Playlist. The Smart Playlist dialog box appears.
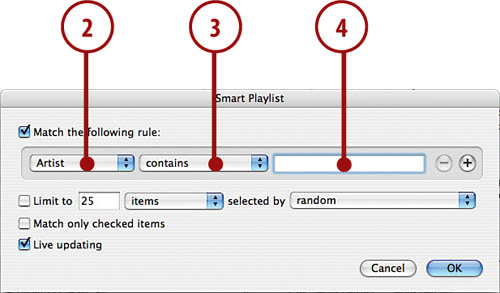
2. Select the first tag on which you want the smart playlist to be based in the Tag menu. For example, you can select the Artist, Genre, My Rating, or Year tag, among many others.
3. Select the operand you want to use on the Operand menu. For example, if you want to match data exactly, select Is. If you want the condition to be looser, select contains.
4. Type the condition you want to match in the Condition box. The more you type, the more specific the condition is.
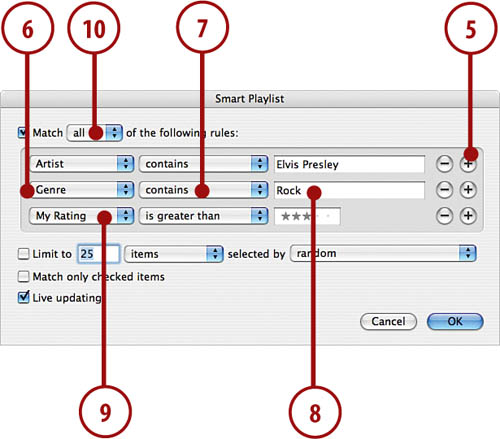
5. To add another condition to the smart playlist, click the Add Condition button. A new, empty condition appears. At the top of the dialog box, the All or Any menu appears.
6. Select the second tag on which you want the smart playlist to be based in the second condition’s Tag menu .
7. Select the operand you want to use in the Operand menu.
8. Type the condition you want to match in the Condition box.
9. Repeat steps 5–8 to add more conditions to the playlist until you have all the conditions you want to include.
10. Select from the list next to Match at the top of the dialog if all the conditions must be met for a track to be included in the smart playlist or select if only one of them must be met.
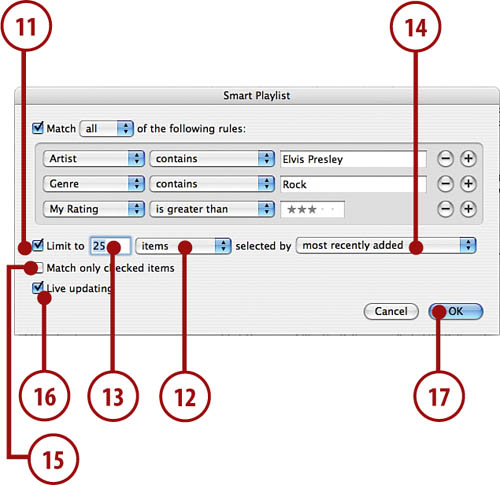
11. If you want to limit the playlist, check the Limit to check box.
12. Select the parameter by which you want to limit the playlist in the first menu; this menu defaults to items. Your choices include the number of items, the time the playlist will play (in minutes or hours), or the size of the files the playlist contains (in MB or GB).
13. Type the data appropriate for the limit you selected in the Limit to box. For example, if you selected minutes in the menu, type the maximum length of the playlist in minutes in the box.
14. Select how you want iTunes to choose the songs it includes based on the limit you selected by using the selected by menu. For example, to have iTunes include tracks you’ve added to the Library most recently, select most recently added.
15. If you want the playlist to include only songs whose check box in the Content pane is checked, check the Match only checked items check box.
16. If you want the playlist to be dynamic, meaning that iTunes updates its contents over time, check the Live updating check box. If you uncheck this check box, the playlist includes only those songs that meet the playlist’s conditions when you create it.
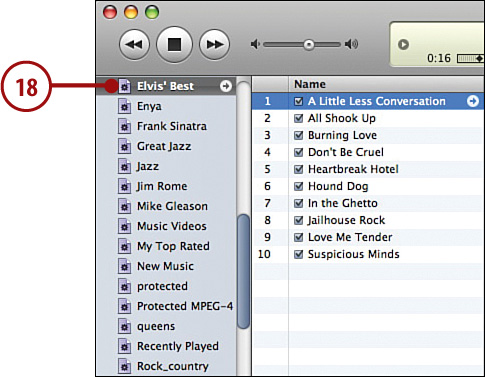
17. Click OK. You move to the Source list; the smart playlist is added and selected, and its name is ready for you to edit. Also the songs in your Library that match the criteria in the playlist are added to it, and the current contents of the playlist are shown.
18. Type the playlist’s name and press Enter (Windows) or Return (Mac).
iTunes Is Helpful
As you make selections on the Attribute menu and type conditions in the Condition box, iTunes attempts to automatically match what you type to tags in your Library. For example, if your Library includes Elvis music and you use Artist as an attribute, iTunes will enter Elvis Presley in the Condition box for you when you start typing Elvis.
Check Please!
Each item in iTunes has a check box. You use this to tell iTunes if you want it to include the item (such as a song or podcast) in whatever you happen to be doing. If you uncheck this box, iTunes ignores the item.
>>>step-by-step
Moving Content from the iTunes Library onto iPhone
To move iTunes content onto iPhone, you need to choose the content you want to move there and then synchronize iPhone. You can set up iPhone so that content is moved automatically or manually.
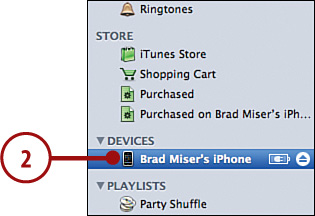
1. Connect the iPhone to your computer using its USB cable. iPhone is mounted on your computer and appears in the iTunes Source list.
2. Click the iPhone icon. The iPhone configuration screen appears.
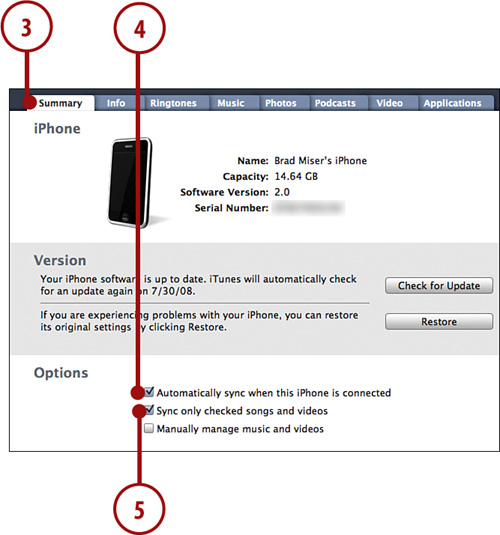
3. Click the Summary tab.
4. Check Automatically sync when this iPhone is connected.
5. To prevent items you’ve unchecked in iTunes so that they don’t play from being moved to iPhone, check Only sync checked songs and videos.
Do It Yourself?
If you check the Manually manage music and videos check box, you can plan content on the iPhone by dragging it from the iTunes Content pane onto the iPhone icon on the Source list.
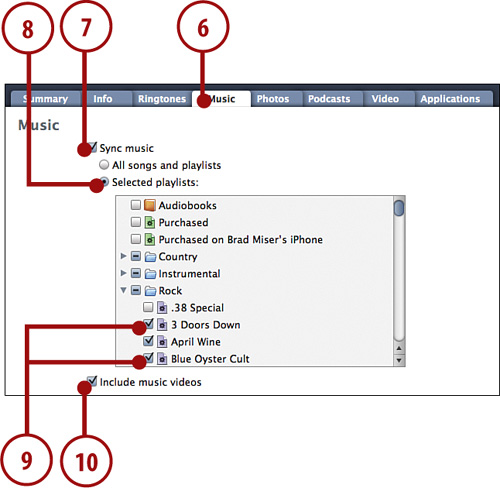
7. Check the Sync music check box.
8. Select Selected playlists.
9. Check the check box next to each playlist that you want to move to iPhone.
10. Check Include music videos if you want music videos in your collection to be on iPhone.
11. Click the Podcasts tab.
12. Check the Sync check box.
13. Choose how many episodes you want to move onto iPhone. For example, to move only episodes to which you haven’t listened, select all unplayed.
14. Select Selected podcasts.
15. Check the check box next to each podcast that you want to move to iPhone.

iTunes Library Not So Large?
If you have a relatively small amount of content in iTunes, select the All Songs and Playlists option so that iTunes attempts to move all your music onto iPhone. As I mentioned earlier, iPhone has limited storage, so unless you have a library that takes less space than is available on your iPhone, you have to choose the content you want to place on iPhone.
16. Click the Video tab. In the Rented Movies section, you see the movies you are currently renting.
17. Click a movie’s right-facing Move button to move it from the iTunes Library onto iPhone. The movie’s icon moves to the right pane of the window, which indicates it will be moved onto the iPhone during the next sync.
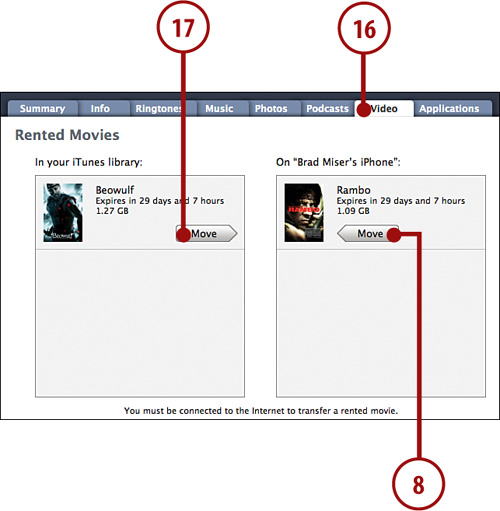
18. In the On iPhone section, click a movie’s left-facing Move button to move it from iPhone back to the iTunes Library.
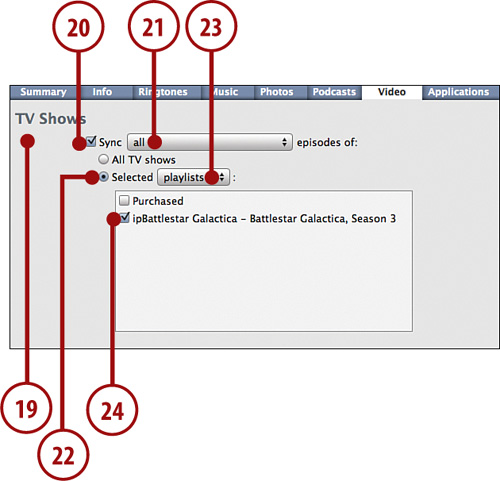
19. Scroll down until you see the TV Shows section.
20. Check the Sync check box to move TV shows onto iPhone.
21. Choose the number of episodes that should be moved on the pop-up menu. One useful option here is all unwatched, which moves all episodes that you haven’t yet watched onto iPhone.
22. Choose the Selected radio button.
23. On the pop-up menu, choose playlists to choose content by playlist or TV shows to choose content by TV series.
24. Check the check box next to each playlist or TV show you want to move to iPhone.
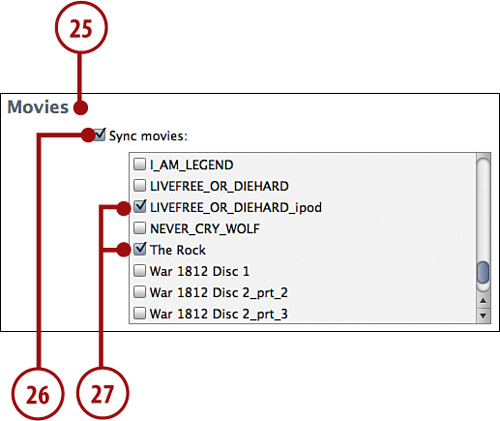
25. Scroll down until you see the Movies section.
26. Check the Sync movies check box.
27. Check the check box next to each movie you want to move to iPhone.
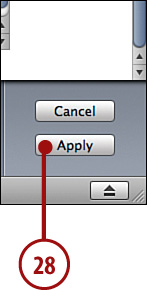
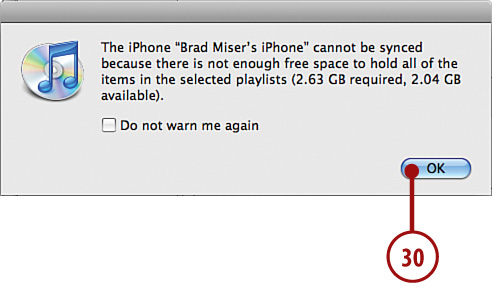
28. Click Apply. iTunes moves the selected content from the Library to iPhone. If there’s enough space on iPhone, then the process continues until all the content has been moved (and you can skip the rest of these steps). If you’ve selected more content than there is room for on iPhone, you see a warning dialog explaining how much content you selected versus how much is available. It also gives you options to remove selected content, such as podcasts.
29. If you want iTunes to remove content, click Yes; if not, click No. If you elected to let iTunes remove content, the content is removed, and the sync is attempted again. If there still isn’t enough space available or you clicked No, you see another dialog box that explains there isn’t enough room on iPhone.
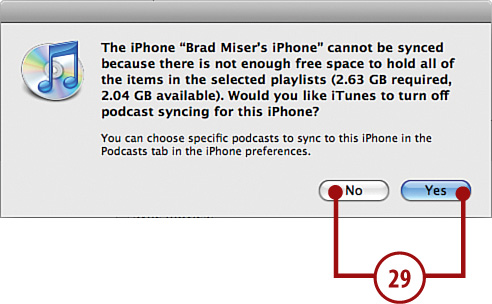
30. Click OK. The dialog closes.
31. Use the information in steps 6–28 to decrease the amount of content you selected and then perform the sync again. When the sync is complete, you see the “iPhone sync is complete” message in the iTunes Information window. At the bottom of the window, you see how iPhone’s memory is being used. Also the Apply button becomes the Sync button; it becomes Apply again whenever you make changes to the content you’ve selected to sync.
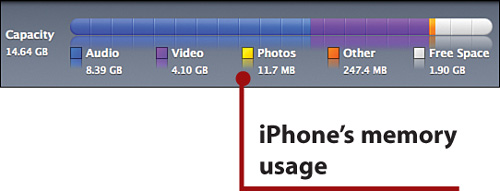
Check First, then Unplug
Wait until the “iPhone sync is complete” message appears in the iTunes Information window located at the top of the iTunes window before removing iPhone from the computer. If you remove it during the sync process, some of the content might not be moved onto iPhone correctly.
Using the iTunes Store Application to Add Audio and Video to iPhone
You can use the iTunes Store application to download audio content from the iTunes Store directly onto iPhone, where you can play it just like content you’ve moved onto iPhone using iTunes. The next time you sync iPhone, the content you purchase is moved into your iTunes Library so you can enjoy it there, too.
You Need an Internet Connection
To be able to use the iTunes Store application on the iPhone, you need to have an Internet connection via a Wi-Fi network. For help connecting iPhone to Wi-Fi networks, see Chapter 4, “Connecting to the Internet, Bluetooth Devices, and VPNs.”
>>>step-by-step
Downloading Audio Content from iPhone’s iTunes Store Application
To add audio content from the iTunes Store directly onto the iPhone, you use the iTunes application.
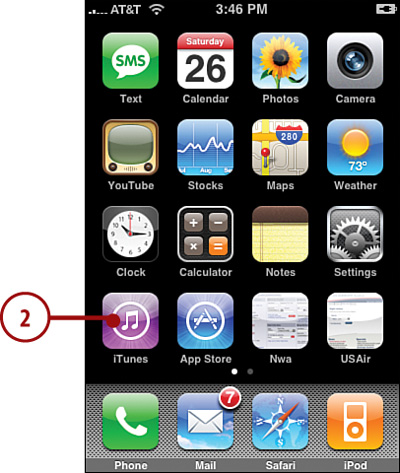
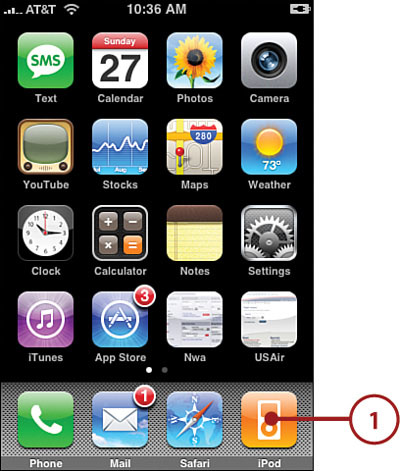
1. Move to the iPhone’s Home screen.
2. Press the iTunes button. You move to the iTunes Store application. At the bottom of the screen, you choose how you want to look for content by pressing one of the following buttons: Featured shows featured content in the store, Top Tens takes you to various top ten lists, and Search enables you to search for content. The Featured area breaks down content into New Releases, What’s Hot, and Genres tabs. The Top Tens categories show you various top ten lists; you press a list to see its content. The rest of these steps explain how to use the Search tool because using Featured or Top Tens is straightforward; you simply press on content in which you are interested.
3. Press Search. The Search tool appears.

4. Press the Search box. The keyboard appears.
5. Type search criteria, such as an artist’s name or song title. As you type, content that matches your search appears under the Search box.
6. When you see something of interest on the results list, press it. For example, press an artist’s name. You see a list of content related to your search.

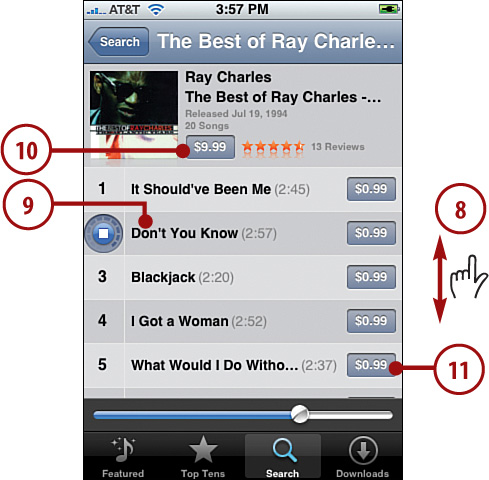
7. To explore the contents of an album, press it. At the top of the screen, you see the album’s general information, such as when it was released and how many songs it contains. In the lower part of the window, you see the tracks on that album.

8. Drag your finger up or down the screen to see the entire list of tracks.
9. To preview a track, press it. A 30-second preview plays. While it’s playing, the track’s number is replaced by the Stop button, which you can press to stop the preview.
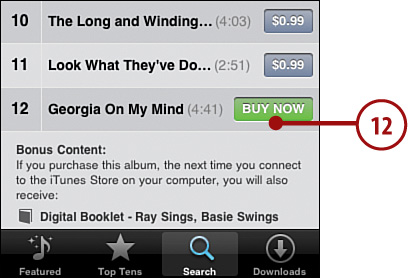
10. To buy an album, press its Buy button, which shows the price of the album. The button becomes the Buy Now button.
11. To buy a song, press its Buy button, which shows the price of the song. The button becomes the Buy Now button.
12. Press the Buy Now button. You see the iTunes Password prompt.
Move from Song to Album
Press a song twice to move to the album that the song comes from.
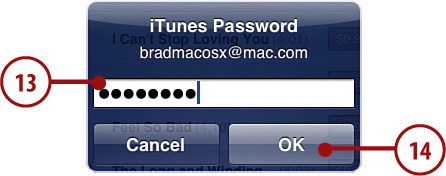
13. Enter the password for your iTunes Store account.
14. Press OK. You move back to the screen showing the content you are purchasing; an indicator appears over the Downloads button to show you how many tracks are being downloaded to iPhone.
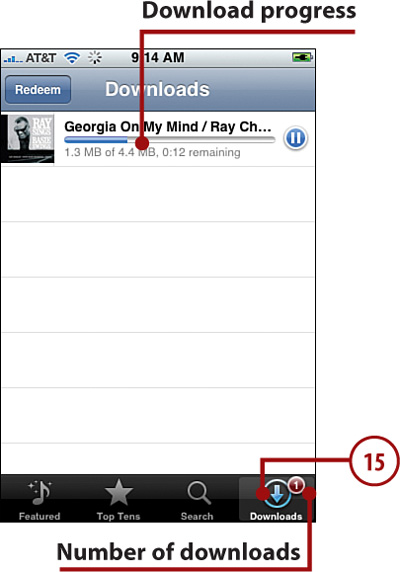
15. Press Downloads. You move to the Downloads screen where you see the details about the tracks you are purchasing, including the amount of time the downloads will take to finish. When the process is complete, the Downloads screen becomes empty. This indicates that the content you purchased has been added to iPhone and is ready for your listening pleasure.
The Next Time You Sync
The next time you sync after purchasing content from the iTunes Store on iPhone, that content is moved into your iTunes Library. It is stored in a playlist called Purchased on iPhonename where iPhonename is the name of your iPhone.
Listening to Music
After you move audio content to iPhone, you can enjoy it while on the move. There are two fundamental steps to listening to audio content. First, find the content you want to listen to; from the Cover Flow Browser to artists and genres, iPhone offers many ways to find what you want to hear. Second, after you select what you want to hear, use iPhone’s playback controls to listen to your heart’s content.
>>>step-by-step
Using the Cover Flow Browser to Find and Play Music
The Cover Flow Browser simulates what it’s like to flip through a stack of CDs; you can quickly peruse your entire music collection to get to the right music for your current mood.
1. On the Home screen, press the iPod button.
2. Press one of the music buttons, such as Playlists, Artists, or Songs.
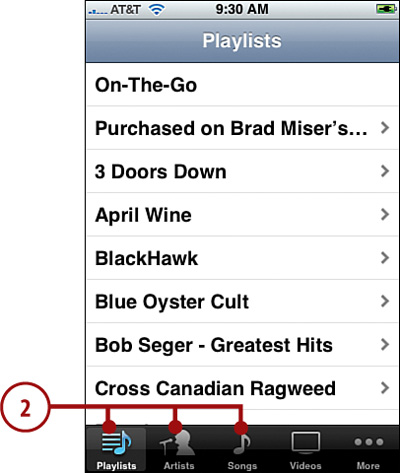
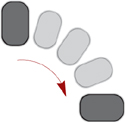
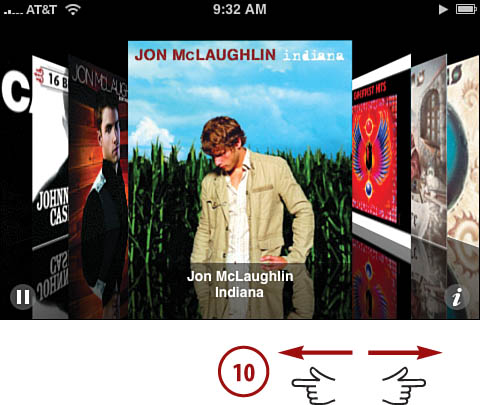
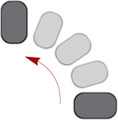
3. Rotate iPhone in the clockwise or counter-clockwise direction. The Cover Flow Browser appears. Each cover represents an album from which you have at least one song stored on iPhone.
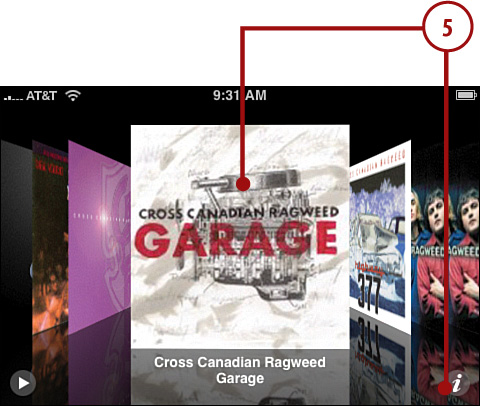
4. To browse your tunes, drag a finger to the right to move ahead in the albums or to the left to move back; the faster you drag, the faster the albums scroll. Below each cover, you see the name and artist for the album in focus, which is the one that is “face on” to the screen.
![]()
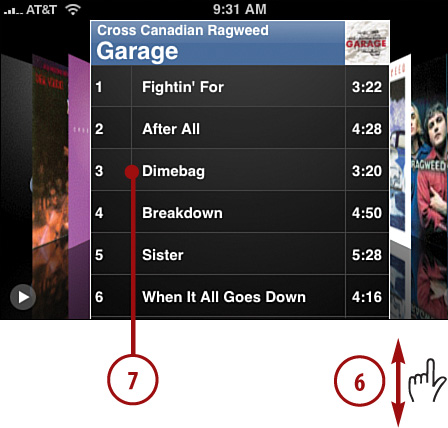
5. To see the contents of an album, press its cover or press the Info button when it is in focus. The Contents screen appears showing you a list of all the songs on that album. At the top of the screen, you see the album information. Below that, each song is listed along with its playing time.
6. To scroll up or down the list of songs, drag your finger up or down the screen.
7. To play a song, press it. The song begins to play. It is marked with a blue arrow, and the Play indicator appears next to the battery icon.
8. To pause a song, press the Pause button. The music pauses, and the Play button replaces the Pause button.
9. To return to the album’s cover, press its title information or press the Info button.

10. While you’re listening, you can continue browsing to find more music you want to listen to.
Turn It Down! (Or Up!)
No matter which technique you use to find and play music, you can control the volume using the Volume keys on the left side of iPhone. Press the upper part of the rocker switch to increase volume or the lower part to decrease it. While you are pressing the switch, a volume indicator appears on the screen to show you how you are changing the volume.
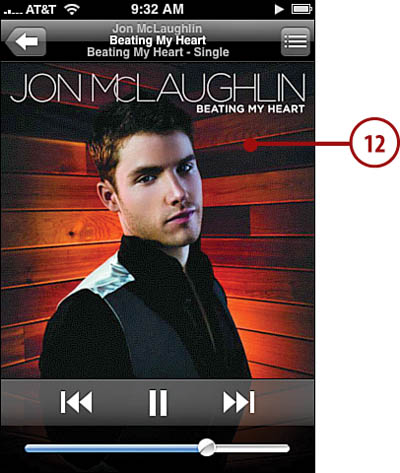
11. Rotate iPhone in the counterclockwise direction to see the Now Playing screen.
12. Use the Now Playing screen to control the music (covered in detail in the “Playing Music” task later in this section).
Using Playlists to Find Music
Accessing the iTunes playlists that you moved to iPhone is simple.
1. On the Home screen, press the iPod button.
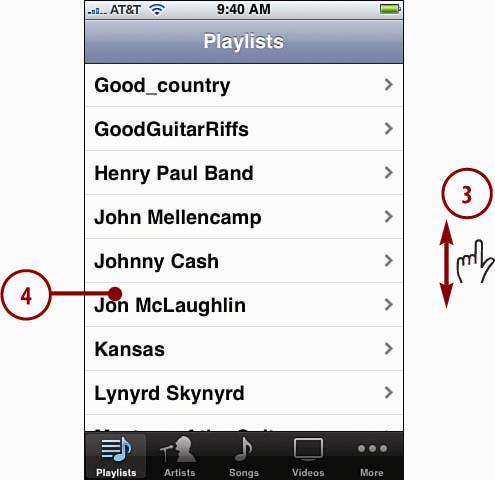
2. Press the Playlists button. The list of all playlists on iPhone appears.
Shuffle Off to Musical Bliss
To hear the songs in a playlist in random order, press Shuffle. It always appears at the top of a playlist’s screen.
3. Slide your finger up and down the list to see all the playlists on iPhone.
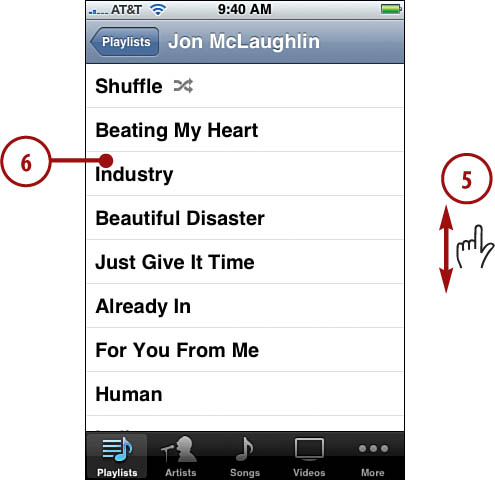
4. Press the playlist that you’d like to explore. The list of songs in that playlist appears on a screen with the title of the playlist at the top.
5. Slide your finger up and down the list to see all the songs it contains.
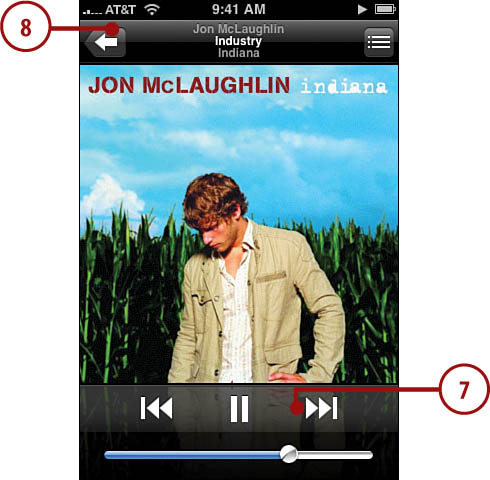
6. When you find the song you want to listen to, press it. The song begins to play, and the Now Playing screen appears.
7. Use the Now Playing screen to control the music (covered in detail in the Playing Music section later in this chapter).
8. Press the Return button to move back to the playlist’s screen.
Play That Funky Music
The song currently playing is marked with the Speaker icon on the playlist’s screen.
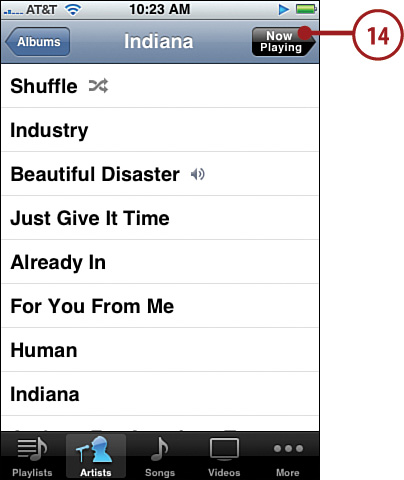
Using Artists to Find Music
You can always find music on iPhone by artist.
1. On the Home screen, press the iPod button.
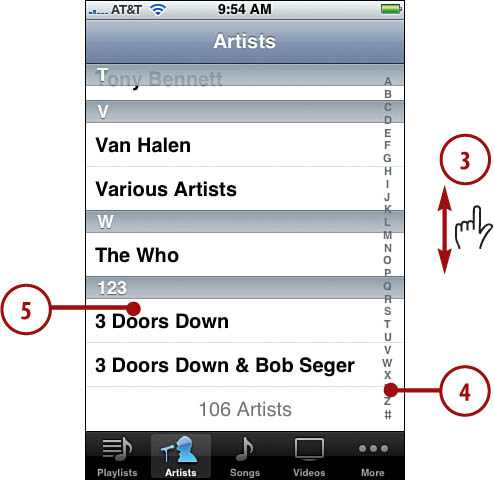
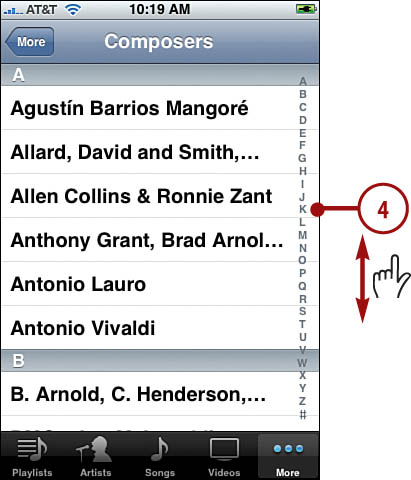
2. Press Artists. The list of all artists whose content is on iPhone appears. Artists are grouped by the first letter of their first name or by group name.
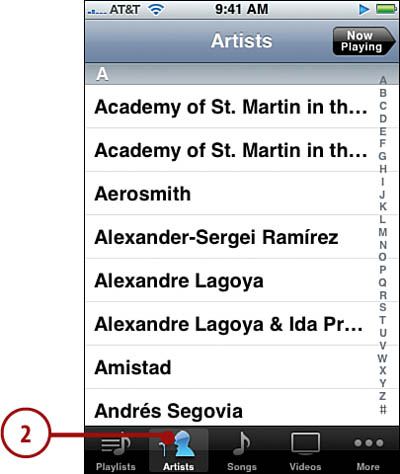
3. Slide your finger up and down the list to browse all available artists.
4. To jump to a specific artist, click the letter along the right side of the screen for the artist’s or group’s first name.
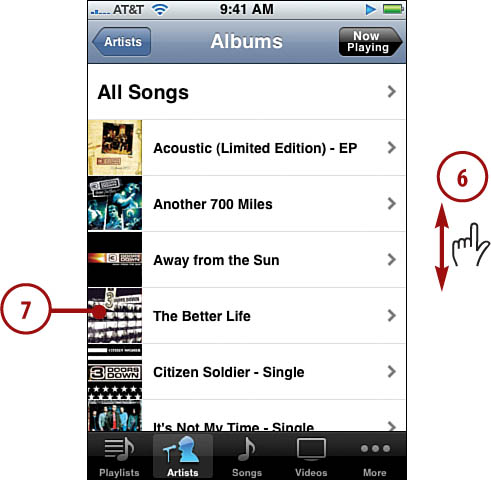
5. Press an artist whose music you’d like to explore. The list of songs by that artist organized by album appears on the Albums screen.
Shuffle Music
To hear the songs on an album in random order, press Shuffle. It always appears at the top of the album’s screen.
6. Slide your finger up and down the screen to see all the albums for that artist.
7. To see the contents of an album, click it. The list of contents screen appears with the album’s title at the top.
8. Drag your finger up and down the screen to see all the songs on the selected album.
9. To move back to the Albums screen, press Albums.
10. To move back to the Artists screen, press Artists.
11. Continue browsing artists, albums, and songs until you find songs you want to hear.
12. When you find the song you want to listen to, press it. The song begins to play, and the Now Playing screen appears.

13. Use the Now Playing screen to control the music (covered in detail in the Playing Music task later in this section).
14. Press the Return button to move back to the Artists screen.

What’s the Speaker Mean?
The song currently playing is marked with the album screen.
Using Genres to Find Music
Like the other categories, using Genres to find music is simple.
1. On the Home screen, press the iPod button.
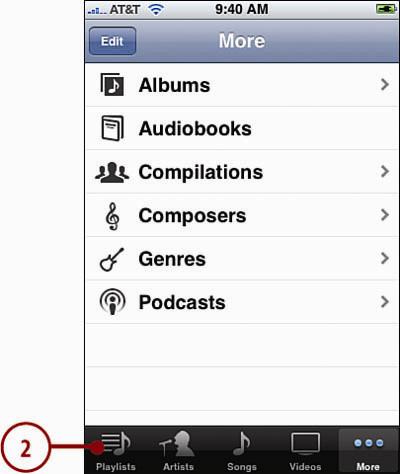
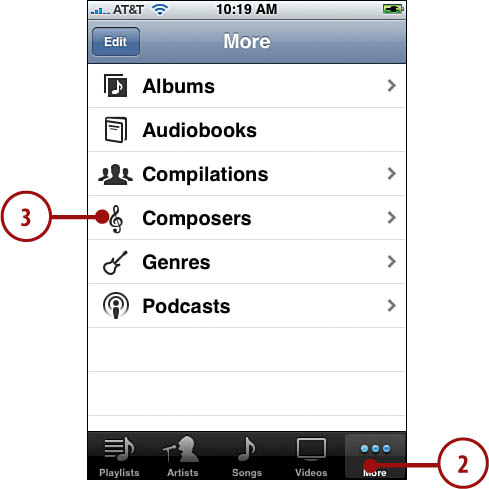
2. Press More. The More screen appears, showing you all the categories of content on iPhone.
3. Press Genres. The Genres screen appears, showing you all the genres of music on iPhone.

4. Slide your finger up and down the list to see all the genres.
5. Press the genre in which you are interested. That genre’s screen appears, and you see all the artists whose music is in that genre. At the top of the screen is the All Albums option, which shows you all the albums in that genre on iPhone.

6. Scroll the screen to see all of the artists in the genre.
7. When you find an artist whose music you want to view, press it. That artist’s screen appears, and you see all the songs by that artist on iPhone, organized by album.

8. Press an album to see the songs it contains.
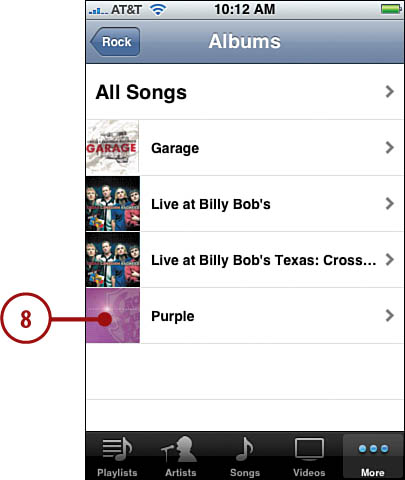
9. Scroll the screen to see all song titles in the album.
10. When you find the song you want to listen to, press it. The song begins to play, and the Now Playing screen appears.

11. Use the Now Playing screen to control the music (covered in detail in the “Playing Music” task later in this section).

Using the More Menu to Find Music
The More menu shows you all the content categories on iPhone. You can use this menu to access content when it can’t be found by one of the category buttons at the bottom of the screen. If you read the previous section, you already know how the More menu works.
1. On the Home screen, press the iPod button.
2. Press More. The More screen appears, showing you all the content categories on iPhone.
3. Press the category in which you are interested. That category’s screen appears.
4. Browse the category and drill down into its detail to get to songs you want to hear. Browsing categories is simil to browsing playlists, artists, and genres. In fact, these are just three examples of categories available on the More menu.
Playing Music
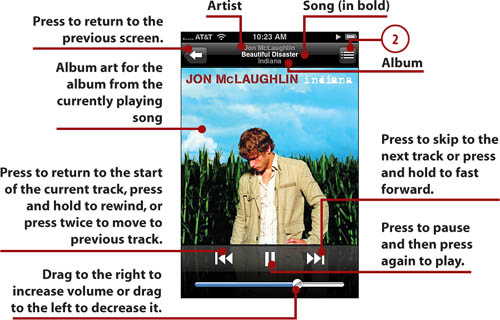
As you have seen, the Now Playing screen appears whenever you play music. This screen provides several controls for the music, and you can use them to navigate back to wherever you came from.
1. Find and play a song or album. The Now Playing screen appears, and you can use its controls.
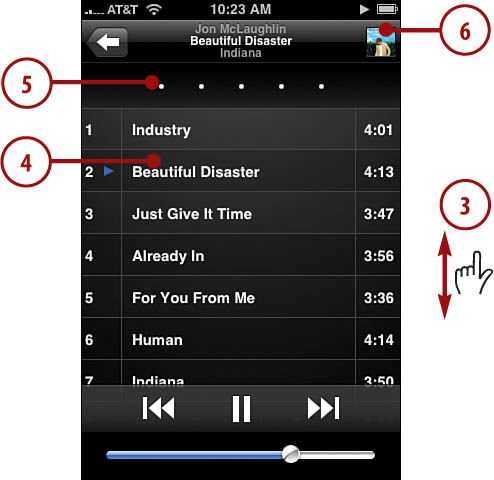
2. Press the Track List view button or double-tap the album cover. The Album Cover view is replaced by the Track List view. Here you see the list of all tracks from which the current song comes, even if you aren’t listening to the album itself (such as when you are listening to a playlist). You see the order of tracks on the album along with their names and playing times.
3. Drag your finger up and down to scroll through the tracks in the album.
4. Press a song to play it.
5. Rate the song playing by pressing one of the dots. Stars fill up to the dot you pressed to give the song a star rating between one and five stars.
6. Press the Album Cover button. You return to the Album Cover view.
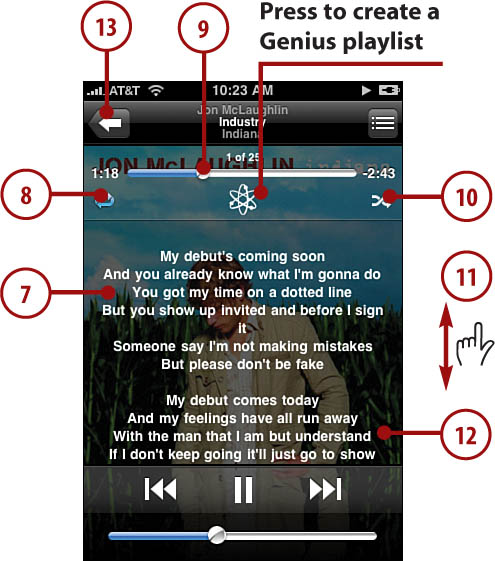
7. Press the album cover once. The Timeline bar appears. If the song has lyrics associated with it in iTunes, the lyrics are shown on top of the album cover.
8. To repeat the current album until you stop playing it, press the Pause button, press the Repeat button once. To repeat the album one time, press the Repeat button again. When the album is set to repeat indefinitely, the button is blue. When it is set to repeat once, a small 1 appears on the button.
9. To move ahead or back in the song, drag the Playhead to the right or left.
10. To play the songs on the album randomly, press the Shuffle button.
11. Scroll up and down the screen to read all the lyrics.
12. Press the album cover again or just wait for a few seconds. The Timeline bar disappears.
13. Press the Return button. You move back to the screen from which you selected music to play.
14. Press the Now Playing button. You return to the Now Playing screen.
Audiobooks
Another excellent iPod function is the capability to listen to audiobooks. You can get these from the iTunes Store, Audible.com, and many other locations. After you add audiobooks to your iTunes Library, you determine whether they are moved to iPhone by using the music-syncing tools. The tools and techniques for listening to audiobooks are similar to listening to music.
Viewing Albums
As soon as you play a song from the Track List view screen, you jump to Album mode. From that point on, you are working with the album from which the current song came only. For example, if you play a playlist, switch to Track List view and play a different song on the same album. You change the content to only that album, so the next song that plays is the next one on the album, not the next one in the playlist. When you press the Return button, you move to the album’s screen instead of the playlist’s screen. If you view only the song’s information or give it a rating in Track List view, when you move back to the Cover view, you are still working with the original source, such as a playlist.
Controlling Audio Content with the iPod Control Bar
Because you can do so much more on iPhone than just listen to music, you’ll often be doing something else, such as browsing the Web while music is playing. It would be a nuisance to have to move back into the iPod functions to perform basic actions, such as pausing music. Fortunately, with the iPod control bar, you don’t have to.
>>>step-by-step
Configure the iPod Control Bar
First, configure how you want to activate the control bar.
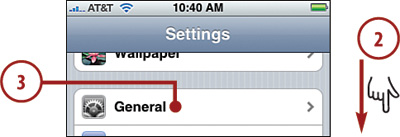
1. On the Home screen, press Settings. You see the Settings screen.
2. Scroll down until you see the General option.
3. Press General.
4. Scroll down until you see the Home Button option.
5. Press Home Button.

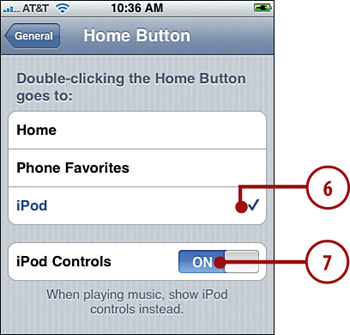
6. If you want to move to the iPod functions when you press the Home button twice, press iPod. If you want to move to Phone Favorites or Home instead, press those options.
7. To make the iPod control bar active when music is playing, ensure ON shows next to iPod Controls; if not, press to the left of the OFF button, which turns the function on.
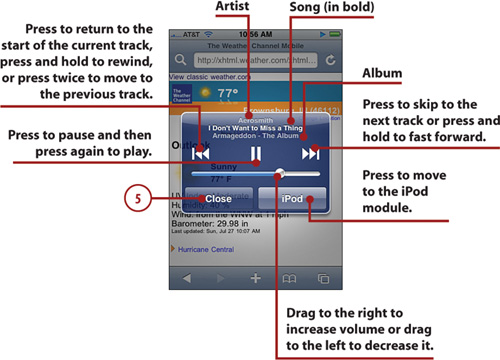
Use the iPod Control Bar
Use the control bar to do the following tasks.
1. Play music.
2. Move away from the iPod screens, such as by moving back to the Home screen and then opening the Web browser.
3. Press the Home button twice. The screen you were using fades into the background, and the iPod control bar appears.
4. Use the controls on the bar to control music.
5. When you’re done, press Close. The control bar closes, and you move back to whatever you were doing.
Finding and Listening to Podcasts
iPhone is a great way to listen to your podcasts. Like all other iPod functions, you first find the podcast you want to listen to and then use iPhone’s audio playback controls to hear it.
>>>step-by-step
1. On the Home screen, press the iPod button.
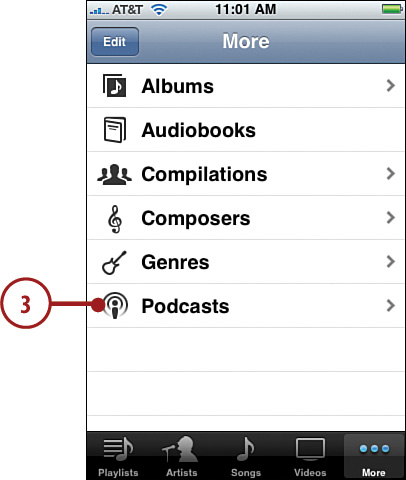
2. Press the More button. The More screen appears, showing you all the content categories on iPhone.
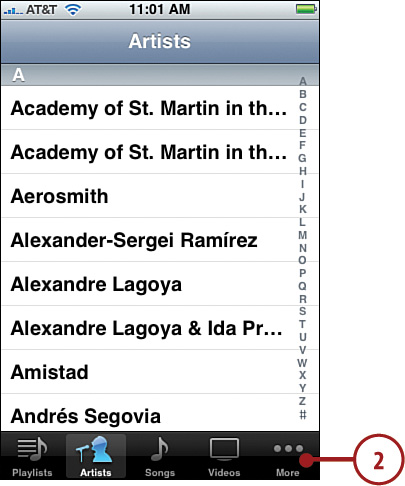
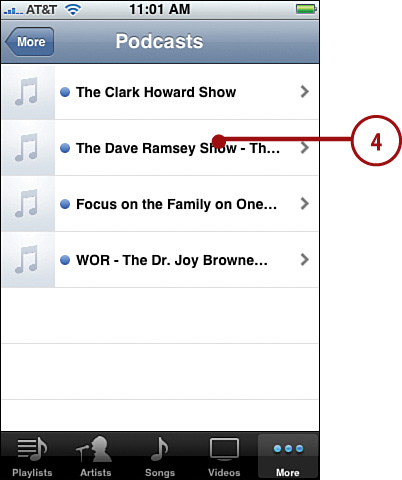
3. Press Podcasts. The Podcasts screen appears, showing you the podcasts to which you are subscribed and that have been moved onto iPhone.
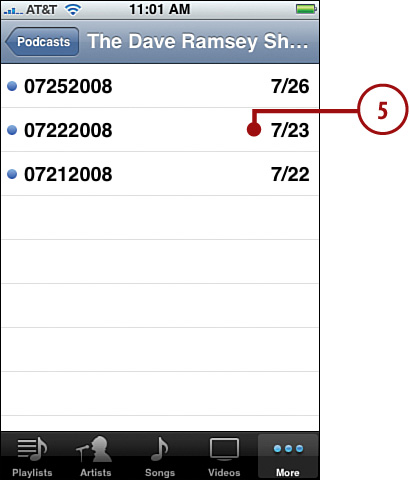
4. Press the podcast to which you want to listen. The list of episodes for that podcast is shown; the name of the list screen is the name of the podcast. Podcasts to which you haven’t listened are marked with a blue dot.
5. Press the episode you want to hear. The podcast begins to play, and the Now Playing screen appears.
6. To control the podcast, use the controls on the Now Playing screen, which work just as they do when you are playing music. (See the previous section for details.)

Finding and Watching Video
iPhone is a great way to enjoy video content as well, such as movies or TV shows, while you’re on the move. Like music and other content, the first step is to find the video you want to watch. Then you use iPhone’s video tools to watch that video.
>>>step-by-step
Finding Video
Finding video content on iPhone is similar to finding the other kinds of content we’ve already discussed.
1. On the Home screen, press the iPod button.
Going Back Again
When content is playing and you press the iPod button, you move to the Now Playing screen. To get back to the iPod screen, press the Return button until the iPod buttons appear at the bottom of the screen.
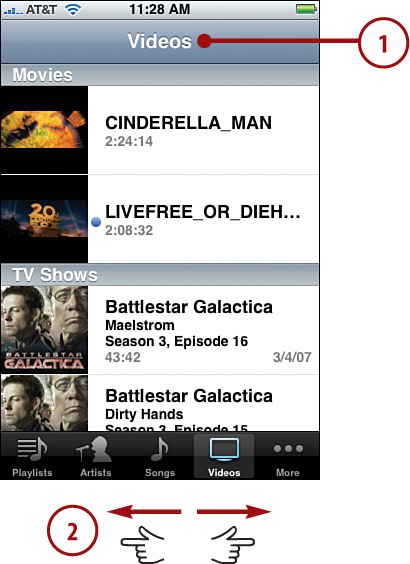
2. Press Videos. The Videos screen appears, showing you the video content on iPhone.
3. Scroll the screen to see all the video content, which is organized by type, such as Movies, TV Shows, and Music Videos. Content you haven’t watched yet is marked with a blue dot.
4. To watch a movie, an episode of a TV series, or a music video, press it and rotate the iPhone clockwise or counter-clockwise. The screen rotates, and the content begins to play.

5. Watch and control the video; see the next section for details of controlling video.

Series, Series
In some cases, episodes of a TV show might be listed by seasons of a series instead of listing each episode. In that case, select the season containing the episode you want to watch. You see the episodes that season contains. Press the episode you want to watch.
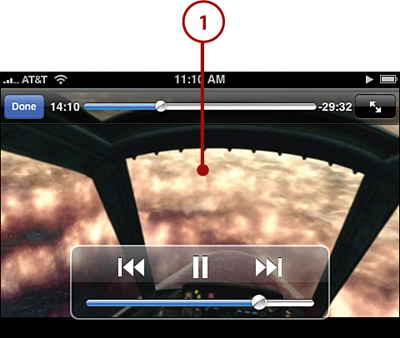
Watching Video
When you play video, it is always oriented in landscape mode so that it can fill the screen.
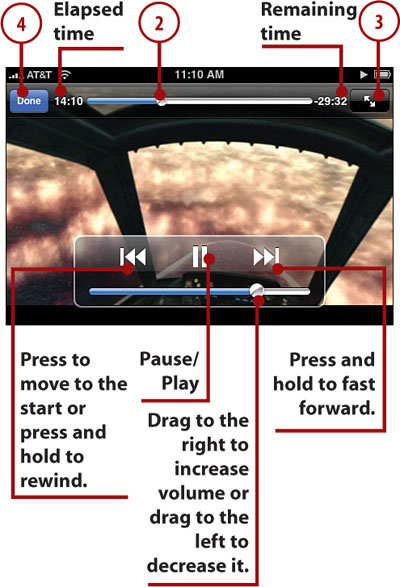
1. Press the video you are watching. The video controls appear.
Scale This
If native scale of the video is not the same proportion as the iPhone screen and you play it in its original scale, the video might not fill the screen. When you scale the video, it fills the screen, but some content might be cut off.
2. Drag the playhead to the right to move ahead or to the left to move backward.
3. Press the Scale button to scale the video to fit the screen or to show it in its native scale. After a few seconds, the video controls disappear.
4. When you’re done watching, press Done. You move back to the Videos screen.
Remember Where You Were?
For most kinds of video, iPhone remembers where you left off. So if you stop a movie somewhere in the middle, when you restart it, iPhone will start you at that same point.
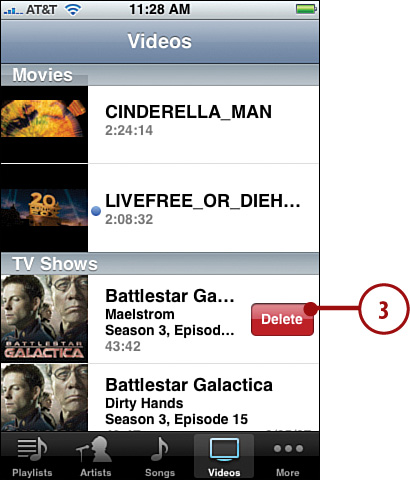
Deleting Video
Because it takes up a lot of space, video is the only content you can delete from iPhone.
1. Move to the Videos screen.
2. Drag left or right on the video you want to delete. The Delete button appears.
Gone but Not Forgotten
Deleting video from iPhone only removes it from the iPhone. The video content remains in your iTunes Library, even after the next sync. You can add video back to iPhone again by including it in a sync.
3. Press Delete. A warning prompt appears.
4. Press Delete again to delete the video or Cancel to keep it.

Music Video Without the Video
If you want to hear the audio from a video without watching it, choose it from any screen except the Videos screen. Only its audio content plays.
Customizing iPhone for iPod
You could use iPhone as an iPod just fine without performing any of the steps in this section. However, because this book is named My iPhone, you should explore these options to make iPhone your own.
>>>step-by-step
Building and Editing an On-The-Go Playlist
You can build a special playlist on iPhone. This is called the On-The-Go playlist because, well, you build it while you are on the go.
Creating and Listening to an On-The-Go Playlist
1. Move to the Playlists screen.
2. Press On-The-Go. The Songs screen appears.
While you’re in Playlist-building mode, you can add content from any iPod screen. For example, to add content by artist instead of by song, press the Artists button. The Artists screen appears. Press the artist whose music you want to add to the playlist and add the songs by that artist by pressing those songs or clicking the Add buttons. You can add content by genre, composer, and so on in the same way.
3. Drag your finger up and down the screen to browse all the songs on iPhone.
4. To add a song to the playlist, press the song or the Add button. After you add a song, it is grayed out to show it’s already part of the playlist. You can add the same song to the playlist only one time.
5. Repeat steps 3 and 4 until you’ve added all the songs that you want the playlist to contain.
6. Press Done. You move to the On-The-Go playlist screen and see the songs it contains.

7. Play the On-The-Go playlist just like playlists you’ve moved from the iTunes Library.

All at Once
You can add all the songs shown on any screen by pressing Add All Songs.
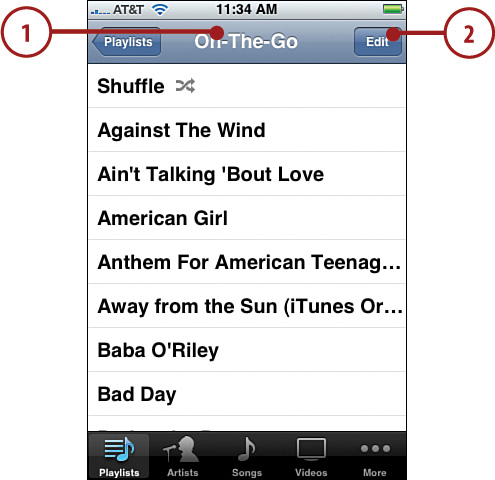
Changing an On-The-Go Playlist
1. Move to the Playlists screen as described in the previous task and press the On-The-Go playlist option. You see the On-The-Go playlist screen.
2. Press Edit. The screen changes to Edit mode.
Clear It
To remove all songs from a playlist, press Clear Playlist and then press Clear Playlist again. The playlist is returned to an empty state.
3. To add songs, press the Add button; this works just like when you added songs to the playlist originally. (See the previous section for details.)
4. To change the order in which songs play, press the List button and drag a song to its new position on the playlist.
5. To remove songs, press the Unlock button. The Delete button appears.
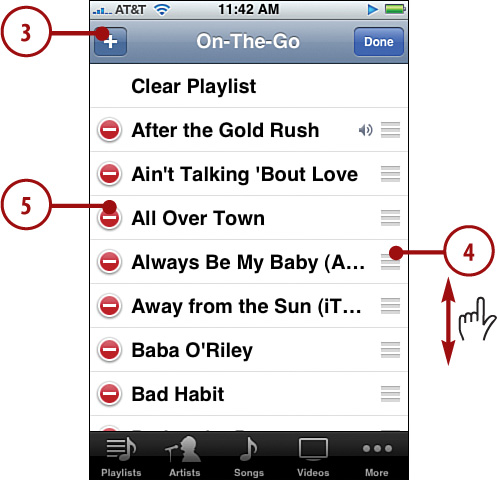
6. Press Delete. The song is removed from the playlist.
7. When you’re finished making changes, press Done. You move back to the On-The-Go playlist screen.

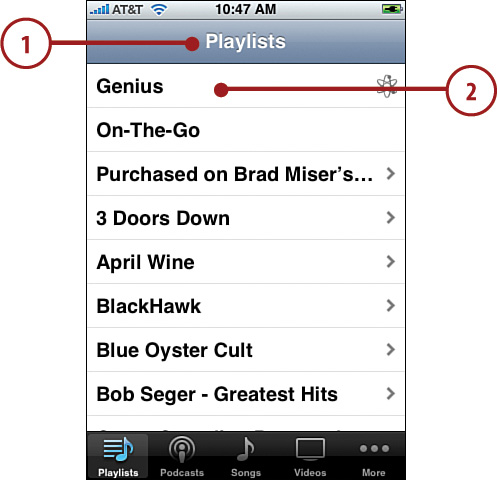
Using the iPhone Genius
The Genius features build a playlist based on music you already have. How the Genius selects songs that sound good with other songs is a bit of a secret, but it seems to work pretty well. You can have the Genius build a playlist for you in a couple of ways, and then work with the Genius playlist similar to how you can use the On-the-Go playlist.
>>>step-by-step
Creating a Genius Playlist Based on the Current Song
1. Play a song.
2. On the Now Playing screen, press the screen so the Timeline and controls appear.
3. Press the Genius button. iPhone creates the Genius playlist that’s includes 25 songs that sound good with the current song. The music stops playing and you move to the Genius screen where you see the songs that the Genius thinks will sound good with the song you were playing; that song is at the top of the list and is marked with the Genius icon.

4. Press any song on the playlist to start playing it.
5. Press the New button to start a new Genius playlist (see “Creating a Genius Playlist By Selecting a Song”).
6. To have the Genius change the playlist, press Refresh. Songs may be added and the order in which they are listed may be changed.
7. To save the playlist, press Save. The name of the playlist changes from Genius to be the name of the song on which the playlist was based. The New and Refresh buttons disappear, and the Save button becomes Edit to show you that the playlist has been saved. The playlist appears on the Playlists screen like other playlists you have created except it is marked with the Genius icon, and Genius playlists appear near the top of the Playlists screen. You can then play the playlist like the others on the Playlists screen or edit it (covered in the “Refreshing a Genius Playlist” section). It is moved into your iTunes Library the next time you sync iPhone, just as the On-the-Go playlist is (except its name isn’t changed).

Creating a Genius Playlist By Selecting a Song
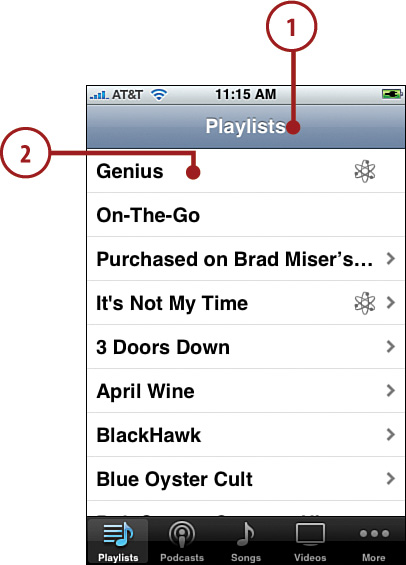
1. Move to the Playlists screen.
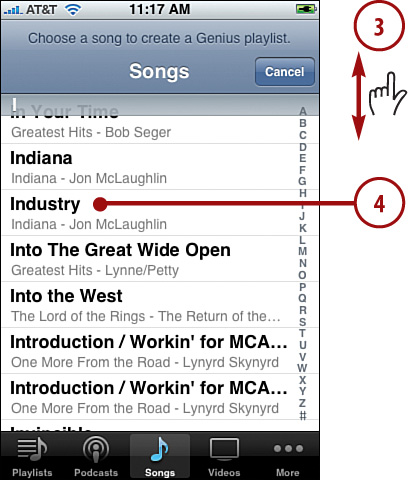
2. Press Genius. You see the Songs screen.
3. Browse for the song on which you want the playlist to be based.
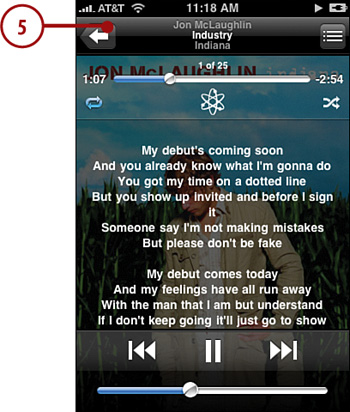
4. Press the song on which you want the playlist to be based. The Genius creates the playlist and it appears briefly on the Genius screen. It starts to play automatically and you move to the Now Playing screen.
5. Press the Return button. You move back to the Genius screen.
6. Use steps 5 through 7 in the previous task to work with the playlist.
Refreshing a Genius Playlist
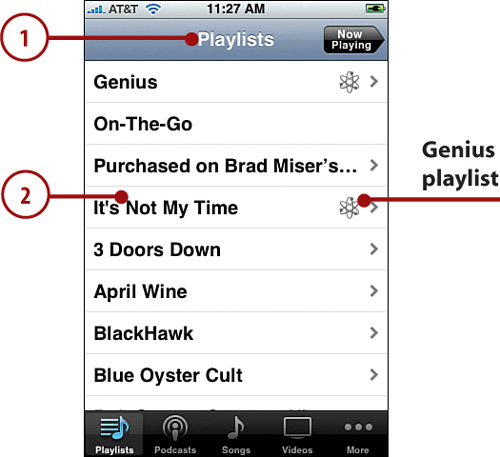
1. Move to the Playlists screen.
2. Press the Genius playlist you want to manage. Its screen appears.
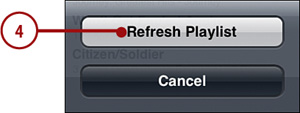
3. Press Edit. The Refresh prompt appears.
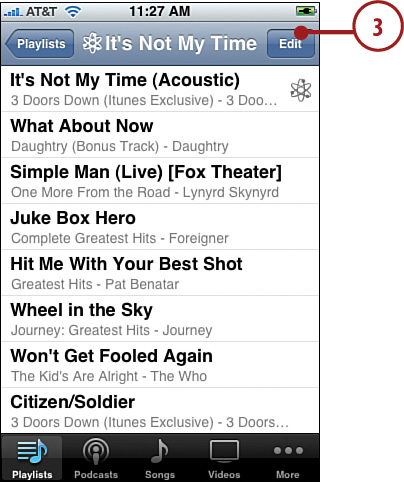
4. Press Refresh. The Genius builds a new playlist based on the same song. The resulting playlist might have the same or different songs and they might be in a different order. The refreshed playlist replaces the previous version.
Deleting a Genius Playlist
If you press the Edit button immediately after you’ve saved a playlist, the Delete Playlist option appears. Press this to delete the playlist. The option appears only for the most recently created playlist. To delete other Genius playlists, you delete them from the iTunes Library and then sync iPhone.
Configuring iPhone’s iPod Toolbar
The five buttons at the bottom of the iPod screen enable you to get to specific content quickly. You can choose four of the buttons that appear on the screen to make accessing content by type even easier and faster.
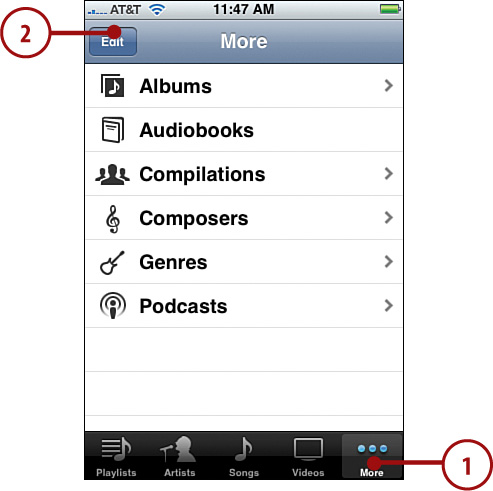
1. Move to the More screen.
2. Press Edit. The Configure screen appears.
More, Always More
You can’t replace the More button. It always appears on the iPod toolbar.
3. Drag the button you want to add to the toolbar to the location of one of the buttons currently there. As you get over the current button, it lights up to show you that it will be the one replaced when you lift your finger. The button you dragged replaces the button over which you placed it. The original button is moved onto the Configure screen.
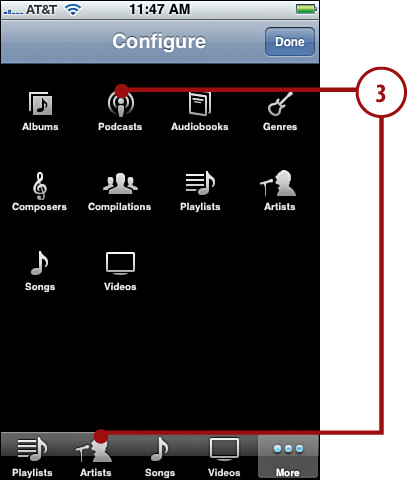
4. Repeat step 3 until the four buttons you want to be on the toolbar are there. (The fifth button is always the More button.)
5. Press the Done button located in the upper-right corner of the screen. The iPod toolbar contains the buttons you placed on it along with the More button.

Configuring iPhone’s iPod Settings
There are a few iPod settings you use to configure various aspects of iPhone’s iPod functionality.
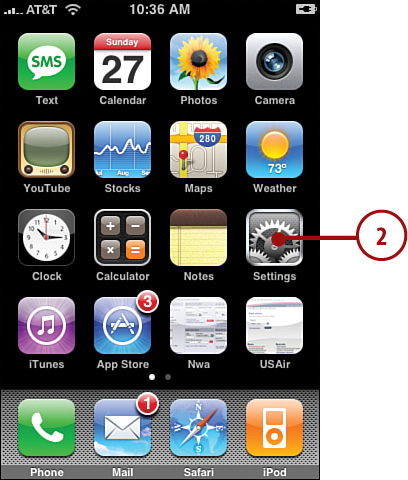
1. Press the Home button to move back to iPhone’s Home.
2. Press Settings. The Settings screen appears.
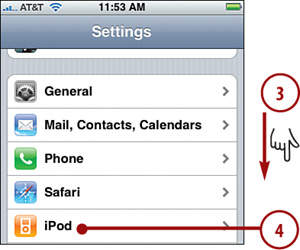
3. Scroll down until you see the iPod settings option.
4. Press iPod. The iPod Settings screen appears.
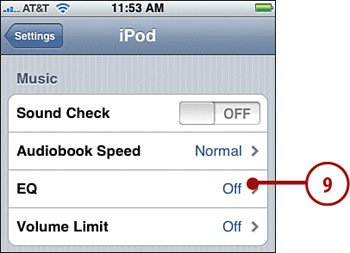
5. Press Sound Check if you want iPhone to attempt to even the volume of the music you play so that all the songs play at about the same relative volume level. Sound Check’s status is indicated by OFF or ON. When you press the Sound Check button, its status toggles from one to the other.
6. To set the speed at which audiobooks play, press Audiobook Speed. The Audiobook Speed screen appears.

7. Press the speed at which you want audiobooks to play; the current speed is indicated by the check mark.
8. Press iPod.

9. To set an equalizer, press EQ. The EQ screen appears.
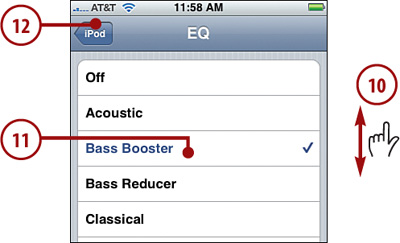
10. Scroll the screen to see all the equalizers available to you.
11. Select the equalizer you want iPhone to use when you play music; the current equalizer is indicated by the check mark. To turn the equalizer off, select Off.
12. Press iPod.
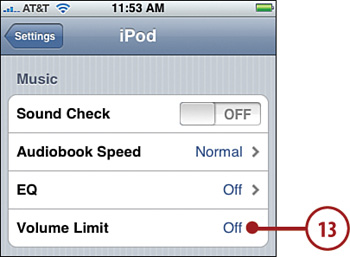
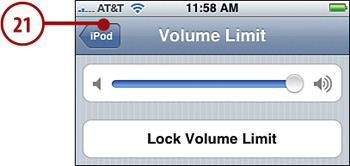
13. To set a limit to the volume level on iPhone, press Volume Limit. The Volume Limit screen appears.
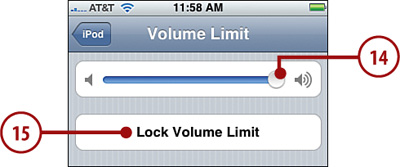
14. Drag the volume slider to the point that you want the maximum volume level to be.
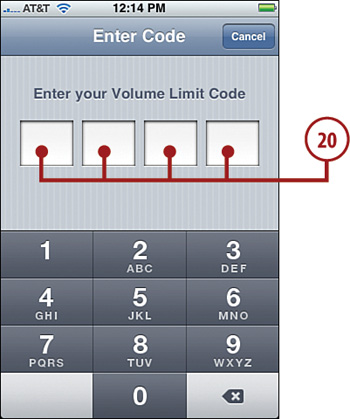
15. To lock this control so that it can’t be changed without a passcode, press Lock Volume Limit. The Set Code screen appears.
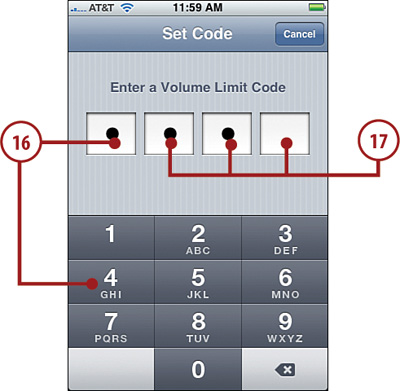
16. Press a digit, which becomes the first digit in the code.
17. Press each of the other three digits to create a four-digit code.
18. Re-enter the code to confirm it. If the code matches, you return to the Volume Limit screen, and the code is set.
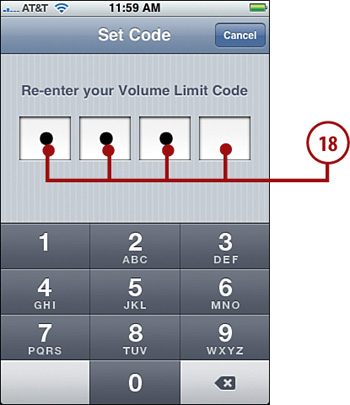
Forgot the Code?
If you forget the passcode, you can reset or restore iPhone to clear it. See Chapter 12, “Maintaining iPhone and Solving iPhone Problems,” to learn how.
19. To make changes to a locked volume limit, press Unlock Volume Limit.

20. Enter the code. The volume limit is unlocked, and you can change it again.
21. Press iPod to move back to the iPod Settings screen.
22. Scroll down until you see the Video settings. These settings impact how video plays on iPhone.
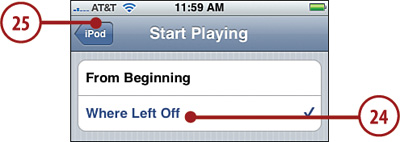
23. Press Start Playing.
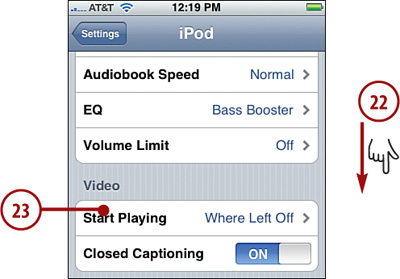
24. Press Where Left Off to have iPhone remember where you last were watching in a video so it resumes at the same location when you play it again or From Beginning to have iPhone always start at the beginning.
25. Press iPod to move back to the iPod Settings screen.
26. To enable or disable Closed Captioning on video, press the Closed Captioning button. Its status is indicated by ON or OFF. When you press the button, it toggles between the two states.
27. Scroll down until you see the TV Out settings. These settings impact how video plays on a TV when it is connected to iPhone.
28. To enable or disable widescreen playback, press the Widescreen button. Its status is indicated by ON or OFF. When you press the button, it toggles between the two states.
29. To select a specific output format, press TV Signal.
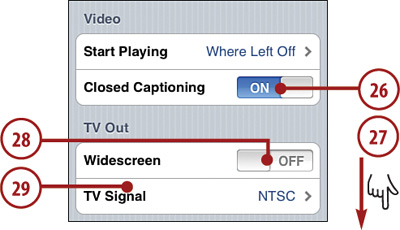
30. To choose the NTSC format (for U.S. televisions for example), press NTSC or to choose the PAL format (European televisions are some that use this format), press PAL.
31. Press iPod to return to the iPod Settings screen.
