In this chapter, you’ll explore how to add and manage third-party applications and use one of the best default applications, Maps. The topics include the following:
![]() Using iTunes to find and install iPhone applications
Using iTunes to find and install iPhone applications
![]() Using the App Store to find and install iPhone applications
Using the App Store to find and install iPhone applications
![]() Using iPhone applications you install
Using iPhone applications you install
![]() Maintaining iPhone applications
Maintaining iPhone applications
![]() Removing applications from iPhone
Removing applications from iPhone
10 Working with iPhone Applications
If you’ve read through this book to this point, you’ve already learned enough great iPhone tricks that you’re probably convinced iPhone is one of the most useful, not to mention one of the coolest, gadgets ever. Here’s where you get some icing on that nice iPhone cake.
iPhone comes with a powerful set of applications that you can use out-of-the-box, such as Mail, Safari, Calendar, Contacts, and so on. However, these are really only the starting point for your iPhone; there are thousands of other applications that you can download and use.
And any discussion of iPhone applications isn’t complete without including one of the most useful default applications, Maps.
Using iTunes to Find and Install iPhone Applications
The iTunes Store has many applications that you can download and install on iPhone. Many of these are free, while others have a license fee (which you pay through your iTunes Store account). Downloading applications from the iTunes Store is similar to downloading audio and video content (that topic is covered in detail in Chapter 3, “Listening to Audio and Watching Video”).
Like moving other kinds of content onto iPhone from the iTunes Store, there are two steps to this process. The first is to download applications to your iTunes Library. The second is to move those applications onto iPhone by syncing it with your computer.
>>>step-by-step
Downloading Applications from the iTunes Store
You can use the iTunes Store to browse for and download applications.
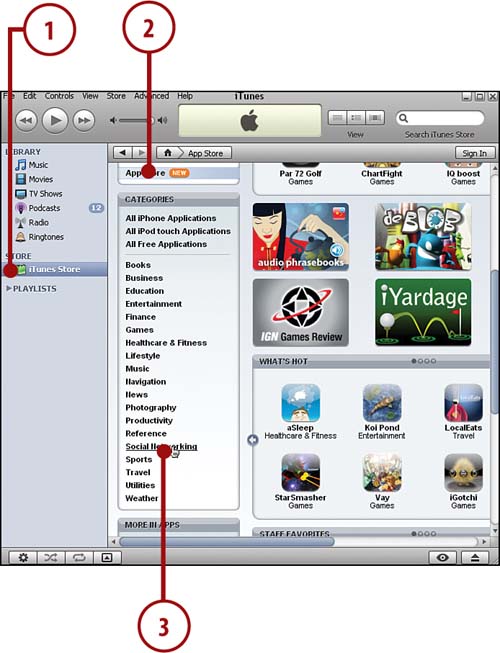
1. Open iTunes and select iTunes Store on the Source list.
2. In the iTunes Store section, click App Store. You move to the App Store Home page. You can click the various links you see to find applications, or you can browse for applications using the Categories section. The rest of these steps demonstrate using the Categories section.
3. Click the category of application in which you are interested, such as Social Networking. The applications within that category appear. For each application, you see its name, category, release date, and cost.
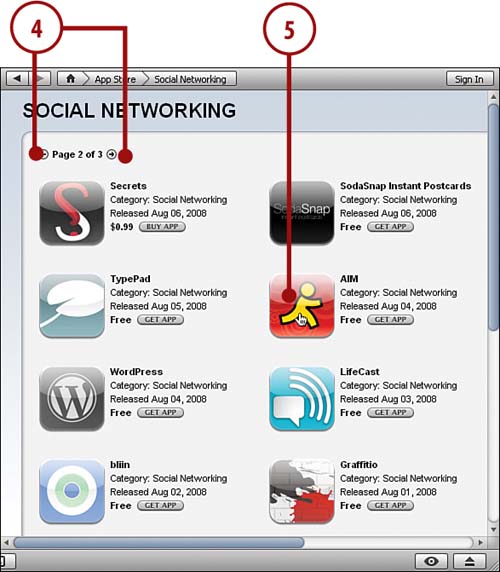
4. Click the page forward or page back buttons to move through other pages within the category you are browsing.
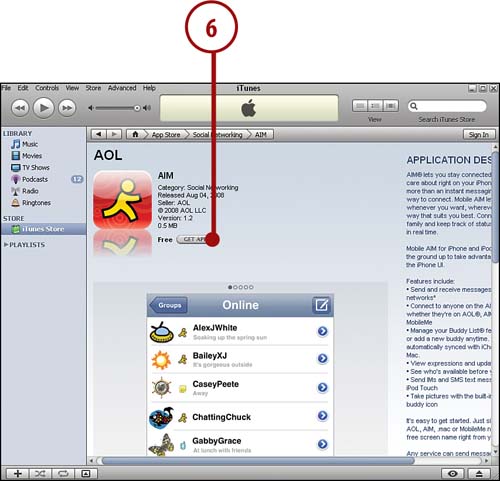
5. When you find an application in which you are interested, click its icon. You move to the application’s description screen, where you can read about the application and look at screenshots.
6. When you’re ready to download the application, click the Get App button if it is a free application or the Buy App button if it has a license fee.
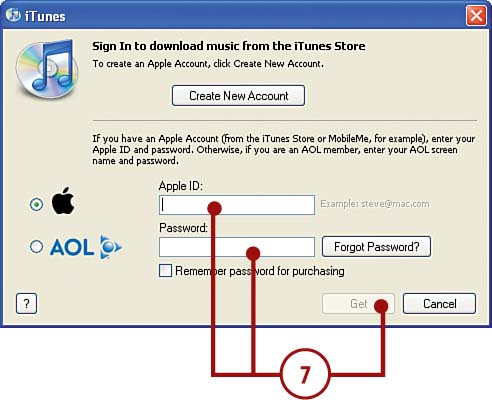
7. If you aren’t signed into your iTunes Store account, do so at the prompt by entering your Apple ID and password (or AOL screen name and password) and then clicking Get. The application is downloaded to your iTunes Library. (You can view the applications you have downloaded by clicking Applications on the Source list.)
Just Download It
You don’t have to view an application’s details to download it. Just click the Get App or Buy App button next to the application’s icon while you are browsing to start the download process.
Searching for Apps in all the Right Places
You can also search for iPhone applications. Click the Power Search link located on the top, right side of the iTunes Store Home page. Choose Applications on the Power Search drop-down list and then enter a title or description, developer name, or category. On the Device Compatibility drop-down list, choose iPhone. If you want to limit the results to include only free applications, check the Search for free applications check box. Click Search. Any applications that meet your criteria are shown.
>>>step-by-step
Moving Applications from Your Library onto iPhone
After applications have been downloaded, you can move them onto iPhone.
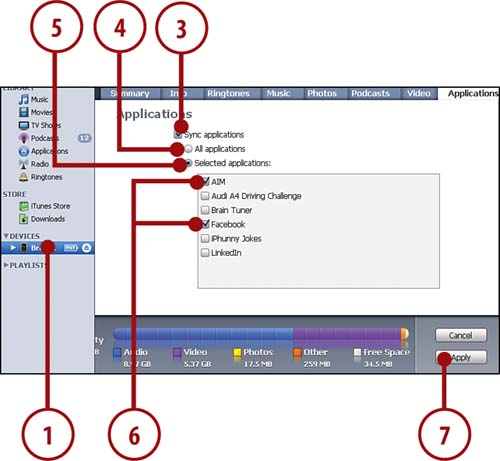
1. Connect iPhone to your computer and select it on the Source list.
2. Click the Applications tab.
3. Check the Sync applications check box.
4. To move all the applications you’ve downloaded onto iPhone, click all applications and skip to step 7.
5. To move just some of your applications onto iPhone, click Selected applications.
6. Check the check box next to each application you want to move onto iPhone.
7. Click Apply. The applications you selected are copied onto iPhone. If you selected All applications, each time you sync, all your applications are moved onto iPhone. If you chose Selected applications instead, you’ll need to repeat these steps when you download a new application and want to move it onto iPhone.
Using the App Store to Find and Install iPhone Applications
The App Store, which is an application in itself, enables you to find applications and download them directly from the iTunes Store onto iPhone.
Connections
To use the App Store, iPhone needs to be connected to the Internet with Wi-Fi or 3G. For best results, use the App Store when you are on a Wi-Fi network.
>>>step-by-step
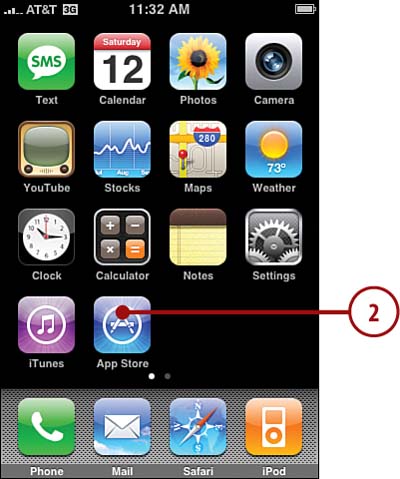
1. Move to the Home screen.
2. Press App Store. You move into the App Store. At the bottom of the screen, you see several buttons you can use to find applications in different ways.
• The Featured button takes you to applications that are being featured in the iTunes Store.
• The Categories button shows you various categories of applications that you can browse (this works very similarly to browsing categories in the iTunes Store).
• Top 25 takes you to a list of the top 25 iPhone applications. This tool has two tabs: Top Paid shows you the top applications for which you have to pay a license fee, while Top Free shows you a similar list containing only free applications.
• The Search button enables you to search for applications. The rest of these steps show you how to browse by category; the other options are similar.
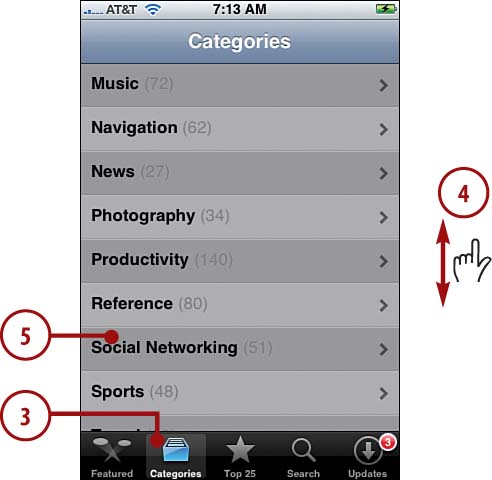
3. Press Categories. You see a list of categories.
4. Scroll the list until you see a category of interest.
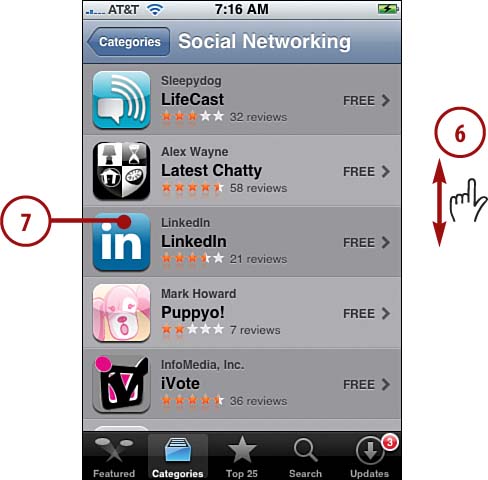
5. Press the category in which you are interested. You see the applications in that category. For each application, you see its icon, developer, name, user ranking, and its cost (a price or Free).
6. Scroll the list of applications in the category.
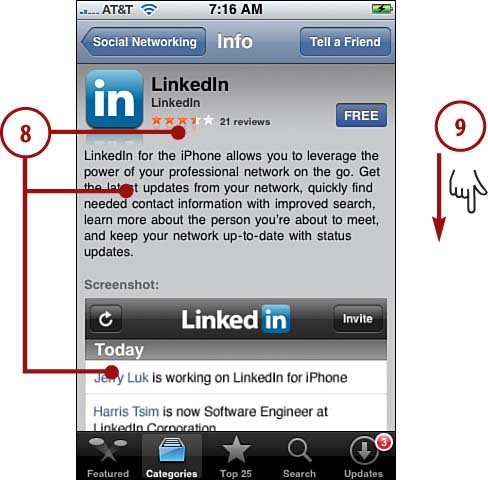
7. Press the application in which you are interested. You move to the application’s Info screen.
8. Look at the application’s user rating, read the application’s description, and look at any screenshots.
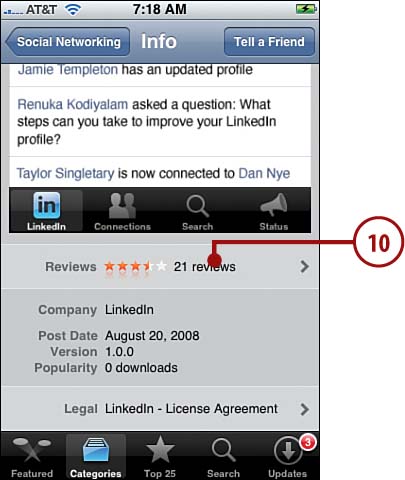
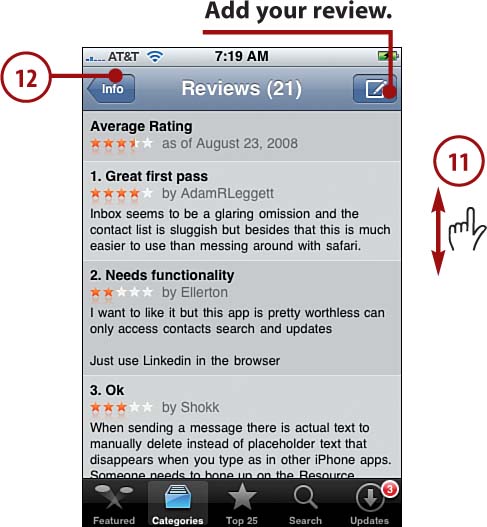
9. To read reviews, scroll down the screen.
10. Press Reviews. You move to the application’s reviews screen where you see user reviews for the application.
Make Your Voice Known
After you have used an application, you can add your own review by moving back to its Info screen and clicking the Add button. Press Write a Review. You move to the Submit Review screen where you have to enter your iTunes Store account information before you can write and submit a review.
11. Scroll the screen to read all reviews.
12. Press Info. You move back to the Info screen.
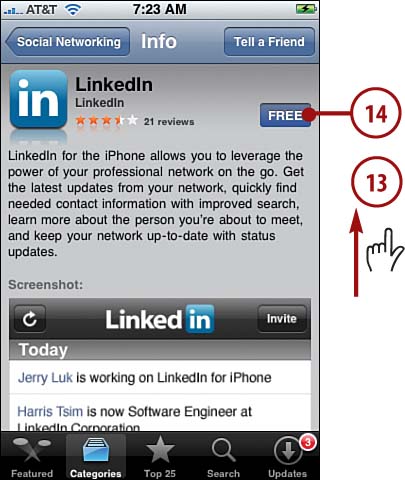
13. Scroll to the top of the screen.
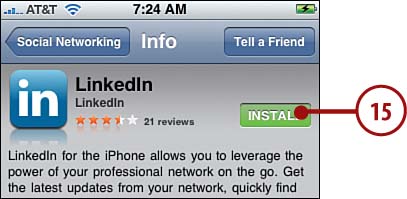
14. To download the application, press FREE if it is a free application or press the price to download the application if it has a license fee. The button becomes Install if it is a free application or Buy Now if it has a license fee.
Gotta Share?
If you decide an application is one someone you know should know about, move to the application’s Info screen and press Tell a Friend. An email message is created with a link to the application. Complete and send the email (see Chapter 5, “Emailing,” for help emailing).
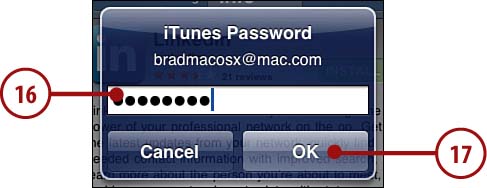
16. Enter your iTunes Store password.
17. Press OK.
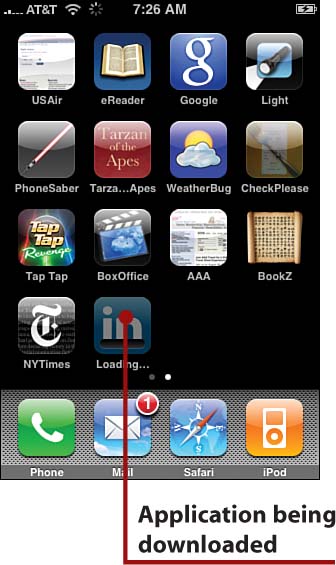
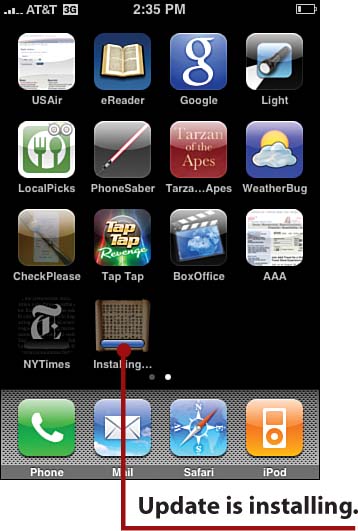
The application is downloaded to iPhone. You move to the Home screen where you see the application’s icon with the word “Loading” under it.
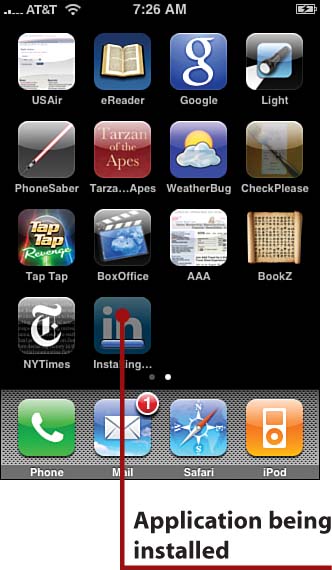
After the application is downloaded, it installs and you see the progress bar and “Installing” under the application’s icon.
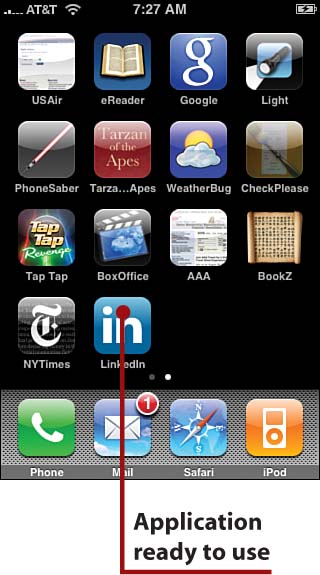
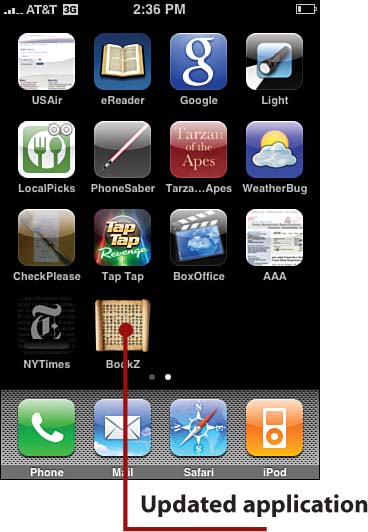
When the installation is complete, you see the application’s icon, and it is ready for you to use. (The next time you sync your iPhone, the application is also added to your iTunes Library.)
Keep the Home Screen Organized
As you add application icons to the Home screen, you can organize your icons on the pages of the Home screen to organize them in a way that makes the screen layouts the most efficient for you to use. To learn how, see Chapter 11, “Customizing iPhone.”
Using iPhone Applications You Install
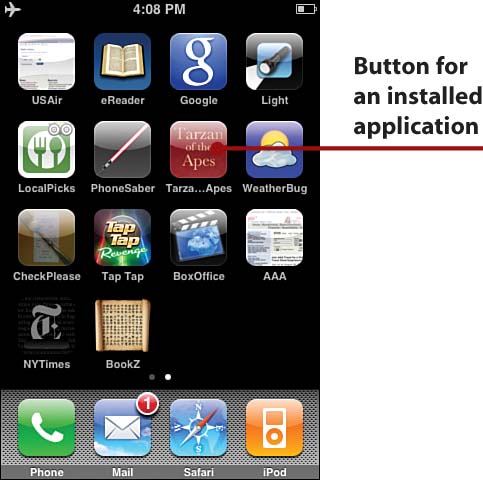
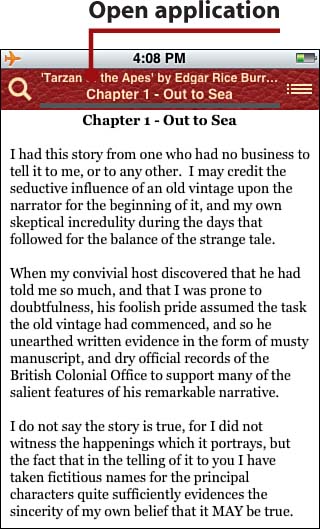
After you’ve installed applications, you use them just like iPhone’s default applications. Press the application’s icon on the Home screen, and it opens. At that point, how you use the application depends on the specific one you are using.
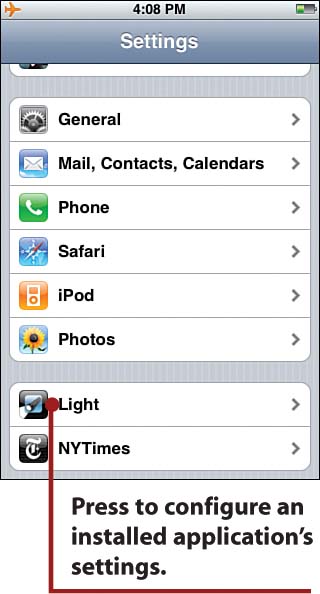
Some applications enable you to configure preferences using iPhone’s Settings tool. To see which of your applications provide settings, open the Settings screen and scroll to the bottom. If you see an application, press its name to access its settings.
Internet Required
Many iPhone applications require a connection to the Internet. With these applications, you get better results when you are connected via Wi-Fi or 3G. Most work with the EDGE network, but they will be painfully slow.
Maintaining iPhone Applications
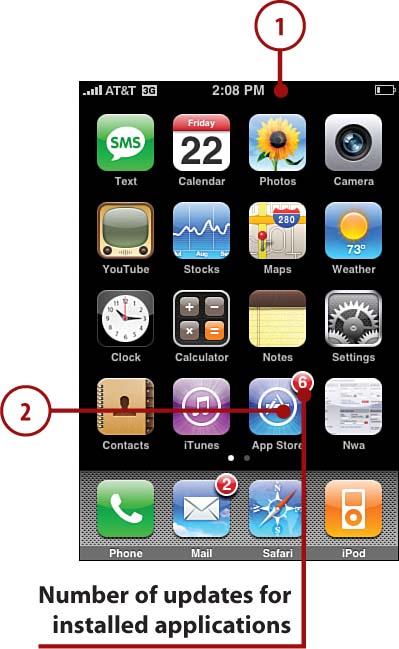
Like applications you use on a computer, iPhone applications are regularly updated. When updates are available for applications installed on iPhone, you see a counter on the App Store icon that indicates updates for some or all of your installed applications are available. To update your applications, perform the following steps.
>>>step-by-step
1. Move to the Home screen.
2. Press App Store.
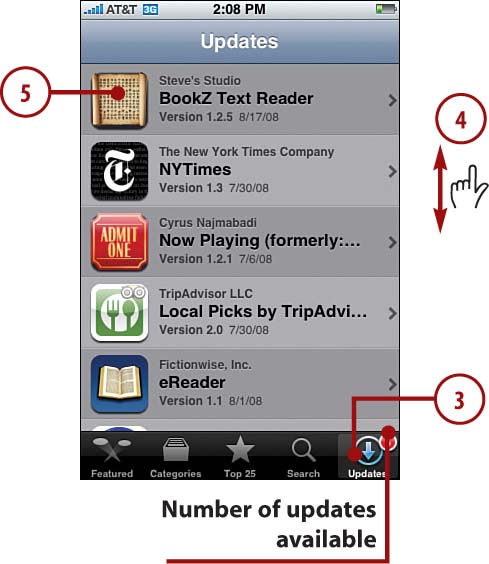
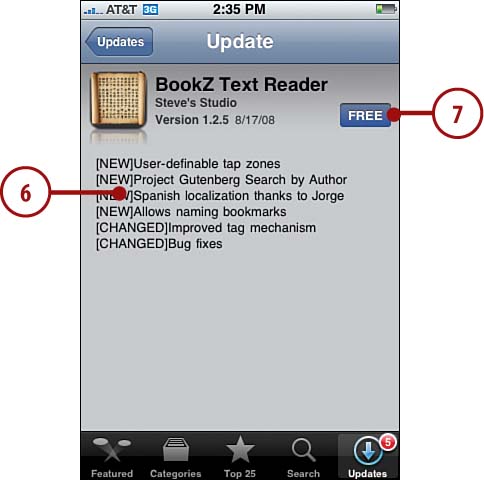
3. Press Updates. The applications for which updates are available are shown in the red circle. On the Updates screen, you see all of the installed applications for which an update is available. For each application, you see its developer, name, the version number of the update, and the release date.
4. Scroll the screen to see all of the updates available.
5. Press the application that you want to update. You move to the Update screen.
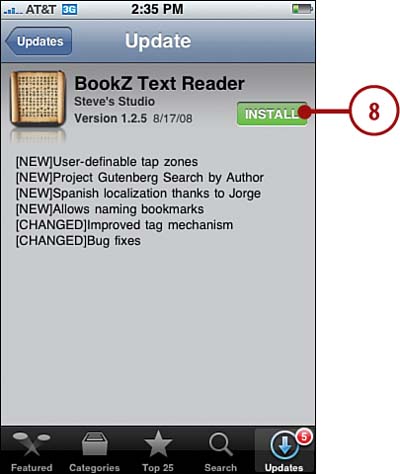
7. If the update is free, press Free; if it isn’t, press the button showing the cost of the update. The button becomes the Install button for a free update or Buy Now for an update that has a fee.
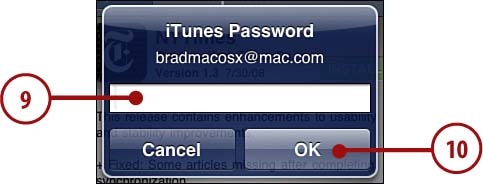
8. Press INSTALL or Buy Now. If you haven’t updated other applications recently, you’re prompted to enter your iTunes Store password (if you don’t see the prompt, skip steps 9 and 10).
9. Enter your iTunes Store password.
10. Press OK.
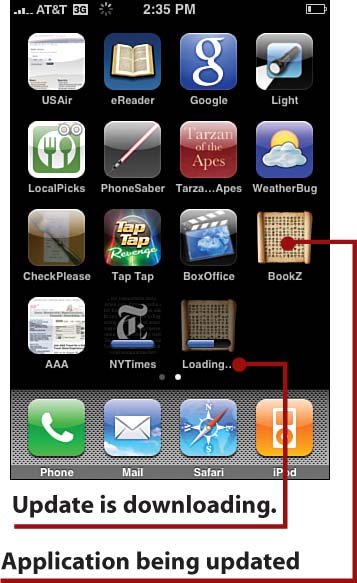
• The update begins to download to iPhone. You move back to the Home screen, where you see the updated application’s icon with the word “Loading” under it. During this process, the original version of the application remains on the screen.
Using iTunes to Check for Updates
You can also update applications via iTunes. Select the Applications source on the Source list. Click the Check for Updates link or the X Updates Available link (where X is the number of updates available if you’ve already checked for updates) at the bottom of the iTunes window. iTunes checks the versions of applications in your library versus the current versions that are available. If newer versions are found, you can download them. The next time you sync iPhone, the updates move from the library onto iPhone.
• When the download process is complete, you see the progress of the installation process under the icon. When the install process starts, the original application icon disappears.
• When installation is complete, the status information disappears. The next time you run the application, you use the updated version.
Removing Applications from iPhone
Not all that glitters is gold, and not all iPhone applications are worth keeping. You can get rid of iPhone applications you don’t use.
If you delete an application that you installed from the iTunes Library or if you sync’d the iPhone since you installed the application (so that it was moved from iPhone to the iTunes Library), it will be added to iPhone again the next time you sync if that application is included in the sync settings.
To permanently remove an application from iPhone, you can remove it from the sync settings or delete the application from the Application’s source in iTunes.
To permanently remove an application from both locations, remove it from the Applications source on the iTunes Source list and also remove it from iPhone. Before you do that though, you need to carefully consider if you really want to permanently remove the application, depending on which of two situations you are in.
One situation is if you’ve purchased the application, you should keep a copy in your iTunes Library but remove it from the sync settings and then delete it from iPhone; this will allow you to reinstall the application at some point in the future without paying for it again.
The other situation is if the application manages data for you that isn’t available elsewhere; when you delete an application from iPhone, all the data it is managing goes away too. Make sure you have that data backed up or available elsewhere before you delete an application.
Except for these caveats, the steps of deleting an application from iPhone are simple.
>>>step-by-step
1. Move to the page of the Home screen showing the icon for the application you want to delete.
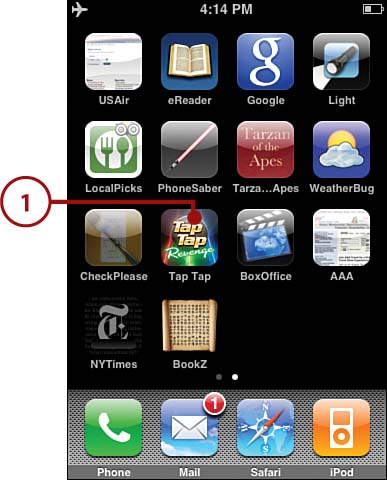
2. Press and hold the icon of the application you want to delete until the icons on the screen start shaking and the Delete buttons appear.
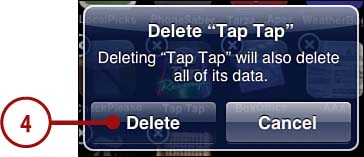
3. Press the Delete button for the application you want to delete.
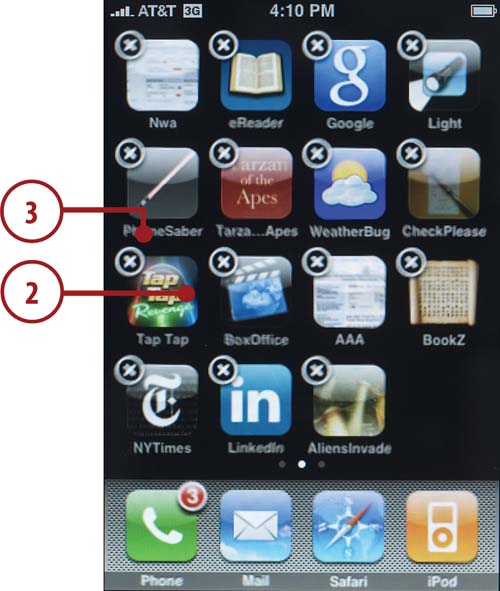
4. Press Delete at the prompt. The application and all of its data are deleted from iPhone.
Finding Your Way with Maps
The Maps application just might be one of the most useful iPhone applications, especially if you are directionally challenged like I am. Using the Maps application, you can find the location of addresses using Google Maps. You can also get directions from one address to another. Even better, in most cases, you can use GPS or cell network data to show your current location on the map and on the routes you generate. Also maps are linked to your contacts, so you can quickly show the location of any address in your contacts on a map and then get directions. You can even see current traffic conditions along the way.
A number of ways exist to find locations on the map, such as by searching or by using a contact’s address. After you find a location, you can use that location for different purposes, such as to create driving directions.
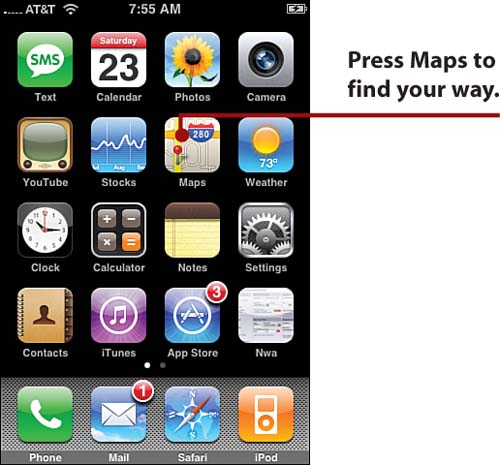
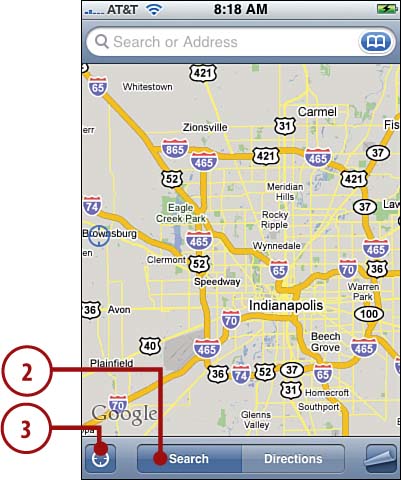
To open the Maps application, press the Maps button on the iPhone Home screen. The application appears, and you can start finding your way.
>>>step-by-step
Finding a Location by Searching
You can search for locations in many ways. Your search can be very specific, such as an address, or your search can be more general, such as a search for gas stations or restaurants. The original iPhone can’t access GPS information and is limited to using its cellular network to determine its location. This is much less accurate than GPS. If you have an original iPhone, you can still use Maps as described in this section, but none of the GPS information applies to you.
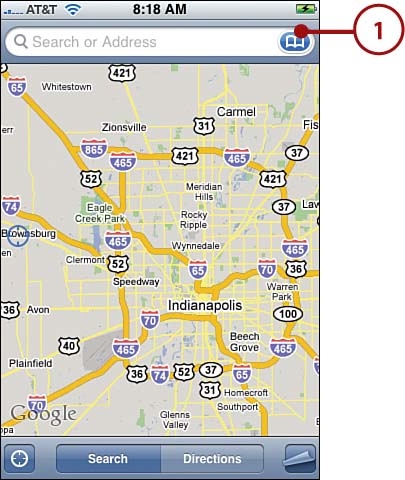
1. Press in the Search bar (if you don’t see the Search bar, press Search at the bottom of the screen). The keyboard appears.
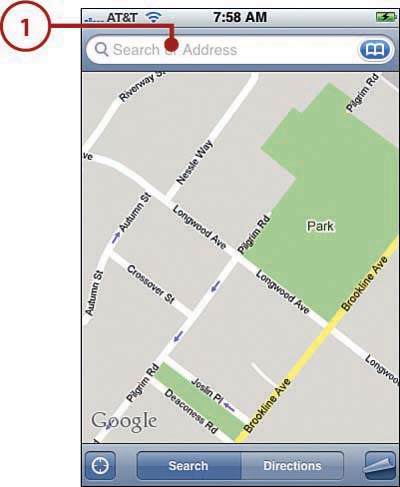
Easy Searching
As you enter a search, iPhone attempts to match what you type with recent searches. As it finds matches, it presents the list of matches to you. Click a search on the list to perform it.
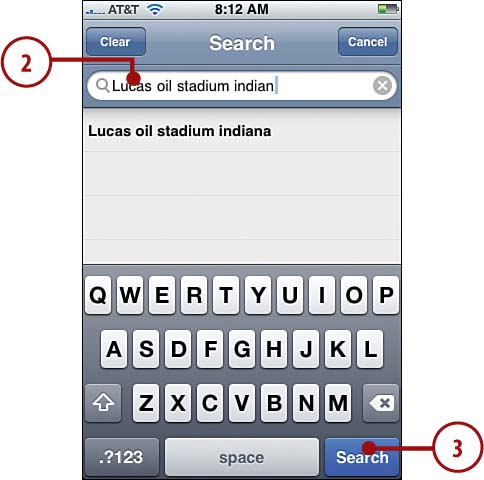
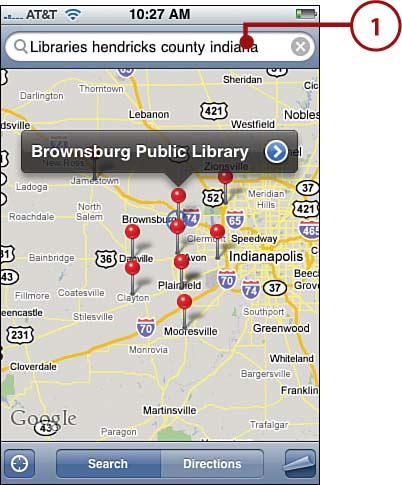
2. Type your search. You can enter an address, city, category, or just about anything else. The more specific your search term, the more likely it is that you’ll find the location. But general searches can be helpful, such as a search for gas stations.
iPhone remembers the context of your last search, so if you want to change the general area of the search item, you should include a state or zip code in the search term. For example, if you search for an address in one state and then perform a general search (such as for libraries), iPhone searches in the area of the address for which you previously searched. To change that context, enter the state or zip code where you want to search (such as libraries Indiana to find libraries in Indiana).
As you type a search, iPhone attempts to identify typos; if it finds one, it presents a prompt that enables you to change the term to iPhone’s recommendation.
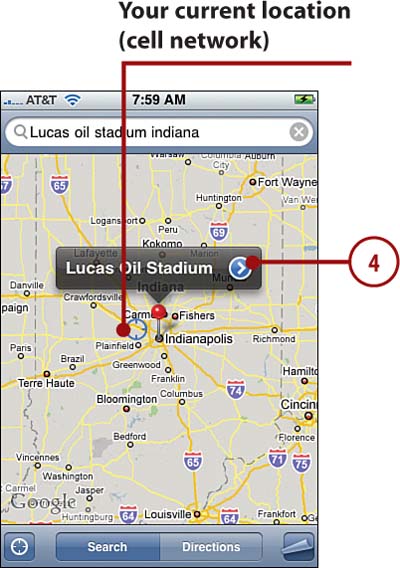
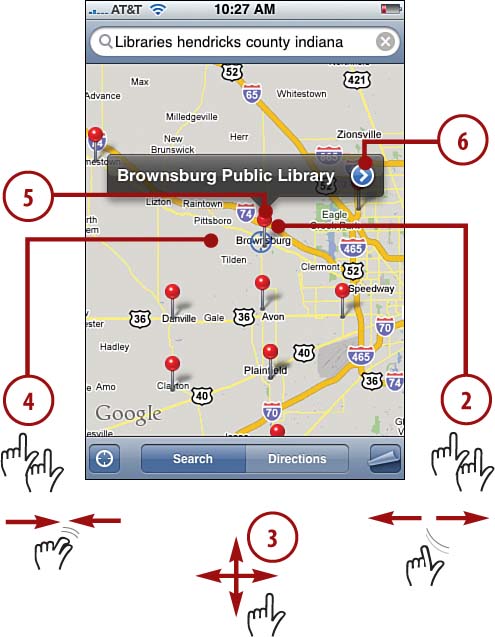
3. Press Search. The map appears, and the locations that meet your search criteria are marked with push pins; the location that iPhone thinks is most likely to be the one you are looking for has the Info bar above it. Your current location is shown in the blue circle if it is identified by the cell network or in the blue dot if iPhone is using GPS.
Clear a Search
To clear a search, press the Clear button, which is the gray circle containing an “x,” located at the right end of the Search bar.
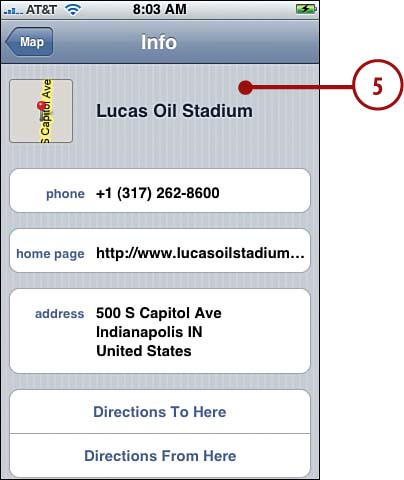
4. To see information about a location, press the arrow in its Info bar. The location’s Info screen appears.
5. Use the information in the Working with Maps task later in this chapter to find out more information about the location and to change the map’s view.
Finding a Location with Bookmarks
Bookmarks enable you to save locations and return to them easily. (See the Working with Maps task later in this chapter to learn how to set bookmarks.)
1. Open the Search screen and press the Lists button in the Search bar.
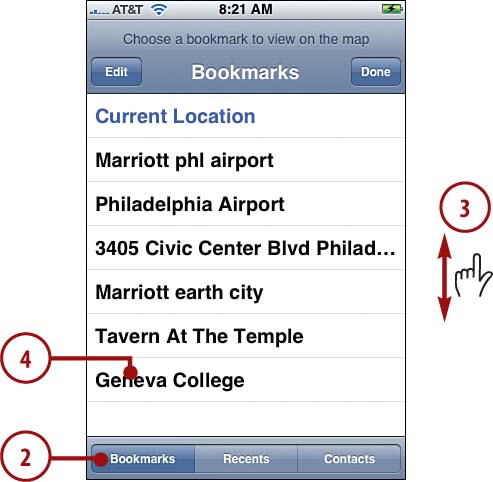
2. Press Bookmarks. The Bookmarks screen appears.
3. Browse up or down the list to see all the bookmarks available to you.
4. Press the bookmark you want to see on the map. You move back to the map, and the bookmarked location is shown.
5. Use the information in the Working with Maps task later in this chapter to find out more information about the location and to change the map’s view.

Very Useful Bookmark
At the top of the Bookmarks list, you see Current Location. This is very useful when you are creating directions; when you press it, your current location is selected if you are generating directions, or you move to the map and your current location is shown (via GPS or a cell network).
Deleting or Changing Bookmarks
You can remove bookmarks from the list, and you can change their information as shown in the following steps.
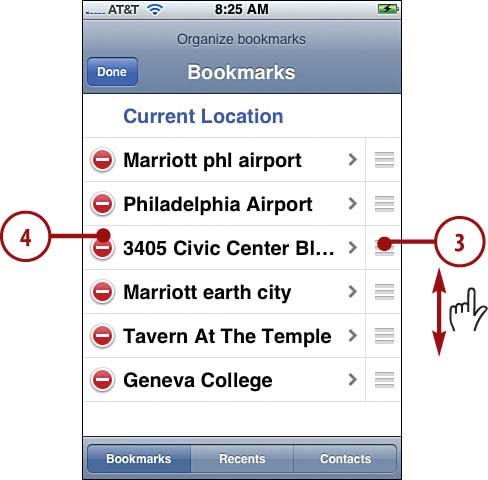
1. Move to the Bookmarks screen.
2. Press Edit. Unlock and Order buttons appear for each bookmark.

3. To change the order of bookmarks, press a bookmark’s Order button and drag it up or down the list of bookmarks.
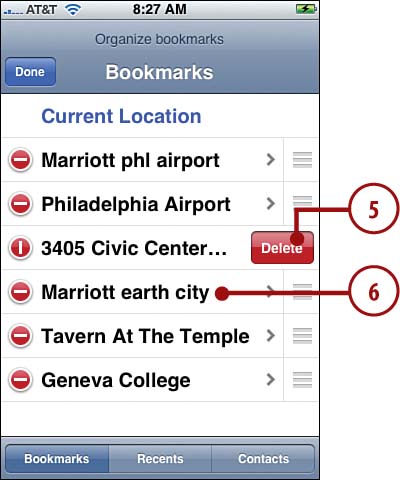
4. To delete a bookmark, press its Unlock button.
5. Press Delete. The bookmark is deleted from the list.
6. To change a bookmark’s name, press it. The Edit Bookmark screen appears.
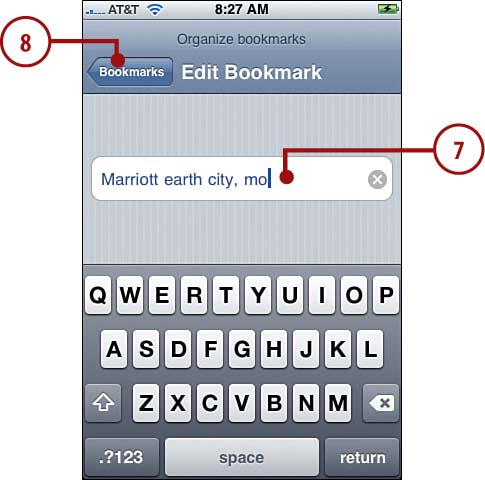
7. Use the keyboard to make changes to the bookmark’s name.
8. Press Bookmarks. You return to the Bookmarks screen, and the changes you made to the bookmark’s name are shown.
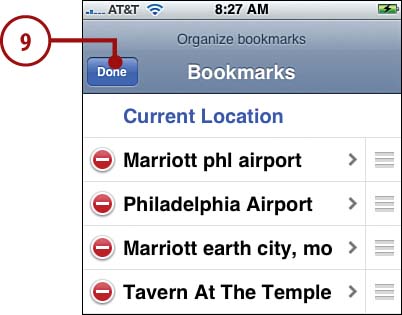
9. When you’re done making changes, press Done. You exit the Edit mode and can work with bookmarks again—or press Done again to return to the map.
Other Ways to Find Locations
You can also find a location by opening a contact and pressing an address; you move to the map showing the location of the address you pressed. To do this, press the Lists button in the Search bar and then press Contacts. Use the All Contacts screen to find the contact with the address you want to see on the map. You can also repeat a recent search by pressing the Lists button and then pressing Recents; press the recent search you want to perform again.
Finding Your Current Location
When you are using a map, knowing your current location is very important. iPhone has two ways to identify your location, via GPS or via a cell network. GPS locations are more accurate, so iPhone uses a GPS signal if it is available; if not, it uses the current cell network to identify your location. The steps you use to find your location are the same; iPhone chooses the method automatically.
1. Move into Maps.
2. Press the Search tab.
3. Press the My Location button. What you see depends on the method iPhone uses to locate you.
If iPhone uses a cell network, you see a large blue circle with cross hairs to show your general location.
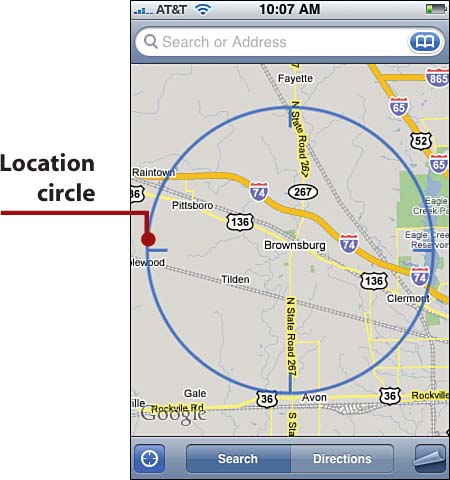
If iPhone can make your location more specific, the map zooms in, and the location circle gets smaller until iPhone has your location pinpointed as precisely as possible.
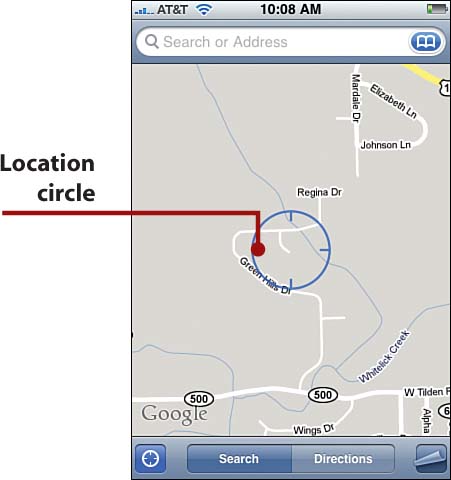
If iPhone can use GPS for your location, you see the blue GPS locator dot on the map. The dot pulses to show you that it is a dynamic display, meaning the dot moves as you do. Because GPS is more accurate, iPhone uses it first. GPS signals are usually blocked by buildings, so if you are inside, it’s unlikely GPS will be available.
When you are using GPS with a route, pressing the My Location button—such that it is dark blue—keeps the GPS marker centered on the screen This is helpful, so you can always see your current location as you move.

More on Location Services
Other applications in addition to Maps can use location services to determine your current location; when they attempt to do so, you are prompted to allow it or not. If you allow access to your location, the application can do what it was trying to do. If you don’t want iPhone to be able to locate you in any situation, move to the General settings screen and press Location Services ON to turn off this capability. Neither GPS nor cell network location functionality will work.
Working with Maps
After you find locations on a map, you can work with them for a variety of purposes.
1. Using the techniques (such as searching for a location) explained in the previous sections, find locations in which you are interested.
2. To zoom in on a location, double-press the map near the location or unpinch the map to zoom in.
3. To scroll the map, drag your finger up or down and left or right.
4. Double-press to zoom out by a set amount or pinch your fingers together on the screen to zoom out.
5. Press a location’s push pin. You see the name of the location.
6. Press the More Info arrow. The Info screen appears.
7. Use the information on the Info screen to call the location, view its website, or see it on the map.
Show Them All
When your search has found more than one location on the map, press List to see a listing of all the locations shown. Press a location to jump to it on the map. This is helpful when you’ve done a more general search and you want to see all the results easily.
8. Scroll down the screen.
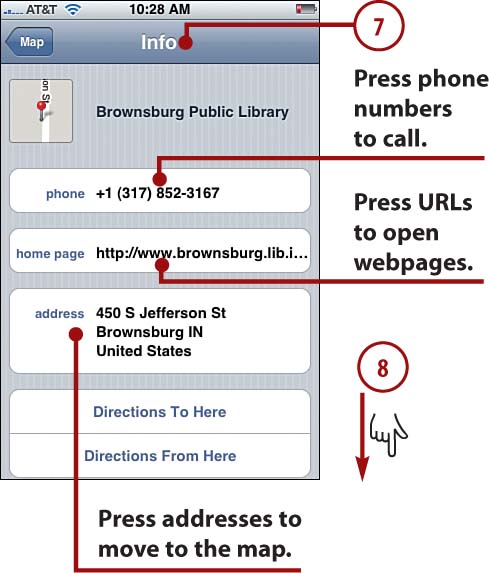
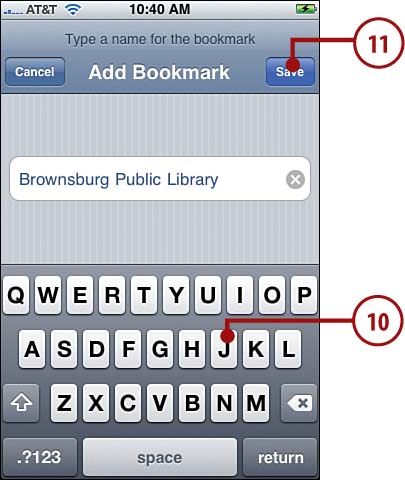
9. To set a bookmark for the location press Add to Bookmarks. The Add Bookmarks screen appears.

10. Use the keyboard to make changes to the bookmark’s name.
11. Press Save. The location is added to your bookmarks and you return to the Info screen.
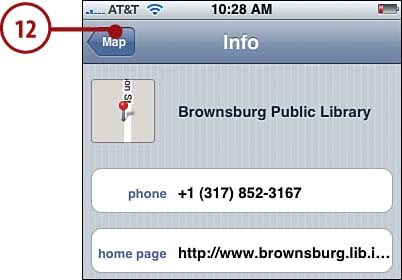
12. Press Map. You move back to the map and can work with other locations.
Buttons Change
The buttons you see on a location’s Info screen depend on the status of that location. For example, if you’ve already added the location as a bookmark, the Add to Bookmarks button doesn’t appear.
>>>step-by-step
Getting Directions
The Maps application can generate driving directions between two locations along with an estimate of how long the trip will take. Using Location services (GPS or cell network), you can see where you are along a route or how to get back to a route if you get off it.
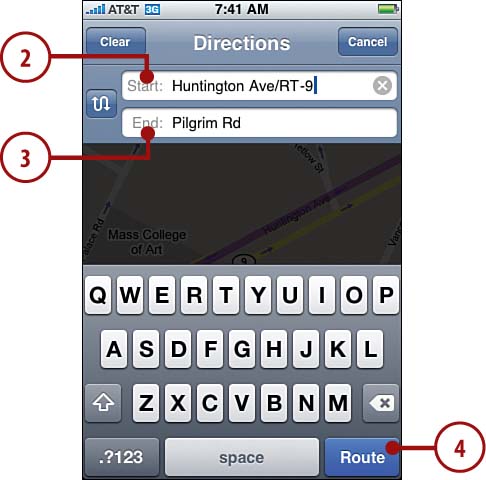
1. Press the Directions button. The Start and End boxes appear.

Can’t Tell if You’re Coming or Going?
You can start the direction process from a location’s Info screen by pressing the Directions To Here or Directions From Here button to set that location as the starting point or endpoint.
2. Find the start location by searching for it or by using the Lists button to select it from a list. Finding a start or end location works just like finding any location. For example, you can use a bookmark, recent item, or contact information to set a location along with searching for a location.
3. Find the end location by searching for it or by using the Lists button to select it from a list.
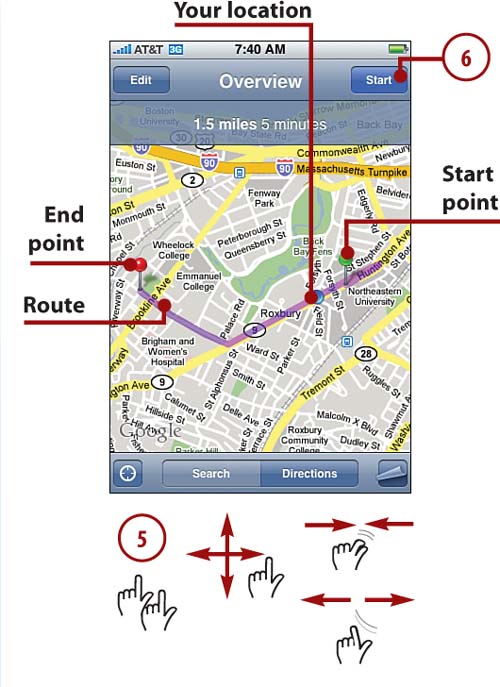
4. Press Route. A path from the start location to the end location is generated and appears on the map in a purple line. The start point is shown as a green pushpin, while the end point is a red pushpin. If GPS location is available, you see your position on the map. If GPS isn’t available, but iPhone can determine your location using the cell network, you see the crosshairs icon to show your location.
5. Zoom or scroll the map as needed to view the entire route.
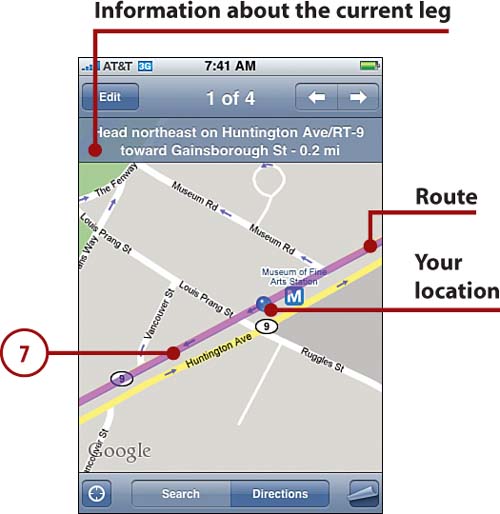
6. When you’re ready to start moving along the route, press Start. You see the first leg of the route. Instructions and information about the leg appear at the top of the screen.
Going Back Again
To quickly reverse the current route, press Edit. Then press the Reverse button, which is located to the left of the Start and End fields.
7. Follow your location along the first leg of the route. As you approach the next segment of the route, you see a circle on the route.
Keeping Centered
To keep the GPS indicator on your screen (the map moves as you do instead of the indicator moving), press the My Location button located in the lower left corner of the screen. The button turn dark and the GPS indicator stays in the center of the screen while the map moves “under it.” As long as you remain on or near the route, you continue to see both the dark purple route line and the blue GPS indicator on the screen. If you get too far off the route, you might not see it on the screen. You can zoom out to see the route again, but you have to manually generate another route and choose Current Location as the starting point to get back on course.
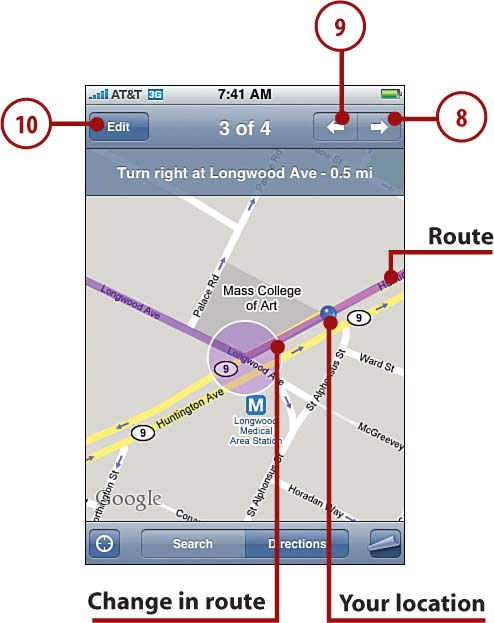
8. After you’ve made the change to get onto the next segment of the route, press the Forward button to move to the next segment on the map. If the next leg isn’t visible on the current map, the GPS indicator may move off the map; press the My Location button to center the map on the indicator again.
9. To move to a previous segment, press the Back button.
10. To change the route, press Edit.
Be Careful
As I mentioned earlier, it takes some manual manipulation and looking at iPhone’s screen to move through a route on iPhone. This can distract you if you are driving a car, so be very careful. Remember that driving safely is more important than keeping on a route.
11. Use the Edit screen to make changes in the same way you set the route originally.