In this chapter, you’ll explore all the email functionality that iPhone has to offer. Topics include the following:
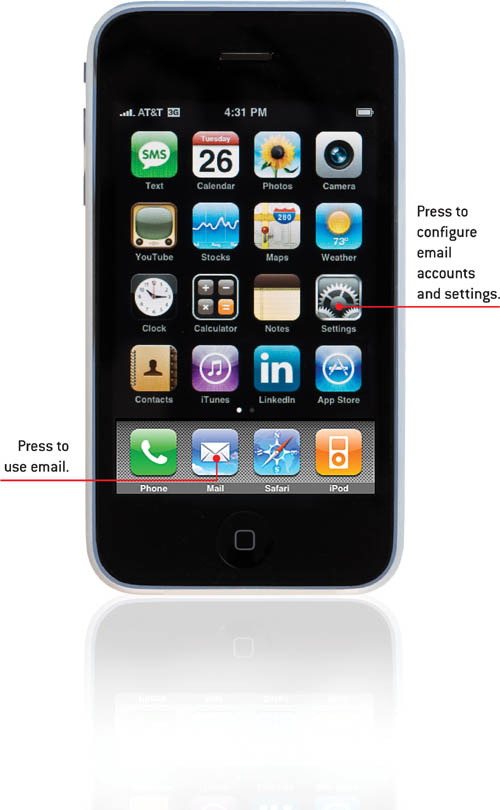
![]() Configuring email accounts on iPhone
Configuring email accounts on iPhone
![]() Configuring general email settings
Configuring general email settings
5 Emailing
For most of us, email is an important way to communicate with others, both in professional and personal life. Fortunately, iPhone has great email tools so that you can work with email no matter where you are. You can read, send, reply, and do all the other email actions you might expect from the comfort and convenience of your iPhone.
You can configure multiple email accounts on iPhone so that you can access all of them there. Even better, you can sync iPhone’s email accounts with your computers so that you access the same email from multiple devices.
Get Connected
It probably goes without saying, but I’ll say it anyway, to use email, you must have an Internet connection. To learn how to connect iPhone to the Internet, see Chapter 4, “Connecting to the Internet, Bluetooth Devices, and VPNs.”
Configuring Email Accounts on iPhone
Before you can start using iPhone for email, you have to configure the email accounts you want to access with it. iPhone supports a number of standard email services including MobileMe, Gmail, Yahoo!, and AOL. You can also configure any email account that uses POP (Post Office Protocol and no, I’m not making that up) or IMAP (Internet Message Access Protocol); this is good because almost all email accounts provided through ISPs (Internet service providers) use one of these two formats. One of the major improvements made with the iPhone version 2.0 software is that iPhone also supports Exchange email, which is the dominant email system used in business.
There are many ways to configure email accounts on iPhone. The specific methods you should use depend on the kind of email accounts you work with. The following options are explained in this section:
• Using MobileMe You can configure a MobileMe email account with just a few steps.
• Syncing with computers You can configure email accounts on iPhone by syncing with both Windows PCs and Macs.
• Configuring Gmail, Yahoo! Mail, or AOL email accounts manually iPhone is designed to work with these email accounts and has specific account configuration tools for them.
• Configuring other email accounts manually If you have an account that isn’t configured on a computer and isn’t one of those listed in the previous bullet, you can add it to iPhone manually with just a bit more work.
After you have created the base email account on iPhone, you can do some advanced configuration to tweak the way it works.
And, as noted earlier, you can also configure Exchange email accounts on iPhone.
>>>step-by-step
Using MobileMe to Configure Email Accounts on iPhone
If you have a MobileMe account, it is very simple to access your email (along with your contacts, calendar, and bookmarks) on iPhone (for information about obtaining and configuring a MobileMe account, see the Prologue).
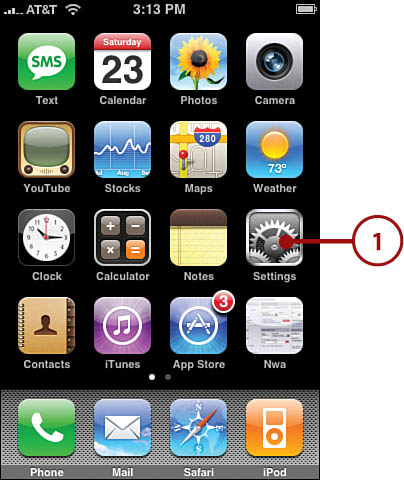
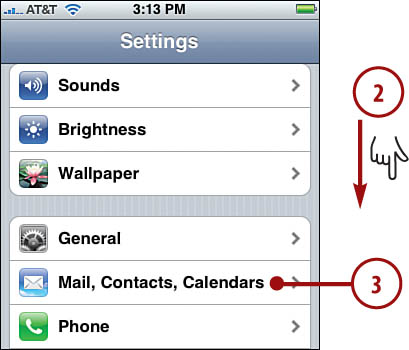
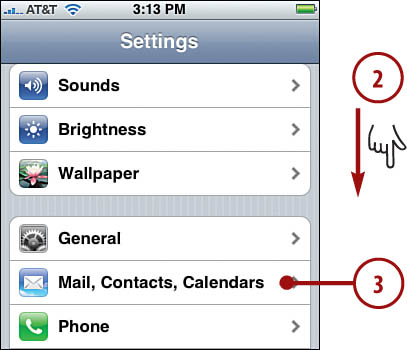
1. On the Home screen, press Settings.
2. Scroll down the screen.
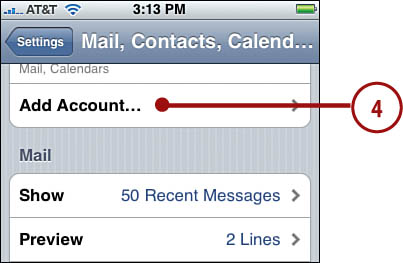
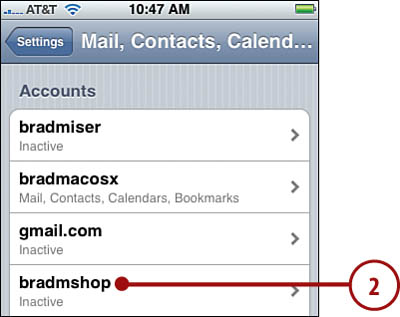
3. Press Mail, Contacts, Calendars. The Mail, Contacts, Calendars screen appears.
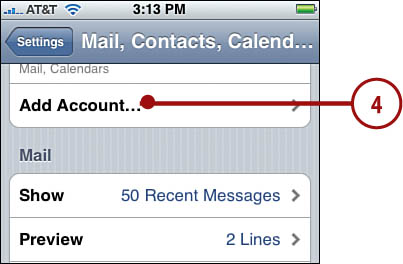
4. Press Add Account…. You see the Add Account… screen.

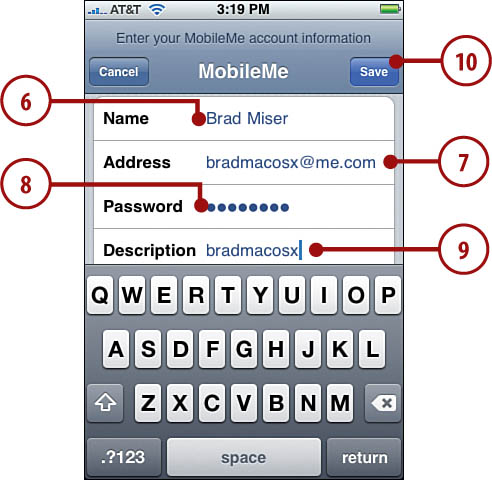
5. Press mobileme. You see the MobileMe account screen.

7. Enter your MobileMe email address.
8. Enter your MobileMe account password.
9. Change the default description, which is your email address, if you want to. This description appears on various lists of accounts.
10. Press Save. Your account information is verified. When that process is complete, you see the MobileMe screen that you use to choose which elements of your MobileMe account are going to be synchronized on iPhone.
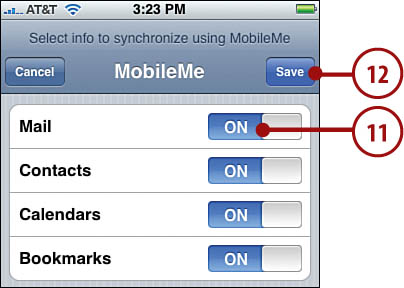
11. Ensure that the Mail status is ON to sync your MobileMe email to iPhone (if it is OFF, press OFF to change the status to ON).
12. Press Save. The account is synced to iPhone. You return to the Mail, Contacts, Calendars screen where you see your account on the Accounts list. The account is ready to use.
13. If you want to perform advanced configuration for the account, refer to Performing Advanced Configuration of Email Accounts on iPhone, later in this chapter.
Syncing Email Accounts with a Windows PC
You can sync POP and IMAP email accounts from Outlook or Outlook Express on a Windows PC with iPhone to quickly configure it to work with email for those accounts.
1. Connect iPhone to your computer.
2. Select iPhone on the Source list in iTunes.
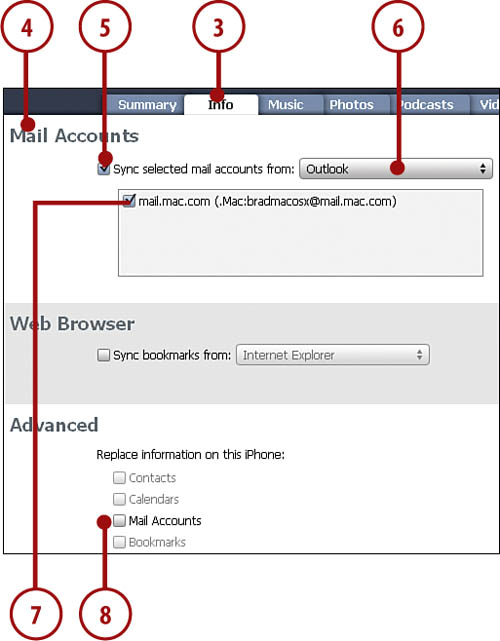
3. Click the Info tab.
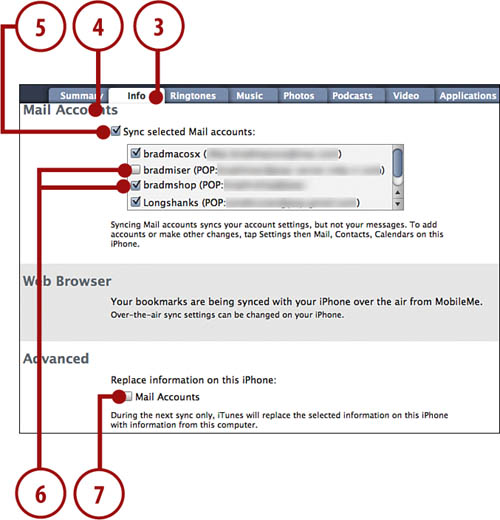
4. Scroll down until you see the Mail Accounts section.
5. Check Sync selected mail accounts from.
6. On the pop-up menu, choose the email application configured with the accounts you want to move onto iPhone.
7. Check the check box for each account you want to move onto iPhone. You can choose to move any or all of your email accounts in the selected application onto iPhone.
8. If you want the email accounts to replace the accounts currently on iPhone, check Mail Accounts; if you leave this unchecked, the selected email accounts are added to iPhone, leaving those already configured on it unchanged.
9. Click Apply. The sync process runs, and the email accounts you selected move onto iPhone and are ready for you to use there.
10. Configure the accounts you synced using the steps in Performing Advanced Configuration of Email Accounts on iPhone, later in this chapter.
Syncing Email Accounts with a Mac
You can sync email accounts from Mail or Entourage on a Mac with iPhone to quickly configure it to work with email for those accounts.
1. Connect iPhone to your computer.
2. Select iPhone on the Source list in iTunes.
3. Click the Info tab.
4. Scroll down until you see the Mail Accounts section.
5. Check Sync selected Mail accounts.
6. Check the check box for each account you want to move onto iPhone. You can choose to move any or all of your email to iPhone.
7. If you want the email accounts to replace the accounts currently on iPhone, check Mail Accounts; if you leave this unchecked, the selected email accounts are added to iPhone, leaving those already configured on it unchanged.
8. Click Apply. The sync process runs, and the email configurations you selected move onto iPhone and are ready for you to use.
9. Configure the accounts you synced using the steps in Performing Advanced Configuration of Email Accounts on iPhone, later in this chapter.
Configuring Gmail, Yahoo! Mail, or AOL Email Accounts on iPhone Manually
iPhone is designed to work easily with email accounts from these providers. Setting up one of these accounts is similar to setting up a MobileMe account.
GMail POPs Is for Me
If you don’t have a GMail account, you can sign up for a free one at mail.google.com. When you set up the account, make sure that you select the POP option. If you already have an account, log in to your Google account, choose GMail settings, click the Forwarding and POP tab, choose the Enable POP for all mail option, and save your changes. If your GMail account is not POP-enabled, it won’t work on iPhone.
1. On the Home screen, press Settings.
2. Scroll down the screen.
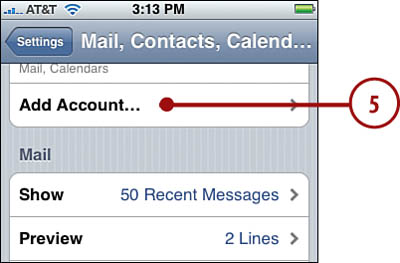
3. Press Mail, Contacts, Calendars. The Mail, Contacts, Calendars screen appears.

4. Press Add Account…. You see the Add Account… screen.
5. Press the kind of account you want to configure. The rest of the steps are for a Gmail account, but configuring Yahoo! Mail or AOL accounts is similar. You see the account screen.

6. Enter your name.
7. Enter your Gmail email address.
8. Enter your Gmail account password.
9. Change the default description, which is your email address, if you want to. This description appears on various lists of accounts.
10. Press Save. Your account information is verified. When that process is complete, you see the Mail, Contacts, Calendars screen, which shows the account you configured on the Accounts list. The account is ready to use.

11. If you want to perform advanced configuration of the account, refer to Performing Advanced Configuration of Email Accounts on iPhone, later in this chapter.
Configuring Other Email Accounts on iPhone Manually
If you don’t configure an email account via syncing, and it isn’t one of the “standard” types shown previously, you can still configure it to work on iPhone with only slightly more work.
When you obtain an email account, such as accounts that are part of your Internet service from an ISP, you should have received a document with all of the information you need to configure that account. If you don’t have this information, visit the provider’s website and look for information on configuring the email account on an email client. If you already have the account configured on an email client that you aren’t syncing for some reason, you can copy the information from the configuration screens in that application. You must have this information to be able to configure the account on iPhone.
Sync ‘Em If You’ve Got ‘Em
If you have an email account already configured on a computer, there’s really no need to configure it manually on iPhone. It’s much easier just to sync the account onto iPhone.
>>>step-by-step
1. Gather the configuration information for your email account, such as its type, your email address, your username, your password, incoming mail server, and outgoing mail server.
2. On iPhone’s Home screen, press Settings.
3. Scroll down the screen.
4. Press Mail, Contacts, Calendars. The Mail, Contacts, Calendars screen appears.

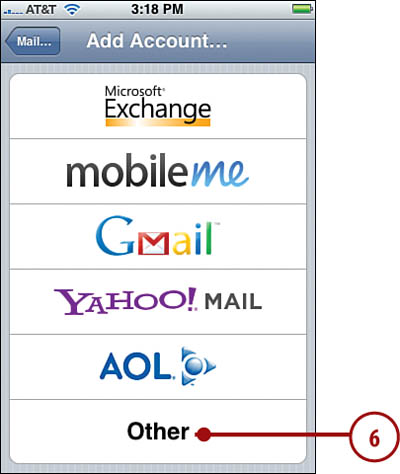
5. Press Add Account…. You see the Add Account… screen.
6. Press Other. You see the New Account screen.
7. Enter your name.
8. Enter your email address.
9. Enter your email account password.
10. Change the default description, which is your email address, if you want to. This description appears on various lists of accounts.
11. Press Save. Your account information is verified. If iPhone can’t connect to the server using the information you provided via SSL, you see a prompt.

No SSL?
When you see a message about SSL (Secure Sockets Layer, a communication security protocol) not being available, press No to proceed without SSL. In case you’re wondering, SSL is used to encrypt data that is transferred over the Internet. Some email tools can work with SSL connections, while others can’t. If you can use it, you should, but if you can’t, it’s not something to worry about.
12. Press No to clear the prompt. You move to the New Account screen with the information you’ve configured for the account so far.

13. Press IMAP if the email account uses IMAP or POP if the account uses POP.
14. Scroll down until you see both the Incoming Mail Server and Outgoing Mail Server options.
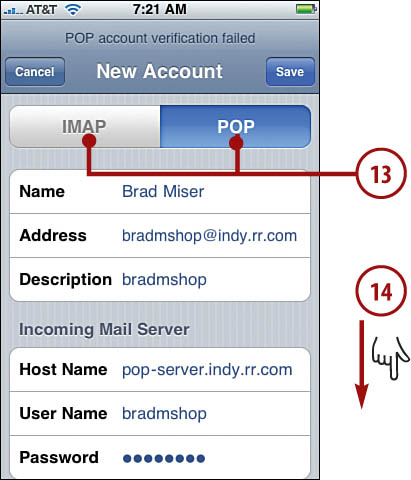
15. Check the information in the Incoming Mail server section, including the Host Name, your user name, and the password (the user name and password should be fine if you entered them correctly in the previous steps). iPhone attempts to create the appropriate host name based on the email address you entered; sometimes this is correct, sometimes it isn’t.
16. If you need to change any of this information, press the appropriate field and enter the correct information.

17. Enter the host name of the outgoing server in the Outgoing Mail Server field. This is usually something like smtp-server.domain.com.
18. Enter the user name and password for the outgoing mail server; these are usually the same as for the incoming mail server. If you are using an SMTP server that isn’t associated with the email account you are configuring, use that user name and password instead.
19. Press Save. The account information you entered is verified.

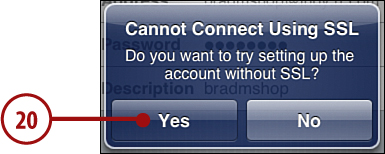
20. If the SSL prompt appears again, and the account doesn’t use SSL, press Yes to set it up without SSL.
Once the account information is verified, the account is created, you move back to the Mail, Contacts, Calendars screen, and you see the new account on the Account list.
21. If you want to perform advanced configuration of the account, refer to Performing Advanced Configuration of Email Accounts on iPhone, later in this chapter.
Performing Advanced Configuration of Email Accounts on iPhone
Different kinds of email accounts have different sets of advanced configuration options, but you access those options in a similar way for all accounts. The following steps show details for a MobileMe account. To do advanced configuration of other accounts you use similar steps, but the details for the specific accounts you are configuring will differ.
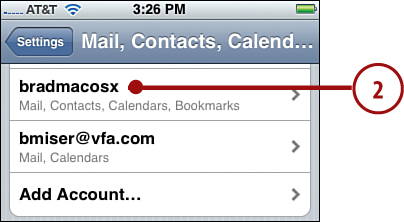
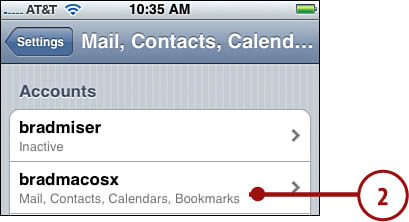
1. Move the to Mail, Contacts, Calendars screen.
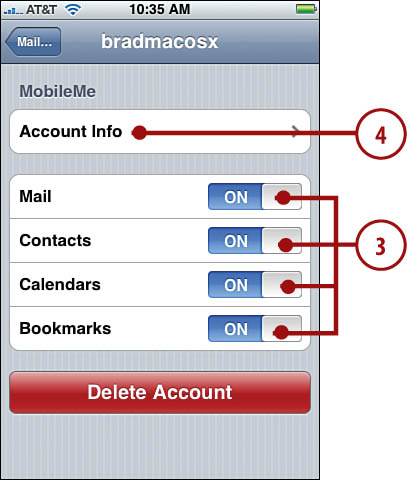
2. Press the email account you want to configure. You move to the account configuration screen.
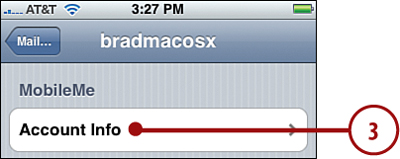
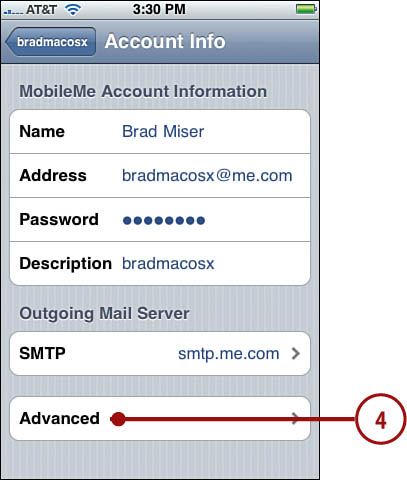
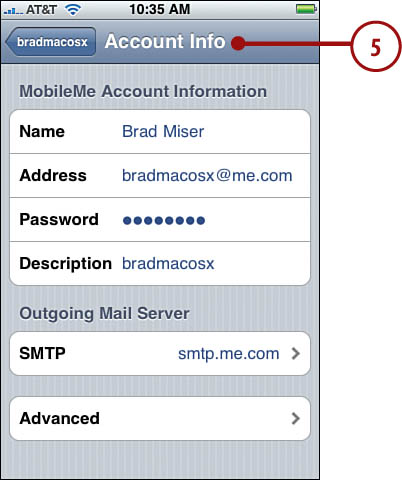
3. Press Account Info. You see the Account Info screen, where you see the information you configured for the account when you added it.
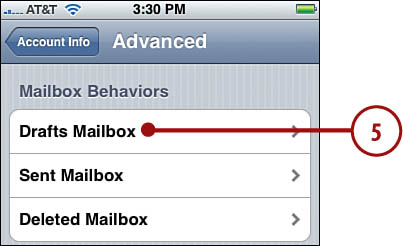
4. Press Advanced. You see the Advanced screen that you can use to set specific behaviors.
5. Press Drafts Mailbox.
6. To have drafts of your emails stored on iPhone, press Drafts, or to have them stored on the server, press INBOX.
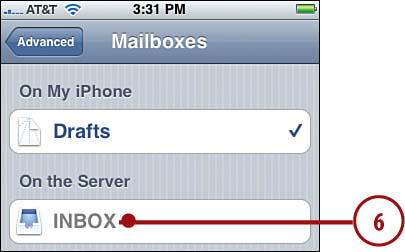
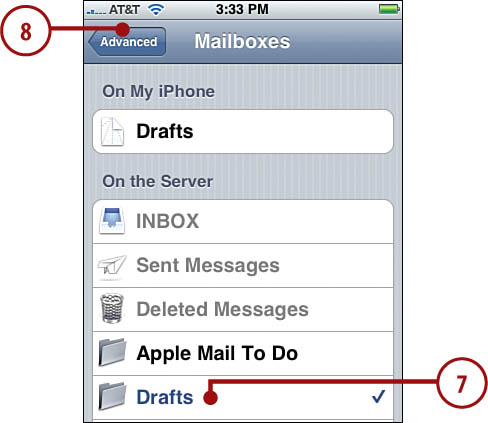
7. In the On the Server section, which appears only after you press INBOX in step 6, press the folder in which you want draft messages stored. The advantage of storing drafts on the server is that you can work on them from any location that can access your MobileMe account, such as a computer. If you save them on iPhone, you can only work on them using iPhone.
8. Press Advanced.
9. Using the information in steps 6 through 8, set the location where your sent mail is stored and where deleted messages are stored. The options are the same as for drafts.
10. Press Remove.
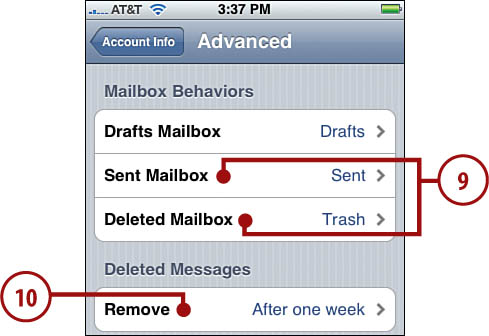
11. Choose when you want deleted email to be removed from the server. The longer the time frame, the longer storage space on the server is used for deleted messages, but the longer you will be able to recover those messages. In most cases, the amount of space you have on the email server associated with the email account is limited, so it’s better not to store messages you have deleted there for a long period of time.
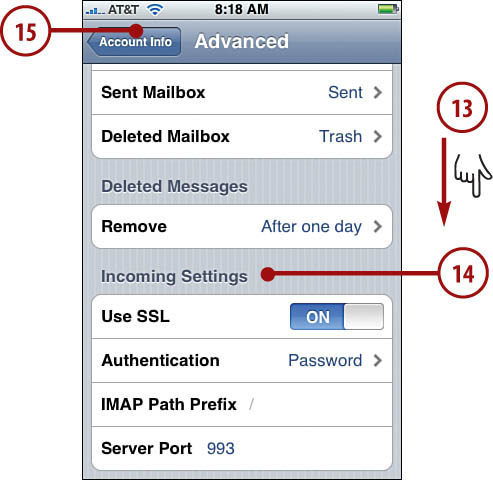
12. Press Advanced.

13. Scroll down so you see the Incoming Settings section.
14. If you should ever need to change any of the settings that enable you to retrieve email for the account, use the fields in the Incoming Settings section to do so. It is unlikely you will need to change these settings, assuming you synced the account with a computer or were careful when you first configured it. If you ever do change the settings, you need to make sure they match the incoming mail server information provided for the email account by the ISP.
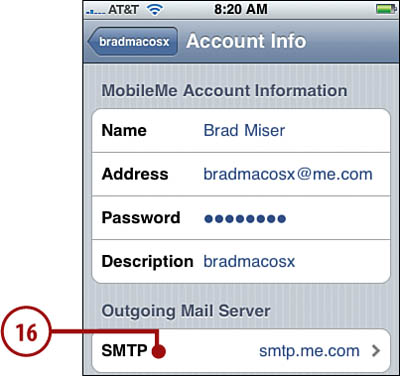
15. Press Account Info. You move back to the Account Info screen.
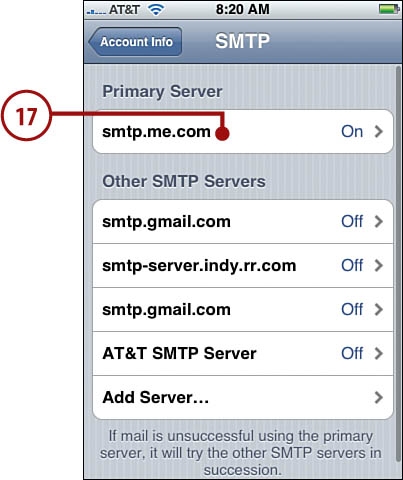
16. Press SMTP. You move to the SMTP screen for the account. Here, you see all of the SMTP servers for the various email accounts configured on iPhone. At the top of the screen is the primary server, which is the one that iPhone always tries first when you send email. The Other SMTP Servers list shows other servers that are configured. If a server’s status is On, iPhone will attempt to send email via that server if the primary fails. It’s useful if you have at least two SMTP servers On for each email account.
17. If you need to change the configuration for the primary server, press it. You see the configuration screen for that SMTP server.
18. To turn the server off for the account, press ON; the status becomes OFF, and that server will not be used to send email from the account.
19. To change the server settings, use the fields in the Outgoing Mail Server area; the settings you use need to match the information provided by the organization that provides the server.
20. Press SMTP.

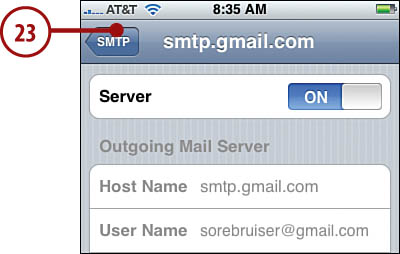
21. To enable another SMTP server for the account, press it on the Other SMTP Servers list. You move to the configuration screen for that SMTP server.
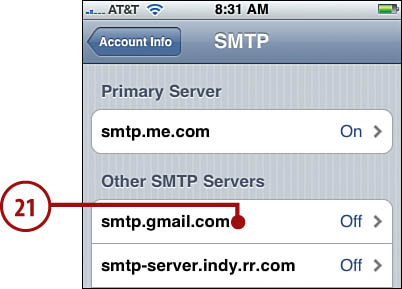
22. To enable the server for the account, press OFF so the status becomes ON. That server will be used when sending email if the primary account fails.

23. Press SMTP.
Changing SMTP Server Settings
If the fields for an SMTP server are disabled, it means that the server is the primary for another email account, so you can’t change it from the current one. To make changes to that server, move to the Advanced screen for the email account for which it is the primary SMTP server, and use its tools to make the changes to the server settings.
24. Enable or disable other SMTP servers.
25. To add a new SMTP server, press Add Server… and then configure the server with the Add Server screen; you use the same type of settings as when you configure an email account.

Configuring Exchange Email Accounts on iPhone Manually
Microsoft Exchange is the most widely used system for corporate email. iPhone email is compatible with Exchange, which is very good news indeed. There are two ways to connect iPhone to an Exchange account (which can include email, calendar, and contacts). One is to go through an Outlook Web Access (OWA) service; this service enables you to access your Exchange information over the Web. The good news about this is that you don’t need any support from the organization’s IT department to configure iPhone to access your Exchange account. The other option is for your organization’s Exchange system to be configured to support iPhone access directly; this does require support from the IT department. Some additional configuration work (and slight expense) is needed to enable this.
If you already know you can access your Exchange account through OWA, you’re ready to configure your Exchange account on iPhone, and you can move ahead with the following steps. If you aren’t sure, check with your IT department to see if OWA is supported. If it is, use the following steps to configure it on iPhone. If OWA isn’t provided, find out if the Exchange system has been configured to support iPhones. If it has, get the configuration information you need from your IT department and use that to configure iPhone. (The following steps show an OWA configuration.)
>>>step-by-step
1. On the Home screen, press Settings.
2. Scroll down the screen.
3. Press Mail, Contacts, Calendars. The Mail, Contacts, Calendars screen appears.
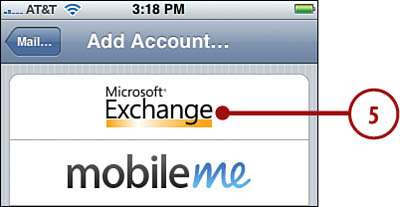
4. Press Add Account…. You see the Add Account… screen.
5. Press Exchange. You see the Exchange account screen.
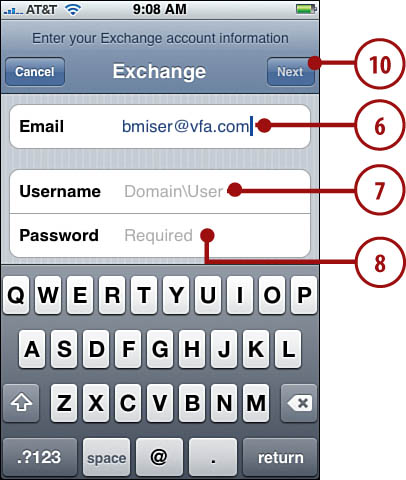
6. Enter your email address.
7. Enter your domain and user name. (To enter a between the domain and user name, press the .?123 key and then press #+= key.)
8. Enter your password.
9. Enter a description of the account (the default is your email address).
10. Press Next. The account information is verified, and you see the Exchange screen with your information and some additional fields.
11. Enter the server address. If you are using OWA, this might be something like owa.yourcompany.com. You don’t enter the https:// before the address you use to move to the server via a web browser nor the /exchange after that address. If you’re not using OWA, enter the address provided by your IT department.
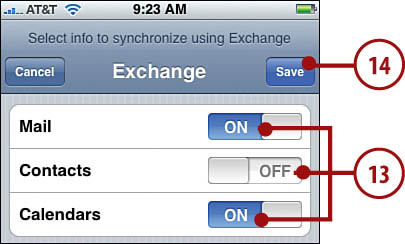
12. Press Next. The account information is verified, and you see the controls that enable you to determine which information is synced on iPhone.

13. Press ON for any of the information you don’t want to be moved onto iPhone; its status becomes OFF to show you it won’t be synced on iPhone.
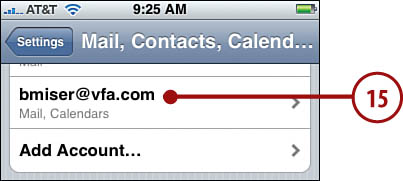
14. Press Save. The sync is configured, and you move back to the the Mail, Contacts, Calendars screen where you see your Exchange account.
15. Press your Exchange account.
16. Press Mail days to sync.
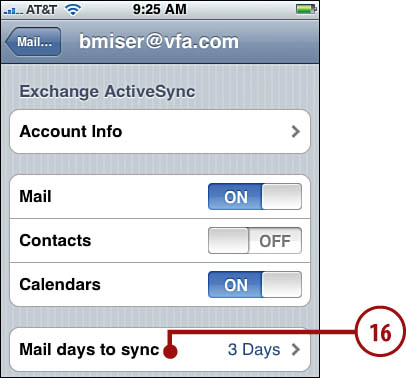
17. Press the amount of time over which Exchange information should be synced. For example, to have one week of Exchange information on iPhone, press 1 Week.
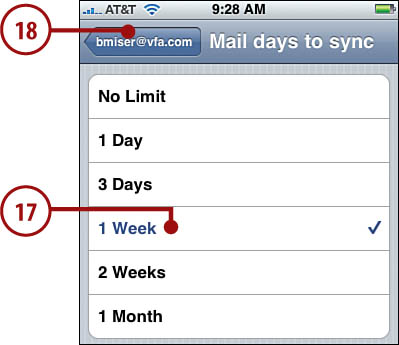
18. Press the account button labeled with your email address.
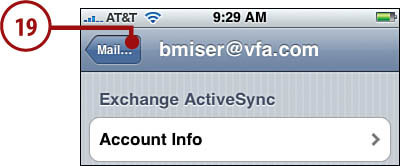
19. Press Mail… to return to the Mail, Contacts, Calendars screen.
Configuring General Email Settings
There are several settings you use to configure how iPhone handles your email.
>>>step-by-step
Configuring How Email is Retrieved
There are several ways email is retrieved on iPhone. Using Push, email is automatically pushed from the email server onto iPhone. Not all email accounts support push (MobileMe and Exchange accounts do), but its benefit is that email on iPhone is always in sync with the email server. The downside is that pushing email to iPhone consumes more battery power because of the near constant activity. iPhone can also fetch email, which means that it contacts the server at defined intervals to get email. This approach doesn’t retrieve email as fast as pushing, but it does use much less battery power. You can set iPhone to fetch email at specific intervals, or you can fetch email manually.
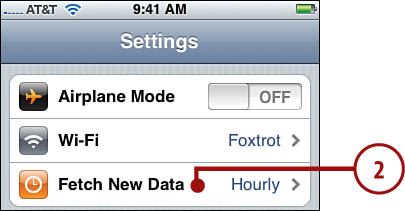
1. On the Home screen, press Settings.
2. Press Fetch New Data. You see the Fetch New Data screen.
3. To enable email to be pushed to iPhone, ensure the Push status is ON (if it isn’t, press OFF to turn it on); or to disable push to extend battery life, press ON so the status becomes OFF.
4. Press the amount of time that you want iPhone to fetch email when Push is OFF. Or for accounts that don’t support push, press Manually if you want to only check for email manually.
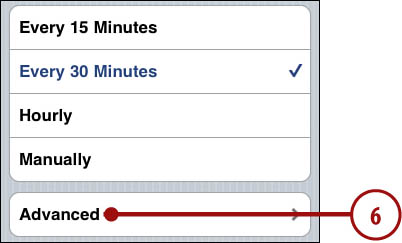
5. Scroll down the screen.
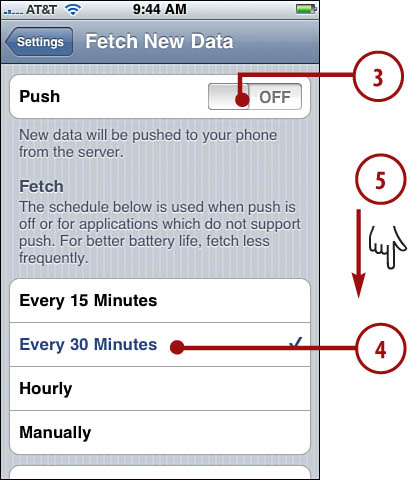
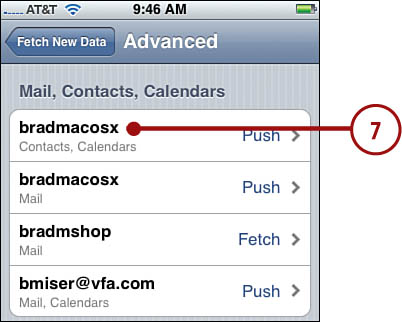
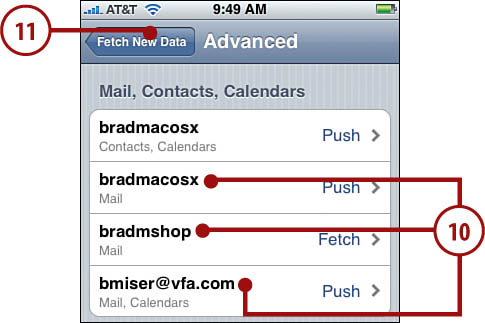
6. Press Advanced. You see the Advanced screen that contains a list of all your active email accounts. Next to each account, you see if it is configured to use Push, Fetch, or Manual.
7. To change how an account gets email or other information, press it. You see the account’s screen. The options on this screen depend on the kind of account it is. You may see Push or Fetch, but all accounts have the Manual option.
8. Press the option you want to use for the account.
9. Press Advanced.
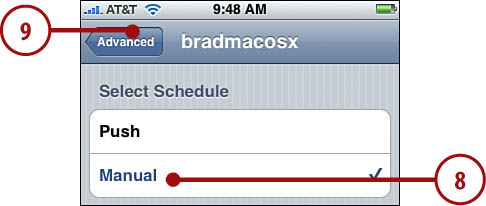
10. Repeat steps 7 through 9 for each account.
11. Press Fetch New Data.
Configuring Global Email Settings
iPhone includes a number of settings that affect all of your email accounts. You can also set preferences for specific email accounts, as you learn later in this chapter.
1. Move to the Settings screen.
2. Press Mail, Contacts, Calendars.
3. Scroll down until you see the Mail section.
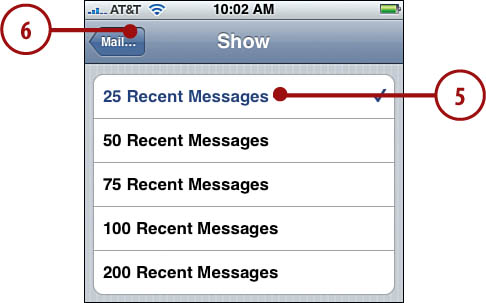
4. Press Show. The Show screen appears.

5. Press the number of recent messages you want iPhone to display in the email application.
6. Press Mail….
7. Press Preview. The Preview screen appears.
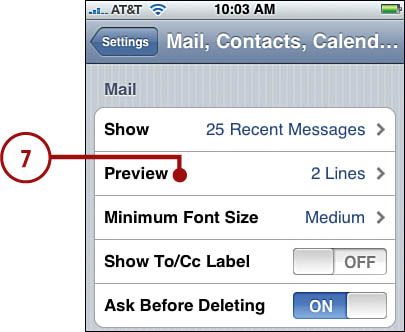
8. Press the number of lines you want iPhone to display for each email when you view the inbox.
9. Press Mail….

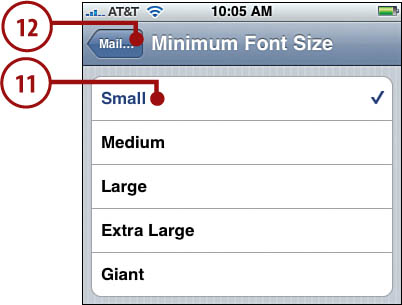
10. Press Minimum Font Size. The Minimum Font Size screen appears.

11. Press the smallest font size you want iPhone to use for email. The larger the size, the easier to read, but the less information fits on a single screen.
12. Press Mail….
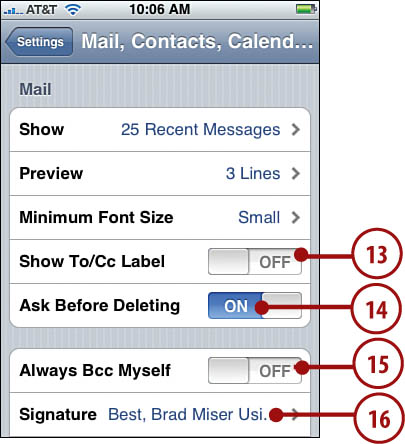
13. Press Show To/Cc Label to see the To and Cc labels in email headers.
14. If you don’t want to have to confirm when you delete messages, press Ask Before Deleting ON. Its status becomes OFF, and you don’t have to confirm that you want to delete a message when you press its Delete button.
15. If you want to receive a blind copy of each email you send, press Always Bcc Myself OFF. Its status becomes ON, and each time you send a message, you also receive a copy of it, but your address is not shown to the other recipients.
16. Press Signature. The Signature screen appears.
17. Enter the signature you want to append to each message you send.
18. Press Mail….

19. Press Default Account. The Default Account screen appears.
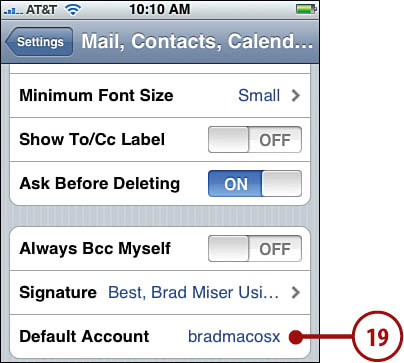
20. Press the account you want to be your default. The default account appears at the top of lists and is used as the From address for emails you send. (You can change it on messages when you send them.) It is also the one used when you send photos, YouTube videos, and so on.
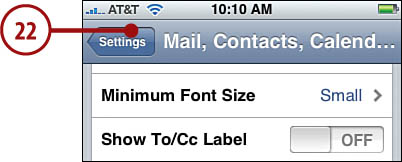
21. Press Mail…. You move back to the Mail screen. Now enable or disable email sounds.

22. Press Settings.
23. Press Sounds.

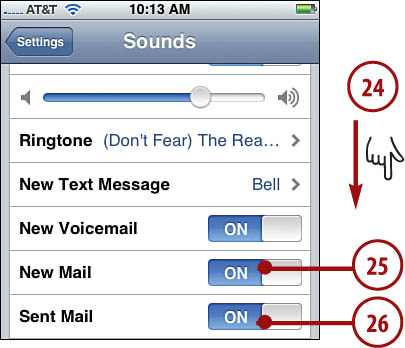
24. Scroll down the screen.
25. To hear a sound when you receive new mail, make sure that the ON status for New Mail is shown; press OFF to turn the new mail sound to ON or press ON to turn it to OFF.
26. To hear a sound when you send mail, make sure that the ON status for Sent Mail is displayed; press ON to turn the sent mail sound off or OFF to turn it on again. Your global email configuration is complete.
Managing Email Accounts
There are a number of ways in which you can manage your email accounts.
Changing Email Account Configurations
As you work with your email accounts, you might need to make changes from time to time. The specific changes you can make depend on the type of account you are changing. The general steps to change an account follow.
1. Move to the Mail, Contacts, Calendars screen.
2. Press the account you want to change.
3. Use the ON and OFF buttons to enable or disable information to sync with the account.
4. Press Account Info.
5. Use the Account Info screen to make changes to the account. This screen is explained in the section Performing Advanced Configuration of Email Accounts on iPhone, previously in this chapter.
Disabling Email Accounts
You can disable POP or IMAP email accounts so that they are not used in iPhone’s email application but remain configured on iPhone should you want to use them again.
1. Move to the Mail, Contacts, Calendars screen.
2. Press the account you want to disable.

3. Press Account ON so its status becomes OFF. The email account is no longer used by iPhone’s Mail application.
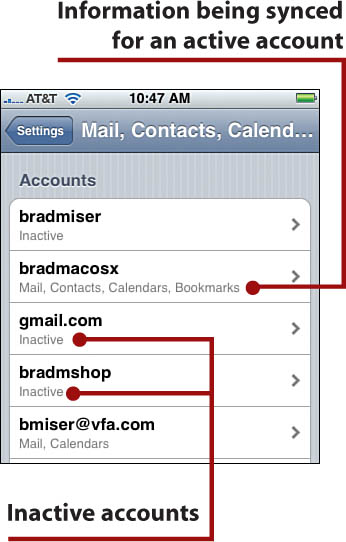
4. Press Mail…. When you return to the Mail, Contacts, Calendars screen, you see the kind of information being synced for active accounts or the Inactive status for disabled accounts.

Deleting Email Accounts
If you no longer want to receive email from an account on iPhone, you can delete it. Of course, the account still exists; you just won’t get email from it on iPhone. You can still use it with an email application, via the Web, and so on. (You can restore it to iPhone by syncing it or by recreating it manually.)
1. Move to the Mail, Contacts, Calendars screen.
2. Press the account you want to delete.
3. Scroll to the bottom of the screen.
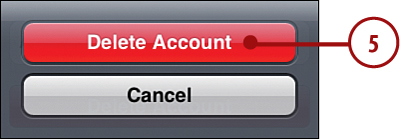
4. Press Delete Account.

5. Press Delete Account at the prompt. The account is removed from iPhone.
Working with Email
After you configure email accounts on iPhone, you’re ready to start using those accounts for all your email needs. When you move to the Home screen, you see the number of new email messages you have in the Mail button. Even if you don’t have any new email, the Mail button leads you to iPhone’s email application.
>>>step-by-step:
Receiving and Reading Email
iPhone’s Mail application enables you to receive and read email for all the email accounts configured on it that are active.
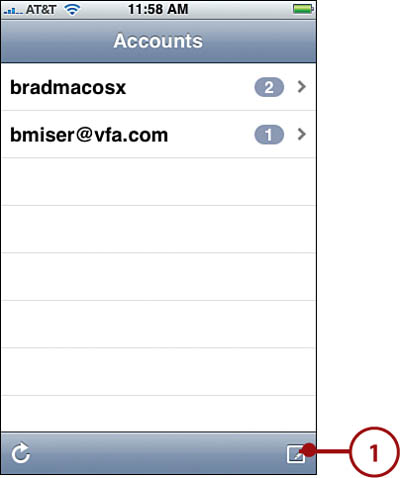
1. On the Home screen, press Mail. The Mail application opens, and you move to the last screen you used. If that isn’t the Accounts screen, press the return button in the upper left corner of the screen until you reach the Accounts screen.
Skip to step 3 if you have only one email account configured on iPhone. You know this applies to you if you don’t have an accounts screen because you always move directly to your email account’s screen when you press the Mail button.
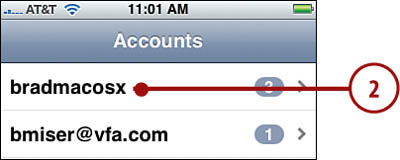
Next to each account, you see the number of new emails received in that account.

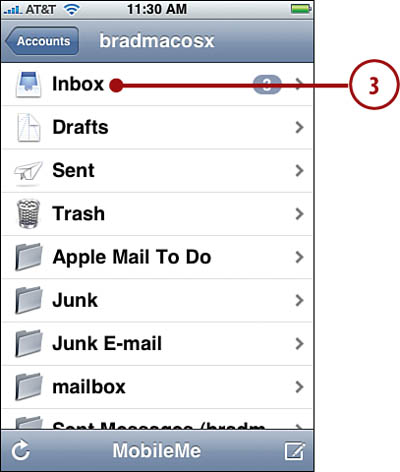
2. To read messages, press the account that contains messages you want to read. You move to that account’s screen; the name of the account is the account’s description, which defaults to the email address. You see all the folders within that account. The number and type of folders you see depends on the type of account it is.
Loading More Messages
If more messages are available than are downloaded, press the Load More Messages link. The additional messages download to the inbox you are viewing.
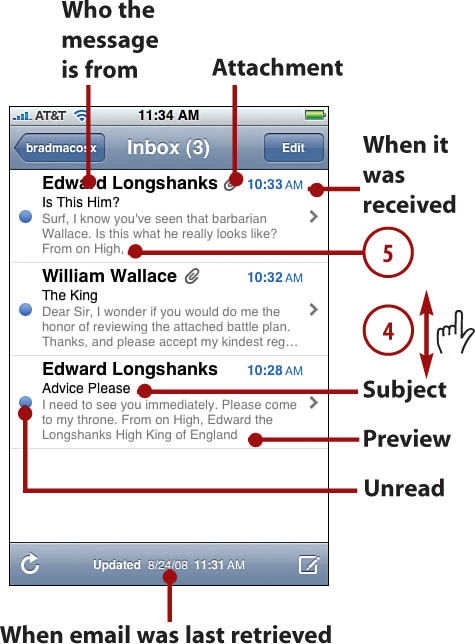
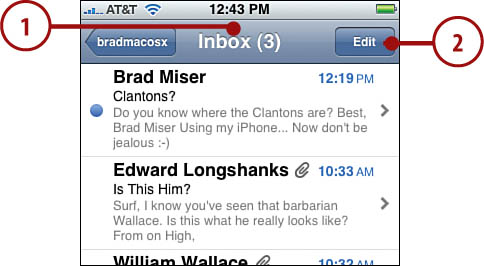
3. Press Inbox. The inbox for that account opens, and you see all the messages it contains. Unread messages are marked with a blue dot. A paperclip icon indicates that a message includes an attachment. At the bottom of the screen, you see when the inbox was last updated, meaning the last time messages were retrieved.
4. Scroll up or down the screen to browse all the messages.
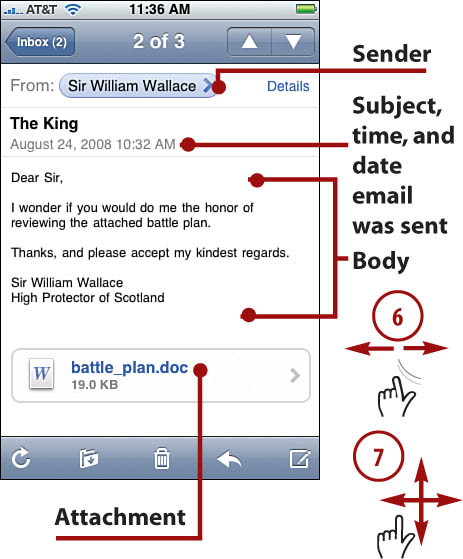
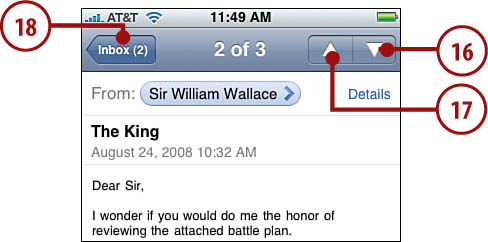
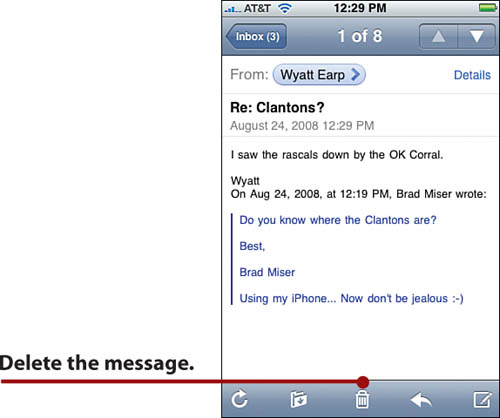
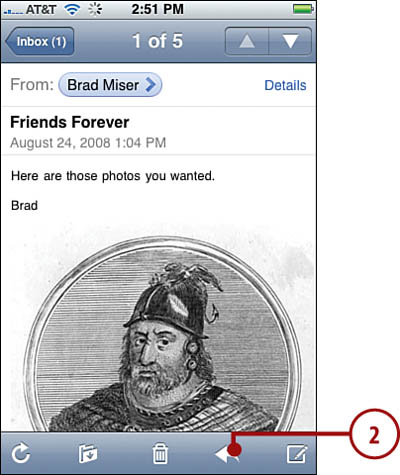
5. To read a message, press it. The message screen appears. As soon as you open a message’s screen, it’s marked as read, and the email counter reduces by 1. At the top of the screen, you see the number of the message and the total in the inbox (such as 2 of 10). Just below that is the address information, including who the message is from and who it was sent to. Under that, you see the message’s subject along with time and date it was sent. Under that, you see the body of the message. If the message has an attachment, you see it at the bottom of the screen.
6. Unpinch or double-press your finger on the message to zoom in. If you double-press on a column of text, it resizes to fit the screen.
See More Address Info?
Press the Details link located just under the down arrow at the top of the email screen to show more address information, such as the To and Cc sections. Press Details to hide that information again.
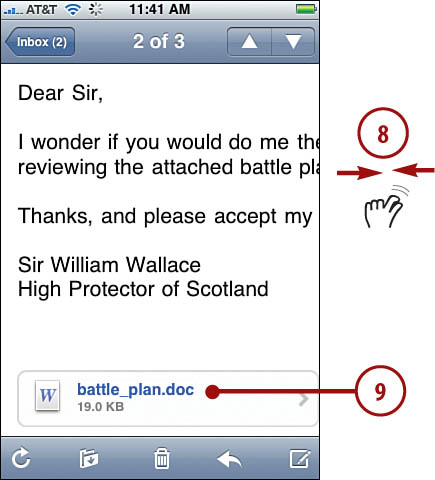
7. Drag the message around the screen to read it. To scroll up or down, left or right, just drag your finger around the screen.
8. Pinch your fingers or double-press to zoom out.
Photos Attached
If the message includes a photo, iPhone displays the photo in the body of the email message. You can zoom in or out and scroll to view it just as you can with text.
9. To view a message’s attachment, press it. If iPhone can display files of its type, the file downloads to iPhone, and you see the file on a screen with the file’s title as its name. If iPhone can’t display the attachment, you’ll just see an icon for the attachment with no button to view it.
10. Scroll the document by dragging your finger up, down, left, or right on the screen.
11. Unpinch or double-press to zoom in.
12. Pinch or double-press to zoom out.
13. Press Message. You move back to the Message screen.

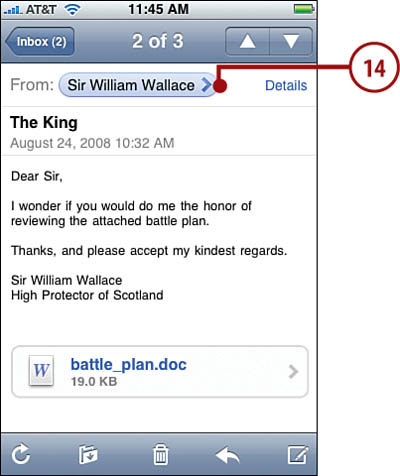
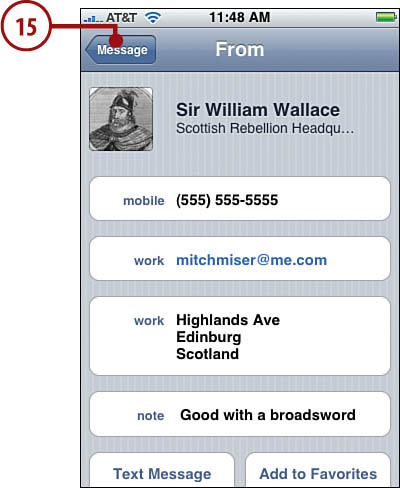
14. To view information for an email address, such as who sent the message, press it. The Info screen appears; its title tells you how the person relates to the message. For example, if you pressed the email address in the From field, the screen title is From. If the person is on your Contacts list, you see his contact information. If not, you see as much information as iPhone can determine based on the email address.
HTML Email
Mail can receive HTML email that behaves like a webpage. When you press a link (usually blue text, but can also be photos and other graphics) in such an email, Safari opens and takes you to the link’s source. You then use Safari to view the webpage. See Chapter 6, “Surfing the Web,” for information about Safari.
15. Press Message. You move back to the email.
16. To read the next message in the inbox, press the down arrow. The next message in the Inbox list replaces the current one.
17. To move to a previous message in the inbox, press the up arrow.
18. To move back to the inbox, press Inbox.
Large Messages
Some emails, especially HTML messages, are large and don’t immediately download to iPhone in their entirety. When you open a large message, you see that the entire message has not been downloaded. Press the link to download the rest of it.
Sending Email
You can send email from any of your accounts.
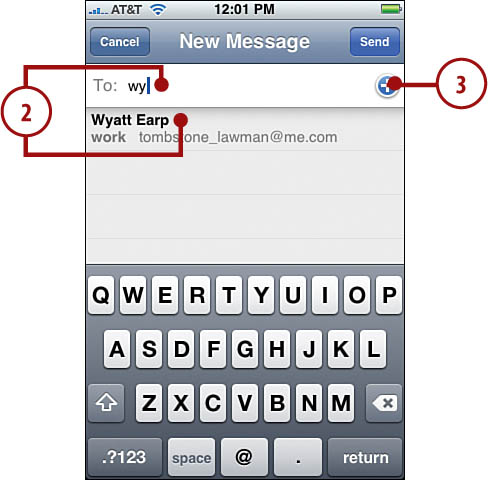
1. Press the New Mail button on any Mail screen. The New Message screen appears. The From address is your default email account unless you were viewing a screen for a different account, in which case that account is used as the From address. Your signature is placed at the bottom of the message.
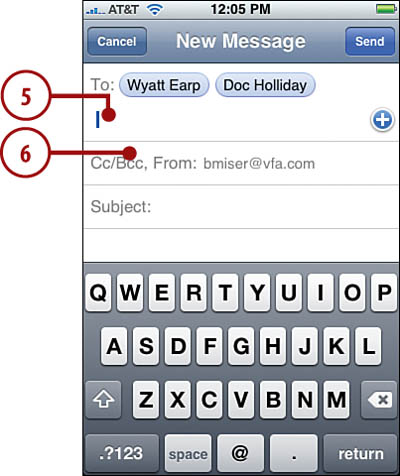
2. To type a recipient’s email address, press the To field and type in the address using iPhone’s keyboard. As you type, iPhone attempts to find matching addresses in your Contacts list or in emails you’ve sent or received and displays the matches it finds. To select one of those addresses, press it, and iPhone enters the rest of the address for you. Or just keep entering information until the address is complete.
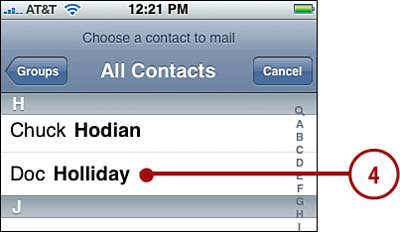
3. To address the email using contacts, press Add Contact. The All Contacts screen appears.
4. Use the All Contacts screen to select an email address (see Chapter 2, “Managing Contacts,” for details about contacts). When you select a contact, the address is pasted into the To field, and you return to the New Message window.
5. Repeat steps 2 through 4 to add all the recipients to the message.
6. Press the Cc/Bcc, From line. The Cc and Bcc lines expand.
Removing Addresses
To remove an address, press it and then press the Delete button on iPhone’s keyboard.
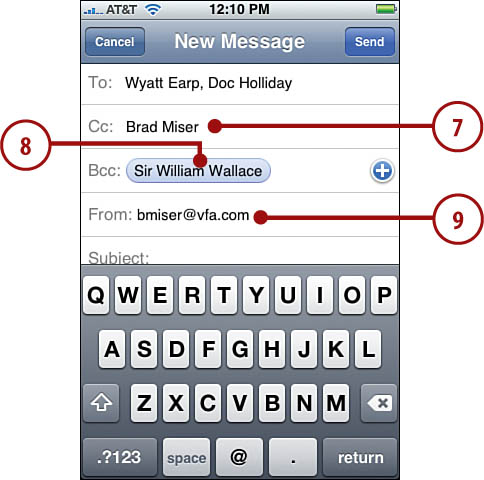
7. Use steps 2 though 4 to add recipients to the Cc field.
8. Use steps 2 though 4 to add recipients to the Bcc field.
9. To change the account from which the email is sent, press the From field. The account wheel appears at the bottom of the screen.
10. Press the account you want to use to send the message. It is marked with a check mark, and the address is placed in the From field.
11. Press in the Subject line. The account wheel closes.
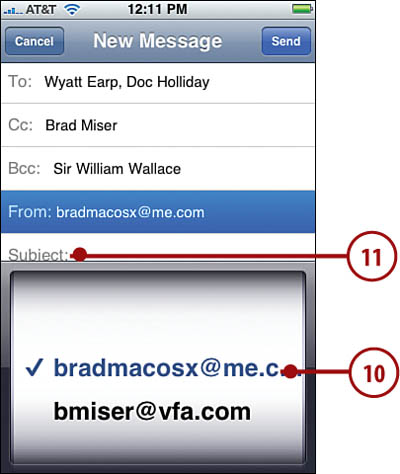
12. Type the subject of the message.

13. Scroll down the screen until you see the body area.
14. Press in the body and type the body of the message above your signature. As you type, iPhone attempts to correct spelling and makes suggestions to complete words. To accept a proposed change, press the spacebar when the suggestion appears on the screen; to ignore a correction, press the x in the suggestion box.
15. When you finish the message, press Send. iPhone sends it.

Saving Your Work in Progress
If you want to save a message without sending it, press Cancel. A prompt appears; choose Save to save the message. When you want to work on the message again, move to the account’s screen and open the Drafts folder. Press the message, and you move back to the New Message screen as it was when you pressed the Cancel button. You can make more changes to the message and then send it or save it again.
Sending Email from All the Right Places
You can send email from a number of different places on iPhone. For example, you can share a photo with someone by pressing the Email button. Or you can press a contact’s email address to send an email from your contacts list. For yet another example, you can share a YouTube video. In all cases, iPhone creates a new message that includes the appropriate content, such as a photo or link, and you use Mail’s tools to complete and send the email.
>>>step-by-step:
Replying to Email
Email is all about communication, so Mail makes it simple to reply to messages.
1. Move to the message you want to reply to.
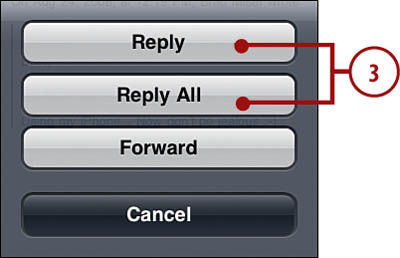
2. Press the Action button. A prompt appears.
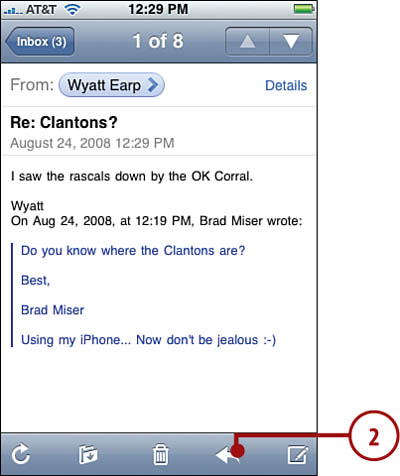
3. Press Reply to reply to only the sender or press Reply All to reply to everyone who received the original message. (You only see Reply All if the message was sent to more than one person.) The Re: screen appears showing a new message addressed to just the sender or to everyone who received the message, depending on the action you selected. iPhone pastes the contents of the original message at the bottom of the body of the new message below your signature.
4. Use the message tools to write your reply, to add more To or Cc recipients, or to make any other changes you want.
5. Press Send. iPhone sends your reply.

Forwarding Email
When you receive an email that you think someone else should see, you can forward it to them.
1. Read the message you want to forward.
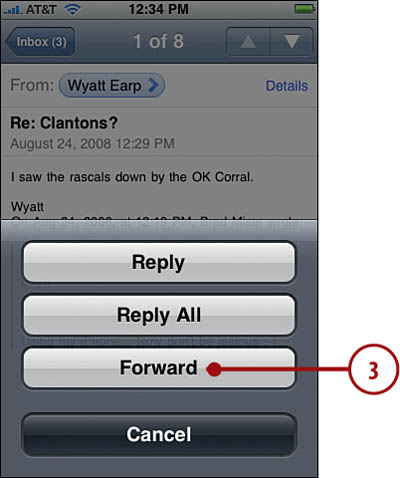
2. Press the Action button. A prompt appears.

3. Press Forward. The Forward screen appears. iPhone pastes the contents of the message you are forwarding at the bottom of the message, below your signature.
4. Address the forwarded message using the same tools that you use when you create a new message.
5. Type your commentary about the message above your signature.
6. Edit the forwarded content as needed.
7. Press Send. iPhone forwards the message.

Large Messages
Some emails, especially HTML messages, are large so that they don’t immediately download to iPhone in their entirety. When you forward such messages before they finish downloading, iPhone prompts you to wait until the download finishes before forwarding. If you choose not to wait, iPhone forwards only the downloaded part of the message.
Checking for New Messages

You can check for new mail from any Inbox or message screen by pressing the Get New Mail button. iPhone gets and downloads all the email for that account since iPhone last checked it. If you get new mail from the Accounts screen, messages in all your accounts are retrieved.
The bottom of the Mail screens always shows the status of the most recent check.
Determining the Status of Messages
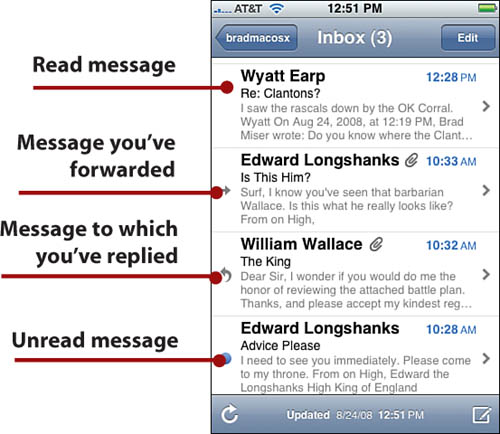
When you view an Inbox, you see icons next to each message to indicate its status (except for messages that you’ve read but not done anything else with).
Deleting Email from the Message Screen
To delete a message while viewing it, press the Trash can. If you’ve configured the warning preference, confirm the deletion, and iPhone deletes the message. If you’ve disabled the confirmation, iPhone deletes the message immediately.
Dumpster Diving
As long as an account’s trash hasn’t been emptied (you learned how to set that earlier in the chapter by configuring the Remove setting for an account), you can work with a message you’ve deleted by moving to the account’s screen and opening the Trash folder.
>>>step-by-step:
Deleting Email from the Inbox
1. Move to the inbox for the account from which you want to delete email.
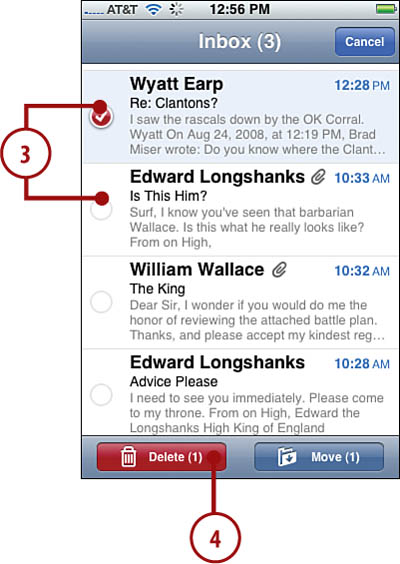
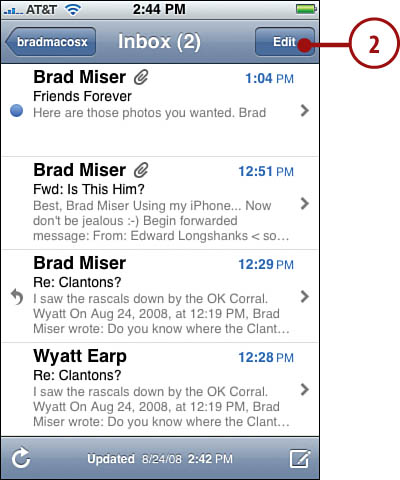
2. Press Edit. A selection circle appears next to each message. The Delete and Move buttons appear at the bottom of the screen.
3. Select the messages you want to delete by pressing their selection circles. As you select each message, the counter in the Delete button increases by one, and the message’s selection circle is marked with a check mark.
4. Press Delete. iPhone deletes the selected messages and exits Edit mode.
Yet Another Way to Delete
While you are on the Inbox screen, drag your finger to the left or right across a message. The Delete button appears. Press it to delete the message.
Organizing Email from the Message Screen
1. Open a message that you want to move to a folder.
2. Press the Mailboxes button. The Mailboxes screen appears. At the top of this screen, you see the current message. Under that, you see the mailboxes available under the current account.

3. Press the folder to which you want to move the message. The message moves to that folder, and you move to the next message in the Inbox.

Organizing Email from the Inbox
1. Move to the inbox for the account from which you want to organize email.
2. Press Edit. A selection circle appears next to each message. The Delete and Move buttons appear at the bottom of the screen.
3. Select the messages you want to move by pressing their selection circles. As you select each message, the counter in the Move button increases by one, and the message’s selection circle is marked with a check mark.
4. Press Move. The Mailboxes screen appears.

5. Press the folder into which you want to place the messages. They are moved into that folder, and you return to the Inbox, which is no longer in Edit mode.

>>>step-by-step:
Viewing Messages in a Folder
1. Move to the account screen for the account containing the folders and messages you want to view. You see all the folders for the account.
2. Press the folder containing the items you want to view. That folder’s screen appears on which you see the messages it contains.

3. Press a message to view it.

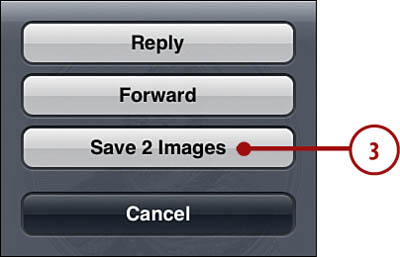
Saving an Image Attached to a Message
1. Move to the message screen for an email that contains images.
2. Press the Action button.
3. Press Save X Images, where X is the number of images attached to the message. The images are saved in the Photo Roll album in the Photos application (see Chapter 9, “Taking, Storing, and Viewing Photos,” for help working with the Photos application). The next time you sync iPhone, the images are moved onto the computer.