Have you ever wondered why your pictures are brighter when you don’t zoom and get darker when you zoom? Are you trying to figure out why your attempts at portraits make your subjects look like gargoyles? Can’t figure out why the digital zoom feature makes your high-megapixel pictures look like they were taken through a screen door? You’ve come to the right place.
Understanding how your camera’s built-in or interchangeable zoom lenses work, and what your options are for interchangeable lenses on DSLR cameras, is essential if you want better pictures—and that process starts now.
Air shows and long zoom lenses are made for each other. I used the following settings in Figure 15.1:
f/5.6
1/800 second
ISO 200

Fast (f/1.8 or wider) prime lenses for DSLR cameras make capturing special moments easy, even in dim light. I used the following settings in Figure 15.2:
f/1.8
1/20 second
ISO 1600

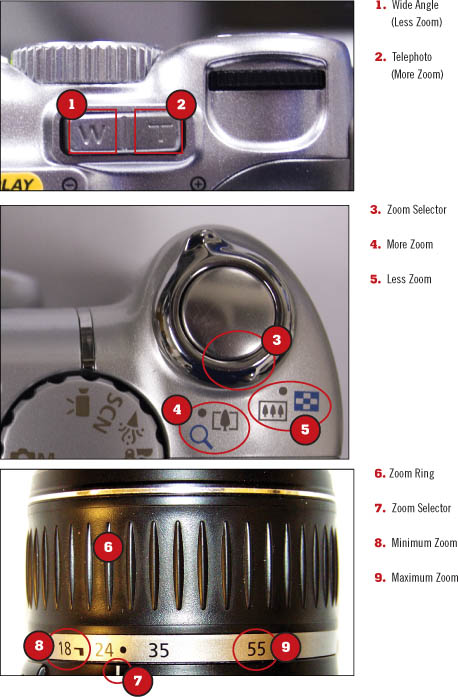
Except for a few bargain-basement models, virtually every digital camera features a zoom lens. So, what’s a zoom lens? A zoom lens can change its magnification at the touch or twist of a button (as in most point-and-shoot cameras) or at the twist of the zoom ring (as in DSLR cameras and a few high-end point-and-shoot cameras) which, in turn, moves lens elements inside the lens barrel. This type of zoom is known as an optical zoom. Figure 15.3 shows typical zoom controls on point-and-shoot and DSLR cameras.
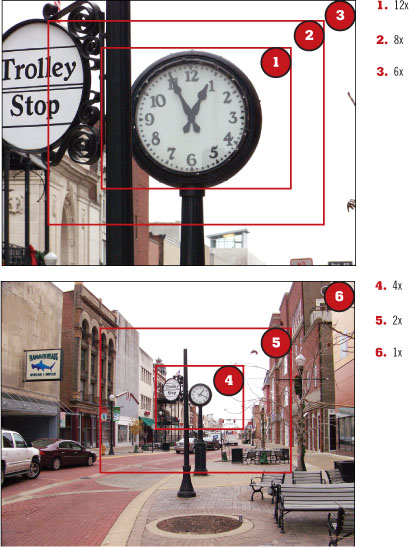
Zoom lenses in point-and-shoot cameras are typically identified by their zoom ratios, such as 3x, 4x, 10x, and so on. This number refers to how much larger the subject appears at full zoom than at minimal zoom. Figure 15.4 compares shots taken of the same subject at 1x–12x zoom levels.
Note

With a DSLR camera, you have to do a bit of math to figure out the zoom ratio of any lens. For example, to determine the zoom ratio of an 18–55mm lens, divide 55 by 18 to figure out the zoom ratio (it’s just a tad over 3x).
However, if you have two or more lenses and you want to figure out the total zoom ratio they provide, divide the minimum and maximum focal lengths of the longer lens by the shortest focal length of your shortest lens. For example, if you have an 18–55mm lens and a 75–300mm lens, the 75–300mm lens provides a 4.17–16.67x zoom ratio compared to the 3x zoom ratio of the 18–55mm lens. By performing this type of calculation, you can determine exactly how any new lens purchase affects your total zoom ratio.
Many point-and-shoot digital cameras include a feature called digital zoom either in addition to or instead of an optical zoom. Sounds great, but digital zoom works by magnifying the pixels in an image. Figure 15.5 compares 12x digital and optical zoom photos. As you can see, optical zoom provides far better picture quality than digital zoom.

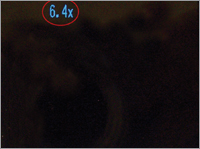
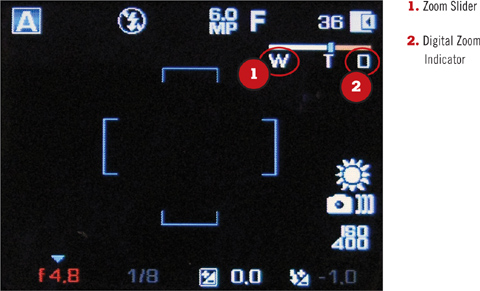
How can you tell when your camera switches from optical to digital zoom? Some cameras display a magnification ratio when you switch to digital zoom (Figure 15.6), while others use a different-colored bar to indicate the change (see Figure 15.7).
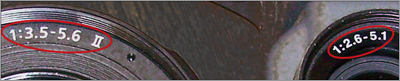
Most cameras and lenses (Kodak being a major exception) mark the maximum aperture (f-stop) on the front of the lens or the lens barrel. If you see a range of apertures marked on your lens, as in Figure 15.8, or listed in your camera or lens specifications, you have a variable aperture lens. This feature can cause problems when you’re shooting in dim light or with flash.
As you zoom from 1x (widest view) to narrower views with a variable aperture zoom lens, the maximum aperture gets smaller, allowing less light for shooting. The result? You must use a slower shutter speed to provide correct exposure, or increase the ISO if you want to keep the same shutter speed. If you don’t, you will get a dark photo (compare the pictures shown in Figure 15.9).

→ | To learn more about aperture settings and how different numbers compare to each other, see the section “Using Aperture Priority Mode,” page 103. |
Most low-end digital cameras have a 3x to 4x zoom lens. The “kit” lens provided with most DSLR cameras as standard, usually an 18–55mm (Canon, Nikon, Sony) or 14–45mm (Olympus Four Thirds), is also a 3x zoom.
3x–4x zooms provide moderate wide-angle to portrait telephoto coverage and are very useful for capturing everyday life. Zoom back to 1x for dramatic group shots at close range (see Figure 15.10). 2x zoom is a good choice for grabbing special moments around you (Figure 15.11). Zoom out to 3x–4x for portraits (Figure 15.12).


Many point-and-shoot digital cameras include zoom lenses with zoom ratios beyond 4x. Longer zooms enable you to get better photos of baptisms or other special events (Figure 15.13), isolate your main subject (Figure 15.14), or bring foreground and background closer to each other (Figure 15.15).


Long zoom lenses (8x or longer) put you in the middle of the action, whether it’s on the water (Figure 15.16), in the air (Figure 15.17), or on the field (Figure 15.18).


Keep in mind that as zoom lens ratios get larger, motion blur and camera shake can become an issue, especially at shutter speeds longer than 1/250 second.
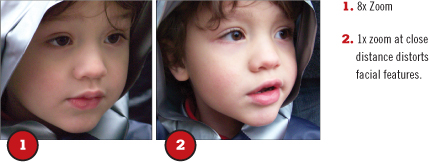
You can take portraits with any lens, but what zoom ratio is the best? I recommend 3x–4x ratios, but what happens with longer or shorter ratios? Compare the zoom ratios used in Figure 15.19. The left photo was shot at 8x, while the right photo was shot at 1x. Note how the facial features are distorted by shooting at close range at 1x, but are much more pleasing when shooting from a longer distance at 8x.
Lenses with a maximum aperture of f/2.8 or wider are often called “fast” lenses because they allow more light than lenses with smaller maximum apertures (f/3.5–f/5.6), which in turn permits faster shutter speeds (Figure 15.20), shooting in lower light at the same ISO, or shooting in low light without a flash (Figure 15.21). Wide apertures also enable selective focus (Figure 15.22), which blurs the background to draw the eye to the main subject.


If you are having problems getting sharp pictures of extremely close (less than three feet or one meter) or extremely distant scenes with a point-and-shoot camera, you might need to change the camera’s focusing mode.
 Point-and-shoot digital cameras generally have at least two focusing zones: normal and macro.
 Some cameras also include a third mode, variously known as Scenery, Distant, or Infinity AF.
To switch between modes, you might push a button on the camera or switch the control dial to the mode desired. Figures 15.23 and 15.24 compare close-up photos taken in normal and close-up (macro) modes.


DSLR cameras, and a few point-and-shoot digital cameras, can use filters. A filter is an optical glass device used to alter the image seen by the camera. It can help by absorbing light (ND), changing the reflectivity of light (polarizer), adding a slight warming tone (Skylight), softening details (soft focus or fog), or protecting the front of the lens from damage (UV), to list just the most common types of filters. Most filters screw into the front of the lens, but some wide aperture lenses used by professionals use filters that slip into the lens barrel. Figure 15.25 illustrates some of the most common types of filters discussed in the following sections.
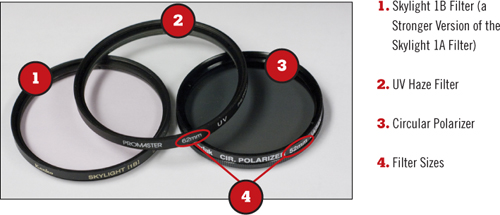
UV filters were used on film cameras to help reduce UV haze effects on sunny, smoggy days, but are used primarily to protect the camera lens on DSLRs. Skylight filters have a slight pinkish tinge that adds a touch of warmth to your photos. The Skylight 1A version is more common, and the Skylight 1B version shown in Figure 15.25 has a slightly greater warming effect. Skylight filters also protect the front of the lens from damage.
Just as polarized sunglasses remove glare from reflective objects, darken blue clear skies, and provide more vivid colors, polarizing filters provide the same benefits for your pictures. Any camera with a threaded front lens mount (such as a DSLR camera) can use a polarizing filter, and tube adapters are available for some point-and-shoot cameras with retractable lenses.
Tip
To determine what size filter a particular lens uses, look for a marking like this one on the front ring or side of the lens barrel: ![]() , followed by a number. For example,
, followed by a number. For example, ![]() 55 indicates 55mm filter;
55 indicates 55mm filter; ![]() 58 indicates 58mm filter, and so on.
58 indicates 58mm filter, and so on.
Almost all digital cameras use circular polarizing filters (the name refers to the type of polarizing material used). The older linear polarizing filters interfere with modern autofocus methods and should not be used on autofocus cameras.
Use a polarizing filter outdoors on sunny days; use it indoors only if you are shooting photos of items in glass cases (it can remove reflections from the glass). Polarizing filters create more vivid colors in your photos by removing reflections from glass, leaves, and other shiny objects, and by darkening blue skies.
To attach a polarizing filter, screw it into the screw threads at the front of the lens or tube adapter barrel. If you are using a protective filter, such as UV or Sky/Skylight 1A/1B filter, remove it first. Aim the camera at your subject and revolve the front ring on the filter to adjust the polarizing effect. Take the picture when you are satisfied. To see the effect on a point-and-shoot camera, you must use the LCD display or electronic viewfinder, not the optical viewfinder.
Polarizers intensify blue skies (compare Figures 15.26 and 15.27) and wipe out reflections on objects such as leaves and windows. (compare Figures 15.28 and 15.29).


Neutral Density (ND) filters absorb light, enabling you to shoot with wide apertures or use slow shutter speeds even on a sunny day. ND filters are a uniform gray color and are available in various strengths. The most common types include ND2/ND0.3 (transmits 50% of light), ND4/ND0.6 (transmits 25% of light), and ND8/ND0.9 (transmits 12.5% of light). The camera will automatically adjust the exposure for you.
If you have a point-and-shoot digital camera with a lens barrel that does not collapse completely, you might be able to purchase an adapter to enable your camera to use filters. The adapter is a metal tube that fits over the lens barrel and is threaded at one end to accept filters.
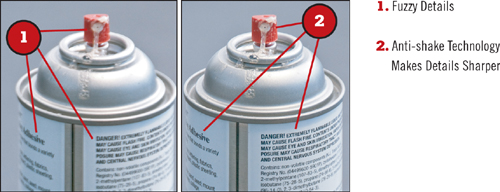
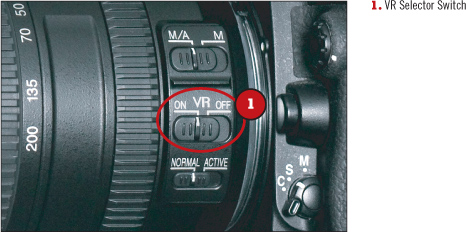
Anti-shake technologies, usually referred to as image stabilization (IS) or vibration reduction (VR), are becoming increasingly popular in both digital point-and-shoot cameras and DSLR cameras. IS/VR technologies can be built in to the camera body (point-and-shoot cameras and some Olympus and Sony DSLRs) or built in to some interchangeable lenses (some lenses for Canon and Nikon DSLRs). IS/VR technologies built in to the camera body are enabled or disabled through menu settings, whereas IS/VR technologies built in to the camera lens use a selector switch on the lens (see Figure 15.30).
Anti-shake technologies enable you to shoot with slower shutter speeds and get sharp results. Figure 15.31 compares pictures taken at 1/15 second with and without IS/VR. Note that most vendors use the term image stabilization (IS), but Nikon refers to this technology as vibration reduction (VR).