
If all you want is a picture when the sun is shining, just push the shutter button of your digital camera. But if you want to create daytime photos that people will enjoy viewing, pictures that will bring back special memories of vacations or other special days, you’ll want to learn how to use your camera’s special features. That’s what this chapter is all about.
The choice of aperture has a big impact on your outdoor photos because it affects the depth of field (how much of the photo is in sharp focus from front to back). If you use Auto or Program mode, you have no choice in aperture settings; with these settings, the brighter the scene, the smaller the aperture and faster the shutter speed. If you’re shooting portraits or landscapes, though, you’ll want to select your own aperture.
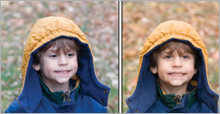
For portraits (see Figures 7.1 and 7.2), you want to focus on the subject and blur out the background. To do this, select a wide aperture (f/1.8 to f/5.6) because these apertures have shallower depth of field than narrower apertures. If you cannot select a wide aperture in Aperture Priority mode without overexposing your photo, select a low ISO (200 or less).


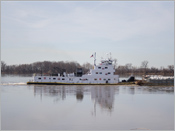
For landscapes (see Figure 7.3), you usually want the entire photo to be in focus. If the landscape has objects at different distances from the camera, you might need to use narrow apertures (f/8.0 and smaller) to achieve the desired depth of field. When you use narrow apertures, you must watch out for shutter speeds that are too slow to hand-hold successfully.

If you’re not worrying about how much of the picture’s in focus, you can use Auto ISO or ISO 200 on a sunny day and you’ll usually get sharp photos. However, there are situations, even outdoors, where changing to a higher or lower ISO makes sense.
With a higher (faster) ISO, you can use narrower apertures or faster shutter speeds and still have enough light to shoot by, even with very long (10x or longer) zoom lenses.
If your camera cannot provide a hand-holdable shutter speed when you use Aperture Priority and select the aperture you want, you have a couple of choices: Increase the ISO to 400, or use a tripod.
If you are shooting with long lenses (8x or longer; 200mm or longer on most DSLRs; 100mm or longer on Olympus DSLRs), the issue of hand-holdable shutter speeds becomes even more critical: High zoom ratios not only bring distant subjects closer but also magnify every hand tremor. If you find that Auto ISO doesn’t let you use a fast enough shutter speed to hand-hold your long zoom shots, use a higher ISO (400 or greater), enable image stabilization (IS/VR), or use a monopod or tripod.
Using ISO 400 or higher on cloudy days, around dawn, or around dusk also enables you to avoid camera shake, no matter what shooting mode you’re using.
If you want to use selective focus techniques outdoors to emphasize your subject, or if you want to use panning to capture a feeling of speed, you might need to use lower ISOs on your camera than what Auto ISO might select when you shoot with 1x–4x zooms. By using a low ISO (ISO 64–200), you can use the limited depth of field created by wide apertures to control what’s in focus, or use slower shutter speeds for creative effects (compare Figures 7.4 and 7.5).


To learn more about choosing ISO settings, see the section “Using ISO Adjustments” on page 122. | |
→ | To learn more about IS/VR technology, see the section “Using Anti-Shake Technologies” on page 196. |
Here are the rules of thumb for better color outdoors:
On sunny days, use Auto white balance or, for more vivid colors, use Daylight white balance (see Figure 7.6).
On overcast days, if you notice the colors are too blue, use Cloudy or Open Shade white balance (see Figure 7.7).
If your camera has both Cloudy and Open Shade white balance settings, try Cloudy first. Use Open Shade if pictures are too blue when using Cloudy.

You can also use Custom white balance outdoors as well as indoors.
Caution

If you use Custom white balance, don’t forget to check your results frequently. White balance shifts during the day from warm to cool to warm again as you go from sunrise to high noon to sunset. If you don’t change Custom white balance when the light changes, you will have off-color photos that will need to be corrected with photo editing software.
To learn more about choosing the best white balance settings, see Chapter 11, “Improving Color.” |
How important is shutter speed when you’re shooting outdoors? It depends on the subject. When you’re shooting action, you’ll probably want to use shutter speeds of 1/500 second and faster. However, if you’re trying to capture the look of moving water, shutter speeds of 1/250 second and slower are better.
Here are some general guidelines for better landscape photos:
White balance: Daylight (preferred) or Auto
ISO: Up to 400
Suggested modes: Aperture Priority (A, Av)
Shutter speed: Set automatically by camera
Aperture: f/1.8 to f/5.6 (selective focus on details); f/5.6 or narrower (overall shot in focus)
Scene mode: Auto, Beach, Snow as needed
Zoom: As needed
Notes: Shoot before 11 a.m. or after 2 p.m. for the best light. Use a tripod or image stabilization (IS) to prevent camera shake.
The light is lower in the morning and afternoon, and it can provide some outstanding “spotlight” effects, as shown in Figure 7.8.

To get the full benefit of directional lighting, though, make sure you’re shooting at an angle where you can see both highlights and shadows. Compare Figures 7.9 and 7.10.

Here are some general guidelines for better building and architectural photos:
White balance: Daylight (preferred) or Auto
ISO: Up to 400
Suggested modes: Aperture Priority (A, Av)
Shutter speed: Set automatically by camera
Aperture: f/1.8 to f/5.6 (selective focus on details); f/5.6 or narrower (overall shot in focus)
Scene mode: Auto, Beach, Snow as needed
Zoom: As needed
Notes: Shoot before 11 a.m. or after 2 p.m. for the best light. Use a tripod or image stabilization (IS) to prevent camera shake. Use EV adjustment as needed to bring out details.
Figure 7.11 is one of a series I did for a local newspaper on an historic neighborhood. I used +0.3 EV to add a bit more exposure to bring out shadow detail. The morning light brought out building detail and made the flag the center of attention.

Overall shots, such as Figure 7.12, help establish the scene, but to capture the real essence of an interesting building or structure, be sure to look for details (see Figure 7.13). I used -0.7 EV in both photos to darken the sky and make the shadows deeper.

The early 1900s house shown in Figure 7.14 was decorated for the 4th of July. To capture the unique flavor of the home’s rare beveled-pane windows, I took a picture of the bunting through the window.

It’s easier to get pictures of children outside, but that doesn’t mean it’s easy to get good pictures. Follow these guidelines to help you get better photos:
White balance: Daylight (preferred) or Auto when it’s sunny; switch to Cloudy or Open Shade when it’s overcast
ISO: 200–400 (sunny); 400–800 (overcast)
Suggested modes: Shutter Priority (S, Tv)
Shutter speed: 1/125 to 1/500 or faster
Aperture: Set automatically by camera
Scene mode: Sports, Kids and Pets, or similar action-oriented modes. Use Hi ISO if pictures are too dark or are blurred by camera shake or subject motion.
Zoom: As needed
Notes: Shoot before 10 a.m. or after 2 p.m. for the best light. Use image stabilization (IS) to prevent camera shake. Use Servo or continuous focus.
Wide-angle shots can cover up the subject with clutter (see Figure 7.15). Use your zoom lens to get in closer for better photos (see Figure 7.16). Figure 7.16 also demonstrates that holding the camera sideways (vertical) works better for some shots.


...but don’t get too close, as shown in Figures 7.17 and 7.18.


Shooting against the sky helps make children at play stand out (Figure 7.19), while using a wide aperture to blur out the background helps capture quieter moments (Figure 7.20).


Shooting around sunrise or sunset means dealing with rapid changes in lighting, concerns about white balance, and high ISO and low shutter speeds. However, you can get some great photos if you’re careful by using these guidelines:
White balance: Daylight (captures the redness in the sky at sunrise and sunset); Cloudy or Open Shade (before sunrise or after sunset; use when skin tones become blue)
ISO: 400–800 before and at sunrise; during and after sunset
Suggested modes: Shutter Priority (S, Tv) or Aperture Priority (A, Av)
Shutter speed: If hand-held, 1/30 second or faster (Shutter Priority); set automatically by camera (Aperture Priority)
Aperture: f/1.8 to f/5.6 (Aperture Priority); set automatically by camera (Shutter Priority)
Scene mode: Sunset while sky is red; Night scene after sunset or before sunrise
Zoom: As needed
Notes: Use image stabilization (IS), a tripod, or a steady surface to prevent camera shake. Use a short (2-second) self-timer if you are not shooting moving subjects.
No matter how simple or how complex your digital camera is, it’s easy to control how intense a sunrise or sunset is: It all depends on where you lock your focus and exposure (see Figure 7.21).

→ | To learn more about exposure lock, see the section “Using Exposure Lock” on page 116. |
The combination of a fading sunset and brightly lit buildings can provide striking photographs (see Figure 7.22). Be sure to use a tripod or place the camera on a steady surface to avoid camera shake because exposures will often be in the 1/8-second or slower range.

People and other subjects look better when you avoid front and overhead lighting. For better photos of family and friends of any age, use these tips to supplement the exposure settings needed for the lighting conditions.
I recommend shooting before 10 a.m. and after 2 p.m. because the sun casts longer, more interesting shadows, and with people, it’s easier to avoid shadows on the face (see Figure 7.23).

Shooting your subjects when they face away from the sun helps the face to relax and captures a halo effect around the hair (see Figure 7.24). In some cases (but not in this photo), you might need to increase exposure by +0.7 to +1.0 EV.

One of the reasons I prefer wide-aperture (f/2.8 and faster) lenses is because they make it easier to blur out the background. Compare Figures 7.25 and 7.26.

On scene-driven cameras, use Portrait mode to help blur out the background.
Want to capture good action photos? It’s harder than it looks. You could just bump up the ISO to 400 or 800, select the fastest shutter speed possible, or select Sports mode and shoot away. This approach will get you a lot of stop-action photos, but they might not convey the feeling of action. To help convey action, try the following techniques.
Smoke from historic rifles helps convey the feeling of action in your photos (see Figure 7.27). Water spray from speedboats is also effective (see Chapter 12, “Stopping Action,” for details).

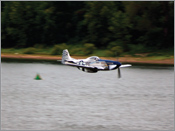
Panning helps streak the background for a feeling of speed when shooting fast cars, boats, or airplanes (see Figure 7.28).
Tip
| Use burst mode to help capture split-second events. |
→ | For more about burst mode and panning, see Chapter 12, “Stopping Action.” |
To make your vacation pictures stand out from the rest, look for unusual ways to view your subjects. Here’s a small sampling.
The Walt Disney and Mickey Mouse statue is in front of the Disney World Cinderella castle (see Figure 7.29). For a new perspective, I walked next to the statue and saw that Disney was “blessing” his creation (see Figure 7.30).


Enclosures can be a big problem (Figure 7.31), but by shooting through or over the fence, or shooting where there is no fence (Figure 7.32), you can get some intriguing photos.

