
Chapter 18. Building Your Presentation
In this chapter
Organizing Formats with Master Slides
Changing Paragraph and Text Formatting
Extra Credit: Creating Top-Notch Notes and Handouts
Picking the Best Slide Layout
Although it’s easy to add a new slide to a presentation, choosing the right slide layout isn’t always so simple.
PowerPoint supports two broad categories of slides: title slides (typically the first slide in a presentation) and “regular” slides (which, confusingly, are usually just called slides). PowerPoint has one predefined layout for title slides and almost two dozen predefined layouts for regular slides.
Slide layouts aren’t static: You can change a slide’s layout by selecting the slide, choosing Format, Slide Layout, and clicking a layout in the Slide Layout task pane.
Choosing a Slide Layout
Whether you’re applying a layout to a brand-new slide (by clicking New Slide on the Home tab) or changing the layout of an existing slide (by clicking Layout on the Home tab), PowerPoint presents you with the Slide Layout choices shown in Figure 18.1.
Figure 18.1. The Slide Layout pane gives you nine ways to organize a slide.
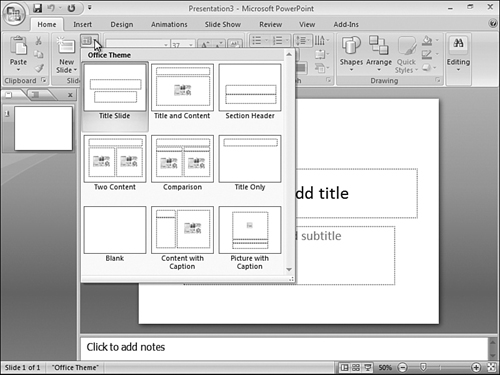
If you choose the first thumbnail in the Slide Layout pane, PowerPoint turns the new slide (or selected slide) into a title slide. Title slides are treated differently from other slides in a presentation—they’re formatted independently of the rest of the slides, using the Title Master. They generally don’t have bullet points and they generally do have a subtitle, so make sure you really want a title slide before making this choice.
![]() For more information on editing title slides, see “Using the Slide Master,” p. 574.
For more information on editing title slides, see “Using the Slide Master,” p. 574.
Note
The distinction between a title slide and a “regular” slide comes into play because of the way master formatting changes ripple through a presentation. The only way you can manually turn a regular slide into a title slide is by applying the first layout, Title Slide, in the Slide Layout pane.
Other slide thumbnails in the Slide Layout dialog box (refer to Figure 18.1) contain one or more of the following:
- Text placeholders—Typically for bulleted and numbered lists.
- A general content placeholder—Ties into PowerPoint’s Insert Object function. The standard content options include a simple grid (that is, a table), an Excel Chart, clip art, a picture (from a file), a SmartArt graphic, or a media clip.
- Combinations of content and text—The placeholders are arranged in various configurations.
Tip
Placeholders can be resized or dragged to fit your requirements. You need not settle for the size or placement established in the Slide Layout dialog pane.
The general content placeholder is a superset of the individual placeholders (tables, charts, and so on). In general, you do not limit your choices by using the Slide Layout pane’s Content layouts, as opposed to the other layouts.
Using Placeholders
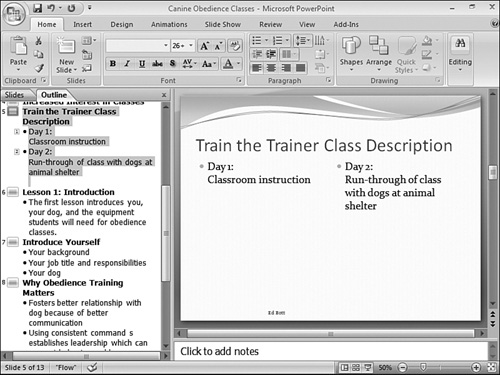
With few exceptions, every slide layout has a title placeholder, which reserves space for the title of the slide; this text also appears at the highest hierarchical level in the presentation’s outline.
Most slides also have at least one text placeholder. The contents of the text placeholder appear in the outline as points underneath the highest hierarchical level.
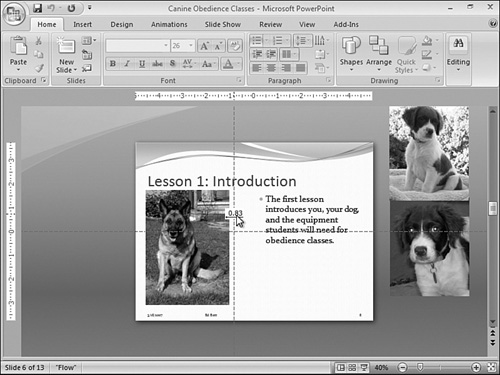
Slides that have two text placeholders generate separate outline sections for each placeholder. As you can see in Figure 18.2, PowerPoint gives each placeholder a number, which is used in the outline to keep track of what text belongs in which placeholder.
Figure 18.2. Multiple text placeholders receive separate numbers, as indicated in the outline pane.
All the other kinds of slide layout placeholders are special kinds of graphic placeholders: table, chart, SmartArt Graphic, picture, clip art, media clip, and general content placeholders all contain graphics that don’t appear in the outline. The only real difference among all these graphic placeholders, in fact, is the kind of link they provide to retrieve the graphic.
Note
You cannot manually insert a placeholder on a slide. Instead, you have to use the Slide Layout task pane. If you copy or paste a text placeholder, it appears as a text box on the slide, and any text you type is not available in the outline. As a result, you cannot add a third text placeholder to a slide.
Going Outside the Placeholders
Not all slide activity takes place within placeholders. In fact, any of the items that can go in one of the many content placeholders can also be placed directly on the slide—no placeholder required.
Using the content placeholders to position graphics and other non-text items has two benefits: First, as the name implies, this technique holds a place open on the slide so PowerPoint can scale the inserted graphic or other object properly and move other placeholders out of the way as needed. Second, placeholders provide easy links to specific kinds of objects. If neither of these characteristics matters on a given slide, consider bypassing content placeholders entirely.
Graphics and drawings (for example, items that you insert via the Illustrations group of the Insert tab) placed directly on a slide go in the drawing layer.
![]() To learn more about how the drawing layer stores graphics and drawings for your presentation, see “Working with the Drawing Layer,” p. 109.
To learn more about how the drawing layer stores graphics and drawings for your presentation, see “Working with the Drawing Layer,” p. 109.
Note, in particular, that text entered in the drawing layer (say, inside a text box that you create using the Insert tab) does not appear in the outline.
Editing Slides
Slides can contain text, bulleted and numbered lists, tables, and other content such as clip art and charts. In most cases, you can make changes to each of these elements directly on the slide itself, in Normal view.
Adding and Editing Text
The highest-level points in a presentation’s outline appear as slide titles. Everything else in the outline appears in text placeholders for slides within the presentation. The outline links to the slide strictly and exclusively via the title placeholder and the text placeholder.
If you try to enter more text than a placeholder can accommodate, PowerPoint automatically tries to shrink the text to fit within the confines of the placeholder. First, it tries to reduce the spacing between lines. If that doesn’t work, it shrinks the size of the font. If you start to see your text shrinking, maybe it’s time to take another look and see whether you need to trim some verbiage or split the slide into two.
![]() To work from the outline, see “Editing the Presentation Outline,” p. 551.
To work from the outline, see “Editing the Presentation Outline,” p. 551.
Whenever PowerPoint shrinks text to fit in a placeholder, an AutoFit Options action menu appears (it resembles the AutoCorrect action menu). If you don’t want PowerPoint to squeeze the text into the placeholder, click the button and choose Stop Fitting Text to This Placeholder from the menu. When you choose this option, your text spills over onto the face of the slide. This action menu also gives you the options to split the text on the current slide into two slides, to continue on a new slide, or to change to a two-column layout (which only helps if your bulleted list consists of very short items).
Tip
On presentations that adhere to strict design guidelines, auto-fitting text damages the integrity of the design; it might also make the slide too hard to read. To turn off AutoFit, choose Control AutoCorrect Options on the AutoFit Options action menu. On the AutoFormat as You Type tab of the AutoCorrect dialog box, clear the check boxes labeled AutoFit Body Text to Placeholder and AutoFit Title Text to Placeholder.
Tip
In a bulleted list, use Ctrl+Tab to insert a tab character into the text. Pressing the Tab key by itself changes the bullet level.
You might also place text anywhere in the drawing layer—which is to say, on “top” of the slide—by inserting a text box or using one of the many different shapes available in the Shapes gallery (in the Illustrations group of the Insert tab).
In the case of shapes, PowerPoint allows you to type text that extends beyond the ends of the shape, but doesn’t display that text. To make it visible, enlarge the shape. In text boxes, PowerPoint expands the text box as necessary, while you type, to accommodate all the text you care to add. In neither case is the size of the text adjusted (as it is in text placeholders). In both cases, any text that extends beyond the edge of a slide when viewed in the slide pane does not show up on the slide when you view the slideshow or print that slide.
You can apply formatting to any text on a slide by selecting the text and then choosing the formatting. If you want to change the formatting on all slides, however—say, change all the titles on all the slides to a new font, or make all the first-level bullet points on all the slides green—you should use the Slide Master.
Tip
You can change all instances of a font (typeface) to another font by opening the Replace menu (in the Editing group of the Home tab) and choosing Replace Fonts.
![]() For an explanation of how Slide Masters work, see “Using the Slide Master,” p. 574.
For an explanation of how Slide Masters work, see “Using the Slide Master,” p. 574.
PowerPoint applies AutoFormatting while you type, changing fractions (1/4 to ¼), ordinals (1st to 1st), “smart” curly quotes, dashes, and the like. It also changes a single quote in front of a number into a curly quote (’04 to ’04), with the curl pointing in the correct direction, change (c) into a copyright symbol, and change several combinations of : and) into a smiley face.
![]() For advice on making AutoCorrect work the way you want—and to turn the vexing changes off—see “Using AutoCorrect to Type Faster,” p. 90.
For advice on making AutoCorrect work the way you want—and to turn the vexing changes off—see “Using AutoCorrect to Type Faster,” p. 90.
Working with Bulleted and Numbered Lists
Most of the text you enter on slides appears as bulleted—or possibly numbered—items.
You can pick bullets or a numbering scheme when the insertion point is in any text, whether in the title placeholder, text placeholder, or even on the drawing layer.
If you’ve applied a theme to your presentation, PowerPoint has probably already selected a bullet character and formatted it with a color from the default palette for that theme. To change a bullet—say, to use a picture as a bullet—go through the Bullets and Numbering dialog box.
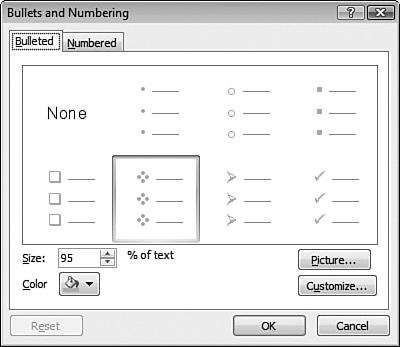
Click within the line you want to change, or select all the lines to change, and then click the Home tab and pull down the Bullets menu. Alternatively (and more simply), right-click the lines you want to change and choose Bullets from the shortcut menu. Then click Bullets and Numbering at the bottom of the gallery. The Bullets and Numbering dialog box, shown in Figure 18.3, appears.
Figure 18.3. PowerPoint enables you to choose any character or picture as a bullet.
Tip
Although you can change the bullet character for a single line, you will usually want to change all the bullets on a slide. To customize an entire presentation, perform these steps using the Slide Master rather than an individual slide.
Choose a bullet character from the list of preset options, or click Customize to select a different character from any available font. You can also use a picture in any Office-compatible graphics format—GIF or JPEG, for example—as a bullet. To do so, click Picture (see Figure 18.4) and use one of the built-in bullets, or click Import to bring in a picture of your own.
Figure 18.4. Choose a picture from among the ones offered, or import your own.

Tip
PowerPoint stores the bullets just once, so you needn’t be overly concerned about swelling file sizes if you stick to just one or two picture bullets. Your primary concern should be how legible the bullet will be in your presentation. Simple line art drawings—say, a pointing finger or a starburst—can help make your point. Washed-out photographs rendered in tiny sizes will only leave your audience squinting.
The Size nn% of Text box in the Bullets and Numbering dialog box (refer to Figure 18.3) adjusts the size of the bullet (whether picture or character), scaling it to the point size of the text. You can select any size between 25% and 400%.
Note
The Color drop-down list box in the Bullets and Numbering dialog box applies only to characters; it does not affect the color of a picture used as a bullet.
Numbered paragraphs renumber themselves as you add new items and delete or move existing ones. Follow these steps to number the lines in a slide:
- Click within the line you want to number, or select a range of lines to be numbered. Auto numbering is supported only for the highest-level paragraphs; if you select lower-level paragraphs, they are ignored.
- Click the Home tab, pull down the Numbering menu from the Paragraph group, and then choose Numbering. (Or right-click the text and choose Numbering from the shortcut menu.)
- In the Bullets and Numbering dialog box, click the Numbered tab.
- Pick the type of numbering you want—fairly simple Roman and Arabic numbers as well as alphabet sequences (a, b, c) are supported on the Numbered tab.
- If you have a long numbered list that extends over multiple slides, specify a starting value other than 1.
The size and color formatting options mentioned for bullets earlier in this section apply to numbers, too.
If you want to construct multiple-level numbering schemes (for example, 1.1, 1.2, 1.3, 2.1, 2.2), you have to type and maintain the numbers manually.
Working with Tables
PowerPoint supports several methods for constructing tables. To create a table on a slide with a content placeholder, for example, you can simply click the Table icon, the upper-left icon in the cluster of icons that appears in the content placeholder (the one that looks like a miniature spreadsheet). PowerPoint responds with a simple Insert Table dialog box, in which you indicate the number of rows and columns you want in your table. The table arrives as a drawing-layer object, which you can move, size, and format to suit. With the table selected, PowerPoint adds Design and Layout tabs to the Ribbon, under the new heading Table Tools. The Design tab is replete with formatting options, and the Layout tab enables you to do such things as insert and delete rows and columns, suppress gridlines, and merge and split cells.
If you’re not starting from a slide with a content placeholder, you can get your table by clicking the Insert tab and pulling down the Table menu, at the left edge of the Ribbon. Choosing Insert Table from this menu produces the same simple dialog box that you would get by clicking the Table icon in a content placeholder. The resulting table exists in the drawing layer, and you can move it to a position appropriate for the surrounding text. Select the table and click the Format or Layout tabs to change the structure or appearance of the table.
As an alternative to using the Insert Table dialog box, you can click the Insert tab, open the Table menu, and then drag your mouse across the grid of cells that appears at the top of the menu. The effect is the same; you’re just specifying your table’s dimensions with a wave of the mouse instead of by filling out a form.
The methods just described generate tables in which all the rows initially have the same height and all the columns have the same width. (You can adjust column widths and row heights with the mouse, and PowerPoint will make height adjustments automatically if you type more text in a cell than will fit; but the tables start out evenly spaced.) If you want something more freeform, PowerPoint will accommodate you. Click the Insert tab, open the Table menu, and choose Draw Table. Your mouse pointer turns to a pencil. Drag out a rectangle to represent the outer borders of your table. Then click the Design tab (if it’s not already active), and click Draw Table, in the Draw Borders group near the right end of the Ribbon. Your mouse cursor again takes on a pencil shape, and you can draw your table’s row and column borders. When you work this way, you can put the cell boundaries anywhere you please. PowerPoint will draw perfectly straight vertical and horizontal lines, but they don’t have to be evenly spaced and they don’t have to extend the full height or width of the table. Thus, for example, you can have cells in one column that are twice as deep as the cells in neighboring columns. If at first you don’t get exactly the layout you want, use the Eraser tool (directly to the right of Draw Table in the Design tab) to remove what you don’t want; then try again.
Any of these approaches is fine for creating a new table from scratch in a PowerPoint slide. If you already have your tabular data set up in Excel or Word, of course, there’s no need to re-create it in PowerPoint. Copy it from the source document and paste it into your presentation. Be sure to use Paste Special, though, not a simple Ctrl+V or Paste command. If you do the latter, you’ll get the default HTML format, which will not please you. Click the Home tab, pull down the Paste menu, choose Paste Special, and then choose Microsoft Office Excel Worksheet Object or Microsoft Office Word Document Object. (These Paste Special options will appear somewhat differently if you’re starting from nondefault file formats in Excel or Word; choose the format that includes the word object.)
The Table menu in PowerPoint also includes an Excel Spreadsheet command that enables you to create an Excel table object on a slide, starting from scratch. It works, but it’s clumsy. If you need to whip up an Excel table object in a hurry, it’s simpler to open Excel, create the table there, and then paste it into PowerPoint.
Note
Although tables created in PowerPoint look a lot like Word tables, there are fundamental differences, both in options and in implementation—the version in PowerPoint isn’t nearly as powerful. If you need advanced cell formatting (for example, rotating text within cells), use the Draw Table feature in Word and then paste the resulting table into your presentation.
Adding Pictures, SmartArt, and Clip Art
Use the full array of Office drawing tools (available on the Home and Insert tabs as well as any Format tab that appears when you select an object) to insert pictures and text boxes; add shapes, SmartArt, or WordArt; set colors; connect shapes with lines; draw shadows; and so on.
![]() For details about working in the drawing layer, see “Working with the Drawing Layer,” p. 109.
For details about working in the drawing layer, see “Working with the Drawing Layer,” p. 109.
Grids and guidelines help you line up drawing items; you can be a little imprecise as you add items and then, when you’re finished, allow PowerPoint to line up things precisely. When working with pictures and other drawing tools, it’s helpful to show gridlines on the screen. The simplest way to do this is to click the View tab, and then select the Gridlines check box in the Show/Hide group. For precise positioning of graphic objects, you might also find it useful to select the Ruler check box, in the same command group of the View tab.
To fine-tune the positions of PowerPoint’s gridlines, select a graphic object, click the Format tab, open the Align menu, and choose Grid Settings. In the Grid and Guides dialog box (see Figure 18.5), you can adjust the grid spacing.
Figure 18.5. PowerPoint enables you to control the granularity of its grid, and whether drawings should be snapped to the grid.
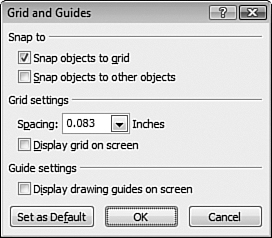
Sometimes you want to know how far a picture lies from dead center. That’s where drawing guides come in handy. If you choose to display drawing guides onscreen, you’ll get horizontal and vertical lines that you can use to gauge how far any particular item on the slide sits, compared to dead center (see Figure 18.6). Click the guide, and its distance from center appears as a ScreenTip. You can drag the guides into any position you like, making even fine layout tasks easier. To add drawing guides, select Display Drawing Guides on Screen, in the Grid and Guides dialog box.
Figure 18.6. PowerPoint’s drawing guides—one horizontal, one vertical—are shown here. Note that we’ve “parked” pictures in the unused region around the slide.
In the Grid and Guides dialog box, you can take your pick of two Snap To check boxes. You can choose to line up shapes so they snap to the grid, or use the Snap Objects to Other Objects setting to make them automatically abut each other or share a common axis.
PowerPoint also allows you to park pictures in the gray area outside a slide, but still in the slide pane. This option can come in handy if you have a few pictures you’re considering for the slide, but can’t make up your mind which one would be best: Parking them in the margin enables you to swap them in and out quickly. To get a picture into the margin, click and drag on the picture, moving it to the edge of the pane. It takes a little practice to get a picture positioned this way, but the picture remains handy without appearing on the slide itself. (This option is most useful in Normal view when you close the Outline/Slides pane on the left.)
Organizing Formats with Master Slides
Behind every great PowerPoint presentation lurk masters that control the presentation’s appearance: the Slide Master, Notes Master, and Handouts Master. Each master stores detailed formatting information for a key part of the overall presentation: slides, speaker’s notes, and hardcopy handouts, respectively.
These masters control many facets of the slides themselves—backgrounds, fonts (typeface, point sizes, colors, and the like), bullets, locations for all the main components, tabs, and indents. You can also use masters to specify pictures—a logo, for example—and boilerplate text that appears on all slides. As part of the Slide Master, PowerPoint also includes a separate master for every layout, which enables you to configure the appearance of each layout.
Tip
If you want to put a graphic, a piece of text, or any other type of object on a bunch of slides, add it to the Slide Master. If you want the object to appear only on a specific layout, add it to the Layout Master instead.
Masters ensure a uniform appearance for your entire presentation. If you’re preparing a presentation on behalf of an organization that already has a standard slideshow template, use it.
When you create a blank presentation, PowerPoint creates three generic masters—Slide, Notes, and Handouts. To work with master slides, click the View tab and then select Slide Master, Handout Master, or Notes Master.
Using the Slide Master
Whenever you want to change all the slides in your presentation (except the title slides) in exactly the same way, you should change the Slide Master. If you want to put a logo on all your slides, for example, add the graphic to the Slide Master instead of editing each individual slide. The same is true if you want to put identical text on all the slides—or change a color, modify a font, or use a different kind of bullet. Making changes to the Slide Master automatically changes all the slides in your presentation. For example, if you change the Slide Master’s first-level bullet text to 20-point Arial bold, all the slides in your presentation will have their first-level bullets in that font.
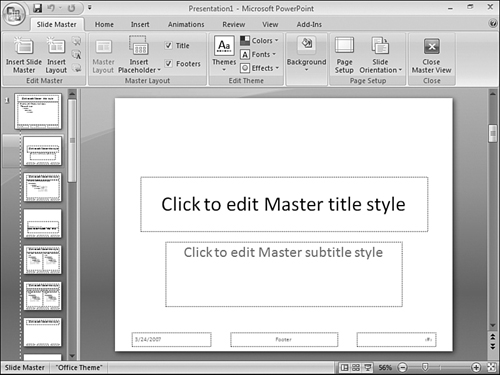
When you click the View tab and then click Slide Master, PowerPoint switches to Slide Master view, adds a Slide Master tab to the left end of the Ribbon (bumping the Home tab from its accustomed position), and displays a set of thumbnails in the left pane (see Figure 18.7). The top thumbnail represents the Slide Master; changes you make here affect all layouts. The remaining thumbnails represent your various layouts; changes you make in one of these affect only a particular layout.
Figure 18.7. Use the Slide Master to manage the design of all slides in a presentation.
Note
When you hover the mouse pointer over a layout thumbnail, a Screen Tip tells you both the name of the layout and the number of slides in the current presentation that use that layout.
The Slide Master includes placeholders for the title (Master title style) and bullet text (Master text style), as well as a background design (usually assigned by the theme you apply from the Design tab). The Slide Master also has placeholders for a date, footer, and slide number.
To change the formatting of the title or bullets, click inside the placeholder, switch to the Home tab, and apply font or paragraph formatting. Similarly, you can click inside the date, footer, or slide number placeholders and adjust their formatting.
For example, if you want the title on all slides to be left aligned (instead of centered), click once inside the title placeholder, select the text, and then click the Home tab and use the Align Text Left command (in the Paragraph group).
In a Slide Master, you can set formatting and bullets for each level of bulleted text in the body of your presentation. The easiest way to accomplish this task is by applying a theme. To change the formatting of the bullet points in your presentation manually, switch into Slide Master view and then click the Slide Master thumbnail for editing. To change the formatting of text in the highest-level bullet points, click the line that reads “Click to edit Master text styles” and apply the formatting as follows:
- You can change the font, font size, font color, and indent level.
- You can change the bullet character used on all slides based on this Master Slide. To do this, display the Home tab, pull down the Bullets list, and choose the bullet you like.
Repeat this process for the second-, third-, fourth-, and fifth-level bullet items by clicking the appropriate line and applying the formatting.
Similarly, you can resize or move any of the placeholders on the Slide Master. If you move the title placeholder down a half inch on the Slide Master, the titles on all slides will move down half an inch.
Tip
To “tighten up” the distance between the bullet and text, choose View, Ruler, and adjust the tab stops. PowerPoint aligns each level’s bullet and text with the stops shown on the ruler.
PowerPoint ignores any text you type into the title or subtitle placeholders. But if you type text into the date, footer, or slide number placeholders, PowerPoint repeats the text on all slides.
Note
If you override a Slide Master setting by applying formatting to a particular slide, you break the link between the setting and the master; subsequent changes to the master won’t affect that particular slide. To restore the link, right-click the slide in the Slide pane and then click Reset Slide. Alternatively, click Reset in the Slides group of the Home tab.
Using the Layout Masters
The various layout masters (all the masters in Slide Master view, except the one at the top of the slide pane) control the formatting and placeholder positions of individual layouts in your presentation. The placeholders you see depend on the layout. Some have content placeholders; others have only title and text placeholders.
In the same way that PowerPoint maintains a link between the Slide Master and the slides in a presentation, the program also maintains links between the Slide Master (the one at the top of the slide pane) and individual layout masters. For example, if you change the title formatting in the Slide Master, that change is propagated to each of the layout masters. However, if you change the formatting in a layout master, that link is broken and subsequent changes to the Slide Master do not affect that particular layout.
Unfortunately, PowerPoint doesn’t offer a straightforward reset command to patch up such a broken link. You can fix the link by hand, as follows:
- In the layout master, click the placeholder that is no longer linked to the Slide Master, and press Delete to remove it.
- Select the Slide Master.
- Click the placeholder you want to restore on the layout master and then press Ctrl+C.
- Return to the layout master and press Ctrl+V to paste the placeholder.
Changing the Background of Every Slide
If you want a logo, a graphic, or a drawing item to appear on all slides, place it on the Slide Master. Any object in the Slide Master’s drawing layer appears in the drawing layer of all slides in the same location it occupies on the Slide Master.
Text you place on the Slide Master behaves the same way. For example, in a presentation that contains sensitive data, you might want to add the word Confidential to every slide; for a presentation that’s under construction, you could add the word Draft; and so on. To put identical text on every slide, follow these steps:
- Switch into Slide Master view and select the Slide Master.
- Click the Insert tab and then click Text Box. Draw a text box on the Slide Master and adjust its size and position as needed.
- Click in the text box and enter the text you want to repeat on all slides. This text will not show up in the outline.
- To format the text box, right-click the edge of the box and choose Format Shape. You might want to add a thick line around the box, for example, or change its background color.
Similarly, if you want a logo, fixed text, or other drawing item to appear within a particular layout, put it on the corresponding layout master.
You’ll find by far the richest vein of background customizing options when you learn how to develop, modify, and apply themes. Use these techniques to customize the Master Slides included with PowerPoint’s ready-made designs, or devise your own masters and store them for future use.
![]() To work with themes, see “Applying and Modifying Themes” p. 582.
To work with themes, see “Applying and Modifying Themes” p. 582.
Working with Headers and Footers
If you’re used to working with headers and footers in Word or Excel, PowerPoint’s Header and Footer dialog box might be confusing initially. On a slide, you’ll search in vain for a header. Paradoxically, though, you can move the Footer Area placeholder, which normally appears centered at the bottom of the slide, to any location—including the top. The Notes Master and Handout Master contain both a Header Area and a Footer Area, positioned by default at the top left and bottom left of printed pages; you can move these placeholders anywhere on the page as well.
In addition, all masters include placeholders for the date and slide number, which normally appear at the bottom of the slide but can be moved anywhere on the slide. When working with any of these elements on the Title Master or Slide Master, follow these guidelines:
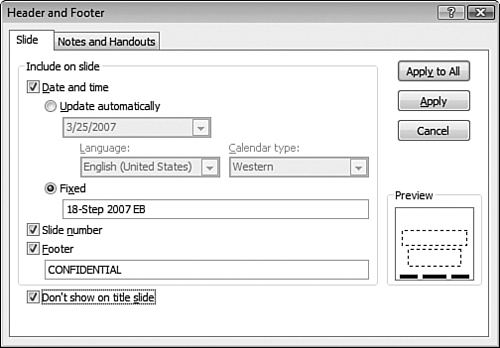
- The Date Area placeholder can show the current date—that is, the date the slideshow is being presented. To add a date field of this sort, select the Date Area placeholder. Then click Header and Footer in the Text group of the Insert tab. In the Header and Footer dialog box (see Figure 18.8), select the Date and Time check box, select the Update Automatically option, and then use the drop-down list to select a date format. If you want to track different versions of a presentation as you change it, select the Fixed option instead of the Update Automatically option, and then enter a descriptive text label (it doesn’t have to include the date); remember to enter a new description when you save an updated version of the presentation.
Figure 18.8. Use this dialog box to specify which placeholders appear and replacements for the three Slide Master dummy values.
- The Footer Area placeholder can carry any text you want, and you can drag it to any location on the slide. You can use this element to label each slide with the name of a school or civic organization, the class for which you’re preparing it, or even with the title of the presentation itself.
- The Number Area placeholder can be confusing if it appears near other numbers on a slide. Slide numbers are rarely useful (you might rely on them as a visual reminder of how many slides are left), and they’re frequently distracting. If you decide to use slide numbers, keep them subtle, and remember that you can always make the font smaller than the default provided by PowerPoint.
If you look closely at a Slide Master, you’ll see that these three placeholders all have dummy values:
- The Date Area placeholder includes the current date.
- The Footer placeholder includes a dummy value called Footer.
- The Number Area placeholder includes a dummy value called
<#>.
To show (or hide) the date/time, footer, or slide number placeholders and their contents, do the following:
- Click Header and Footer, in the Text group of the Insert tab, to display the Header and Footer dialog box (see Figure 18.8). If necessary, click the Slide tab.
- Select the appropriate check boxes to display any or all of the three placeholders on all slides; clear the check mark to hide the selected placeholder.
- Use the entries under the check boxes to define what, if anything, replaces the dummy entries—the current date or a footnote, for example.
- Click Apply to All to make the change to all slides in your presentation. To avoid applying the same change to the title slide, select the Don’t Show on Title Slide check box.
Note
If you open the Header and Footer dialog box from Normal view, you can change the display of dates, slide numbers, and footers on an individual slide (click Apply) or on the Slide Master (click Apply to All). If you’re certain you don’t want to use one of these placeholders, you can safely delete it.
Tip
If you are likely to use the same headers or footers or other master elements in additional presentations, save a copy of the presentation as a template. (Click the Microsoft Office button, choose Save As, choose Other Formats, and then select PowerPoint Template in the Save as Type list.)
Removing Slide Master Elements from a Single Slide
You can have the slide number appear on every slide except one. You might need to do this if one slide includes a big chart, for example, and you need every square inch of slide space to hold it. You might think that you could select the slide number placeholder on a single slide and press the Delete key to remove it. If you try it, however, you’ll see that this approach doesn’t work.
In fact, removing elements of the Slide Master from an individual slide is an all-or-nothing proposition: You get all of them, or you get none of them. This can be particularly vexing when the design you’ve chosen includes a graphic object—and most of the designs included with PowerPoint include graphics—or when you have a graphic element, such as a logo, that’s supposed to appear on all slides.
To remove all the Slide Master elements (except the Title Area placeholder and Object Area placeholder) from a single slide layout:
- Select the layout master.
- Select Hide Background Graphics, in the Background group of the Slide Master tab.
If this method is too drastic—you want to remove only one element, for example, on just one slide—you can cover the element up, instead of removing it:
- Create a small rectangle by clicking Shapes on the Insert tab and choosing the rectangle shape.
- Make the rectangle just slightly larger than the element you want to eliminate. If you need to adjust the size in finer increments than the tool normally allows, press the Alt key while making the adjustments.
- Drag the rectangle over the element.
- On the Format tab, click the down arrow next to the Shape Fill icon. There should be a color very close to the background color available at the beginning of the first or second line of color swatches. Choose the color closest to the background color.
- On the Format tab, click the down arrow next to the Shape Outline icon. Click the down arrow next to the Line Color icon. Choose the same color you just chose for the fill color, or choose No Line.
If you match the colors carefully, your audience will never know.
To accomplish the same trick on multiple slides, even those with fancy multi-colored backgrounds, make a copy of the master slide, remove the element from the copy, and then use this master for the slides where you want the one element removed.
Creating Speaker Notes and Audience Handouts
The Notes Master and Handout Master behave differently from the Slide Master; their only function is to provide extremely rudimentary instructions for printing speaker notes and audience handouts.
Speaker notes and handouts, in PowerPoint, are designed to be printed on letter-size paper. Each page typically holds one slide. On speaker notes, the slide appears at the top of the page, with the notes for that slide at the bottom. Handouts, by contrast, consist solely of printed copies of the slides.
To set PowerPoint printing options for speaker notes, follow these steps:
- Go into Notes Master view (see Figure 18.9) by clicking Notes Master on the View tab. You will almost always want to adjust the Zoom factor by using the Zoom button or slider in the status bar.
Figure 18.9. Use the Notes Master view to change the layout and formatting of your notes pages.
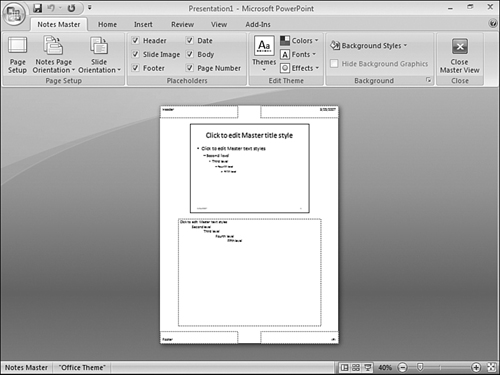
- Apply formatting to the Notes Body Area just as you would to the Slide Master’s text placeholder—click the desired bullet level and apply text formatting.
- Resize and/or move the slide placeholder and the Notes Body Area.
- Move the header placeholder, footer placeholder, date/time placeholder, and page number placeholder (marked “Number Area”). Note that you can type text into any of these placeholders and the text will appear on the notes.
- Control the appearance and contents of those four placeholders by clicking Header and Footer on the Insert tab and setting the check boxes as needed.
When you’re satisfied with the formatting, print the speaker notes—click the Microsoft Office button, choose Print, choose Notes Pages in the Print What box, and click OK.
Tip
Color slides—particularly those with dark backgrounds—invariably print better on a black-and-white printer if you select the Grayscale check box in the Print dialog box.
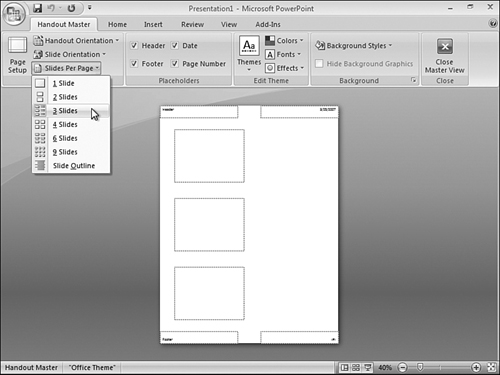
Click Handout Master on the View tab to see the layout for your handouts. As Figure 18.10 illustrates, you can use the Slides Per Page drop-down to change the page layout so that each page includes two, three, four, six, or nine slides. If you choose the three-slides-per-page layout, PowerPoint adds blank lines next to the slides so the audience can take notes. You can also move or format the Header Area, Footer Area, Date Area, and Number Area (which contains a page number rather than slide numbers, as in the presentation itself). Here, too, you can type text into any of these placeholders and the text will appear on the handouts.
Figure 18.10. The three-slides-per-page handout layout saves paper and gives your audience space to add their own notes on the right.
Tip
The only reason to use the Handout Master view is if you want to add text or graphics to your handouts. You can adjust headers and footers using the Header and Footer dialog box, and you can choose a layout for printing handout sheets from the Print dialog box. (Click the Microsoft Office button, choose Print, select Handouts from the Print What box, and choose a number from the Slides Per Page list.)
Applying and Modifying Themes
PowerPoint themes control the appearance of a presentation. By allowing you to save, modify, and reuse designs—including dozens of Microsoft-supplied samples—PowerPoint makes it easy to create presentations that are visually appealing and consistent. Consistency is especially important when you want a group of presentations from the same organization to share a common look.
Don’t be intimidated by the themes included with PowerPoint. These are only a starting point. Feel free to adapt, combine, customize, and tweak to your heart’s content. If you come up with a theme that really gets your point across, save the presentation as a template and use it to design new presentations.
A theme is a set of colors, fonts, effects, and background styles. In some themes, these elements are consistent in every slide layout, while in other themes, you see different elements in some layouts. In any case, between them, these elements completely control the look of a presentation.
![]() To change every slide in a presentation, see “Organizing Formats with Master Slides,” p. 573.
To change every slide in a presentation, see “Organizing Formats with Master Slides,” p. 573.
Choosing the Best Theme for Your Presentation
Nothing detracts more from a good presentation than a poor design. To choose the best possible design for a presentation, consider your audience, your image, and your message. For a serious, low-key presentation, stick with a no-nonsense design. If you’re trying to impress your audience with your energy and ability to project bold ideas, go with bold graphics and vivid colors.
After you have a clear vision of the image you want to project, you’re ready to choose a theme. To pick a theme for your presentation, follow these steps:
- Start with an existing presentation or create a new blank presentation.
- Display the Themes group by clicking the Design tab on the Ribbon.
- In the Themes group, click the More button to open the Themes gallery.
- If you don’t see a theme you like, click More Themes on Microsoft Office Online to look for updated themes on the Web. Or click Browse for Themes to look for themes on your hard drive or network.
- When you’ve found a suitable design, click it. PowerPoint applies the theme’s colors, fonts, effects, and background styles to every slide in your presentation.
Modifying Theme Colors
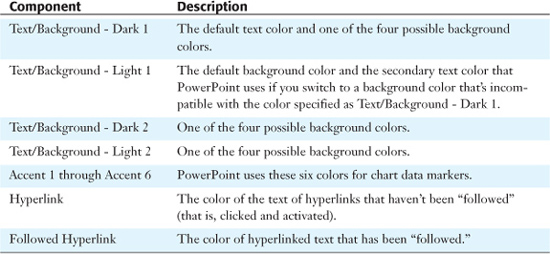
The theme colors are a set of 12 colors that represent presentation text, background, accents (such as chart data markers), and hyperlinks. PowerPoint comes with more than 20 ready-made color schemes, each of which includes foreground and background colors that work well together.
The problem is that sometimes you don’t want the colors to blend together so harmoniously. From time to time, a little bit of dash can be a good thing. For example, the color schemes that ship with PowerPoint can be very soothing when applied to text and backgrounds. But when you have a chart on the screen, you want the bars to stand apart from each other.
You can create your own color schemes by using any colors that your video settings will support. Table 18.1 lists the components of a set of theme colors with which you can work.
Table 18.1. Theme Color Components
Just as you can change any detail on a Master Slide, you can change the colors in the current presentation by changing the theme colors of any master. PowerPoint saves colors along with the theme; if you apply a new theme, PowerPoint discards any previous color changes and applies the colors from the new theme to your presentation.
PowerPoint uses theme colors in many places. For example, the Background Styles gallery (discussed later in this chapter in “Choosing the Best Background”) offers colors from the current theme, and the colors used to create graphics in many standard designs change when you change themes.
Choosing New Theme Colors
To apply theme colors to your presentation, first apply the theme you want to use. Then follow these steps:
- Click the Design tab.
- In the Themes group, click the Colors button to display the Theme Colors gallery, as shown in Figure 18.11.
Figure 18.11. Use the Theme Colors gallery to select or create theme colors for your presentation.
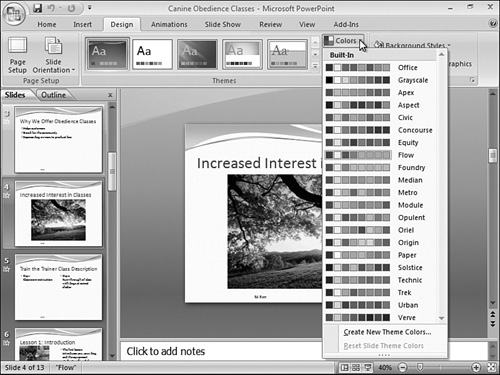
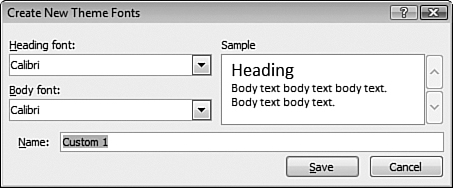
- Hover the mouse over any gallery item to see a preview of its effect. When you see the one you want to apply, click it. Or click Create New Theme Colors at the bottom of the gallery and use the Create New Theme Colors dialog box (see Figure 18.12) to create your own scheme.
Figure 18.12. Use the Create New Theme Colors dialog box to create custom theme colors.
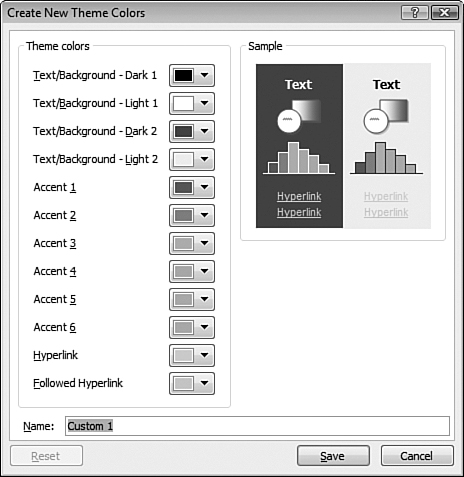
Note
In the Create New Theme Colors dialog box, select your colors for each element, type a name for the theme colors, and then click Save. Your custom theme colors will now appear in the Theme Colors gallery, so you can reuse them any time you like.
Changing Colors on Selected Slides
If you decide you need to change one color on a slide—perhaps it clashes with a picture or doesn’t contrast enough with a chart—you might want to consider changing the entire color scheme for that slide.
The procedure for changing the color scheme for a single slide (or a selection of slides) is nearly identical to the procedure outlined in the preceding section. First, select the slides you want to modify; then, in step 3, right-click the theme colors you want to use and choose Apply to Selected Slides instead of Apply to All Slides.
Using Theme Fonts
Each presentation theme also applies a set of theme fonts to your presentation. These fonts consist solely of typefaces (other font characteristics, such as size and weight, aren’t part of the theme fonts), and each theme fonts collection specifies two fonts—one for headings and one for body text.
To apply theme fonts to your presentation, follow these steps:
- Click the Design tab.
- In the Themes group, click the Fonts button to display the Theme Fonts gallery (see Figure 18.13).
Figure 18.13. Use the Theme Fonts gallery to select or create theme fonts for your presentation.
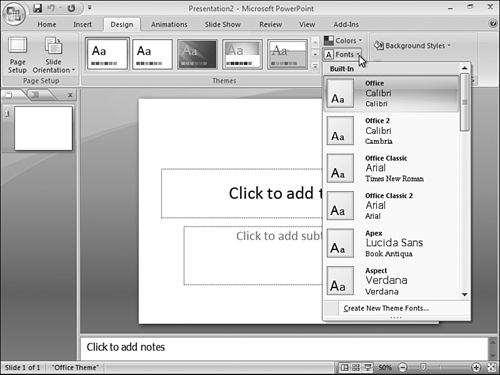
- Hover the mouse pointer over any gallery item to see a preview of its effect. When you see the one you want to apply, click it. Or click Create New Theme Fonts and use the Create New Theme Fonts dialog box (see Figure 18.14) to specify custom fonts.
Figure 18.14. Use the Create New Theme Fonts dialog box to assign custom theme fonts.
Note
In the Create New Theme Fonts dialog box, select a Heading Font and a Body Font, type a name for the theme fonts, and then click Save. Your custom theme fonts will now appear in the Theme Fonts gallery for reuse in other presentations.
Note that when you change fonts as part of a theme, your changes apply to all slides using that theme. PowerPoint 2007 does not allow you to apply the theme fonts to some slides and not to others.
Using Theme Effects
In PowerPoint 2007, a theme also includes a set of theme effects. These control a number of formatting elements, including shadows, glowing, bevels, soft edges, 3D, and line styles. The effects apply mostly to shapes and SmartArt diagrams.
To apply theme effects to your presentation, follow these steps:
- Click the Design tab.
- In the Themes group, click the Effects button to display the Theme Effects gallery (see Figure 18.15).
Figure 18.15. Use the Theme Effects gallery to select theme effects for your presentation.
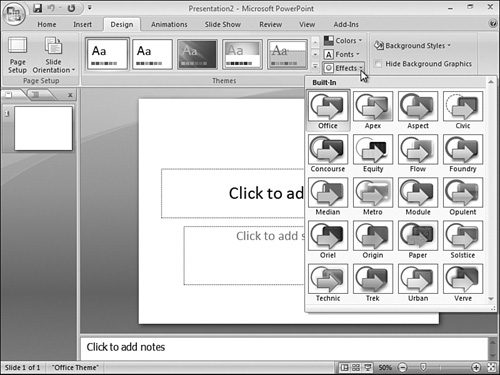
- Hover the mouse over any gallery item to see a preview of its effect. When you see the one you want to apply, click it.
Note that, unlike theme colors and fonts, theme effects can’t be applied only to selected slides. There’s also no way to create your own custom theme effects.
Choosing the Best Background
The background of your presentation—the canvas that sits behind all elements on your slides—offers a wide range of possibilities. The background might include solid colors, gradient fills of one or two colors, textures, or patterns; you can also import a graphic file (in GIF, JPEG, Windows Metafile, or any other compatible graphics format) to use as the background.
In addition to the fundamental design principles discussed earlier in this chapter, your selection of a background should be influenced by the medium you’ll use for the presentation. If you’re going to make the presentation in a darkened room on a large, high-contrast screen, you can get away with just about any combination of colors. But if you’re presenting in a low-contrast situation (in a room where ambient light will fall on the screen, for example), make sure you use light letters on a dark background or vice versa. Those who have trouble discerning colors in low-contrast situations will thank you.
To change the background, do the following:
- Apply the theme or theme colors you want.
- Select the Design tab.
- Select the Background Styles list to display a gallery of backgrounds, as shown in Figure 18.16. Note that the four colors you see along the top row are the four Text/Background colors specified in the current theme.
Figure 18.16. Use the Background Styles gallery to select or create a background for your presentation.
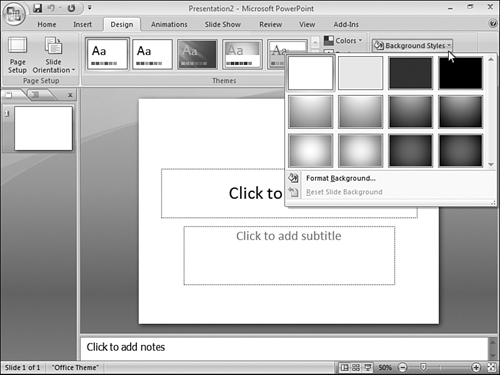
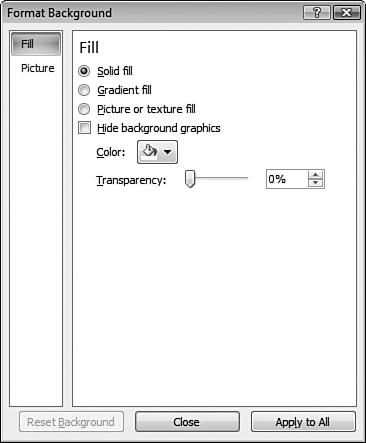
- Hover the mouse pointer over any gallery item to see a preview of its effect. If you see the one you want to apply, click it; otherwise, click Format Background to open the Format Background dialog box (see Figure 18.17).
Figure 18.17. The Format Background dialog box shows PowerPoint’s extensive set of tools for changing backgrounds.
Build your background using any of the following techniques:
- To select a solid background color, click Solid Fill and choose a new color from the Color drop-down list. (For a more extensive selection, click More Colors.)
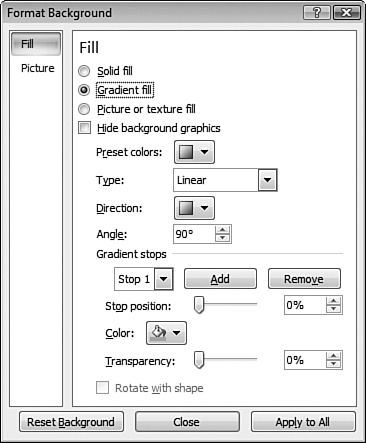
- To create a one- or two-color gradient, click Gradient Fill to display a new set of controls (see Figure 18.18) and use those controls to set up the gradient.
Figure 18.18. Click Gradient Fill to see the gradient related controls.
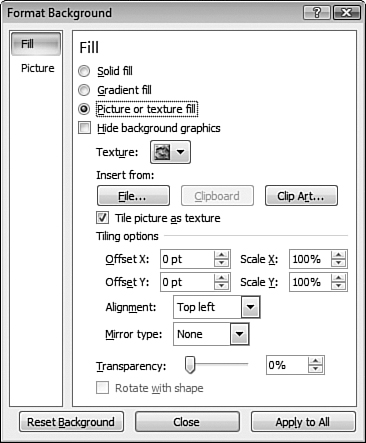
- To use an image or texture as the background, click Picture or Texture Fill to display a new set of controls (see Figure 18.19) and use those controls to select and configure the picture or texture (you can use the samples included with PowerPoint or import your own). You can also import a picture to use as the background; the picture will be stretched to fit the slide.
Figure 18.19. Click Picture or Texture Fill to see the picture and texture related controls.
- When you’ve constructed the background you want, click Apply to All to have the changes take effect throughout your presentation.
If you want to apply the background to selected slides only, select the slides you want to use and then, in step 4, right-click the background you want to use and choose Apply to Selected Slides.
Saving a Custom Theme
When you make changes to some or all of a theme’s components—the colors, fonts, effects, and background—it can take a long time to get things just right. If you think you’ll be using this modified theme in other presentations, the last thing you want to do is repeat the customizing procedures every time.
You can avoid this drudgery by saving your theme modifications as a custom theme. This theme will then appear in the Themes gallery, so you can apply it to another presentation with just a few mouse clicks. Follow these steps:
- Make your changes to the theme colors, fonts, effects, and background.
- In the Design tab, display the Themes gallery and click Save Current Theme. PowerPoint displays the Save Current Theme dialog box and selects the Document Themes folder.
- Type a filename for your theme and click Save.
Changing Paragraph and Text Formatting
Not all presentation text is created equal, and not all text falls into PowerPoint’s relentless and presumed point-by-point-by-point format. Sometimes you might want to center a line of text to make it stand out. In other presentations, you might want to ensure that each top-level bullet point has an extra bit of space after it, to make the presentation more readable from the back of the room. Then there’s the inevitable bold text, italic text, and even the typographer’s nightmare, bold italic text. All these treatments have a place in your repertoire of presentation tricks.
In general, PowerPoint paragraph and text formatting options mirror those available in Word. Select whatever you want to change—paragraphs, words, characters—and then use the Home tab’s Font and Paragraph groups to apply the changes.
Note
To change paragraph or text formatting for all the slides in your presentation, change the Slide Master. To change paragraph or text formatting for a particular layout, if your presentation uses the layout multiple times, change the master for that layout; otherwise, change the slide directly.
Using Paragraph Formatting
All the standard paragraph formatting settings found in Word are at your disposal, including alignment (right, center, and left), spacing (double and triple), and so on. These options are available in the Home tab’s Paragraph group.
Note
To remove bullets from a paragraph, click inside the paragraph, select the Home tab, and then either pull down the Bullets list and click None, or click the Bullets button.
To change tab stops and adjust the behavior of tab characters, you must use the ruler (select Ruler in the Show/Hide group of the View tab).
Some tab formatting options you might use in other Office applications do not exist in PowerPoint. For example, there is no easy way to put a tab stop in every cell of a table; you have to enter them all manually.
Using Fonts
Professional designers recommend you stick with one font for titles and another for text. Using too many fonts detracts from a presentation.
To adjust any font effects, select some text and use the Home tab’s Font group. You can also right-click the selected text and choose Font from the shortcut menu. All standard effects are available in the Font dialog box: color, bold, italic, bold italic, underline, shadow, emboss, and superscript/subscript. You can also adjust the elevation of superscripts and subscripts in the Offset box.
If you’re planning to deliver your presentation on a large screen, avoid italicized fonts, which often end up looking like wavy blobs. You can use underline to emphasize a word or phrase instead, or consider using bold.
Replacing Fonts Throughout a Presentation
If you’re trying to change all the Times New Roman in a presentation to Garamond, you might be tempted to change the Title Master and Slide Master and call it a day.
Unfortunately, if you’ve applied any manual formatting to individual slides, the link between the slide and its master might be broken. In that case, even if the master is updated, the slide might not make the switch.
![]() To change every slide in your presentation, see “Using the Slide Master,” p. 574.
To change every slide in your presentation, see “Using the Slide Master,” p. 574.
To truly change all occurrences of Times New Roman to Garamond, select the Home tab, pull down the Replace list, and then choose Replace Fonts. Choose Times New Roman from the Replace drop-down list; choose Garamond from the With list. Click OK to apply the change throughout the presentation—even in the masters. This solution is especially useful when you inherit a presentation created by someone who used a font you don’t have.
 Troubleshooting
Slide Master Link Damage
I changed the Slide Master, but some of the slides in my presentation haven’t been updated with the changes.
If you do something odd (for example, delete one of the placeholders in a slide), it’s possible to break the link between a slide and the Slide Master. After the link has been broken, changes to the Slide Master are no longer propagated to the slide. To reset the link, select the slide and then click Reset on the Home tab. (Or right-click the slide in the Slides pane and choose Reset Slide from the shortcut menu.)
Extra Credit: Creating Top-Notch Notes and Handouts
PowerPoint’s canned layouts for speaker notes and handouts have the singular advantage of being easy to use. If you just want your audience to have a place to scribble notes about your talk, these basic templates will do the trick.
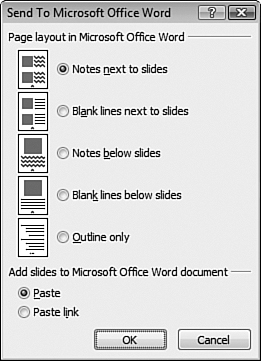
But for truly professional-looking leave-behinds, consider sending the presentation to Word, which offers much better formatting and printing options than the basic notes and handout layouts in PowerPoint. After polishing your presentation to perfection, click the Microsoft Office button, click Publish, and then choose Create Handouts in Microsoft Office Word. Using the choices in the Send to Microsoft Office Word dialog box, Word creates a new document with blank lines next to the thumbnails, in a format suitable for handouts (see Figure 18.20).
Figure 18.20. Use the layout options in Microsoft Word to export your presentation in a variety of ways.
You can use all of Word’s editing tools to add content and sizzle to the resulting document, or insert the presentation into an existing document, such as a corporate backgrounder or product datasheets.
After you’ve finished creating your handouts, consider how your audience will use them before you begin your presentation! When audience members can look at your handout and jump ahead to a topic that specifically concerns them, you might find it difficult to keep their attention focused on what you’re saying. The solution? Hand out a one- or two-page summary of your presentation before the talk begins, with room for your audience to jot down comments and questions, but pass out the unabridged handouts after your presentation is complete.