Chapter 24. Extending Office with Templates, Macros, and Add-ins
In this chapter
Extending Your Office Expertise with Third-Party Templates
Installing and Running Add-ins
Using Add-ins to Create Your Own Ribbon Customizations
Using the Add-ins That Come with Excel 2007
Managing Security for Add-ins, Macros, and Other External Content
Setting Security Options in the Trust Center
Office 2007 is unquestionably a powerful suite of software. But no software package can be all things to all users. Microsoft designed its Office applications to support extensions you can use to augment a program’s features in ways that serve your own specific needs. The principal vehicles for doing this are via macros and add-ins. You can also kick-start the document creation process by using templates created by other people.
Macros, which can be used for anything from automating simple routine tasks to creating elaborate applications, are based on a programming language called Visual Basic for Applications (VBA), which is built in to all Office applications. You don’t have to be schooled in the programming arts to use macros, however. As we’ll see in this chapter (and as Chapter 26, “Using Macros to Automate Routine Tasks,” will explain in further detail), even if you know nothing at all about VBA, you can enhance your productivity in Office by running macros created by others. Or you can let your Office programs create simple macros for you by recording steps that you take and translating them into VBA.
You can think of an add-in as a more elaborate sort of macro—a program that runs in the context of one or more Office applications and alters or extends the basic functionality of its host application. These are typically third-party products that you download, license, and install, just as you might a game or some other piece of standalone software. Not all add-ins are extra-cost items, however (and many of those that are can be installed free in time-limited trial versions). Your Office suite includes a handful of Excel add-ins that are available but not installed by default (because the add-ins would be a waste of disk space and memory if you didn’t need them). We’ll show you how to use those add-ins and look at some of the many third-party add-ins in this chapter.
Extending Your Office Expertise with Third-Party Templates
Sometimes what you need most to get a particular job done is not a tool that extends the capabilities of an Office application (as a macro or add-in might), but simply a well-made model showing how someone else has accomplished the task. To meet that need, you’ll want to explore the hundreds of free templates available at Microsoft Office Online. You can get to these in either of the following ways:
- Click the Microsoft Office button in Word, Excel, or PowerPoint. Click New and then select one of the categories under Microsoft Office Online. Then select one of the templates that appears.
- Use your Web browser to go to http://office.microsoft.com/en-us/templates. Choose a category under the heading Browse Templates and then follow the instructions to download a template.
The first method enables you to choose from templates for a specific application—Word, Excel, or PowerPoint. At times, you might not be sure which application is appropriate to use, however, and in those cases it’s better to start at Microsoft’s website.
The Office Online template library is extensive, having been built up from many sources over a period of many years. You’ll find templates designed for all versions of Office from Office 97 onward. (The version of Office for which a template was designed is indicated on the website but is not apparent when you download templates via the New command.) If you want a template to show you how to use the latest Office features—some of the new conditional formatting capabilities in Excel, for example—you need to restrict your search to Office 2007. On the other hand, if you’re just looking to accomplish a certain task quickly (creating a nicely styled expense report, for example), the older templates are often as good as the newer ones.
Many of the Office Online templates are quite general in purpose—budgets, expense reports, brochures, diagrams, and so on. Others are startlingly specific (see, for example, the Word template “Complaint to Principal About Teacher” or the Excel template “6 Step Sermon Planning Workbook for Pastors”). In any case, a good browse will be worth your while. The remainder of this section includes a few examples of useful and practical items you might find.
Create a Brochure in Word
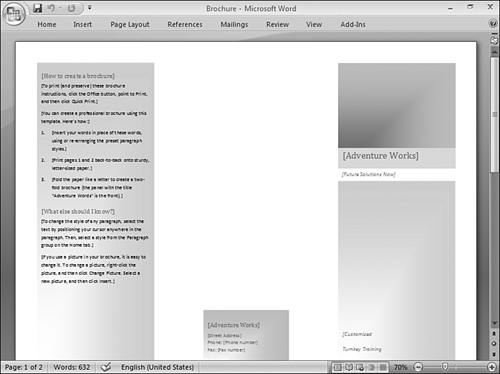
Word can generate stylish two-fold and three-fold brochures, but setting up the layout can be time-consuming if you’ve never done it before. Try starting from a template instead of starting from scratch. The Brochure template shown in Figure 24.1 provides layout, attractive gradients, and instructions. All you have to do is print the template unchanged (so you have instructions to refer to as you work) and then replace the instructional text with your own.
Figure 24.1. To create a preformatted brochure, replace the instructional text with your own words and pictures.
Create a Family Budget in Excel
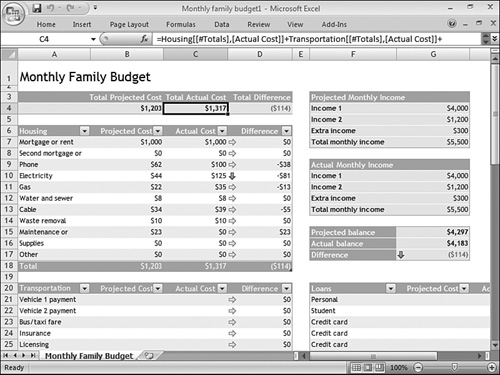
The budget template shown in Figure 24.2 exemplifies several of the new data-management features in Excel 2007. The arrow icons at the left edge of column D and in cell G17, for example, are supplied via conditional formatting. If the actual cost for a line item rises above the projected cost, that item’s arrow turns south and changes from yellow to red. The formulas in row 4 make effective use of structured referencing. The formula shown in the formula bar in Figure 24.2, for example, adds the Actual Cost item in the Total line of the Housing table to the Actual Cost in the Total line of the Transportation table—and so on. Meanwhile, the filter arrows for the various table headers make it easy for you to sort line items by projected or actual cost (or the difference between projected and actual) or to focus a table on items that meet some criterion—for example, the top five items in terms of actual cost.
Figure 24.2. This budget template makes effective use of structured referencing and conditional formats.
Plan Your Wedding in OneNote
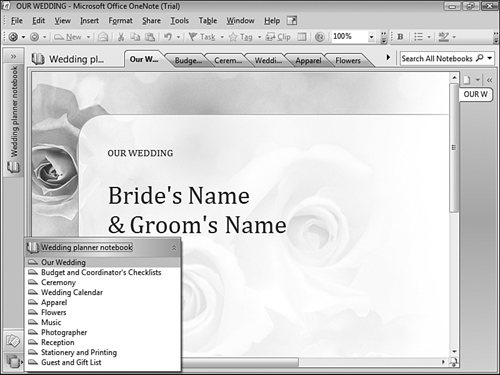
The OneNote notebook depicted in Figure 24.3 has sections covering many of the organizational details for a moderately elaborate wedding. In the Budget and Coordination section, for example, you can enter estimated and actual expenses for everything from the groom’s shoes to lighting and balloons. The Photographer section includes both a scheduling page and a checklist to help you remember what questions to ask. The Guest and Gift List section help you track invitations sent, accepted, and declined; shower and wedding gifts received and acknowledged; accommodations arranged for out-of-town attendees, and so on.
Figure 24.3. You can plan everything from rings to roses in this OneNote template.
OneNote doesn’t have a simple mechanism for connecting to Microsoft Office Online. To download the Wedding Planner notebook (or any of several other planning notebooks), direct your browser to http://office.microsoft.com/en-us/templates/CT101423511033.aspx.
Expanding Office with Macros
If you’re brand new to the Office macro language, VBA, probably the best way to get started is to use the macro recorder in Word, Excel, or PowerPoint (see Chapter 26 for details). Pick any task you do repeatedly—formatting worksheet cells or adjusting column widths in Excel, for example—and let the recorder translate your keystrokes and mouse actions into lines of VBA code. Then take a look at the code in the Visual Basic Editor and see if you can figure out what’s going on. (Whether you can or not, you’ll have a macro you can reuse any time you need to perform the same tedious task.)
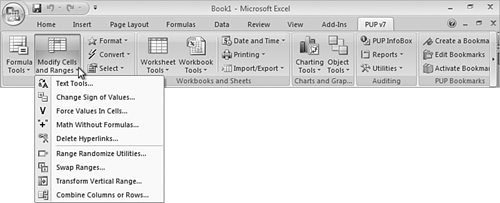
If in recording macros you develop an appetite to learn more, and to learn how to code your own macros (which can be far more versatile than macros you record), you can turn to numerous books on the subject. If you already have intermediate to advanced VBA skills and want to learn more from an accomplished Excel developer, we recommend John Walkenbach’s Power Utility Pak (PUP) version 7. PUP (see Figure 24.4) is an extensive set of utilities that expands the native Excel feature set in almost every direction. Its 70 add-in tools and 53 worksheet functions either enable you to do things that Excel itself cannot (such as create perpetual calendars, set reminder alarms, or search for text within comments) or simplify tasks that are awkward to accomplish in Excel (such as formatting superscripts and subscripts).
Figure 24.4. Power Utility Pak (PUP) version 7 uses VBA to add 70 new tools and 53 new worksheet functions to Excel.
As a Swiss Army knife for Excel users, PUP is worth its $40 price tag (a 30-day free trial is available). By studying the VBA source code (available for an additional $20), you can learn advanced programming techniques by example, or customize the utilities to suit your own needs. For more information, see http://j-walk.com/ss/pup/pup7/.
Installing and Running Add-ins
Add-ins come in many shapes and forms. Some are based on Microsoft’s Component Object Model (COM) and implemented as executable (.EXE) files, even though they have no standalone function. (Typically an add-in of this kind launches its host Office application and installs itself when you run the executable.) Others are written in VBA, Microsoft’s macro language, and might need to be opened by some action you take within the host application. Usually, if you purchase a third-party add-in or download a trial version, the publisher provides instructions about how to activate it, and you won’t have to do anything further.
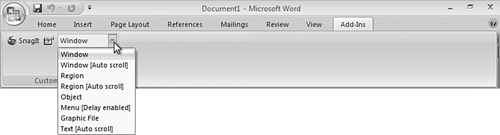
Add-ins typically make their functionality accessible by modifying the Ribbon in some way. Some simply add a tab called Add-ins. For example, the screen-capture utility SnagIt (the program used to capture screens for this book) is essentially a standalone program. But it also includes add-in modules for Excel, Word, and PowerPoint. You can use these add-ins to capture an image (a window or a screen region, for example) and paste it into the current Office document, in a single step. In the context of these Office applications, SnagIt sets up an Add-ins tab with a single custom toolbar (see Figure 24.5). (For more information about SnagIt, see http://www.techsmith.com/snagit.asp.)
Figure 24.5. As an add-in for Word, PowerPoint, or Excel, the screen-capture utility SnagIt adds an Add-in tab, with a single custom toolbar, to the Ribbon.
The Add-ins tab’s Custom Toolbars group can accommodate multiple add-ins. Figure 24.6, for example, shows Word with two add-ins attached to this part of the user interface—the aforementioned SnagIt and the bibliographic utility EndNote. (EndNoteX supports Word 2007 and is an invaluable tool for managing research citations and bibliographies. For information, see http://www.endnote.com/. If you run Office 2007 in Windows Vista, be sure to read the compatibility notes at http://www.endnote.com/enword2k7.asp.)
Figure 24.6. The Custom Toolbars group in Word appears when you install compatible third-party programs like the two shown here.

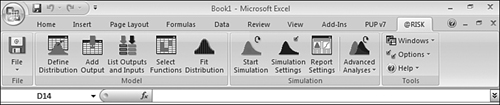
Other add-ins amend the Ribbon in more elaborate ways by adding their own tabs and groups. Figure 24.4, for example, shows the custom tab created by PUP7. Figure 24.7 shows the user interface of Palisade’s @Risk, an add-in that performs Monte Carlo simulations and risk analysis in Excel. (For information about @Risk, see http://www.palisade.com/risk/. For information about a comparable risk-analysis add-in, Decisioneering’s Crystal Ball, visit http://www.crystalball.com/.)
Figure 24.7. Add-ins like this one can create new tabs on the Ribbon dedicated exclusively to their features.
Using Add-ins to Create Your Own Ribbon Customizations
If an add-in can modify the Ribbon for its own purposes, why not an add-in that simply enables you to tailor the Ribbon yourself? Although the native Office 2007 user interface does not provide you with a way to modify the Ribbon (a shortcoming that early adopters of Office 2007, who were used to customizing menu bars and toolbars in Office 2003, were quick to point out), add-ins for this purpose are available.
Recreating the Office 2003 User Interface
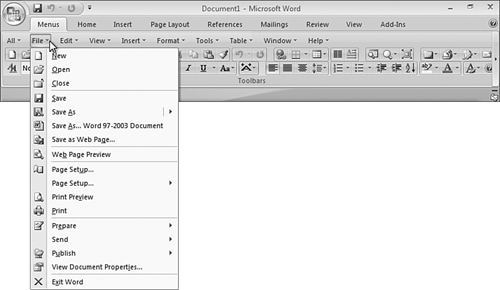
Do you miss the old menus and toolbars? Or are you simply ambivalent about the new Ribbon-based interface? Microsoft decided not to include a “classic mode” option in Office 2007, but you can install one yourself, with the help of Classic Menu for Office 2007. Classic Menu doesn’t replace the Ribbon; it simply adds a Menus tab and some familiar-looking toolbars (see Figure 24.8). The Menus tab essentially recreates the old menu system (with modifications necessary to accommodate changes in the new Office applications’ feature sets). You can install it for Word, Excel, and PowerPoint, or only for a certain one of those applications. If you really hate the Ribbon, you can minimize it and rely exclusively on the Menus tab. Or you can simply use the Menus tab as a useful fallback for those times when you just can’t find what you’re looking for in the new interface. A free trial of Classic Menu for Office 2007 is available at http://www.addintools.com/english/menuoffice/.
Figure 24.8. With Classic Menu for Office 2007, you can add the Office 2003 menus and toolbars to the Office 2007 Ribbon.
Reorganizing the Ribbon
Microsoft not only declined to include a classic user interface option in Office 2007; it also decided not to give you any convenient way to rearrange the Ribbon. So if you like the Ribbon but want it arrayed differently, you need to turn to a third-party tool. Patrick Schmid’s RibbonCustomizer fits the bill.
RibbonCustomizer, shown in Figure 24.9 in the context of PowerPoint (it also works in Word and Excel), lets you add new tabs or remove existing ones, populate new tabs with whatever groups you want to use, create your own groups with any commands you want, and change the order in which tabs and groups appear. You can even toggle between the default Ribbon and your own customized version. No programming is required. The add-in comes with a feature tour, and demos are available at http://pschmid.net/office2007/ribboncustomizer. You can download a 30-day trial at that site, or simply use a free “starter” version for as long as you like.
Figure 24.9. RibbonCustomizer addresses a major shortcoming of the Office 2007 Ribbon interface, allowing you to rearrange the Ribbon to suit your needs and preferences.

Using the Add-ins That Come with Excel 2007
As we mentioned near the beginning of this chapter, Excel 2007 comes with a handful of add-ins that, because they are relatively specialized, are not installed by default. It’s possible that you’ll find one or two of these useful. To see what’s available and to install selected add-ins, follow these steps:
- Click the Microsoft Office button.
- Click Excel Options.
- In the left pane of the Excel Options dialog box, click Add-ins.
- In the Manage drop-down menu (at the bottom of the dialog box), select Excel Add-ins.
- Click Go.
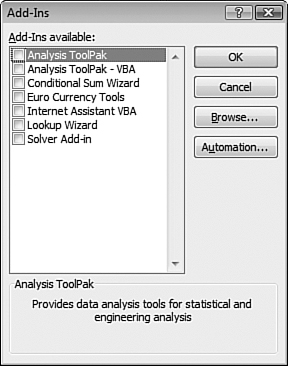
The available add-ins appear as a set of items with check boxes (see Figure 24.10). Select any add-ins you want to install and click OK. Depending on whether the selected items have ever been installed on your computer, you might need to confirm the installation and wait while the Office setup routine does its thing.
Figure 24.10. Microsoft ships these add-ins with Excel 2007, but does not install them by default.
Note
Figure 24.10 presents the list of add-ins supplied by Microsoft. If you (or someone else) has made VBA-based add-ins available, you might see additional items on the list.
Two of the seven Microsoft add-ins provide additional functions for use in VBA code. The remaining five are of potential use to non-programming Excel users.
Doing Statistics with the Analysis Toolpak
If you’re a veteran of earlier Excel versions, you might have already installed the Analysis Toolpak to make its 80+ analytical functions available to your worksheet formulas. These functions, ranging from the simple but useful (RANDBETWEEN, for example, which takes some of the grunt work out of generating random integers in a specified numeric range) to the highly specialized (the set of functions that deal with bond values, for example), are no longer tucked away in the add-in. They’re now a core part of Excel.
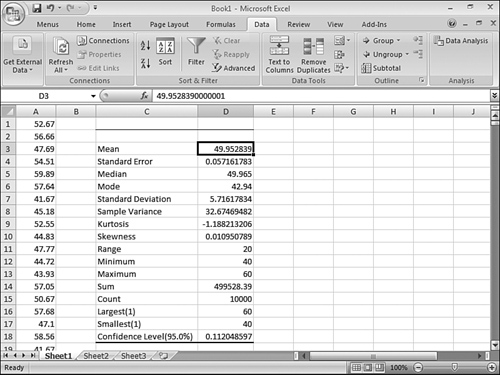
The rest of the Analysis Toolpak consists of a set of statistical utilities (see Figure 24.11). These should not be considered the equivalent of a dedicated statistics package, but they might very well help you get through a basic statistics class. To use the utilities, install the add-in, and then click Data Analysis, in the Analysis group of the Data tab. Select a utility, click OK, and then supply the necessary parameters in the ensuing dialog box. Figure 24.12 shows a sample of the output from the Descriptive Statistics utility.
Figure 24.11. The Analysis Toolpak allows you to choose from a selection of standard data analysis tools.
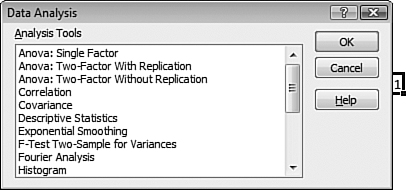
Figure 24.12. The Descriptive Statistics utility generates a table of statistical measures from a specified input range.
Using Wizards to Simplify Lookups and Conditional Sums
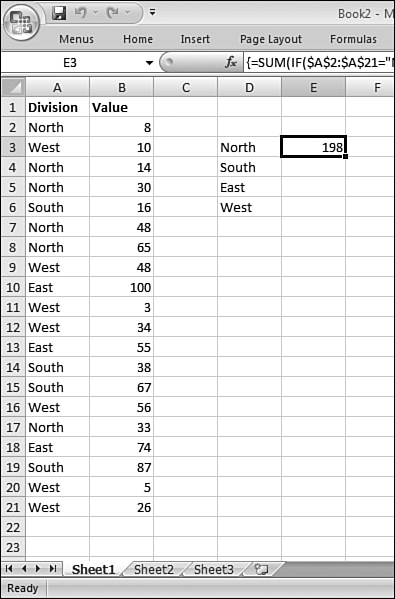
The Conditional Sum Wizard and Lookup Wizard add-ins don’t accomplish anything that you couldn’t do with worksheet formulas, but they can save you the trouble of looking up function syntax. Assume, for example, that in Figure 24.13 you want to total the values in column B by the divisions listed in column A. You could do this with the SUMIF function, the DSUM function, or an array formula based on the SUM and IF functions. Or you could put the Conditional Sum Wizard to work. As all good wizards do, this one presents a series of dialog boxes that ask what values you want to total, for what condition you’re testing, and where you want to place the result. At the end of the interview, you get an array formula, as shown in Figure 24.14.
Figure 24.13. Use the Conditional Sum Wizard to make short work of complex formulas that would be mind-numbingly difficult to create manually.
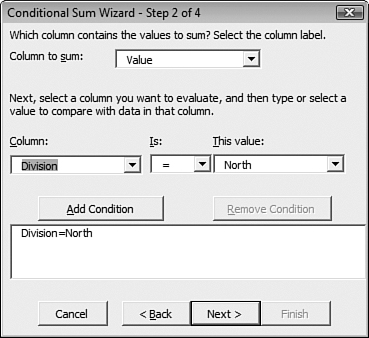
Figure 24.14. The Conditional Sum Wizard generated the array formula in E3.
The Lookup Wizard performs a similar kind of service, relieving you of the need to understand the VLOOKUP, HLOOKUP, and MATCH functions. If you need to pluck values from lookup tables—for example, to find the tax due for a given income level and filing status by searching through an IRS table—the Lookup Wizard can do the job.
After they are installed, the Conditional Sum Wizard and Lookup Wizard are both accessible in the Solutions group of the Formulas tab.
Converting Currencies with the Euro Currency Tools
The Euro Currency Tools add-in, which, when installed, appears as a command in the Solutions group of the Formulas tab, performs conversions between the European Currency Unit (Euro) and the currencies of individual European Union countries that have adopted the Euro. If you need to know how many Austrian Schillings a particular number of Euros represents, for example, this add-in does the job.
Tip
To perform conversions between U.S. dollars and various currencies around the world (including the Euro), don’t turn to the Euro Currency Wizard. Instead, download Microsoft’s Currency Rate Calculator template. This template, which sets up a Web query to Microsoft’s MSN MoneyCentral site, is deeply buried in the New Workbook dialog box. Click the Microsoft Office button and choose New. At the bottom of the Templates pane on the left side of the new Workbook dialog box, choose More Categories. When the More Categories list appears, click Calculators. Then browse through the gallery of calculator templates and double-click Currency Rate Calculator.
In addition to installing a couple of interactive commands, the Euro Currency Tools add-in adds a EUROCONVERT worksheet function to Excel. (To find it, click the Formulas tab, click Insert Function, select All from the category list, and scroll through the alphabetical list until you reach the newly added function.)
Solving Optimization Problems with the Solver Add-in
The most ambitious of the Microsoft-supplied add-ins for Excel, Solver is a program that solves linear and nonlinear optimization problems. Such problems seek to find a maximum or minimum value of a cell (for example, to maximize profit or minimize cost), given variable inputs and one or more constraints.
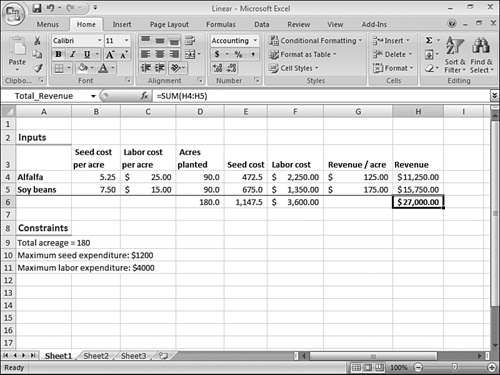
Figure 24.15, for example, illustrates a linear programming problem of the sort you might encounter in a basic algebra class. A farmer has 180 acres to divide between two crops, alfalfa and soy beans. The crops yield different amounts of revenue per acre and incur different costs for seed and labor. The farmer wants to maximize his income, given the constraints that total seed expenditure must not exceed $1,200 and total labor expenditure must not exceed $4,000.
Figure 24.15. Solver makes quick work of a linear optimization problem like this one.
After installing Solver, you could tackle this problem by clicking the Solver button, in the Analysis group of the Data tab, and filling out the Solver Parameters dialog box as shown in Figure 24.16. Note that the dialog box specifies the cell whose value you want to optimize (called the target cell), the fact that you want to optimize it by maximizing it (in a different kind of problem, you might be seeking to minimize some target cell), the cells that you can adjust to achieve your solution, and the constraints that must be met.
Figure 24.16. Setting up Solver parameters entails specifying a target cell (and whether to maximize or minimize it), the cells whose values can be changed, and the constraints that must be met.

Clicking Solve in Figure 24.16 generates the solution shown in Figure 24.17. Note that the Solver Results dialog box lets you revert to your original values or keep the ones that Solver found.
Figure 24.17. If Solver finds a solution, you can keep its results or restore the ones with which you started.

Solver is capable of dealing with much more complex problems than this, of course, including problems in which the relationship between the target cell and one or more inputs is nonlinear.
Managing Security for Add-ins, Macros, and Other External Content
Add-ins, macros, ActiveX controls, and other forms of active external content have the potential to make your Office applications far more useful than they were in their out-of-the-box state. But as you might have noticed, they also have the potential to trigger security warnings. If you’ve ever encountered a message bar comparable to the one shown in Figure 24.18, you know what we mean.
Figure 24.18. Ever alert, Office 2007 wards off all potential security threats by default.

Security warnings like the one in Figure 24.18 often appear below the Ribbon whenever you open or download a file that the host application perceives as a potential threat—which essentially means anything that contains executable code. Macros embody code, so Office disables them (by default). When opening a file or downloading something from the Internet triggers a security warning, you can click the adjacent Options button to bypass the security measures for the current item. You might then see a dialog box similar to the one shown in Figure 24.19.
Figure 24.19. Clicking the Options button on a security warning message bar gives you the opportunity to enable the current content.

There’s nothing wrong with tranquilizing the watchdogs on a case-by-case basis by selecting Enable This Content in dialog boxes like the one shown in Figure 24.19. But you can save yourself time and frustration by training the dogs to bark only when you want them to. The next section shows you how.
Note
If you never see a message bar like the one shown in Figure 24.18, but macros, add-ins, or ActiveX controls fail to run, it’s possible that the message bars themselves have been turned off. Click the Microsoft Office button in Word, Excel, or PowerPoint and then click Word Options, Excel Options, or PowerPoint Options. In the left pane of the Options dialog box, select Trust Center. Then click Trust Center Settings. In the left pane of the Trust Center, click Message Bar. Be sure the Show the Message Bar in All Applications When Content Has Been Blocked option is selected.
Tip
When a security warning appears in a message bar, you don’t have to make an immediate decision about whether to allow the blocked content. You can begin working with the document in question and decide later. The message bar is a docked, modeless dialog box—one that remains on screen until you send it away. (You can do that by clicking Options or the Cancel button at the right side of the bar.) This represents a design improvement over the security dialog boxes in earlier versions, which, because they were modal, were often thoughtlessly dismissed.
Setting Security Options in the Trust Center
The Trust Center provides a central location for security settings in Office applications. With seven categories—Trusted Publishers, Trusted Locations, Add-ins, ActiveX Settings, Macro Settings, Message Bar, and Privacy Options—the Trust Center provides a much more granular approach to security settings than the High-Medium-Low mechanism used by previous Office iterations. (In Excel, an additional Trust Center category is called External Content.) You can make your system hyper-alert for potentially harmful ActiveX controls, for example, while giving macros carte blanche.
To get to the Trust Center, click the Microsoft Office button and then click Word Options, Excel Options, or PowerPoint options (depending on which program you’re using). In the left pane of the Options dialog box, click Trust Center, and then click the Trust Center Settings dialog box.
Tip
If you think that opening the Trust Center requires an impressive number of mouse clicks, you’re not alone. Fortunately, there’s often a quicker way. If you’re presented with a Security Options dialog box, such as the one shown in Figure 24.19, look for a link labeled Open the Trust Center, in the lower-left corner of the dialog box. This takes you there directly; no need to pass Go.
Be aware that some of the options you configure in the Trust Center (macro settings, for example) apply only to the current application, not to the whole suite. Others, such as Trusted Publishers, are global. We will point out which is which.
Using the Trusted Publishers List
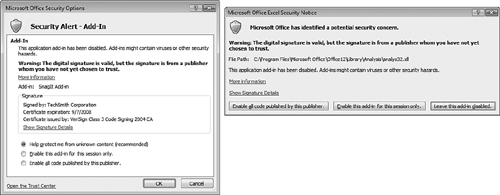
A trustworthy publisher is a supplier of content whose goods have a valid, current (not expired) digital signature backed by a reputable certification authority. (A digital signature is a cryptographic means of ensuring the authenticity of something, such as an email message, contract, or software component. The presence of a valid digital signature provides assurance that the item in question comes from whom it purports to come from and has not been altered on route to you.) If you configure either add-in security or macro security to require digital signatures, you might see a dialog box similar to one of the boxes shown in Figure 24.20 when you attempt to run or install an active item.
Figure 24.20. If you have configured Office to look for valid digital signatures, you can use links or options in these dialog boxes to white-list particular publishers.
If you see a dialog box like either of these, look for an option or a button labeled Enable All Code Published by This Publisher. By selecting the option (or clicking the button), you can elevate the publisher in question from trustworthy status to trusted status, and Office will give the green flag to all subsequent downloads or installs. You can inspect the list of trusted publishers in the Trust Center (see Figure 24.21).
Figure 24.21. Vendors in the Trusted Publishers list are assumed to be benign.

Note that there is no way to add a vendor to the Trusted Publishers list from within the Trust Center. Instead, you populate the list on a vendor-by-vendor basis when an Office application presents a dialog box of the form shown in Figure 24.20. What you can do in the Trust Center is view a publisher’s certificate and, if necessary, remove vendors from the list.
Note
A single Trusted Publishers list is maintained by all Office applications, and this list is also shared with Internet Explorer. It’s possible that you will see entries in the Trust Center that arrived by way of an Internet Explorer dialog box, as opposed to an Office dialog box. If you upgraded an earlier version of Office to Office 2007, you might also see a Prior Trusted Sources list enumerating publishers that you trusted in that earlier version.
Bypassing Security Measures by Storing Documents in Trusted Locations
One of the most convenient features of the Office 2007 security apparatus is the Trusted Locations list. Any document you load from a trusted location is waved through security, regardless of whether it includes macros, ActiveX controls, links to external data sources, or links to external Excel workbooks. There is one exception. (There always is.) An ActiveX control that has a “kill bit” set in the registry is terminated on sight, even if it dwells within a document stored in a trusted location. This drastic treatment is accorded only to ActiveX controls that are known (by Microsoft) to be malevolent.
The Trusted Locations list is intended to serve as an inducement not to turn off the standard security measures. If you’re frustrated by message bars and security warnings for documents that you know are benign, resist the temptation to blow away the whole security service. Instead, simply move the documents in question to a trusted location. Or add their current folder to the Trusted Locations list.
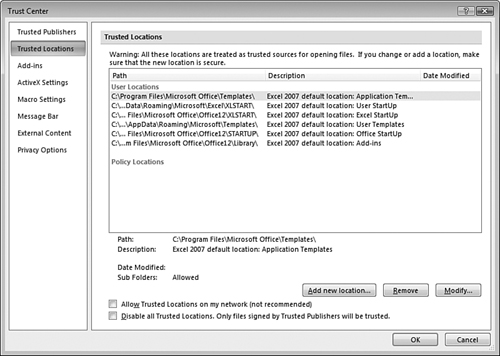
Word, Excel, and PowerPoint each maintain its own Trusted Locations list, and each application provides certain trusted folders by default—such as the folders for templates and startup documents. Figure 24.22 shows the default list for Excel. You can add locations or remove or edit existing ones by means of the three buttons below the list.
Figure 24.22. Documents opened from a trusted location are assumed to present no security threat.
Note
The Policy Locations section of the Trusted Locations list holds locations established by a system administrator. Unless you work in an environment managed by an IT staff, this area will presumably be empty.
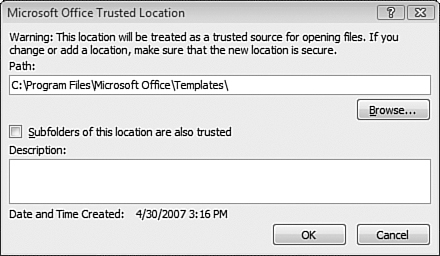
When you add a trusted location (see Figure 24.23), the dialog box that appears gives you the opportunity to add a description of the location—a few words about the folder’s purpose and the kinds of documents you plan to store there, for example. The check box in the middle of the dialog box gives you the option of extending trust to subfolders of the specified folder. To see whether an item in the current list includes subfolders, highlight it and read the text beside the words Sub Folders, near the bottom of the dialog box (see Figure 24.22).
Figure 24.23. When you add a trusted location, you can write a short description of its purpose; you can also extend trust to the location’s subfolders.
Tip
Although the dialog box in which you create a trusted location is titled Microsoft Office Trusted Location, the location you create is application-specific. To make a folder available as a trusted location to all of your Office applications, repeat the process in each.
Although you can easily make your entire document store a trusted location, by adding the Documents folder (or My Documents, if you’re running Windows XP) to the list and enabling its subfolders, doing so is nearly tantamount to turning off security altogether. If you are the least bit concerned about protecting yourself from malicious active content, you should adhere to the following guidelines:
- Trust specific folders, not vast trees of folders and subfolders.
- Do not trust folders to which other users have write access.
- Do not trust folders on network servers (doing so is disallowed by default). If you must, select the Allow Trusted Locations on My Network (Not Recommended) check box.
Caution
Do not add any folder to your list of trusted locations that can be used for temporary storage of email attachments. Do not, for example, trust the folder pointed to by the system variable %LocalAppData%Temp.
Configuring Add-in Security
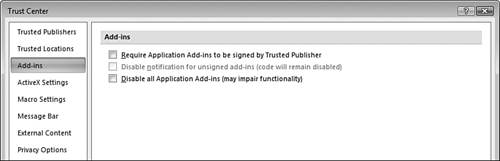
Add-ins, accessory programs that augment the built-in functionality of one or more Office applications, are, by default, allowed to run without notification or warning. (They are, in fact, the only form of external code that Office doesn’t ward off in some manner by default.) Because add-ins can conceivably be designed to do harm, you have the option of applying more restrictive settings. The Add-ins section of the Trust Center presents three check boxes (see Figure 24.24).
Figure 24.24. Add-ins are permitted to run by default, but you can use these check boxes to raise the security bar.
Note
Add-in security settings apply only to the current application. Thus, for example, if you want to allow add-ins in Word and Excel but disallow them completely in PowerPoint, you can leave the default settings for Excel and Word in place, open the Trust Center in PowerPoint, and select Disable All Application Add-ins. Your setting in PowerPoint does not override your settings in Word and Excel.
If you’re really concerned that someone might install a malicious add-in on your system, you can select the Disable All Application Add-ins check box. A more moderate approach, however, and one that would likely be as effective, would be to select the Require Application Add-ins to Be Signed by Trusted Publisher check box. Having done that, you can use the Trusted Publishers list to separate the add-ins you trust from those you do not.
With the Require Application Add-ins to Be Signed by Trusted Publisher check box selected, the option to disable unsigned add-ins without notification becomes available (that’s the second check box, the one grayed out in Figure 24.24). Selecting both of those check boxes will ensure that only signed add-ins from trusted publishers will be allowed to run. Add-ins lacking a digital signature will be rejected without notification to you.
Configuring ActiveX Security
An ActiveX control is a snippet of code that uses the Component Object Model (COM) to perform some presumably useful task, such as adding a toolbar, input control, or small application to the program that hosts it. ActiveX controls have a greater potential for causing mayhem than the other forms of active content discussed in this chapter, because they have access to such things as your file system and registry. On the other hand, precisely because they are powerful and responsive, and because many websites rely on them, it would be difficult to live entirely without them.
Figure 24.25 shows the default security settings and available options for ActiveX controls. Note that these settings are global; that is, changes made in one Office application apply to the others as well.
Figure 24.25. These default ActiveX security settings make for a reasonable tradeoff between functionality and safety.
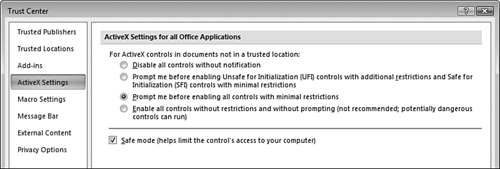
The first and fourth option buttons for ActiveX security are probably self-explanatory. The first disables all controls, no questions asked, no prompts presented. Choose this if you’re completely averse to risk. The fourth enables all controls, no prompts, no message bars. This one is for thrill-seekers only; Microsoft doesn’t recommend it, and neither do we.
The remaining two options are more opaque than anything else in the Trust Center. The differences between the two options are minimal. With either setting, if an ActiveX control arrives in the context of a document that also includes a VBA project (that is, one or more macros written in Visual Basic for Applications), the control is blocked and you are presented with a message bar. If you use the message bar to enable the control, the control functions—but only in the current document and the current session.
Tip
If you’re bothered by security warnings when you use a document that has a known-to-be-trustworthy ActiveX control, move that document to one of the folders listed in your Trusted Locations. The only scrutiny Office gives to ActiveX controls that come from trusted locations is to look for the kill bit. Otherwise, the control is assumed to be benign.
With both the second and the third options, if you open a document containing ActiveX controls, and all of those controls have been marked by their developers as Safe for Initialization (SFI), the controls run, and you are not prompted for approval. If you open a document containing one or more ActiveX controls that have not been signed as Safe for Initialization, you are presented with a message bar. With either option, if you use the message bar to approve the control, it runs, but the second option imposes more restrictions on the control than does the third.
Configuring Macro Security
The four macro-security options, shown in Figure 24.26, are “per-application” settings. If you never use macros in Word or PowerPoint, for example, but use them all the time in Excel, you can apply a more restrictive setting in the two programs where you don’t need them.
Figure 24.26. The settings for macro security are application-specific.
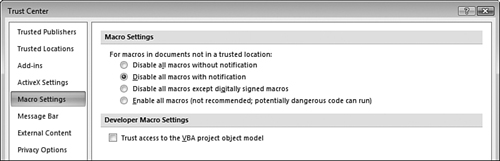
If you write or record your own macros, you might be tempted, despite Microsoft’s disapproval, to select the fourth option in this dialog box, Enable All Macros. That’s because the default setting, Disable All Macros with Notification, will block your own work along with any other macros that come along. (You can enable the blocked content by going through a Security Options dialog box similar to Figure 24.19, but those extra mouse clicks will get to be a major annoyance before long.) But, as we have said before, it’s more prudent to keep some level of security in place but move your macro-laden files to a trusted location.
If you don’t write your own macros and want nothing to do with macros written by anyone else, you can select the first option, Disable All Macros Without Notification. Be aware, though, that this option really precludes a potential source of pleasure and productivity enhancement. You don’t have to be a programmer to make effective use of macros; you can use your programs’ macro-recording features to simplify tedious, repetitious tasks, without having to learn a line of VBA code.
![]() For more details about creating and editing macros, see Chapter 26, “Using Macros to Automate Routine Tasks.” p. 721.
For more details about creating and editing macros, see Chapter 26, “Using Macros to Automate Routine Tasks.” p. 721.
If you opt for the middle ground, note that the third option is slightly more permissive than the second. The second option, Disable All Macros with Notification, blocks macros even if they come with a valid digital signature from a trusted publisher. The third option gives free passage to digitally signed macros, provided you have added their developers to your Trusted Publishers list.
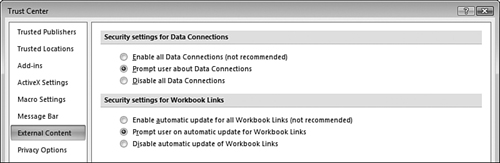
Setting Security Options for External Content in Excel
In Excel only, the Trust Center includes an additional category called External Connections. This category is concerned with two types of hazards: connections to external data (such as queries to or PivotTables based on a corporate database) and formulas that link cells in one workbook to cells in another. In both cases, the default settings (see Figure 24.27) prompt for approval. You can disable either form of external content altogether, but you’ll be turning off extremely useful Excel functionality if you do so. You can also turn off the security dogs for either content type and live with the risks—as you have always done in the past if you’ve used earlier versions of Excel. Our own take on this one is that the risks are minimal and don’t merit the hassle of warning prompts.
Figure 24.27. Excel, by default, prompts for approval when you connect to external data or link one workbook to another.