
Chapter 26. Using Macros to Automate Routine Tasks
In this chapter
How Office Applications Store Macros
Troubleshooting Recorded Macros
Digitally Signing Macros You Create
Extra Credit: Getting Ready to Tackle VBA
Getting Started with Macros
Office macros are small computer programs that perform tasks on your behalf. And when we say small, we mean very small. A skilled programmer can create a macro that does something meaningful with just a few lines of program code, written in the underlying programming language of Office, Visual Basic for Applications (VBA).
Anyone can create powerful macros using tools built into Word, Excel, and PowerPoint (OneNote does not support the use of macros). But most people never use Office macros. Why? The two most common reasons are
- They have no idea what macros can do.
- They have no desire to become a programmer.
After you learn what macros can do, you’ll probably think of dozens of ways you can use them to automate simple tasks. But there’s no getting around the fact that you have to invest some time and effort before you can use macros successfully. For instance, in Word, Excel, or PowerPoint, you can turn on a macro recorder that captures the results of your clicks and keystrokes as you perform a task. The recorder generates program code that you can save as a macro you can play back later to perform the same task. As we note in this chapter, however, most recorded macros require some tweaking of the generated code before they will work as you expect. As a result, you need to understand basic programming principles to make the most of these tools.
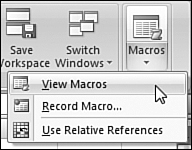
If you learned how to create and use macros in a previous Office version, your skills are directly transferable to Office 2007. First, though, you have to find all those familiar tools. In Office 2007 programs that use the new Ribbon-based interface, you’ll find a tiny Macros group at the far right of the View tab (see Figure 26.1); it contains basic tools for viewing existing macros and recording a new one.
Figure 26.1. The default Macros group contains this limited set of tools for creating and managing macros.
You’ll find a more complete set of macro-related tools on the Developer tab, which is normally hidden. To unhide it so you can begin using macros in Word, Excel, or PowerPoint, click the Office button, click Word (or Excel or PowerPoint) Options, and click to select the check box next to Show Developer tab in the Ribbon. As Figure 26.2 shows, the Code group contains commands to open the Visual Basic Editor, the Macros dialog box, the macro recorder, and the Macro Security dialog box.
Figure 26.2. You’ll find a more complete set of macro tools on the Developer tab, which is hidden by default.

Tip
When you make the Developer tab visible in one Office program, it becomes visible in all other Ribbon-based programs as well.
The more you know about macros and VBA, the more you’re able to use them effectively. In this chapter, we explain how macros work, how to troubleshoot recorded macros, and how to manage a collection of macros.
What Can You Do with a Macro?
Most of the time, you use the individual programs that make up Microsoft Office interactively—typing text, inserting graphics, formatting, saving, and printing. That’s fine when you’re creating new content, but it’s no fun at all when you have to perform the same task regularly. Even a procedure that requires only three or four mouse clicks can become unbearable if you have to repeat it several times a day. The problem is even more acute if you perform any weekly tasks using Word or Excel where the step-by-step instructions are so complicated you have to print out a cheat sheet. If you have any such complicated task on your daily or weekly to-do list, you’re a prime candidate to create a macro that automates that task using a single command.
Macros can be surprisingly short—even a one-line macro can perform helpful tasks—or they can run for hundreds of lines, with loops and variables and input boxes, and other elements you normally associate with a full-fledged programming language.
Note
In this chapter, we focus on the core elements of understanding, creating, fine-tuning, and using macros. For more detailed instructions, you’ll need to find other sources of information. One surprisingly useful source is just a click away. The Help file for each program in the Office family includes a Developer Reference section that explains basic concepts. This resource defines the purpose and syntax of each available programming object, often with code samples that you can cut and paste directly into your own projects. To see the local copy of the Developer Reference, open the Help window for the program for which you’re planning to write a macro, click the drop-down arrow to the right of the Search box, and choose Developer Reference under the Content from This Computer section.
With rare exceptions, you can create a macro to automate any task you can do manually in Word, Excel, or PowerPoint.
Macros are ideal for automating routine drudge work—those everyday tasks that normally require multiple menu selections and mouse clicks. For example, you can use macros to do any of the following tasks:
- Print letters and companion envelopes for a mailing by selecting the correct paper trays for letterhead, additional pages, and envelopes.
- Apply complex formatting rules—everything from scanning reports to ensuring that all Level 1 headings start with a number, to validating the searchable keywords in a memo, to correcting common typographical mistakes such as two spaces following a period.
- Collate and aggregate worksheets, complete with charts and custom pivot tables, based on Excel spreadsheets submitted by individuals working on separate parts of the project. When changes come, roll the new numbers into the master report in minutes.
- Retrieve data from an Excel membership list and generate letters in Word for all members who haven’t signed up for an upcoming event or who haven’t paid their annual dues.
You can use macros for simple tasks, such as toggling a group of Word or Excel settings for a specific task, or for complex document assembly processes. You can assign a macro to a toolbar button, a keyboard shortcut, or a menu command.
What shouldn’t you do with macros? Each individual Office program includes features that help you automate tasks without having to use macros. When there’s a good alternative to writing a custom macro, the alternative is almost always preferable:
- For inserting boilerplate text into documents, workbooks, or slides, it’s usually more efficient to use AutoCorrect or AutoText entries.
- Before you write a custom macro to find and replace characters, try Word’s extremely capable Find feature.
- Excel’s automatic data-entry and list-management features can help you accomplish many complex tasks without having to work with VBA code.
![]() For hints on how to bring in boilerplate text, see “Using AutoCorrect to Type Faster,” p. 90.
For hints on how to bring in boilerplate text, see “Using AutoCorrect to Type Faster,” p. 90.
![]() To tailor a Find in Word, see “Finding and Replacing Text and Other Parts of a Document,” p. 182.
To tailor a Find in Word, see “Finding and Replacing Text and Other Parts of a Document,” p. 182.
Using the Visual Basic Editor
The Visual Basic Editor (see Figure 26.3) is the tool you use to view and edit Office macros.
Figure 26.3. The Visual Basic Editor usually contains two dockable, resizable panes, plus a large open area for writing programs and creating custom dialog boxes.

To open the Visual Basic Editor in Word, Excel, or PowerPoint, press Alt+F11. The Visual Basic Editor sits in its own window, separate from the Office application that opened it. For the simple tasks that we describe in this chapter, you’ll use only the code window, where you can see the code created by the macro recorder and directly edit it. If you’re interested in exploring the editor in more detail, use its excellent Help files.
How Office Applications Store Macros
Each Office program handles macros in a slightly different way. Although the precise details are complex, here’s a quick summary of how each Office application stores macros:
- Word—For security reasons, Word does not allow you to store macros in default document (.docx) and template (.dotx) formats. To save a macro, you must use a macro-enabled document (with the
.docmextension), a macro-enabled template (.dotm), or the global macro-enabled template known as Normal.dotm. When you open a document that is associated with a macro-enabled template, macros in that template become available. If you store macro-enabled templates in the %ProgramFiles%Microsoft OfficeOffice12Startup folder, Word gives you access to macros stored in those templates whenever you start Word.
![]() For details on template locations, see “Where Does Word Store Templates?” p. 306.
For details on template locations, see “Where Does Word Store Templates?” p. 306.
- Excel—Like Word, Excel prohibits saving macros in standard workbook and template formats; instead, you must use macro-enabled workbooks (
.xlsm) or templates (.xltm). Unlike Word, Excel does not maintain a link between a workbook and the template you use to create it; if you add or edit a macro in a template, that macro is available only in new workbooks you create with that template. Excel automatically opens all workbooks in the %appdata%MicrosoftExcelXLSTART folder when it starts, including the hidden workbook Personal.xlsm. Thus, all macros in Personal.xlsm are available all the time.
![]() For details on templates, see “Customizing Excel,” p. 393.
For details on templates, see “Customizing Excel,” p. 393.
- PowerPoint—PowerPoint stores macros in macro-enabled presentations (
.pptm) and templates (.potm). Like Excel, PowerPoint uses templates only to create new files, so adding or editing macros in a template will not affect existing presentations based on that template. PowerPoint does not have a Startup folder or anything resembling a global template. Macros written or recorded in earlier versions of PowerPoint should work in PowerPoint 2007.
![]() To understand the role of templates in PowerPoint, see “PowerPoint File Types,” p. 544.
To understand the role of templates in PowerPoint, see “PowerPoint File Types,” p. 544.
Caution
Unless you’re a skilled programmer, avoid trying to automate anything but the most routine PowerPoint tasks with VBA. Compared with Word and Excel, its capability to help you with everyday tasks is incomplete. There’s no easy way to copy macros from one presentation to another short of copying and pasting code in the Visual Basic Editor. The lack of a global template makes it difficult to manage macros, and there is precious little documentation unless you dive into the Visual Basic Editor.
Recording Simple Macros
Word and Excel allow you to kick off the Macro Recorder by choosing Macros on the View tab and then clicking the Record Macros menu. The Macro Recorder exists in PowerPoint 2007 as well, but the command to start and stop the recorder has been inexplicably left off the View and Developer tabs. To record a PowerPoint macro, use the legacy keyboard commands Alt+T, M, R to start, and use the same keyboard combination to stop recording.
In theory, when you turn on the macro recorder, VBA “watches” as you perform some action or series of actions. When you turn off the recorder, you can replay the resulting recorded macro to replicate that series of actions.
In practice, you’ll more often use the macro recorder to eliminate the tedious steps of creating a macro. Unfortunately, a recorded macro rarely solves a real-world problem by itself. After recording a macro, you’ll typically need to make some modifications.
You can also use the recorder to capture the steps of a particular task and then copy all or part of the recorded macro into a larger macro.
How the Macro Recorder Captures Actions
As anyone who’s used the Office macro recorder for more than a few minutes can tell you, the macro recorder can’t record every single action you take. There are two fundamental reasons why the recorder can fail:
- The action you take might not have an exact translation in the application’s object model. For example, if you record a macro in PowerPoint to change first-level bullet points in a presentation to 18-point bold, the macro won’t work because PowerPoint’s object model doesn’t include commands for working with first-level bullet points.
Caution
This type of failure, generally completely undocumented, happens without any warning to you. The recorder doesn’t stop and there’s no other feedback. You know the failure occurred only because the macro fails to work when you play it back.
- The action you take might be ambiguous; in other words, the recorder might not be able to tell exactly what you want to do. For example, if you type this paragraph into a new, blank Word document and use the mouse to select it, the VBA/Word macro recorder has no way of knowing what you’re trying to do. Are you selecting the current paragraph? Or are you selecting the first paragraph that starts with the word “The”? Maybe you really want to select the tenth paragraph in the document. Or the first one with more than a hundred words. That’s why the recorder usually won’t record mouse actions—there’s just too much ambiguity, most of the time, when you use the mouse.
After you turn on the macro recorder, it records the effect of your actions, not the actions themselves. The full effect of your actions goes into the recorded macro, not the means you used to apply them. For example:
- If you choose File, Open, switch to a subfolder in your Documents folder, and double-click a file called Mydoc.docx, the recorder notes that you opened Mydoc.docx—not that you went through all the pointing and clicking.
- If you choose Format, Font, and change the font to Wingdings, the recorder records the fact that you changed the font to Wingdings—but it also picks up all the other formatting settings that happened to be set by default in the Font dialog box, including font size, bold, italic, underline, and so on.
- If you open a dialog box, navigate to a specific tab, and then stop recording the macro, the recorder ignores your actions because you didn’t actually do anything. You can’t use this technique to automate the process of opening a specific dialog box to make a selection.
- If your insertion point is inside a paragraph in a Word document, and you want to tell the recorder to select the first word in that paragraph, double-clicking the first word in the paragraph will not work. If you try to double-click the first word in the paragraph, the recorder won’t let you do it. The recorder can’t record your double-click action because it’s ambiguous. You know that you want to select the first word in the current paragraph, but there’s no way to specify that precisely by clicking with the mouse. For all the recorder knows, you might want to select the fiftieth word on the page, or the first word on the tenth line, or the last capitalized word in the paragraph.
When recording, instead of using the mouse, you’ll frequently have to resort to obscure keyboard navigation keys. To move to the beginning of the current paragraph in Word (or the previous paragraph, if the insertion point is already at the beginning of a paragraph), press Ctrl+↑. To select the word to the right of the insertion point (the first word in the paragraph, if you previously moved to the beginning of the paragraph), press Ctrl+Shift+ →. To italicize the word, press Ctrl+I.
Tip
Nobody, but nobody, memorizes all of Word’s obscure key combinations. To create a lengthy document listing them all, open the Macros dialog box, click in the Macro Name box, type listcommands, and then click OK. Unfortunately, there’s no easy equivalent for PowerPoint or Excel.
Recording a Macro
Word, Excel, and PowerPoint include simple macro recorders that all work in essentially the same way. To record a macro in Word, for example, follow these steps:
- Create a new document or open an existing document.
- Click the View tab, click Macros, and choose Record Macro. In the Record Macro dialog box (see Figure 26.4), click in the Macro Name box and type a name (
ItalicizeFirstWord, in this example).Figure 26.4. Replace the generic Macro1 name with a descriptive macro name, but don’t use spaces or punctuation marks.

- Choose a location for the macro (the current document or a template, for example). If you want to assign the macro to a keyboard shortcut or toolbar button, click the respective button. (You can change either shortcut assignment after the macro has been recorded. See the “Troubleshooting” section at the end of this chapter.) The Description box is blank by default; if you want, you can enter additional explanatory text about the macro. Click OK to begin recording.
- You’ll see the Recording pointer, which includes a picture of a cassette tape beneath the familiar arrow. In addition, the Stop Recording toolbar appears in the status bar (the Excel and PowerPoint versions of this toolbar are slightly different, but both include a Stop Recording button). Perform any actions you want to record in your macro.
- Click the Stop Recording button on the status bar or choose Stop Recording from the Macros menu on the View tab. Or press Alt+T, M, R.
Testing the Macro
After recording a macro, it’s essential that you test it to see whether it works the way you expect. To quickly run a Word macro, follow these steps:
- Open a document or create a new document. If necessary, click to position the insertion point at an appropriate location in the document.
- To run the macro, click Macros on the View tab. You’ll see the Macros dialog box shown in Figure 26.5.
Figure 26.5. All available macros appear in the Macros dialog box.

- Click the name of the macro you want to run and press Enter or click Run. If all goes well, the macro performs the task you intended.
- For more complete troubleshooting, click in another location within the document, and repeat steps 1–3.
Using the Macro dialog box enables you to run all currently available macros, regardless of which program you’re using. If you’re going to use the macro regularly, it’s easier to assign the macro to the Quick Access toolbar, or to a keyboard shortcut, as we explain in the Troubleshooting section at the end of this chapter.
Troubleshooting Recorded Macros
Macros rarely work right the first time. Recorded macros, in particular, frequently require some tweaking before they work as intended. If the macro you recorded doesn’t work, re-record it and see whether you can use a different method for accomplishing the same result. Edit a recorded macro only when it works most of the time, but occasionally fails to work the way you expect, or triggers an error message.
Stepping Through and Editing Recorded Macros
Fortunately, Office makes it relatively easy to edit a recorded macro. It even supports you in your bug-extermination efforts by allowing you to run the macro program one line at a time, and see what the effect of each command might be. Here’s how to use the Visual Basic Editor to step through a macro recorded in Word (the steps in Excel and PowerPoint are virtually identical):
- Create a new document or open an existing document and position the insertion point as necessary. For example, to test a macro that italicizes the first word in a paragraph, be sure to click inside a paragraph in the current document.
- On the View tab, click Macros. In the Macros dialog box, select the name of the macro you want to troubleshoot and click Step Into. The Visual Basic Editor opens, with your macro visible in the right pane (see Figure 26.6). You’ll see a large yellow arrow appear to the left of the Sub line, and the Sub line will be highlighted.
Figure 26.6. When you step into a macro for troubleshooting, the line that’s about to be run appears highlighted.

- Arrange the windows on your desktop so you can see both the program (in this case, Word) and the Visual Basic Editor at the same time. Click the window holding the Visual Basic Editor.
- To begin executing the VBA code one step at a time, press F8, or choose Debug, Step Into. The first line of the macro—the Sub line—executes.
- Press F8 again, and watch carefully as the macro performs the next actions; repeat this process, one command at a time.
- When you reach the End Sub line, the Visual Basic Editor stops. You can start all over again, if you like, beginning with step 4.
Frequently, you’ll be able to identify the location of the problem (or problems) in a macro by stepping through it in this way. Although the solution might not be at all clear—there are lots of VBA commands, and each one behaves in a different way—being able to narrow the problem down to a line or two can make a huge difference.
After you isolate the line that you suspect is causing the problem, position the insertion point within that line and press F1. That action brings up context-sensitive VBA Help, which might present a possible solution.
Follow the same procedures to step through Excel and PowerPoint macros; you’ll find recorded macros in the current workbook or presentation, in a module called Module1. Press F8 to step through the macro.
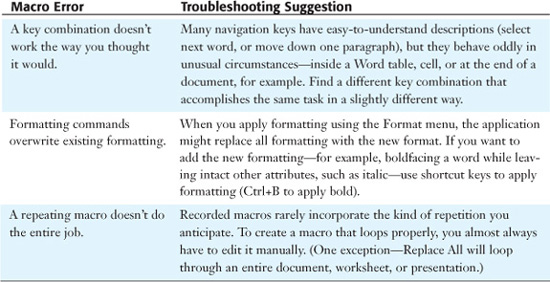
Common Recorded Macro Mistakes
When a recorded macro doesn’t work as you expect, chances are the problem is one of several common errors. Table 26.1 lists common mistakes and suggested troubleshooting steps.
Table 26.1. Common Macro Problems
In addition, any number of unusual circumstances can trigger errors in recorded macros. For example, if you search for the word widget in a document where that word is in a footer and not in the body of the document, the search will succeed. When you record that action in a VBA/Word macro, everything appears to work just fine. But when you play back the recorded macro in the same document, Word won’t find the word you’re looking for no matter how many times you run it—in fact, it will trigger a run time error. The recorded version of the Find operation works differently from the interactive version when it comes to footers.
Testing and Bullet-Proofing Macros
Just because a macro appears to work in a handful of simple tests doesn’t mean that the macro will work correctly all the time. Word macros are notorious for working properly inside simple documents, but failing—without any warning whatsoever—when run on a table, in text boxes, on pictures, in a document with Track Changes enabled, in headers and footers, in comments, in footnotes, and on and on. It can be devilishly difficult to find the problems and, after they are found, to figure out how to fix them.
Will your recorded macro work properly every time you run it? Frankly, there’s no way to know for sure—VBA macros hardly fall into the category of “probably correct” computer programs—but you can improve the odds of a macro working correctly by employing two time-honored testing techniques:
- Trace through the logic. In most cases, that means stepping through the macro, as explained earlier in this section. Watch for behavior or settings that you don’t understand.
- Test it in a wide variety of circumstances. Try to think of odd situations that might make the macro fail, and then see whether it does. Ask a friend to test a macro, if possible, because testers will think of situations that just don’t occur to you.
For example, the ItalicizeFirstWord macro example (in the “Recording a Macro” section earlier in this chapter) should italicize the first word in the current paragraph, but in one particular case it won’t. When the insertion point is at the beginning of a paragraph, this macro italicizes the first word of the preceding paragraph. Running through the macro a step at a time reveals that the culprit is the MoveUp command; when you point to that command and press F1, the context-sensitive help suggests several examples. The solution? You have to MoveRight once before performing a MoveUp, to stay in the original paragraph.
The recorded ItalicizeFirstWord macro contains a second problem as well. When you run the macro and then leave the insertion point in the same paragraph and run the macro again, it removes the italic formatting from the first word. Stepping through the macro again lets us see the problem: The Selection.Font.Italic line toggles the italic attribute on and off. According to the Help file, the Italic property “can be set to True, False, or wdToggle.” Changing the value from wdToggle to True causes it to work properly.
Running Macros
Although each of the Office programs offers myriad ways to run macros, three simple methods in Word, Excel, or PowerPoint will get you going:
- On the View tab, click Macros to open the Macros dialog box, which contains a list of all currently available macros. Use this technique for macros you run occasionally.
- Before you start recording a macro, you can choose to assign the macro to a menu (Word only) or a specific key combination (Word or Excel).
- After recording a macro, you can create or change its assignment to a Quick Access toolbar button or to a key combination.
![]() For details on setting up macros as buttons, see “Customizing the Quick Access Toolbar,” p. 33.
For details on setting up macros as buttons, see “Customizing the Quick Access Toolbar,” p. 33.
Digitally Signing Macros You Create
Office 2007 includes a number of security measures to help protect you from macro-based malware. Digital signatures lie at the heart of the approach most frequently encountered by Office users.
A digital signature identifies the source of a macro. Developers must apply for digital signatures from certifying authorities, which verify the identity of developers before issuing them a signature. Certifying authorities can revoke a certificate after issuing it if they discover evidence that a developer is distributing viruses or unsafe software.
The default settings for Office 2007 disable all macros except those included as part of files stored in trusted locations (typically the Templates and startup folders).
![]() For more details on trusted locations, see “Setting Security Options in the Trust Center,” p. 702.
For more details on trusted locations, see “Setting Security Options in the Trust Center,” p. 702.
Those are excellent security precautions, but they get in the way if you create a document, workbook, presentation, or template that contains macros you want to reuse or share with other people.
If you are writing VBA programs that you want to share with other people without requiring them to lower their security settings to unacceptable levels, you must:
- Acquire a digital certificate.
- “Sign” your VBA project.
- Tell the people who will be using your macros what your signature looks like, and what they need to do to get your macros working.
Note
If your users have their security set to disable macros without notification, they won’t be able to use your macros, and they won’t be told why unless you sign your macros.
![]() For more details on setting up security levels to manage macros, see “Managing Security for Add-ins, Macros, and Other External Content,” p. 701.
For more details on setting up security levels to manage macros, see “Managing Security for Add-ins, Macros, and Other External Content,” p. 701.
You have three options for obtaining a digital certificate:
- You can create an unauthenticated certificate by running Selfcert.exe, the Digital Certificate for VBA Projects application. This utility is normally found in the Microsoft Office Tools folder on the Programs menu. If it isn’t installed on your computer, rerun Office Setup and click Add or Remove Features. Click the plus sign (+) next to Office Shared Features, click Digital Signature for VBA Projects, and then click Run from My Computer. Click Update. This certificate is stored in the Registry and is required to run macros in Office applications that prohibit the use of any unsigned macros. It can be used to sign macros only on the computer on which it was created. An unauthenticated certificate represents no security at all: Anybody can create an unauthenticated certificate claiming to be anyone, even Bill Gates. When a user opens a VBA project that’s signed with an unauthenticated certificate, he or she will always be asked to verify that he trusts the source of the project.
- If you work for a large organization, you might be able to get a certificate from your group’s certification authority (your network administrator will use Microsoft Certificate Server to generate the file for you).
- You can buy an authenticated certificate from VeriSign (http://www.verisign.com) or thawte (http://www.thawte.com)—look for “developer certs” or “code signing digital IDs.” Avoid Class 2 IDs, which certify the existence of a particular email address—Selfcert.exe works just as well. Class 3 IDs, for organizations, cost hundreds of dollars for the first year (subsequent years are at a reduced price) and are best-suited for commercial software developers.
To sign a VBA project, follow these steps:
- Open the project (template, document, workbook, or presentation) using the associated application.
- Press Alt+F11 to start the VBA Editor.
- In Project Explorer, highlight the project you want to sign.
- Choose Tools, Digital Signature. Click the Choose button and select either a new certificate or change an existing one. Click OK to save your changes.
After using your self-generated digital certificate to sign a project, you can examine its contents by clicking the Detail button. A self-signed certificate is marked with a red X that indicates it is not trusted because it can’t be traced back to a trusted certifying authority.
If you copy a document, template, or workbook containing a macro project that has been digitally signed with a self-generated certificate, you’ll be unable to open any of those macros on another computer. Windows protests that it can’t authenticate the certificate and thus gives you only the option to disable the macros and open the document.
Are you stymied? Not at all. If you’re absolutely, positively confident of the identity of the party who created the macros—for instance, if you created and signed them yourself on one computer and you want to use them on another computer in the same office—you can tell Windows that you want your self-generated certificate to be fully trusted. To do this, you need to install the certificate as a Trusted Root Certification Authority. Follow these steps:
- On the computer containing the original signed project, click Start and and click in the Search box (Windows Vista) or click Run (Windows XP) and click in the Open box. Enter
certmgr.mscand click OK. The Windows Certificates console opens. - Select your self-generated certificate from the Personal store, right-click, and choose Export from the All Tasks menu.
- Save the exported certificate to a removable drive or a network share so you can transfer it to the other computer.
- On the computer where you want to use the signed project, open the Windows Certificates console (certmgr.msc).
- Select the Trusted Root Certification Authorities store, right-click, and choose Import from the All Tasks menu. Navigate to the file you saved and click OK.
Now when you inspect the properties of the certificate, you’ll see that the red X has been replaced with an official seal of approval. You’ll also discover that your macros work flawlessly on the new computer.
 Troubleshooting
Changing the Key Combination for a Macro
I recorded a macro and told Word to run it whenever I press Shift+F5. I changed my mind after discovering that Word has a built-in command already assigned to Shift+F5. How do I change the macro so it runs when I push Shift+F6, and restore Word’s built-in command to Shift+F5?
In Word, click the arrow at the right of the Quick Access Toolbar and choose More Commands from the menu. This opens the Customize tab of the Word Options dialog box; click the Customize button at the bottom of the dialog box, to the right of the Keyboard Shortcuts heading. In the Categories list on the left, click Macros; then, in the Macros list on the right, select the name of the macro that you recorded. In the Current Keys box at the lower left, click the unwanted keyboard shortcut (in this case, Shift+F5), and then click Remove. That removes the Shift+F5 key assignment for your recorded macro and restores the assignment to Word’s default command. Click in the Press New Shortcut Key box, and press Shift+F6. Click Assign; then click Close twice. Shift+F5 will revert to the old GoBack function. Shift+F6 will run your recorded macro.
In Excel, the procedure is much simpler: Open the Macros dialog box, click the name of the macro and click the Options button. Your keyboard shortcut can consist of Ctrl+ any letter or number. Clear the box to remove the shortcut, or type a new letter to change it.
Extra Credit: Getting Ready to Tackle VBA
Ready to start working with VBA? Good. Take a few moments to organize your screen and customize the Visual Basic Editor. That way, you won’t have to hunt and click so much to get going. (To start the Visual Basic Editor, just start your favorite Office program and press Alt+F11.)
The behavior of the Visual Basic Editor is controlled by choosing Tools, Options and clicking the Editor tab. In particular, consider selecting the Require Variable Declaration check box. That will protect you from the single most common source of programming errors—misspellings.
If you do a lot of VBA programming, do yourself a favor and take advantage of the Windows support for multiple monitors. That way, you can keep the Visual Basic Editor window open on one monitor and view the current Office application on the other monitor. If you have only a single screen to work with, arrange your windows so that the application is in the top half of the screen and the Visual Basic Editor is in the bottom half. In either of these configurations, you can step through your program, keeping track of the active command in the Visual Basic Editor window, while watching the effects of your program in the top window.
As you become more proficient, you might want to add the Immediate Window (choose View, Immediate Window) so you can change variable values as the program runs and test unfamiliar VBA commands. You might also want to get rid of the Properties window (in the lower-left corner; View, Properties Window) if you won’t be working with custom-built dialog boxes.
Even if you’re new to programming and have only just begun writing your first VBA programs, you should always keep several tips in mind:
- Use lots of comments. To add a comment, place a single quotation mark at the beginning of the line and then type the comment text. Yes, you can remember precisely what each line of code in your program does, and what each variable’s duty in life might be. But when you look at your program a year from now, it will all be gibberish unless you add a lot of comments now, while it’s still fresh in your mind.
- Don’t be afraid to experiment. You aren’t going to break anything. The real beauty of VBA is that you can try something, see how (or whether) it works, and then try something else. Amazing things have been discovered by trial and error.
- Remember that nothing is perfect, and VBA certainly follows that rule. Although VBA itself is reasonably stable and predictable, the underlying object models in all the Office applications have lots and lots (and lots and lots) of rough edges. Go slowly, step through all your programs, and be observant.
- Test. Then test some more. Then give your program to 10 friends, and have them all test it even more. Everyone has a slightly different configuration, and odd settings can throw off even the most well-conceived program.
- Keep your sense of humor. Programming is fun. But it’s also hard work. The machine isn’t out to get you—even though there will certainly be days when you think it is.
- Ask questions. Nobody knows it all. And even if they did, by the time they figured out the last nuance of the last feature, they would’ve forgotten what they knew in the first place.
- No matter what happens, there’s always another revision. VBA is a dynamic language and every new version brings some exciting new capabilities. Stay on top of the wave, and you’ll be able to solve problems that would curl the hair of mere mortals.